
Oracle® Communications Session
Report Manager
Installation Guide for Oracle Fusion
Middleware 19c
Release 8.2
F33693-03
March 2021
Oracle Communications Session Report Manager Installation Guide for Oracle Fusion Middleware 19c,
Release 8.2
F33693-03
Copyright © 2020, 2021, Oracle and/or its affiliates.
This software and related documentation are provided under a license agreement containing restrictions on
use and disclosure and are protected by intellectual property laws. Except as expressly permitted in your
license agreement or allowed by law, you may not use, copy, reproduce, translate, broadcast, modify, license,
transmit, distribute, exhibit, perform, publish, or display any part, in any form, or by any means. Reverse
engineering, disassembly, or decompilation of this software, unless required by law for interoperability, is
prohibited.
The information contained herein is subject to change without notice and is not warranted to be error-free. If
you find any errors, please report them to us in writing.
If this is software or related documentation that is delivered to the U.S. Government or anyone licensing it on
behalf of the U.S. Government, then the following notice is applicable:
U.S. GOVERNMENT END USERS: Oracle programs (including any operating system, integrated software,
any programs embedded, installed or activated on delivered hardware, and modifications of such programs)
and Oracle computer documentation or other Oracle data delivered to or accessed by U.S. Government
end users are "commercial computer software" or "commercial computer software documentation" pursuant
to the applicable Federal Acquisition Regulation and agency-specific supplemental regulations. As such,
the use, reproduction, duplication, release, display, disclosure, modification, preparation of derivative works,
and/or adaptation of i) Oracle programs (including any operating system, integrated software, any programs
embedded, installed or activated on delivered hardware, and modifications of such programs), ii) Oracle
computer documentation and/or iii) other Oracle data, is subject to the rights and limitations specified in the
license contained in the applicable contract. The terms governing the U.S. Government’s use of Oracle cloud
services are defined by the applicable contract for such services. No other rights are granted to the U.S.
Government.
This software or hardware is developed for general use in a variety of information management applications.
It is not developed or intended for use in any inherently dangerous applications, including applications that
may create a risk of personal injury. If you use this software or hardware in dangerous applications, then you
shall be responsible to take all appropriate fail-safe, backup, redundancy, and other measures to ensure its
safe use. Oracle Corporation and its affiliates disclaim any liability for any damages caused by use of this
software or hardware in dangerous applications.
Oracle and Java are registered trademarks of Oracle and/or its affiliates. Other names may be trademarks of
their respective owners.
Intel and Intel Inside are trademarks or registered trademarks of Intel Corporation. All SPARC trademarks are
used under license and are trademarks or registered trademarks of SPARC International, Inc. AMD, Epyc,
and the AMD logo are trademarks or registered trademarks of Advanced Micro Devices. UNIX is a registered
trademark of The Open Group.
This software or hardware and documentation may provide access to or information about content, products,
and services from third parties. Oracle Corporation and its affiliates are not responsible for and expressly
disclaim all warranties of any kind with respect to third-party content, products, and services unless otherwise
set forth in an applicable agreement between you and Oracle. Oracle Corporation and its affiliates will not
be responsible for any loss, costs, or damages incurred due to your access to or use of third-party content,
products, or services, except as set forth in an applicable agreement between you and Oracle.

Contents
About This Guide
My Oracle Support viii
Revision History
1
Pre-Installation Tasks
Check System Requirements 1-1
Decide How You Want to Implement Report Manager 1-2
Simple Implementation of Report Manager 1-3
Create an Oracle User Account 1-5
Select the GUI Installer Method 1-6
Configure SSH with X11 Forwarding 1-6
Configure VNC 1-6
2
Install the Oracle Database Software
Install Dependencies for the Oracle Database Software 2-1
Download the Oracle Database Software Installer 2-2
Start the Oracle Database Software Installer 2-2
Install the Oracle Database Software 2-3
Execute Configuration Scripts to Access the Oracle Database Software 2-5
Change the Oracle Database Listener Configuration File 2-6
3
Create an Oracle Database Instance for BI Publisher
Specify Oracle Database Software Variables 3-2
Add an Oracle Database User that Connects to BI Publisher for Backup and
Restore Functions 3-3
4
Install Oracle BI Publisher
Install the Latest Java Development Kit 8 4-1
iii

Install the Oracle Fusion Middleware Infrastructure 4-2
Start Oracle Business Intelligence 12c Installation 4-4
Install the Oracle Business Intelligence 12c Configuration Assistant 4-6
Access BI Publisher and the WebLogic Console 4-8
Create the Boot Properties File 4-8
Configure the BI Publisher Security Model 4-9
Configuring User Privileges for Local Configurations 4-10
Configure a Data Pump Directory for Local Installations 4-11
5
Create a Report Manager Database Instance
6
Verify the Report Manager Database Instance
7
Verify LISTENER2 is Created on the Oracle Database
8
Register Oracle BI Publisher
Register BI Publisher in HTTPS Mode 8-1
Register BI Publisher in Session Delivery Manager 8-1
Register a Local Standalone Mode of BI Publisher for Report Manager 8-2
Registering a Remote Standalone BI Publisher 8-4
Register a Local BI Publisher Cluster 8-4
9
Report Manager Administrator Operations
Shutdown Report Manager 9-1
Start Report Manager 9-2
Reset the OCSREMDW User Password 9-3
Free Up Disk Space 9-5
Uninstall Oracle Database 9-5
How to Start, Stop, and Check the Status of the Oracle Database Listeners 9-5
Manage the WebLogic Server 9-6
Stop the WebLogic Server 9-6
Start the WebLogic Server 9-7
10
Troubleshoot Installation Problems
X11 Forwarding 10-1
xdpyinfo Errors 10-1
iv


About This Guide
This document and other product-related documents are described in the Related
Documentation table.
Related Documentation
Table 1 Oracle Communications Product Plug-in Documentation Library
Document Name Description
Session Element Manager User Guide Provides information for managing and
optimizing network infrastructure elements
and their functions with comprehensive
tools and applications used to provision
fault, configuration, accounting, performance,
and security (FCAPS) support for managed
network functions and their associated devices
in Oracle Communications Session Delivery
Manager (SDM).
Report Manager User Guide Provides information about configuring Report
Manager to interoperate with Oracle BI
Publisher as well as creating reports on
Session Delivery product network devices.
Report Manager Installation Guide Provides information for installing Oracle
Communications Report Manager product as
an addition to SDM including the Oracle
database and BI Publisher components.
The Oracle session delivery product plugin
must be added to Oracle Communications
Session Delivery Manager before performing
the Report Manager installation.
Route Manager User Guide Provides information for updating local route
table (LRT) data on a single device or multiple
devices.
About This Guide
vi

Table 2 Oracle Communications Session Delivery Manager Documentation
Library
Document Name Document Description
Administration Guide Provides the following administration
information:
• Implement SDM on your network as a
standalone server or high availability (HA)
server.
• Login to the SDM application, access GUI
menus including help, customize the SDM
application, and change your password.
• Access the product plugin service through
the GUI to manage product plugin
tasks, including how product plugins are
uploaded and installed.
• Manage security, faults, and transport
layer security certificates for east-west
peer SDM server communication, and
southbound communication with network
function (NF) devices.
• Configure northbound interface
(destination) fault trap receivers and
configure the heartbeat trap for
northbound systems.
• Monitor SDM server health to detect
heartbeat messages and display the
server status to prevent health problems,
or view server disk utilization information
and server directory statistics.
• Maintain SDM server operations, which
includes database backup and database
restoration and performing server cluster
operations.
• Use available SDM server scripts, the
contents of fault trap notifications, and
a list of northbound notification traps
generated by the SDM server.
Installation Guide
Provides the following installation information:
• Do pre-installation tasks, which include
reviewing system requirements, adjusting
linux and firewall settings, completing
SDM server settings and configuring your
NNCentral account for security reasons.
• Do the typical installation to perform the
minimal configuration required to run the
SDM server.
• Do the custom installation to perform
more advanced configurations including
the mail server, cluster management,
Route Manager, transport layer security
(TLS), and Oracle database configuration.
Release Notes Contains information about the administration
and software configuration of the SDM feature
support new to this release.
About This Guide
vii

Table 2 (Cont.) Oracle Communications Session Delivery Manager
Documentation Library
Document Name Document Description
Security Guide Provides the following security guidelines:
• Use guidelines to perform a secure
installation of SDM on your server,
which includes methods for securing the
server, firewall settings, system support
for encryption and random number
generators (RNG), using HTTPS, and
password guidelines.
• Review Security Manager features that
are used to configure groups, users,
operations, privileges, and manage
access to the system.
• Follow a checklist to securely deploy SDM
on your network and maintain security
updates.
REST API Guide Provides information for the supported REST
APIs and how to use the REST API interface.
The REST API interface allows a northbound
client application, such as a network service
orchestrator (NSO), to interact with SDM and
its supported product plugins.
SOAP API Guide The SOAP API guide provides information for
the SOAP and XML provisioning Application
Programming Interface (API) client and server
programing model that enables users to
write client applications that automate the
provisioning of devices. The web service
consists of operations that can be performed
on devices managed by the SDM server and
data structures that are used as input and
output parameters for these operations.
My Oracle Support
My Oracle Support (https://support.oracle.com) is your initial point of contact for all
product support and training needs. A representative at Customer Access Support
(CAS) can assist you with My Oracle Support registration.
Call the CAS main number at 1-800-223-1711 (toll-free in the US), or call the Oracle
Support hotline for your local country from the list at http://www.oracle.com/us/support/
contact/index.html. When calling, make the selections in the sequence shown below
on the Support telephone menu:
1. Select 2 for New Service Request.
2. Select 3 for Hardware, Networking, and Solaris Operating System Support.
3. Select one of the following options:
• For technical issues such as creating a new Service Request (SR), select 1.
• For non-technical issues such as registration or assistance with My Oracle
Support, select 2.
About This Guide
viii

You are connected to a live agent who can assist you with My Oracle Support
registration and opening a support ticket.
My Oracle Support is available 24 hours a day, 7 days a week, 365 days a year.
Emergency Response
In the event of a critical service situation, emergency response is offered by the
Customer Access Support (CAS) main number at 1-800-223-1711 (toll-free in the
US), or call the Oracle Support hotline for your local country from the list at http://
www.oracle.com/us/support/contact/index.html. The emergency response provides
immediate coverage, automatic escalation, and other features to ensure that the
critical situation is resolved as rapidly as possible.
A critical situation is defined as a problem with the installed equipment that severely
affects service, traffic, or maintenance capabilities, and requires immediate corrective
action. Critical situations affect service and/or system operation resulting in one or
several of these situations:
• A total system failure that results in loss of all transaction processing capability
• Significant reduction in system capacity or traffic handling capability
• Loss of the system's ability to perform automatic system reconfiguration
• Inability to restart a processor or the system
• Corruption of system databases that requires service affecting corrective actions
• Loss of access for maintenance or recovery operations
• Loss of the system ability to provide any required critical or major trouble
notification
Any other problem severely affecting service, capacity/traffic, billing, and maintenance
capabilities may be defined as critical by prior discussion and agreement with Oracle.
Locate Product Documentation on the Oracle Help Center Site
Oracle Communications customer documentation is available on the web at the Oracle
Help Center (OHC) site, http://docs.oracle.com. You do not have to register to access
these documents. Viewing these files requires Adobe Acrobat Reader, which can be
downloaded at http://www.adobe.com.
1. Access the Oracle Help Center site at http://docs.oracle.com.
2. Click Industries.
3. Under the Oracle Communications sub-header, click the Oracle Communications
documentation link.
The Communications Documentation page appears. Most products covered by
these documentation sets appear under the headings "Network Session Delivery
and Control Infrastructure" or "Platforms."
4. Click on your Product and then Release Number.
A list of the entire documentation set for the selected product and release appears.
5. To download a file to your location, right-click the PDF link, select Save target as
(or similar command based on your browser), and save to a local folder.
About This Guide
ix

Access to Oracle Support
Oracle customers that have purchased support have access to electronic support
through My Oracle Support. For information, visit http://www.oracle.com/pls/topic/
lookup?ctx=acc&id=info or visit http://www.oracle.com/pls/topic/lookup?ctx=acc&id=trs
if you are hearing impaired.
About This Guide
x

Revision History
This section provides a revision history for this document.
Date Revision
July 2020 • Initial Release.
• Includes SDM 8.2.2 updates
September 2020 • Added a note in the chapter - Install the
Latest Java Development Kit 8.
March 2021 • Included SDM 8.2.3 updates
xi

1
Pre-Installation Tasks
Read and understand the summary of pre-installation steps that need to be
done before installing Oracle® Communications Report Manager on your Oracle
Communications Session Delivery Manager system.
Note:
The Oracle® Communications Report Manager for Oracle Fusion
Middleware 12c installation is a new, clean installation. The previous Report
Manager databases are not upgraded.
1. Check Linux server requirements before installing the required software.
2. Decide if you are going to implement Oracle® Communications Report Manager in
a local or remote configuration.
3. Create an Oracle group and user account on your Linux system(s).
4. Select either X11 forwarding using secure shell (SSH) or the virtual network
computing (VNC) to install the Oracle database and BI Publisher software with
a graphical user interface (GUI) installer on your Linux system.
Check System Requirements
Oracle has certified the following requirements for the Oracle® Communications
Report Manager installation with Oracle Fusion Middleware 12c Standard Edition 2
and Oracle Database 19c:
• Operating system: Oracle Linux (64-bit) 8.0, 8.1, and 8.2, and 8.3
• Oracle Fusion Middleware Infrastructure:
fmw_12.2.1.2.0_infrastructure_Disk1_1of1.zip with the latest JDK version 1.8 or
later.
• BI Publisher: fmw_12.2.1.2.0_bi_linux64_Disk1_1of2.zip and
fmw_12.2.1.2.0_bi_linux64_Disk1_2of2.zip
• 300 GB hard drive minimum
• 8 GB RAM for 64-bit JVM in large, high volume deployments
• 2 GB RAM for 32-bit JVM in small deployments
• 30 GB shared disk space for cluster deployments
• 20 GB non-shared, temporary disk space for document processing
• Plan to have 300 GB of disk space for storing HDR data, whether it is on the same
system on which SDM is running or on a separate FTP or SFTP repository.
1-1

Note:
For more information about Oracle Communications Session Delivery
Manager system requirements, see the Oracle Communications Session
Delivery Manager Installation Guide for more information.
Decide How You Want to Implement Report Manager
The information in this section is used to determine which Report Manager
implementation is appropriate for your organization before doing any installations.
Oracle Communications Report Manager is an optional application within Oracle
Communications Session Delivery Manager that is used to centrally manage the
following database functions, display functions, and applications:
• Use Oracle Business Intelligence Publisher (Oracle BI Publisher) application to
render reports.
• Report Manager uses Oracle BI Publisher to render reports based on metrics
collected from Historical Data Recording (HDR). HDR is a group of management
features used to configure a managed device in order to collect statistics about
system operation and function. The Report Manager collects raw data in CSV files
from designated devices to aggregate it into time granularities (raw, hourly, daily,
monthly, yearly), and make this data available for running reports.
Note:
With the introduction of Oracle Communications Session Delivery Manager,
Release 7.5, both the Oracle Communications Session Delivery Manager
and Oracle database software, must be installed together on the same
server if you are using Report Manager. The Oracle Communications
Session Delivery Manager Data Warehouse (OSCDMDW) database
software that is used to store collected data from devices that are managed
by Oracle Communications Session Delivery Manager.
You can do a simple or Oracle BI Publisher cluster installation for Report Manager:
• Simple installation—A local standalone installation, local cluster installation, or a
remote standalone installation. See the Simple Implementation of Report Manager
section for more information.
• Oracle BI Publisher Cluster Installation and scale-out installation—A remote
cluster installation, in which multiple instances of Oracle BI Publisher and Oracle
Communications Session Delivery Manager are installed on separate servers. See
the Oracle BI Publisher Cluster Implementation of Report Manager section for
more information.
Chapter 1
Decide How You Want to Implement Report Manager
1-2
Note:
You can select this installation option (Enterprise Install) later when you
are installing Oracle BI Publisher and creating an Oracle BI Publisher
cluster. See the Create a BI Publisher Cluster section in this document
for more information.
Note:
In a remote cluster installation (Enterprise Install), the Oracle BI
Publisher is not on the same server as the Oracle Communications
Session Delivery Manager. Ensure that the Oracle database application
is installed on one of the servers on which Oracle BI Publisher is
installed and on both servers on which Oracle Communications Session
Delivery Manager is installed.
Simple Implementation of Report Manager
A simple implementation of Report Manager can include the following types of
installations:
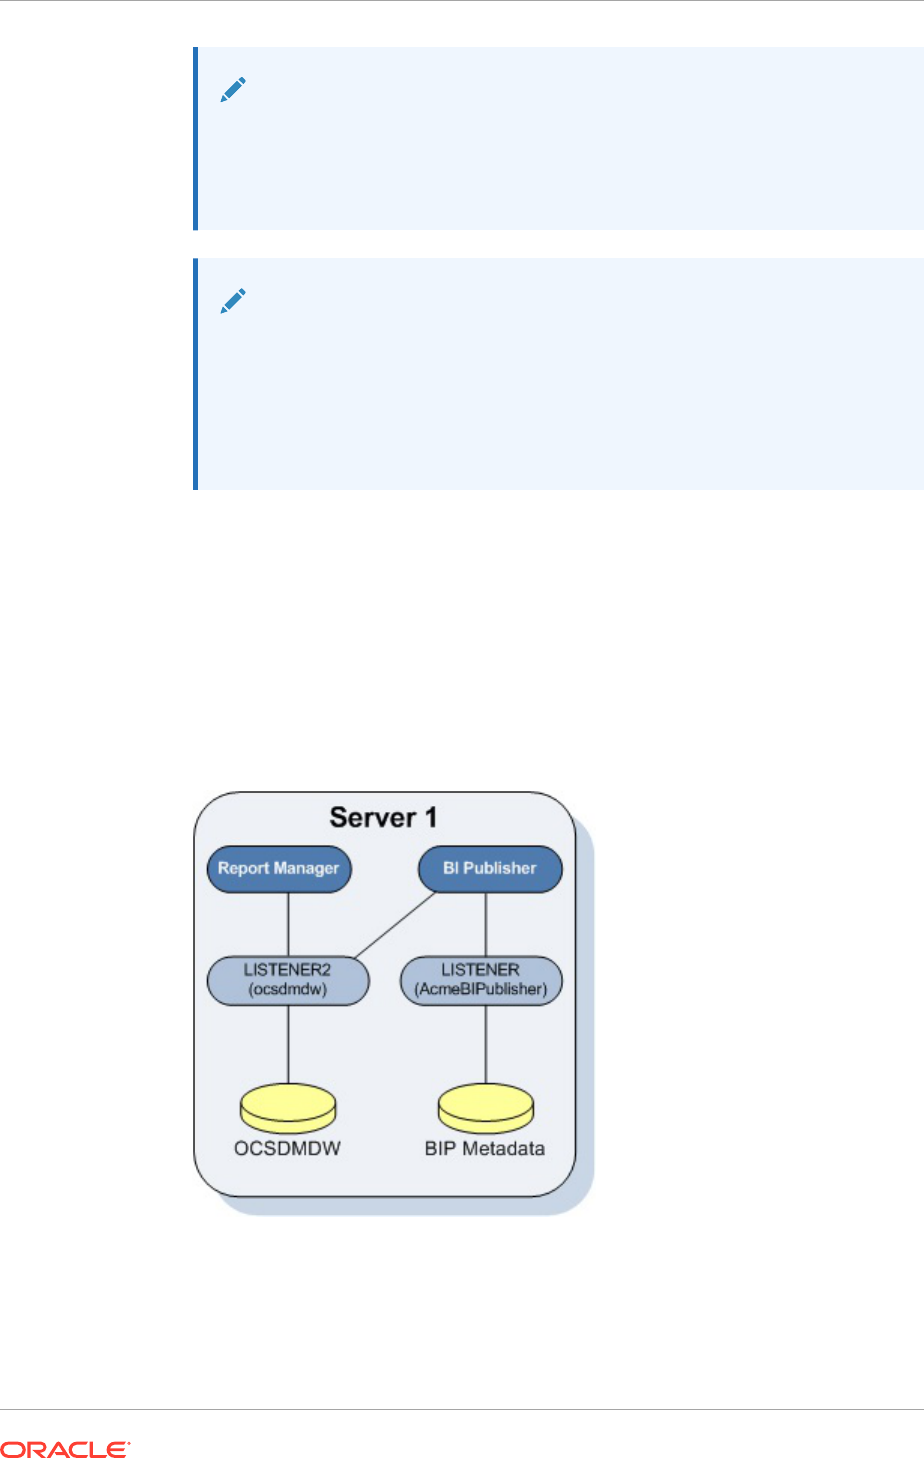
• Local standalone installation—A single local server that has Oracle
Communications Session Delivery Manager, Oracle BI Publisher, and their
respective databases that work together to generate reports.
Figure 1-1 Local standalone installation of Report Manager
• Local cluster installation—A cluster of local servers that generate reports and
provide high availability in case one system experiences a sudden failure. On
each local server that is part of the same cluster, Oracle BI Publisher and Oracle
Communications Session Delivery Manager are installed with their respective
databases. Once installed, the Oracle BI Publisher application is local to the
Oracle Communications Session Delivery Manager application.
Chapter 1
Decide How You Want to Implement Report Manager
1-3
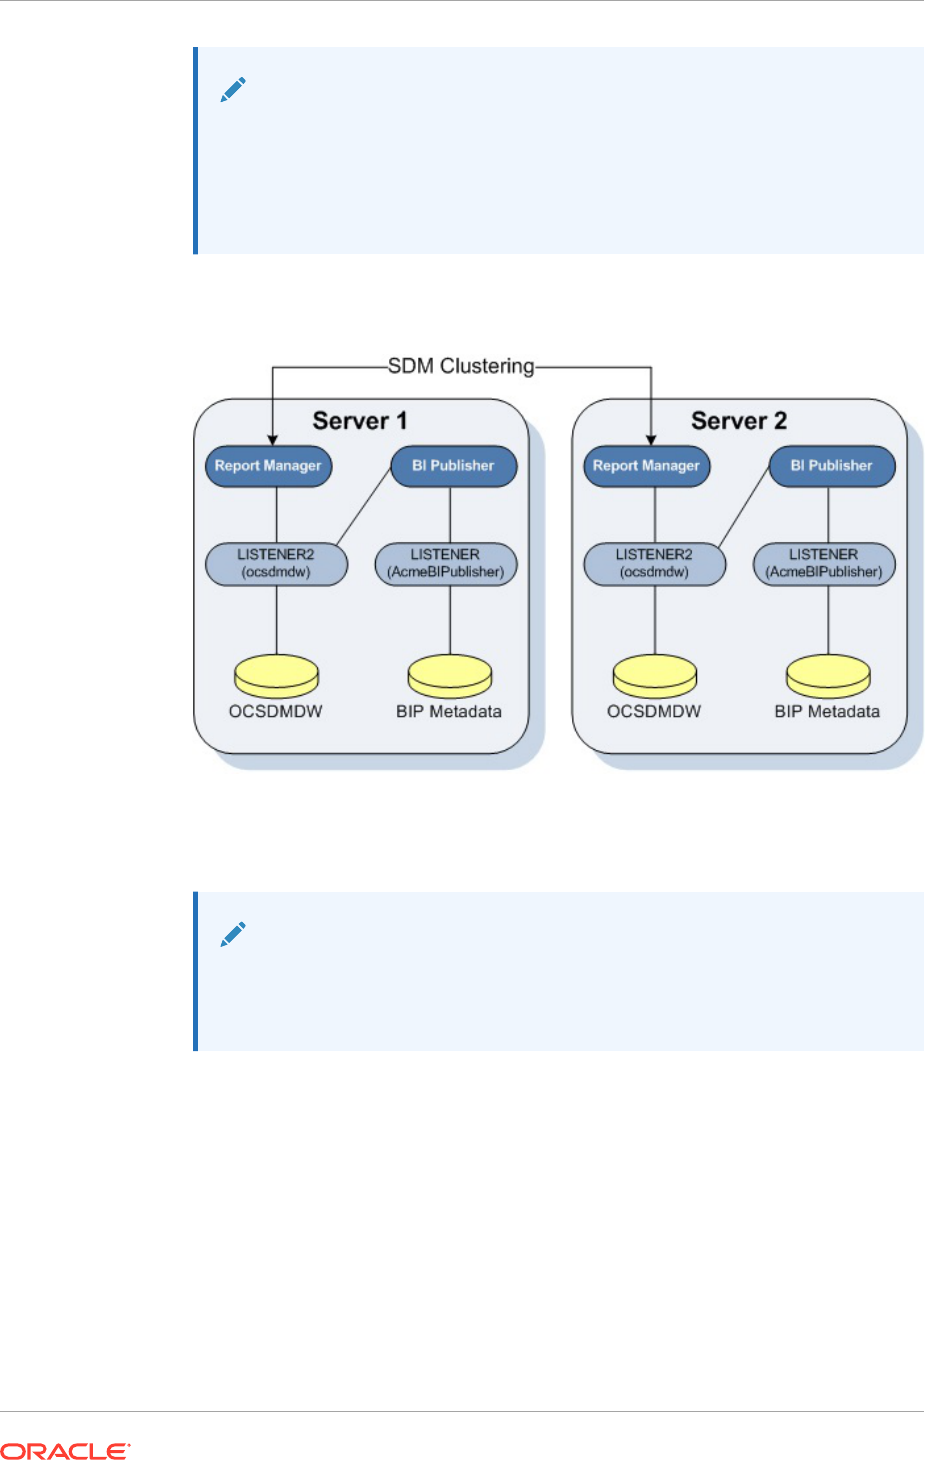
Note:
In a local cluster, the databases synchronize every night. The database
content of all non-master cluster nodes is synchronized with the
master cluster node. All identifying information for one host, such as
a username, password, and database prefix, should be identical to the
identifying information of another host in the same cluster.
Figure 1-2 Local cluster installation of Report Manager
• Remote standalone installation—A single remote server that has Oracle
Communications Session Delivery Manager, Oracle BI Publisher, and their
respective databases.
Note:
If you select this type of installation, install Oracle Communications
Session Delivery Manager on its server first on Server 1, and next install
the Oracle BI Publisher software on Server 2.
Chapter 1
Decide How You Want to Implement Report Manager
1-4
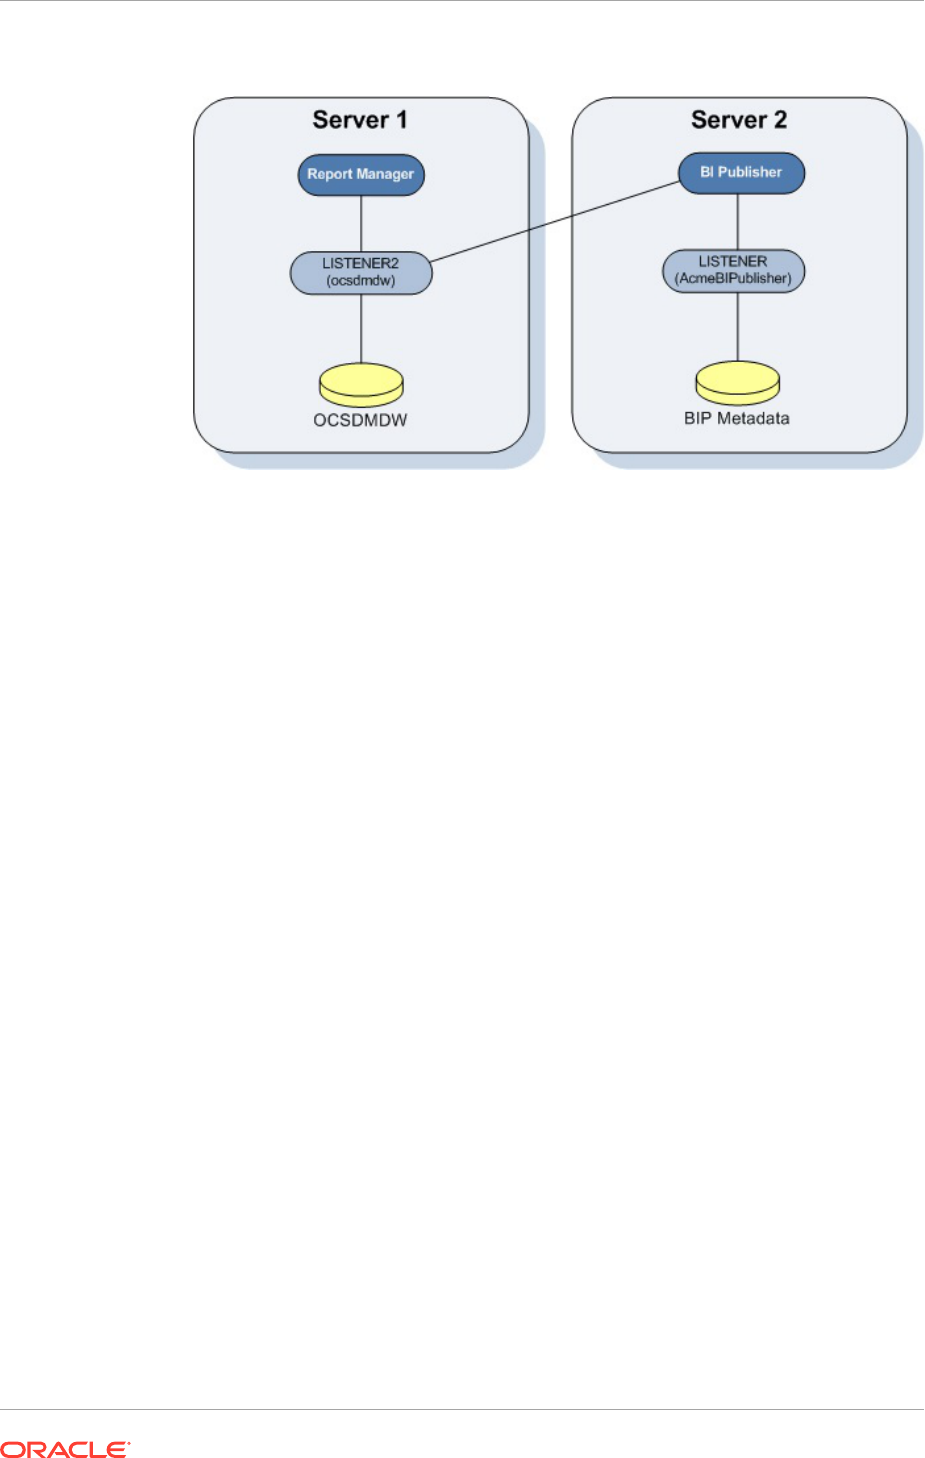
Figure 1-3 Remote standalone installation of Report Manager
The distinct databases in the illustration above function in the following ways for
Oracle Communications Session Delivery Manager, Oracle BI Publisher, and Oracle
Communications Report Manager:
• The Berkeley (SDM) XML database is embedded into the Oracle Communications
Session Delivery Manager infrastructure, and provides database storage for
Oracle Communications Session Delivery Manager user name and user group
variables. It is initiated by the database service.
• The AcmeBIPublisher database is maintained and used by the Oracle database
to hold the schemas and configuration required by the Oracle BI Publisher
application.
• The Oracle Communications Session Delivery Manager Data Warehouse
(ocsdmdw) database is maintained by Oracle Communications Session Delivery
Manager and it is used to store data that is collected from devices for which
collection is enabled is OCSDM.
Create an Oracle User Account
Create an Oracle group and user account on your Linux system(s).
1. Create a new group called oracle.
groupadd oracle
2. Create a new user account called oracle that belongs to the oracle group.
useradd -m -g oracle -d /home/oracle -s /bin/bash oracle
3. Set the password for the oracle user account.
passwd oracle
Chapter 1
Create an Oracle User Account
1-5

Select the GUI Installer Method
Select either X11 forwarding using secure shell (SSH) or the virtual network computing
(VNC) to do installations with a graphical user interface (GUI) installer on your Linux
system.
Configure SSH with X11 Forwarding
1. You can use either the -X or -Y flag to enable X11 forwarding through SSH when
you log in as the root user. For example:
ssh –Y root@server-name
Note:
If you do not have DNS on your server or the server name does not
work, enter the IP address of the server.
2. (Optional) Install the
xorg-x11-xauth
package (if it is not already installed). For
example:
yum install xorg-x11-xauth
yum install xorg-x11-utils
3. You can use either the -X or -Y flag to enable X11 forwarding through SSH when
you disconnect and log in as the oracle user. For example:
ssh -Y oracle@vm
4. Find the values for the DISPLAY variable with the
xauth list
command.
$ xauth list
<domain name>/unix:12
<domain name>/unix:11
<domain name>/unix:10
In the example above, either 12, 11, or 10 are suitable values for the DISPLAY
variable.
Configure VNC
1. You can use either the -X or -Y flag to enable X11 forwarding through SSH when
you log in as root. For example:
ssh –Y root@server-name
Chapter 1
Select the GUI Installer Method
1-6

2. Install the Desktop package group, which includes X11 and gnome-desktop. For
example:
yum install @desktop
3. Install a VNC server. For example:
yum install tigervnc-server
4. Reboot the server.
5. Log in as root.
6. Start the VNC server.
vncserver :1
Chapter 1
Select the GUI Installer Method
1-7

2
Install the Oracle Database Software
Install the Oracle database software on your Linux server for Oracle®
Communications Report Manager by downloading and running the Oracle database
installer, then start the oracle database and listeners.
Install Dependencies for the Oracle Database Software
You must install software packages that the Oracle database software depends on for
its proper operation.
Note:
For more information, see Oracle Database 19c installation on Oracle Linux
8.
1. Log in to the server as the root user.
2. Execute the command:
dnf install -y oracle-database-preinstall-19c
3. Install the following libraries. Install each of the libraries as per the example given
below:
dnf install -y libnsl
libnsl.i686, libnsl2, libnsl2.i686,
vsftpd, binutils, glibc,
glibc-devel, gcc, cpp,
glibc-headers, gcc-c++, libstdc++,
make, ksh, elfutils-libelf,
elfutils-libelfdevel, sysstat,
libaio, libaio-devel,
unixODBC,unixODBC-devel
4. Download the following:
compat-libcap1-1.10-7.el7.x86_64.rpm
compat-libstdc++-33-3.2.3-72.el7.x86_64.rpm
5. Install using the following commands:
i. yum -y localinstall compat-libcap1-1.10-7.el7.x86_64.rpm
ii. yum -y localinstall compat-libstdc++-33-3.2.3-72.el7.x86_64.rpm
2-1

Download the Oracle Database Software Installer
1. As root, create an
/home/oracle/app/oracle/product/19.3.0/dbhome_1
directory
that is owned by the
oracle
user.
[oracle@vm ~]$ su
Password:
[root@vm oracle]# mkdir /home/oracle/app
[root@vm oracle]# chown oracle:oracle /home/oracle/app
[root@vm oracle]# exit
exit
[oracle@vm ~]$ mkdir /home/nncentral/app/oracle/
[oracle@vm ~]$ mkdir /home/oracle/app/oracle/product/
[oracle@vm ~]$ mkdir /home/oracle/app/oracle/product/19.3.0/
[oracle@vm ~]$ mkdir /home/oracle/app/oracle/product/19.3.0/dbhome_1
2. Navigate your browser to the Oracle Database Software Downloads page:
Oracle Database 19c Software Downloads.
3. Under the "Oracle Database Software Downloads" heading, select Accept License
Agreement.
4. Download the Oracle Database 19c Release 3 for Linux x86-64
(LINUX.X64_193000_db_home.zip).
5. Copy the files to the
/home/oracle/app/oracle/product/19.3.0/dbhome_1
directory.
Start the Oracle Database Software Installer
1. Log in as the oracle user with the -Y flag.
ssh -Y oracle@vm
2. Navigate to the following directory:
cd /home/oracle/app/oracle/product/19.3.0/dbhome_1
3. Unzip the Oracle database software installer.
Note:
If necessary, install unzip with the command
yum install unzip
.
unzip LINUX.X64_193000_db_home.zip
4. Export the command:
export CV_ASSUME_DISTID=OEL8
Chapter 2
Download the Oracle Database Software Installer
2-2
5. Run the Oracle database software installer.
./runInstaller
6. When you run the installer you will see this message.
[oracle@myserver dbhome_1]$ ./runInstaller
Launching Oracle Database Setup Wizard...
Note:
If you see a warning message on insufficient swap space, type y to
ignore this message and continue the installation.
Install the Oracle Database Software
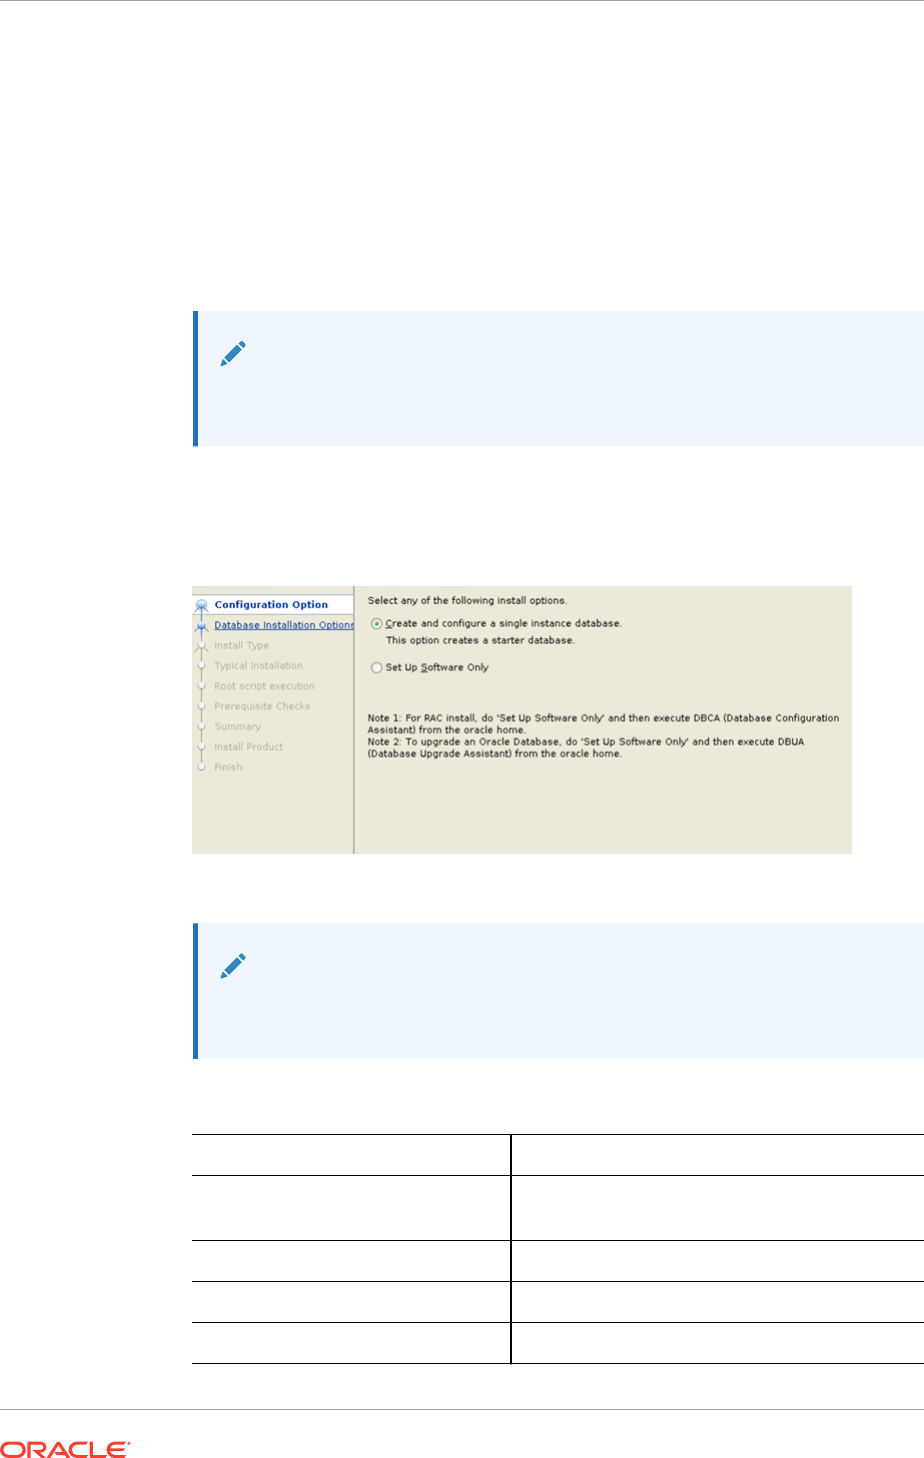
1. In the Configuration Option window, click Create and configure a single
instance database, and click Next.
2. In the Select System Class window, select Desktop Class and click Next.
Note:
The Desktop Class is sufficient for Report Manager and BI Publisher to
use the Oracle database.
3. In the Typical Installation Configuration window, keep the fields identified with
default values and change any of the fields as required below:
Oracle base field (Default) /home/oracle/app/oracle
Software Location field (Non -editable) /home/oracle/app/oracle/
product/19.3.0/dbhome_1
Database file location field (Default) /home/oracle/app/oracle/oradata
Database edition drop-down list Select Standard Edition 2.
Character Set drop-down list Select Unicode (AL32UTF8).
Chapter 2
Install the Oracle Database Software
2-3
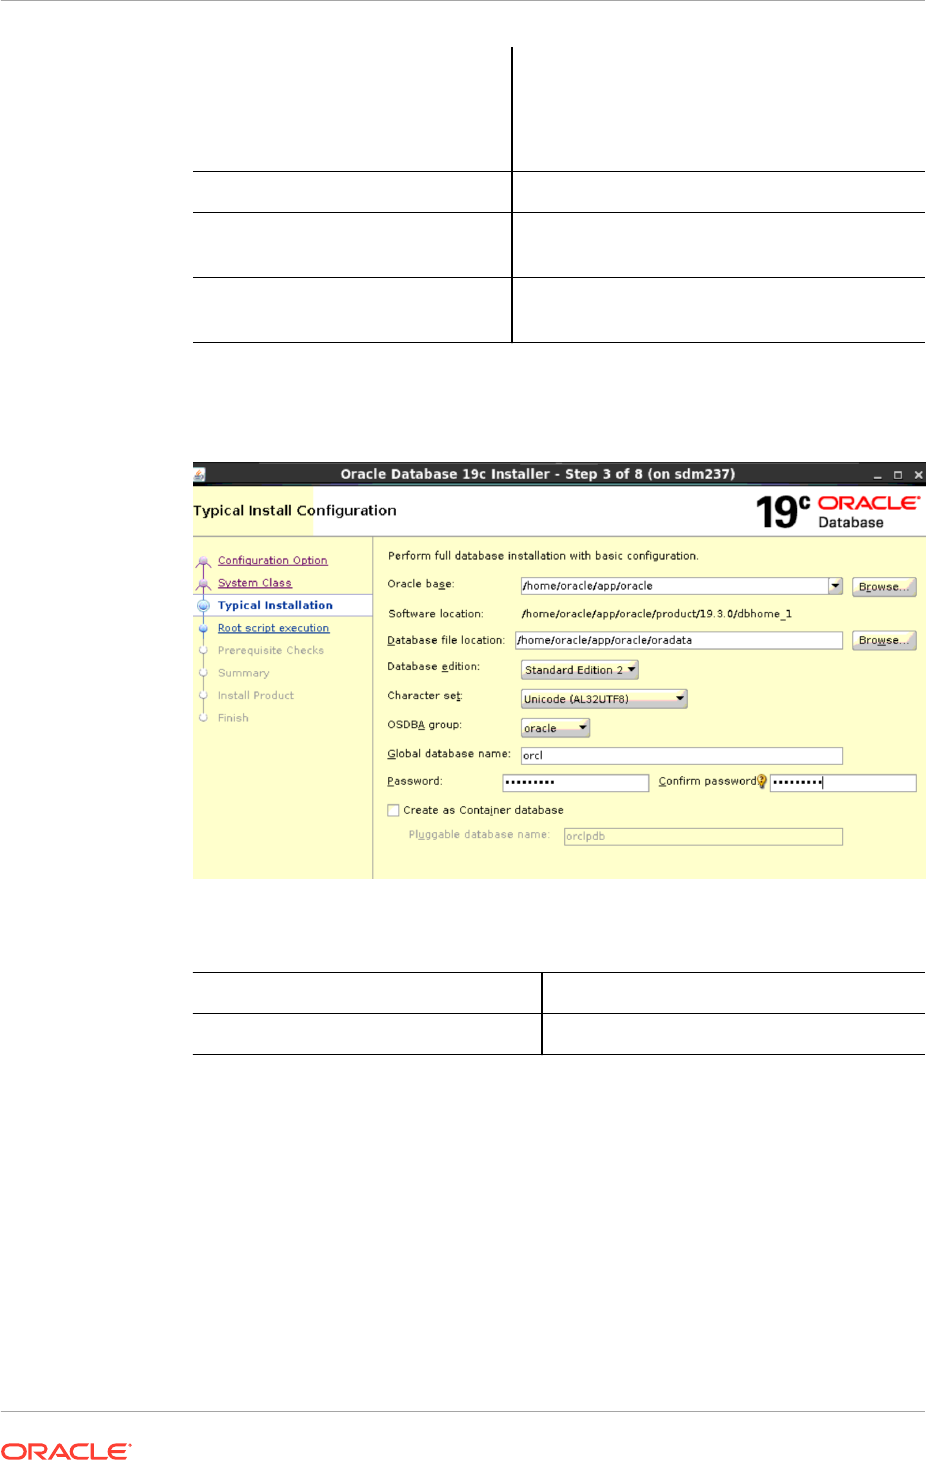
OSDBA Group drop-down list (Default) oracle
If the OSDBA Group is specified with
another group by default, you must change
it to oracle.
Global database name field (Default) orcl
Password field Enter the password for the Global Database
name.
Create as Container database
checkbox
Uncheck the checkbox.
The following example shows the completed Typical Installation Configuration
window.
4. Click Next.
5. If the Create Inventory window displays, accept the default values. For example:
Inventory Directory /home/oracle/app/oraInventory
oraInventory Group Name oracle
6. In the Root script execution window, clear the Automatically run configuration
scripts check box if it is already selected, and click Next.
7. In the Perform Prerequisite Checks window, you may encounter error
messages, take the appropriate actions. However, if you do not want to correct
them, check Ignore All, and click Next.
8. In the Summary window, click Install.
A default database is created. The global database name is orcl and its SID is
orcl.
The Install Product window appears and shows the progress of your installation.
At some point in the installation, the Execute Configuration Scripts dialog box
appears. Proceed to the next section for more information.
Chapter 2
Install the Oracle Database Software
2-4
Execute Configuration Scripts to Access the Oracle
Database Software
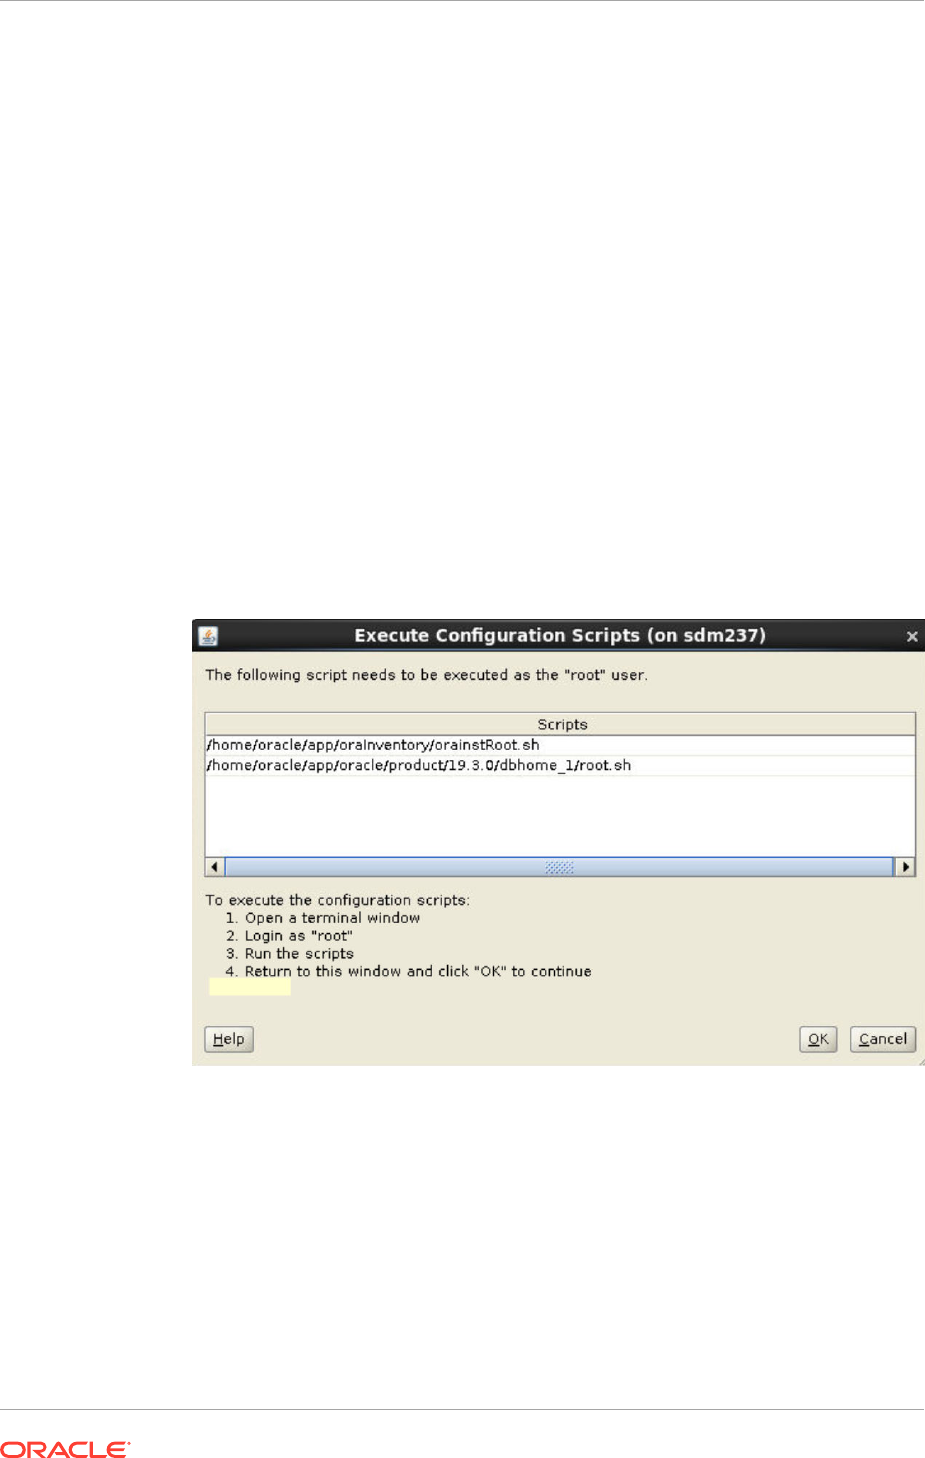
The Execute Configuration scripts dialog box opens to display the location of scripts
that must be run by the root user before continuing.
1. Open a separate terminal window and login to the server as the root user.
2. Run the following scripts displayed in the following Execute Configuration
scripts dialog box in the separate terminal window that you opened:
cd /home/oracle/app/oraInventory/
./orainstRoot.sh
cd /home/oracle/app/oracle/product/19.3.0/dbhome_1
./root.sh
The Execute Configuration scripts dialog box displays the scripts you need to
execute to create the Oracle database:
3. Go back to the Execute Configuration scripts dialog box, and click OK.
Continue to monitor the Install Product window.
Chapter 2
Execute Configuration Scripts to Access the Oracle Database Software
2-5

4. When the installation finishes, the Finish window appears and tells you that the
installation was successful. Click Close .
The Oracle database is created and can now be reached at https://
<localhost>:5500/em.
Change the Oracle Database Listener Configuration File
Edit the Listener to ensure the Oracle database software is accessible remotely by BI
Publisher, edit the listener.ora file.
1. Change directories to the admin directory.
[oracle@vm ~]$ cd /home/oracle/app/oracle/product/19.3.0/dbhome_1/
network/admin/
2. Change the value of the HOST parameter from "localhost" to the hostname of your
server.
[oracle@vm admin]$ sed -i s/localhost/`hostname`/ listener.ora
3. If you desire, refer to theHow to Start, Stop, and Check the Status of the Oracle
Database Listeners section for more information regarding the Oracle Database
listener that you configured here.
Chapter 2
Change the Oracle Database Listener Configuration File
2-6

3
Create an Oracle Database Instance for BI
Publisher
1. Log in as the oracle user. For example:
ssh -Y oracle@<my_oracle_server>
2. Run the Database Creation Assistant.
[oracle@vm ~]$ cd /home/oracle/app/oracle/product/19.3.0/
dbhome_1/bin
[oracle@vm bin]$ ./dbca
3. In the Select Database Operation window, select Create a Database (Default)
and click Next.
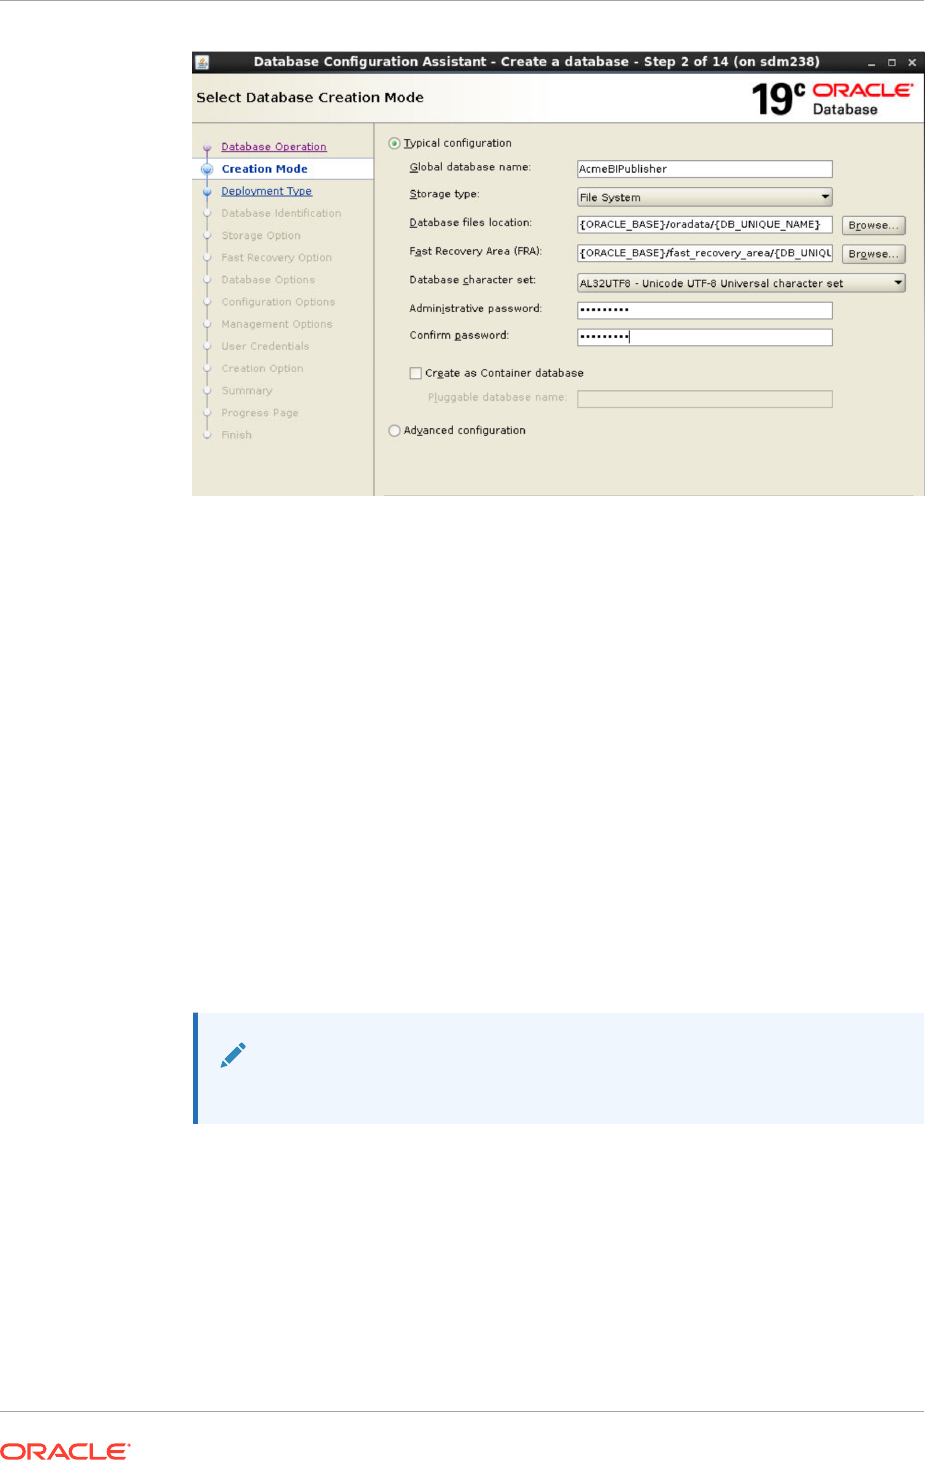
4. In the Select Database Creation Mode window, the Typical configuration is
selected by default. Keep the fields identified with default values and change any
of the fields as required below:
Global Database Name
field
Enter AcmeBIPublisher.
Storage type drop-down
list
(Default) File System
Database files location
field
(Default) {ORACLE_BASE}/oradata/
{DB_UNIQUE_NAME}
Fast Recovery Area
(FRA) field
(Default) {ORACLE_BASE}/
fast_recovery_area{DB_UNIQUE_NAME}
Database character set
drop-down list
(Default) AL32UTF8 - Unicode UTF-8 Universal
character set
Administrative password
field
Enter the AcmeBIPublisher database password.
Confirm password field Reenter the AcmeBIPublisher database password to
confirm it.
Create as Container
database check box
Uncheck the checkbox. Ensure that the password
conforms to the Oracle recommended standards.
The following example shows the completed Select Database Creation Mode
window with the AcmeBIPublisher database parameters that you entered above.
3-1
5. Click Next.
6. In the Summary window, click Finish.
The Progress Page window appears to show the progress of the
AcmeBIPublisher database installation.
7. In the Finish window, click Close to finish the AcmeBIPublisher database
installation.
Specify Oracle Database Software Variables
Use the following steps to specify the variable for the oracle database
(ORACLE_HOME), and the system identifier (SID) variable that identifies the BI
Publisher database.
1. Append the following lines to /home/oracle/.bash_profile.
export ORACLE_HOME=/home/oracle/app/oracle/product/19.3.0/dbhome_1
export ORACLE_SID=AcmeBIPublis
Note:
Make sure the ORACLE_HOME path has no trailing slash.
2. Switch to the nncentral user.
su - nncentral
3. Append the following line to /home/nncentral/.bash_profile.
export ORACLE_HOME=/home/oracle/app/oracle/product/19.3.0/dbhome_1
Chapter 3
Specify Oracle Database Software Variables
3-2

Note:
The ORACLE_HOME variable must be set when restarting either the
listener or Oracle Communications Session Delivery Manager.
4. Start a new bash shell as the "oracle" Linux user. For example:
ssh -Y oracle@<my_oracle_server>
Add an Oracle Database User that Connects to BI Publisher
for Backup and Restore Functions
Add an Oracle database user called nncentral to connect BI Publisher database for
backup and restore functions work properly. This task needs to be done for local
installations only.
1. Log into the Oracle database.
[oracle@vm ~]$ echo $ORACLE_SID
AcmeBIPublis
[oracle@vm ~]$ cd $ORACLE_HOME/bin/
[oracle@vm bin]$ ./sqlplus '/as sysdba'
2. Create a user called nncentral and the user password.
Note:
The password that you configure expires after 180 days. Seven days
before the password expires, a password expiry trap warns you through
SDM that your password needs to be reset. If you need to reset this user
password later, see the Reset the Password for the Oracle Database
User section in the Oracle Communications Report Manager User Guide
for more information.
SQL> CREATE USER nncentral IDENTIFIED BY <password>;
3. Grant the appropriate privileges.
SQL> GRANT CONNECT, DBA, SYSDBA, CREATE SESSION TO nncentral;
4. Exit the Oracle database prompt.
SQL> exit
Chapter 3
Add an Oracle Database User that Connects to BI Publisher for Backup and Restore Functions
3-3

4
Install Oracle BI Publisher
This chapter describes the BI Publisher WebLogic server, the Oracle Fusion
Middleware Infrastructure and the Oracle Business Intelligence 12c installation.
Note:
If you encounter errors during the installation process, see the
Administrator's Troubleshooting Guide for BI Publisher.
Install the Latest Java Development Kit 8
The BI Publisher WebLogic Server that is part of the Fusion Middleware infrastructure
must be installed separately before the Oracle Fusion Middleware product. Prior to the
12c (12.2.1.2.0) release of BI Publisher, the Fusion Middleware product was part of the
Oracle Business Intelligence Suite.
1. Get the latest version of the Java Development Kit (JDK) version 8 from the Oracle
customer portal.
2. Save the tar.gz file to the directory on your server where you want to install it.
3. Login to your server as the root user.
4. Navigate to the directory where you downloaded the tar.gz file.
5. Extract the tar.gz file. For example:
- tar xzf jdk-8u144-linux-x64.tar.gz
6. Add the following two lines to the /home/oracle/.bashrc file to permanently set the
JAVA_HOME environment variable and set the java binary as part of the system
PATH:
export JAVA_HOME=/opt/jdk1.8.0_144
export PATH=$JAVA_HOME/bin:$PATH
Note:
JAVA_HOME must be accessible to the oracle user. In the above
example, the /opt directory must be accessible to the oracle user.
4-1

Note:
Install JDK earlier than JDK 1.8.0_188 for NNC Version 8.2.1 and
below. For JDK versions that are later than JDK 1.8.0_188, "Subject
Alt names" is expected by BIP in the BIP Certificate for BIP Registration
in the HTTPS mode. For more information, see Register BI Publisher in
HTTPS Mode. For NNC 8.2.2 and above, you can install any latest JDK
version.
Install the Oracle Fusion Middleware Infrastructure
With the introduction of Business Intelligence (BI) Publisher, Release 12c, the
Repository Creation Utility is part of the Oracle Fusion Middleware product. This task is
used to install the Oracle Fusion Middleware infrastructure in preparation for installing
the BI Publisher application.
1. Download the Oracle Fusion Middleware version 12c zip file
(fmw_12.2.1.2.0_infrastructure_Disk1_1of1.zip) from the Oracle Business
Intelligence Downloads page.
Note:
Report Manager only supports Oracle Fusion Middleware version
12.2.1.2.0.
2. Copy the file to your server.
3. Log in to your server as the oracle user with the -Y flag.
ssh -Y oracle@vm
4. To ensure the file was not corrupted during transfer, match the checksum of the file
to checksum that Oracle publishes for the file. The checksum displays next to the
download link on the right.
The checksum output has the following format: <checksum> <byte count>
<filename>
5. Unzip the file.
unzip fmw_12.2.1.2.0_infrastructure_Disk1_1of1.zip
6. Run the following command on the resulting JAR file to run the Oracle Fusion
Middleware installer:
java –d64 –jar fmw_12.2.1.2.0_infrastructure.jar
7. In the Welcome window, click Next.
8. In the Auto Updates window, you can use the default choice (Skip Auto
Updates) if you do not plan on receiving any updates for Oracle Fusion
Middleware from Oracle Support and click Next. However, if you want automatic
Chapter 4
Install the Oracle Fusion Middleware Infrastructure
4-2
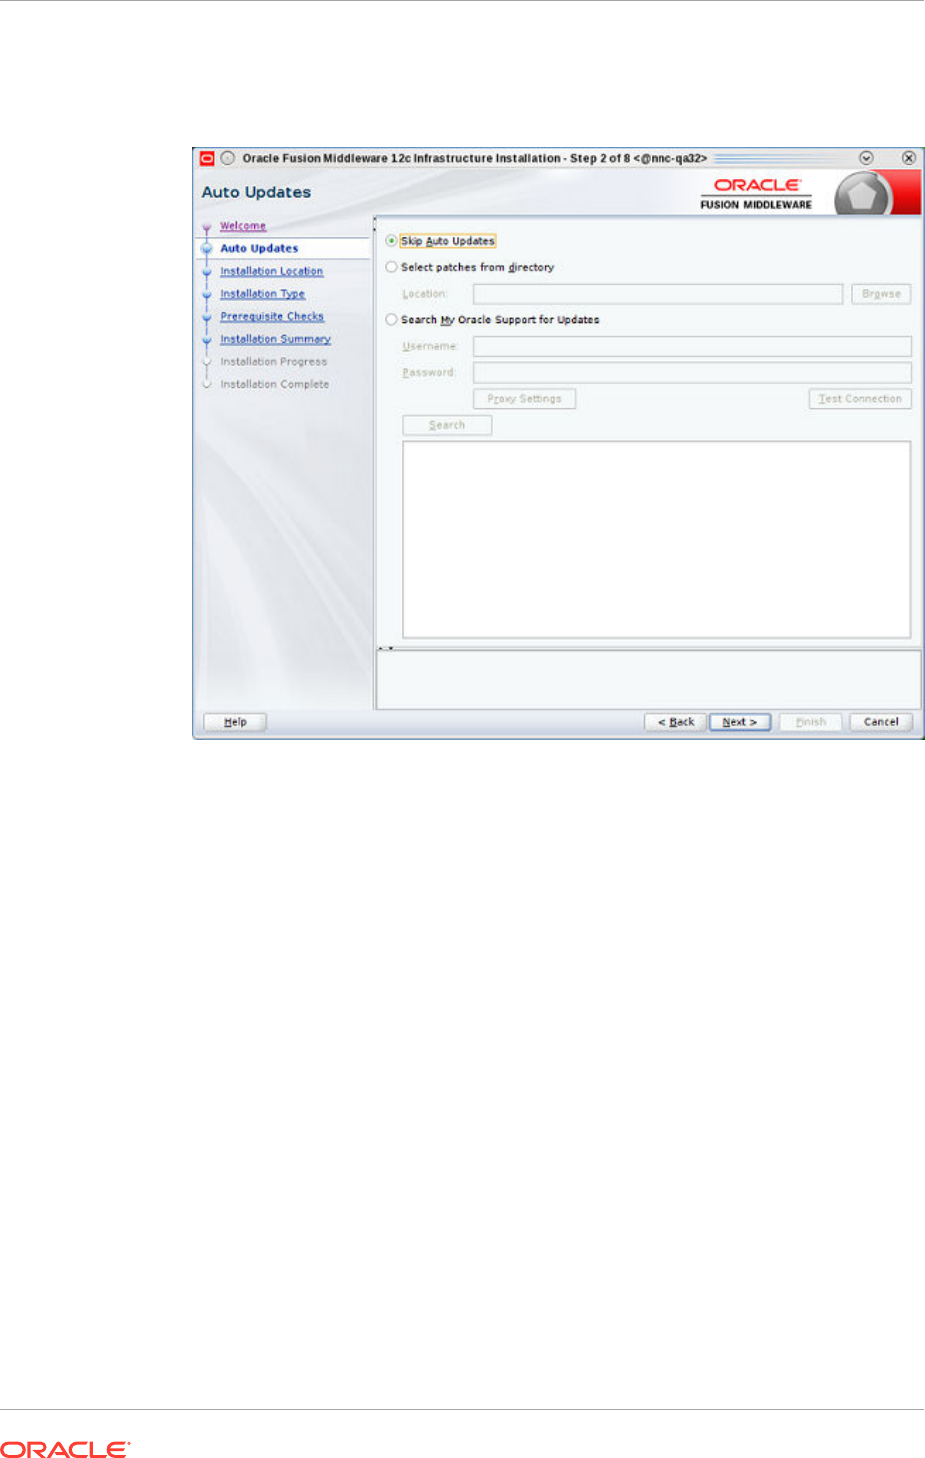
updates later or the ability to search updates through Oracle Support you can
choose the other options and click Next. For example:
9. In the Installation Location window, click Next.
10. In the Installation Type window, keep the default choice (Fusion Middleware
Infrastructure) and click Next.
11. In the Prerequisite Checks window, checks are performed. Click Next.
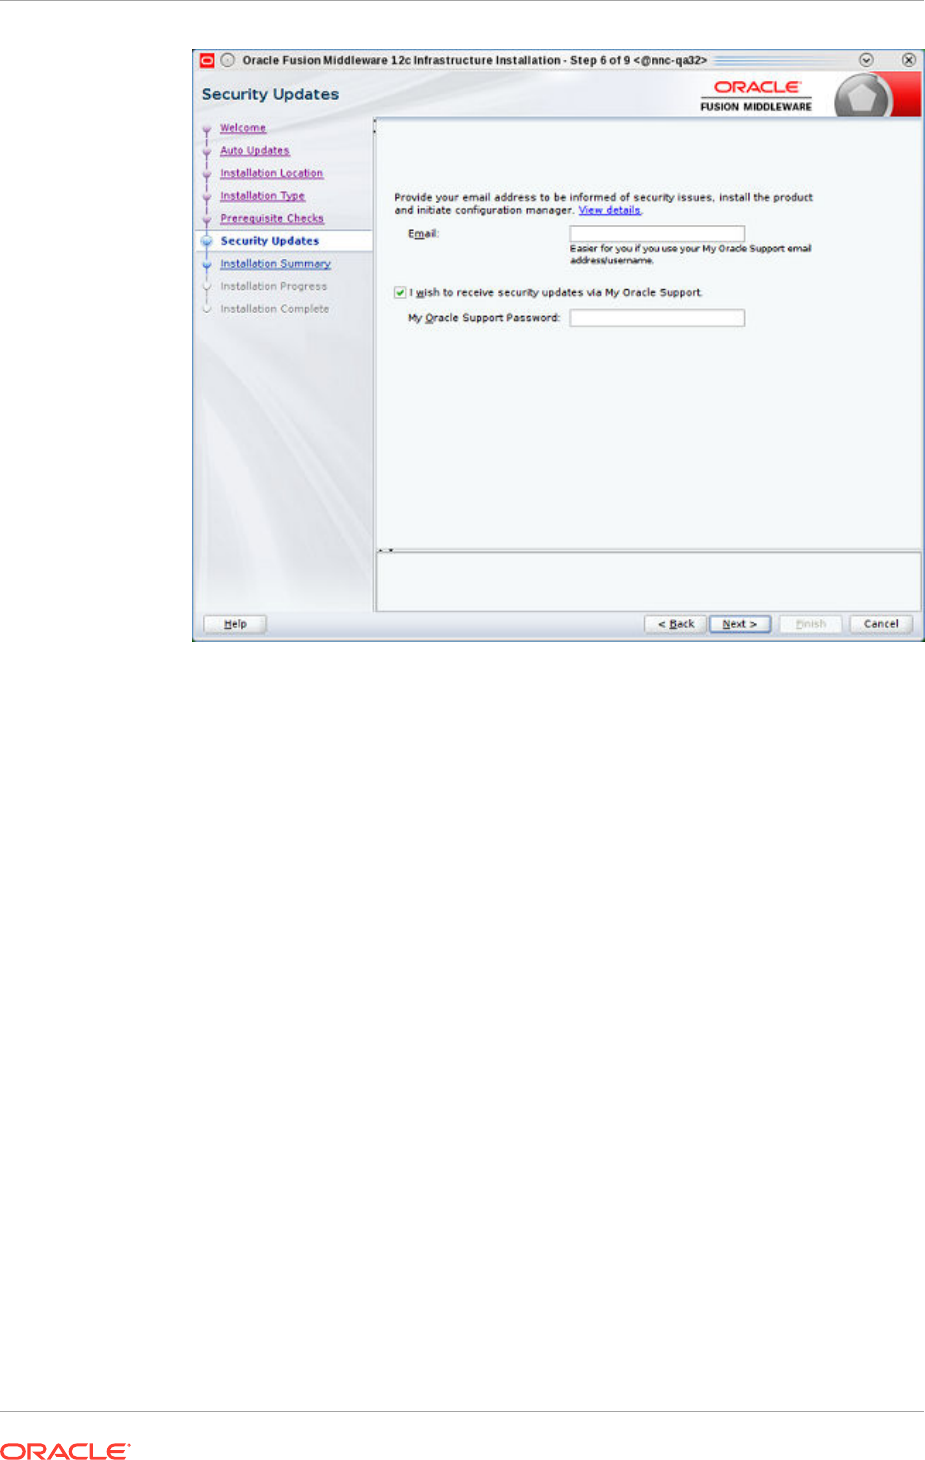
12. In the Security Updates window, provide an email address in the Email field and
click Next. You can optionally check the checkbox to receive security updates
through your My Oracle Support account. Enter your password for this account in
the My Oracle Support Password field. For example:
Chapter 4
Install the Oracle Fusion Middleware Infrastructure
4-3
13. In the Installation Summary window, click Install to begin the Oracle Fusion
Middleware installation.
The Installation Progress window appears to display the progress of the
installation.
14. When the installation completes, click Next.
15. In the Installation Complete window, click Finish.
Start Oracle Business Intelligence 12c Installation
Installing the Oracle Business Intelligence 12c software is important part of the Oracle
BI Publisher installation.
1. Download the following Oracle Business Intelligence 12c Installation files from the
Oracle Business Intelligence Downloads page.
fmw_12.2.1.2.0_bi_linux64_Disk1_1of2.zip
fmw_12.2.1.2.0_bi_linux64_Disk1_2of2.zip
2. Extract the contents of the .Zip files to get:
bi_platform-12.2.1.2.0_linux64-2.zip and
bi_platform-12.2.1.2.0_linux64.bin
3. Execute the Oracle Business Intelligence 12c installer as oracle user:
./bi_platform-12.2.1.2.0_linux64.bin
Chapter 4
Start Oracle Business Intelligence 12c Installation
4-4
4. In the Welcome window click Next.
5. In the Auto Updates window, you can use the default choice (Skip Auto
Updates) if you do not plan on receiving any updates for the Oracle Business
Intelligence 12c software from Oracle Support and click Next. However, if you
want automatic updates later or the ability to search updates through Oracle
Support you can choose the other options and click Next.
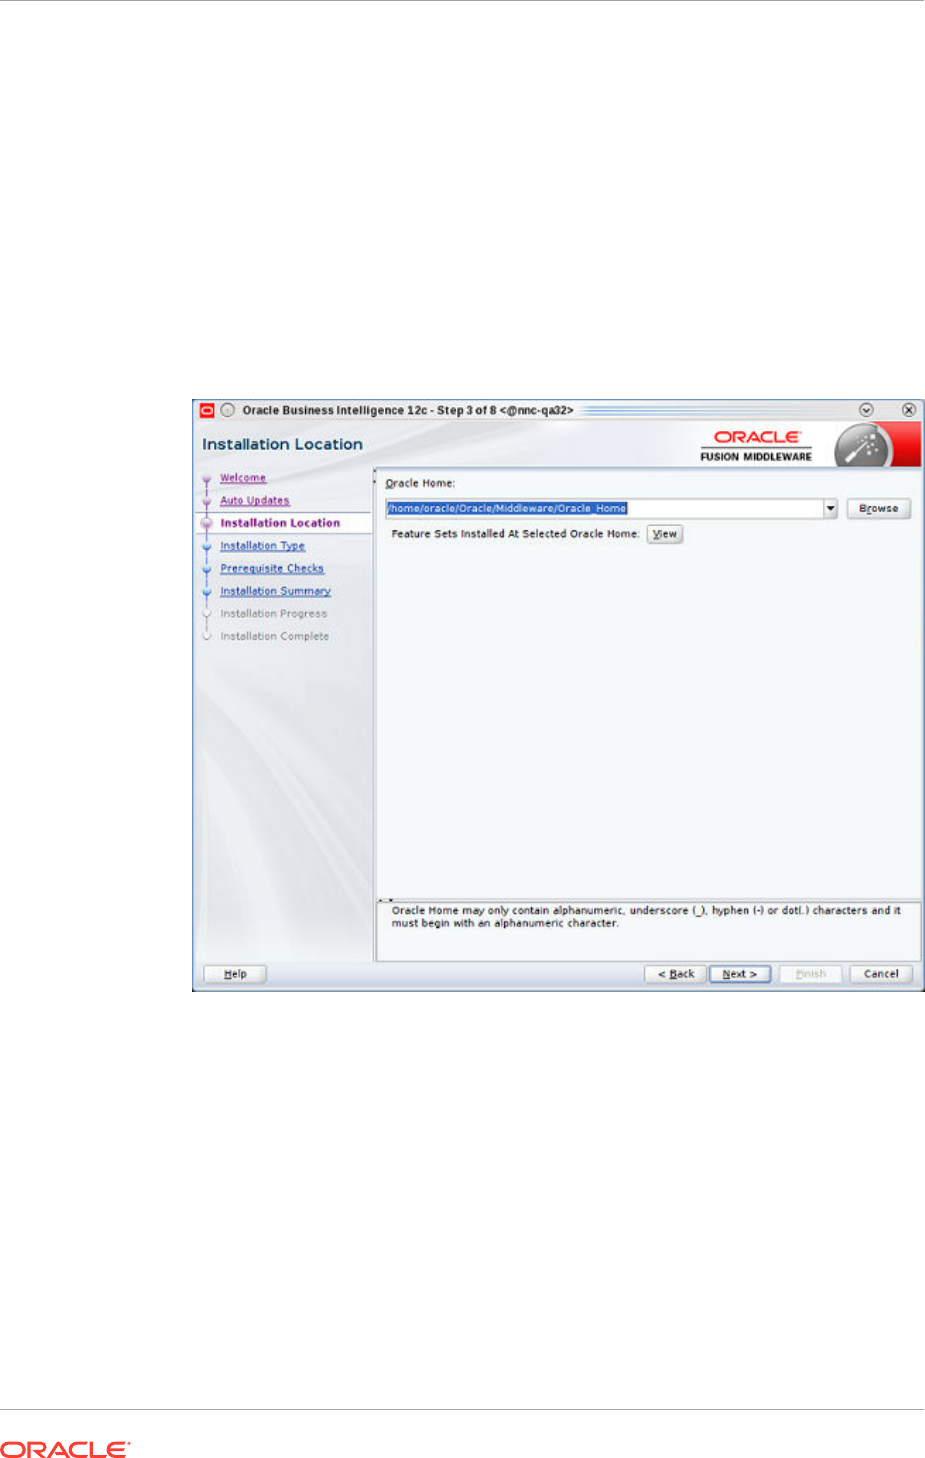
6. In the Installation Location window, select the directory from the Oracle Home
drop-down list or you can browse to the directory where you want to install the
software.
The following example shows the /home/oracle/Oracle/Middleware/Oracle_Home
directory:
7. In the Installation Type window, select the BI Platform distribution option that you
want. The default is BI Platform Distribution with Samples.
8. In the Prerequisite Checks window, click Next.
9. In the Installation Summary window, click Install.
10. In the Installation Progress window, click Next.
11. In the Installation Complete window, click Finish.
Chapter 4
Start Oracle Business Intelligence 12c Installation
4-5

Install the Oracle Business Intelligence 12c Configuration
Assistant
Now that the Oracle Fusion Middleware and Oracle Business Intelligence 12c software
is installed, you must install the Oracle Business Intelligence 12c Configuration
Assistant.
Note:
Any values that you configure in this section, save a record of them for future
use.
1. Ensure that the listener is running. Refer to the How to Start, Stop, and Check the
Status of the Oracle Database Listeners section for more information. Look for the
expected result in the status display:
Service "AcmeBIPublisXDB" has 1 instance(s).
Instance "AcmeBIPublis", status READY, has 1 handler(s) for this
service...
Service "AcmeBIPublisher" has 1 instance(s).
Instance "AcmeBIPublis", status READY, has 1 handler(s) for this
service...
Service "orcl" has 1 instance(s).
2. Change the directory to the bin directory that was created for you as part of the
Oracle Business Intelligence 12c installation. For example:
/home/oracle/Oracle/Middleware/Oracle_Home/bi/bin
3. Install the Oracle Business Intelligence 12c Configuration Assistant with the
config.sh script:
./config.sh
4. In the Welcome window, uncheck the Essbase and Business Intelligence
Enterprise Edition check boxes under the Components to include header and
click Next.
5. In the Prerequisite Checks window, click Next when the prerequisite checks are
completed.
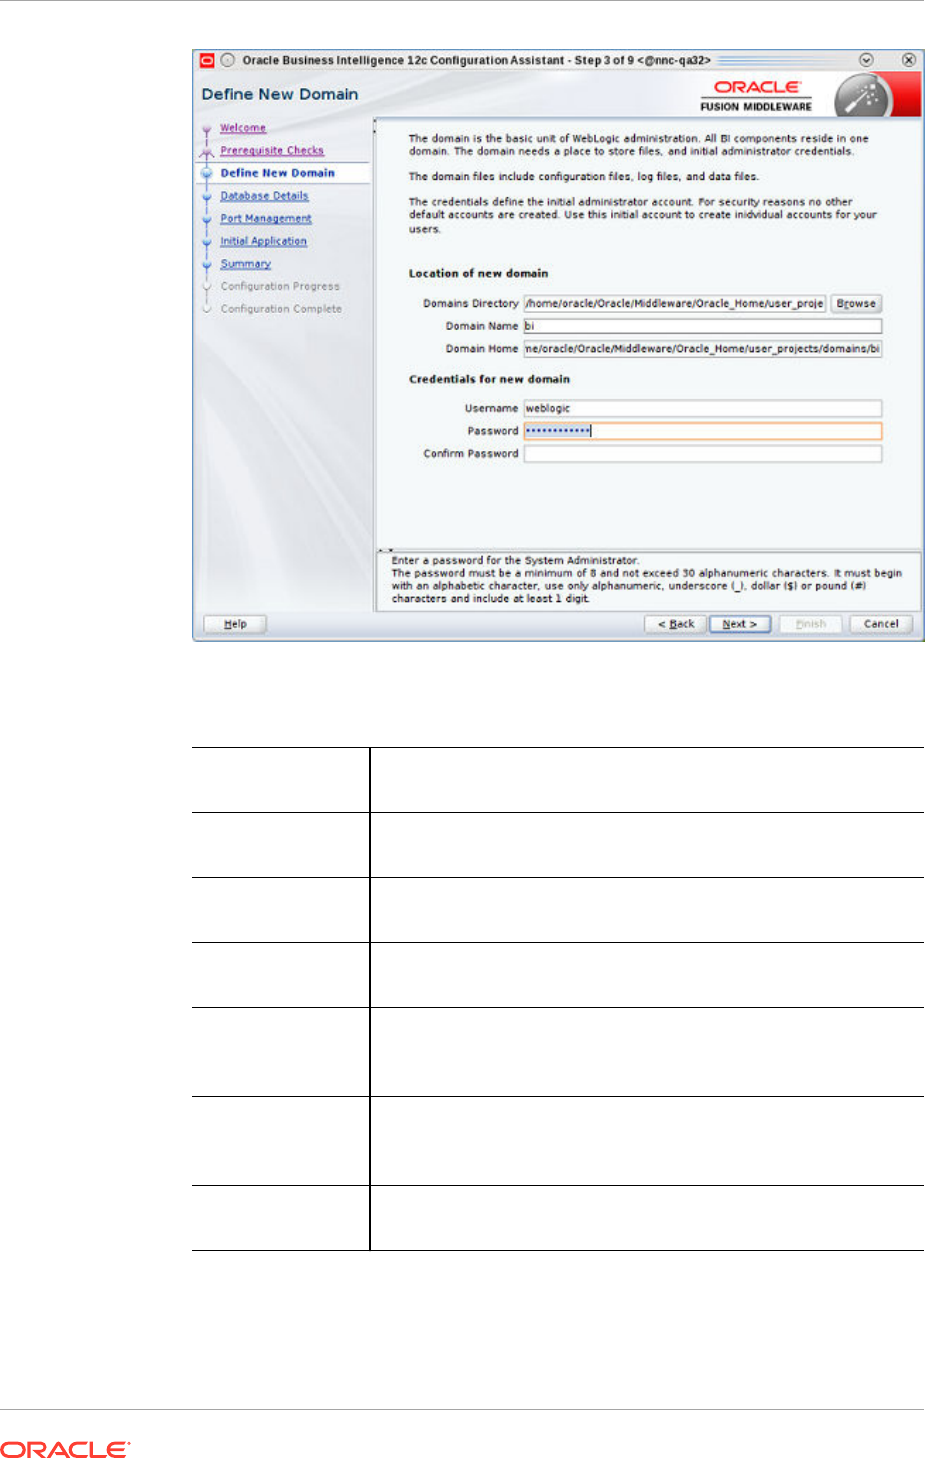
6. In the Define New Domain window, the location and credential information
is populated in their respective fields, enter the password credentials for the
Weblogic server in the Credentials for new domain section (you will use these
credentials later when you login to the Weblogic server) and click Next. For
example:
Chapter 4
Install the Oracle Business Intelligence 12c Configuration Assistant
4-6
7. In the Database Schema window, you are creating a new schema. The Create
new schema option is selected for you. Complete the following fields and click
Next:
Schema prefix
field
DEV
Schema
password field
Enter a password that is at least nine characters or greater.
Confirm schema
password field
Reenter the schema password.
Database type
drop-down list
Select Oracle Database (Default).
Username field Enter the nncentral user. Refer to the Add an Oracle
Database User that Connects to BI Publisher for Backup and
Restore Functions section for more information.
Password field Enter the nncentral user password. Refer to the Add an
Oracle Database User that Connects to BI Publisher for
Backup and Restore Functions section for more information.
Simple connect
string field
Use the <server_name>:<port>:<service_name> format. For
example: vm:1521:AcmeBIPublisher
8. In the Port Range window, the following default Port Range values display:
Chapter 4
Install the Oracle Business Intelligence 12c Configuration Assistant
4-7

Port Range
Starting Port
9500 (Default) If you need to change the start port number for
the Business Intelligence (BI) and Web Logic Server (WLS)
processes to use.
Port Range End
Port
9999 (Default) If you need to change the end port number for
the Business Intelligence (BI) and Web Logic Server (WLS)
processes to use.
9. In the Initial Application window, we recommend that you select the Clean Slate
(no predefined application) option.
10. In the Summary window, review your configuration and click Configure.
11. In the Configuration Progress window, when the progress of the configuration is
complete, click Next.
12. In the Configuration Complete window, click Finish.
Access BI Publisher and the WebLogic Console
1. In your web browser, access the BI Publisher by navigating to the following URL:
http://<hostname>:9502/xmlpserver
2. In another tab in your web browser, access the WebLogic console by navigating to
the following URL:
http://<hostname>:9500/console
Create the Boot Properties File
The post-installation process involves the creation of a boot.properties file.
1. Change directories to the BI Publisher domain. For example:
cd /home/oracle/Oracle/Middleware/Oracle_Home/user_projects/
domains/bi
2. If the following path does not exist on your system, create it with the mkdir
command. Otherwise, change directories from the BI Publisher domain to
servers/AdminServer/security. For example:
cd servers/AdminServer/security
3. Create a file called boot.properties.
vi boot.properties
4. Add the following two lines:
username=weblogic
password=<password>
Chapter 4
Access BI Publisher and the WebLogic Console
4-8

Use the password which you created for the weblogic user. Refer to Install
the Oracle Business Intelligence 12c Configuration Assistant section for more
information.
Configure the BI Publisher Security Model
1. Open your web browser and log into BI Publisher with the following URL:
http://<hostname>:9502/xmlpserver
2. In the Oracle BI Publisher Enterprise login page, enter weblogic in the
Username field.
3. Enter the password for the Weblogic user that you set in the Define New Domain
window in the Oracle Business Intelligence 12c Configuration Assistant. Refer to
Install the Oracle Business Intelligence 12c Configuration Assistant section for
more information.
4. In the top right corner of the page, click Administration.
5. In the Administration page, under the Security Center heading, click Security
Configuration.
6. Scroll down the page to the Authorization heading and select BI Publisher
Security from the Security Model drop-down list.
7. Enter the administrator password in the New Password field.
8. Scroll to the top of the page, and in the top right-corner, click Apply.
The settings are saved successfully, but do not take effect until the application is
restarted.
9. Scroll to the top of the page, and in the top right-corner, click Sign Out.
10. Restart the WebLogic server. Refer to the Start or Stop the WebLogic Server for
12c section for more information.
Note:
After restarting the WebLogic server, the weblogic account is disabled.
Administrative actions must be performed with the administrator account.
11. Login to the WebLogic server, complete the following fields:
Username field Enter administrator in this field.
Password field Enter the new password that you configured in step 7.
12. Click Sign In to enter a new session.
Chapter 4
Configure the BI Publisher Security Model
4-9

Configuring User Privileges for Local Configurations
For local standalone and local cluster setups only, add the nncentral user to the oracle
group and oinstall group, add the oracle user to the nncentral group and oinstall group,
and add both the oracle and nncentral users to the dba group.
The following procedure is necessary only when Oracle BI Publisher and Oracle
Session Delivery Manager are installed on the same server.
1. SSH to your BI Publisher server.
2. As root, open the /etc/group file.
3. Add oracle to the end of the line that begins with
nncentral
and
oinstall
. Add
nncentral to the end of the line that begins with
oracle
and
oinstall
. Add the
oracle and nncentral to the end of the line that begins with
dba
.
For example:
nncentral:x:<###>:oracle
oracle:x:<###>:nncentral
oinstall:x:<###>:oracle,nncentral
dba:x:<###>:oracle,nncentral
Note:
The <###> represents a series of numbers.
4. Save and close the file.
5. Change from the root user to the oracle user.
6. Grant the nncentral user permission to act as a sysdba.
cd $ORACLE_HOME/bin
chmod 6751 oracle
cd $ORACLE_HOME/bin
su nncentral
chmod 6751 /home/nncentral
7. The nncentral user must have read, write, and execute privileges for the oracle
user where the Oracle DB is installed. You may grant the necessary privileges as
the oracle user with the following command:
chmod -Rf g+rwX <ORACLE_DB_INSTALL_PATH>
For example:
chmod -Rf g+rwX /home/oracle/app
Chapter 4
Configuring User Privileges for Local Configurations
4-10

8. The nncentral user must have read, write, and execute privileges for the
oracle user where Oracle MiddleWare is installed. You may grant the necessary
privileges as the oracle user with the following command:
chmod -Rf g+rwX <ORACLE_MIDDLEWARE_PATH>
For example:
chmod -Rf g+rwX /home/oracle/Oracle/Middleware/Oracle_Home
9. Switch to the nncentral user to restart Oracle Communications Session Delivery
Manager (SDM) if it is currently running.
Configure a Data Pump Directory for Local Installations
If your system is set up as a local standalone or local cluster, you need to manually
specify the data pump directory. The data pump directory is used in the backup and
restore process for the Oracle database.
1. Connect to the Oracle database as the sysdba.
cd $ORACLE_HOME/bin
./sqlplus / as sysdba
2. Change the directory location of the data pump files to your desired directory.
Below is an example of the command.
CREATE OR REPLACE DIRECTORY "DATA_PUMP_DIR" as '/home/oracle/app/
oracle/product/12.2.0/dbhome_1/rdbms/log/';
3. Verify the change took place.
SELECT owner, directory_name, directory_path FROM dba_directories
WHERE directory_name='DATA_PUMP_DIR';
Chapter 4
Configure a Data Pump Directory for Local Installations
4-11

5
Create a Report Manager Database
Instance
If you are using Oracle® Communications Report Manager with Oracle
Communications Session Delivery Manager, you must create a Report Manager
database instance on the external Oracle database.
When you complete the Report Manager database instance (OCSDMDW)
configuration on Oracle Communications Session Delivery Manager, the following
items are created on the external Oracle database:
• Oracle database instance for Oracle Communications Report Manager
(OCSDMDW).
• Oracle database user (OCSREMDW)
• LISTENER2 instance, which listens on its designated port 1522 (for the Report
Manager application) on the Oracle database.
5-1

6
Verify the Report Manager Database
Instance
You must verify that the Report Manager database instance (OCSDMDW) is created.
1. From your Linux system, query the Oracle database to verify if the OCSDMDW
database is active:
ssh -Y oracle @vm
export ORACLE_SID=ocsdmdw
cd $ORACLE_HOME/bin
2. Enter the path to the OCSDMDW database:
./sqlplus ocsremdw/<ocsremdw password>@ocsdmdw
If a success message appears, it indicates that the OCSDMDW database is active
and installed correctly. If a failure message appears, either the database is not
installed or not configured. Continue to step three if you get a failure message.
3. Check the logs directory to discover why a failure happened (if a failure has
happened).
/home/nncentral/AcmePacket/NNC<version>/logs/SetupApplication.log
4. Look for any error messages in the setup application log. We suggest filtering
your search with the words LISTENER2 and OCSDMDW. If you are unable
to determine what is wrong, contact your Oracle Communications support
representative.
6-1

7
Verify LISTENER2 is Created on the
Oracle Database
You must verify that LISTENER2 on port 1522 is created on the Oracle database.
1. From your Linux system, query the NNC report LISTENER2 status to see if it is
active:
cd $ORACLE_HOME/bin
2. If there is a failure message, manually try activating LISTENER2:
./lsnrctl start LISTENER2
3. Check the status of LISTENER2 again:
./lsnrctl status LISTENER2
If a success message appears, it indicates that LISTENER2 is active and the
Oracle database is installed correctly. If a failure message appears again, either
the database is not installed or the listener is not configured. Continue to step four
if you get a failure message.
4. Check the logs directory to discover why a failure happened (if a failure has
happened).
/home/nncentral/AcmePacket/NNC<version>/logs/SetupApplication.log
5. Look for any error messages in the setup application log. We suggest filtering
your search with the words LISTENER2 and OCSDMDW. If you are unable
to determine what is wrong, contact your Oracle Communications support
representative.
7-1

8
Register Oracle BI Publisher
Register BI Publisher in HTTPS Mode
Oracle recommends you register BI Publisher in HTTPS mode to encrypt any
communication between Oracle Communications Session Delivery Manager and BI
Publisher. BI Publisher can be run in both HTTP and HTTPS modes. If you decide to
run BI Publisher in HTTP mode, then you can skip this section and go to the Register
BI Publisher in Session Delivery Manager section.
Register BI Publisher in Session Delivery Manager
After the Oracle Communications Session Delivery Manager installation, Oracle BI
Publisher must be registered from within the SDM GUI application.
1. Start the Oracle Communications Session Delivery Manager server as the
nncentral user:
cd /opt/AcmePacket/NNC<version>/bin/
./startnnc.sh
2. Navigate to your Oracle Communications Session Delivery Manager server IP
address on port 8080.
3. Ensure that you have your product plugin installed.
4. Select Report Manager, Register BI Publisher.
5. (Use this step to re-register BI Publisher in SDM only) In the Register BI
Publisher pane, click Configure Registration.
6. In the Register BI Publisher Step 1 of 2 pane, complete the following installation
details fields to register a BI Publisher server:
Installation
Location radio
buttons
Select the following location type:
• local—The Report Manager and BI Publisher software is
installed on the same server.
• remote—The Report Manager and BI Publisher software is
installed on separate servers.
Note:
If you are registering BI Publisher with SSL on a local
server, a domain name server (DNS) is required.
8-1

Installation
Type radio
buttons
Select the following installation type:
• standalone—A single or remote installation of Oracle
Communications Session Delivery Manager, Oracle BI
Publisher, and their respective databases that work
together to generate reports.
• cluster—A cluster of servers (A local cluster is supported
for 12c) that generate reports and provide high availability
in case one system experiences a sudden failure. On each
server that is part of the same cluster, Oracle BI Publisher
and Oracle Communications Session Delivery Manager are
installed with their respective databases.
Weblogic
Admin User
Name field
Enter weblogic. This is the user name that was created when
you installed Oracle BI Publisher. Refer to the Install the Oracle
Business Intelligence 12c Configuration Assistant section for
more information.
Weblogic
Admin
Password field
Enter the Weblogic password that you created when you
installed Oracle BI Publisher. Refer to the Install the Oracle
Business Intelligence 12c Configuration Assistant section for
more information.
Weblogic
Admin Port field
Enter the Weblogic administrator port that you created when
you installed Oracle BI Publisher. For example: 9500. Refer to
the Install the Oracle Business Intelligence 12c Configuration
Assistant section for more information.
Admin User
Name field
Enter administrator. This is the user name that you entered
when you configured BI Publisher security. Refer to Configure
the BI Publisher Security Model section for more information.
Admin
Password field
Enter the Oracle BI Publisher administrator password that
you created when you installed Oracle BI Publisher. Refer to
Configure the BI Publisher Security Model section for more
information.
7. Click Next.
The available configuration parameters for Step 2 of 2 depend on your selections in
Step 1 of 2.
Register a Local Standalone Mode of BI Publisher for
Report Manager
If you entered local standalone in the previous section, use this additional task to
register a local standalone installation of Oracle BI Publisher for Report Manager:
1. In the Register BI Publisher Step 2 of 2 pane, complete the following installation
details fields to register a local standalone installation of Oracle BI Publisher for
Report Manager:
Server Protocol
drop-down list
Select http or https for the secure hypertext transfer protocol.
Chapter 8
Register a Local Standalone Mode of BI Publisher for Report Manager
8-2

Server Location
field
The host name.
Note:
This value should be the same host name
used when creating the certificate (For example,
server1.oracle.com).
Server Port field The Oracle BI Publisher server port number. For example,
9502.
BI Publisher
Home Folder field
The BI Publisher Home Folder. For the
installation previously documented, the path
is /home/oracle/Oracle/Middleware/Oracle_Home/
user_projects/domains/bi. The path for your installation
may differ if you selected a different location for the
OracleMiddleWare directory.
Repository
Location field
The repository location that can be found by logging
into BI Publisher and navigating to Administration,
Server Configuration, Catalog, Path. For the
installation previously documented, the repository
location is /home/oracle/Oracle/Middleware/
Oracle_Home/user_projects/domains/bi/bidata/
components/bipublisher/repository.
Note:
The 'nncentral' user must have write privileges for
the BIP home folder and repository location.
BI Publisher
Schema Prefix
field
The prefix schema for BI Publisher. The default prefix is DEV.
Oracle Database
User Name field
The nncentral user name for your Oracle database. See
the Add an Oracle Database User that Connects to BI
Publisher for Backup and Restore Functions section for more
information.
Oracle Database
User Password
The password for the nncentral database user.
Oracle Database
Service Name
The Oracle database service name. Unless you previously
selected a different name, enter AcmeBIPublisher.
Oracle Database
Home Path
Enter the Oracle database home path. For the installation
previously documented, the Oracle database home path is: /
home/oracle/app/oracle/product/19.3.0/dbhome_1
Chapter 8
Register a Local Standalone Mode of BI Publisher for Report Manager
8-3

Oracle Database
SID
Enter the Oracle database SID. The SID is the first
12 characters of the Oracle Database Service Name. If
AcmeBIPublisher is the Oracle Database Service Name, enter
AcmeBIPublis.
2. Click Apply.
Registering a Remote Standalone BI Publisher
Use this task if you entered remote standalone in the previous step:
1. In the Register BI Publisher Step 2 of 2 pane, complete the following fields:
Server Protocol drop-
down list
Select https or http for the web server protocol.
Server Location field The host name of the server on which BI Publisher is
installed.
Server Port field The BI Publisher xmlpserver port. For example: 9502.
FTP User Name field The FTP user name.
FTP Password field The FTP password.
FTP Path for BI
Publisher Home Folder
field
The FTP path for the BI Publisher
Home Folder. For example: /home/oracle/Oracle/
Middleware/Oracle_Home/user_projects/domains/bi.
The path for your installation may differ if you
selected a different location for the OracleMiddleWare
directory.
2. Click Apply.
Register a Local BI Publisher Cluster
If you entered the local and cluster options in the Register BI Publisher Step 1 of 2
pane, complete the following task:
1. Select the local cluster node and click Edit.
2. In the BI Publisher Cluster Member window, enter the protocol, IP address, port,
FTP user name, FTP password, BI Publisher home folder, repository location, and
Oracle database information for each node in the cluster.
Note:
If setting up a local cluster, the BI Publisher server information is pre-
populated.
3. Click Apply to save and close the BI Publisher Cluster Member window.
4. Click Apply.
Chapter 8
Registering a Remote Standalone BI Publisher
8-4

9
Report Manager Administrator Operations
Shutdown Report Manager
1. On the SDM server, log in as the nncentral user.
2. Change the directory to the bin directory.
For example:
cd /home/nncentral/AcmePacket/NNC<version>/bin
3. Execute the shutdownnnc.sh script. By default, the shutdownnnc.sh script
detects whether the existing installation is a standalone or clustered system and
prompts you with the option to shutdown the entire cluster if no flag options are
provided.
Note:
However, you can script an option ahead of time by adding -local for
single nodes and - cluster to shutdown an entire cluster.
./shutdownnnc.sh
Shutdown back-end server
Do you wish to shut down the entire cluster (Yes/No)? Yes
4. On the server where the Oracle database software and BI Publisher are installed,
login as the Oracle user.
5. Change to the WebLogic server directory. For example:
[oracle@vm ~]$ cd /home/oracle/Oracle/Middleware/Oracle_Home/
user_projects/domains/bi/bin
6. Stop the WebLogic server. Go to the section for more information.
7. Stop the BI Publisher database instance listener (LISTENER).
[oracle@vm bin]$ ./lsnrctl stop
8. Manage the WebLogic Server
9. Stop the OCSDMDW database instance listener (LISTENER2):
[oracle@vm bin]$ ./lsnrctl stop LISTENER2
9-1

10. If undefined, set the ORACLE_HOME variable in the .bash_profile of both the
oracle user and the nncentral user.
export ORACLE_HOME=/home/oracle/app/oracle/product/19.3.0/dbhome_1
11. Specify the ORACLE_SID variable for the AcmeBIPublisher database.
export ORACLE_SID=AcmeBIPublis
12. Execute the ORACLE_HOME/bin/sqlplus script.
[oracle@vm bin]$ ./sqlplus '/ as sysdba'
13. Use the following option to shutdown the Oracle database instance and exit:
SQL> shutdown immediate;
SQL> exit
14. Specify the ORACLE_SID variable for the Report Manager database instance
(OCSDMDW).
export ORACLE_SID=ocsdmdw
15. Execute the ORACLE_HOME/bin/sqlplus script.
[oracle@vm bin]$ ./sqlplus '/ as sysdba'
16. Use the following option to shutdown the Oracle database instance and exit:
SQL> shutdown immediate;
SQL> exit
Start Report Manager
1. On the server where the Oracle database software and BI Publisher are installed,
login as the Oracle user.
ssh -Y oracle@myserver
2. If undefined, set the ORACLE_HOME variable in the .bash_profile of both the
oracle user and nncentral user.
export ORACLE_HOME=/home/oracle/app/oracle/product/<oracle-database-
software-version>/dbhome_1
cd $ORACLE_HOME/bin
3. Specify the ORACLE_SID variable for the AcmeBIPublisher database.
export ORACLE_SID=AcmeBIPublis
Chapter 9
Start Report Manager
9-2

4. Execute the ORACLE_HOME/bin/sqlplus script.
./sqlplus '/ as sysdba'
5. Use the following option to start the Oracle database and exit:
SQL> startup
SQL> exit
6. Specify the ORACLE_SID variable for the Report Manager database instance
(OCSDMDW).
export ORACLE_SID=ocsdmdw
7. Execute the ORACLE_HOME/bin/sqlplus script.
./sqlplus '/ as sysdba'
8. Use the following option to start the Oracle database and exit:
SQL> startup
SQL> exit
9. Start the database listeners. Refer to How to Start, Stop, and Check the Status of
the Oracle Database Listeners section for more information.
10. Start the WebLogic server. Refer to theStart the WebLogic Server section for more
information.
11. On the SDM server, log in as the nncentral user.
12. Change the directory to the bin directory.
For example:
cd /home/nncentral/AcmePacket/NNC<version>/bin
13. Execute the startnnc.sh script.
./startnnc.sh
Note:
The console displays the number of services started. After all services
have started, the system is ready for use. Do not attempt to log in until
the console has indicated that the web servers are up.
Reset the OCSREMDW User Password
The password for the Oracle Communications OCSREMDW User who connects to
the Oracle Communications Session Delivery Manager Data Warehouse (ocsdmdw)
Chapter 9
Reset the OCSREMDW User Password
9-3

database expires every 180 days. Use this task to reset the expired password with a
new password.
1. Shutdown SDM as the nncentral user.
cd /opt/AcmePacket/NNC<version>/bin
./shutdownnnc.sh
2. Run setup.sh as root.
3. Select Custom and Oracle DB OCSDMDW Configuration.
4. Enter and then confirm the OCSDMDW password.
5. Enter the ORACLE_HOME path.
The error message should say "OCSDMDW Oracle DB already exists. Please
drop this DB and try again."
6. Exit setup.sh.
7. Set the ORACLE_HOME and ORACLE_SID variables as the nncentral user.
su nncentral
export /home/oracle/app/oracle/product/19.3.0/dbhome_1
export ORACLE_SID=ocsdmdw
8. Log in to the Oracle database.
cd $ORACLE_HOME/bin
./sqlplus / as sysdba
9. If the database user accounts are locked because of multiple failed logins with the
wrong password, unlock the nncentral and oscremdw accounts.
alter user nncentral account unlock;
alter user ocsremdw account unlock;
10. Change passwords for the nncentral user and the ocsremdw user. The new
ocsdmdw password must be the same as the one specified in step 4.
alter user nncentral identified by <new_password>;
alter user ocsremdw identified by <new_password>;
11. Exit
exit;
12. Confirm the password changes by looking for a successful log in to the following
commands:
./sqlplus nncentral/<new_password>@ocsdmdw
./sqlplus ocsremdw/<new_password>@ocsdmdw
Chapter 9
Reset the OCSREMDW User Password
9-4

13. Start SDM as the nncentral user.
cd /opt/AcmePacket/NNC<version>/bin/
./startnnc.sh
Free Up Disk Space
In local clusters, dump files may be deleted if the server runs low on disk space.
Note:
Do not run this command if a backup or restore is in progress.
1. Log in as the oracle user.
2. Find and remove the dump files.
find . -name OCSDMDW_Dump*.dmp | xargs rm –rf
Uninstall Oracle Database
To uninstall Oracle database:
1. Run the deinstall script in the $ORACLE_HOME/deinstall folder.
[oracle@vm ~]$ cd $ORACLE_HOME/deinstall/
[oracle@vm deinstall]$ ./deinstall
2. Select the default options unless you need to drop or delete schemas and
listeners.
3. Type
y
to continue.
4. After the script finishes, remove the oracle folder.
rm -rf /home/oracle/app/oracle
How to Start, Stop, and Check the Status of the Oracle
Database Listeners
1. Log in as the Oracle user.
ssh -Y oracle@myserver
Chapter 9
Free Up Disk Space
9-5

2. Use the export ORACLE_HOME variable to restart the listener. Ensure that this
variable identifies (set to equal) the directory path on which you installed the
Oracle database software. For example:
export ORACLE_HOME=/home/oracle/app/oracle/product/<oracle-database-
software-version>/dbhome_1
cd $ORACLE_HOME/bin
3. Start the BI Publisher database listener (LISTENER).
./lsnrctl start
4. Start the OCSDMDW database listener (LISTENER2).
./lsnrctl start LISTENER2
5. To check the status of either listener mentioned above, use the following
command:
./lsnrctl status
Manage the WebLogic Server
You may need to stop and then restart the WebLogic server for the following reasons:
• After registering BI Publisher server with SDM, you must stop the WebLogic server
before restarting the Weblogic server again.
• SSL needs to be reenabled for HTTPS mode.
• The BI Publisher security model is enabled with the single sign-on (SSO) feature.
Stop the WebLogic Server
Note:
If you set up a standalone, stop the WebLogic server. If you set up a cluster,
stop all WebLogic servers in the cluster.
1. Login to the WebLogic server as the oracle user. For example:
ssh -Y oracle@myweblogicserver
2. Change the directory to the DOMAIN_HOME/bin directory:
cd /home/oracle/Oracle/Middleware/user_projects/domains/bi/bin
3. Check if the WebLogic server is running:
ps -ef | grep weblogic
Chapter 9
Manage the WebLogic Server
9-6

Note:
Verify if there are three processes running (by viewing three groups of
output text).
4. Open your web browser and use the following URL:
http://<myweblogicserver>:9500/console
5. Login to the WebLogic Server Administration Console 12c welcome page and
login using the weblogic username and the password that you set when you
installed the Oracle Business Intelligence 12c Configuration Assistant. Refer to
the Install the Oracle Business Intelligence 12c Configuration Assistant section for
more information.
6. In the Domain Structure section on the navigation tree, expand the Environment
tree and select Servers.
7. In the Summary of Servers section on the right pane, click the Control tab.
8. Check the check boxes for the AdminServer(admin) and bi_server1 listed in the
table and select Force shutdown now from the Shutdown drop-down list.
9. In the confirmation pane, select Yes to force the shutdown of the servers.
The WebLogic server console page is no longer available.
10. Go back to your linux session and stop the NodeManager process exactly as
shown below:
./stopNodeManager.sh &
11. Check if the WebLogic server has been stopped:
ps -ef | grep weblogic
If there is no return of any WebLogic-related processes listed, then the WebLogic
server has stopped completely.
Start the WebLogic Server
Note:
If you set up a standalone, restart the WebLogic server. If you set up a
cluster, restart all WebLogic servers in the cluster.
1. Login to the WebLogic server as the oracle user. For example:
ssh -Y oracle@myweblogicserver
Chapter 9
Manage the WebLogic Server
9-7

2. Change the directory to the DOMAIN_HOME/bin directory:
cd /home/oracle/Oracle/Middleware/user_projects/domains/bi/bin
3. Check if the WebLogic server is running:
ps -ef | grep weblogic
If there is no return of any WebLogic-related processes listed, then the WebLogic
server is stopped.
4. Start the NodeManager process exactly as shown below:
./startNodeManager.sh &
5. Start the WebLogic server console.
nohup ./startWeblogic.sh &
6. Next type the following command to verify if the WebLogic server console has
started:
tail -f nohup.out
The following statement appears in the output:
<Mar 30, 2018, 1:31:49,454 PM EDT> <Notice> <WebLogicServer>
<BEA-000360> <The server started in RUNNING mode.>
<Mar 30, 2018, 1:31:49,462 PM EDT> <Notice> <WebLogicServer>
<BEA-000365> <Server state changed to RUNNING.>
7. Open your web browser and use the following URL:
http://<myweblogicserver>:9500/console
8. Login to the WebLogic Server Administration Console 12c welcome page and
login using the weblogic username and the password that you set when you
installed the Oracle Business Intelligence 12c Configuration Assistant. Refer to
the Install the Oracle Business Intelligence 12c Configuration Assistant section for
more information.
9. In the Domain Structure section on the navigation tree, expand the Environment
tree and select Servers.
10. In the Summary of Servers section on the right pane, click the Control tab.
11. Check the check box for bi_server1 listed in the table and select Start.
12. In the confirmation pane, select Yes to start the server.
13. Check if the WebLogic server is running:
ps -ef | grep weblogic
Chapter 9
Manage the WebLogic Server
9-8

Verify that there is output for the three WebLogic processes showing that the
WebLogic server is running.
Chapter 9
Manage the WebLogic Server
9-9

10
Troubleshoot Installation Problems
X11 Forwarding
If the
xorg-x11-xauth
program is not installed, the following error appears if X11
forwarding over SSH is used:
X11 forwarding request failed on channel 0
• If you see this error, install the
xorg-x11-xauth
package.
yum install xorg-x11-xauth
xdpyinfo Errors
The following error messages indicate that xdpyinfo is not installed:
• Checking monitor: must be configured to display at least 256 colors
• Could not execute auto check for display colors using command /usr/bin/xdpyinfo.
Check if the DISPLAY variable is set. Failed.
The xdpyinfo program must be installed.
1. Type the following command.
yum install xorg-x11-utils-<version-number>
2. If the program is already installed, check whether the oracle user has execute
privileges.
[oracle@ouzo ~]$ cd /usr/bin
[oracle@ouzo bin]$ ls -al | grep xdpyinfo
-rwxr-xr-x 1 root root 38112 Feb 23 2015 xdpyinfo
Note:
In this example, the oracle user has execute privileges.
3. If the oracle user does not have executable privileges, log in as root and execute
this command:
xhost +SI:localuser:oracle
10-1

4. Log in as the oracle user and run the installer.
./runInstaller
Browser Path error
After the installation, the Oracle installer attempts to reach the BI Publisher login
window by first searching for your default browser. You receive an error if the default
browser is not set on your operating system.
If this error occurs, open a web browser and navigate to
<hostname>:9502/
xmlpserver
.
Data Pump Directory
Follow these steps if the expdp command in the backup script fails.
Note:
You must shut down the SDM server before you complete the steps in this
section.
1. Connect to your Oracle database as sysdba.
cd $ORACLE_HOME/bin
./sqlplus / as sysdba
2. Change the streams pool size to generate data pump files.
ALTER SYSTEM SET streams_pool_size=128M;
3. Shutdown the Oracle database.
SHUTDOWN IMMEDIATE;
4. Restart the Oracle database.
STARTUP;
5. Verify the change took place with the following command:
SHOW PARAMETER streams_pool_size;
Oracle Database Installer Errors
If you receive an error that says the Oracle Net Configuration Assistant failed or
there is an invalid specification for system parameter LOCAL_LISTENER ORA-00130,
ensure your /etc/hosts file contains a valid hostname besides "localhost."
Chapter 10
Browser Path error
10-2

FTP Errors
Connection errors may occur when registering BI Publisher.
1. If you get a "Unknown service vsftpd" error message, install the FTP server on
each BI Publisher node.
yum install vsftpd
2. If you get an "Unable to connect to hosts via ftp protocol" error message, make
sure the FTP server has been started on each BI Publisher node.
service vsftpd start
Hourly Summary Reports
Hourly summary reports may occasionally generate errors for some devices.
If hourly summary reports are not displaying properly:
1. Log into BIPublisher as an administrator.
2. Click Administrative and navigate to Runtime Configuration, Properties.
3. Select the Properties tab and find the Memory Guard section of the table.
4. Find the elements that are generating errors and update their default values
with new values. After 30 seconds the changes are enabled. A restart of the
BIPublisher is not required.
Repeat this process until the reports display properly.
Chapter 10
FTP Errors
10-3
