
Using VMware Fusion
VMware Fusion 13
VMware Fusion Pro 13
You can find the most up-to-date technical documentation on the VMware by Broadcom website at:
https://docs.vmware.com/
VMware by Broadcom
3401 Hillview Ave.
Palo Alto, CA 94304
www.vmware.com
Copyright
©
2024 Broadcom. All Rights Reserved. The term “Broadcom” refers to Broadcom Inc. and/or its
subsidiaries. For more information, go to https://www.broadcom.com. All trademarks, trade names, service
marks, and logos referenced herein belong to their respective companies.
Using VMware Fusion
VMware by Broadcom 2
Contents
Using VMware Fusion 9
1 Getting Started with Fusion 10
Basics About VMware Fusion 10
About VMware Fusion Pro 11
System Requirements for Fusion 11
Install Fusion 13
Start Fusion 14
How-To Videos 14
Take Advantage of Fusion Online Resources 14
2 Understanding Fusion 16
Virtual Machines and What Fusion Can Do 16
What Is a Virtual Machine? 16
Fusion Capabilities 17
Supported Guest Operating Systems 17
Virtual Hardware Specifications 17
Navigating and Taking Action by Using the Fusion Interface 22
VMware Fusion Toolbar 22
Use the Fusion Toolbar to Access the Virtual-Machine Path 22
Default File Location of a Virtual Machine 23
Change the File Location of a Virtual Machine 23
Perform Actions on Your Virtual Machines from the Virtual Machine Library Window 24
Using the Home Pane to Create a Virtual Machine or Obtain One from Another Source 25
Using the Fusion Applications Menus 26
Using Different Views in the Fusion Interface 30
Resize the Virtual Machine Display to Fit 36
Using Multiple Displays 37
3
Configuring
Fusion 38
Setting Fusion Preferences 38
Set General Preferences 38
Select a Keyboard and Mouse Profile 39
Set Key Mappings on the Keyboard and Mouse Preferences Pane 40
Set Mouse Shortcuts on the Keyboard and Mouse Preference Pane 41
Activate or Deactivate Mac Host Shortcuts on the Keyboard and Mouse Preference Pane
41
Activate Fusion Shortcuts on the Keyboard and Mouse Preference Pane 42
VMware by Broadcom
3
Set Fusion Display Resolution Preferences 42
Set Default Applications Preferences 43
Creating Custom Networks 44
Enable Jumbo Frames 47
Enable Dictation 48
Join or Leave the Customer Experience Improvement Program 49
Customizing the Fusion Display 49
Show or Hide the Fusion Toolbar 49
Customize the Fusion Toolbar 50
Resize the Fusion Display and Resolution 50
Keep a Windows Application in the Mac Dock on the Intel-based Mac 50
Set a Virtual Machine Application to Open When You Log in to Your Mac 51
Contents of the Virtual Machine Package 51
Work with Virtual Machine Packages 52
4 Creating Virtual Machines 53
Create a Virtual Machine 53
Creating a Microsoft Windows Virtual Machine 54
Download and Install Windows 11 as Guest Operating System on Apple Silicon Mac 61
Download and Generate Windows 11 ISO Using the Command-line Interface 67
Creating a Linux Virtual Machine in Fusion 68
Creating a macOS Virtual Machine in Fusion 71
Creating a Shared Virtual Machine in Fusion 72
Create a Virtual Machine from a Mac Recovery Partition 72
Create a Virtual Machine on a Remote Server 73
Create a Virtual Machine for Any Supported Operating System 75
Power On the Boot Camp Partition as a Virtual Machine 76
Activate Windows in a Virtual Machine 77
Upload a Virtual Machine to a Remote Server 78
Download a Virtual Machine from a Remote Server 79
Importing Windows Virtual Machines 79
Supported Guest Operating Systems for Import 80
How Importing Affects Settings 80
Import a Parallels Virtual Machine 81
Import the Boot Camp Partition 82
Import an Open Virtualization Format Virtual Machine on Intel-based Mac 82
Export a Virtual Machine to OVF Format on Intel-based Mac 83
Export a Virtual Machine with vTPM to OVF Format on Intel-based Mac 84
Installing and Using VMware Tools 86
Installing or Upgrading VMware Tools 87
Repair or Change Modules in Windows Virtual Machines 93
Using VMware Fusion
VMware by Broadcom 4
Uninstalling VMware Tools 93
Cloning Virtual Machines with Fusion Pro 94
Using Linked Clones 94
Using Full Clones 95
Clone a Virtual Machine 95
5 Working with Your Virtual Machines 97
Scan for Virtual Machines to Add to the Virtual Machine Library 97
Running Fusion and Virtual Machines 98
Open an Existing Virtual Machine 98
Browse for a Virtual Machine 99
Open a Virtual Machine From the Finder 99
Start a Virtual Machine's Operating System 100
Open a Virtual Machine Without Powering On 100
Shut Down a Virtual Machine's Operating System 100
Suspend and Resume a Virtual Machine in Fusion 101
Cancel a Resume Command 101
Power on a Virtual Machine to Firmware in Fusion Pro 101
Pause a Virtual Machine 102
Restart a Virtual Machine 102
Reset a Virtual Machine 102
Uninstall a Virtual Machine by Using the Finder 103
Uninstall a Virtual Machine by Using the Virtual Machine Library 103
Configure SSH Login on a Linux Virtual Machine 104
Edit or Delete the SSH Login Configuration for a Linux Virtual Machine 105
Send the Ctrl-Alt-Delete Command to a Virtual Machine 106
Send Special Key Commands to a Windows or Linux Virtual Machine 106
Special Key Commands 106
Switch Power Commands from the Default Options 107
Options for Fusion Power Commands 108
Open a Windows Application While You Are in Unity View on Intel-based Mac 110
Open a Windows Application from the Applications Menus on Intel-based Mac 111
Moving and Sharing Files with Your Mac 111
Moving and Copying Files and Text Between Virtual Machines and Your Mac 112
View Shared Folders in a Windows Guest by Using Windows Explorer 113
View Shared Folders in a Windows Guest by Mapping Them as a Drive 113
View Shared Folders in a Linux Guest 114
View Shared Folders in a macOS Guest 114
Sharing Applications Between Your Mac and Your Windows Virtual Machines 114
Open a File in a Virtual Machine with an Application on Your Mac 114
Open a File on Your Mac with an Application in a Virtual Machine 115
Using VMware Fusion
VMware by Broadcom 5
Keep a Windows Application in the Mac Dock on the Intel-based Mac 116
Switch Between Virtual Machines That Are Powered On 116
Using Mac Input Devices in a Virtual Machine 116
Enable the Secondary Button in an Apple Mighty Mouse 117
Using Mac Keyboards in a Virtual Machine 117
Force Virtual Machines to Grab Keyboard and Mouse Input 118
6 Sharing Files Between Windows and Your Intel-based Mac 119
Guest Operating Systems That Support Shared Folders 119
Guest Operating Systems That Support Mirrored Folders 120
Enable Shared Folders or Mirrored Folders for a Virtual Machine 121
Add or Remove a Mirrored Folder 121
Add a Shared Folder 121
Remove a Shared Folder 122
7 Protecting Your Virtual Machines 123
Snapshots 123
View Snapshots for a Virtual Machine 123
Take a Snapshot 124
Restore a Virtual Machine to the State in a Snapshot 124
Delete a Snapshot 125
AutoProtect 125
Set Up Automatic Snapshots with AutoProtect 126
Prevent the Deletion of an AutoProtect Snapshot 126
Copy a Virtual Machine to External Media 127
Using Time Machine When You Have Fusion on Your Mac 127
Exclude a Virtual Machine From Time Machine 128
Use Shared and Mirrored Folders If You Back Up Your Mac With Time Machine 128
8 Configuring Your Virtual Machines 130
Fusion General System Settings 130
Set a Virtual Machine to Start When Fusion Starts 131
Setting Virtual Processors and Memory 132
Set the Number of Virtual Processors 132
Set the Amount of Virtual Memory 133
Set Advanced Processor Options 133
Enable Default Applications 134
App Nap Support 135
Configuring Keyboard and Mouse Profiles 135
Enable a CD/DVD Drive on a Remote Virtual Machine 136
Enable a Floppy Drive on a Remote Virtual Machine 137
Using VMware Fusion
VMware by Broadcom 6
View the Status of a Server or Remote Virtual Machine 137
Configuring Display Resolution Settings 138
Enable Accelerated 3D Graphics 138
Enable External GPU 139
Enable Retina Display Support 139
Configure Resolution Settings for Virtual Machine Display 140
Enable Hot Keys for Virtual Machines 141
Configure Discrete Graphics Management 142
Add a Device 143
Configuring the Network Connection 143
Managing Virtual Hard Disks 148
Configuring the CD/DVD Drive 155
Configuring a Floppy Device 158
Configuring the Sound Card 161
Add a Camera to a Virtual Machine 162
Configuring the USB Controller and Connecting USB Devices 163
Add a Parallel Port 167
Add a Serial Port 168
Sharing Bluetooth Devices with a Virtual Machine 168
Configuring a Trusted Platform Module Device 170
Select a Startup Device 171
Encrypting a Virtual Machine 171
Encrypt a Virtual Machine 172
Change the Password for an Encrypted Virtual Machine 173
Remove Encryption from a Virtual Machine 173
Store the Password for an Encrypted Virtual Machine in Keychain 174
Virtual Machine Compatibility 174
Change the Hardware Compatibility of a Virtual Machine 175
Choose the Hardware Version for a Virtual Machine 176
Configuring Guest Isolation Options for a Virtual Machine 176
Managing Advanced Settings 177
Configure Time Synchronization Between Guest and Host Operating Systems 177
Show the Mac Power Supply Status in the Virtual Machine 178
Troubleshooting Your Virtual Machine 178
Change Hard Disk Buffering 179
Set Password Requirement for Opening a Boot Camp Virtual Machine 180
Enable a VNC Client to Access the Virtual Machine Remotely 180
Configure Virtual Machine Power Options 182
Enable Verbose USB Debugging 183
Enable Dark Mode Synchronization 184
Enable Microsoft Virtualization-Based Security 184
Using VMware Fusion
VMware by Broadcom 7
Configure a Firmware Type 185
9 Using vctl Command to Manage Containers and Run Kubernetes Cluster on Intel-
based Mac 187
Using the vctl Utility 188
Enabling KIND to Use vctl Container as Nodes to Run Kubernetes Clusters 188
Running vctl Commands 190
Syntax of vctl Commands 190
Examples of vctl Commands 193
Cleaning Up Residual Environment Data 195
Changes/Enhancements to the vctl Utility 195
10 Using the vmrun Command to Control Virtual Machines 197
Use the vmrun Utility 199
Syntax of the vmrun Command 199
Using Authentication Flags in vmrun Commands 199
Running vmrun Commands 200
Path to VMX File 200
Deactivate Dialog Boxes 200
Syntax of vmrun Commands 201
Examples of vmrun Commands 208
11 Using vmcli to Control Virtual Machines 213
12 Using VMware Fusion REST API 218
Use the VMware Fusion REST API Service 218
Using VMware Fusion REST API Service to Manage Power Options of Encrypted Virtual
Machines 220
13 Upgrading Fusion 222
Upgrade Fusion with Autoupdate 222
Upgrade Fusion From a Download 223
Upgrading VMware Tools 224
Uninstalling Fusion 224
Uninstall Fusion 224
Force Virtual Machine Processes to Quit 225
Using VMware Fusion
VMware by Broadcom 8
Using VMware Fusion
Using VMware Fusion
describes how to use VMware Fusion
®
to create, use, and manage virtual
machines. It also describes how to install, configure, upgrade, and uninstall Fusion.
Intended Audience
This information is intended for anyone who wants to install, upgrade, or use Fusion.
VMware by Broadcom 9
Getting Started with Fusion
1
With Fusion, you can run personal computer (PC) applications and devices on all supported Mac.
Designed for the Mac user, Fusion takes advantage of the security, flexibility, and portability of
virtual machines to run Windows and other operating systems at the same time as macOS.
Read the following topics next:
n Basics About VMware Fusion
n About VMware Fusion Pro
n System Requirements for Fusion
n Install Fusion
n Start Fusion
n How-To Videos
n Take Advantage of Fusion Online Resources
Basics About VMware Fusion
Take a quick look at what Fusion does and how it works.
What Fusion Does
Fusion enables you to run your Windows applications and PC-only devices on all supported Mac.
You can run multiple operating systems and applications at the same time, along with your Mac
applications. The operating systems and applications are isolated in secure virtual machines.
How Fusion Works
Fusion maps the physical hardware resources to the virtual machine’s resources, so each virtual
machine has its own processor, memory, disks, I/O devices and so on. Each virtual machine is
the full equivalent of a standard x86/ARM computer, although it is represented in a single file
package on the Mac.
VMware by Broadcom
10
After you install Fusion and create a virtual machine, you can install and run complete,
unmodified operating systems, and associated application software in the virtual machine, just
as on a physical PC. Operating systems you can use include Windows, Linux, and macOS.
Fusion offers the benefits of having a second PC without its added expense, physical setup,
and maintenance.
The operating system of the computer on which you run Fusion is called the host. Mac OS X, Mac
OS X Server, OS X, and macOS are the only hosts supported for Fusion. The virtualized operating
system you run inside Fusion is called the guest.
About VMware Fusion Pro
Fusion Pro provides advanced virtualization features for managing the virtual machines on your
Mac.
Fusion Pro provides the following virtualization features:
n Clone a virtual machine
n Ability to power on a virtual machine to firmware
n Export a virtual machine to OVF format
n Set a keyboard shortcut for a virtual machine
n Create advanced custom networking configurations
n Connect to a remote server
n Obtain information from the Virtual Machine Library window, such as processor, memory,
network, and disk information for a virtual machine
n Set bandwidth, packet loss, and latency for a virtual network adapter to simulate various
network environments
n Set the firmware type
n Enable UEFI Secure Boot
n Enable VBS (virtualization-based security) for a Windows 10 and later virtual machine
n Use Rest API
System Requirements for Fusion
Verify that you have the minimum system requirements for installing and using Fusion.
Fusion 12.1.2 and earlier
n The following processors are supported.
n Processors on all Macs launched in 2011 or later except for the Intel® Xeon® W3565
processor when used on the 2012 Mac Pro Quad Core
Using VMware Fusion
VMware by Broadcom 11

n Processors on 2010 Mac Pro Six Core, Eight Core, and Twelve Core
n The following Metal host graphics rendering engine requirements apply.
n Hardware Requirements
n MacBook, Early 2015 or later
n MacBook Air, Mid 2012 or later
n MacBook Pro, Mid 2012 or later
n Mac Mini, Late 2012 or later
n iMac, Late 2012 or later
n Mac Pro, Late 2013 or later
See https://support.apple.com/en-us/HT205073 for information about Mac support of
Metal.
n Software Requirements
n macOS 10.12.5 or later
n macOS 10.15 Catalina and newer versions for the host OS.
n Operating system installation media (disk or disk image) for virtual machines. Windows
operating systems are available separately from Microsoft and other retailers.
Important Fusion does not provide any operating systems for installation on virtual
machines that you create with Fusion. You must provide the operating system installation
media.
n 4 GB of memory, 8 GB recommended.
n 750 MB of free disk space for Fusion, and at least 5 GB of free disk space for each virtual
machine.
Note You must have enough memory to run macOS, plus the memory required for each
guest operating system and for applications on the Mac and in the virtual machines.
Fusion 12.2.0 and later
n Any Intel-based Mac that officially supports macOS 11 Big Sur or later.
n Minimum 8 GB of memory. 16 GB or more recommended for running multiple virtual machines.
Using VMware Fusion
VMware by Broadcom 12

n Operating system installation media (disk or disk image) for virtual machines. Windows
operating systems are available separately from Microsoft and other retailers.
Important Fusion does not provide any operating systems for installation on virtual
machines that you create with Fusion. You must provide the operating system installation
media.
n 750 MB of free disk space for Fusion, and at least 5 GB of free disk space for each virtual
machine.
Note You must have enough memory to run macOS, plus the memory required for each
guest operating system and for applications on the Mac and in the virtual machines.
Fusion 13.0.0 and later
n Any Mac that officially supports macOS 12 Monterey or later.
n Minimum 8 GB of memory. 16 GB or more recommended for running multiple virtual machines.
n Operating system installation media (disk or disk image) for virtual machines. Windows
operating systems are available separately from Microsoft and other retailers.
Important Fusion does not provide any operating systems for installation on virtual
machines that you create with Fusion. You must provide the operating system installation
media.
n 1.5 GB of free disk space for Fusion, and at least 5 GB of free disk space for each virtual
machine.
Note You must have enough memory to run macOS, and in addition to that the memory
required for each guest operating system, and for applications on the Mac and in the virtual
machines.
Install Fusion
Fusion 13.0 installer package is transitioned to universal binary. You install Fusion in the same way
you install other macOS applications.
Installation of Fusion does not modify existing virtual machines.
Prerequisites
n Verify that you have the administrator password for your Mac.
n Download the Fusion installer file to your Mac. You can obtain the Fusion installer file from the
VMware website.
n Verify that you have the appropriate license key. For example, if you are using VMware
Fusion Pro, you must provide a Fusion Pro license key to activate the Fusion Pro features.
Using VMware Fusion
VMware by Broadcom 13
Procedure
1 Double-click the Fusion installer dmg file to open it.
The contents of the disk image appear in the Fusion Finder window.
2 In the Finder window, double-click the click to install Fusion icon.
3 When prompted, type your administrator user name and password.
Fusion is installed in the Applications folder on your Mac.
Start Fusion
Start using Fusion.
Prerequisites
Verify that you have the administrator password for your Mac.
Procedure
1 In the Applications folder, double-click VMware Fusion.
The Virtual Machine Library window appears. From this window, you can start working with
virtual machines.
2 (Optional) To save Fusion in the Mac Dock, right-click the icon, and select Options > Keep in
Dock.
How-To Videos
Watch online videos about using Fusion.
If you are new to Fusion, watch some how-to videos to become familiar with Fusion features.
Procedure
u In Fusion, click Help > Video Tutorials to access a wide variety of topics that help you get
started with Fusion.
What to do next
On the Fusion Support Center page, you can find support and troubleshooting information
for running Windows and Linux on the Mac, such as Windows activation issues, sharing data,
working with virtual disks, and many other topics. See the Fusion Support Center at https://
www.vmware.com/support/fusion.html.
Take Advantage of Fusion Online Resources
Go to the Fusion Support Center for product news, FAQs, more resources, and the online
community.
Using VMware Fusion
VMware by Broadcom 14
To learn about available Fusion support offerings, registering a product, or creating a
technical support request, see the Fusion Support Center at https://www.vmware.com/support/
fusion.html.
You can also find information about using Fusion at the following self-help sources:
n Join the VMware Fusion Community at https://communities.vmware.com/community/vmtn/
fusion. The VMware Fusion Community is where Fusion users can exchange information,
questions, and comments to get the most out of Fusion.
n The VMware Knowledge Base provides troubleshooting information, solutions to error
messages, and some best practice information for most VMware products. To find
information on a specific problem you encounter in Fusion, select VMware Fusion in the
product list and search for your problem by key word at http://kb.vmware.com.
n For answers to frequently asked questions about Fusion, go to http://www.vmware.com/
products/fusion/faqs.html.
Using VMware Fusion
VMware by Broadcom 15
Understanding Fusion
2
Fusion harnesses virtualization to give you a powerful tool to run PC applications and devices on
your Mac.
Read the following topics next:
n Virtual Machines and What Fusion Can Do
n Navigating and Taking Action by Using the Fusion Interface
Virtual Machines and What Fusion Can Do
With Fusion, you can run virtual machines inside your Mac, which gives you access to a wide
range of Windows and other operating systems and applications.
What Is a Virtual Machine?
A virtual machine is a software computer that, like a physical computer, runs an operating system
and applications.
A virtual machine typically contains a display, a hard disk or disks, one or more processors,
memory, a CD/DVD drive, a network adapter, and a USB controller. All of these components are
virtualized. That is, these elements of a virtual machine are all created by software and stored in
files on your Mac.
The virtual machine runs in a window on all supported Mac. You install an operating system
and applications in the virtual machine and operate it as you would a physical computer. An
operating system cannot distinguish between a virtual machine and a physical machine, nor can
applications or other computers on a network. What you can do with a physical machine (install
software, save files, add additional drives, and so on) you can do with a virtual machine.
Virtual machines are fully supported by Fusion with the underlying physical hardware. For
example, you can configure a virtual machine with virtual components that are completely
different from the physical components that are present on the underlying hardware. Virtual
machines on the same physical host can run different kinds of operating systems (Windows,
Linux, macOS, and others).
VMware by Broadcom
16
Fusion Capabilities
With Fusion, you can create, open, and run VMware virtual machines, and use PC-specific
hardware with a Mac.
With Fusion, you can perform the following tasks:
n Run x86 operating systems, including Windows, Linux, macOS, and others, on macOS without
rebooting.
n Run ARM operating systems, including Windows, Linux, and others on macOS without
rebooting.
n Run Windows and Linux applications on all supported Mac.
n Run most Windows 3D applications that require DirectX 9, DirectX 10, DirectX 10.1 or DirectX
11 on your Intel-based Mac.
n Import virtual machines created with Parallels Desktop or virtual machines that use the OVF
(Open Virtualization Format) standard on Intel-based Mac.
n Access USB devices, such as video cameras and high-speed disks, from a virtual machine.
n Drag files between your Intel-based macOS host machine and virtual machines running other
x86 operating systems.
n Fusion works with VMware virtual machines created with different VMware products. For
more information, see Virtual Machine Compatibility
Supported Guest Operating Systems
Fusion supports more than 100 guest operating systems, including most versions of Windows,
Linux, Mac OS X, OS X, and macOS.
For guest operating system support, visit http://www.vmware.com/go/hcl
You can also go to the VMware Web site and click the Support tab. Under Support Resources,
click the Compatibility Guides link.
Virtual Hardware Specifications
Each virtual machine has a standard virtual hardware configuration for chip set, BIOS, ports, and
so on. The amount of memory and number of processors depends on your Mac.
Processor
n One virtual processor on a host system with one or more logical processors
n Up to 32 virtual processors, depending on the available processors on your Mac, virtual
machine hardware version, and guest operating system support
n The following configurations have two logical processors:
n A multiprocessor Mac with two or more physical CPUs
Using VMware Fusion
VMware by Broadcom 17

n A single-processor Mac with a multicore CPU
Chip Set
n Intel 440BX-based motherboard
n NS338 SIO
n 82093AA IOAPIC
n Apple Silicon
BIOS
n PhoenixBIOS 4.0 Release 6 with VESA BIOS
Memory
n Up to 128 GB, depending on the available memory on your Mac, virtual machine hardware
version, and guest operating system support
n Total memory available for all virtual machines is limited only by the amount of memory on
the Mac
Note If you assign too much memory to your virtual machines and have them all running
at the same time, your Mac might slow down because of heavy disk swapping. As a best
practice, make sure the total memory that Fusion and all running virtual machines use stays
below 70 percent of your total Mac memory.
Graphics
n VGA
n SVGA
n 128 MB 3D accelerated video with DirectX 9.0c with Shader Model 3 and OpenGL 2.1 for
Windows XP as the guest OS
n 256 MB 3D accelerated video with DirectX 9.0EX with Aero and OpenGL 2.1 for Windows
Vista and later as the guest operating system
n 3D accelerated video with DirectX 11 with OpenGL 4.3 for Windows 7 and later as the guest
operating system. DirectX 11 requires macOS 10.15 or later on the host and hardware version
18 and later. OpenGL 4.3 requires hardware version 20 and later. You can enable DirectX 11 on
the following Mac models
n MacPro 2013 and later
n iMac 27-inch 2014 and later
n MacBook Pro 13-inch 2015 and later
n MacBook Pro 15-inch 2015 with dual graphics and later
n MacBook Air 2015 and later
Using VMware Fusion
VMware by Broadcom 18
n MacBook 2015 and later
n iMac 21-inch 2015 and later
n iMac Pro 2017 and later
n MacMini 2018 and later
n To use the GL_EXT_texture_compression_s3tc and GL_S3_s3tc Open Graphics Library
(OpenGL) extensions in a Windows XP or Windows 7 or later guest operating system, you
must install Microsoft DirectX End-User Runtime in the guest operating system. OpenGL is an
application program interface that is used to define 2D and 3D computer graphics. You can
download Microsoft DirectX End-User Runtime from the Microsoft Download Center website.
IDE Devices
n Up to four devices. Any of these devices can be a virtual hard disk or CD/DVD drive
n IDE virtual disks up to 8 TB
n CD/DVD drive can be a physical device on the host or client system, or an ISO image file or a
DMG image file
SATA Devices
n Up to 120 SATA devices: 4 controllers and 30 devices per controller
n SATA virtual disks up to 8 TB
SCSI Devices
n Up to 60 devices. Any of these devices can be a virtual hard disk or CD/DVD drive
n SCSI virtual disks up to 8 TB
n LSI Logic LSI53C10xx Ultra320 SCSI I/O controller. For Windows XP guest systems, this
controller requires an add-on driver from the LSI Logic website. On the website, select
Support & Downloads, click the link for downloading drivers, and select the controller in the
drop-down menu to find the driver to download.
n Mylex (BusLogic) BT-958 compatible host bus adapter. For Windows XP and Windows Server
2003 guest systems, this requires an add-on driver from the VMware Web site. See http://
www.vmware.com/download/fusion/drivers_tools.html.
NVMe Devices
n Up to 256 NVMe devices: 4 controllers and 64 devices per controller. This feature is
supported in hardware version 21 and above
n The following guest operating systems do not support virtual NVMe hard disks by default.
n Windows operating systems prior to Windows 8.1
n Mac operating systems prior to macOS 10.13
n Some Linux operating systems
Using VMware Fusion
VMware by Broadcom 19
Several Linux operating systems support NVMe while others do not. Check with the
operating system vendor.
n Support for NVMe 1.3 in the following guest operating systems:
n Microsoft Windows 11
n Microsoft Windows Server 2022
Floppy Drives
n Up to two 1.44 MB floppy devices
n Virtual floppy devices use floppy image files only
Serial (COM) Ports
n Up to four serial (COM) ports
n Virtual serial ports support only output to a file
Parallel (LPT) Ports
n Up to three bidirectional parallel (LPT) ports
n Virtual parallel ports support only output to a file
USB Ports
n Supports high-speed USB 2.0 and SuperSpeed USB 3.0 and SuperSpeed Plus USB 3.1
n Supports most devices, including USB printers, scanners, PDAs, hard disk drives, memory
card readers and digital cameras, as well as streaming devices such as webcams, speakers,
and microphones
Keyboard
n 104-key Windows 95/98 enhanced
Mouse and Drawing Tablets
n PS/2 mouse
n USB mouse
n USB drawing tablets
Ethernet Card
n Up to 10 virtual Ethernet cards are supported.
Virtual Networking
n Three virtual hubs are configured by default for bridged, host-only, and NAT networking.
n Support for most Ethernet-based protocols, including TCP/IP v4, Microsoft Networking,
Samba, Novell NetWare, and Network File System.
Using VMware Fusion
VMware by Broadcom 20

n Built-in NAT supports client software using TCP/IP v4, FTP, DNS, HTTP, WINS, and Telnet,
including VPN support for PPTP over NAT.
n Create additional virtual networks to create isolated logical networks. This feature is available
only with Fusion Pro.
n Support for IPv6 for NAT only applies to additional virtual networks, and is available only with
Fusion Pro.
Sound
n Sound output and input using the Mac default input and output settings.
n Emulates Creative Labs Sound Blaster ES1371 AudioPCI sound card. MIDI input, game
controllers, and joysticks are not supported.
n HDAudio
Solid-State Drives
If your host machine has a physical solid-state drive (SSD), the host informs guest operating
systems they are running on an SSD.
This allows the guest operating systems to optimize behavior. How the virtual machines
recognize SSD and use this information depends on the guest operating system and the disk
type of the virtual disk (SCSI, SATA, IDE, or NVMe).
n On Windows 8, Windows 10, Ubuntu, and Red Hat Enterprise Linux virtual machines, all drive
types can report their virtual disks as SSD drives.
Note
n NVMe virtual hard disks are natively supported for Windows 8.1 and later.
n To create a new a virtual machine with a Windows 7 or Windows 2008 R2 guest
operating system using NVMe as the virtual hard disk, apply the appropriate Windows
hot fix. See https://support.microsoft.com/en-us/kb/2990941.
n Several Linux operating systems support NVMe while others do not. Check with the
operating system vendor.
n On Windows 7 virtual machines, only IDE and SATA virtual disks can report their virtual
disks as SSD. SCSI virtual disks only report as SSD when used as a system drive in a virtual
machine, or as a mechanical drive when used as a data drive inside a virtual machine.
n On Mac virtual machines, only SATA and NVMe virtual disks are reported as SSD. IDE and
SCSI virtual disks are reported as mechanical drives.
Note NVMe virtual hard disks are supported for macOS 10.13 and later.
Use the virtual machine operating system to verify your virtual machine is using SSD as its virtual
disk.
Using VMware Fusion
VMware by Broadcom 21
Navigating and Taking Action by Using the Fusion Interface
With Fusion interface elements, you can access your virtual machines and manage Fusion.
VMware Fusion Toolbar
You can use icons on the toolbar to initiate actions or change settings.
You can use the Fusion toolbar to change the state of the virtual machine (for example, power
on, suspend, reboot), access its snapshots, or view and change settings for the virtual machine.
With the Virtual Machine Path item in the toolbar, you can navigate the virtual-machine path and
easily view the full path in a text file or terminal window on the Mac host. See Use the Fusion
Toolbar to Access the Virtual-Machine Path.
You can see the toolbar in the virtual machine window in Single Window view and in the Virtual
Machine Library based on your selection to show or hide the toolbar in the View menu. See Show
or Hide the Fusion Toolbar.
You can customize the toolbar. See Customize the Fusion Toolbar
Use the Fusion Toolbar to Access the Virtual-Machine Path
You can use the Virtual Machine Path item in the virtual-machine toolbar to navigate the virtual-
machine path and quickly view the full path in a text file or terminal window on the Mac host.
The Virtual Machine Path item consists of an icon coupled with the name of the virtual machine.
The path leads to the location of the virtual machine, which Fusion stores as a single package.
Prerequisites
n If not already added, add the Virtual Machine Path item to the toolbar of the virtual machine.
See Customize the Fusion Toolbar.
Procedure
u Navigate to a location on the virtual-machine path.
Command-click the name portion of Virtual Machine Path item and select a location.
The location opens in the Finder on your Mac host.
u Create a file on the Mac host that contains the full path of a virtual machine.
In Single Window view, click the icon portion of the Virtual Machine Path item and drag it to
the Mac host.
Open the file to see the full path to the virtual machine.
u Copy the full path of a virtual machine into a text file or terminal window on the Mac host.
In Single Window view, click the icon portion of the Virtual Machine Path item and drag it to
the text file or terminal window on the Mac host.
The full path to the virtual machine appears in the text file or terminal window.
Using VMware Fusion
VMware by Broadcom 22
Default File Location of a Virtual Machine
Unless you specify a file location for a virtual machine when you create it, Fusion saves the virtual
machine package to a default location.
The possible default file locations for newly created virtual machines are as follows.
n your home directory/Virtual Machines, the default virtual-machine folder for new
installations of Fusion 11 or later.
n your home directory/Documents/Virtual Machines, the default virtual-machine folder for
installations of Fusion earlier than Fusion 11 and Fusion 11 and later installations that were
upgraded from a version of Fusion earlier than Fusion 11.
n The last location to which you saved a virtual machine.
When you use Fusion to create a virtual machine and you specify a virtual-machine location,
instead of accepting the default, your specified location becomes the default the next time
you create a virtual machine with Fusion.
For information about determining the file location of virtual machines available in the Virtual
Machine Library, see Perform Actions on Your Virtual Machines from the Virtual Machine Library
Window.
For information about changing the file location of virtual machines, see Change the File Location
of a Virtual Machine.
Change the File Location of a Virtual Machine
You can change the location to which a virtual machine file is stored.
Unless you specify a file location for a virtual machine when you create it, Fusion saves the virtual
machine package to a default location, which can vary. See Default File Location of a Virtual
Machine.
Regardless of where the virtual machine package is stored, you can move the file to another
location.
Prerequisites
Power off the virtual machine that you want to move.
Procedure
1 Select Window > Virtual Machine Library.
2 To determine the file location of the virtual machine, in the Virtual Machine Library window,
control-click the virtual machine, release the control button, and select Show in Finder.
You need the file location to access the virtual machine package again.
3 In the Virtual Machine Library window, control-click the virtual machine, and select Delete.
The Remove Virtual Machine dialog box appears.
Using VMware Fusion
VMware by Broadcom 23

4 Click Keep File.
5 Use the Finder to navigate back to the virtual machine package and move it to another
folder.
6 Double-click the virtual machine package in the Finder window.
A dialog box appears.
7 Click I Moved It.
The virtual machine starts up and appears in the Virtual Machine Library.
Perform Actions on Your Virtual Machines from the Virtual Machine
Library Window
The Virtual Machine Library window shows the virtual machines you created or powered on in
Fusion.
Procedure
1 To access the Virtual Machine Library window, select Window > Virtual Machine Library .
2 To perform an action with an existing virtual machine or to create a virtual machine, follow
the appropriate instruction.
Option
Action
Start a virtual machine Click the play button on the thumbnail image of the virtual machine.
Suspend a virtual machine Select the thumbnail image of the virtual machine and click the suspend
button in the toolbar.
Add notes about a virtual machine Select the virtual machine and click Virtual Machine > Get Info. Type notes in
the Notes text box of the General settings for the virtual machine.
Obtain specific information about
the virtual machine (Fusion Pro only)
The following information is available in the Virtual Machine Library window.
n Virtual machine processor and memory information.
To access the Processors & Memory settings window, click the
information icon.
n Network information appears when the virtual machine is connected to a
network and powered on with VMware Tools installed.
To obtain more detailed network information, click the information icon.
n Hard disk, snapshot, and reclaimable information.
Reclaimable information is listed for Windows virtual machines only.
Click the Refresh disk space icon to update the hard disk, snapshot,
and reclaimable information and to prompt the Clean Up Recommended
message to appear, if applicable.
Clean up a virtual machine (Fusion
Pro only)
The Clean Up Recommended message appears for a virtual machine when
the virtual machine is powered off and a significant amount of virtual
machine space is available to be freed.
To initiate the cleanup, click the message. The General settings dialog box
appears, which includes cleanup options you can select.
Using VMware Fusion
VMware by Broadcom 24

Option Action
Rename a virtual machine a Control-click the virtual machine.
b Select Rename.
c Type a new name and press Enter.
Determine the location of a virtual
machine's files
a Control-click the virtual machine.
b Release the control button.
c Select Show in Finder.
Change the settings for a virtual
machine
To open the Settings window for that virtual machine, select Virtual Machine
> Settings. Some settings can be changed only when the virtual machine is
powered off.
Add virtual machines to the Virtual
Machine Library window
You can add one or more virtual machines at a time to the Virtual Machine
Library window
Manual Drag the virtual machine package icons or the virtual
machines' .vmx files to the window.
Automated 1 Select File > Scan for Virtual Machines.
2 Click +.
3 Select a folder.
4 Click Open.
5 Click Scan.
Remove a virtual machine from the
Virtual Machine Library window
a Shut down or power off the virtual machine.
b Control-click the virtual machine.
c Select Delete.
Removing a virtual machine from the Virtual Machine Library window is not
the same as deleting the virtual machine from your hard disk.
Create a new virtual machine, import
a virtual machine, or migrate a
physical computer
Use the File menu to create a new virtual machine, import a virtual machine,
or migrate a PC.
Using the Home Pane to Create a Virtual Machine or Obtain One
from Another Source
You can create a virtual machine, or migrate a physical PC.
Power On the Boot Camp Partition as a Virtual Machine
You can use the contents of your Boot Camp partition at the same time that you are running your
Mac operating system. To do so, you use Fusion to power on the Boot Camp partition as a virtual
machine.
Using VMware Fusion
VMware by Broadcom 25

Boot Camp is Apple software that enables an Intel-based Mac to run Windows operating
systems. Boot Camp requires you to choose between Mac or Windows at boot time. Boot
Camp creates separate Mac and Windows partitions on your hard disk to create a dual-boot
environment. When you use your Windows Boot Camp partition as a Fusion virtual machine, you
can perform the following tasks:
n Use your Boot Camp virtual machine and your Mac without rebooting and switching between
them.
n Share files between your Boot Camp virtual machine and your Mac, through shared folders,
dragging files, or cutting and pasting text.
Note Windows reactivation complications can occur if you do not install VMware Tools. In such
a case, if you reactivate Windows in your Boot Camp virtual machine, and subsequently boot
your Boot Camp partition natively, you will be prompted to reactivate Windows. Reactivating
Windows in your native Boot Camp partition will result in your Boot Camp virtual machine
requiring reactivation the next time you power it on, and so forth. Installing VMware Tools solves
this problem.
Prerequisites
You must have a Boot Camp partition in place before you start this procedure.
You must have administrator privileges to use the Boot Camp partition as a virtual machine.
Procedure
1 Select Window > Virtual Machine Library.
2 In the Virtual Machine Library window, click the Boot Camp thumbnail in the list of virtual
machines, which identifies the partition that Fusion detected.
3 (Optional) Type your Mac password to access the Boot Camp partition.
Fusion creates a virtual machine that uses your Boot Camp partition and starts Windows.
4 Follow the onscreen instructions and restart your virtual machine when prompted.
After Windows boots from your Boot Camp virtual machine, Fusion starts the installation
of VMware Tools. VMware Tools enables full virtual machine functionality and optimizes
performance for your Boot Camp partition when you use the partition as a virtual machine.
5 When the VMware Tools installation is complete, reboot your computer.
What to do next
The first time you power on your Boot Camp virtual machine after you install VMware Tools, you
must reactivate Windows.
Using the Fusion Applications Menus
The applications menus include the applications menu ( ), available for all virtual machines and
the Unity applications menu ( ), available for virtual machines with Windows guest operating
Using VMware Fusion
VMware by Broadcom 26
systems that support Unity. The applications menus can provide you with quicker access to
virtual machine settings, functionality, and applications.
The following table provides detailed information about the applications menus.
Table 2-1. About the Applications Menus
Application Menu Type Icon Description
The Applications Menu n Accessible from the Mac menu bar or with a keyboard
shortcut.
n Available for all virtual machines.
n Lists all the virtual machines in the Virtual Machine
Library.
You can select a virtual machine in the list to perform
the following operations.
n Access the settings and snapshots of the virtual
machine.
n Change the view mode and power status mode of
the virtual machine.
n For a virtual machine with a Windows guest
operating system, you can also quickly access
applications listed in the applications menu.
n Configurable from the Fusion General Preferences
dialog box. You can perform the following
configurations.
n Show or hide the applications menu in the Mac
menu bar.
n Set up a keyboard shortcut for the applications
menu.
The Unity Applications Menu
n Accessible from the Mac Dock .
The Unity applications menu icon appears in the Mac
Dock when you switch the Windows virtual machine
to Unity view and disappears when you switch the
Windows virtual machine out of Unity view.
The Mac Dock contains a Unity applications menu icon
for each Windows virtual machine that is in Unity view,
allowing multiple Unity applications menus to appear in
the Mac Dock at the same time.
n Available for virtual machines with Windows guest
operating systems that support Unity.
n Lists the Unity applications menu options.
You can perform the following operations.
n Access the settings and snapshots of the virtual
machine.
n Change the view mode and power status mode of
the virtual machine.
n Access the applications installed in the Windows
guest.
Using VMware Fusion
VMware by Broadcom 27

You can also configure the Applications Menu settings. The Applications Menu settings apply to
both the applications menu ( ) and the Unity applications menu ( ), specifically for supported
Windows guests. When you add a Windows application to the application list in the Applications
Menu settings dialog box, Fusion pins the application to the top of the list in the applications
menus.
To set the General Preferences for the applications menu ( ), see Set General Preferences.
To add, remove, or reorder Windows applications in the applications menus, see Set Up the
Applications Menus.
Note The Applications Menu is deprecated in VMware Fusion 13.6 and later.
What to read next
n Set Up the Applications Menus
You can configure the Fusion applications menus for quick access to settings and
applications.
n Find a Windows Guest Application by Using the Applications Menus
For supported Windows guest operating systems, you can find and open any virtual
machine application from the applications menus. The applications menus include the
applications menu ( ), accessible in the Mac menu bar or with a keyboard shortcut, and
the Unity applications menu ( ), accessible from the Mac Dock when the virtual machine is
in Unity view.
Set Up the Applications Menus
You can configure the Fusion applications menus for quick access to settings and applications.
The applications menus include the applications menu ( ), accessible in the Mac menu bar or
with a keyboard shortcut, and the Unity applications menu (
), accessible from the Mac Dock
when the virtual machine is in Unity view.
For supported Windows guest operating systems, the applications menus provide quick access
to applications you add when you configure the applications menu and to applications you
recently opened.
The applications menus also provide access to Fusion functions, such as the power commands
and the views, and certain Windows functions, such as the run command.
Procedure
1 Select Window > Virtual Machine Library.
2 Select a virtual machine in the Virtual Machine Library window and click Settings.
3 Under System Settings in the Settings window, click Applications Menu.
Using VMware Fusion
VMware by Broadcom 28

4 (Optional) Add items to the applications menus.
a To see the applications and other items available in the virtual machine, click the add (+)
button.
b Click, shift-click, or -click the items to appear in the applications menu and click Add.
5 (Optional) Use the mouse to select and move items up or down to reorder them.
6 (Optional) Remove items from the applications menus.
a Select the item in the list to remove.
b Click the remove (-) button.
Find a Windows Guest Application by Using the Applications Menus
For supported Windows guest operating systems, you can find and open any virtual machine
application from the applications menus. The applications menus include the applications menu
(
), accessible in the Mac menu bar or with a keyboard shortcut, and the Unity applications menu
( ), accessible from the Mac Dock when the virtual machine is in Unity view.
For supported Windows guests, the applications menus provide quick access to applications
you add when you configure the applications menus, see Set Up the Applications Menus, and
applications you recently opened.
Prerequisites
n To access the applications menu ( ), configure the applications menu to make it accessible.
See Set General Preferences.
n To access the Unity applications menu ( ), switch the virtual machine to Unity view.
With the virtual machine open in single window or full screen view, switch to Unity view. For
example, select View > Unity.
When you switch to Unity view, the following events occur.
n The virtual machine interface disappears.
n Applications currently open in the virtual machine appear directly on the Mac desktop.
n VMware Unity ( ) appears in the Mac Dock.
Procedure
1
Open the applications menu ( ) or the Unity applications menu ( ).
n
To open the applications menu, click the application menu ( ) status item in the Mac
menu bar or use the keyboard shortcut and click the appropriate virtual machine.
n
To open the Unity applications menu, click VMware Unity ( ) in the Mac Dock.
2 In the list, find the application to open.
Using VMware Fusion
VMware by Broadcom 29

3 (Optional) If the application name does not appear in the list, you can show more
applications.
n Click All Programs.
n Type the name of the application in the search text box.
4 To open the application, click the icon.
Using Different Views in the Fusion Interface
You can view the Fusion interface in Single Window view, Full Screen view, and Unity view. These
views enable you to work with your applications and virtual machines in different ways.
Use Single Window View to Have Your Virtual Machine Appear in a Single
Window on the Mac Desktop
In Single Window view, the virtual machine appears in a single window that you can resize and
move with the mouse.
In Single Window view, you can see and use the VMware Fusion toolbar.
n Switch to Single Window View
To see the Mac desktop and the virtual machine desktop at the same time, switch to Single
Window view.
n Return to Another View from Single Window View
To have the desktop of your virtual machine fill your display or set of displays, or to see a
guest application in a window on the Mac desktop, exit Single Window view.
Switch to Single Window View
To see the Mac desktop and the virtual machine desktop at the same time, switch to Single
Window view.
In Single Window view, the virtual machine appears in a single window that you can resize and
move with the mouse.
Procedure
u Switch to Single Window view.
n In Full Screen view with the Full Screen title bar, select View > Single Window.
n In Full Screen view without the Full Screen Minibar, use the keyboard shortcut
+Control+F to switch to Single Window view.
n In Unity view, use the keyboard shortcut +Shift+U to switch to Single Window view.
Return to Another View from Single Window View
To have the desktop of your virtual machine fill your display or set of displays, or to see a guest
application in a window on the Mac desktop, exit Single Window view.
Using VMware Fusion
VMware by Broadcom 30

Procedure
u To have the desktop of your virtual machine fill your entire display or set of displays, from the
VMware Fusion menu bar, select View > Full Screen.
u To display guest application windows directly on your Mac desktop without seeing the virtual
machine's desktop, select View > Unity.
Use Unity View to Display Guest Applications Directly on a Mac Desktop
To work with your virtual machine applications from the Mac desktop without the Fusion
interface, use Unity view.
In Unity view, your virtual machine's window is hidden and VMware Unity appears in the Mac
Dock. When you open virtual machine applications, those applications also appear in the Mac
Dock. You can use the virtual machine applications just as you use your native Mac applications.
Note Unity Mode is deprecated in VMware Fusion 13.6 and later.
n About Unity View
Unity view is supported in several Windows operating systems, and enables you to use
many Mac functions with your guest applications.
n Switch to Unity View
You can switch to Unity view from an application open in another view.
n Use the Waiting for Unity Window to Interact with the Guest Operating System
Some operating system activities that require a response do not appear in Unity view.
Fusion displays the Waiting for Unity window to enable you to respond.
n View the Windows Taskbar and System Tray in Unity View
You can have the Windows taskbar or system tray visible while in Unity view.
n Connect a USB Device in Unity View
You must manually connect USB devices when your virtual machine is running in Unity view.
n Switch to Another View From Unity View
To see the desktop of the virtual machine, you can switch from Unity view to Single Window
view or Full Screen view.
About Unity View
Unity view is supported in several Windows operating systems, and enables you to use many
Mac functions with your guest applications.
Unity view is fully supported in virtual machines running Windows XP, Windows Vista, Windows
7, Windows 8, and Windows 10. Unity view is experimentally supported in virtual machines
running Windows Server 2003 (32-bit and 64-bit), 2008, 2012, and 2016.
Using VMware Fusion
VMware by Broadcom 31

You can use the + C, + X, and + V Mac keyboard shortcuts to copy, cut, and paste text
between your Mac applications and virtual machine applications displayed in Unity view. You can
also use the Mission Control feature with virtual machine applications in Unity view, and you can
use + Tab to switch between applications.
To use a virtual machine application, click the application in the Mac Dock, which launches Fusion
and opens the application.
The following Mac features are supported with virtual machine applications.
n Keep virtual machine applications in the Mac Dock after you power off your virtual machine
and quit Fusion. See Keep a Windows Application in the Mac Dock on the Intel-based Mac.
n Set virtual machine applications to open when you start up your Mac and log in. See Set a
Virtual Machine Application to Open When You Log in to Your Mac.
Switch to Unity View
You can switch to Unity view from an application open in another view.
Prerequisites
Unity view works only if VMware Tools is installed in the virtual machine.
Procedure
1 In your Windows XP, Windows Vista, Windows 7, Windows 8, or Windows 10 virtual machine,
open the applications to use in Unity view.
2 Switch to Unity View using one of the following methods:
n From the View menu, select Unity.
n Use the keyboard shortcut +Shift+U.
n Click the Switch to Unity view icon in the tool bar of the virtual machine window.
The virtual machine window is hidden. The open applications are displayed in windows on the
Mac desktop and as icon tiles in the Mac Dock.
What to do next
To exit Unity view, click the Fusion icon in the Mac Dock and select View > Single Window or
View > Full Screen.
Use the Waiting for Unity Window to Interact with the Guest Operating System
Some operating system activities that require a response do not appear in Unity view. Fusion
displays the Waiting for Unity window to enable you to respond.
Procedure
u In the Waiting for Unity window, follow prompts to respond to the dialog boxes.
When you are finished responding, the virtual machine returns to Unity view.
Using VMware Fusion
VMware by Broadcom 32

u Respond to the virtual machine's operating system by exiting Unity view.
a Click Exit Unity.
b Perform any activities that the guest operating system requires.
c To return to Unity view, select View > Unity.
View the Windows Taskbar and System Tray in Unity View
You can have the Windows taskbar or system tray visible while in Unity view.
Procedure
u Show the taskbar by selecting View > Show Taskbar in Unity.
You might have to move the location of the Mac Dock to see the taskbar.
The Hide System Tray menu item is dimmed.
u Hide the taskbar by selecting View > Hide Taskbar in Unity.
u Show the system tray by selecting View > Show System Tray in Unity.
u Hide the system tray by selecting View > Hide System Tray in Unity
Results
When they are set to show, these elements also remain visible when you switch to work in
non-Windows applications.
Connect a USB Device in Unity View
You must manually connect USB devices when your virtual machine is running in Unity view.
Note Fusion does not support USB adapters for connecting displays to your virtual machines.
Procedure
1 Plug the USB device into your Mac.
The selection dialog appears.
2 Select the system to which you want to connect the device.
The action you take depends on how many virtual machines are open.
Option
Description
If you have one virtual machine
powered on
Select Connect to Mac or Connect to
OS of your open virtual machine
.
If you have two or more virtual
machines powered on
In the pop-up menu, select Connect to your Mac or Connect to
virtual
machine name
for the selected virtual machine. Click OK.
Using VMware Fusion
VMware by Broadcom 33

Switch to Another View From Unity View
To see the desktop of the virtual machine, you can switch from Unity view to Single Window view
or Full Screen view.
Prerequisites
Fusion must be the active application, so that the Fusion menu appears at the top of the display.
Procedure
u Exit Unity view.
Option Action
Have your virtual machine appear in
a single window on the Mac desktop.
From the VMware Fusion menu bar, select View > Single Window.
Have the desktop of your virtual
machine fill your entire display or set
of displays.
From the VMware Fusion menu bar, select View > Full Screen.
Results
The open applications appear in the Fusion virtual machine window.
Use Full Screen View To Make Your Virtual Machine Desktop Fill Your Display
In Full Screen view, Fusion fills your entire display or set of displays with the desktop of your
virtual machine.
In this view you do not see the Mac Dock. You can show or hide the VMware Fusion menu bar.
This view looks as if you are using a machine dedicated to running your guest operating system.
You have access to the toolbar by moving the cursor to the top of the display to reveal the
toolbar. Optionally, a subset of Fusion functions are available via the compact Full Screen Minibar.
n Switch Fusion to Full Screen View
You can switch to Full Screen view from another view.
n Hide the VMware Fusion Menu Bar in Full Screen View
When you are in Full Screen view, the VMware Fusion menu bar hides until you hover the
cursor at the top of the Full Screen display. You can set the VMware Fusion menu bar to
hide all the time.
n Set the Full Screen Minibar
When you are in Full Screen view, you can use the Full Screen Minibar to access some virtual
machine controls such as state change and some Virtual Machine menu options.
n Return to Another View from Full Screen View
To see the Mac desktop and the virtual machine desktop at the same time, or to see a guest
application in a window on the Mac desktop, switch to Unity view or Single Window view.
Using VMware Fusion
VMware by Broadcom 34

Switch Fusion to Full Screen View
You can switch to Full Screen view from another view.
Procedure
u Switch to Full Screen view.
n Click the Enter Full Screen button in the toolbar at the top of the virtual machine window.
n From the View menu, select Full Screen.
n Use the +Control+F keyboard shortcut to switch to Full Screen view.
Results
The Fusion virtual machine window expands to fill the full screen (or screens if you have multiple
displays and have Fusion configured to use them all). When possible, a new space is created for
easy navigation using Mission Control.
Hide the VMware Fusion Menu Bar in Full Screen View
When you are in Full Screen view, the VMware Fusion menu bar hides until you hover the cursor
at the top of the Full Screen display. You can set the VMware Fusion menu bar to hide all the
time.
The Full Screen menu bar behavior applies to running virtual machines.
Procedure
u Set the Hide Menu Bar in Full Screen option.
n Select View > Hide Menu Bar in Full Screen.
n Use the + Shift +M keyboard shortcut to hide or show the VMware Fusion menu bar in
Full Screen view.
Set the Full Screen Minibar
When you are in Full Screen view, you can use the Full Screen Minibar to access some virtual
machine controls such as state change and some Virtual Machine menu options.
In Full Screen view, the virtual machine window expands to fill the full screen, or screens if
you are using multiple displays. In this view you do not see the Mac Dock. However, you can
access some Virtual Machine menu options by using the Full Screen Minibar. The Full Screen
Minibar contains the Fusion suspend and run button for the virtual machine, some virtual machine
options, and the return to Single Window view button.
Procedure
1 Select View > Full Screen.
The virtual machine view changes to Full Screen view and the Full Screen Minibar appears on
the right side of the screen by default.
Using VMware Fusion
VMware by Broadcom 35
2 Select the button in the Minibar with the gear icon and set the Full Screen Minibar behavior
from the Full Screen Minibar menu.
Option Description
Always Show The Full Screen Minibar is always visible.
Automatically Hide and Show For running virtual machines, the Full Screen Minibar is visible if you move
the pointer over its position at the edge of the display. For virtual machines
that are not running, the Full Screen Minibar always appears.
Always Hide The Full Screen Minibar never appears. Use the +Control+F keyboard
shortcut to exit Full Screen view.
Position on Screen Set where the Full Screen Minibar appears: Top, Left, Bottom, or Right edge.
You can also drag and drop the Full Screen Minibar to different positions in
a single display or you can drag it to another display if you have more than
one display.
Note The Full Screen Minibar can be moved to a different side of the display by dragging.
Return to Another View from Full Screen View
To see the Mac desktop and the virtual machine desktop at the same time, or to see a guest
application in a window on the Mac desktop, switch to Unity view or Single Window view.
To have your virtual machine appear in a single window on the Mac desktop, exit to Single
Window view. To display guest application windows directly on your Mac desktop without seeing
the virtual machine's desktop, exit to Unity view.
Procedure
u To exit Full Screen to Single Window view, in the Full Screen title bar, select View > Single
Window, or use the keyboard shortcut +Control+F.
u To exit Full Screen to Unity view, in the Full Screen title bar, select View > Unity, or use the
keyboard shortcut +Shift+U.
Resize the Virtual Machine Display to Fit
You can force the virtual machine display to fit the current screen or window size.
This option is not available when the virtual machine is in Unity view or when the virtual machine
display cannot be resized.
Procedure
u Select View > Resize Virtual Machine to Fit
The virtual machine display is resized to fit the current screen or window.
Using VMware Fusion
VMware by Broadcom 36
Using Multiple Displays
Fusion supports multiple displays. Fusion detects up to ten displays and can automatically adjust
when displays are plugged in or unplugged, and change in resolution and orientation.
Use Multiple Displays in Unity View
Fusion detects multiple displays by default. You can drag a window in Unity view to any available
display without having to change settings.
For multiple displays and virtual machines in Unity view, do not use the display settings within the
guest operating system. Fusion does not support any changes made there.
Use All Displays in Full Screen View
You can set Fusion Full Screen view to use all of the displays attached to your Mac.
Procedure
1 Select View > Use All Displays in Full Screen if Use Single Display in Full Screen Mode is
enabled.
Use All Displays in Full Screen is not supported for Mac OS X guests.
2 Select View > Full Screen if you are in another view.
Move Full Screen View to One of Multiple Displays
When you have multiple displays, you can specify one of them to use Full Screen view for a
Fusion virtual machine.
You can have a virtual machine to run in Full Screen view on a single display out of many,
rather than use all of the displays. You can have different virtual machines in Full Screen view on
different monitors.
Procedure
1 In the menu bar, select View > Single Window if you are in another view.
2 Drag the Fusion virtual machine window to the display you want to use for Full Screen view.
3 (Optional) In the menu bar, select View > Use Single Display in Full Screen if Fusion is set to
use all displays in Full Screen view.
4 In the menu bar, select View > Full Screen.
The Fusion virtual machine window fills the specified display.
Using VMware Fusion
VMware by Broadcom 37
Configuring Fusion
3
You can configure Fusion so that it looks and works in ways that fit your needs.
Read the following topics next:
n Setting Fusion Preferences
n Customizing the Fusion Display
n Keep a Windows Application in the Mac Dock on the Intel-based Mac
n Set a Virtual Machine Application to Open When You Log in to Your Mac
n Contents of the Virtual Machine Package
n Work with Virtual Machine Packages
Setting Fusion Preferences
You can set preferences that control the behavior of Fusion.
Set General Preferences
You can set how your mouse works, how your virtual machines behave when you quit Fusion,
and other general operations.
Procedure
1 Select VMware Fusion > Preferences.
2 Click General.
VMware by Broadcom
38

3 In the When closing a virtual machine section, select how Fusion behaves when you close a
virtual machine.
Option Description
Suspend the virtual machine The virtual machine is suspended when you close the virtual machine
window.
If you close a virtual machine window with this preference selected, when
you next open the virtual machine, it restarts with applications running and
files open. The behavior is similar to when you suspend and resume a laptop
computer.
Power off the virtual machine The virtual machine is powered off when you close the virtual machine
window.
Confirm before closing Fusion opens a dialog box that asks for confirmation before closing the
virtual machine window. To run virtual machines in the background, you
must select this option.
4 In the Gaming section, select a setting that fits how you expect to use your mouse.
Option Description
Auto-detect Mouse for Games Fusion detects when it needs to lock a mouse to a virtual machine window
for correct operation during gaming. If no game is detected, the mouse
works in the normal fashion. This is the default setting.
Never Optimize Mouse for Games Sometimes, the autodetect function detects nongame applications as
games. Use this option to turn autodetect off so that the mouse can work in
the normal fashion for these applications.
Always Optimize Mouse for Games Sometimes, the autodetect function fails to recognize a game. Use this
option to have correct mouse operations for gaming in this instance.
5 In the Applications Menu section, select options for accessing the applications menu.
a Select an option for when the applications menu ( ) icon appears in the Mac menu bar.
b (Optional) To configure a shortcut that displays the applications menu, select Enable
keyboard shortcut and select a keyboard shortcut from the drop-down menu.
When you perform the keyboard shortcut, the applications menu opens.
6 (Optional) In the Updates section, select the Automatically check for updates check box to
have Fusion check for software updates when it starts.
A message alerts you when a new version of Fusion is available to download and install. If
you do not select the Automatically check for updates check box, you can check for updates
manually at any time by selecting VMware Fusion > Check for Updates.
Select a Keyboard and Mouse Profile
Fusion provides standard keyboard and mouse profiles for each language it supports.
You can assign each virtual machine its own profile.
Using VMware Fusion
VMware by Broadcom 39

Procedure
1 Select VMware Fusion > Preferences and click Keyboard & Mouse.
2 Select a profile from the Keyboard & Mouse Profile drop-down menu.
3 Select Edit Profiles.
4 (Optional) Add or remove a profile using the add (+) button and the delete (-) button.
5 Click Done.
Set Key Mappings on the Keyboard and Mouse Preferences Pane
You can map certain key combinations on your Mac keyboard to keys on your virtual machine.
The following mappings are supported:
n Key to Key
n Set of Modifiers to Modifier
n Set of Modifiers + Key to Key
You cannot stack key mappings. You cannot create one key mapping and include that key
mapping as part of another key mapping.
Procedure
1 Select VMware Fusion > Preferences and click Keyboard & Mouse.
2 Click Key Mappings to go to the Key Mappings pane.
3 Select the Enable Key Mappings check box.
4 (Optional) Select the Enable Language Specific Key Mappings check box if you want to
incorporate key mappings related to the keyboard layout for the language you selected in
the Input Menu (as shown by the flag icon in the menu bar).
When you change the Input Menu to a supported keyboard layout, additional key mappings
are appended to the key mapping list. Fusion supports U.K. English, Belgian, Danish, French,
Swiss French, and German. This feature is not available for Mac OS X Server virtual machines.
5 Change the key mapping settings.
Option
Description
Turn a key mapping on or off Click the check box to the left of the Mac Shortcut.
Edit a key mapping Double-click the Mac Shortcut or Virtual Machine Shortcut to change and
make that change in the Edit Key Mapping dialog.
Add a key mapping Click the add (+) button and define the new key mapping in the Edit Key
Mapping dialog.
Delete a key mapping Select the key mapping and click the remove (-) button.
Restore the default settings Click Restore Defaults.
Using VMware Fusion
VMware by Broadcom 40

Set Mouse Shortcuts on the Keyboard and Mouse Preference Pane
In Fusion, you can use shortcuts to operate a single-button mouse as a two-button or three-
button mouse.
The defaults are Control + primary button to mimic the secondary mouse button (right-click) and
+ primary button to mimic a third button.
You can change the shortcut.
Procedure
1 Select VMware Fusion > Preferences and click Keyboard & Mouse.
2 Click Mouse Shortcuts to go to the Mouse Shortcuts pane.
3 Double-click the mouse shortcut and hold down the keys for the new shortcut.
To restore the defaults, click Restore Defaults.
Activate or Deactivate Mac Host Shortcuts on the Keyboard and
Mouse Preference Pane
By default in Fusion, global keyboard shortcuts that the Mac operating system or third-party
applications have registered are sent to the Mac operating system instead of your virtual
machine.
Examples of global Mac keyboard shortcuts include Command-Tab (switch applications) and F9,
F10, and F11 (Exposé commands). You set these shortcuts and commands in the macOS System
Preferences.
You can use the Mac Host Shortcuts pane to deactivate all these shortcuts while you use Fusion.
This action applies only to Single Window view and Full Screen view. In Unity view, all macOS
shortcuts are always enabled.
Procedure
1 Select VMware Fusion > Preferences and click Keyboard & Mouse.
2 To go to the Mac Host Shortcuts pane, click Mac Host Shortcuts .
3 To activate or deactivate all shortcuts, select or deselect the Enable Mac OS Host Keyboard
Shortcuts check box.
4 To customize how the virtual machine maps the Mac Command key ( ) to the Windows
command key, select the option from the drop-down menu.
Option
Description
Either Command Key Use either Mac Command key to map to the Windows command key.
Left Command Key Use the left Mac Command key to map to the Windows command key.
Right Command Key Use the right Mac Command key to map to the Windows command key.
Using VMware Fusion
VMware by Broadcom 41

Results
The macOS commands are not editable here. You must change them in the macOS System
Preferences.
Activate Fusion Shortcuts on the Keyboard and Mouse Preference
Pane
Fusion has several keyboard shortcuts for Fusion commands when you are in Single Window
view or Full Screen view. You can activate or deactivate these shortcuts in Fusion Preferences.
Procedure
1 Select VMware Fusion > Preferences and click Keyboard & Mouse.
2 Click Fusion Shortcuts to go to the Fusion shortcuts pane.
3 Select or deselect an item in the list.
Set Fusion Display Resolution Preferences
You can set preferences for how Fusion virtual machines appear in both single window mode and
full screen mode.
These preferences apply by default to all of your virtual machines. You can change these settings
for specific virtual machines. For more information, see Configuring Display Resolution Settings.
Procedure
1 Select VMware Fusion > Preferences.
2 Select Display.
3 Select the Single Window resolution setting.
This setting specifies how all virtual machines appear in single window mode.
Option
Description
Stretch the virtual machine in the
window
When the virtual machine window is resized, the virtual machine display is
stretched to fill the window with the resolution unchanged.
Resize the virtual machine and the
window
The virtual machine display is resized to fit the single window.
Using VMware Fusion
VMware by Broadcom 42

4 Select the Full Screen resolution setting.
This setting specifies how all virtual machines appear in full screen mode.
Option Description
Center the virtual machine in the
screen
When the virtual machine enters Full Screen view mode, the virtual machine
display is centered on the screen with the resolution unchanged.
Stretch the virtual machine in the
screen
When the virtual machine enters Full Screen view mode, the virtual machine
display is stretched to fill the screen space with the resolution unchanged.
Resize the virtual machine to fit the
screen
The virtual machine display is resized to fit the full screen.
Set Default Applications Preferences
You can set applications from the Mac or the virtual machines to be used to open different
categories of URLs.
You can open the following categories of URLs:
n RSS feeds (feed)
n File transfers (FTP, SFTP)
n Web pages (HTTP, HTTPS)
n Mail (mailto)
n VMRC (VMware Remote Console)
n Newsgroups (news)
n Remote sessions (Telnet, SSH)
If you make a Web browser the default from within a virtual machine, the default setting for how
Fusion handles URLs does not change. The next time you start or resume the virtual machine,
or change the URL preferences, the Fusion settings overwrite the changes that you make in the
guest machine.
Procedure
1 Select Window > Virtual Machine Library.
2 Select a virtual machine in the Virtual Machine Library window and click Settings.
3 Under System Settings in the Settings window, click Default Applications.
4 Click Configure.
Using VMware Fusion
VMware by Broadcom 43

5 Set or change the preference.
Option Description
Add a category of URL to the Default
Applications pane
Click the add (+) button and select a URL category from the pop-up menu.
Set or change an application to use
to open a category of URL
Select an application from the pop-up menu to the right of the appropriate
Open [category] with check box. You can select from all available
applications on your Mac and in your virtual machines.
Remove a URL category Click the remove (-) button to the right of the pop-up menu for the category.
Creating Custom Networks
With Fusion Pro, you can change key networking settings, add and remove virtual custom
networks, create custom virtual networking configurations, and require the virtual machine to
prompt for confirmation before allowing the network adapter to run in promiscuous mode. The
changes that you make affect all virtual machines that connect to the custom network running on
the host system.
You can create custom networks to accomplish the following tasks:
n Add additional NAT configurations for scenarios in which a virtual machine shares the IP
address and MAC address of your Mac.
n Add additional private virtual networks to enable communication between virtual machines
and the host system.
For either type of custom network, you can specify which subnet is used by Fusion and whether
to connect a physical network on the host system to the custom network.
Note While editing a custom network, do not change the MTU, Subnet IP, Subnet Mask, Enable
IPv6 and the IPv6 prefix values in the Advanced Network settings page when the VMs are
connected to the corresponding subnets. Disconnect the VMs before changing and applying the
settings, and then reconnect the VMs.
Add a NAT Configuration
With Fusion Pro, you can add additional NAT configurations for scenarios in which a virtual
machine shares the IP address and MAC address of your Mac.
By default, Fusion provides one Share with my Mac configuration that uses NAT. You can add
additional NAT configurations to perform actions such as turning off the DHCP service or using a
non-default subnet IP or subnet mask.
Prerequisites
n Verify that you know the administrator password.
Procedure
1 Select VMware Fusion > Preferences and click Network.
Using VMware Fusion
VMware by Broadcom 44

2 Click the lock icon, enter the administrator password, and click OK.
3 Click the plus sign (+) under the list of networks.
4 (Optional) If you want to rename a virtual network, double-click the name, enter a new name,
and press the Return key.
5 Allow virtual machines on the network to use NAT to connect to external networks.
a Select Allow virtual machines on this network to connect to external networks (using
NAT).
Note On Big Sur hosts, the virtual machine gets IPv6 addresses if the host has IPv6
configured. If you use Fusion 12.1.2 or an earlier version with a Mac OS Big Sur host
configured with IPv6, skip step 5.b.
b (Optional) Select the Enable IPv6 check box.
c (Optional) Use the appropriate option to configure the IPv6 Prefix text box.
Option Description
Manual Enter the IPv6 prefix in the text box.
Automatic Leave the text box blank to allow an IPv6 prefix to generate
automatically.
d (Optional) Click the plus sign (+) under the Port Forwarding section for each port-
forwarding configuration you want to add.
e (Optional) For each port-forwarding configuration you add, provide the following
information and click OK.
Host port
A port number available on the Mac host. Verify that the port does not conflict with ports
used by existing port forwarding entries.
Type The appropriate protocol to use.
Virtual Machine IP
address
The IP address of the virtual machine to which you want to forward the incoming requests.
Virtual Machine
Port
The port number to use for requests on the specified virtual machine. The port might be
the standard port, such as 80 for HTTP, or a nonstandard port if software running in the
virtual machine is configured to accept requests on a nonstandard port.
A port-forwarding configuration appears in the list of networks.
6 (Optional) To connect the host system to this private network, select Connect the host Mac
to this network.
Note The Connect the host Mac to this network check box is not available for Fusion 12.1.2
and earlier on MacOS Big Sur hosts.
Using VMware Fusion
VMware by Broadcom 45

7 (Optional) If you enabled IPv6 and want the Mac host to use IPv6 to communicate with virtual
machines, manually add an IPv6 address to the NAT virtual network interface.
Note On Mac systems, the NAT virtual network interface does not automatically accept IPv6
address assignments.
a Open a terminal window on your Mac.
b Enter a command such as the following.
sudo ifconfig VirtualNetworkInterfaceName inet6 IPv6Prefix::1 up
Where
VirtualNetworkInterfaceName
is a placeholder for the name of the virtual network
interface, such as vmnet2, and
IPv6Prefix::1
is a placeholder for the IPv6 prefix, which has
a format such as xxxx:xxxx:xxxx:xxxx::1.
8 (Optional) To use a local DHCP service to distribute IP addresses to virtual machines on the
network, select Provide addresses on this network via DHCP.
Note The DHCP check box is not available for Fusion 12.1.2 and earlier on MacOS Big Sur
hosts.
9 (Optional) To change the subnet IP address or subnet mask, modify the addresses in the
Subnet IP and Subnet Mask text boxes.
10 (Optional) To configure jumbo frame, select Custom from the MTU drop-down menu and
enter a value between 72 bytes and 9194 bytes in the text box.
Note The jumbo frame feature is not available for Fusion 12.1.2 and earlier on MacOS Big Sur
hosts.
11 Click Apply.
Results
The network that you configured is now available to the virtual network adapters associated with
virtual machines on your Mac.
Add a Private Network Configuration
With Fusion Pro, you can add additional custom host-only private virtual networks (vmnet)
configurations to only allow communication between virtual machines and the host system.
Multiple virtual machines configured with this type of host-only networking are on the same
network. The VMware DHCP server can provide addresses on the network.
You might want to set up multiple private networks on the same computer in the following
situations:
n To have two virtual machines connected to one private network, and other virtual machines
connected to another private network to isolate the network traffic on each network.
Using VMware Fusion
VMware by Broadcom 46

n To test routing between two virtual networks.
n To test a virtual machine that has multiple network interface cards, without using any physical
network adapters.
Prerequisites
n Verify that you know the administrator password.
Procedure
1 Select VMware Fusion > Preferences and click Network.
2 Click the lock icon, type the administrator password, and click OK.
3 Click the plus sign (+) under the list of networks.
4 (Optional) If you want to rename a virtual network, double-click the name, enter a new name,
and press the Return key.
5 Verify that the following check box is not selected: Allow virtual machines on this network to
connect to external networks (using NAT).
6 (Optional) To connect a physical network on the host system to this private network, select
Connect the host Mac to this network.
Note The Connect the host Mac to this network check box is not available for Fusion 12.1.2
and earlier on MacOS Big Sur hosts.
7 (Optional) To use a local DHCP service to distribute IP addresses to virtual machines on the
network, select Provide addresses on this network via DHCP.
Note The DHCP check box is not available for Fusion 12.1.2 and earlier on MacOS Big Sur
hosts.
8 (Optional) To change the subnet IP address or subnet mask, modify the addresses in the
Subnet IP and Subnet Mask text boxes.
9 (Optional) To configure jumbo frame, select Custom from the MTU drop-down menu and
enter a value between 72 bytes and 9194 bytes in the text box.
Note The jumbo frame feature is not available for Fusion 12.1.2 and earlier on MacOS Big Sur
hosts.
10 Click Apply.
Results
The network that you configured is now available to the virtual network adapters associated with
virtual machines on your Mac.
Enable Jumbo Frames
With Fusion Pro, you can enable jumbo frames for built-in networks.
Using VMware Fusion
VMware by Broadcom 47

Jumbo frames let you send larger frames out onto the physical network. For built-in networks,
jumbo frames can be configured in the Share with my Mac and Private to my Mac tabs.
Prerequisites
n Verify that you know the administrator password.
n If you use Fusion 12.1.2 or earlier on MacOS Big Sur hosts, the jumbo frame feature is not
available for built-in NAT and private networks. Only bridged networking is supported when
jumbo frame is enabled on the host.
Procedure
1 Select VMware Fusion > Preferences and click Network.
2 Click the lock icon, enter the administrator password, and click OK.
3 Select Share with my Mac.
4 Select Custom from the MTU drop-down menu and enter a value between 72 and 9194 bytes
in the text box and Click Apply.
5 Select Private to my Mac.
6 Select Custom from the MTU drop-down menu and enter a value between 72 bytes and 9194
bytes in the text box and Click Apply.
Results
Jumbo frame is enabled for built-in networks.
What to do next
Note To enable jumbo frames on Mac OS Big Sur host, the network adapter must support jumbo
frames. To enable this feature perform the following steps:
1 Navigate to System Preferences > Network > Advanced > Hardware.
2 Change Configure to Manually and choose Jumbo (9000) in the MTU drop-down.
Enable Dictation
Dictation allows you to use your voice instead of typing. You must enable Dictation in Fusion to
use it with guest operating systems.
Procedure
1 Select VMware Fusion > Preferences and click Keyboard & Mouse.
2 Select a profile to use from the Keyboard & Mouse Profile drop-down menu.
3 Click Mac Host Shortcuts to go to the Mac Host Shortcuts pane.
4 Make note of how your virtual machine maps the Command key to the Windows key.
5 Assign a hot key to start dictation in the virtual machine.
Using VMware Fusion
VMware by Broadcom 48

Join or Leave the Customer Experience Improvement Program
The VMware Customer Experience Improvement Program (CEIP) provides information to
VMware. VMware uses the information to improve its products and services, to fix problems,
and to advise you on how best to deploy and use VMware products.
VMware Fusion participates in the VMware CEIP. Information about the data collected through
CEIP and how VMware uses it are in the Trust & Assurance Center at http://www.vmware.com/
trustvmware/ceip.html.
The CEIP appears the first time you launch Fusion after you install the product. You must then
make a selection. You can change your selection any time afterwards.
Procedure
1 Launch Fusion.
2 Select VMware Fusion > Preferences.
3 Click Feedback.
4 Join or leave the CEIP depending on the participation preference currently selected.
Option Description
Join Select Join the VMware Customer Experience Improvement Program.
Leave Deselect Join the VMware Customer Experience Improvement Program.
Customizing the Fusion Display
You can customize the Fusion display to fit the way you work with virtual machines.
n Show or Hide the Fusion Toolbar
If you prefer working on your Mac without toolbars hidden when you aren't using them, you
can hide the Fusion toolbar in the virtual machine window.
n Customize the Fusion Toolbar
You can add or remove icons from the toolbar.
n Resize the Fusion Display and Resolution
You can use the mouse to resize the virtual machine window.
Show or Hide the Fusion Toolbar
If you prefer working on your Mac without toolbars hidden when you aren't using them, you can
hide the Fusion toolbar in the virtual machine window.
Procedure
u Click View > Show/Hide Toolbar.
Using VMware Fusion
VMware by Broadcom 49

Customize the Fusion Toolbar
You can add or remove icons from the toolbar.
Prerequisites
You must use Single Window view to customize the toolbar.
Procedure
1 Select Customize Toolbar using one of the following methods.
Option Description
Fusion Menu With the virtual machine selected in the Virtual Machine Library, select View
> Customize Toolbar.
Virtual Machine With the virtual machine open, control-click the title bar of the virtual
machine and select Customize Toolbar.
The list of all the tools available for the toolbar appears.
2 Click Done.
Resize the Fusion Display and Resolution
You can use the mouse to resize the virtual machine window.
Prerequisites
Changing the display resolution by resizing the window works only if VMware Tools is installed
and is up to date in the virtual machine.
Procedure
u With the pointer over the resize control at the lower-right corner of the virtual machine
window, hold down the primary mouse button and drag the handle to resize the window.
Results
The display resolution adjusts to the new window size.
Keep a Windows Application in the Mac Dock on the Intel-
based Mac
You can place an icon tile for a Windows application in your Mac Dock. You can open the
application in the same way that you open your Mac applications. You can access your
virtual machine's applications without having to use the VMware Fusion menu bar or the guest
operating system interface.
Using VMware Fusion
VMware by Broadcom 50

Procedure
1 With the application open, switch to Unity view by selecting View > Unity.
The application appears in the Mac Dock.
2 Control-click or right-click the application in the Mac Dock and select Options > Keep in Dock.
Set a Virtual Machine Application to Open When You Log in
to Your Mac
For convenience, you might want to have an application on your virtual machine open whenever
you start your Mac.
Procedure
1 With the application open, switch to Unity view by selecting View > Unity.
The application appears in the Mac Dock.
2 Control-click or right-click the application in the Mac Dock and select Options > Open at
Login.
Contents of the Virtual Machine Package
The files that describe a virtual machine are bundled in a package in macOS.
Virtual machine files have different functions, as shown in Table 3-1. Files in the Virtual Machine
Package. Some of these files, like the lock files, are created when the virtual machine runs.
Table 3-1. Files in the Virtual Machine Package
File Description
Virtual disk file(s) *.vmdk This can be a single large file or many 2GB portions,
depending on how you set up your disk and if you have
snapshots.
Configuration file *.vmx A plain text file describing the virtual machine, such as
which files it uses, how much RAM it gets, and a variety of
other settings.
BIOS file *.nvram This contains information such as the virtual machine's
boot order.
Log file vmware.log This is a plain text file that contains information on the
most recent run of the virtual machine. The next-most-
recent is called vmware-0.log, then vmware-1.log, and
finally vmware-2.log. If you ever have a problem with
Fusion, you might be asked to provide this file.
Lock files *.lck These files are created for the configuration and disk files
when the virtual machine is running.
Memory files *.vmem Snapshot files are an example of memory files.
Using VMware Fusion
VMware by Broadcom 51

Work with Virtual Machine Packages
When you create a virtual machine, Fusion stores the virtual machine files as a single package.
This feature lets you move an entire virtual machine as a single entity.
A package (sometimes called a bundle) has the extension .vmwarevm. When you move the
package, all virtual machine files are included.
You might need to access the virtual machine package files during troubleshooting.
Note Editing the configuration file can cause problems. Make a backup copy of the file before
you make any changes.
Prerequisites
Fusion must not be running during virtual machine file editing.
Procedure
1 In the Finder, select the virtual machine package.
a In Fusion, select Window > Virtual Machine Library.
b Control-click the virtual machine.
c Release the control button.
d Select Show in Finder.
2 Control-click the package in the Finder window and select Show Package Contents.
3 Perform one of the following tasks.
n Copy the log file (vmware.log) to provide for troubleshooting analysis.
n Open the configuration file (*.vmx) in a text editor to modify it. You can find instructions
for how to modify the file in the Fusion release notes or from appropriate support
personnel.
Using VMware Fusion
VMware by Broadcom 52
Creating Virtual Machines
4
You can create virtual machines, import virtual machines created elsewhere, and migrate virtual
machines converted from physical PCs. If you have Fusion Pro, you can also clone existing virtual
machines.
Read the following topics next:
n Create a Virtual Machine
n Upload a Virtual Machine to a Remote Server
n Download a Virtual Machine from a Remote Server
n Importing Windows Virtual Machines
n Export a Virtual Machine to OVF Format on Intel-based Mac
n Export a Virtual Machine with vTPM to OVF Format on Intel-based Mac
n Installing and Using VMware Tools
n Cloning Virtual Machines with Fusion Pro
Create a Virtual Machine
How you create a virtual machine depends on its guest operating system. Virtual machines
created using Fusion 6 and later are created with SATA virtual disks or CD drives.
n Creating a Microsoft Windows Virtual Machine
You can create a virtual machine that uses a Microsoft Windows operating system as its
guest operating system.
n Download and Install Windows 11 as Guest Operating System on Apple Silicon Mac
You can now download and install Windows 11 on your Apple Silicon Mac from the Fusion
user interface.
n Download and Generate Windows 11 ISO Using the Command-line Interface
You can now download the Windows 11 ESD file and generate a Windows 11 ISO file via the
command-line user interface using the vmw_esd2iso tool bundled with Fusion.
n Creating a Linux Virtual Machine in Fusion
You can create a virtual machine that uses a Linux distribution as its guest operating system.
VMware by Broadcom
53

n Creating a macOS Virtual Machine in Fusion
You can install Mac OS X, OS X, or macOS in a virtual machine. Fusion creates the virtual
machine, opens the operating system installation assistant, and installs VMware Tools.
VMware Tools loads the drivers required to optimize a virtual machine's performance.
n Creating a Shared Virtual Machine in Fusion
You can create a shared virtual machine in Fusion that can be accessed by all users on the
local Mac host.
n Create a Virtual Machine from a Mac Recovery Partition
You can use the recovery partition on your Mac to create virtual machines running macOS.
n Create a Virtual Machine on a Remote Server
You can create a virtual machine on a remote server, but certain requirements must be met
for the server.
n Create a Virtual Machine for Any Supported Operating System
You can create a virtual machine with a guest operating system that does not have an Easy
Install option if the guest operating system is supported by
Fusion.
n Power On the Boot Camp Partition as a Virtual Machine
You can use the contents of your Boot Camp partition at the same time that you are running
your Mac operating system. To do so, you use Fusion to power on the Boot Camp partition
as a virtual machine.
n Activate Windows in a Virtual Machine
In some cases you must activate Windows when you create, import, or migrate a virtual
machine.
Creating a Microsoft Windows Virtual Machine
You can create a virtual machine that uses a Microsoft Windows operating system as its guest
operating system.
Fusion creates your virtual machine, selects the default Windows installation options, and installs
VMware Tools, which loads the drivers required to optimize your virtual machine's performance.
You can also allow Windows Easy Install to make your home folder available to Windows as a
shared folder. This feature provides you with options, such as sharing files between the virtual
machine and your Mac.
Windows Easy Install is available for the following Windows operating systems:
n Windows 10, Windows 8, Windows 7, Windows Vista, and Windows XP
n Windows Server 2016, Windows Server 2012, Windows Server 2008, Windows Server 2003,
and Windows 2000 Server
Note You must provide the operating system software and its product key. Fusion does not
include any operating system or license.
Using VMware Fusion
VMware by Broadcom 54

If you are not using one of these Windows operating systems in your virtual machine, or if you
are using Windows but want to install the operating system manually, you can use the procedure
for creating a virtual machine for any supported operating system.
Create a Virtual Machine by Using Windows Easy Install
When you create a Microsoft Windows virtual machine, you can use the Fusion Windows Easy
Install feature to install the Windows operating system you supply and to install VMware Tools in
your virtual machine.
Unless you specify a file location for a virtual machine when you create it, Fusion saves the virtual
machine package to a default location, which can vary. See Default File Location of a Virtual
Machine.
Prerequisites
n If you are installing the guest operating system from an image file, verify that the ISO image
file is in a directory that is accessible to the host system.
n If you are installing the guest operating system from a physical disc, insert the operating
system installation disc into your Mac.
Important Fusion does not include any operating systems to install in virtual machines that you
create. You must obtain the operating system and any necessary product keys.
Procedure
1 Select File > New.
A dialog box appears with the Select the Installation Method panel showing.
2 Click Continue.
3 Select the disc or ISO image.
Option
Description
ISO image file a Click Use another disc or disc image, browse to the .iso file for the
operating system, and click
Open to identify the file.
b Select the file from the list in the Create a New Virtual Machine window,
and click Continue.
Physical disc Select the disc you inserted into the Mac from the list and click Continue.
If the disc does not appear in the list, click Use another disc or disc image
and browse to the location of the disc.
4 In the Microsoft Windows Easy Install panel, select the Use Easy Install option, provide the
appropriate information, and click Continue.
n Display Name or Account Name
Using VMware Fusion
VMware by Broadcom 55

For Windows XP and earlier, the entry in the Display Name text box appears in Info
windows as the name your Windows software is registered to. It is not the Windows user
name.
n Password (optional)
The entry in the Password text box is the password for the Windows administrator
account only.
n Windows Product key
Fusion does not provide the product key. The product key is included in the materials
from the Windows operating system vendor.
5 In the Integration panel, indicate how basic file sharing is handled in the new virtual machine.
Option Description
More Seamless Fusion shares the documents and applications on your Mac with Windows.
Files on your Mac that Windows supports open in Windows. Windows can
modify your Mac’s documents, so install and regularly update Windows
antivirus software.
More Isolated Fusion does not share the documents and applications on your Mac with
Windows. To copy files between your Mac and Windows, use drag and
drop.
You can change these settings after the virtual machine is created by selecting Virtual
Machine > Settings and using the Sharing panel.
6 In the Finish panel, you can use default settings or customize the settings before powering
on the virtual machine to start the operating system installation.
Option
Action
To create the virtual machine
according to the specifications listed
in the Finish panel
a Click Finish.
b Indicate the location to save the virtual machine to or accept the default,
such as the your home directory/Virtual Machines folder.
c (Optional) To share the virtual machine with other users on the Mac host,
save the virtual machine to the Shared folder and select the Share this
virtual machine with other users on this Mac check box. Deselect the
check box to save to the Shared folder but not share the virtual machine
with other users on the Mac host. See
Creating a Shared Virtual Machine
in Fusion .
To change disk size or other
standard settings of the virtual
machine
a Click Customize Settings.
b Save the new virtual machine.
c Make changes to the virtual machine’s disk size, processor usage,
removable devices, and other configurations on the Settings window.
Results
Fusion starts the new virtual machine, installs the operating system, and installs VMware Tools.
Using VMware Fusion
VMware by Broadcom 56

Create a Virtual Machine by Using Windows Easy Install and a Disc Image File
When you create a Microsoft Windows virtual machine, you can use the Fusion Windows Easy
Install feature to install the Windows operating system you supply and to install VMware Tools in
your virtual machine.
Unless you specify a file location for a virtual machine when you create it, Fusion saves the virtual
machine package to a default location, which can vary. See Default File Location of a Virtual
Machine.
Prerequisites
Important Fusion does not include any operating systems to install in virtual machines that you
create. You must obtain the operating system and any necessary product keys.
Procedure
1 Select File > New.
A dialog box appears with the Select the Installation Method panel showing.
2 Click Continue.
3 Click Use another disc or disc image, browse for the .iso file for the operating system, and
click Open to identify the file.
4 Select the file from the list in the Create a New Virtual Machine window, and click Continue.
5 In the Microsoft Windows Easy Install dialog box, select the Use Easy Install option, provide
the appropriate information, and click Continue.
n Display Name or Account Name
For Windows XP and earlier, the entry in the Display Name field appears in Info windows
as the name your Windows software is registered to. It is not the Windows user name.
n Password (optional)
The entry in the Password field is the password for the Windows administrator account
only.
n Windows Product key
Fusion does not provide the product key. The product key is included in the materials
from the Windows operating system vendor.
Using VMware Fusion
VMware by Broadcom 57

6 In the Integration panel, indicate how basic file sharing is handled in the new virtual machine.
Option Description
More Seamless Fusion shares the documents and applications on your Mac with Windows.
Files on your Mac that Windows supports open in Windows. Windows can
modify your Mac’s documents, so install and regularly update Windows
antivirus software.
More Isolated Fusion does not share the documents and applications on your Mac with
Windows. To copy files between your Mac and Windows, use drag and
drop.
You can change these settings after the virtual machine is created by selecting Virtual
Machine > Settings > Sharing.
7 In the Finish panel, you can use default settings or customize the settings before powering
on the virtual machine to start the operating system installation.
Option Action
To create the virtual machine
according to the specifications listed
in the Finish panel
a Click Finish.
b Indicate the location to save the virtual machine to or accept the default,
such as the your home directory/Virtual Machines folder.
c (Optional) To share the virtual machine with other users on the Mac host,
save the virtual machine to the Shared folder and select the Share this
virtual machine with other users on this Mac check box. Deselect the
check box to save to the Shared folder but not share the virtual machine
with other users on the Mac host. See
Creating a Shared Virtual Machine
in Fusion .
To change disk size or other
standard settings of the virtual
machine
a Click Customize Settings.
b Save the new virtual machine.
c Make changes to the virtual machine’s disk size, processor usage,
removable devices, and other configurations on the Settings window.
Results
Fusion starts the new virtual machine, installs the operating system, and installs VMware Tools.
Install Windows 11 as the Guest Operating System
Installing Windows 11 on a virtual machine is similar to installing Windows 11 on a physical
computer. When you create a virtual machine with Windows 11 as the guest operating system,
Fusion adds vTPM (virtual Trusted Platform Module) to the virtual machine.
Using VMware Fusion
VMware by Broadcom 58

To install Windows 11, a physical machine must have a TPM chip version 2.0. The vTPM is a
representation of the physical TPM 2.0 on virtual machines. While creating a virtual machine
with Windows 11 as the guest operating system, you must choose the full encryption or fast
encryption of the virtual machine. Fusion adds vTPM to an encrypted virtual machine.
Note After you complete the installation of the Windows 11 operating system, we recommend
that you do not remove the encryption or the vTPM device from the virtual machine for a
seamless experience of using Windows 11.
Note Fusion does not support creating a Windows 11 guest operating system on a remote virtual
machine.
You can install a guest operating system from an installer disc or ISO image file. If the host
configuration does not permit the virtual machine to boot from an installer disc, you can create
an ISO image file from the installer disc.
Prerequisites
n Verify that the operating system is supported. See the online VMware Compatibility Guide on
the VMware Web site.
n See the
VMware Guest Operating System Installation Guide
for information on the guest
operating system that you are installing.
n If you want to install the operating system using an installer CD, ensure that you have
configured the virtual machine to use a physical CD-ROM or DVD drive. Also, ensure that
you have configured the drive to connect at power on.
n If you want to install the guest operating system from an ISO image file, configure the
CD/DVD drive in the virtual machine to point to the ISO image file, and configure the drive to
connect at power on.
Procedure
1 Select File > New.
Using VMware Fusion
VMware by Broadcom 59

A dialog box named Select the Installation Method appears.
2 Select the installation method, and then click Continue.
3 From Choose the Operating System dialog box, select Windows 11 x64 for Intel-based Mac
or Windows 11 64-bit Arm for Apple Silicon Mac.
4 Click Continue.
5 From the Choose Firmware Type dialog box, select a boot firmware and click Continue.
6 From the Choose Encryption dialog box, select an encryption type, enter a password for the
encryption, and then click Continue.
You can choose to encrypt all the files, or only the minimum needed files to support the vTPM
device.
Note You can specify a password of your choice or select the Auto Generate Password
option to automatically generate a password. You can also select the option to remember the
encryption password.
Mac's Keychain stores the password.
7 Create a new virtual disk or use an existing virtual disk, and then click Continue.
8 To change disk size, CPU, memory, or other standard settings of the virtual machine, click
Customize Settings, and make the required changes.
9 Enter the name and location of the virtual machine, and then click Save.
10 Click Finish.
Using VMware Fusion
VMware by Broadcom 60

Results
Fusion starts the new virtual machine and user can install the operating system by following the
installation instructions.
What to do next
Install VMware Tools. You should install VMware Tools before you activate the license for the
operating system.
Download and Install Windows 11 as Guest Operating System on
Apple Silicon Mac
You can now download and install Windows 11 on your Apple Silicon Mac from the Fusion user
interface.
Windows 11 introduces new system requirements for physical and virtual machines.
VMware Fusion 13 provides the necessary hardware and security requirements to satisfy these
requirements, and gives options for the user to customize if necessary.
The following is the list of Windows 11 requirements:
n TPM 2.0 device (or vTPM equivalent)
n UEFI Firmware
Note The best Windows 11 experience requires Virtual Hardware version 21. Virtual Hardware
version 21 is default in Fusion 13.5 and later.
When you install Windows 11 on a physical machine, the PC must have a TPM chip of at least
version 2.0. The vTPM in VMware virtual machines is a representation of a physical TPM 2.0,
and requires a measure of encryption. While creating a Windows virtual machine, you may
choose between a full encryption or a fast encryption of the virtual machine to satisfy the
requirements for the vTPM. After the VM is encrypted, Fusion automatically adds the vTPM
during the installation walkthrough.
These requirements are for both the traditional x86-based Windows as well as Windows for Arm
devices, which is required when you use Fusion on Macs with Apple silicon such as the M1 and M2
chips.
Note If you have previously created an ISO using this method, you can cancel this method
and use another method to install Windows 11 with the already existing ISO file located in the
following directory: ~/Virtual Machines.localized/VMWIsoImages/
Note Fusion does not support creating a Windows 11 guest operating system on a remote virtual
machine.
The following steps provide a walkthrough of a fresh Windows 11 guest installation on an Apple
Silicon Mac host using the new built-in ISO download utility.
Using VMware Fusion
VMware by Broadcom 61
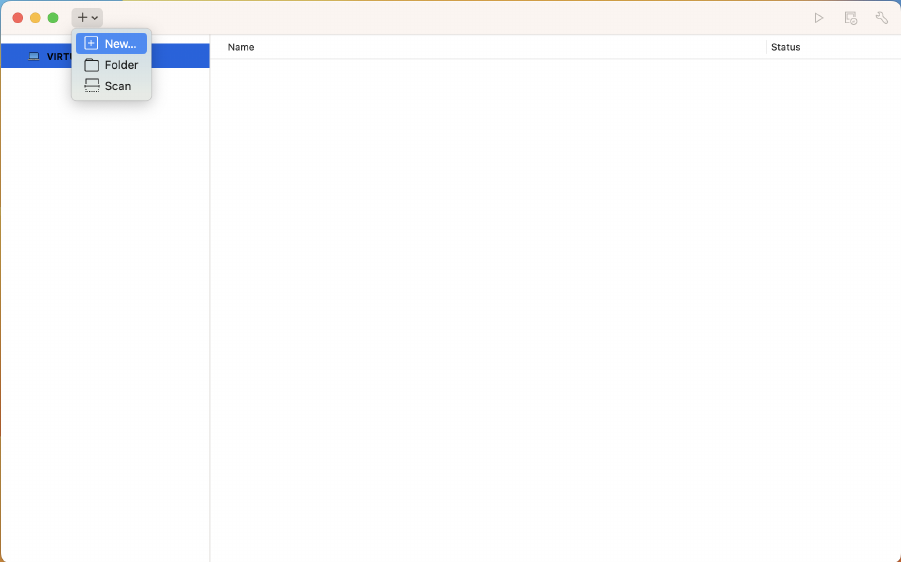
Prerequisites
To use this feature, you must have an Apple Silicon Mac using Fusion Pro or Player version 13.5
and onward.
Procedure
1 Select File > New.
A dialog box named
Select the Installation Method appears.
2 Select Get Windows from Microsoft, and click Continue.
Using VMware Fusion
VMware by Broadcom 62
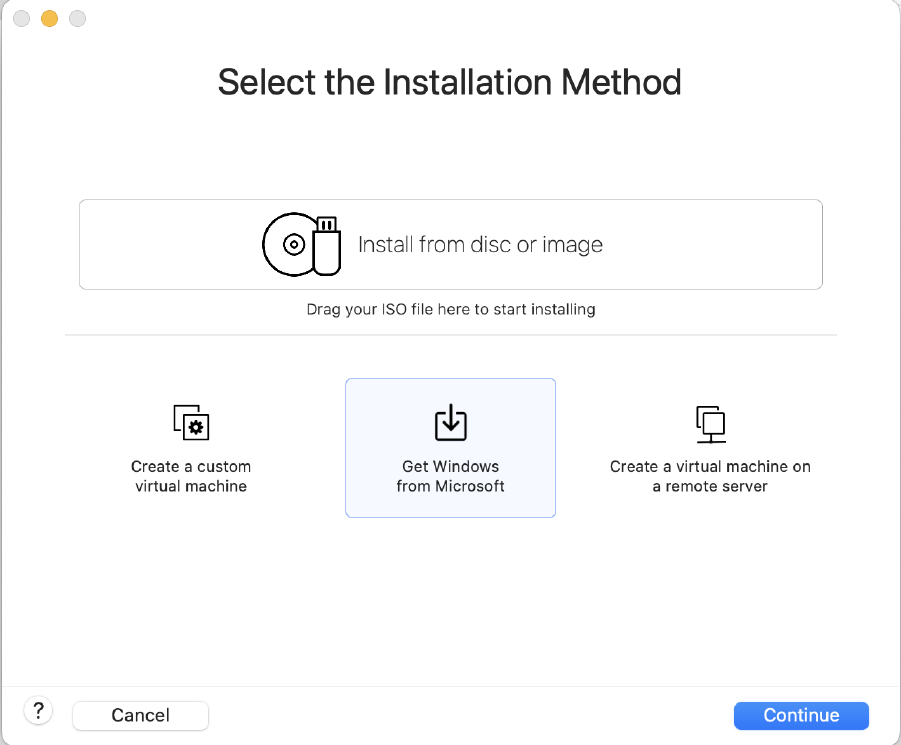
The Download and Install Windows 11 window appears.
3 Click Continue.
4 In the Windows Edition field, select your preferred edition for Windows 11.
Using VMware Fusion
VMware by Broadcom 63
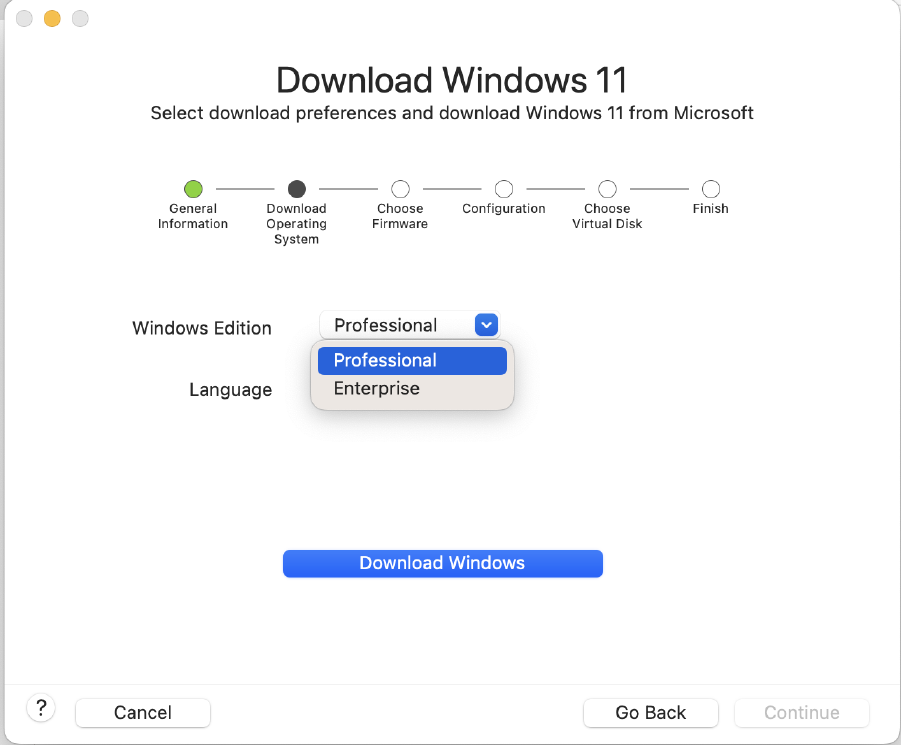
5 In the Language field, select your preferred language for Windows 11.
Using VMware Fusion
VMware by Broadcom 64

6 Click Download Windows.
Fusion downloads and creates the Windows 11 ISO file for installation. After the ISO file is
created, you can see the path to the ISO in the dialog. You may use this ISO file to install
Windows 11 any number of times in any number of virtual machines.
Using VMware Fusion
VMware by Broadcom 65
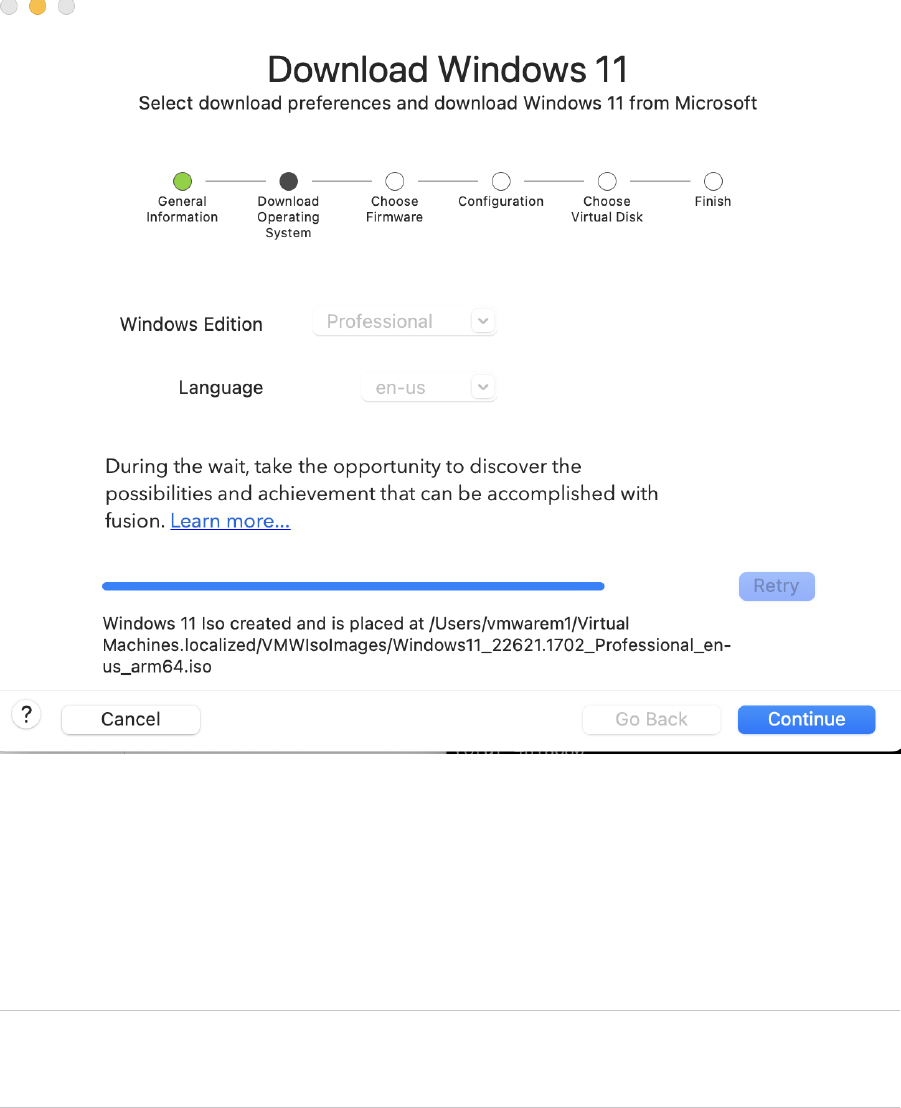
7 Click Continue.
8 From the Choose Firmware Type dialog box, select a boot firmware and click Continue.
9 From the Choose Encryption dialog box, select an encryption type, enter a password for the
encryption, and then click Continue.
You can choose to encrypt all the files, or only the minimum needed files to support the vTPM
device.
Note You can specify a password of your choice or select the Auto Generate Password
option to automatically generate a password. You can also select the option to remember the
encryption password. Mac's Keychain stores the password.
10 Create a new virtual disk or use an existing virtual disk, and then click Continue.
11 To change disk size, CPU, memory, or other standard settings of the virtual machine, click
Customize Settings, and make the required changes.
12 Enter the name and location of the virtual machine, and then click Save.
13 Click Finish.
Using VMware Fusion
VMware by Broadcom 66

Results
Fusion starts the new virtual machine and begins installing Windows 11, taking you through the
out-of-the-box experience.
What to do next
After Windows 11 is successfully installed, you need to install VMware Tools. It is recommended
that you install VMware Tools before you attempt to activate/license the operating system.
For more information on installing VMware Tools on an Apple Silicon Mac, see Manually Install
VMware Tools on Windows
Download and Generate Windows 11 ISO Using the Command-line
Interface
You can now download the Windows 11 ESD file and generate a Windows 11 ISO file via the
command-line user interface using the vmw_esd2iso tool bundled with Fusion.
You can use this feature for both x86-based Mac and Apple Silicon Mac. You can use the
command with the following syntax to get a desired output:
<File name with path for the vmw_esd2iso file> [command] [options]
For example, if you have the vmw_esd2iso file located at /Applications/VMware\ Fusion.app/
Contents/Library/, use the following command to get the URL for downloading the ESD file:
[~/Documents]$ /Applications/VMware\ Fusion.app/Contents/Library/vmw_esd2iso getesdurl
The following table lists the commands you can use with vmw_esd2iso tool:
Table 4-1. vmw_esd2iso Commands
Command Description
getesd Download the Windows 11 ESD file from the Microsoft
website
getesdurl Get the url to download the Windows 11 ESD file from the
Microsoft website
generateiso Generate the Windows 11 ISO file from a Windows 11 ESD
file
Note Fusion does not support creating a Windows 11 guest operating system on a remote virtual
machine.
Prerequisites
To use this feature, you must have Fusion Pro or Player version 13.5 and onward.
Procedure
1 On your Mac, open a terminal window.
Using VMware Fusion
VMware by Broadcom 67

2 To download the Windows 11 ESD file, run the ./vmw_esd2iso getesd command in the
following format:
vmw_esd2iso getesd --edition <Microsoft Windows 11 Edition> --lang <language code>
The following example illustrates the command:
[~/Documents]$ /Applications/VMware\ Fusion.app/Contents/Library/vmw_esd2iso getesd --
edition "Professional" --lang "en-us"
The vmw_esd2iso tool downloads the Windows 11 ESD file in your current working directory.
Note Ensure that you have sufficient privileges to write on the current folder to avoid any
error while downloading the file.
3 To generate the Windows 11 ISO file from the ESD file you downloaded, run the ./
vmw_esd2iso generateiso command in the following format:
vmw_esd2iso generateiso --esd <path to the downloaded ESD file> --drivers "<absolute path
of the driver 1>,<absolute path of the driver 2>"
After you run the command, vmw_esd2iso tool generates the Windows 11 ESD file into an ISO
file and saves it in your current working directory.
Note Ensure that you have sufficient privileges to write on the current folder to avoid any
error while generating and saving the ISO file.
Creating a Linux Virtual Machine in Fusion
You can create a virtual machine that uses a Linux distribution as its guest operating system.
Fusion creates your virtual machine, selects the default Linux installation options, and installs
VMware Tools, which loads the drivers required to optimize your virtual machine's performance.
You can also have Linux Easy Install make your home folder available to Linux as a shared folder,
so that you can share files between the virtual machine and your Mac.
Linux Easy Install is available for the following operating systems:
n Ubuntu 7.10 and later
n Ubuntu Server Edition 8.10 and later
n Red Hat Enterprise Linux 3 and later
n SUSE Linux Enterprise Desktop/Server 10 and later
n Open SUSE 11.3 and later
If you are not using one of these Linux operating systems in your virtual machine, or if you are
using Linux but want to install the operating system manually, you can use the procedure for
creating a virtual machine for any supported operating system.
Using VMware Fusion
VMware by Broadcom 68
Create a Virtual Machine by Using Linux Easy Install and an Installation CD
When you create a Linux virtual machine, you can use the Fusion Linux Easy Install feature
to install the Linux operating system you provide and to install VMware Tools in your virtual
machine.
Unless you specify a file location for a virtual machine when you create it, Fusion saves the virtual
machine package to a default location, which can vary. See Default File Location of a Virtual
Machine.
Prerequisites
You must obtain the operating system installation image. Fusion does not include any operating
systems to install in virtual machines that you create.
Procedure
1 Select File > New.
A dialog box appears with the Select the Installation Method panel showing.
2 Insert the operating system installation CD into your Mac.
Fusion detects it and asks for confirmation that it is the operating system to install.
3 If it is the correct operating system, ensure that Install this operating system is selected and
click Continue to go to the Linux Easy Install panel.
4 In the Linux Easy Install dialog box, select the Use Easy Install option, provide the
appropriate information, and click Continue.
a Enter your Display Name, Account Name, and Password.
b Select Make your home folder accessible to the virtual machine to have Linux Easy Install
configure your home folder as a shared folder, so you can share files between the virtual
machine and your Mac.
5 (Optional) If you selected to make your home folder accessible, select either Read only or
Read & Write for your virtual machine.
Using VMware Fusion
VMware by Broadcom 69

6 In the Finish panel, you can use default settings or customize the settings before powering
on the virtual machine to start the operating system installation.
Option Action
To create the virtual machine
according to the specifications listed
in the Finish panel
a Click Finish.
b Indicate the location to save the virtual machine to or accept the default,
such as the your home directory/Virtual Machines folder.
c (Optional) To share the virtual machine with other users on the Mac host,
save the virtual machine to the Shared folder and select the Share this
virtual machine with other users on this Mac check box. Deselect the
check box to save to the Shared folder but not share the virtual machine
with other users on the Mac host. See
Creating a Shared Virtual Machine
in Fusion .
To change disk size or other
standard settings of the virtual
machine
a Click Customize Settings.
b Save the new virtual machine.
c Make changes to the virtual machine’s disk size, processor usage,
removable devices, and other configurations on the Settings window.
Results
Fusion starts the new virtual machine, installs the operating system, and installs VMware Tools.
Create a Virtual Machine by Using Linux Easy Install and an Image File
When you create a Linux virtual machine, you can use the Fusion Linux Easy Install feature
to install the Linux operating system you provide and to install VMware Tools in your virtual
machine.
Unless you specify a file location for a virtual machine when you create it, Fusion saves the virtual
machine package to a default location, which can vary. See Default File Location of a Virtual
Machine.
Prerequisites
You must obtain the operating system installation image. Fusion does not include any operating
systems to install in virtual machines that you create.
Procedure
1 Select File > New.
A dialog box appears with the Select the Installation Method panel showing.
2 Click Continue.
3 Click Use another disc or disc image, browse for the .iso file for the operating system, and
click Open to identify the file.
4 Select the image in the Create a New Virtual Machine panel and click Continue.
Using VMware Fusion
VMware by Broadcom 70

5 In the Linux Easy Install dialog box, select the Use Easy Install option, provide the
appropriate information, and click Continue.
a Enter your Display Name, Account Name, and Password.
b Select Make your home folder accessible to the virtual machine to have Linux Easy Install
configure your home folder as a shared folder, so you can share files between the virtual
machine and your Mac.
6 If you selected to make your home folder accessible, select either Read only or Read & Write
for your virtual machine.
7 In the Finish panel, you can use default settings or customize the settings before powering
on the virtual machine to start the operating system installation.
Option Action
To create the virtual machine
according to the specifications listed
in the Finish panel
a Click Finish.
b Indicate the location to save the virtual machine to or accept the default,
such as the your home directory/Virtual Machines folder.
c (Optional) To share the virtual machine with other users on the Mac host,
save the virtual machine to the Shared folder and select the Share this
virtual machine with other users on this Mac check box. Deselect the
check box to save to the Shared folder but not share the virtual machine
with other users on the Mac host. See
Creating a Shared Virtual Machine
in Fusion .
To change disk size or other
standard settings of the virtual
machine
a Click Customize Settings.
b Save the new virtual machine.
c Make changes to the virtual machine’s disk size, processor usage,
removable devices, and other configurations on the Settings window.
Results
Fusion starts the new virtual machine, installs the operating system, and installs VMware Tools.
Creating a macOS Virtual Machine in Fusion
You can install Mac OS X, OS X, or macOS in a virtual machine. Fusion creates the virtual machine,
opens the operating system installation assistant, and installs VMware Tools. VMware Tools loads
the drivers required to optimize a virtual machine's performance.
Mac OS X, OS X, or macOS virtual machines that you create in Fusion can run on any
Apple-branded hardware that uses Intel processors. The Apple licensing agreement defines the
situations when it is permissible to virtualize Mac OS X, OS X, or macOS. Fusion does not change
these terms or enable macOS on non-Apple hardware. You cannot use a Mac OS X, OS X, or
macOS virtual machine in another VMware product, such as Workstation Pro.
Fusion supports the following Mac server and client versions for the guest operating system:
n Mac OS X Server 10.5, 10.6
n Mac OS X 10.7
Using VMware Fusion
VMware by Broadcom 71

n OS X 10.8, 10.9, 10.10, 10.11
n macOS 10.12, 10.13, 10.14, 10.15
n macOS 11.x
n macOS 12.x
n macOS 13.0
Fusion does not support the following features for Mac virtual machines:
n Multiple displays
n 3D Accelerated graphics
n Unity view
To install the operating system, use the procedure for creating a virtual machine for any
supported operating system. See Create a Virtual Machine for Any Supported Operating System.
Creating a Shared Virtual Machine in Fusion
You can create a shared virtual machine in Fusion that can be accessed by all users on the local
Mac host.
Unless you specify a file location for a virtual machine when you create it, Fusion saves the virtual
machine package to a default location, such as the your home directory/Virtual Machines
folder. See Default File Location of a Virtual Machine.
This folder has limited permissions that allow only the creator of the virtual machine to use it. To
allow other users on the Mac host to access the virtual machine, save it to the /Users/Shared
folder on the Mac.
With a shared virtual machine, the user can log out of the current account on the Mac host, and
another user on the Mac host can log in to access the virtual machine.
The Run Windows applications from your Mac's Applications folder option is not available on
shared virtual machines.
Important Shared virtual machines in Fusion work differently than shared virtual machines in
Workstation Pro. In Workstation Pro, a shared virtual machine is a virtual machine on the host
system that remote Workstation Pro users can access as a remote virtual machine. In Fusion,
shared virtual machines can be accessed only on the local Mac host.
Create a Virtual Machine from a Mac Recovery Partition
You can use the recovery partition on your Mac to create virtual machines running macOS.
Unless you specify a file location for a virtual machine when you create it, Fusion saves the virtual
machine package to a default location, which can vary. See Default File Location of a Virtual
Machine.
Using VMware Fusion
VMware by Broadcom 72

Prerequisites
n You must have a recovery partition on your Mac to create this kind of virtual machine.
n You must have Mac OS X 10.11 or later.
Procedure
1 Select File > New.
A dialog box appears with the Select the Installation Method panel showing.
2 Click Install macOS from the recovery partition.
3 Select a recovery partition and click Continue.
If you have more than one recovery partition, a list of partitions is presented from which to
choose.
4 Provide information about the virtual machine.
a In the Where text box, indicate the folder to save the virtual machine to or accept the
default, such as the your home directory/Virtual Machines folder.
b To enable the virtual machine to be shared with other users on the Mac host, save the
virtual machine to the Shared folder and select the Share this virtual machine with other
users on this Mac check box.
c Click Save.
5 In the Finish panel, you can use default settings or customize the settings before powering
on the virtual machine to start the operating system installation.
Option
Action
To create the virtual machine
according to the specifications listed
in the Finish panel
n Click Finish.
To change disk size or other
standard settings of the virtual
machine
a Click Customize Settings.
b Make changes to the virtual machine’s disk size, processor usage,
removable devices, and other configurations on the Settings window.
Create a Virtual Machine on a Remote Server
You can create a virtual machine on a remote server, but certain requirements must be met for
the server.
Prerequisites
n You have login credentials for the server where you want to create the virtual machine.
n The server is defined in the Virtual Machine Library.
n Sufficient space exists on the server to accommodate the virtual machine.
Using VMware Fusion
VMware by Broadcom 73

n The remote server is running VMware Workstation Pro, VMware ESXi or VMware vCenter
Server.
n Confirm that the firmware type with which you plan to configure the virtual machine is
supported by the guest operating system. See Configure a Firmware Type.
Important Fusion does not include operating systems to install in virtual machines that you
create. You must obtain the operating system and any necessary product keys.
Procedure
1 Select File > New.
A dialog box appears with the Select the Installation Method panel showing.
2 Click Create a virtual machine on a remote server.
3 Click Continue.
4 Select the server from the list in the Choose a Server window, and click Continue.
5 (Optional) If the server supports folders, select a folder location for the virtual machine and
click Continue.
6 Select the host and datastore from the Choose a Host and Datastore window, and click
Continue.
7 Select a hardware version from the Choose a Hardware Version drop-down menu, and click
Continue.
8 Select a network option for the virtual machine.
Option
Description
Custom To configure a network connection for the virtual machine, use the Custom
drop-down menu to select a network option.
Do not use a network connection To create the virtual machine without a network connection, select the Do
not use a network connection option.
9 Select the guest operating system for the virtual machine and click Continue.
10 Select the firmware type and click Continue.
11 Configure the virtual disk by creating a virtual disk or use an existing virtual disk. If you create
a virtual disk, use the disk size slider to specify the size of the virtual disk and specify the bus
type. Click Continue.
The Finish window appears.
12 (Optional) Change the name of the new remote virtual machine.
13 Click Finish.
The new remote virtual machine appears in Virtual Machine Library under the remote server.
Using VMware Fusion
VMware by Broadcom 74

Create a Virtual Machine for Any Supported Operating System
You can create a virtual machine with a guest operating system that does not have an Easy
Install option if the guest operating system is supported by Fusion.
Unless you specify a file location for a virtual machine when you create it, Fusion saves the virtual
machine package to a default location, which can vary. See Default File Location of a Virtual
Machine.
Prerequisites
n If you are installing the guest operating system from an image file, verify that the image file is
in a directory that is accessible to the host system.
The image file is an ISO file or, for a macOS 10 virtual machine, a .app file. A .app file for a
macOS 10 operating system is available at the App Store.
n If you are installing the guest operating system from a physical disc, insert the operating
system installation disc into your Mac.
Important Fusion does not include any operating systems to install in virtual machines that you
create. You must obtain the operating system and any necessary product keys.
Procedure
1 Select File > New.
A dialog box appears with the Select the Installation Method panel showing.
2 Locate an operating system installation disc image file and drag and drop it to Install from
disc or image.
The Create a New Virtual Machine assistant starts.
3 Click Continue.
n If you are installing the guest operating system from an image file, verify that the image
file is in a directory that is accessible to the host system.
n If you are installing the guest operating system from a physical disc, insert the operating
system installation disc into your Mac.
Important Fusion does not include any operating systems to install in virtual machines that
you create. You must obtain the operating system and any necessary product keys.
If you are installing a Windows or Linux operating system, the Easy Install panel appears.
4 (Optional) Deselect Use Easy Install and click Continue to skip this panel of the assistant.
Using VMware Fusion
VMware by Broadcom 75

5 In the Finish panel, you can use default settings or customize the settings before powering
on the virtual machine to start the operating system installation.
Option Action
To create the virtual machine
according to the specifications listed
in the Finish panel
a Click Finish.
b Indicate the location to save the virtual machine to or accept the default,
such as the your home directory/Virtual Machines folder.
c (Optional) To share the virtual machine with other users on the Mac host,
save the virtual machine to the Shared folder and select the Share this
virtual machine with other users on this Mac check box. Deselect the
check box to save to the Shared folder but not share the virtual machine
with other users on the Mac host. See
Creating a Shared Virtual Machine
in Fusion .
To change disk size or other
standard settings of the virtual
machine
a Click Customize Settings.
b Save the new virtual machine.
c Make changes to the virtual machine’s disk size, processor usage,
removable devices, and other configurations on the Settings window.
What to do next
After you install the operating system in the virtual machine, install VMware Tools.
Power On the Boot Camp Partition as a Virtual Machine
You can use the contents of your Boot Camp partition at the same time that you are running your
Mac operating system. To do so, you use Fusion to power on the Boot Camp partition as a virtual
machine.
Boot Camp is Apple software that enables an Intel-based Mac to run Windows operating
systems. Boot Camp requires you to choose between Mac or Windows at boot time. Boot
Camp creates separate Mac and Windows partitions on your hard disk to create a dual-boot
environment. When you use your Windows Boot Camp partition as a Fusion virtual machine, you
can perform the following tasks:
n Use your Boot Camp virtual machine and your Mac without rebooting and switching between
them.
n Share files between your Boot Camp virtual machine and your Mac, through shared folders,
dragging files, or cutting and pasting text.
Note Windows reactivation complications can occur if you do not install VMware Tools. In such
a case, if you reactivate Windows in your Boot Camp virtual machine, and subsequently boot
your Boot Camp partition natively, you will be prompted to reactivate Windows. Reactivating
Windows in your native Boot Camp partition will result in your Boot Camp virtual machine
requiring reactivation the next time you power it on, and so forth. Installing VMware Tools solves
this problem.
Using VMware Fusion
VMware by Broadcom 76
Prerequisites
You must have a Boot Camp partition in place before you start this procedure.
You must have administrator privileges to use the Boot Camp partition as a virtual machine.
Procedure
1 Select Window > Virtual Machine Library.
2 In the Virtual Machine Library window, click the Boot Camp thumbnail in the list of virtual
machines, which identifies the partition that Fusion detected.
3 (Optional) Type your Mac password to access the Boot Camp partition.
Fusion creates a virtual machine that uses your Boot Camp partition and starts Windows.
4 Follow the onscreen instructions and restart your virtual machine when prompted.
After Windows boots from your Boot Camp virtual machine, Fusion starts the installation
of VMware Tools. VMware Tools enables full virtual machine functionality and optimizes
performance for your Boot Camp partition when you use the partition as a virtual machine.
5 When the VMware Tools installation is complete, reboot your computer.
What to do next
The first time you power on your Boot Camp virtual machine after you install VMware Tools, you
must reactivate Windows.
Activate Windows in a Virtual Machine
In some cases you must activate Windows when you create, import, or migrate a virtual machine.
When you install Windows on a computer, you must activate it to use it. You activate Windows
either over the Internet or by phone with Microsoft Support. When the Windows operating
system starts up, it checks to see if it is running on the same hardware on which it was originally
installed. If the hardware has changed, the Windows operating system requires reactivation.
If you install Windows as a guest operating system in a new virtual machine, it requires activation
the same as if you had installed it on a physical computer. If you import a virtual machine from
another source, if you run the Boot Camp partition as a virtual machine, or if you migrate a
physical PC to a virtual machine, Windows recognizes that the virtual hardware is different.
The type of license you have for your Windows operating system can affect how you activate
Windows after you start to use it in a Fusion virtual machine.
n With an OEM license, Windows is tied directly to the hardware on which it was loaded
by the manufacturer. Most pre-installed versions of Windows have OEM licenses. OEM
licenses generally cannot be transferred to another computer, or to a virtual machine. If
you use the Fusion Migrate Your PC feature to migrate one of these types of systems
Using VMware Fusion
VMware by Broadcom 77
to a virtual machine, you might be required to purchase a second license (or product
key) from Microsoft. If a second product key is required, you can get that through the
Microsoft representative when you call Microsoft Support to activate the operating system
now residing in the virtual machine.
n With a retail license, when you buy Windows from a vendor, the license enables you to
change platforms as often as you want. In this case, you can reactivate Windows over the
Internet, or by phone with Microsoft Support.
n With an enterprise license, you can move the operating system around freely.
Prerequisites
Install VMware Tools in the virtual machine before you activate Windows. VMware Tools keeps
track of the activation keys. Without VMware Tools installed, you must reactivate Windows each
time you start up the virtual machine.
Procedure
u Activate Windows online or by phone.
The Help and Support item on the Windows Start menu enables you to find specific
information about activation for that version of the operating system.
What to do next
If you have activation questions, contact Microsoft.
Upload a Virtual Machine to a Remote Server
When you upload a virtual machine to a remote server, Fusion Pro copies the virtual machine to
the remote host and datastore that you select. The original virtual machine remains on the host
system.
Prerequisites
Verify that the following conditions are met:
n You have login credentials for the server where you want to upload the virtual machine.
n The server is defined in the Virtual Machine Library.
n Sufficient space exists on the server to accommodate the virtual machine.
n The remote server is running VMware ESXi or VMware vCenter Server.
n The virtual machine is not encrypted. You cannot upload an encrypted virtual machine.
n The virtual machine is not powered on or suspended. It must be powered off.
Procedure
1 Select File > Connect to Server.
Using VMware Fusion
VMware by Broadcom 78
2 Enter the name of the host server or click the Recent Servers drop-down menu to select a
server from the list.
3 Enter your login credentials and click Connect.
4 Select a virtual machine from the Virtual Machine Library.
5 Drag the virtual machine to the server.
6 In the Upload Virtual Machine dialog box, select a host and a datastore folder or shared
folder.
7 Click Upload.
Download a Virtual Machine from a Remote Server
Your users can download a virtual machine from a remote server.
Prerequisites
Verify that the following conditions are met:
n You have login credentials for the server where you want to download the virtual machine.
n The server is defined in the Virtual Machine Library.
n Sufficient space exists on the Mac host to accommodate the virtual machine.
n The remote server is running VMware ESXi or VMware vCenter Server.
n The virtual machine is not powered on or suspended. It must be powered off.
Procedure
1 Select File > Connect to Server.
2 Enter the name of the host server or click the Recent Servers icon to select a server from the
list of recently accessed servers.
3 Enter your login credentials and click Connect.
4 Select a virtual machine from the remote server.
5 Drag the virtual machine to the Virtual Machine Library.
6 Click Save.
Importing Windows Virtual Machines
You can import into Fusion virtual machines that you created with Parallels Desktop, as well as
virtual machines using the Open Virtualization Format (OVF).
Fusion can import virtual machines created with Parallels or OVF.
Using VMware Fusion
VMware by Broadcom 79
When you import a Parallels virtual machine, Fusion creates a VMware virtual machine based on
the original virtual machine. The import process is nondestructive, so you can continue to use the
original source virtual machine with the product you use to create the source virtual machine.
Fusion can also import the contents of the Boot Camp partition as a virtual machine, creating
a completely new VMware virtual machine based on the partition. This is a separate entity, not
tied to the partition like the virtual machine described in Power On the Boot Camp Partition as
a Virtual Machine. You can then reclaim the space by deleting the Boot Camp partition, which
restores the drive to a single volume.
Supported Guest Operating Systems for Import
A guest operating system is the system that runs in a virtual machine. Fusion supports importing
Parallels virtual machines with certain operating systems.
Fusion supports importing the following operating systems:
n Microsoft Windows 10
n Microsoft Windows 8
n Microsoft Windows 7
n Microsoft Windows Vista
n Microsoft Windows XP Service Pack 3
n Microsoft Windows XP Service Pack 2
Virtual machines must be powered off before you import them.
If your copy of Windows was not licensed with a volume-license key, you might need to
reactivate it when it starts inside Fusion.
How Importing Affects Settings
You might have to modify the imported virtual machine, depending on settings and virtual
hardware.
The imported VMware virtual machine contains an exact copy of the disk state from your source
virtual machine, except for some hardware-dependent drivers and sometimes the mapped drive
letters. Imported virtual machines are created with IDE or SCSI virtual disks. You can manually
change the disk to SATA or NVMe when the import process is complete.
Settings from the Source Computer
The following settings from the source computer remain identical:
n Operating system configuration (computer name, security ID, user accounts, profiles and
preferences, and so on)
n Applications and data files
n The volume serial number of each disk partition
Using VMware Fusion
VMware by Broadcom 80
Because the target and the source virtual machines or system images have the same identities
(name, SID, and so on), running both on the same network can result in conflicts. To redeploy the
source virtual machine or system image, ensure that you do not run both the source and target
images or virtual machines on the same network at the same time.
For example, if you use the Fusion Importer to test the viability of running a Parallels virtual
machine as a VMware virtual machine without first decommissioning the original non-VMware
machine, you must resolve the duplicate ID problem first.
Changes to Virtual Hardware
Most imported applications should function correctly in the VMware virtual machine because their
configuration and data files have the same location as the source virtual machine. Applications
might not work if they depend on specific characteristics of the underlying hardware such as the
serial number or the device manufacturer.
When you troubleshoot after a virtual machine import, notice the following potential hardware
changes:
n CPU model and serial numbers (if activated) can be different after the import. They
correspond to the physical computer hosting the VMware virtual machine.
n Ethernet adapter can be different (AMD PCNet or VMXnet) with a different MAC address.
Each interface’s IP address must be individually reconfigured.
n Graphics card can be different (VMware SVGA card).
n Numbers of disks and partitions are the same, but each disk device can have a different
model and different manufacturer strings.
n Primary disk controllers can be different from the source machine’s controllers.
n Applications might not work if they depend on devices that are not available from within a
virtual machine.
Import a Parallels Virtual Machine
You can import existing third-party virtual machines and run them in Fusion.
Procedure
1 Select File > Import.
2 Browse to the existing virtual machine you want to import and click Open.
3 Type the name for the imported virtual machine in the Save As text box and indicate where
to save it.
The default destination is the Virtual Machines folder created by Fusion.
Fusion displays the disk space needed for the import, and the space available on the current
disk.
Using VMware Fusion
VMware by Broadcom 81
4 Click Import.
When the import is complete, the virtual machine appears in the virtual machine list, in the
powered-off state.
5 Click Finish.
Fusion installs VMware Tools after the virtual machine powers on, and reboots the system
after the Tools installation is complete.
Results
You have a separate Fusion version of the third-party virtual machine.
Import the Boot Camp Partition
You can import the Boot Camp partition as a virtual machine, creating a VMware virtual machine
that copies the partition.
Prerequisites
Power on the boot camp partition. See Power On the Boot Camp Partition as a Virtual Machine.
Procedure
1 Select Window > Virtual Machine Library.
2 In the Virtual Machine Library window, control-click the Boot Camp virtual machine and click
Import.
3 Change the name for the imported virtual machine in the Save As text box from the default
Boot Camp to something unique, and indicate where to save it.
The default destination is the Virtual Machines folder created by Fusion.
Fusion displays the disk space needed for the import, and the space available on the current
disk.
4 Click Import.
When the import is complete, the virtual machine appears in the virtual machine list, in the
powered-off state.
5 Click Finish.
Fusion installs VMware Tools after the virtual machine powers on, and reboots the system
after the Tools installation is complete.
Import an Open Virtualization Format Virtual Machine on Intel-based
Mac
You can import an Open Virtualization Format (OVF) virtual machine and run it in Fusion. You can
import both .ovf and .ova files.
Fusion converts the virtual machine from OVF format to VMware runtime (.vmx) format.
Using VMware Fusion
VMware by Broadcom 82

OVF is a platform-independent, efficient, extensible, and open packaging and distribution
format for virtual machines. For example, you can import OVF virtual machines exported from
Workstation Pro into Fusion. You can import OVF 1.x files only.
You can also use the standalone OVF Tool to convert an OVF virtual machine to VMware runtime
format. For information about using the OVF Tool, see the
OVF Tool User Guide
.
Prerequisites
Download or copy the OVF virtual machine file (.ovf or .ova file) to a location that is accessible
to your Mac.
Procedure
1 Select File > Import.
2 Click Choose file and browse to the .ovf or .ova file and click Open.
3 Type the name for the imported virtual machine in the Save As text box and indicate where
to save it.
The default destination is the Virtual Machines folder created by Fusion.
4 Click Save.
Fusion performs OVF specification conformance and virtual hardware compliance checks. A
status bar indicates the progress of the import process.
Note You must use the graphical user interface to import an OVF virtual machine file with
vTPM placeholder. You cannot import such OVF files using the OVF tool command line. If the
OVF file contains a vTPM device placeholder, the Choose Encryption window appears.
5 If the Choose Encryption window appears, choose an encryption option, enter a password,
and then click Continue.
Results
After the import is complete, the virtual machine appears in the virtual machine library and in a
separate virtual machine window. The virtual machine is shut down.
Note If the OVF file contains a vTPM placeholder, Fusion adds the vTPM device to the virtual
machine after it is encrypted.
Export a Virtual Machine to OVF Format on Intel-based Mac
You can export a virtual machine from Fusion Pro to Open Virtualization Format (OVF). You can
export both .ovf and .ova files.
Fusion Pro converts the virtual machine from VMware runtime (.vmx) format to OVF format.
Using VMware Fusion
VMware by Broadcom 83
OVF is a platform-independent, efficient, extensible, and open packaging and distribution format
for virtual machines. OVF format provides a complete specification of the virtual machine,
including the full list of required virtual disks and the required virtual hardware configuration. The
virtual hardware configuration includes CPU, memory, networking, and storage. An administrator
can quickly provision an OVF-formatted virtual machine with little or no intervention.
You can also use the standalone version of OVF Tool to convert a virtual machine that is in
VMware runtime format to an OVF virtual machine. The standalone version of OVF Tool is
installed in the Fusion Pro installation directory under Contents/Library/VMware OVF Tool .
See the
OVF Tool User Guide
documentation on the VMware Web site for information about
using OVF Tool.
Prerequisites
n Verify that the virtual machine is not encrypted. You cannot export an encrypted virtual
machine to OVF format.
n Verify that the virtual machine is powered off.
Procedure
1 Select the virtual machine and select File > Export to OVF.
2 Enter a name for the OVF file and specify a directory in which to save it.
3 Specify whether to export the virtual machine as an OVF, a folder with separate files, or as an
OVA, a single-file archive.
4 Click Export to start the OVF export process.
The export process can take several minutes. A status bar indicates the progress of the
export process.
Export a Virtual Machine with vTPM to OVF Format on Intel-
based Mac
You can manually export a virtual machine with vTPM device from Fusion Pro to Open
Virtualization Format (OVF) using the command line of OVF Tool 4.5 or later. The OVF Tool
is bundled with Fusion. You can export to both .ovf and .ova files.
A virtual machine with vTPM is always encrypted. You cannot directly convert a virtual machine
with vTPM device in Fusion Pro from VMware runtime (.vmx) format to OVF format because
the OVF Tool does not support export of an encrypted virtual machine. Before you proceed
with the manual export, you must manually remove the vTPM device and decrypt the virtual
machine. After you decrypt the virtual machine, export the virtual machine to OVF with a vTPM
placeholder.
The following steps guide you through the process of manually removing the vTPM, decrypting
the virtual machine, and then exporting to OVF using command line.
Using VMware Fusion
VMware by Broadcom 84

Prerequisites
n Remove any application in the virtual machine that uses the vTPM device.
Note If you do not remove an application in the virtual machine that uses the vTPM, the
application might not function properly when you later import the virtual machine with the
vTPM device.
n Verify that the virtual machine is powered off.
Procedure
1 To remove the vTPM, perform the following steps:
a Select the required virtual machine in the Virtual Machine Library window and click
Settings.
b Under Removable Devices in the Settings window, click Trusted Platform Module.
c Click Remove Trusted Platform module.
d To confirm the removal of the vTPM, click Remove.
2 To remove the virtual machine encryption, perform the following steps:
a Select the required virtual machine in the Virtual Machine Library window and click
Settings.
b Under Other in the Settings window, click Encryption.
c Select Virtual machine is not encrypted.
d Type the password for the virtual machine.
e Click OK.
3 To export the virtual machine to OVF with an added vTPM placeholder, use the following
command in the OVF Tool bundled with Fusion:
main % '/Applications/VMware Fusion.app/Contents/Library/VMware OVF Tool/ovftool' --
X:logLevel=verbose --exportFlags=extraconfig --allowExtraConfig --addDevice:vtpm '<path of
the virtual machine vmx file with the file name>' '<path to export the ovf file with the
file name>'
The following is an example command to export a virtual machine named
vm
:
main % '/Applications/VMware Fusion.app/Contents/Library/VMware OVF Tool/ovftool'
--X:logLevel=verbose --exportFlags=extraconfig --allowExtraConfig --addDevice:vtpm '/
Users/<userid>/Virtual Machines.localized/vm.vmwarevm/vm.vmx' '/Users/<userid>/Virtual
Machines.localized/ovfExportPath/vm.ovf'
Note Fusion does not provide a graphical user interface to export a virtual machine with
a vTPM placeholder. A user must use the command line to export a virtual machine with a
vTPM placeholder.
Using VMware Fusion
VMware by Broadcom 85

After you export the virtual machine, the OVF file shows the added vTPM placeholder in the
following format:
<Item ovf:required="false">
<rasd:AutomaticAllocation>false</rasd:AutomaticAllocation>
<rasd:ElementName>Virtual TPM</rasd:ElementName>
<rasd:InstanceID>14</rasd:InstanceID>
<rasd:ResourceSubType>vmware.vtpm</rasd:ResourceSubType>
<rasd:ResourceType>1</rasd:ResourceType>
</Item>
Installing and Using VMware Tools
VMware Tools is a suite of utilities that enhances the performance of the virtual machine's guest
operating system and improves management of the virtual machine.
For example, the following features are just some of the features that are available only if
VMware Tools is installed:
n Significantly faster graphics performance and Windows Aero on operating systems that
support Aero
n The Unity feature, which enables an application in a virtual machine to appear on the host
desktop like any other application window
n Shared folders between host and guest file systems
n Copying and pasting text, graphics, and files between the virtual machine and the host or
client desktop
n Improved mouse performance
n Synchronization of the clock in the virtual machine with the clock on the host or client
desktop
n Scripting that helps automate guest operating system operations
n Enables guest customization for virtual machines.
Although the guest operating system can run without VMware Tools, you would lose important
functionality and convenience.
You can use the Windows Easy Install or Linux Easy Install feature to install VMware Tools as
soon as the operating system is finished installing.
In the case of Windows Easy Install or Linux Easy Install, Fusion installs VMware Tools as soon as
it finishes installing the operating system. When you finish installing the operating system in your
new virtual machine by any other means (rebooting the virtual machine when prompted), install
VMware Tools.
Not all features are supported on all guests.
Using VMware Fusion
VMware by Broadcom 86

You can use the VMware Tools control panel to set various options that optimize your guest
operating system for use in a virtual machine.
Note If you have not downloaded the latest version of the VMware Tools ISO file or the VMware
Tools ISO file for that operating system, you are prompted to download the file from https://
packages-prod.broadcom.com/tools/frozen/. Alternatively, on the host, from the VMware Fusion
menu bar, select Virtual Machine > Install VMware Tools. You will get a link to download the
specific VMware Tools ISO file.
Installing or Upgrading VMware Tools
Installing VMware Tools is part of the process of creating a new virtual machine, and upgrading
VMware Tools is part of the process of keeping your virtual machine up to current standards.
How you install or upgrade VMware Tools depends on the operating system and the source you
use for the tools.
VMware upgrades VMware Tools frequently to support new devices and to add enhancements
that improve the performance of your virtual machines. When you upgrade Fusion, you should
also upgrade VMware Tools.
In Windows virtual machines, you can set VMware Tools to notify you when an upgrade is
available. If this notification option is enabled, the VMware Tools icon in the Windows taskbar
includes a yellow caution icon ( ) when a VMware Tools upgrade is available.
Manually Install VMware Tools on Windows
You can manually install VMware Tools on a windows virtual machine. The Guest operating
systems that support VMware Tools are Windows 2000 and earlier, Windows XP, Windows
Server 2003, Windows Vista and later versions.
Prerequisites
n Power on the virtual machine.
n Verify that the guest operating system is running.
n If you connected the virtual machine’s virtual CD/DVD drive to an ISO image file when
you installed the operating system, change the setting so that the virtual CD/DVD drive is
configured to autodetect a physical drive.
The autodetect setting enables the virtual machine's first virtual CD/DVD drive to detect and
connect to the VMware Tools ISO file for a VMware Tools installation. This ISO file is detected
as a physical CD by your guest operating system. Use the virtual machine settings editor to
set the CD/DVD drive to autodetect a physical drive.
n Log in as an administrator unless you are using an older Windows operating system. Any user
can install VMware Tools in a Windows 95, Windows 98, or Windows ME guest operating
system. For operating systems later than these, you must log in as an administrator.
Using VMware Fusion
VMware by Broadcom 87

n The AppDefense component is not installed by default. You must perform a custom
installation and include that component.
Procedure
1 On the host, from the VMware Fusion menu bar, select Virtual Machine > Install VMware
Tools.
If an earlier version of VMware Tools is installed, the menu item is Update VMware Tools.
If the VMware Tools ISO file for the guest operating system is not available with the product,
you get a pop-up with a link to download the VMware Tools ISO file.
2 If you are installing VMware Tools for the first time, click OK on the Install VMware Tools
information page.
If autorun is enabled for the CD-ROM drive on the guest operating system, the VMware Tools
installation wizard starts.
To launch the wizard manually if autorun is not enabled, click Start > Run and enter
D:\setup.exe, where D: is your first virtual CD-ROM drive. Use D:\setup64.exe for 64-bit
Windows guest operating system.
Note If you use Windows on ARM for the virtual machine, perform the following steps to
install or upgrade the VMware Tools:
a Open Windows Terminal as an administrator.
b Navigate to the directory containing the ISO image of the VMware Tools for Windows on
ARM.
c Type setup.ps1, and then press Enter.
d For silent installation, run the following command: setup.ps1 -Silent
e To install specific drivers in VMware Tools, specify the drivers when running the install
command in the following format: setup.ps1 -Drivers <driver1>,<driver2>,...
Currently, for Windows on ARM, the VMware Tools is available with the following drivers:
n VMXNet3
n SVGA
3 Follow the on-screen prompts.
4 If the New Hardware wizard appears, follow the prompts and accept the defaults.
Note If you are installing a beta or RC version of VMware Tools and you see a warning that a
package or driver is not signed, click Install Anyway to complete the installation.
5 When prompted, reboot the virtual machine.
Results
Using VMware Fusion
VMware by Broadcom 88
What to do next
If a new virtual hardware version is available for the virtual machine, upgrade the virtual
hardware.
Manually Install VMware Tools on Linux
You can manually install VMware Tools on a Linux virtual machine using the command line. For
later Linux distributions, use the integrated open-vm-tools version.
For more information about Linux distributions supported by Open VM Tools, see Open VM
Tools (README) and the VMware Compatibility Guide at https://www.vmware.com/resources/
compatibility/search.php.
VMware Tar Tool for Linux virtual machine is feature-frozen at version 10.3.10, so the tar tools
(linux.iso) included in Workstation Player is 10.3.10 and will not be updated. Due to this change,
the Install/Update/Reinstall VMware Tools menu is not available for the following Linux virtual
machines:
n Modern Linux distributions not officially supported by tar tools.
n Red Hat Enterprise Linux 8 and later releases.
n CentOS 8 and later releases.
n Oracle Linux 8 and later releases.
n SUSE Linux Enterprise 15 and later releases.
n Linux kernel version is 4.0 or later, and the version of the installed Open VM Tools is 10.0.0 or
later.
n Linux kernel version is 3.10 or later, and the version of the installed Open VM Tools is 10.3.0 or
later.
For the Linux virtual machines that have Open VM Tools installed but are not in the scope
mentioned in the preceding bullet, Install/Update/Reinstall VMware Tools menu is enabled, so
that you can install bundled tar tools on top of Open VM Tools to get Shared Folder (HGFS)
feature support.
For old Linux virtual machines not supported by Open VM Tools, perform the following steps to
install tar tools.
Prerequisites
n Power on the virtual machine.
n Verify that the guest operating system is running.
n Because the VMware Tools installer is written in Perl, verify that Perl is installed in the guest
operating system.
Using VMware Fusion
VMware by Broadcom 89

Procedure
1 On the host, from the VMware Fusion menu bar, select Virtual Machine > Install VMware
Tools.
If an earlier version of VMware Tools is installed, the menu item is Update VMware Tools.
If the VMware Tools ISO file for the guest operating system is not available with the product,
you get a pop-up with a link to download the VMware Tools ISO file.
2 In the virtual machine, open a terminal window. Run the mount command with no arguments
to determine whether your Linux distribution automatically mounted the VMware Tools virtual
CD-ROM image.
If the CD-ROM device is mounted, the CD-ROM device and its mount point are listed in a
manner similar to the following output:
/dev/cdrom on /mnt/cdrom type iso9660 (ro,nosuid,nodev)
If the VMware Tools virtual CD-ROM image is not mounted, mount the CD-ROM drive.
a If a mount point directory does not already exist, create it.
mkdir /mnt/cdrom
Some Linux distributions use different mount point names. For example, on some
distributions the mount point is /media/VMware Tools rather than /mnt/cdrom. Modify
the command to reflect the conventions that your distribution uses.
b Mount the CD-ROM drive.
mount /dev/cdrom /mnt/cdrom
Some Linux distributions use different device names or organize the /dev directory
differently. If your CD-ROM drive is not /dev/cdrom or if the mount point for a CD-ROM
is not /mnt/cdrom, modify the command to reflect the conventions that your distribution
uses.
3 Change to a working directory, for example, /tmp.
cd /tmp
4 Delete any previous vmware-tools-distrib directory before you install VMware Tools.
The location of this directory depends on where you placed it during the previous installation.
Often this directory is placed in /tmp/vmware-tools-distrib.
List the contents of the mount point directory and note the file name of the VMware Tools tar
installer.
ls mount-point
Using VMware Fusion
VMware by Broadcom 90

Uncompress the installer.
tar zxpf /mnt/cdrom/VMwareTools-x.x.x-yyyy.tar.gz
The value
x.x.x
is the product version number, and
yyyy
is the build number of the product
release.
5 If necessary, unmount the CD-ROM image.
umount /dev/cdrom
If your Linux distribution automatically mounted the CD-ROM, you do not need to unmount
the image.
6 Run the installer and configure VMware Tools as a root user
cd vmware-tools-distrib
sudo ./vmware-install.pl
Follow the prompts to accept the default values, if appropriate for your configuration.
Follow the instructions at the end of the script.
Depending on the features you use, these instructions can include restarting the X session,
restarting networking, logging in again, and starting the VMware User process. You can
alternatively reboot the guest operating system to accomplish all these tasks.
Usually, the vmware-config-tools.pl configuration file runs after the installer file finishes
running. If you attempt to install a tar installation over an RPM installation, or the reverse,
the installer detects the previous installation and must convert the installer database format
before continuing.
Note For newer Linux distributions, users are prompted to choose the integrated open-vm-
tools.
What to do next
If a new virtual hardware version is available for the virtual machine, upgrade the virtual
hardware.
Manually Install VMware Tools on macOS
You can install or upgrade VMware Tools on a macOS virtual machine using an installer assistant.
For macOS VMs, the VMware Tools contains the following two kernel extension modules that are
vital for certain features when running on Fusion:
n com.vmware.kext.vmhgfs: For hgfs or shared folder support
Using VMware Fusion
VMware by Broadcom 91

n com.vmware.kext.VMwareGfx: For VMware video driver
Note macOS Big Sur onwards, Apple has deprecated support for KEXT kernel extension
modules. The KEXT modules are not loaded automatically when you install the VMware tools.
If you want to use the features associated with the kernel extension modules, ensure that you
manually allow the loading of VMware kernel extension modules when prompted with an option.
Prerequisites
n Power on the virtual machine.
n Verify that the guest operating system is running.
Procedure
1 On the host, from the VMware Fusion menu bar, select Virtual Machine > Install VMware
Tools.
If an earlier version of VMware Tools is installed, the menu item is Update VMware Tools.
If the VMware Tools ISO file for the guest operating system is not available with the product,
you get a pop-up with a link to download the VMware Tools ISO file.
2 On the Connect VMware Tools installer CD pop-up, click Install
3 On the VMware Tools dialog box, click Install VMware Tools.
a On the Welcome to the VMware Tools Installer page, click Continue.
b Select Standard Install on 'Macintosh HD', and then click Install.
If this is a first-time installation on macOS Big Sur or later, a System Extension Blocked pop-up
will appear for each .kext in the VMware Tools release.
4 If you do not want to load the kernel extension modules, click OK.
Note If you do not load the kernel extension modules, the features associated with the
kernel extension modules will not work.
5 If you want to load the kernel extension modules, perform the following steps.
a Click Open Security Preference.
b Unlock the Security & Privacy user interface.
c For the System software from developer 'VMware, Inc.' was blocked from loading
option, click Allow.
d For the restart prompt, click Not now.
e Re-lock the Security & Privacy user interface.
f Close the Security & Privacy window.
The VMware Tools installation completes successfully.
6 Click Restart to reboot the system with the KEXT modules loaded.
Using VMware Fusion
VMware by Broadcom 92

7 Optionally, to verify that the VMware KEXT modules are loaded, log in and run the following
command:
sudo kextstat --list-only | grep -i vmware
Repair or Change Modules in Windows Virtual Machines
If you have problems with enhanced graphics display or mouse actions or with features that
depend on VMware Tools, you might need to repair or modify installed modules.
Occasionally, some new modules are not installed during a VMware Tools upgrade. You can
manually install new modules by modifying installed modules.
Use the guest operating system’s Programs and Features item in the Windows Control Panel to
repair or modify VMware Tools.
Uninstalling VMware Tools
When the upgrade process of VMware Tools is incomplete, you can uninstall and then reinstall
VMware Tools.
Prerequisites
n Power on the virtual machine.
n Log in to the guest operating system.
Procedure
1 Select a method to uninstall VMware Tools.
Operating System
Action
Windows 7, 8, 8.1, or Windows 10 In the guest operating system, select Programs > Uninstall a program.
Windows Vista and Windows Server
2008
In the guest operating system, select Programs and Features > Uninstall a
program.
Windows XP and earlier In the guest operating system, select Add/Remove Programs.
Linux Log in as root and enter vmware-uninstall-tools.pl in a terminal
window.
Mac OS X, OS X, or macOS Use the Uninstall VMware Tools application, found in /Library/
Application Support/VMware Tools.
Windows on ARM Open Windows Terminal, navigate to the directory containing the ISO image
of the VMware Tools, and then type the following: setup.ps1 -Uninstall
2 Restart the guest operation system.
What to do next
Reinstall VMware Tools.
Using VMware Fusion
VMware by Broadcom 93

Cloning Virtual Machines with Fusion Pro
Installing a guest operating system and applications can be time consuming. With Fusion Pro, you
can make many copies of a virtual machine from a single installation and configuration process.
Clones are useful when you must deploy many identical virtual machines to a group. For
example, an MIS department can clone a virtual machine that has a suite of preconfigured office
applications for each employee. You can also configure a virtual machine that has a complete
development environment and clone it repeatedly as a baseline configuration for software
testing.
The existing virtual machine is called the parent virtual machine. Two types of clones are
available for creation: linked clones and full clones. Linked clones are created more quickly than
full clones, but are dependent on the parent virtual machine. Full clones take longer to create, but
are completely independent of the parent virtual machine.
Changes made to a clone do not affect the parent virtual machine, and changes made to the
parent virtual machine do not appear in a clone. The MAC address for a clone is different from
the parent virtual machine.
Using Linked Clones
A linked clone is a copy of a virtual machine that shares virtual disks with the parent virtual
machine in an ongoing manner. You can create linked clones only by using Fusion Pro.
Because a linked clone is created from a snapshot of the parent, disk space is conserved and
multiple virtual machines can use the same software installation. All files available on the parent
at the moment you take the snapshot continue to remain available to the linked clone.
Ongoing changes to the virtual disk of the parent do not affect the linked clone, and changes
to the disk of the linked clone do not affect the parent. A linked clone must have access to the
parent. Without access to the parent, you cannot use a linked clone.
Because linked clones are created quickly, you can create a unique virtual machine for each task.
You can also share a virtual machine with other users by storing the virtual machine on your local
network where other users can quickly make a linked clone. For example, a support team can
reproduce a bug in a virtual machine, and an engineer can quickly make a linked clone of that
virtual machine to work on the bug.
You can make a linked clone from a linked clone, but the performance of the linked clone
degrades. It is recommended that you make a new linked clone of the original parent virtual
machine, when possible. If you make a full clone from a linked clone, the full clone is an
independent virtual machine that does not require access to the linked clone or its parent.
Important You cannot delete a linked clone snapshot without destroying the linked clone. You
can safely delete the snapshot only if you also delete the clone that depends on it. Also, moving
the linked clone or the parent virtual machine breaks the connection between the linked clone
and parent.
Using VMware Fusion
VMware by Broadcom 94

Since a linked clone has a dependency on the parent, you cannot delete a parent if it has a clone.
You must first delete all linked clones and snapshots before you can delete the parent virtual
machine.
Using Full Clones
A full clone is a complete and independent copy of a virtual machine. A full clone shares nothing
with the parent virtual machine after the cloning operation. Ongoing operation of a full clone is
separate from the parent virtual machine. You can create full clones only with Fusion Pro.
Because a full clone does not share virtual disks with the parent virtual machine, full clones
generally perform better than linked clones. Full clones take longer to create than linked clones.
Creating a full clone can take several minutes if the files involved are large.
Because a full clone duplicates only the state of the virtual machine at the instant of the cloning
operation, it does not have access to snapshots of the parent virtual machine.
You can delete a full clone without affecting the parent virtual machine.
Clone a Virtual Machine
You can clone virtual machines only if you have Fusion Pro. You do not need to find and manually
copy the parent virtual machine files.
Note
n You can access cloning options from the right-click menu, Virtual Machine menu and
snapshot manager.
n You cannot create linked clones from encrypted virtual machines.
n You cannot create linked or full clones from Boot Camp virtual machines.
n You can create full clones from encrypted virtual machines.
n You can create a cloned virtual machine from the powered off snapshot of the parent virtual
machine.
Prerequisites
n Familiarize yourself with the types of clones. See Using Linked Clones and Using Full Clones.
n If making a linked or full clone from the current state of a virtual machine, power down the
virtual machine.
Using VMware Fusion
VMware by Broadcom 95
Procedure
1 (Optional) To create a clone from the current state of a virtual machine:
a Select a virtual machine from the Virtual Machine Library.
b Click Virtual Machine and select either Create Full Clone or Create Linked Clone,
depending on the type of clone you want to create.
Fusion takes a snapshot of the selected virtual machine when creating a linked clone.
2 (Optional) To create a clone from a snapshot of a virtual machine:
a Select a virtual machine from the Virtual Machine Library.
b Click Snapshots.
c Select a snapshot and right-click. Select either Create Full Clone or Create Linked Clone,
depending on the type of clone you want to create.
3 Type a name for the clone and click Save.
A full clone can take several minutes to create, depending on the size of the virtual disk that
is being duplicated.
Results
The clone appears in the Virtual Machine Library.
A linked clone virtual machine is designated by a clone badge in the Virtual Machine Library.
The parent virtual machine name is shown under the virtual machine name in the Virtual Machine
Library display. In snapshot manager, a snapshot which has a linked clone virtual machine is
designated with a snapshot badge.
What to do next
If the parent virtual machine uses a static IP address, change the static IP address of the clone
before the clone connects to the network to prevent IP address conflicts.
Although the cloning process creates a new MAC address for the clone, other configuration
information, such as the virtual machine name and static IP address configuration, is identical to
that of the parent virtual machine.
Using VMware Fusion
VMware by Broadcom 96
Working with Your Virtual
Machines
5
You can work with virtual machines in the same way that you can work with physical machines.
Your Mac and virtual machines can also interact.
Read the following topics next:
n Scan for Virtual Machines to Add to the Virtual Machine Library
n Running Fusion and Virtual Machines
n Open a Windows Application While You Are in Unity View on Intel-based Mac
n Open a Windows Application from the Applications Menus on Intel-based Mac
n Moving and Sharing Files with Your Mac
n Sharing Applications Between Your Mac and Your Windows Virtual Machines
n Keep a Windows Application in the Mac Dock on the Intel-based Mac
n Switch Between Virtual Machines That Are Powered On
n Using Mac Input Devices in a Virtual Machine
n Force Virtual Machines to Grab Keyboard and Mouse Input
Scan for Virtual Machines to Add to the Virtual Machine
Library
You can quickly add multiple virtual machines to the Virtual Machine Library by initiating a scan.
You can manually add one or more virtual machines at a time to the Virtual Machine Library. For
information about various actions you can perform in the Virtual Machine Library, see Perform
Actions on Your Virtual Machines from the Virtual Machine Library Window. Alternatively, you
can initiate a scan that automates the process of adding virtual machines to the library. Using a
scan to search for virtual machines eliminates the need for you to search for or remember the
location of each virtual machine.
Fusion scans the preselected folders and all subfolders within the preselected folders. In the
context of a scan, files with the .vmx extension are considered virtual machines.
VMware by Broadcom
97

You can preselect which folders Fusion searches during a scan. When you initiate the scan,
Fusion adds all the new virtual machines it finds in the preselected folders to the Virtual Machine
Library.
Procedure
1 Select File > Scan for Virtual Machines.
2 Add and delete folders as necessary until the list of folders in the Scan for Virtual Machines
dialog box meets your needs.
Option Description
Add a Click +.
b Search as necessary and select a folder to add.
c Click Open.
The selected folder path is added to the Scan for Virtual Machines dialog
box.
Delete a Click a folder path in the Scan for Virtual Machines dialog box.
b Click -.
The selected folder path is deleted from the Scan for Virtual Machines
dialog box.
3 Click Scan.
A message appears that reports the number of virtual machines found and added to the
Virtual Machine Library.
4 To view the list of virtual machines in the Virtual Machine Library, select Window > Virtual
Machine Library.
Running Fusion and Virtual Machines
You can start up, shut down, suspend, pause, resume, restart, and reset your virtual machines.
You can send power commands to either the guest operating system or the virtual machine.
Open an Existing Virtual Machine
You can open an existing virtual machine from the Virtual Machine Library window or from the
applications menu.
Procedure
u Open a virtual machine from the Virtual Machine Library.
a Select Window > Virtual Machine Library.
b Select a virtual machine from the list of recognized virtual machines.
c Click the run button.
Using VMware Fusion
VMware by Broadcom 98

u Open a virtual machine from the applications menu
a Click the applications menu status item ( ) in the Mac menu bar.
The applications menu appears, either displaying all the local virtual machines or the most
recently accessed virtual machine.
b If the applications menu displays the most recently accessed virtual machine, to select
a different virtual machine, click the Back arrow in the blue title bar and select another
virtual machine.
c Click the Resume or Start Up icon.
Browse for a Virtual Machine
One way to open an existing virtual machine is to find and open its package file.
Procedure
1 Select File > Open.
2 In the file selection window, find and select the virtual machine package or configuration file
for the virtual machine to open.
Virtual machine package files have the extension .vmwarevm. Virtual machine configuration
files have the extension .vmx. You can view a file's extension by selecting File > Get info.
3 Click the Open button.
Results
Fusion opens the virtual machine and powers it on.
Open a Virtual Machine From the Finder
You can open an existing virtual machine from its package file.
Unless you specify a file location for a virtual machine when you create it, Fusion saves the virtual
machine package to a default location, which can vary. See Default File Location of a Virtual
Machine.
Procedure
1 In the Finder, browse to the virtual-machine location, such as the default your home
directory/Virtual Machines folder, and find the package or configuration file for the virtual
machine.
Virtual machine package files have the extension .vmwarevm. Virtual machine configuration
files have the extension .vmx.
2 (Optional) You can view a file's extension by selecting File > Get info.
Using VMware Fusion
VMware by Broadcom 99
3 Double-click the virtual machine package or configuration file to open the virtual machine in
Fusion.
If Fusion is not running, it starts automatically.
Start a Virtual Machine's Operating System
You can start a powered-off guest operating system in your virtual machine.
Certain actions, such as making changes to the virtual machine configuration, require having a
virtual machine open without the operating system powered on. After the action is complete, you
can start the operating system.
Procedure
u Start the virtual machine's operating system, depending on the state of the virtual machine
and guest operating system.
u If the virtual machine is not running, open the virtual machine from the Finder or Virtual
Machine Library.
Fusion starts the virtual machine's operating system when you open the virtual machine.
u If the virtual machine is already open in Fusion, but the operating system is shut down,
select Virtual Machine > Start Up.
Open a Virtual Machine Without Powering On
Some configuration tasks require that the virtual machine be powered off. In the Virtual Machine
Library you can access a virtual machine without powering it on.
Procedure
1 In the Virtual Machine Library window, select the virtual machine to work on.
2 (Optional) If the virtual machine to configure is displayed as Suspended or Powered on, open
the virtual machine and power it off.
n Use the Shut Down button in the toolbar
n Use the Shut Down command in the Virtual Machine menu.
Fusion opens the virtual machine without powering it on or opening it in a window.
3 Click the Settings button.
Results
You can make changes to the settings that require that the virtual machine be powered off.
Shut Down a Virtual Machine's Operating System
You can shut down the guest operating system in your virtual machine.
Using VMware Fusion
VMware by Broadcom 100
You can use several methods to shut down your virtual machine's operating system. This is the
preferred method.
Procedure
u Select Virtual Machine > Shut Down.
Suspend and Resume a Virtual Machine in Fusion
The suspend and resume feature is useful to save the current state of a virtual machine and
continue work later from the same state, even if you quit Fusion in the interim.
Fusion does not support suspending and resuming in Boot Camp virtual machines. Suspending
and resuming rely on being able to save a known state that will not change. You can boot
natively into Windows in the Boot Camp partition. When you do so, the known state is lost and
data loss occurs.
Procedure
u Take one of the following actions.
n Select Virtual Machine > Suspend to suspend your virtual machine.
You can also set a Fusion preference to suspend the virtual machine when you close the
virtual machine window.
n Select Virtual Machine > Resume to resume your virtual machine.
Cancel a Resume Command
You can cancel a resume command while Fusion is restoring the virtual machine state.
When you resume a suspended virtual machine, Fusion displays two progress bars in order. The
second bar has a cancel button.
Procedure
u Click the cancel button before the progress bar is 100 percent filled.
Power on a Virtual Machine to Firmware in Fusion Pro
In Fusion Pro, you can power on or restart a virtual machine to firmware.
The power on to firmware option is available for local and remote virtual machines. If the virtual
machine is suspended, the power on to firmware option is not available
The power on to firmware option is supported in Fusion Pro 8.1 and later.
Using VMware Fusion
VMware by Broadcom 101

Procedure
u Click Virtual Machine > Power on to firmware.
If the virtual machine is powered off, the virtual machine boots directly to firmware. If the
virtual machine is powered on, you are prompted to restart your virtual machine. Click
Restart.
Pause a Virtual Machine
Pausing a virtual machine stops the current state of a virtual machine. When you resume a
paused virtual machine, the state of the virtual machine is exactly the same as when you paused
it.
Note The current state of the virtual machine is not saved when you pause a virtual machine.
If you quit Fusion while a virtual machine is paused, Fusion suspends or shuts down the virtual
machine depending on your Fusion preferences.
Procedure
u Click Virtual Machine > Pause.
What to do next
Resume the virtual machine when you are ready to work with it again.
Restart a Virtual Machine
You can restart a virtual machine without restarting your Mac.
Procedure
u Restart the virtual machine operating system.
n In the virtual machine, restart the operating system as you would in a physical computer.
The restart method depends on the operating system running in the virtual machine.
n In Fusion, select Virtual Machine > Restart.
Reset a Virtual Machine
You can select a Fusion command to reset a virtual machine, much as you would press the reset
button on a physical computer when it becomes unresponsive.
Caution Resetting the virtual machine can cause data loss.
Procedure
u Press the Option key and click Virtual Machine > Force Restart, the hard power option, to
reset the operating system in your virtual machine.
Using VMware Fusion
VMware by Broadcom 102
Uninstall a Virtual Machine by Using the Finder
You can uninstall a virtual machine by deleting its files.
One method for uninstalling a virtual machine is to use the Finder to delete the virtual machine
package.
Unless you specify a file location for a virtual machine when you create it, Fusion saves the virtual
machine package to a default location, which can vary. See Default File Location of a Virtual
Machine.
Prerequisites
Shut down or power off the virtual machine.
Exit Fusion.
Procedure
1 In the Finder, browse to the virtual-machine location, such as the default your home
directory/Virtual Machines folder, and select the virtual machine to uninstall.
2 Move the virtual machine package file to the Trash.
What to do next
Open Fusion. If you see the uninstalled virtual machine in the Virtual Machine Library, right-click it
and select Delete.
Uninstall a Virtual Machine by Using the Virtual Machine Library
You can uninstall a virtual machine by deleting its files.
One method for uninstalling a virtual machine is to use the Virtual Machine Library to delete the
virtual machine files.
Prerequisites
Shut down or power off the virtual machine.
Procedure
1 Select Window > Virtual Machine Library.
2 Click the thumbnail of the virtual machine to uninstall.
3 Select Edit > Delete.
Using VMware Fusion
VMware by Broadcom 103

4 In the Remove Virtual Machine dialog box, select a method of uninstalling the virtual machine.
Depending on the type of virtual machine you are uninstalling, you might be presented with
different options for deleting the virtual machine.
Option Action
Move to Trash Removes the virtual machine from the Virtual Machine Library window and
moves all the virtual machine files to the Trash.
Keep File Removes the virtual machine from the Virtual Machine Library window, but
does nothing to the virtual machine files in the Virtual Machines folder.
Delete Permanently Removes the virtual machine from the Virtual Machine Library window
and deletes the virtual machine files permanently. The files are deleted
permanently and not moved to the trash.
Configure SSH Login on a Linux Virtual Machine
With VMware Fusion, when a Linux virtual machine has an SSH service enabled, you can
configure quick SSH login to the virtual machine. The configuration enables SSH login from the
Mac host to a Linux virtual machine in the Virtual Machine Library. The virtual machine can be
running on the Mac host or on a remote server running VMware Workstation Pro, VMware ESXi,
or VMware vCenter Server.
By configuring SSH login, you provide yourself with easy and secure SSH access to the Linux
virtual machine now and at anytime in the future. You can then use a terminal window to
access the Linux virtual machine, where you can view files, transfer data, and run the commands
available on the Linux operating system.
You can use an SSH command to log into a Linux virtual machine instead of using Fusion to
configure SSH login on the virtual machine. However, each time you use an SSH command you
must provide the IP address of the virtual machine and your user name and password.
Prerequisites
n Enable SSH on the Linux virtual machine, if not already enabled. See instructions for the
specific Linux operating system.
n Add the Linux Virtual Machine to the Virtual Machine Library, if not already added.
You can add virtual machines that reside on the Mac host or on a supported remote server.
See Perform Actions on Your Virtual Machines from the Virtual Machine Library Window
n Start up the Linux virtual machine, if not already started. See Start a Virtual Machine's
Operating System
Procedure
1 Select Window > Virtual Machine Library.
2 Control-click or right-click the thumbnail of the Linux virtual machine and click Connect to SSH
in the drop-down menu.
Using VMware Fusion
VMware by Broadcom 104

3 Complete the form and click Connect.
Option Description
Username Enter the user name of the virtual machine.
Password Enter the password of the virtual machine.
Port If 22, the default SSH service port number, is not correct for the Linux virtual machine you are
configuring, enter the correct port number.
The default number might be incorrect. For example, previously, using a terminal window in
the virtual machine, you reconfigured the SSH port number.
Remember
password
To enable Fusion to provide the virtual machine password when you make an SSH login
attempt, select this option.
Results
A terminal window opens on the Mac host desktop and SSH connects to the virtual machine.
With the terminal window open and connected to the Linux virtual machine, you now have
command-line access to the Linux virtual machine.
What to do next
In the future, to open an SSH connection from the Mac host to the Linux virtual machine, in the
Fusion Virtual Machine Library, select the Connect to SSH option for the Linux virtual machine.
Edit or Delete the SSH Login Configuration for a Linux Virtual
Machine
After you configure SSH login on a Linux virtual machine, you can change or delete the
configuration.
If any of the following items change, you must edit the SSH login configuration.
n Port number for the SSH service
n Your Linux virtual machine user name
n Your Linux virtual machine password
You can also delete the SSH login configuration.
Prerequisites
n Configure SSH login on the Linux virtual machine with the Remember password setting
enabled. See Configure SSH Login on a Linux Virtual Machine.
n Successfully establish the SSH connection at least once.
Procedure
1 Select Window > Virtual Machine Library.
2 Control-click or right-click the thumbnail of the Linux virtual machine and click Configure SSH
in the drop-down menu.
Using VMware Fusion
VMware by Broadcom 105

3 Either edit updated options and click Save or remove the configuration.
Option Description
Username Edit this option if your virtual machine user name changed.
Password Edit this option if your virtual machine password changed.
Port Edit this option if the port number for the SSH service changed.
Remove Configuration To delete the SSH login configuration, click this option.
Send the Ctrl-Alt-Delete Command to a Virtual Machine
You can use a Fusion command to send the Ctrl-Alt-Delete keystroke combination to a Windows
virtual machine.
Procedure
u You can send the keystroke combination in any of the following ways.
n Select Virtual Machine > Send Ctrl-Alt-Del.
n If you are using an external PC keyboard, press Ctrl+Alt+Del.
n On a full-sized Mac keyboard, press Fwd Del+Ctrl+Option. The Forward Delete key is
below the Help key.
n On a Mac laptop keyboard, press Fn+Ctrl+Option+Delete.
Send Special Key Commands to a Windows or Linux Virtual Machine
If your keyboard does not have the full range of keys that can be found on some keyboards, you
can still send special key commands to the guest operating system.
Procedure
1 Select Virtual Machine > Send Key.
2 Select the key command from the pop-up menu. See Special Key Commands.
Results
Fusion sends the key command to the guest operating system on the virtual machine.
Special Key Commands
You can use special key commands with a virtual machine.
The Send Key item on the Virtual Machine menu contains a number of key commands that might
not be available on all keyboards.
Using VMware Fusion
VMware by Broadcom 106

Table 5-1. Special Key Commands
Key commands that can be sent to the virtual machine with the Send Key menu item
Help (Insert)
Home
End
(Forward Delete)
Caps Lock
Clear (Num Lock)
Scroll Lock
Print Scrn
Pause
Break
Menu
F8
F9
F10
F11
F12
F13
F14
F15
F16
変換 (Henkan)
無変換 (Muhenkan)
ひらがな (Hiragana)
Switch Power Commands from the Default Options
With a keyboard shortcut, you can switch some of the Fusion power command options that
appear in the Virtual Machine drop-down menu and the applications menus, from the default
option.
Using VMware Fusion
VMware by Broadcom 107

The shortcut applies to the Shut Down/Power Off and Restart/Reset power-option pairs as listed
in the Virtual Machine drop-down menu and the applications menus. Pressing the Option or Alt
key does not affect the power buttons in the toolbar.
For example, if your virtual machine defaults to the soft options, Shut Down and Restart, holding
down either the Option key or the Alt key changes the soft options to the hard options, Power
Off and Reset, respectively.
Pressing the Option or Alt key has no effect on other power options.
Note You can also configure Fusion to permanently display the hard option or soft option of
a power-option pair. Therefore, you can change Shut Down to Power Off and Restart to Reset.
Later, when you access the Virtual Machine drop-down menu or an applications menu while the
virtual machine is in a powered-on state, Fusion lists the Power Off option instead of the Shut
Down option and the Reset option instead of the Restart option. See Configure Virtual Machine
Power Options.
Procedure
1 Select Virtual Machine to display the Virtual Machine drop-down menu.
2 Hold down the Option key (Mac keyboards) or Alt key (PC keyboards) and select an
alternative power option.
Table 5-2. Power Commands
Soft Option Hard Option
Shut Down Power Off, also called Force Shut Down
Restart Reset, also called as Force Restart
See Options for Fusion Power Commands for descriptions of the power commands.
Options for Fusion Power Commands
You can configure your virtual machine to have soft or hard power options.
Using VMware Fusion
VMware by Broadcom 108

The way the Fusion power commands work depends on the way your virtual machine is
configured. If the virtual machine was created in Fusion, the power commands default to soft
options. The commands take effect on the guest operating system. Virtual machines created in
other VMware products might default to hard power options. These commands act on the virtual
machine the way the power and reset buttons work on a physical computer's power supply.
Note You can change the default configuration of some of the power-option pairs from the hard
option to the soft option or reverse after the virtual machine is created. For example, you can
change Shut Down, which is a soft power option, to its hard-option counterpart, Power Off.
n To perform the switch with a keyboard shortcut, see Switch Power Commands from the
Default Options.
n To configure Fusion to make the switch permanently, see Configure Virtual Machine Power
Options.
Table 5-3. Soft and Hard Options for Power Commands in the Virtual Machine Menu
Command Result
Start Up (soft option) Triggers a startup script to run. You can
customize this script. For more information, see
the document
Installing and Configuring VMware
Tools
at http://www.vmware.com/pdf/vmware-tools-
installation-configuration.pdf.
Power On (hard option) Starts the virtual machine.
Resume (soft option) Triggers a resume script to run. You can
customize this script. For more information, see
the document
Installing and Configuring VMware
Tools
at http://www.vmware.com/pdf/vmware-tools-
installation-configuration.pdf.
Force Resume (hard option) Resumes the virtual machine from a suspended state.
Shut Down (soft option) Triggers a poweroff script to run. Sends a shut-down
signal to the guest operating system. An operating
system that recognizes this signal shuts down gracefully.
Not all guest operating systems respond to a shut-down
signal from this button. If your operating system does not
respond, shut down from the operating system, as you
would with a physical machine.
Power Off (hard option)
Also called Force Shut Down
Works the way a power switch works on a computer's
power supply. The virtual machine is abruptly powered
off, with no consideration for work in progress. This action
can result in data loss. When possible, shut down the
virtual machine's operating system before you power off
the virtual machine.
Using VMware Fusion
VMware by Broadcom 109

Table 5-3. Soft and Hard Options for Power Commands in the Virtual Machine Menu (continued)
Command Result
Suspend (soft option) Triggers a suspend script to run. You can
customize this script. For more information, see
the document
Installing and Configuring VMware
Tools
at http://www.vmware.com/pdf/vmware-tools-
installation-configuration.pdf.
Force Suspend (hard option) The Force Suspend command suspends the virtual
machine.
Restart (soft option) Sends a restart signal to the guest operating system.
An operating system that recognizes this signal shuts
down gracefully and restarts. Not all guest operating
systems respond to a restart signal from this button. If
your operating system does not respond, restart from the
operating system, as you would with a physical machine.
Reset (hard option)
Also called Force Restart
Works as a reset switch. The virtual machine is abruptly
reset, with no consideration for work in progress. When
possible, restart the virtual machine's operating system.
Use the reset option only as a last resort when the virtual
machine's operating system is unresponsive.
Open a Windows Application While You Are in Unity View
on Intel-based Mac
When a virtual machine is running in Unity view, you do not see the guest operating system's
desktop, but you can open an application without it.
When you are working with applications in an operating system, you can use several methods
to start an application. In some cases, you click an icon on the desktop or use a start menu or
its equivalent. When you use Unity view with a virtual machine, you cannot use those methods
because only the active application windows appear on your Mac's desktop.
Prerequisites
With the virtual machine open in single window or full screen view, switch to Unity view. For
example, select View > Unity.
When you switch to Unity view, the following events occur.
n The virtual machine interface disappears.
n Applications currently open in the virtual machine appear directly on the Mac desktop.
n
VMware Unity ( ) appears in the Mac Dock.
Using VMware Fusion
VMware by Broadcom 110

Procedure
u Select the application from the Unity applications menu.
a Click VMware Unity ( ) in the Mac Dock.
A window opens that contains the Unity applications menu.
b Click the application icon in the list, or find it by clicking All Programs.
u Keep a virtual machine application in the Mac Dock.
a With the application open, switch to Unity view by selecting View > Unity.
The application appears in the Mac Dock.
b Control-click or right-click the application in the Mac Dock and select Options > Keep in
Dock.
The application remains in the Mac Dock, where you can open it even if Fusion is not
currently running.
u Show the Windows taskbar to use the start menu.
a Select View > Show Taskbar in Unity.
You might have to move the location of the Mac Dock to see the taskbar.
b Click the Start menu and select the application.
Open a Windows Application from the Applications Menus
on Intel-based Mac
You can open a Windows application from either of the applications menus, the applications
menu ( ), accessible in the Mac menu bar or with a keyboard shortcut, and the Unity applications
menu ( ), accessible from the Mac Dock when the virtual machine is in Unity view.
For supported Windows guests, the applications menus provide quick access to applications. See
Find a Windows Guest Application by Using the Applications Menus.
Procedure
u Open the applications menu of your choice.
u Search for the application.
Moving and Sharing Files with Your Mac
With Fusion, you can move and share files between a virtual machine and your Mac.
Using VMware Fusion
VMware by Broadcom 111
Moving and Copying Files and Text Between Virtual Machines and
Your Mac
You can drag files and folders to move and copy them between your virtual machines and your
Mac. You can move text by copying and pasting or cutting and pasting.
You can also drag images between Windows applications and Mac applications. You can drag
Outlook attachments from a Windows virtual machine to your Mac. You can drag files in a virtual
machine directly onto Mac applications. You can also drag and drop text, files or folders between
a macOS virtual machine and your Mac.
You can copy and paste images and formatted text between a Windows or Linux virtual machine
and your Mac. You can copy and paste text between a macOS virtual machine and your Mac.
Copying and pasting files or folders between a macOS virtual machine and your Mac is not
supported.
These features require VMware Tools.
Drag Files and Folders Between Virtual Machines and Your Mac
You can use your mouse to drag files and folders in either direction.
Procedure
u In either the virtual machine or your Mac, with the pointer over the icon of the file or folder to
move, hold down the primary mouse button and drag the file or folder to the new location.
Results
Fusion copies the file or folder to the new location.
Copy and Paste Between Virtual Machines and Your Mac Using the Menu
You can copy and paste between a virtual machine and your Mac.
Copy and paste works with images and text for Windows and Linux virtual machines and your
Mac.
Procedure
1 In either the virtual machine or your Mac, select the text.
2 From the Edit menu, select Copy to copy the text, or Cut to move the text.
3 Move the pointer to the new location.
4 From the Edit menu, select Paste to copy or move the text to the new location.
Copy and Paste Between Virtual Machines and Your Mac Using Keyboard
Shortcuts
You can copy and paste between a virtual machine and your Mac.
Using VMware Fusion
VMware by Broadcom 112
You can copy and paste images and formatted text between a Windows or Linux virtual machine
and your Mac. You can copy and paste text between a macOS virtual machine and your Mac.
Copying and pasting files or folders between a macOS virtual machine and your Mac is not
supported.
Prerequisites
To use these shortcuts, make sure the Fusion preference Enable Key Mappings preference is
selected.
Procedure
1 In either the virtual machine or your Mac, select the text.
2 Use the Mac keyboard shortcut +C to copy the text, or +X to move the text.
3 Move the pointer to the new location.
4 Use the Mac keyboard shortcut +V to copy or move the text to the new location.
View Shared Folders in a Windows Guest by Using Windows
Explorer
You can use Windows Explorer to view shared folders between your Mac and Windows.
Procedure
1 Open Windows Explorer.
2 View shared folders using one of the following methods:
n Click on the VMware Shared Folders shortcut.
n In the Address bar, type \\vmware-host\Shared Folders\.
n In the Address bar, type Z:.
When the Enable Shared Folders setting is enabled, Fusion creates a network drive that
maps the \\vmware-host\Shared Folders directory to the Z drive.
Results
The Windows Explorer window displays your shared folders.
View Shared Folders in a Windows Guest by Mapping Them as a
Drive
You can view your shared folders between your Mac and Windows by mapping them as a drive
in Windows.
Procedure
1 Start Windows Explorer.
2 Navigate to My Computer or Computer.
Using VMware Fusion
VMware by Broadcom 113

3 Run the command to map a network drive.
Option Description
Windows Vista, Windows 7,
Windows 8, Windows 10
Click Map Network Drive
Windows operating systems other
than Vista, Windows 7, Windows 8,
Windows 10
Click Tools > Map Network Drive
4 Select a drive to map.
5 In the Folder field, type \\vmware-host\Shared Folders\.
6 Click Finish.
Results
Your shared folders appear in Windows Explorer on the drive that you mapped.
View Shared Folders in a Linux Guest
You can go to specific directories to find your shared folders.
Procedure
u Open the /mnt/hgfs directory in File Explorer to view shared folders on a Linux guest.
View Shared Folders in a macOS Guest
You can view folders that are shared between the macOS guest and the Mac host.
Procedure
1 Open the macOS guest.
2 Click the VMware Shared Folders shortcut on the guest OS desktop.
The guest OS desktop displays your shared folders.
Sharing Applications Between Your Mac and Your Windows
Virtual Machines
In the Applications panel of the virtual machine Settings window, you can set up Fusion so
that your Mac can open applications in a virtual machine or so that a virtual machine can open
applications on your Mac, or both.
Open a File in a Virtual Machine with an Application on Your Mac
When you select a file in your virtual machine, you can open it with the appropriate application
on your Mac.
Using VMware Fusion
VMware by Broadcom 114
Prerequisites
Verify that the following conditions are met:
n You turned on Shared Folders in the Sharing panel of the virtual machine Settings window.
n You enabled Open your Windows files and web links using Mac applications in the Default
Applications panel of the Settings window.
n You selected a folder or folders to share.
n The file to open is located in one of the shared folders.
Procedure
u To open a file one time, right-click the file, select Open With and select Default Host
Application.
Fusion determines the appropriate application on the Mac and uses that application to open
the file.
u To always open a particular file with the Mac application, right-click the file, select Properties,
click
Change for Opens With, and select Default Host Application in the Open With dialog
box.
Whenever you open this file, it opens in the Mac application.
u To always open files of this type with the Mac application, right-click the file, select Open
With, select Default Host Application > Choose Program, and select Always use the selected
program to open this kind of file.
Fusion determines the appropriate application on the Mac and uses that application
whenever you open any file of this type.
Open a File on Your Mac with an Application in a Virtual Machine
You can open a file on your Mac with the appropriate application in one of your virtual machines.
For Windows virtual machines, you can open the Mac file with a virtual machine application as a
one-time event, or you can set the application to be used whenever you open the file.
Prerequisites
Verify that the following conditions are met:
n You turned on Shared Folders in the Sharing panel of the virtual machine Settings window.
n You selected a folder or folders to share.
n The file to open is located in one of the shared folders.
n You enabled Shared Folders in the Default Applications panel of the Settings window.
Using VMware Fusion
VMware by Broadcom 115
Procedure
u For a one-time event, right-click the file, select Open With, and select an application from the
menu.
Because you can find the same application across many virtual machines, the menu entry
shows the name of the virtual machine and the application name.
The file opens in the application that appears in the menu.
u To always open with the virtual machine application, right-click the file, select Get Info and
select an application from the Open with pop-up menu.
u (Optional) Click Change All to use the application to open all files of this type.
Results
Whenever you open this file, it launches in the application that you selected.
Keep a Windows Application in the Mac Dock on the Intel-
based Mac
You can place an icon tile for a Windows application in your Mac Dock. You can open the
application in the same way that you open your Mac applications. You can access your
virtual machine's applications without having to use the VMware Fusion menu bar or the guest
operating system interface.
Procedure
1 With the application open, switch to Unity view by selecting View > Unity.
The application appears in the Mac Dock.
2 Control-click or right-click the application in the Mac Dock and select Options > Keep in Dock.
Switch Between Virtual Machines That Are Powered On
You can operate multiple virtual machines at the same time, and can switch between them easily.
Procedure
u Select the virtual machine to work with from the Window menu within Fusion.
Using Mac Input Devices in a Virtual Machine
To use Mac keyboards, mice, and trackpads in a virtual machine, you sometimes must change
settings and use key combinations as equivalents to PC commands.
Using VMware Fusion
VMware by Broadcom 116
Enable the Secondary Button in an Apple Mighty Mouse
In a virtual machine, the Apple Mighty Mouse does not perform a right-click when you Control-
click. You must enable the secondary button to perform a right-click in a virtual machine.
Procedure
1 Select VMware Fusion > Preferences and click Keyboard & Mouse.
2 Select the Secondary Button check box.
3 (Optional) To change the shortcut for the secondary button, double-click the current
shortcut, select a new shortcut, and click OK.
Using Mac Keyboards in a Virtual Machine
Because PC and Mac keyboards differ, you must press certain key combinations to enable
certain PC commands on a Mac keyboard.
For keys with no keyboard equivalent, Fusion provides the Send Key item in the Virtual Machine
menu.
For keys with no keyboard equivalent, Fusion provides the Send Key item in the Virtual Machine
menu.
Table 5-4. PC and Mac Keyboard Equivalents
PC Keyboard Apple External Keyboard
MacBook and MacBook Pro Built-In
Keyboard
F1-F12 F1-F12 fn+F1 . . . fn+F12
Print Screen F14 (use Send Key)
Scroll Lock F15 (use Send Key)
Pause/Break F16 (use Send Key)
Backspace delete delete
delete
(Forward Delete)
delete fn+delete
Insert (toggles overwrite) help (early models) (use Send Key and select Help item)
Num Lock clear fn+num lock F6
Command
(Windows logo key—between Ctrl
and Alt keys)
Alt alt option alt option
Using VMware Fusion
VMware by Broadcom 117

Force Virtual Machines to Grab Keyboard and Mouse Input
You can set the virtual machine to grab mouse and keyboard input. When input is grabbed, the
mouse pointer is confined to the virtual machine window, and all keyboard and mouse input is
directed to the virtual machine.
Ordinarily, with VMware Tools installed, when you click in the virtual machine, Fusion directs
keyboard and mouse input to the virtual machine. When you click on your Mac desktop,
keyboard and mouse input is directed to your Mac host. You can force all input to the virtual
machine.
Procedure
u Force grab or force release keyboard and mouse input.
Option Action
Force a virtual machine to grab
keyboard and mouse input
On the keyboard, press Cmd+G.
Force a virtual machine to release
keyboard and mouse input
On the keyboard, press Ctrl+ .
Using VMware Fusion
VMware by Broadcom 118

Sharing Files Between Windows
and Your Intel-based Mac
6
You can set up shared folders in guest operating systems to share files between your Mac and
your Windows and other virtual machines.
In the Sharing panel of a virtual machine's Settings window, you can select shared folders on
your Mac to make available to the virtual machine. This feature requires VMware Tools.
You can mirror folders in your Windows virtual machine and in your Mac. Mirrored folders match
key folders in the virtual machine with their corresponding Mac folders: Desktop, Documents,
Downloads, Movies, Music, and Pictures.
To use shared folders, you must configure your virtual machine settings to enable shared folders
and to specify which directories on your Mac are to be shared. The shared folders can be in your
Mac file system or they can be network directories accessible from your Mac.
The guest operating system determines how shared folders appear. You can view shared
folders in certain Windows and Linux guest operating systems. For a list, see Guest Operating
Systems That Support Shared Folders. Before you can view shared folders, you must enable and
configure the shared folders function.
Note Do not open a file in a shared folder from more than one application at a time. For
example, do not use an application on the Mac’s operating system and another application in
the virtual machine’s operating system to open the same file at the same time. If one of the
applications writes to the file, data might be corrupted.
Read the following topics next:
n Guest Operating Systems That Support Shared Folders
n Guest Operating Systems That Support Mirrored Folders
n Enable Shared Folders or Mirrored Folders for a Virtual Machine
n Add or Remove a Mirrored Folder
n Add a Shared Folder
n Remove a Shared Folder
Guest Operating Systems That Support Shared Folders
You can use shared folders with virtual machines that are running certain operating systems.
VMware by Broadcom
119

Fusion supports shared folders in certain Windows, Mac, and Linux operating systems.
n Windows 10
n Windows 8.1
n Windows 8
n Windows 7
n Windows Server 2016
n Windows Server 2012
n Windows Server 2008
n Windows Server 2003
n Windows Vista
n Windows XP
n macOS 11.0
Note Shared Folder is not supported for Windows 11 ARM GOS on Apple Silicon hosts.
n macOS 12.0
n macOS 13.0
n macOS 10.12, 10.13, 10.14 and 10.15
n Mac OS X 10.6, 10.7, 10.8, 10.9, 10.10 and 10.11
n Supported Linux guest operating systems with a kernel version of 2.4 or later
Guest Operating Systems That Support Mirrored Folders
You can use mirrored folders with virtual machines that are running a variety of Windows
operating systems.
Fusion supports mirrored folders in these Windows operating systems.
n Windows 10
n Windows 8
n Windows 7
n Windows Vista
n Windows XP
Fusion does not support mirrored folders for Windows 2000 and earlier, or for Windows
Server 2003 and Windows Server 2008. For virtual machines with unsupported guest operating
systems, the choices are not available in the Sharing panel of the Settings window.
Using VMware Fusion
VMware by Broadcom 120
Enable Shared Folders or Mirrored Folders for a Virtual
Machine
Before you can identify which folders to share or mirror, you must configure your virtual machine
to share folders.
Procedure
1 Select Window > Virtual Machine Library.
2 Select a virtual machine in the Virtual Machine Library window and click Settings.
3 Under Systems Settings in the Settings window, click Sharing.
4 Select the Enable Shared Folders check box.
This action enables shared folders. It also enables mirrored folders for supported Windows
guest operating systems. On Windows and macOS virtual machines, a VMware Shared
Folders shortcut is created on the guest operating system. Click on the shortcut to view
the shared folders.
Add or Remove a Mirrored Folder
With Fusion mirrored folders you can map special folders on your Mac, such as Desktop,
Documents, Downloads, Movies, Music, and Pictures, to their counterparts in certain Windows
virtual machines.
Procedure
1 Select Window > Virtual Machine Library.
2 Select a virtual machine in the Virtual Machine Library window and click Settings.
3 Under System Settings in the Settings window, click Sharing.
4 Select the Enable Shared Folders check box.
5 In the Mirrored Folders section, select the Mac folders to mirror and deselect any folders that
you do not want mirrored.
Add a Shared Folder
You can share files between virtual machines and your Mac by using shared folders.
Procedure
1 Select Window > Virtual Machine Library.
2 Select a virtual machine in the Virtual Machine Library window and click Settings.
3 Under Systems Settings in the Settings window, click Sharing.
Using VMware Fusion
VMware by Broadcom 121

4 Select the Enable Shared Folders check box.
On Windows and macOS virtual machines, a VMware Shared Folders shortcut is created on
the guest operating system.
5 Click the add (+) button at the bottom of the display box.
6 In the Finder sheet, find the location of the folder to share, select it, and click Add.
7 In the Permissions field, set the virtual machine permission on the contents of the Mac's
shared folder.
Option Description
Read & Write Enables the virtual machine to change the contents of the shared folder on
your Mac.
Read Only Prevents the virtual machine from changing the contents of the shared
folder on your Mac.
Permission settings on your Mac also determine access to files in the shared folder. Read-only
permission on a file or folder takes precedence over the Shared Folder permission setting.
8 (Optional) Click the Open in Guest button to open the shared folder in the virtual machine.
This option is available only for Windows virtual machines that are powered on. The Open in
Guest option was added in Fusion 8.1.
Remove a Shared Folder
You can remove a folder from the list of shared folders to stop sharing it.
Procedure
1 Select Window > Virtual Machine Library.
2 Select a virtual machine in the Virtual Machine Library window and click Settings.
3 Under Systems Settings in the Settings window, click Sharing.
4 In the display box at the top of the Sharing panel, select the folder to remove.
5 Click the remove (-) button at the bottom of the display box.
Using VMware Fusion
VMware by Broadcom 122
Protecting Your Virtual Machines
7
You can protect your virtual machines from data loss and other problems by using snapshots,
AutoProtect, complimentary anti-virus software, and backup applications.
Read the following topics next:
n Snapshots
n AutoProtect
n Copy a Virtual Machine to External Media
n Using Time Machine When You Have Fusion on Your Mac
Snapshots
Taking a snapshot in Fusion lets you preserve the state of the virtual machine so that you can
return to that state.
You might take a snapshot any time you are about to take an action in your virtual machine and
you are unsure of the consequences. For example, you might take a snapshot before you make
a change to your virtual machine's system software, such as an operating system upgrade or a
major configuration change. If something doesn't work as expected after the change, you can
restore the snapshot to return the virtual machine to its previous state.
You might also take a snapshot before you go on to the Internet, or log in to an unknown
network. If your computer acquires a software virus or spyware, you can restore the snapshot to
return the virtual machine to its previous uninfected state.
A snapshot captures the entire state of the virtual machine at the time you take the snapshot.
n Memory state – Contents of the virtual machine memory
n Settings state – Virtual machine settings
n Disk state – State of all the virtual disks
A snapshot is not the same as a backup. It is not a copy of your virtual machine.
View Snapshots for a Virtual Machine
The Snapshots window shows all of the snapshots for a virtual machine.
VMware by Broadcom
123
The Snapshots window shows manual snapshots and AutoProtect snapshots.
Procedure
1 Select the virtual machine to view snapshots for in one of the following ways.
n Select the virtual machine from the Virtual Machine Library.
n Open the virtual machine.
2 Open the Snapshots window for the selected virtual machine in one of the following ways.
n Select Virtual Machine > Snapshots.
n Click the Snapshots button in the virtual machine toolbar.
Take a Snapshot
Take a snapshot of the virtual machine's current state from the Snapshots window for that virtual
machine.
The virtual machine does not need to be powered on for you to take a snapshot.
You cannot take a snapshot of a Boot Camp virtual machine. Snapshots rely on being able to
save a known state that will not change. This is not possible with Boot Camp, in which you can
boot natively into Windows in the Boot Camp partition. Once that happens, the known state
would be lost and data loss would occur.
Procedure
1 In the Snapshots window of the virtual machine, select the Current State if it is not selected.
2 Click Take.
3 Name the new snapshot and give it a description in the dialog.
4 Click Take.
Fusion takes the snapshot of the current state of the virtual machine.
5 Close the Snapshots window.
Restore a Virtual Machine to the State in a Snapshot
You can restore a virtual machine to an earlier state.
Procedure
1 Select Virtual Machine > Snapshots.
2 Select the snapshot to restore.
3 Click Restore.
4 Click either Save to save a snapshot of the current state before you restore the virtual
machine to the selected snapshot state, or Don't Save a snapshot.
Using VMware Fusion
VMware by Broadcom 124

Results
The virtual machine is restored to the state that the selected snapshot captured.
Delete a Snapshot
You can manually delete snapshots that you no longer need or to make more disk space
available.
The virtual disk files that a snapshot creates do not contain the entire contents of the virtual
machine's virtual disk. When you delete a snapshot, you must consolidate the changes that it
captured into the original, parent virtual disk.
You cannot delete the snapshot showing the "Current State" of the virtual machine.
Prerequisites
Allocate enough time for virtual disk consolidation. If a snapshot captured a state considerably
different from the earlier state, for example, a service pack upgrade, the consolidation might take
up to a few hours.
Procedure
1 Select Virtual Machine > Snapshots.
2 Select the snapshot to delete.
Option
Action
To select multiple adjacent
snapshots.
Shift-click
To select multiple snapshots that are
not adjacent.
Command-click
3 Click Delete.
4 Click Delete to confirm that you want to delete the snapshot.
Results
The snapshot is deleted and virtual disk consolidation takes place.
AutoProtect
Fusion can take snapshots of the state of your virtual machine at intervals with the AutoProtect
function. This feature is in addition to manual snapshots, which you can take at any time.
Use AutoProtect to instruct Fusion to take a snapshot automatically every 30 minutes, every
hour, or every day.
Using VMware Fusion
VMware by Broadcom 125

Set Up Automatic Snapshots with AutoProtect
Fusion can take snapshots of the state of a virtual machine automatically at set intervals, with the
AutoProtect function. This function is in addition to manual snapshots, which you can take at any
time.
When you turn on AutoProtect, you set the maximum number of AutoProtect snapshots to keep
at a time. After this number is reached, Fusion deletes the oldest AutoProtect snapshot in the
range to make room for the newest snapshot.
This number setting can affect the number of manual snapshots that you can take and keep. You
can have no more than 100 snapshots for a virtual machine, and depending on the types and
sizes of the virtual disk files, this number can be less. If the total of AutoProtect snapshots reach
the limit, you cannot take manual snapshots.
Fusion uses this setting to estimate the minimum amount of hard disk space the AutoProtect
snapshots will use. That information appears at the bottom of the panel. The maximum amount
of hard disk space can be significantly more than the estimate, depending on the amount of
changes you make between snapshots.
Note When you have manual or AutoProtect snapshots of a virtual machine, you cannot add or
modify its virtual hard disk.
Procedure
1 Open a virtual machine, or select it in the Virtual Machine Library.
2 Select Virtual Machine > Snapshots.
3 Click AutoProtect Settings.
4 Select the Enable AutoProtect check box.
5 Select the frequency of snapshots.
6 Select the number of AutoProtect snapshots to retain.
After this number is reached, Fusion deletes the oldest AutoProtect snapshot in the range to
make room for the newest snapshot.
7 Click Done to apply the AutoProtect settings.
8 Close the Snapshots view and return to the virtual machine.
Prevent the Deletion of an AutoProtect Snapshot
When AutoProtect takes a new snapshot, it deletes the oldest snapshot to maintain the allowable
number that you set. You can prevent the deletion of an AutoProtect snapshot.
Procedure
1 In the Snapshots window, hover the cursor over the AutoProtect snapshot to keep, and click
the information button (i).
Using VMware Fusion
VMware by Broadcom 126

2 Click Keep Snapshot.
Results
Fusion considers the AutoProtect snapshot the same as a snapshot taken manually. AutoProtect
will not delete this snapshot when the next AutoProtect snapshot is taken.
Copy a Virtual Machine to External Media
Because virtual machines are files, you can back them up by making a copy.
Although virtual machines run other programs and manipulate files, they are still files themselves.
Because of this, you can back them up by making a copy to external media and restore the
virtual machines by copying back.
Note You cannot copy a Boot Camp virtual machine, because instead of having a virtual hard
disk, the Fusion virtual machine uses the Boot Camp partition.
Unless you specify a file location for a virtual machine when you create it, Fusion saves the virtual
machine package to a default location, which can vary. See
Default File Location of a Virtual
Machine.
Prerequisites
Shut down or power off the virtual machine and shut down Fusion.
Procedure
1 Connect to the media to which you will be copying the virtual machine.
2 Browse to the virtual-machine location, such as the default your home directory/Virtual
Machines folder, and select the virtual machine to copy.
3 Right-click and select Copy "
virtual machine name
".
4 Open the external media in the Finder, right-click and select Paste Item.
Results
The contents of the virtual machine package is copied to the external media. You can reverse the
process to restore the copied virtual machine to your Mac.
Using Time Machine When You Have Fusion on Your Mac
If you use Time Machine, exclude virtual machines from the backup.
Using VMware Fusion
VMware by Broadcom 127
Any change to a virtual machine's virtual hard disk file results in the entire file being backed up.
When you have a 40GB virtual machine, having Time Machine back it up every hour can fill a hard
disk quickly.
What to read next
n Exclude a Virtual Machine From Time Machine
To prevent problems with your virtual machines and to save space on your backup media,
you should not back up virtual machines with Time Machine.
n Use Shared and Mirrored Folders If You Back Up Your Mac With Time Machine
To use Time Machine to back up data and documents from your virtual machines, keep
those files on the Mac.
Exclude a Virtual Machine From Time Machine
To prevent problems with your virtual machines and to save space on your backup media, you
should not back up virtual machines with Time Machine.
If you do not exclude virtual machines from Time Machine backups, Time Machine can back up
a virtual machine while it is running. Restoring from this kind of backup would overwrite your
current virtual machines with versions that are incomplete and potentially damaged. For the
recommended method of backing up virtual machines, see Copy a Virtual Machine to External
Media.
Procedure
1 Open the Mac's System Preferences and click Time Machine.
2 Click Options.
3 Click the add (+) button at the bottom of the Do not back up list.
4 Browse to your Documents folder on the Mac, select the Virtual Machines folder, and click
Exclude.
The Virtual Machine folder appears in the Do not back up list, and displays the total memory
used by all your virtual machines.
5 Click Done, and close the Time Machine window.
Use Shared and Mirrored Folders If You Back Up Your Mac With
Time Machine
To use Time Machine to back up data and documents from your virtual machines, keep those
files on the Mac.
Using VMware Fusion
VMware by Broadcom 128
When you use Shared Folders and Mirrored Folders in your virtual machines, you save your
documents and data as files on the host, not in the guests. This means that although you exclude
virtual machines from Time Machine backups, Time Machine can back up the files in the Shared
and Mirrored folders because they do not reside in the virtual machines. See Enable Shared
Folders or Mirrored Folders for a Virtual Machine
Prerequisites
Exclude your virtual machines from Time Machine.
Procedure
u Enable Shared or Mirrored folders.
Using VMware Fusion
VMware by Broadcom 129
Configuring Your Virtual Machines
8
You can configure the way your virtual machine uses the Mac system hardware and attached
devices. You can manage your virtual hard disks.
Read the following topics next:
n Fusion General System Settings
n Set a Virtual Machine to Start When Fusion Starts
n Setting Virtual Processors and Memory
n Enable Default Applications
n Configuring Keyboard and Mouse Profiles
n Enable a CD/DVD Drive on a Remote Virtual Machine
n Enable a Floppy Drive on a Remote Virtual Machine
n View the Status of a Server or Remote Virtual Machine
n Configuring Display Resolution Settings
n Enable Hot Keys for Virtual Machines
n Configure Discrete Graphics Management
n Add a Device
n Select a Startup Device
n Encrypting a Virtual Machine
n Virtual Machine Compatibility
n Configuring Guest Isolation Options for a Virtual Machine
n Managing Advanced Settings
Fusion General System Settings
You can find basic information about your virtual machine in the General system settings.
The General system settings of the virtual machine include the virtual machine name, the guest
operating system, and notes. You can change some of the settings directly in this panel.
VMware by Broadcom
130

Table 8-1. General System Settings
Setting Description
Name Name of the virtual machine that you specified when
you created it. This name appears in the Virtual Machine
Library. You can change the name of the virtual machine
at any time.
OS Guest operating system installed in the virtual machine.
This name is typically provided as the guest operating
system you selected when you created the virtual
machine. If you uninstall the guest operating system
and install a different one, you can change the guest
operating system listed here.
Notes You can add notes about this virtual machine, its use, or
other information at any time.
Start automatically when Fusion launches Starts the virtual machine when you start Fusion.
The General system settings include information about the virtual machine's hard disk and
options for disk clean up.
You can use the Clean up Virtual Machine or Clean up disks after shutting down virtual machine
options to free up space on your Mac. For more information, see Clean up a Virtual Machine.
Set a Virtual Machine to Start When Fusion Starts
You can set any virtual machine to start when you start Fusion.
You can set any number of virtual machines to start when you start Fusion. You must select this
option in each virtual machine that you want to start when Fusion launches.
Setting a virtual machine to start when Fusion starts can be useful if you have many virtual
machines that you want to start. You might want to start a virtual machine when Fusion starts if
you use a laptop to run one virtual machine that you always want to resume every time you start
Fusion.
Procedure
1 Select Window > Virtual Machine Library.
2 Select a virtual machine in the Virtual Machine Library window and click Settings.
3 Under System Settings in the Settings window, select General.
4 Select the Start automatically when VMware Fusion launches check box.
Results
The virtual machine starts each time you start Fusion.
Using VMware Fusion
VMware by Broadcom 131

Setting Virtual Processors and Memory
You can configure processor settings for a virtual machine, including the number of processors,
the amount of virtual memory available, and whether to enable hypervisor applications, code
profiling applications, and IOMMU.
Set the Number of Virtual Processors
You can increase performance of a virtual machine by making more processors available because
more tasks can be performed simultaneously. When you assign a virtual processor to the virtual
machine, it reduces the processor resources that are available to your Mac.
For Windows virtual machines running mostly office and Internet productivity applications, using
multiple virtual processors is not beneficial, so the default single virtual processor is ideal.
For server workloads and compute-intensive applications, adding extra virtual processors may
provide an increase in application performance.
Application Recommended number of processors
Desktop applications 1 processor
Server operating systems 2 processors
Video encoding, modeling, and scientific 4 processors
In some circumstances, adding additional processors can decrease the overall performance of
the virtual machine and your Mac. This can occur if the operating system or application is not
using the processors efficiently. In this case, reducing the number of processors is recommended.
Assigning all processors on the Mac to the virtual machine results in extremely poor performance.
macOS must continue to perform background tasks even if no Mac applications are running. If
you assign all processors to a virtual machine, this prevents important Mac tasks from being
completed.
Prerequisites
Shut down or power off the virtual machine. You cannot change the setting while the virtual
machine is powered on or suspended.
Procedure
1 Select Window > Virtual Machine Library.
2 Select a virtual machine in the Virtual Machine Library window and click Settings.
3 Under System Settings in the Settings window, click Processors & Memory.
4 Select the number of processor cores for the virtual machine.
Information about your selected number of processors is displayed at the bottom of the
Processors & Memory window.
5 Restart the virtual machine.
Using VMware Fusion
VMware by Broadcom 132

Set the Amount of Virtual Memory
Certain applications in the virtual machines might perform better with more memory available.
Having more memory available to the guest operating system can facilitate caching, which can
improve performance of the virtual machine. You can change the amount of virtual memory
available to a virtual machine.
For the best balance of performance between Windows and Mac applications, do not give
Windows too much memory, because it might cause your Mac to become slower. For Windows
XP, 512MB of memory is ideal for Internet and office productivity applications.
For Windows Vista, Windows 7, Windows 8 and Windows 10, 1GB of memory is ideal for
Internet and office productivity applications. 1GB of memory is appropriate for both the 32-bit
and 64-bit versions of Windows 7, Windows 8 and Windows 10. If your Mac has at least 6GB of
memory, Fusion uses 2GB of memory as the default for 64-bit versions of Windows 7, Windows
8 or Windows 10 guests. These settings are the default memory settings for Windows virtual
machines that Fusion Easy Install creates.
Note Manufacturer recommendations do not generally take virtualization into account in terms
of performance. Good performance relies on balancing the needs of the Mac with the needs of
the virtual machine.
Prerequisites
Shut down or power off the virtual machine. You cannot change the setting while the virtual
machine is powered on or suspended.
Procedure
1 Select Window > Virtual Machine Library.
2 Select a virtual machine in the Virtual Machine Library window and click Settings.
3 Under System Settings in the Settings window, click Processors & Memory.
4 Set the amount of memory to allocate to the virtual machine by using the slider control.
The memory slider control displays the recommended amount of memory for your virtual
machine.
Set Advanced Processor Options
You can enable hypervisor applications, applications that use performance counters, or both in
certain virtual machines.
With Fusion virtual machines, you have the following advanced options:
n You can run hypervisor applications such as Workstation Pro and Fusion inside a virtual
machine. For example, you can use Fusion to create a virtual machine, install Workstation
Pro in that virtual machine, and then use that version of Workstation Pro to create a virtual
machine.
Using VMware Fusion
VMware by Broadcom 133

n You can use code profiling applications such as VTune or OProfile to optimize or debug
software that runs inside a virtual machine.
n You can use input–output memory management unit (IOMMU), which is capable of mapping
virtual addresses to physical addresses.
Important If you enable either of the preceding settings and then move the virtual machine to
another host system, confirm that the new host uses the same kind of CPU.
The Enable hypervisor applications in this virtual machine and Enable IOMMU in this virtual
machine settings are required to enable virtualization-based security (VBS), a feature that
reinforces the security of Microsoft Hyper-V. See Enable Microsoft Virtualization-Based Security.
When you enable VBS, these two settings are automatically selected and are not available for
editing. They become editable when you do not enable VBS.
Prerequisites
n Verify that the virtual machine is compatible with Fusion 8 or later virtual machines.
n Verify that the virtual machine does not have an older guest operating system, such as
Windows versions prior to Windows XP.
n Verify that the host system has a CPU that is recent enough to support Virtualized Intel VT-x/
EPT, performance counters, and IOMMU.
n Shut down or power off the virtual machine. You cannot change the setting while the virtual
machine is powered on or suspended.
Procedure
1 Select Window > Virtual Machine Library.
2 Select a virtual machine in the Virtual Machine Library window and click Settings.
3 Under System Settings in the Settings window, click Processors & Memory.
4 Click to expand Advanced Options and select the check boxes for the options that you want
to use.
Enable Default Applications
You can set up Fusion so that certain applications open files regardless of whether the files
reside on your Mac or in the virtual machine.
The Default Applications setting also adds applications from your virtual machine to your Mac
Applications menu and Spotlight.
Prerequisites
n Verify that VMware Tools is installed.
n If your virtual machine is suspended, power it on.
Using VMware Fusion
VMware by Broadcom 134

Procedure
u Select Window > Virtual Machine Library.
u Select a virtual machine in the Virtual Machine Library window and click Settings.
u Under System Settings in the Settings window, click Default Applications.
u Select the defaults for application sharing between your Mac and the virtual machine.
You can enable more than one of these options at the same time.
Option Description
Open your Mac files and web links
by using Windows applications
You can use applications in your virtual machine to open files that reside on
your Mac. For example, you can open a Microsoft Word document stored on
your Mac in a Microsoft Office application in your virtual machine.
Open your Windows files and web
links using Mac applications
You can use your Mac applications to open files in your virtual machines.
Run Windows applications from your
Mac's Applications folder
Find applications that you installed in Windows in your Mac's Applications
folder or using Spotlight. This option requires VMware Tools. The virtual
machine must be running to enable this option. This option is not available
on shared virtual machines.
u (Optional) Click Configure to assign the applications used to manage mail, Web pages, and
so on. See Set Default Applications Preferences.
u (Optional) Click Restore Applications to restore the applications listed in your Mac
Application folder to only those that Windows does not include by default.
If you deleted any of the Windows applications not included by default from the Mac
Application folder, the deleted applications are restored.
If you added any applications that are included by default to your Mac's application folder,
those applications are deleted from the Mac Application folder.
u (Optional) Click Clean Up Applications to delete any Windows applications in the Mac
Application folder that are not being used by any of your virtual machines.
App Nap Support
Fusion 7.0 or later supports the App Nap feature, which places UI applications running in the
background in a reduced system resource state.
You do not have to turn off App Nap for Fusion 7 or later.
Configuring Keyboard and Mouse Profiles
These profiles specify how Mac key combinations and mouse shortcuts are mapped to shortcuts
on a virtual machine, including key combinations for Windows 8 shortcuts.
Using VMware Fusion
VMware by Broadcom 135

With keyboard and mouse profiles, you can also specify whether keyboard shortcuts are sent
to your Mac instead of the virtual machine, and you can specify which Fusion-specific keyboard
shortcuts to enable.
Although you can also create and edit keyboard and mouse profiles in Fusion preferences, you
use virtual machine settings to select which profile to use for a particular virtual machine.
You can edit the default profiles provided by Fusion, or you can create additional profiles, either
by adding a new one or by duplicating and editing one of the existing profiles.
n Profile maps common Macintosh key combinations such as +C and +X to their Windows
and Linux counterparts, such as Control+C and Control+X, respectively.
n Mac Profile has very few keyboard mappings. Most keystrokes are passed directly to the
macOS guest.
n Windows 8 Profile has a set of key mappings specifically for Windows 8 features, such as
pressing Windows-C to open the Charms bar.
Fusion includes a Windows 8 specific profile because many keyboard shortcuts specific
to Windows 8 include the Windows key, which normally maps to the key on macOS.
Unfortunately, many of these key combinations are also used for system hot keys in
macOS. To avoid conflicts, the Windows 8 profile allows you to use the key combination
+shift to map to the Windows key in Windows 8. You can, however, configure a different
key combination.
Enable a CD/DVD Drive on a Remote Virtual Machine
You can enable a CD/DVD drive and select a disk image on a virtual machine hosted on a remote
server. You can access or install software from a physical CD/DVD drive on to your remote
virtual machine.
Prerequisites
Verify that the following conditions are met:
n You have login credentials for the server where the virtual machine is hosted.
n The virtual machine is powered on.
Procedure
1 Select File > Connect to Server.
2 Enter the name of the host server or select a server from the Recent Servers drop-down
menu.
3 Enter your login credentials and click Connect.
4 Select Virtual Machine > Settings.
5 Click CD/DVD Drive.
Using VMware Fusion
VMware by Broadcom 136
6 Select the Enable CD/DVD Drive check box.
7 Select a remote disc image from the Choose a remote disc image drop-down menu.
8 (Optional) Expand Advanced options and select a bus type from the drop-down menu.
9 (Optional) Click Remove CD/DVD Drive to return to the CD/DVD drive that your virtual
machine uses.
Enable a Floppy Drive on a Remote Virtual Machine
You can enable a floppy drive and select a disk image on a virtual machine hosted on a remote
server. You can access or install software from a physical floppy drive on to your remote virtual
machine.
Prerequisites
Verify that the following conditions are met:
n You have login credentials for the server where the virtual machine is hosted.
n The virtual machine is powered on.
Procedure
1 Select File > Connect to Server.
2 Enter the name of the host server or select a server from the Recent Servers drop-down
menu.
3 Enter your login credentials and click Connect.
4 Select Virtual Machine > Settings.
5 Click Floppy.
6 Click the Enable Floppy Drive check box.
7 Select a floppy image from the drop-down menu.
View the Status of a Server or Remote Virtual Machine
You can view the power state, CPU use, and disk space use of a server or the configuration
information of a remote virtual machine.
Prerequisites
Verify that you have login credentials for the server where the virtual machine is hosted. The
server cannot be a vCenter Server host.
Procedure
1 Select File > Connect to Server.
2 Type the name of the server, or select a server from the Recent Servers drop-down menu.
Using VMware Fusion
VMware by Broadcom 137
3 Type your login credentials and click Connect.
4 Select a server to view CPU use, memory use, and available storage information.
5 Select a virtual machine to view snapshot, configuration file, and hardware compatibility
information.
Configuring Display Resolution Settings
You can configure display resolution settings for your virtual machine to enable 3D accelerated
graphics, retina display support, and single window and full screen settings.
Enable Accelerated 3D Graphics
On certain virtual machines, Fusion provides support for accelerated 3D graphics.
On virtual machines running Windows 7 or later, Fusion supports DirectX 11 with Open GL 4.3.
Hardware version 20 and later is required.
On virtual machines running Windows 7 or later, Fusion supports DirectX 11 with Open GL 4.1.
Hardware version 18 is required.
On virtual machines running Windows XP or later, Fusion supports DirectX 9.0c with Shader
Model 3 and OpenGL 2.1 accelerated 3D graphics.
On virtual machines running Windows Vista or later, Fusion supports DirectX 10 with Open GL 3.3.
Hardware version 12 is required.
On virtual machines running Windows 7 or later, Fusion supports DirectX 10.1 with Open GL 3.3.
Hardware version 16 is required.
On virtual machines running Linux, Fusion supports OpenGL 4.1 for accelerated 3D graphics.
Hardware version 18 is required. Linux kernel and Mesa 3D versions that support 3D accelerated
graphics are required.
On virtual machines running Linux, Fusion supports OpenGL 4.3 for accelerated 3D graphics.
Hardware version 20 and later is required. Linux kernel and Mesa 3D versions that support 3D
accelerated graphics are required.
Prerequisites
Shut down or power off the virtual machine. You cannot change these settings while the virtual
machine is powered on or suspended.
Procedure
1 Select Window > Virtual Machine Library.
2 Select a virtual machine in the Virtual Machine Library window and click Settings.
3 Under System Settings in the Settings window, click Display.
Using VMware Fusion
VMware by Broadcom 138

4 Select the Accelerate 3D graphics check box.
The version of DirectX supported by your hardware version is displayed.
5 Select the Battery life menu item from the drop-down menu.
You can select the option to use high-performance graphics for 3D applications only
to conserve battery life. You can select the menu item to always use high-performance
graphics, but this selection results in shorter battery life.
6 Select the shared graphics memory item from the drop-down menu.
Enable External GPU
Fusion provides support for external GPU when an external GPU is connected to the host.
Prerequisites
Shut down or power off the virtual machine before you change the external GPU settings. The
external GPU feature can't be enabled when the virtual machine is powered on or suspended.
Procedure
1 On the host desktop, select Window > Virtual Machine Library.
2 Select a virtual machine in the Virtual Machine Library window and click Settings.
3 Click Display in the Settings window.
4 Select the Prefer External GPU check box.
Results
Fusion will now use external GPU.
What to do next
Note You can also enable external GPU for Fusion UI by performing the following steps:
1 Open Finder and navigate to Applications > right-click VMware Fusion.app > Get Info.
2 Enable the Prefer External GPU option.
3 Restart VMware Fusion.
Enable Retina Display Support
The Retina display options control the appearance of virtual machines on displays with high pixel
density.
Prerequisites
n Verify that you are using a Retina display or another high-pixel density display.
n Verify that you are using hardware version 11 or later. Hardware version 14 is recommended.
Using VMware Fusion
VMware by Broadcom 139

n Verify that the latest version of VMware Tools is installed.
n For best appearance and performance, in the Display pane of System Preferences on the
Mac host, select Best for Display in OS X 10.9.5 or Default for Display in OS X 10.10 and later.
Procedure
1 Select Window > Virtual Machine Library.
2 Select a virtual machine in the Virtual Machine Library window and click Settings.
3 Under System Settings in the Settings window, click Display.
4 Select the Use full resolution for Retina display check box.
When the Use full resolution for Retina display option is on, the virtual machine resolution is
set to the full Retina display resolution.
When the Use full resolution for Retina display option is off, the virtual machine resolution is
set to half of the Retina display resolution. This setting matches the non-Retina display size,
but might appear pixelated.
5 Select the options for Scaled high resolution.
This option takes effect when an external non-Retina display is connected to a Mac with
Retina display. The option adjusts the user-interface size on an extended non-Retina display
to match the user-interface size on the Retina display.
Option
Description
Unity Only Use high resolution scaling for Unity View only.
Unity and Full Screen Use high resolution scaling for Unity View and Full Screen modes.
Unity and Single Window Use high resolution scaling for Unity View and Single Window modes.
All View Modes Use high resolution scaling for all view modes.
6 (Optional) Select the Automatically adjust user interface size in the virtual machine check
box.
Applies to Windows virtual machines only.
Configure Resolution Settings for Virtual Machine Display
You can configure the resolution settings that determine how a virtual machine is displayed.
Prerequisites
n Verify that you are using a Retina display or another high-pixel density display.
n Verify that you are using hardware version 11 or later, preferably hardware version 12.
n Verify that the latest version of VMware Tools is installed.
n For best appearance and performance, select Best for Display in the Display pane of System
Preferences on the Mac host.
Using VMware Fusion
VMware by Broadcom 140

Procedure
1 Select Window > Virtual Machine Library.
2 Select a virtual machine in the Virtual Machine Library window and click Settings.
3 Under System Settings in the Settings window, click Display.
You use the Virtual Machine Resolution options to select the display settings for single
window mode and full screen mode.
4 Select the Single Window resolution setting.
This setting specifies how the virtual machine displays in single window mode.
Option Description
Use Fusion Display Preferences Uses the global Fusion display preference setting. See Set Fusion Display
Resolution Preferences.
Stretch the virtual machine in the
window
When the virtual machine window is resized, the virtual machine display is
stretched to fill the window with the resolution unchanged.
Resize the virtual machine and the
window
The virtual machine display is resized to fit the single window.
5 Select the Full Screen resolution setting.
This setting specifies how the virtual machine is displayed in full screen mode.
Option
Description
Use Fusion Display Preferences Uses the global Fusion display preference setting. See Set Fusion Display
Resolution Preferences.
Center the virtual machine in the
screen
When the virtual machine enters Full Screen view mode, the virtual machine
display is centered on the screen with the resolution unchanged.
Stretch the virtual machine in the
screen
When the virtual machine enters Full Screen view mode, the virtual machine
display is stretched to fill the screen space with the resolution unchanged.
Resize the virtual machine to fit the
screen
The virtual machine display is resized to fit the full screen.
Enable Hot Keys for Virtual Machines
If you have Fusion Pro, you can create a keyboard shortcut to define a hot key combination to
launch a virtual machine.
n The hot key combination must contain at least one key modifier, such as Control or
Command, plus another modifier.
n A hot key combination must be unique to one virtual machine.
n The hot key cannot be a function or a specially defined key such as Return, Escape, Insert,
Delete, Home, End, Page Up, Page Down, F key, Print Screen, Scroll Lock, Pause, or the
arrow keys.
Using VMware Fusion
VMware by Broadcom 141

n You cannot assign a hot key combination to an application.
n You cannot use the Tab key as a hot key.
Procedure
1 Select VMware Fusion > Preferences.
2 Select the Enable per-virtual machine keyboard shortcuts check box.
3 Select Window > Virtual Machine Library.
4 Select a virtual machine in the Virtual Machine Library window and click Settings.
5 Under System Settings in the Settings window, click Keyboard & Mouse.
6 Type the keyboard shortcut to use to trigger the virtual machine.
Configure Discrete Graphics Management
With discrete graphics management, you can manage battery use and performance of
applications that use 3D graphics in a virtual machine.
Prerequisites
n Verify that your MacBook Pro has an integrated graphics card and a discrete graphics card.
Discrete graphics management enables the operating system to switch between the two
cards.
n Verify that 3D graphics are enabled.
Procedure
1 Select Window > Virtual Machine Library.
2 Select a virtual machine in the Virtual Machine Library window and click Settings.
3 Under System Settings in the Settings window, click Display.
4 Verify that the Accelerate 3D Graphics check box is selected.
5 Select a graphics performance option from the Battery life drop-down menu.
Option
Description
Don't Use High Performance
Graphics (Longer Battery Life)
Maximizes battery life.
Use High Performance Graphics for
3D Applications Only
Balances battery life and 3D graphics performance.
Always Use High Performance
Graphics (Shorter Battery Life)
Minimizes battery life.
Using VMware Fusion
VMware by Broadcom 142
Add a Device
You can add removable devices to use with your virtual machine.
You can add the following devices to a virtual machine:
n network adapters
n hard disks
n camera
n CD/DVD
n sound card
n USB and Bluetooth
n serial ports
n parallel ports
n Trusted Platform Module device
Configuring the Network Connection
Configure and implement Fusion virtual networking components on your virtual machine to
connect to other virtual machines in your networking environment.
Fusion supports only Ethernet-based networking, but provides several options for connecting to
networks.
n A virtual machine can use NAT to share the IP address of your host system.
n You can configure a virtual machine to bridge to a specific network interface on the host
system. Fusion supports IPv6 in bridged networking.
n You can create a VPN that includes only the virtual machines on your host system.
In Fusion, when you edit settings for a virtual network adapter, you can choose from several
types of network connections.
Using VMware Fusion
VMware by Broadcom 143

Table 8-2. Network Connection Options
Option Description
Share with my Mac If you want to connect to the Internet or other TCP/IP network using your Mac
dial-up networking connection and you are not able to give your virtual machine
an IP address on the external network, choosing this option is often the easiest
way to give the virtual machine access to that network. The virtual machine does
not have its own IP address on the external network. The virtual machine obtains a
private IP address from the VMware virtual DHCP server.
Bridged Networking items In the Bridged Networking list, you see various choices for bridging to one of the
network interfaces on your Mac, including wireless and Ethernet. Using one of
these options is often the easiest way to give your virtual machine access to a
network.
With one of these bridged networking options, the virtual machine appears as
an additional computer on the same physical Ethernet network as your Mac. The
virtual machine can use any of the services available on the network to which
it is bridged, including file servers, printers, gateways, and so on. Likewise, any
physical host or other virtual machine configured with bridged networking can use
resources of that virtual machine.
Private to my Mac When you use this type of network connection, the virtual machine is connected
to your Mac’s operating system on a virtual private network, which normally is
not visible outside your Mac. Multiple virtual machines configured with host-only
networking on the same Mac are on the same network.
What to read next
n Connect and Set Up the Network Adapter
You can connect the virtual network adapter for the virtual machine and set the type of
networking to use.
n Assign a MAC Address to a Virtual Machine Manually
You can assign a MAC address manually if you need to ensure that the same MAC address is
always assigned to the virtual network adaptor for a virtual machine.
n Add a Network Adapter
You can add up to ten virtual network adapters to a virtual machine.
n Change the Network Adapter on a Remote Virtual Machine
You can enable and change the virtual network adapter for a virtual machine hosted on a
remote server. Your virtual machine will have access to multiple networks.
n Remove a Network Adapter
You can remove network adapters from your virtual machine.
n Simulate a Network Environment with Fusion Pro
In Fusion Pro, you can use advanced virtual network adapter settings to limit the bandwidth,
specify the acceptable packet loss percentage, and create network latency for incoming and
outgoing data transfers for a virtual machine.
Using VMware Fusion
VMware by Broadcom 144

Connect and Set Up the Network Adapter
You can connect the virtual network adapter for the virtual machine and set the type of
networking to use.
Prerequisites
Fusion does not support bridged networking to a VPN. If you have set a VPN to have the top
priority in your Mac system preferences, lower its priority if you intend to use bridged networking
with autodetect in your virtual machine.
Procedure
1 Select Window > Virtual Machine Library.
2 Select a virtual machine in the Virtual Machine Library window and click Settings.
3 Under Removable Devices in the Settings window, click Network Adapter.
4 Select the Connect Network Adapter check box.
Fusion retains and reapplies the setting you select when you start up the virtual machine.
5 Select the networking type.
Option
Description
Share with my Mac The virtual machine does not have its own IP address on the external
network. The virtual machine obtains a private IP address from the VMware
virtual DHCP server.
Bridged Networking items You see various choices for bridging to one of the network interfaces on
your Mac, including wireless and Ethernet. Using one of these options is
often the easiest way to give your virtual machine access to a network.
When you select any of the network types other than Autodetect, you can
click System Preferences to see details of the physical network settings for
your host system.
Private to my Mac The virtual machine is connected only to the host operating system, using a
virtual private network, which is not visible outside your Mac.
Assign a MAC Address to a Virtual Machine Manually
You can assign a MAC address manually if you need to ensure that the same MAC address is
always assigned to the virtual network adaptor for a virtual machine.
Assign a MAC address manually instead of allowing Fusion to assign it to be sure that the
following situations occur:
n The same MAC address is always assigned to the virtual network adaptor for a given virtual
machine, even if the virtual machine is moved.
n A unique MAC address for each virtual machine within a networked environment
Using VMware Fusion
VMware by Broadcom 145
When a physical machine is converted to a virtual machine, the MAC address of the network
adapter is changed. For software in which the licensing is linked to the MAC address, this can be
a problem. Manually assigning the correct MAC address is the solution.
Prerequisites
Shut down or power off the virtual machine. You cannot change the setting while the virtual
machine is powered on or suspended.
Procedure
1 Select Window > Virtual Machine Library.
2 Select a virtual machine in the Virtual Machine Library window and click Settings.
3 Under Removable Devices in the Settings window, click Network Adapter.
4 Click Advanced options.
5 Enter a new MAC address.
n Type a known MAC address.
n Click Generate for Fusion to create a unique address.
Add a Network Adapter
You can add up to ten virtual network adapters to a virtual machine.
Prerequisites
n Familiarize yourself with the various types of network configurations. See Configuring the
Network Connection.
n Shut down or power off the virtual machine. You cannot change the setting while the virtual
machine is powered on or suspended.
Procedure
1 Select Window > Virtual Machine Library.
2 Select a virtual machine in the Virtual Machine Library window and click Settings.
3 Click Add Device.
4 Click Network Adapter.
5 Click Add.
6 Either select a network configuration from the list or, if you have Fusion Pro, click Configure
below the list to create a new network.
What to do next
For more information about creating a custom network, see Creating Custom Networks. For
more information about configuring a new network adapter, see Connect and Set Up the
Network Adapter.
Using VMware Fusion
VMware by Broadcom 146
Change the Network Adapter on a Remote Virtual Machine
You can enable and change the virtual network adapter for a virtual machine hosted on a remote
server. Your virtual machine will have access to multiple networks.
Prerequisites
Verify that the following conditions are met:
n You have login credentials for the server where the virtual machine is hosted.
n The virtual machine is powered on.
Procedure
1 Select File > Connect to Server.
2 Enter the name of the host server or select a server from the Recent Servers drop-down
menu.
3 Enter your login credentials and click Connect.
4 Select Virtual Machine > Settings.
5 Click Network Adapter.
6 Select the network adapter from the Network Connection drop-down menu.
Remove a Network Adapter
You can remove network adapters from your virtual machine.
Prerequisites
Shut down or power off the virtual machine. You cannot change the setting while the virtual
machine is powered on or suspended.
Procedure
1 Select Window > Virtual Machine Library.
2 Select a virtual machine in the Virtual Machine Library window and click Settings.
3 Under Removable Devices in the Settings window, click Network Adapter.
4 Under Advanced options, click Remove Network Adapter.
5 Click Remove in the confirmation dialog box.
Simulate a Network Environment with Fusion Pro
In Fusion Pro, you can use advanced virtual network adapter settings to limit the bandwidth,
specify the acceptable packet loss percentage, and create network latency for incoming and
outgoing data transfers for a virtual machine.
The advanced virtual network adapter settings allow you to simulate a network environment that
differs from your own.
Using VMware Fusion
VMware by Broadcom 147

Procedure
1 Select Window > Virtual Machine Library.
2 Select a virtual machine in the Virtual Machine Library window and click Settings.
3 Under Removable Devices in the Settings window, click Network Adapter.
4 Expand Advanced options.
5 Select incoming and outgoing bandwidth settings.
This setting allows you to simulate network bandwidth.
Option Description
Limit incoming or outgoing data
transfers to the data transfer rate for
a specific network connection type
Select the network connection type from the Bandwidth drop-down menu.
The value in the Kbps text box changes to the data transfer rate, in kilobits
per second, of the network connection type that you select. For example,
if you select Leased Line T1 (1.544 Mbps), the value in the Kbps text box
changes to 1544.
Limit incoming or outgoing data
transfers to a specific data transfer
rate
Select Custom and type the data transfer rate, in kilobits per second, in the
Kbps text box.
6 Enter the acceptable packet loss percentage for incoming and outgoing data transfers in the
Packet Loss (%) text box.
This setting allows you to simulate network packet loss. The default setting is 0.0%. The
packet loss range is 0 to 100%.
7 Enter numbers to set the latency in milliseconds for incoming and outgoing data transfers.
This setting allows you to simulate network latency. The latency range is 0 to 2,000 ms.
Managing Virtual Hard Disks
You can add, remove, and resize virtual hard disks.
If you want to add more disk space to your virtual machine, you can resize your existing virtual
hard disk, or add a separate, additional hard disk.
Note Having manual or AutoProtect snapshots in your virtual machine prevents you from
making changes to a virtual hard disk. You must delete the snapshots before you can make a
change.
Using VMware Fusion
VMware by Broadcom 148

Changing the Bus Type of the Virtual Hard Disk
Caution In the following situations, after you select a bus type for a virtual hard disk, do not
change the bus type.
n On a system boot disk with the operating system installed
Some operating systems are incapable of changing the storage controller of the boot device.
n A virtual machine created using Easy Install
When you select Customize Settings at the end of an Easy Install configuration and change
the hard disk to a non-default bus type, the operating system might fail.
Create a Virtual Hard Disk
You might require more disk space in a virtual machine. For example, if you want to install a
large application or work with a large number of files. You can increase the size of the virtual disk
already associated with your virtual machine, or you can add a new virtual disk. You can create a
virtual hard disk to add to a virtual machine.
Prerequisites
Shut down or power off the virtual machine. You cannot change the setting while the virtual
machine is powered on or suspended.
Procedure
1 Select Window > Virtual Machine Library.
2 Select a virtual machine in the Virtual Machine Library window and click Settings.
3 Click Add Device.
4 Click New Hard Disk.
5 Click Add.
A new hard disk appears. The new hard disk is selected and a default filename appears in the
File name pop-up menu.
6 (Optional) Change the filename for the new virtual hard disk.
a Select the filename in the pop-up menu and select Save As.
b Type the filename for the hard disk in the Save as field and click Save.
Fusion creates the virtual disk file with this name and stores it in the App bundle directory.
7 Use the Disk size slider to set the maximum size for the hard disk.
The maximum size for any hard disk is 8 TB.
Using VMware Fusion
VMware by Broadcom 149

8 (Optional) Under Advanced options, set the Bus type for the hard disk to IDE, SCSI, SATA, or
NVMe.
Note If the guest operating system does not support NVMe, the NVMe option appears
unavailable.
Changing this setting is recommended only for advanced users. Fusion selects the bus type
that is most appropriate for the virtual machine guest operating system.
9 Set your disk space configuration, depending on the constraints of the file system.
Option Description
Pre-allocate disk space Can give better performance for your virtual machine. If you allocate all
the disk now, you cannot use the VMware Tools shrink disk feature later.
Allocating all disk space now is a time-consuming operation that cannot be
canceled. Also, the allocation process requires as much physical disk space
as you specify for the virtual disk.
Split disk into multiple files Default. Some file systems, such as FAT and UFS, cannot support very large
files. Use this option if your virtual machine will be used in a hard drive with
a file system that does not support very large files. This option splits your
virtual disk into multiple files. Also, use this option if you might place the
virtual machine on an external FAT drive or if you might move the virtual
machine to an external drive.
10 Click Apply.
The hard disk is created. View the new hard disk in Settings > Removable Devices of the
virtual machine.
Resize a Hard Disk
You can increase the usable space in a virtual hard disk. You cannot reduce the size of a hard
disk. You cannot make a blank hard disk smaller after it has been formatted.
Prerequisites
Having manual or AutoProtect snapshots in your virtual machine prevents you from making
changes to a virtual hard disk. You must delete the snapshots before you can make a change.
Shut down or power off the virtual machine. You cannot change the setting while the virtual
machine is powered on or suspended.
Procedure
1 Select Window > Virtual Machine Library.
2 Select a virtual machine in the Virtual Machine Library window and click Settings.
3 In the Settings window, click the hard disk you want to resize.
4 Use the Disk size slider to set the new size.
The maximum disk size for any hard disk is 8TB.
Using VMware Fusion
VMware by Broadcom 150

5 (Optional) Under Advanced options, set the Bus type for the hard disk to IDE, SCSI, SATA, or
NVMe.
Note If the guest operating system does not support NVMe, the NVMe option appears
unavailable.
Changing this setting is recommended only for advanced users. Fusion selects the bus type
that is most appropriate for the virtual machine guest operating system.
6 Set your disk space configuration, depending on the constraints of the file system.
Option Description
Pre-allocate disk space Can give better performance for your virtual machine. If you allocate all
the disk now, you cannot use the VMware Tools shrink disk feature later.
Allocating all disk space now is a time-consuming operation that cannot be
canceled. Also, the allocation process requires as much physical disk space
as you specify for the virtual disk.
Split disk into multiple files Default. Some file systems, such as FAT and UFS, cannot support very large
files. Use this option if your virtual machine will be used in a hard drive with
a file system that does not support very large files. This option splits your
virtual disk into multiple files. Also, use this option if you might place the
virtual machine on an external FAT drive or if you might move the virtual
machine to an external drive.
7 Apply the changes and choose automatic or manual partition resize for Windows guests.
Option
Description
Click Apply. For Windows guests, the partition is automatically resized when the hard
disk is resized.
Click Apply while pressing the
Option key.
The hard disk is resized but the partition is not. To manually resize the
partition of the guest, see Resize a Windows Partition with the Disk
Management Tool.
Results
Fusion displays a progress dialog box as it rebuilds the virtual disk.
Resize a Windows Partition with the Disk Management Tool
When you enlarge your virtual hard disk, you must also enlarge your guest operating system's
partition to take advantage of the additional space.
Fusion resizes the guest operating system's partition when you resize the virtual hard disk. If you
held down the Option key when you clicked Apply to resize the disk, you can manually resize
the Windows partition. For Windows Vista and Windows 7 or later, you can use the operating
system's Disk Management tool to resize a partition.
Using VMware Fusion
VMware by Broadcom 151

Prerequisites
Verify that your virtual hard disk is big enough to accept the increase in partition size. See Resize
a Hard Disk.
Procedure
1 Right-click Computer and select Manage.
2 Double-click Storage.
3 Double-click Disk Management.
4 In the list, right-click the partition to expand and select Extend Volume.
5 Follow the prompts to resize the partition and click Finish.
The partition item in the Disk Management pane displays its new size.
6 Close the Computer Management window
Clean up a Virtual Machine
You can perform a manual or automated cleanup of certain virtual machines to free up space on
your Mac. The cleanup compacts and defragments the virtual machine.
When you delete files from your virtual machine, Fusion does not return the space to your Mac.
Cleaning up the virtual machine performs the following operations.
n Compacts the virtual machine and returns freed space to your Mac.
Note Only Windows virtual machines return freed space to your Mac.
n Defragments the virtual machine.
n Consolidates any unconsolidated snapshot files left on the virtual machine. Unconsolidated
snapshot files can be left on the virtual machine when manually deleting a snapshot fails.
Disk cleanup is not supported in the following situations.
n The virtual hard disk uses a FAT32, FAT, or exFAT file system.
n The virtual hard disk uses a preallocated disk format.
Prerequisites
To perform a manual cleanup, shut down or power off the virtual machine. You cannot perform
the manual cleanup while the virtual machine is powered on or suspended.
Procedure
1 Select Window > Virtual Machine Library.
2 Select a virtual machine in the Virtual Machine Library window and click Settings.
3 Under System Settings in the Settings window, click General.
Using VMware Fusion
VMware by Broadcom 152

4 Select a cleanup option.
Manual Click Clean Up Virtual Machine.
This option is only available when a Windows virtual machine has disk space to reclaim, or when any
virtual machine has unconsolidated snapshot files.
Fusion displays a progress dialog box as it cleans up the virtual machine.
Automated Select Clean up disks after shutting down virtual machine.
Fusion cleans up the virtual machine every time the virtual machine is shut down.
Add an Existing Virtual Hard Disk
You can add an existing virtual hard disk to a virtual machine. You can copy or move the disk to
your virtual machine, or share it between virtual machines.
Caution Moving the virtual hard disk can break other virtual machines that are using the virtual
hard disk, because this is the equivalent of removing the hard disk from one physical computer
and installing it in another.
Procedure
1 Select Window > Virtual Machine Library.
2 Select a virtual machine in the Virtual Machine Library window and click Settings.
3 Click Add Device.
4 Click Existing Hard Disk.
5 Click Add Device.
6 In the Open dialog, navigate to the location of the existing .vmdk hard disk file.
7 Select the method for adding the virtual hard disk file.
Option
Description
Make a separate copy of the virtual
disk
Default. Copies the virtual hard disk file to this virtual machine’s package.
Copying the virtual hard disk ensures that no conflicts exist between this
virtual machine and any other virtual machine that might be using the virtual
hard disk.
Share this virtual disk with the virtual
machine that created it
Virtual hard disk file remains in its original location. This might cause a
conflict if it is also being used by that original virtual machine.
Take this disk away from the virtual
machine currently using it
Moves the virtual hard disk file to this virtual machine’s package.
8 Click Open.
9 Click Apply.
Results
Fusion displays a progress dialog box if you select to copy the virtual disk.
Using VMware Fusion
VMware by Broadcom 153
Add a VMDK on a Remote Virtual Machine
You can add a virtual hard disk and select a disk image on a virtual machine hosted on a remote
server.
Prerequisites
Verify that the following conditions are met:
n You have login credentials for the server where the virtual machine is hosted.
n The virtual machine is powered off.
Procedure
1 Select File > Connect to Server.
2 Enter the name of the host server or select a server from the Recent Servers drop-down
menu.
3 Enter your login credentials and click Connect.
4 Select Virtual Machine > Settings.
5 Click Add Device.
6 Click Hard Disk.
7 Select a .vmdk file from the File name drop-down menu.
8 Use the disk size slider to specify the size of the virtual disk.
9 (Optional) Expand Advanced options and select a bus type and choose how to allocate the
disk space.
Remove a Hard Disk
You can remove a virtual hard disk from your virtual machine.
Prerequisites
Shut down or power off the virtual machine. You cannot change the setting while the virtual
machine is powered on or suspended.
Procedure
1 Select Window > Virtual Machine Library.
2 Select a virtual machine in the Virtual Machine Library window and click Settings.
3 In the Settings window, click the hard disk to remove from the virtual machine.
4 Under Advanced options, click Remove Hard Disk.
Using VMware Fusion
VMware by Broadcom 154

5 In the confirmation window, select the option for removing the hard disk.
Option Description
Keep File The virtual hard disk is disconnected from the virtual machine, but the hard
disk files remain in the virtual machine package.
Move to Trash The virtual hard disk files are deleted from the virtual machine package.
Using Virtual DiskManager
Virtual Disk Manager (vmware-vdiskmanager) is a Fusion utility that you can use to create,
manage, and modify virtual disk files from the command line or in scripts.
Virtual Disk Manager is included when Fusion is installed. With Virtual Disk Manager, you can
enlarge a virtual disk so that its maximum capacity is larger than it was when you created it. This
feature is useful if you need more disk space in a given virtual machine, but do not want to add
another virtual disk or use ghosting software to transfer the data on a virtual disk to a larger
virtual disk.
You can also use Virtual Disk Manager to change how disk space is allocated for a virtual hard
disk. You can preallocate all the disk space in advance or configure the disk to grow as more disk
space is needed. If you allocate all the disk space but later need to reclaim some hard disk space
on the host system, you can convert the preallocated virtual disk into a growable disk. The new
virtual disk is still large enough to contain all the data in the original virtual hard disk. You can also
change whether the virtual hard disk is stored in a single file or split into 2GB files.
The Virtual Disk Manager file, vmware-vdiskmanager, is located in the Applications/VMware
Fusion.app/Contents/Library directory.
Configuring the CD/DVD Drive
You can connect the virtual machine's CD/DVD drive to the Mac physical CD/DVD drive or to a
CD or DVD ISO image.
What to read next
n Add a CD/DVD Drive
You can add a virtual CD/DVD drive to a virtual machine.
n Remove a CD/DVD Drive
You can remove a physical or virtual CD/DVD drive from your virtual machine.
n Connect and Set Up a CD/DVD Drive
You can set up a CD/DVD drive so that it is always detected, or so that you must connect it
manually.
n Connect and Disconnect the CD/DVD Drive Without Using the Settings Window
You can use the buttons on the status bar to connect and disconnect devices.
Using VMware Fusion
VMware by Broadcom 155

n Create a CD/DVD Image
You can use the Apple Disk Utility to create CD/DVD disk images.
n Enable a CD/DVD Drive on a Remote Virtual Machine
You can enable a CD/DVD drive and select a disk image on a virtual machine hosted on a
remote server. You can access or install software from a physical CD/DVD drive on to your
remote virtual machine.
Add a CD/DVD Drive
You can add a virtual CD/DVD drive to a virtual machine.
Prerequisites
Shut down or power off the virtual machine. You cannot change the setting while the virtual
machine is powered on or suspended.
Procedure
1 Select Window > Virtual Machine Library.
2 Select a virtual machine in the Virtual Machine Library window and click Settings.
3 Click Add Device.
4 Click CD/DVD Drive.
5 Click Add.
6 Configure the drive.
Option
Description
Automatically detect physical
CD/DVD
The virtual machine detects your Mac CD/DVD drive.
Specify physical CD/DVD Directs the virtual machine’s CD/DVD drive to a physical drive.
Use disk image Directs the virtual machine’s CD/DVD drive to an ISO image. Click the pop-
up menu to browse for and select the ISO image file.
Remove a CD/DVD Drive
You can remove a physical or virtual CD/DVD drive from your virtual machine.
Prerequisites
Shut down or power off the virtual machine. You cannot change the setting while the virtual
machine is powered on or suspended.
Procedure
1 Select Window > Virtual Machine Library.
2 Select a virtual machine in the Virtual Machine Library window and click Settings.
Using VMware Fusion
VMware by Broadcom 156
3 Under Removable Devices in the Settings window, click the CD/DVD drive to remove.
4 Under Advanced options, click Remove CD/DVD Drive.
Connect and Set Up a CD/DVD Drive
You can set up a CD/DVD drive so that it is always detected, or so that you must connect it
manually.
You can turn off the Automatically detect physical CD/DVD feature while the virtual machine is
powered on, but you must power off the virtual machine before you can enable this feature. Use
the Shut Down command in the Virtual Machine menu.
If your CD/DVD drive is a USB device, Fusion handles it as a USB device, not a CD/DVD drive.
See Configuring the USB Controller and Connecting USB Devices.
Procedure
1 Select Window > Virtual Machine Library.
2 Select a virtual machine in the Virtual Machine Library window and click Settings.
3 Under Removable Devices in the Settings window, click the CD/DVD drive to connect.
4 Select the Connect CD/DVD Drive check box.
Connect and Disconnect the CD/DVD Drive Without Using the Settings Window
You can use the buttons on the status bar to connect and disconnect devices.
Procedure
u Click the CD/DVD device button in the status bar.
Create a CD/DVD Image
You can use the Apple Disk Utility to create CD/DVD disk images.
Procedure
1 Start the Mac Disk Utility by going to Applications/Utilities/Disk Utility on your
Mac.
2 Insert the CD/DVD for which you need an image.
3 In the Disk Utility window, select the CD/DVD disk and click New Image.
4 In the Image Format pop-down menu, select DVD/CD Master
5 In the Encryption pop-down menu, select None.
6 Save the CD/DVD image to the chosen location.
What to do next
To attach the images to a virtual machine, see Connect and Set Up a CD/DVD Drive.
Using VMware Fusion
VMware by Broadcom 157
Enable a CD/DVD Drive on a Remote Virtual Machine
You can enable a CD/DVD drive and select a disk image on a virtual machine hosted on a remote
server. You can access or install software from a physical CD/DVD drive on to your remote
virtual machine.
Prerequisites
Verify that the following conditions are met:
n You have login credentials for the server where the virtual machine is hosted.
n The virtual machine is powered on.
Procedure
1 Select File > Connect to Server.
2 Enter the name of the host server or select a server from the Recent Servers drop-down
menu.
3 Enter your login credentials and click Connect.
4 Select Virtual Machine > Settings.
5 Click CD/DVD Drive.
6 Select the Enable CD/DVD Drive check box.
7 Select a remote disc image from the Choose a remote disc image drop-down menu.
8 (Optional) Expand Advanced options and select a bus type from the drop-down menu.
9 (Optional) Click Remove CD/DVD Drive to return to the CD/DVD drive that your virtual
machine uses.
Configuring a Floppy Device
You can add a virtual floppy device to a virtual machine and configure the floppy device to
connect to a floppy image file.
You can also connect and disconnect the floppy device in Fusion. A virtual machine can have no
more than two floppy devices.
Add a Floppy Device
You can add a floppy device to your virtual machine to access data on a floppy disk image file.
Prerequisites
Shut down or power off the virtual machine. You cannot change the setting while the virtual
machine is powered on or suspended.
You must have a floppy image file with one of the following filename extensions:
n .flp
Using VMware Fusion
VMware by Broadcom 158
n .img
n .dsk
n .fdd
Procedure
1 Select Window > Virtual Machine Library.
2 Select a virtual machine in the Virtual Machine Library window and click Settings.
3 Click Add Device.
4 Click Floppy Drive.
5 Click Add.
6 Browse to the floppy image file and select it.
7 Click Open.
What to do next
Configure the new floppy device, as described in Connect and Set Up a Floppy Device .
Connect and Set Up a Floppy Device
You can configure how your virtual machine can use a floppy device to access data on a floppy
disk image file.
Procedure
1 Select Window > Virtual Machine Library.
2 Select a virtual machine in the Virtual Machine Library window and click Settings.
3 Click Add Device.
4 Select the floppy device in the source list in the Other Devices panel.
5 Select or deselect the Connected check box to connect or disconnect the floppy device.
6 (Optional) Select Read only to make the contents of the floppy device read-only.
7 Select Use floppy image and click Choose to browse for the floppy image file to connect the
floppy device to a floppy image file.
If you are working with a virtual machine that is configured to use a physical floppy drive,
or any type of floppy device other than a floppy image file, the Use a custom unsupported
setting option is selected. Fusion supports only floppy image files for use with a virtual floppy
device.
Create a Floppy Disk Image
To read data from a floppy disk to a virtual machine, you must create a disk image that the virtual
machine can recognize.
Using VMware Fusion
VMware by Broadcom 159
Some operating systems require you to use floppy disks to install them. Because the Mac does
not include a physical floppy drive, and because Fusion supports floppy images only, you must
use a USB floppy drive to create floppy images.
The Apple Disk Utility can create floppy disk images for this purpose.
Procedure
1 Attach a USB floppy drive to your Mac.
2 Start the Mac Disk Utility by going to Applications/Utilities/Disk Utility on your
Mac.
3 Insert the floppy disk for which you need an image.
4 In the Disk Utility window, select the floppy disk and click New Image.
5 In the Image Format pop-up menu, select read/write.
6 In the Encryption pop-up menu, select None.
7 Save the floppy disk image to the chosen location.
8 In the Finder, right-click on the created floppy image and select Get Info.
9 In Name & Extension, change the file extension from .dmg to .flp and close the Get Info
window.
Confirm the change when prompted.
10 (Optional) Repeat the process for each floppy disk to create.
What to do next
To attach the images to a virtual machine, see Connect and Set Up a Floppy Device .
Enable a Floppy Drive on a Remote Virtual Machine
You can enable a floppy drive and select a disk image on a virtual machine hosted on a remote
server. You can access or install software from a physical floppy drive on to your remote virtual
machine.
Prerequisites
Verify that the following conditions are met:
n You have login credentials for the server where the virtual machine is hosted.
n The virtual machine is powered on.
Procedure
1 Select File > Connect to Server.
2 Enter the name of the host server or select a server from the Recent Servers drop-down
menu.
Using VMware Fusion
VMware by Broadcom 160
3 Enter your login credentials and click Connect.
4 Select Virtual Machine > Settings.
5 Click Floppy.
6 Click the Enable Floppy Drive check box.
7 Select a floppy image from the drop-down menu.
Configuring the Sound Card
A virtual machine can have only one sound card. You can add a sound card only if you remove
the existing sound card.
Connect the Sound Card
You can enable your virtual machine to use the Mac's sound device.
Procedure
1 Select Window > Virtual Machine Library.
2 Select a virtual machine in the Virtual Machine Library window and click Settings.
3 Under Removable Devices in the Settings window, click Sound Card.
4 Select the Connect Sound Card check box.
5 Select the Output Device and Input Device
6 (Optional) Select the Enable Echo Cancellation check box if there is sound echo in your
virtual machine.
Connect and Disconnect a Sound Adapter Without Using the Settings Window
You can use the buttons on the status bar to connect and disconnect devices.
Procedure
u Click the sound device button in the status bar.
Add a Sound Adapter
You can add a sound adapter if one was previously removed.
Prerequisites
Shut down or power off the virtual machine. You cannot change the setting while the virtual
machine is powered on or suspended.
Procedure
1 Select Window > Virtual Machine Library.
2 Select a virtual machine in the Virtual Machine Library window and click Settings.
Using VMware Fusion
VMware by Broadcom 161
3 Click Add Device.
4 Click Sound Card and click Add.
5 Select the output and input device to add.
Remove a Sound Adapter
Before you can add a new sound adapter, you must remove the existing one.
Prerequisites
Shut down or power off the virtual machine. You cannot change the setting while the virtual
machine is powered on or suspended.
Procedure
1 Select Window > Virtual Machine Library.
2 Select a virtual machine in the Virtual Machine Library window and click Settings.
3 Under Removable Devices in the Settings window, click Sound Card.
4 Click Remove Sound Card.
5 Click Remove in the confirmation dialog box.
Add a Camera to a Virtual Machine
You can enable one or more cameras on a virtual machine.
Prerequisites
Verify that the following conditions are met:
n You have one or more cameras on the host system, either built-in or connected to a USB
device.
n The virtual machine uses hardware version 11 or later.
n The virtual machine is local to your Mac, rather than hosted on a remote server.
Procedure
1 Select Virtual Machine > Settings.
2 Click Add Device.
3 Select Camera.
4 Click Add.
Ordinarily, the default camera of the host system is added to the virtual machine. You can
select a camera by name. If a named camera is chosen, the camera of your virtual machine
is connected explicitly to that camera. In that case, the camera might not connect if you
move the virtual machine to another host, or if you remove the named camera from the host
system.
Using VMware Fusion
VMware by Broadcom 162

Configuring the USB Controller and Connecting USB Devices
You can configure the virtual USB controller to enable USB 3.0/3.1 and 2.0 support. You can also
configure the virtual USB controller to connect USB devices to the virtual machine when such
devices are connected to the Mac while the virtual machine is active. The settings you select can
persist across several VMware products, such as Workstation Pro and VMware Horizon 7.
If you have a Mac that supports connecting USB 3.0/3.1 devices, guest operating systems can
connect to USB 3.0/3.1 devices as USB 3.0/3.1 and connect to USB 2.0 devices as USB 2.0.
However, guests with virtual USB 2.0 hardware have issues when connecting to USB 3.0/3.1
devices. An example of a guest operating system that does not have virtual USB 3.0/3.1
hardware is Windows XP. Depending on the specific device, performance might be slow or
partial, or the device might fail to connect.
Guests on older Macs can have virtual USB 3.0/3.1 virtual hardware, but both USB 2.0 and USB
3.0/3.1 devices connect in USB 2.0 mode. Guests with virtual USB 2.0 hardware also use USB 2.0
mode for USB 2.0 and USB 3.0/3.1 devices.
Note Fusion does not support USB adapters for connecting displays to your virtual machines.
Add the USB Controller
You can add a virtual USB controller to allow your virtual machine to work with the USB devices
that are connected to your Mac.
Prerequisites
Shut down or power off the virtual machine. You cannot change the setting while the virtual
machine is powered on or suspended.
Procedure
1 Select Window > Virtual Machine Library.
2 Select a virtual machine in the Virtual Machine Library window and click Settings.
3 Under Removable Devices in the Settings window, click USB & Bluetooth.
4 Under Advanced USB options, use the drop-down menu to select how Fusion should respond
when a USB device is plugged in to your Mac.
Note Support for USB 3.0 SuperSpeed and USB 3.1 SuperSpeed plus devices requires a
suitably equipped Mac and a guest operating system that supports USB 3.0/3.1 devices.
Remove the USB Controller
You can remove a USB controller from your virtual machine.
When you remove the USB controller, you cannot connect a USB device to the virtual machine.
Using VMware Fusion
VMware by Broadcom 163

Prerequisites
Shut down or power off the virtual machine. You cannot change the setting while the virtual
machine is powered on or suspended.
Procedure
1 Select Window > Virtual Machine Library.
2 Select a virtual machine in the Virtual Machine Library window and click Settings.
3 Under Removable Devices in the Settings window, click USB & Bluetooth.
4 Under Advanced USB options, click Remove USB Controller.
5 Click Remove in the confirmation dialog box.
Choose Where to Connect a USB Device When You Plug It In
When a virtual machine is running, you can select whether a USB device connects to your Mac or
to your virtual machine when you plug the device in.
With Fusion, you can select what system a USB device connects to when you plug it in. You can
also set that choice as the default connection whenever you attach that device in the future.
Prerequisites
Fusion must be open, with a virtual machine powered on.
Procedure
1 Plug the USB device into your Mac.
The selection dialog box appears. If no dialog box appears, you already set a default
connection for this device in the USB settings panel.
2 (Optional) To make your connection selection the default for this device in the future, select
Remember my choice and do not ask again.
You can change this default at any time in the USB & Bluetooth settings panel.
3 Select the system to which you want to connect the device.
The action you take depends on how many virtual machines are open.
Option
Description
If you have one virtual machine
powered on
Select Connect to Mac or Connect to
OS of your open virtual machine
.
If you have two or more virtual
machines powered on
In the pop-up menu, select Connect to your Mac or Connect to
virtual
machine name
for the selected virtual machine. Click OK.
Set the Default Plug-In Action for a USB Device
You can set whether a USB device connects to your Mac or to your virtual machine whenever
you attach the device.
Using VMware Fusion
VMware by Broadcom 164

This setting can be different for each virtual machine. If you set the default plug-in action for
a virtual machine, but the virtual machine is not powered on when you attach the device, the
device attaches to the Mac.
Prerequisites
Fusion must be open, with a virtual machine powered on.
Procedure
1 Select Window > Virtual Machine Library.
2 Select a virtual machine in the Virtual Machine Library window and click Settings.
3 Under Removable Devices in the Settings window, click USB & Bluetooth.
4 Select the USB device in the list.
5 Under Advanced USB options, select the plug-in behavior for the device.
Option Description
Ask what to do Fusion asks if you want to attach the device to the Mac or the virtual
machine.
Connect to this virtual machine Only the virtual machine recognizes the device. The Mac does not recognize
the device.
Connect to your Mac Only the Mac recognizes the device. The virtual machine does not recognize
the device.
This option is the default behavior.
Connect and Disconnect USB Devices
You can connect USB devices to your virtual machines through your Mac.
Connecting a USB device to the virtual machine makes the USB device unavailable to your Mac.
If your CD/DVD drive is a USB device, Fusion handles it as a USB device, not a CD/DVD drive.
Prerequisites
If you disconnect a USB device and reconnect it right away, it will reconnect to the virtual
machine that it was previously connected to. To change the connection, reconnect to a different
USB port on your Mac.
Procedure
1 Select Window > Virtual Machine Library.
2 Under Removable Devices in the Settings window, click USB & Bluetooth.
3 In the Connect USB devices section, select or deselect the check box next to the USB device
to connect or disconnect that device.
Using VMware Fusion
VMware by Broadcom 165

Connect and Disconnect a USB Device Using the Virtual Machine Toolbar
You can use the buttons on the status bar to connect and disconnect devices.
Procedure
1 Click the device button in the status bar.
2 Click Connect
name of device
.
Connect a USB Smart Card Reader
You connect a USB smart card reader with a process different from the process used for other
USB devices.
When you attach a smart card reader to your computer, the reader appears as two separate
USB devices in the Fusion interface. You can use smart cards in virtual mode or USB passthrough
mode. These mode are mutually exclusive. You must pick one or the other.
n Virtual mode (Recommended): The smart card reader device is available as Virtual
model
name of your smart card reader
USB Smart Card Reader. After the virtual reader is
connected to the virtual machine, it appears as
Virtual
the model name of your smart card
reader
USB Smart Card Reader under the device list in the guest operating system. In virtual
mode, the smart card reader can be shared among applications on the host and among
applications within different guests on the host.
n USB passthrough mode: The smart card reader device is available as
model name of your
smart card reader
USB Smart Card Reader. When you connect the reader to the guest, it
appears as
model name of the smart card reader
USB Smart Card Reader under the device
list in the guest operating system. In USB passthrough mode, a single virtual machine directly
controls the physical smart card reader. A USB passthrough smart card reader cannot be
used by applications on the host or by applications within other virtual machines. Use USB
passthrough mode only if connection in virtual mode does not work well for your computing
environment.
Note Disconnect your current mode before you switch to a different mode.
Procedure
u For virtual mode, select Virtual Machine > USB & Bluetooth > Connect
the model name of
your smart card reader
USB Smart Card Reader.
When you select the virtual mode device, the passthrough mode
the model name of your
smart card reader
Smart Card Reader device no longer appears, except in Linux virtual
machines.
u For USB passthrough mode, select Virtual Machine > USB & Bluetooth > Connect
the model
name of your smart card reader
USB Smart Card Reader.
u To disconnect either mode, select Virtual Machine > USB & Bluetooth and the device to
disconnect, and click Disconnect.
Using VMware Fusion
VMware by Broadcom 166
USB Connection Dialog Box Disappears Before Connection Can Be Made
In rare cases, a USB device disconnects itself before Fusion can recognize it.
Problem
When you plug in a USB device, the Fusion EasyConnect dialog box appears, but disappears
before you have an opportunity to take an action. The USB device is then not visible to either
your Mac or your virtual machine.
Cause
Some USB devices disconnect very quickly if they do not receive an immediate response upon
connection. Occasionally, Fusion USB EasyConnect does not produce a response in the time
required by these USB devices.
To work around this problem, you must configure the virtual machine so that Fusion connects
unknown devices without first having to ask about the type of connection.
Solution
1 Shut down or power off the virtual machine.
2 Select Window > Virtual Machine Library.
3 Select a virtual machine in the Virtual Machine Library window and click Settings.
4 Under Removable Devices in the Settings window, click USB & Bluetooth.
5 Under Advanced USB options, if the first option is set to Ask what to do, change the setting
to Connect to this virtual machine or Connect to your Mac.
6 Start up the virtual machine.
Plugging in a USB device results in it being connected to the virtual machine or Mac,
depending on your setting, without going through the USB EasyConnect dialog. The device is
also visible to the Fusion interface, so you can see it in Settings > USB & Bluetooth.
Add a Parallel Port
You can add a parallel port to your virtual machine.
Prerequisites
Shut down or power off the virtual machine. You cannot change the setting while the virtual
machine is powered on or suspended.
Procedure
1 Select Window > Virtual Machine Library.
2 Select a virtual machine in the Virtual Machine Library window and click Settings.
3 Click Add Device.
4 Click Parallel Port.
Using VMware Fusion
VMware by Broadcom 167

5 Click Add.
6 Browse to the location to save the output file of the virtual parallel port.
7 Type a name for the file in the Save As field.
8 Click Save.
Add a Serial Port
You can add a serial port to your virtual machine.
Prerequisites
Shut down or power off the virtual machine. You cannot change the setting while the virtual
machine is powered on or suspended.
Procedure
1 Select Window > Virtual Machine Library.
2 Select a virtual machine in the Virtual Machine Library window and click Settings.
3 Click Add Device.
4 Click Serial Port.
5 Click Add.
6 Browse to the location to save the output file of the virtual serial port.
7 Type a name for the file in the Save As field.
8 Click Save.
Sharing Bluetooth Devices with a Virtual Machine
You can attach a Bluetooth device to a virtual machine
Note Bluetooth device support is removed in VMware Fusion 13.6 and later.
Fusion supports these types of Bluetooth devices:
n Cell phones
n GPS receivers
n Serial Port Profile (SPP) devices
n Most other devices
Fusion has limited support for these types of Bluetooth devices:
n Input devices (HID): Can be attached to guests when using Linux/macOS hosts, but not on
Windows hosts.
OBEX File Transfer: Outgoing (guest to device) transfers only. Guest may not act as an OBEX
server.
Using VMware Fusion
VMware by Broadcom 168
Fusion does not support these types of Bluetooth devices:
n Headphones
n Headsets
n Hands-free audio devices
Fusion has the following limitations for Bluetooth support:
n Only out going connections are allowed. A virtual machine may establish a connection to a
remote Bluetooth device, but remote devices do not see services that virtual machines try to
advertise.
n Virtual machines cannot change the name, class, or discoverability of the host's Bluetooth
adapter. The host is exclusively in control over setting whether other Bluetooth devices can
discover the host, and what name is used.
n The host is exclusively in control of the pairing process and collecting or displaying PIN
numbers. The guest may scan for devices, and initiate a connection with any device. If pairing
is required, the pairing dialog box appears on the host, not in the guest. From the guest's
perspective, the device appears to pair without having needed a PIN.
n Any vendor-specific capabilities on the host's Bluetooth radio are not passed through to
the guest. For example, some radios provide a vendor-specific command to change their
BDADDR. These commands do not appear in the guest. The guest sees a generic VMware-
brand radio.
n The virtual Bluetooth controller itself is not part of snapshots. During snapshots, it is
disconnected and reconnected. Any ongoing connections with Bluetooth devices are
terminated at the time of a snapshot.
Procedure
1 Select Window > Virtual Machine Library.
2 Select a virtual machine in the Virtual Machine Library window and click Settings.
3 Under Removable Devices in the Settings window, click USB & Bluetooth.
4 Select the Share Bluetooth devices with the virtual machine check box.
The virtual Bluetooth radio appears in the guest. You might see notifications from the
guest OS that new hardware was detected. No action is required because the driver is
automatically installed.
5 Use the guest's Bluetooth interface to search for nearby devices to pair with. Devices appear
in the list as they are detected.
6 Select the device you want to connect with and select to connect to it.
Using VMware Fusion
VMware by Broadcom 169

7 Pair the device with the host.
If you have not paired this device with this host before, you are prompted to do so now. The
host may ask you for a PIN, or may display a PIN to be entered on the device.
After the device pairs, the device is now available in the guest.
Configuring a Trusted Platform Module Device
You can add a virtual cryptoprocessor that uses Trusted Platform Module (TPM) technology to
an encrypted virtual machine. Afterward, you can remove the cryptoprocessor from the virtual
machine.
TPM technology provides hardware-based, security-related functions. A TPM cryptoprocessor
carries out cryptographic operations. Fusion supports TPM version 2.0.
Create a Virtual Trusted Platform Module Device
For increased security, you can add a virtual cryptoprocessor that is equipped with Trusted
Platform Module (TPM) technology to an encrypted virtual machine.
Prerequisites
n Create a virtual machine with a minimum hardware version of 14 that uses the UEFI firmware
type.
n Encrypt the virtual machine. See Encrypt a Virtual Machine.
Procedure
1 Select Window > Virtual Machine Library.
2 Select a virtual machine in the Virtual Machine Library window and click Settings.
3 Click Add Device.
4 Click Trusted Platform Module.
If the option is not available, the Trusted Platform Module device is not supported on the
guest.
5 Click Add.
A dialog box appears.
6 Close the dialog box.
Results
The virtual machine uses the virtual TPM device.
Note You cannot decrypt the virtual machine when the TPM device is present.
Remove a Virtual Trusted Platform Module Device
You can remove a Trusted Platform Module device from a virtual machine.
Using VMware Fusion
VMware by Broadcom 170
After you add a virtual cryptoprocessor equipped with Trusted Platform Module (TPM)
technology to an encrypted virtual machine, you can then remove the TPM device.
Procedure
1 Select Window > Virtual Machine Library.
2 Select a virtual machine in the Virtual Machine Library window and click Settings.
3 In the Removable Devices section, click Trusted Platform Module.
4 Click Remove Trusted Platform Module.
A dialog box appears asking if you want to remove the device.
5 Click Remove.
Results
Fusion removes the TPM device from the virtual machine.
Select a Startup Device
You can select the device to use to start up your virtual machine.
Prerequisites
Verify that the virtual machine is running. The change does not take effect if the virtual machine
is not running.
Procedure
1 Select Window > Virtual Machine Library.
2 Select a virtual machine in the Virtual Machine Library window and click Settings.
3 Under Other in the Settings window, click Startup Disk.
4 Click the startup device to use.
5 Click Restart.
You can also hold down the Option key and click Restart to firmware to restart the virtual
machine in firmware setup mode.
Results
The guest operating system restarts and boots from the selected device.
Encrypting a Virtual Machine
Encrypt your virtual machine to control the use of the virtual machine and access to its contents.
Fusion supports the following types of encryption:
Fast VM Encryption
Using VMware Fusion
VMware by Broadcom 171

Fast encryption refers to the encryption of a minimal set of VM files as follows:
n Ancillary data files such as snapshot/screenshot/NVRAM files. These are encrypted with
the key in the configuration file. List of files encrypted- .nvram, .vmsn, .vmss, .vmem
n Partially encrypted VM configuration file.
Full VM Encryption
Full encryption refers to encryption of all VM files as follows:
n Disk file headers. These are encrypted with the key in the configuration file.
n Disk file data. These are encrypted with the key in the configuration file.
n Ancillary data files such as the snapshot/screenshot/NVRAM files. These are encrypted
with the key in the configuration file.
n VM configuration file is encrypted with authentication keys.
When you encrypt a virtual machine, you set a password that is required to open the virtual
machine. You can remove the encryption or change the password at any time.
Note Large virtual machines, such as those that exceed 50GB, might generate a low disk space
warning.
Encrypt a Virtual Machine
You can encrypt your virtual machine with a password to control access to the virtual machine
and its contents.
Prerequisites
n Suspend or shut down the virtual machine.
Procedure
1 Select Window > Virtual Machine Library.
2 Select a virtual machine in the Virtual Machine Library window and click Settings.
3 Under Other in the Settings window, click Encryption.
4 Choose appropriate encryption option and set the encryption password.
The password must be eight characters or longer.
Important Make a record of the encryption password. If you forget the encryption
password, Fusion does not provide a way to retrieve it.
5 (Optional) To store the encryption password in the Keychain password management system
on your Mac, select Remember Password.
6 Click OK.
Using VMware Fusion
VMware by Broadcom 172
Results
The virtual machine is encrypted. Users must provide the encryption password to open the
virtual machine.
Change the Password for an Encrypted Virtual Machine
You can change the password for an encrypted virtual machine at any time.
Prerequisites
n Suspend or power off the virtual machine.
n Verify that you have the password for the encrypted virtual machine.
Procedure
1 Select Window > Virtual Machine Library.
2 Select a virtual machine in the Virtual Machine Library window and click Settings.
3 Under Other in the Settings window, click Encryption.
4 Click Change Password.
5 Type the old password for the virtual machine.
6 Type the password to use to encrypt the virtual machine.
Remember this password. You cannot access the virtual machine without it.
7 Type the password again.
8 (Optional) Select Remember Password to store the password in the Keychain password
management system on your Mac.
9 Click OK.
Results
The encryption password for the virtual machine is changed.
Remove Encryption from a Virtual Machine
You can remove encryption from a virtual machine at any time.
Prerequisites
n Suspend or power off the virtual machine.
n Verify that you have the password for the encrypted virtual machine.
Procedure
1 Select Window > Virtual Machine Library.
2 Select a virtual machine in the Virtual Machine Library window and click Settings.
Using VMware Fusion
VMware by Broadcom 173
3 Under Other in the Settings window, click Encryption.
4 Choose Virtual machine is not encrypted.
5 Type the password for the virtual machine.
6 Click OK.
Results
Encryption is removed from the virtual machine. You no longer not need a password to access
the virtual machine and its contents.
Store the Password for an Encrypted Virtual Machine in Keychain
You can store the password for an encrypted virtual machine in your Mac's Keychain password
management system at any time. Mac Keychain remembers the password for you.
You can store the encryption password in the Keychain password management system when
you first encrypt a virtual machine. See Encrypt a Virtual Machine. You also have the opportunity
to store the encryption password in the Keychain password management system every time you
are prompted for the encryption password.
Prerequisites
n Suspend or power off the virtual machine.
n Verify that you have the password for the encrypted virtual machine.
Procedure
1 Select Window > Virtual Machine Library.
2 Select a virtual machine in the Virtual Machine Library window and click Settings.
3 Select the Remember Password check box.
4 Type the password for the virtual machine.
5 Click OK.
Results
The password for the encrypted virtual machine is stored in Keychain.
Virtual Machine Compatibility
The compatibility of a virtual machine with different versions of Fusion and other VMware
products is based on its hardware version. The hardware version of a virtual machine is
established by the version of Fusion that was used to create the virtual machine.
Consider upgrading the hardware version of your virtual machine if you upgrade Fusion or if you
want to use the virtual machine in other VMware products.
You must power off a virtual machine before you change its hardware version.
Using VMware Fusion
VMware by Broadcom 174
Change the Hardware Compatibility of a Virtual Machine
The latest virtual machine hardware version available yields the best performance and most
reliable behavior from the applications running in your virtual machine.
Virtual machines with hardware version 10 or later are created with SATA hard disks or CD
drives. Upgrading your virtual machine from hardware version 9 or earlier does not change any
devices in your virtual machine to SATA. If you want to use SATA disks or drives with your virtual
machine, you must manually change the disk and drive types.
Prerequisites
n Evaluate the applications running in your virtual machine to determine which hardware
version to select. Some applications might have specific hardware requirements offered
through a virtual machine hardware version older than the latest available version.
n Consider taking a snapshot of the virtual machine. If changing the hardware version of your
virtual machine results in undesirable behavior, you can revert to the snapshot taken before
the hardware version upgrade.
n Shut down or power off your virtual machine before you change its hardware version.
Procedure
1 Select Window > Virtual Machine Library.
2 Select a virtual machine in the Virtual Machine Library window and click Settings.
3 Under Other in the Settings window, click Compatibility.
4 Under Advanced options, select a hardware version from the Use Hardware Version drop-
down menu.
When you select a hardware compatibility setting, a list of the VMware products that are
compatible with that setting appears. For example, if you select hardware version 10, a list of
VMware products that this version supports appears. Limitations for the selected hardware
version also appear.
Some hardware options might not be available for selection, for example, older hardware
versions that your current version of Fusion does not support.
5 (Optional) Click Revert to return to the hardware version that your virtual machine uses.
When you revert your hardware version, you can view the compatibility and limits of your
current hardware version.
6 Click Apply to change the virtual machine hardware version.
7 Click Close.
Results
The hardware version of the virtual machine is changed.
Using VMware Fusion
VMware by Broadcom 175

What to do next
Power on the virtual machine.
Choose the Hardware Version for a Virtual Machine
Upgrading the hardware version of your virtual machine improves performance by increasing the
memory limit, the number of processors utilized, and the amount of disk space available to the
virtual machine.
Prerequisites
Verify that you have the latest version of VMware tools installed.
Procedure
1 Select Window > Virtual Machine Library.
2 Select a virtual machine in the Virtual Machine Library window and click Settings.
3 Under Other in the Settings window, click Compatibility.
4 Under Advanced options, select a hardware version from the Use Hardware Version drop-
down menu.
Hardware version 12 enables higher performance of the virtual machine, including improved
accelerated 3D graphics rendering.
Configuring Guest Isolation Options for a Virtual Machine
With the isolation option, you can restrict file operations between the virtual machine and the
host system, and between the virtual machine and other virtual machines.
To configure guest isolation options for a selected virtual machine, select Virtual Machine >
Settings and select Isolation.
The following restrictions apply:
n VMware Tools must be installed in the guest operating system to use guest isolation features.
n You cannot configure these options for a remote virtual machine.
n If the virtual machine is running macOS as the guest operating system, you can copy and
paste text between the guest operating system and the host, but copying files is not
supported.
Note The drag and drop and copy and paste operations are turned on by default. You might
want to turn off these operations to prevent files from being accidentally transferred between
the virtual machine and the host system.
Using VMware Fusion
VMware by Broadcom 176

Table 8-3. Isolation Options
Option Description
Enable drag and drop When this check box is deselected, the following options are restricted.
n Drag and drop files from the host system to a Linux or Windows guest
operating system.
n Drag and drop files from the guest operating system to the host
system.
n Drag files from a file manager to an application that supports drag
and drop, or from applications such as zip file managers that support
drag-and-drop extraction of individual files.
To enable these operations, select the check box.
Enable copy and paste When this check box is deselected, the following operations are restricted.
n Copy and paste text and files from the host system to a Linux or
Windows guest operating system.
n Copy and paste from the guest operating system to the host system.
n Copy and paste text and files from one virtual machine to another.
To enable these operations, select the check box.
Managing Advanced Settings
You can monitor the power supply status, enable VNC access, enable Microsoft virtualization-
based security, or configure other advanced functions for your virtual machine.
Configure Time Synchronization Between Guest and Host Operating
Systems
You can configure whether the clock on the guest operating system is synchronized with the
clock on the host.
If you turn on this advanced setting for time synchronization, the VMware Tools service, which
runs inside the guest operating system, checks once every minute to determine whether the
clocks on the guest and host operating systems still match. If not, the clock on the guest
operating system is synchronized to match the clock on the host.
For more information about how VMware Tools time synchronization works and for instructions
to turn it off completely, see the document called
Installing and Configuring VMware Tools
at
http://www.vmware.com/pdf/vmware-tools-installation-configuration.pdf.
Prerequisites
Turn off other periodic time synchronization mechanisms. Most guests have clock
synchronization turned on by default.
Procedure
1 Select Window > Virtual Machine Library.
2 Select a virtual machine in the Virtual Machine Library window and click Settings.
Using VMware Fusion
VMware by Broadcom 177

3 Under Other in the Settings window, click Advanced.
4 Select the Synchronize time check box.
Show the Mac Power Supply Status in the Virtual Machine
You can set the virtual machine to display the status of your Mac power supply.
When this feature is enabled, information about the Mac power status is passed to the virtual
machine. The virtual machine can display the remaining charge on a battery and suspend or
hibernate when the battery charge runs low. This feature is not supported on Mac OS X, OS X, or
macOS virtual machines.
Procedure
1 Select Window > Virtual Machine Library.
2 Select a virtual machine in the Virtual Machine Library window and click Settings.
3 Under Other in the Settings window, click Advanced.
4 Select the Pass power status to VM check box.
Troubleshooting Your Virtual Machine
You can decide what level of troubleshooting information to collect for your virtual machines.
The level of troubleshooting information collected can affect the performance of your virtual
machine.
Procedure
1 Select Window > Virtual Machine Library.
2 Select a virtual machine in the Virtual Machine Library window and click Settings.
3 Under Other in the Settings window, click Advanced.
4 Select an option from the Troubleshooting menu.
Option
Description
Default Fusion determines the best setting for your virtual machine.
None Fusion gathers no troubleshooting information from your virtual machine.
This setting enables your virtual machine to run as fast as possible.
Hang/Crash Fusion gathers correctness information about hangs or crashes in the virtual
machine.
Performance Fusion gathers performance information, such as when an operation is
taking too long in the virtual machine.
Using VMware Fusion
VMware by Broadcom 178
What to do next
From the VMware Fusion menu bar, select Help > Collect Support Information to collect
troubleshooting information that Fusion has gathered about a selected virtual machine. Fusion
creates a .zip file on your desktop to contain troubleshooting data.
You can select one of the following options under Collect Support Information:
n Quick: This is an option to collect minimal logs.
The following items are not collected in this option:
n Full physical disk information
n Files :/etc/crontab, /etc/daily, /etc/monthly, /etc/weekly
n Full system and kernel logs
n /var/log/system.*gz, var/log/system.log.*.bz2
n /var/log/kernel.log.*.gz, /var/log/kernel.log.*.bz2
n system_profiler in xml format
n Output file from command : /tmp/system.log, log show --start $(date -v-1d +"%Y-%m-
%d") --style syslog (previously, it was 4 days)
n Full: This option collects full logs.
The following items are collected in this option:
n Existing default items
n All items that are not collected in Quick Collection
Change Hard Disk Buffering
Fusion automatically sets hard disk buffering according to what guest operating system you use,
but you can change the setting.
Hard disk buffering can increase performance of your virtual machine. Hard disk buffering can
also consume more memory on your Mac host than operating unbuffered. Fusion enables or
disables hard disk buffering based on your virtual machine's operating system.
For all Windows Vista and later guest operating systems, Fusion defaults to unbuffered I/O for
Mac hosts. The same is true for all Windows 2000, 2003, XP, and XP 64-bit guests newly created
with this version of Fusion. All other guests default to buffered I/O on Mac hosts.
If you are not familiar with the options, keep the default setting.
Procedure
1 Select Window > Virtual Machine Library.
2 Select a virtual machine in the Virtual Machine Library window and click Settings.
3 Under Other in the Settings window, click Advanced.
Using VMware Fusion
VMware by Broadcom 179

4 Select an option from the Hard disk buffering menu.
Option Description
Automatic Fusion determines your operating system and enables or disables hard
disk buffering depending on which type of buffering provides the best
performance.
Enabled The virtual machine's operating system uses buffered I/O.
Disabled The virtual machine's operating system uses unbuffered I/O.
Set Password Requirement for Opening a Boot Camp Virtual
Machine
If you have a virtual machine that powers on the Boot Camp partition, you can set whether a
password is required each time you open it.
Prerequisites
You must have a Boot Camp partition on your Mac, and you must have created a virtual machine
to power it on.
Procedure
1 Select Window > Virtual Machine Library.
2 Select a virtual machine in the Virtual Machine Library window and click Settings.
3 Under Other in the Settings window, click Advanced.
4 Select the password requirement by setting Administrative privileges for Boot Camp disks.
Option
Description
Never ask When you open a Boot Camp virtual machine in Fusion, you do not need to
enter a password.
Always ask Each time you open a Boot Camp virtual machine, you must enter the
password of the administrator account on the Mac.
Enable a VNC Client to Access the Virtual Machine Remotely
You can configure a virtual machine to allow any virtual network computer (VNC) client to access
the virtual machine by connecting to your Mac.
VNC software enables you to view and interact with one computer from any other computer or
mobile device anywhere on the Internet. VNC software is cross-platform, enabling remote control
between different types of computers.
Table 8-4. Options for VNC describes the ways in which you can set up VNC.
Using VMware Fusion
VMware by Broadcom 180

Table 8-4. Options for VNC
Option Description
Remote Desktop, Screen Sharing, or Third-party VNC
server on the Mac host
n Enables control of the entire host Mac, including
Fusion and any other applications.
n The connection to the server is made by using the
host's IP address or hostname.
VNC server provided by Fusion n Available for each virtual machine.
n Must use unique ports that are not already in use on
the host Mac.
n Enables control of the virtual machine whenever it is
powered on, even before the guest operating system
is running.
n The connection to the server is made by using the
host's IP address or hostname.
VNC server inside the virtual machine's guest operating
system
n The VNC server is installed in the same way as any
other application inside the virtual machine.
n Enables control of only the guest operating system
and is available only after the guest operating system
starts up.
n When using bridged networking, the connection to
the server is made by using the guest's IP address or
hostname.
This procedure describes how to use the VNC server provided by Fusion to enable a VNC Client
to access the virtual machine remotely.
Procedure
1 Select Window > Virtual Machine Library.
2 Select a virtual machine in the Virtual Machine Library window and click Settings.
3 Under Other in the Settings window, click Advanced.
4 Select the Remote display over VNC check box.
5 (Optional) Type a password.
Because data sent over VNC is unencrypted, do not use your regular password.
6 Identify the port on the Mac.
The default port is 5900. If you enabled screen sharing on the Mac, port 5900 might already
be in use and you must use another port, such as 5901. For multiple virtual machines,
increment the port number for each additional virtual machine.
Results
Your virtual machine is now visible to VNC clients.
Using VMware Fusion
VMware by Broadcom 181

Configure Virtual Machine Power Options
You can configure Fusion to list the soft or hard option of specific power-option pairs in the
Virtual Machine drop-down menu and the applications menus.
When you access the Virtual Machine drop-down menu or an applications menu, Fusion lists the
soft or hard option of each power-option pair, depending on which option is configured. You can
configure the soft or hard option for each of the following power-option pairs.
n Resume/Resume (hard)
The Resume and Resume (hard) options are the same unless you customize the resume
script.
n Shut Down/Power Off (hard)
n Suspend/Suspend (hard)
The Suspend and Suspend (hard) options are the same unless you customize the suspend
script.
n Restart/Reset (hard)
For descriptions of the power commands, including information about power-option scripts, see
Options for Fusion Power Commands.
Note Also, using a keyboard shortcut, you can switch to the option in a power-option pair not
currently configured. For example, if the soft option of a power-option pair is configured, you can
use a keyboard shortcut to list the hard option instead. See Switch Power Commands from the
Default Options.
When you create a virtual machine in Fusion, the power commands default to the soft options.
When you create the virtual machine in another VMware product, the virtual machine might
default to the hard power options.
Procedure
1 Select Window > Virtual Machine Library.
2 Select a virtual machine in the Virtual Machine Library window and click Settings.
3 Under Other in the Settings window, click Advanced.
Using VMware Fusion
VMware by Broadcom 182

4 Select the soft or hard option of each power-option pair.
Power-Option Pair Power Options
Resume/Resume (hard)
Resume The soft option of the power-option pair.
Resume (hard) The hard option of the power-option pair. Also called the Force Resume
option.
Shut Down/Power Off
(hard)
Shut Down The soft option of the power-option pair.
Power Off (hard) The hard option of the power-option pair. Also called the Force Shut
Down option.
Suspend/Suspend
(hard)
Suspend The soft option of the power-option pair.
Suspend (hard) The hard option of the power-option pair. Also called the Force
Suspend option.
Restart/Reset (hard)
Restart The soft option of the power-option pair.
Reset (hard) The hard option of the power-option pair. Also called the Force Restart
option.
Results
The power options in the Virtual Machine drop-down menu and the applications menus change
with the powers options configured in the advances settings. For example, if you changed Shut
Down to Power Off (hard) in the advanced settings, the Virtual Machine drop-down menu lists
the Power Off option, not the Shut Down option.
Enable Verbose USB Debugging
You can configure Fusion to increase the log information about USB devices connected to a
virtual machine.
When verbose USB debugging is enabled, Fusion logs more extensive information about
connected USB devices. You can then collect the troubleshooting information.
Procedure
1 Select Window > Virtual Machine Library.
2 Select a virtual machine in the Virtual Machine Library window and click Settings.
3 Under Other in the Settings window, click Advanced.
4 Select the Enable verbose USB debugging check box.
Results
Fusion starts logging more extensive information about connected USB devices.
Using VMware Fusion
VMware by Broadcom 183

What to do next
Collect the troubleshooting information. See Troubleshooting Your Virtual Machine.
To discontinue the impact that increased logging has on virtual machine performance, such as
on CPU and I/O performance, after you finish collecting troubleshooting information, unselect the
Enable verbose USB debugging check box.
Enable Dark Mode Synchronization
You can enable Dark Mode Synchronization for a virtual machine.
If you enable Dark Mode Synchronization, the Light mode/Dark mode settings on the host
system is synchronized automatically to the guest operating system (Windows 10 virtual machine
and macOS virtual machine).
Prerequisites
n This option is only available on Windows 10 virtual machine and Mac virtual machine with
macOS 10.11 or newer versions.
n VMware Tools 11.0.0 or a higher version of tools must be installed.
n This option is only available for local virtual machine and is not available for remote virtual
machine (virtual machine stored on ESXi Server or Workstation host).
Procedure
1 Select Window > Virtual Machine Library.
2 Select a virtual machine in the Virtual Machine Library window and click Settings.
3 Under Other in the Settings window, click Advanced.
4 Select the Enable Dark Mode Synchronization check box.
Results
Now, if you configure your Mac to use Light mode, the guest operating system UI will also
change to Light mode and if you configure your Mac to use Dark mode, the guest operating
system UI switches to the Dark mode automatically.
Enable Microsoft Virtualization-Based Security
You can enable Microsoft virtualization-based security (VBS) on supported Windows guest
operating systems.
VBS reinforces the security of Microsoft Hyper-V. When you enable VBS, Fusion configures the
virtual machine with the following settings.
Option
Required Setting Fusion Settings Page
Firmware type UEFI Advanced Settings
Enable UEFI Secure Boot Enabled Advanced Settings
Using VMware Fusion
VMware by Broadcom 184

Option Required Setting Fusion Settings Page
Enable hypervisor applications in this virtual machine Enabled Processors & Memory
Enable IOMMU in this virtual machine Enabled Processors & Memory
Prerequisites
n Create a virtual machine that uses hardware version 14 or later and one of the following
supported guest operating systems.
n Windows 10 Enterprise, 64-bit
n Windows Server 2016
n To use Windows 2016 as the guest operating system, apply all Microsoft updates to the
guest. VBS might not function in a Windows 2016 guest without the most current updates.
Procedure
1 Select Window > Virtual Machine Library.
2 Select a virtual machine in the Virtual Machine Library window and click Settings.
3 Under Other in the Settings window, click Advanced.
4 Select Enable VBS.
Results
What to do next
For VBS to run in the guest operating system, you must also perform configurations in the guest.
See Microsoft documentation related to virtualization-based security.
Configure a Firmware Type
You can select the firmware type of a virtual machine.
The following firmware types are available depending on the guest operating system.
Option
Description
UEFI Unified Extensible Firmware Interface (UEFI) is an interface between the operating system and the
platform firmware. UEFI has architectural advantages over Basic Input/Output System (BIOS) firmware.
Legacy BIOS Standard BIOS firmware.
If you select UEFI, depending on the guest operating system, you might have the option of
enabling UEFI Secure Boot. UEFI Secure Boot secures the boot process by preventing the
loading of drivers and operating system loaders that are not signed with an acceptable digital
signature.
Procedure
1 Select Window > Virtual Machine Library.
Using VMware Fusion
VMware by Broadcom 185

2 Select a virtual machine in the Virtual Machine Library window and click Settings.
3 Under Other in the Settings window, click Advanced.
4 Select an option from the Firmware type menu.
If the firmware type is not selectable, look for an explanation and, possibly, instructions at the
bottom of the dialog box.
Note
n Once a guest operating system is installed, changing the firmware type might cause the
virtual machine boot process to fail.
n If virtualization-based security (VBS) is enabled, the firmware type is set to UEFI and
cannot be edited.
Results
When you start the virtual machine, it boots with the selected firmware configuration.
Using VMware Fusion
VMware by Broadcom 186

Using vctl Command to Manage
Containers and Run Kubernetes
Cluster on Intel-based Mac
9
You can use the vctl command-line utility in VMware Fusion to manage containers. In addition,
vctl provides support for KIND so that KIND can use vctl container as "nodes" to run local
Kubernetes clusters.
The vctl is a command-line utility bundled inside the VMware Fusion application.
Related binaries/components come bundled in the Fusion application and are available in
Applications/VMware Fusion.app/Contents/Library/vkd/ folder.
The three main binaries/components of the vctl command-line utility are summarized in the
following section.
bin/containerd
This is a runtime daemon that runs in the background. The containerd daemon must be started
first before you can run any container related operation. To start it, use the vctl system start
command and to stop it use the vctl system stop command.
bin/containerd-shim-crx-v2
When a new container is started, a new containerd-shim-crx-v2 process is launched and works
as an adapter between the container in CRX VM and the containerd daemon.
bin/vctl
It is a command-line utility that runs in the foreground and relays the user input to the containerd
daemon.
Note The vctl CLI runs every container inside a lightweight virtual machine, called CRX VM. By
default, a CRX VM is created and starts up when a container starts. It shuts down and is removed
when the container stops. The name of the CRX VM is same as the container.
Read the following topics next:
n Using the vctl Utility
n Enabling KIND to Use vctl Container as Nodes to Run Kubernetes Clusters
VMware by Broadcom
187
n Running vctl Commands
n Cleaning Up Residual Environment Data
n Changes/Enhancements to the vctl Utility
Using the vctl Utility
The vctl utility is included with VMware Fusion and is ready to run in a terminal window.
Prerequisites
Before using vctl to run any operation on a container image or container, the container runtime
must be started first. The container runtime doesn't start automatically when VMware Fusion
application launches, and does not stop automatically when VMware Fusion application quits.
You must manually run the vctl system start command to start it and run vctl system
stop command to stop it.
Procedure
1 On your Mac, open a terminal window.
2 Run the vctl system info command to check the status of the container runtime.
If the command output displays Container runtime is stopped, run vctl system start
command to start the container runtime.
If the command output shows Container runtime is running, you can start using vctl to
manage containers and container images.
3 Run the vctl command to list the command-line options.
Enabling KIND to Use vctl Container as Nodes to Run
Kubernetes Clusters
In Fusion 12.0, vctl utility has an enhancement to support KIND. With this enhancement, KIND
can use vctl container instead of Docker container as nodes to run local Kubernetes clusters.
Prerequisites
By default, vctl assigns 2 GB memory for every CRX VM that hosts the vctl container node.
Ensure that your Mac machine has 2 GB free memory when running single-node cluster, 4 GB
free memory when running two-node cluster. The more nodes configured in your cluster, the
more free memory is needed.
Procedure
1 On your Mac, open a terminal window.
Using VMware Fusion
VMware by Broadcom 188

2 Run the vctl system start command to start the vctl container runtime.
This command performs the following tasks:
a Creates a bin folder in the <user home folder>/.vctl folder.
b Downloads kubectl, kind and crx.vmdk files, and saves them to the bin folder.
c
Creates a docker link file that points to /Applications/VMware Fusion.app/
Contents/Library/vkd/bin/vctl.
3 Run vctl kind command.
This command performs the following four tasks:
a Creates a bin folder in the <user home folder>/.vctl folder.
b Downloads kubectl, kind and crx.vmdk files, and saves them to the bin folder.
c Creates a docker link file that points to /Applications/VMware Fusion.app/
Contents/Library/vkd/bin/vctl.
d Creates a vctl-based KIND context by adding <user home folder>/.vctl/bin to the
PATH environment variable and makes it the first searchable path.
So in the Terminal window, the kubectl/kind/docker CLI tools in the <user home
folder>/.vctl/bin folder will take precedence over other existing versions of these
tools that might be installed else where.
4 The vctl-based KIND context will be lost if you close the Terminal window.
Next time you want to interact with the Kubernetes clusters, run the vctl kind command.
Note
n vctl does not support kind build command.
n By default, vctl assigns 2 GB memory and 2 CPU cores for the CRX VM that hosts the
node container, you can use the --k8s-cpus and --k8s-mem options of vctl system
config command to customize the configurations.
n Each Fusion version supports only a specific version of kind CLI and kubectl CLI tools. For
example:
n Fusion 12.0.0 supports kind v0.8.1 and kubectl v1.18.6.
n Fusion 12.1.0 supports kind v0.9.0 and kubectl v1.19.1
The vctl utility in Fusion 12.1.0 introduces a version check for the kind and the kubectl
CLI tools. When you run vctl system start or vctl kind command, if the kind and
the kubectl CLI tools already exist in <user home folder>/.vctl/bin folder and their
versions are supported by current Fusion version, the vctl command will not download
the tools again. If their versions are not supported by current Fusion version, the vctl
command will download the supported versions of the tools and remove the unsupported
ones.
Using VMware Fusion
VMware by Broadcom 189

Running vctl Commands
The vctl commands have syntax and other requirements that you must follow.
Syntax of vctl Commands
The vctl commands are divided into function categories.
The following tables list vctl commands and their function. Options enclosed in square brackets
are optional. The vertical bar indicates a keyword choice.
Note Use --help to review all the available command options.
vctl Commands to Manage the Container Runtime Resource
Command Description
vctl system config [OPTIONS] Configures and initializes the host OS environment for the container engine.
The command performs the following tasks:
n Creates a <Home_Folder_of_Your_Account>/.vctl folder if it doesn't exist.
n Updates the config.yaml file in the .vctl folder with the customized
configurations specified by the command options.
n Prepares the storage according to the configuration in config.yaml file and
mounts the storage.
n Checks the availability of the VMware Fusion application.
Note The vctl system config command doesn't start containerd daemon.
vctl system info [OPTIONS] Displays the container runtime information.
vctl system start [OPTIONS] Starts the container engine.
The command performs the following tasks:
n Creates a <Home_Folder_of_Your_Account>/.vctl folder if it doesn't exist.
n Updates the config.yaml file in the .vctl folder with the customized
configurations specified by the command options.
n Prepares the storage according to the configuration in config.yaml file and
mounts the storage.
n Checks the availability of the VMware Fusion application
n Starts the containerd daemon.
vctl system stop [OPTIONS] Stops the container runtime.
Using VMware Fusion
VMware by Broadcom 190

vctl Commands to Manage the Image Resource
Command Description
vctl build [OPTIONS] PATH Builds a container image using a Dockerfile.
Note If the RUN instructions in the
Dockerfile run network-related commands, add
ENV instruction into the Dockerfile to set
network proxy, for example: ENV https_proxy
<Proxy_Server>:Proxy_Port for the network
operations to succeed.
vctl images [OPTIONS] [IMAGE...] Lists container images and displays basic
information about the container images.
vctl push [OPTIONS] IMAGE [REMOTE_URL] Pushes the container image to the registry.
vctl rmi [OPTIONS] ([IMAGE...]|--all) Deletes one or more container images.
vctl tag [OPTIONS] SOURCE_IMAGE TARGET_IMAGE [TARGET_IMAGE...] Tags container images. It creates an image alias
with the TARGET_IMAGE.
vctl pull [OPTIONS] IMAGE Pulls a container image from the registry.
vctl Commands to Manage the Container Resource
Command
Description
vctl create [OPTIONS] IMAGE [COMMAND] [ARGUMENTS...] Creates a new container from a container image.
Note Ensure the following when you use the --volume
option:
n Specify paths to the folder. The --volume doesn't
support path to files.
n Use absolute path. Relative paths are not supported.
n Only anonymous volumes can be mounted, mounting
named volumes is not supported.
Note Ensure the following when you use the --publish
option:
n The vctl utility doesn't have a subnet or a link feature to
connect multiple containers to a subnet.
To enable communication between multiple containers,
start the container with the --publish option. This
binds the container port to the host port so that the
service provided by the container is accessible from the
outside.
vctl describe [OPTIONS] CONTAINER Displays details about the container.
vctl exec [OPTIONS] CONTAINER COMMAND [ARGUMENTS...] Runs a command inside a running container.
vctl ps [OPTIONS][CONTAINER...] Lists the containers and displays basic information about the
container.
vctl rm [OPTIONS] ([CONTAINER...]|--all) Deletes one or more containers.
Using VMware Fusion
VMware by Broadcom 191

Command Description
vctl run [OPTIONS] IMAGE [COMMAND] [ARGUMENTS...] Runs a new container from a container image.
Note Ensure the following when you use the --volume
option:
n Specify paths to the folder. The --volume doesn't
support path to files.
n Use absolute path. Relative paths are not supported.
n Only anonymous volumes can be mounted, mounting
named volumes is not supported.
Note Ensure the following when you use the --publish
option:
n The vctl utility doesn't have a subnet or a link feature to
connect multiple containers to a subnet.
To enable communication between multiple containers,
start the container with the --publish option. This
binds the container port to the host port so that the
service provided by the container is accessible from the
outside.
vctl start [OPTIONS] CONTAINER Starts a created or stopped container.
vctl stop [OPTIONS] CONTAINER Stops the container.
vctl inspect [OPTIONS] NAME Displays detailed container information.
vctl Commands to Manage the CRX VM Resource
Command
Description
vctl execvm [OPTIONS] (vmx|-c=CONTAINER) COMMAND [ARGUMENTS...] Runs commands from inside a running virtual
machine that hosts the container.
vctl
Commands to Manage Volumes
Command
Description
vctl volume prune [flags] Removes all unused local volumes.
Using VMware Fusion
VMware by Broadcom 192

vctl Commands to Manage Container Images Registry Authentication
Command Description
vctl login [OPTION] [SERVER] Logs in to a remote registry.
vctl logout [SERVER] Logs out from a remote registry.
Note
n On macOS, the credentials are saved in the Keychain. On Windows, the credentials are saved
in the Credential Manager.
n Once the login is successful, future Pull, Push and Build requests will leverage the saved
credential.
n Logout request deletes the corresponding credential from the Keychain or the Credential
Manager.
vctl Commands to Get System Environment Ready for vctl-Based KIND
Command Description
vctl kind Prepares the system environment for vctl-based KIND.
KIND uses vctl containers as nodes for running Kubernetes
clusters.
Examples of vctl Commands
The command-line examples that follow work on VMware Fusion.
Commands Related to Image
n When you build a new image, to pull the base image from a private Docker registry
successfully, either use the vctl login command to log in to the private Docker registry
first or use the --credential option to pass a JSON file that stores credentials to vctl
build command for registry authentication. For example:
a Encode your Docker registry username and password in base64 with the following
command:
echo -n USER:PASSWORD | base64
b Create a config.json file with your Docker registry URL and the base64 encoded string
generated in step 1.
{
"auths": {
"https://index.docker.io/v2/": {
"auth": "xxxxxxxxxxxxxxx"
}
}
}
Using VMware Fusion
VMware by Broadcom 193
c Build the new image whose base image is in a private Docker registry, by passing the
JSON file to vctl build command:
vctl build --file Dockerfile --tag docker.io/mynamespace/myrepo:1.0 --
credential config.json .
Commands Related to Container
n List running containers.
vctl ps
n List all containers, including the running containers and stopped containers.
vctl ps --all
n Run a container in detached mode using the nginx image, which is the same as docker.io/
library/nginx:latest.
vctl run --name myContainer -d nginx
n Run a container using the --publish option and the fluentd image, here fluentd is
equivalent to docker.io/library/fluentd:latest.
vctl run --name myContainer --publish 24224:24224/udp --publish
24224:24224 fluentd
n Run multiple containers and enable discovery and communication with each other.
n The vctl utility doesn't have a subnet or a link feature to connect multiple containers to a
subnet.
To enable communication between multiple containers, start the container with the
--publish option. This binds the container port to the host port so that the service
provided by the container is accessible from the outside.
vctl run --name mydb -m 2048 -e MYSQL_ROOT_PASSWORD=password -p 3306:3306
mysql
vctl run --name mymatomo -m 4096 -p 8080:80 -e
MATOMO_DATABASE_HOST=<Host_IP>:3306 matomo
n Run a container using the --volume option and the bonita image, here bonita is equivalent
to docker.io/library/bonita:latest.
vctl run --name myContainer -p 8080:8080 --volume ~/Documents/
container:/opt/bonita bonita
Commands Related to CRX VM
n Get shell access to a CRX VM.
n By specifying the container hosted by the CRX VM.
vctl execvm --sh -c myContainer
Using VMware Fusion
VMware by Broadcom 194

n By specifying the vmx path of the CRX VM.
Note To get the vmx path, run the vctl describe myContainer command and refer
to the Host virtual machine value in the output.
vctl execvm --sh <Home_Folder_of_Your_Account>/.vctl/.r/vms/
myContainer/myContainer.vmx
n Execute a command within a CRX VM.
n By specifying the container hosted by the CRX VM.
vctl execvm -c myContainer /bin/ls
n By specifying the vmx path of the CRX VM.
Note To get the vmx path, run the vctl describe myContainer command and refer
to the
Host virtual machine value in the output.
vctl execvm <Home_Folder_of_Your_Account>/.vctl/.r/vms/myContainer/
myContainer.vmx /bin/ls
Cleaning Up Residual Environment Data
By default, the vctl utility stores all its data in the .vctl folder under the home folder of your
user account.
Perform the following to clean up the environment data:
Procedure
1 Run the vctl system stop -f command to stop all running containers and stop container
runtime.
2 Run the vctl system info command to check if container runtime has stopped.
3 Remove the <Home_Folder_of_Your_Account>/.vctl folder.
Changes/Enhancements to the vctl Utility
Fusion 12.1.0
n Upgraded kind CLI tool from v0.8.1 to v0.9.0.
n Upgraded kubectl CLI from v1.18.6 to v1.19.1.
n Changed the storage of anonymous volume data from host to crx.vmdk.
n Added support for kind export logs command.
n Added minikube driver docker-machine-driver-vmware.
Using VMware Fusion
VMware by Broadcom 195
Fusion 12.0
n The administrator password is no longer needed to start the vctl container runtime and
while using the --publish option.
n Added enhancement to support KIND, so that KIND can use vctl container as nodes to run
local Kubernetes clusters.
n
Added vctl login and vctl logout commands.
n Added vctl inspect command to display detailed container information.
n Added support to specify access permission (ro, rw) of the mounted volume
n Added vctl volume prune command.
Using VMware Fusion
VMware by Broadcom 196
Using the vmrun Command to
Control Virtual Machines
10
You can use the vmrun command-line utility in VMware Fusion to control virtual machines and
automate guest operations on VMware virtual machines. The vmrun utility is associated with the
VIX API libraries.
The capabilities of the vmrun utility are summarized in the following sections.
Power Commands
Power commands control virtual machine operations. You can use power commands to start
(power on), stop (power off), reset (reboot), suspend, pause, and unpause a virtual machine.
Snapshot Commands
A snapshot captures the state of a virtual machine at the time of the snapshot, including all data
on virtual disks. You can then use the snapshot to revert the virtual machine to its previous state.
Snapshots are useful for data backup and as a placeholder for development and testing. You can
use snapshot commands to list existing snapshots of a virtual machine, create a snapshot, delete
a snapshot, and revert a virtual machine to its state at the time of a snapshot. Revert to snapshot
does not resume running a virtual machine, even if it was running at the time of a snapshot.
Network Adapter Commands
Network adapter commands allow you to control the virtual network adapters associated with
a virtual machine. You can use network adapter commands to list, add, update, and remove a
network adapter.
Host Network Commands
Host network commands allow you to list the host virtual networks and to list, update, or remove
a port forwarding configuration.
VMware by Broadcom
197
Guest Operating System Commands
Guest operating system commands enable you to interact with a guest operating system in the
following ways.
n Run an executable program in the guest operating system or run an interpreted script that
you provide.
n Check if a file or directory exists in the guest, delete a file or directory, rename a file, list files,
or create a new directory.
n Copy a file from the host to the guest or from the guest to the host.
n Create a temporary file in the guest operating system.
n Add a shared folder from the host, make a shared folder writable in the guest, or remove a
shared folder.
n Capture a screen image from the guest.
n List the processes running in the guest operating system or end a process.
n Read or write a variable in the guest operating system’s environment or virtual machine state.
n Obtain the IP address of the guest operating system.
The timeout, which is the wait period for VMware Tools, is five minutes for all guest‐related
commands.
General Commands
General commands include commands that list all running virtual machines, upgrade the virtual
machine hardware version, install VMware Tools in the guest operating system, check the current
status of VMware Tools, and delete virtual machines. Also, you can clone a virtual machine to
create a copy of the virtual machine.
Template Virtual Machine Command
The name of the template virtual machine command is downloadPhotonVM. The command allows
you to download the VMware Project Photon operating system virtual machine.
Read the following topics next:
n Use the vmrun Utility
n Syntax of the vmrun Command
n Using Authentication Flags in vmrun Commands
n Running vmrun Commands
Using VMware Fusion
VMware by Broadcom 198
Use the vmrun Utility
No configuration is needed to use the vmrun utility on a Mac OS X, OS X, or macOS host.
The vmrun utility is included with Fusion and ready to run in a terminal window.
Procedure
1 On your Mac, open a terminal window.
2 Run the vmrun command to list the command-line options.
Syntax of the vmrun Command
The vmrun command syntax can contain authentication flags, commands, and parameters.
The following syntax applies to the vmrun command.
vmrun [AUTHENTICATION-FLAGS] COMMAND [PARAMETERS]
Using Authentication Flags in vmrun Commands
You can use authentication flags in vmrun commands to provide information required to access a
system.
For example, you can use an authentication flag to specify the local host type because vmrun
commands apply to both VMware Workstation and VMware Fusion host types. You can also use
authentication flags to provide the credentials required to access encrypted virtual machines or a
guest operating system.
Authentication flags must appear before the command and command parameters.
The vmrun command supports the following authentication flags.
-T hostType
-vp encryptedVirtualMachinePassword
-gu guestUser
-gp guestPassword
Product Type
The -T flag is optional. When you run vmrun commands with Fusion, fusion is the default. Use
the -T flag for Fusion as follows.
vmrun -T fusion
Encrypted Virtual Machines
Encrypted virtual machines require a password for most operations.
Using VMware Fusion
VMware by Broadcom 199

-vp encryptedVirtualMachinePassword
Guest Operations
Guest operations require authentication by the guest operating system.
Use the following flags to specify the user name and password of the user in the guest operating
system.
-gu guestUser
-gp guestPassword
Running vmrun Commands
The vmrun commands have syntax and other requirements that you must follow.
Path to VMX File
VMware stores virtual machines as a package that includes the virtual machine settings file,
filename.vmx, and the virtual disks.
When required, you must provide the path to the .vmx file. The examples that follow are of
default paths to Windows and Linux virtual machine for Mac OS X, OS X, or macOS.
Unless you specify a file location for a virtual machine when you create it, Fusion saves the virtual
machine package to a default location, which can vary. See Default File Location of a Virtual
Machine.
Examples of the vmrun command include the relative path to the .vmx file instead of the absolute
paths that follow.
n your home directory/Virtual\ Machines.localized/Win10.vmwarevm/Win10.vmx
n your home directory/Virtual\ Machines.localized/Ubuntu16.vmwarevm/Ubuntu16.vmx
Important For vmrun commands that require VMware Tools, install the latest VMware Tools
package and, especially after operating system updates, keep VMware Tools up‐to‐date.
Deactivate Dialog Boxes
To prevent the vmrun utility from failing when you provide user input through a dialog box, you
can deactivate dialog boxes.
The vmrun utility might time out and fail when you use the utility on a virtual machine that
requires user input through a dialog box.
To deactivate dialog boxes, insert the following line in the virtual machine configuration file,
the .vmx file.
msg.autoAnswer = TRUE
Using VMware Fusion
VMware by Broadcom 200

Syntax of vmrun Commands
The vmrun commands are divided into function categories.
The following tables list vmrun commands and parameters for Fusion according to their function.
Parameters are listed one per line. Parameters enclosed in square brackets are optional. The
vertical bar indicates a keyword choice.
The vmrun Power Commands and Parameters
Option Parameters Description
start path to .vmx file
[ gui | nogui ]
Starts a virtual machine. The default gui option starts the machine interactively, which
is required to display the Fusion interface. The nogui option suppresses the Fusion
interface, including the startup dialog box, to allow noninteractive scripting.
Note To start encrypted virtual machines, use the nogui flag. The vmrun utility does not
support GUI mode with encrypted virtual machines.
stop path to .vmx file
[ hard | soft ]
Stops a virtual machine. Use the soft option to power off the guest after running
shutdown scripts. Use the hard option to power off the guest without running scripts,
as if you pressed the power button. The default is to use the powerType value specified in
the .vmx file, if present.
reset path to .vmx file
[ hard | soft ]
Resets a virtual machine. Use the soft option to run shutdown scripts before rebooting
the guest. Use the hard option to reboot the guest without running scripts, as if you
pressed the reset button. The default is to use the powerType value specified in the .vmx
file, if present.
suspend path to .vmx file
[ hard | soft ]
Suspends a virtual machine without shutting down the virtual machine, so local work
can resume later. The soft option suspends the guest after running system scripts.
On Windows guests, these scripts release the IP address. On Linux guests, the scripts
suspend networking. The
hard
option suspends the guest without running the scripts.
The default is to use the powerType value specified in the .vmx file, if present.
To resume virtual machine operations after the suspend command finishes, use the
start command. On Windows, the IP address is retrieved. On Linux, networking is
restarted.
pause path to .vmx file Pauses a virtual machine.
unpause path to .vmx file Resumes operations of a virtual machine from where you paused normal operations.
The vmrun Snapshot Commands and Parameters
Option
Parameters Description
listSnapshots path to .vmx file
[ showtree ]
Lists all snapshots in a virtual machine. The showtree option displays
snapshots in tree format, with children indented under their parent.
snapshot path to .vmx file
snapshot name
Creates a snapshot of a virtual machine. Because Fusion supports
multiple snapshots, you must provide the snapshot name.
Because the forward slash defines path names, do not use the slash
character in a snapshot name. Otherwise, specifying the snapshot path
later becomes difficult.
Using VMware Fusion
VMware by Broadcom 201

Option Parameters Description
deleteSnapshot path to .vmx file
snapshot name
[ andDeleteChildren ]
Removes a snapshot from a virtual machine. Because Fusion supports
multiple snapshots, you must provide the snapshot name. The virtual
machine must be powered off or suspended. If the snapshot has
children, they become children of the deleted snapshot's parent, and
subsequent snapshots continue as before from the end of the chain.
The andDeleteChildren option deletes the specified snapshot and its
children recursively.
See revertToSnapshot for solutions to name conflicts.
revertToSnapshot path to .vmx file
snapshot name
or
path to .vmx file
Snapshot/"Snapshot
2"/"Snapshot N"
Sets the virtual machine to its state at snapshot time. However if the
virtual machine was powered on at the time of the snapshot, vmrun
reverts it to a suspended state, but does not resume running the
virtual machine.
If a snapshot has a unique name within a virtual machine, revert to that
snapshot by specifying the path to the virtual machine's configuration
file and the unique snapshot name.
If several snapshots have the same name, specify the snapshot by
including a full pathname for the snapshot. A pathname is a series
of snapshot names, separated by forward slash characters (/). Each
name specifies a new snapshot in the tree. For example, the pathname
Snap1/Snap2 identifies a snapshot named Snap2 that was taken from
the state of a snapshot named Snap1.
The vmrun Network Adapter Commands and Parameters
Only Fusion Pro supports the network adapter commands.
Option
Parameters Description
listNetworkAdapters path to .vmx file Lists the network adapters in a virtual machine.
addNetworkAdapter path to .vmx file
Network adapter
type
[
Host nework
]
Adds a network adapter to a virtual machine.
Note The network adapter type can be nat, hostOnly, bridged, or
custom
. When the network adapter is
nat
,
hostOnly
, or
bridged
, the
Host nework parameter is not required. Only when the network adapter
type is custom, must you specify a value for the Host nework parameter.
For example, vmrun addNetworkAdapter .vmx file custom vmnet3.
You must name a custom virtual network with one of the names listed in
the Custom section of the Network settings panel of the virtual machine
or the Fusion Network Preferences panel.
.
Using VMware Fusion
VMware by Broadcom 202

Option Parameters Description
setNetworkAdapter path to .vmx file
Network adapter
index
Network adapter
type
[ Host nework ]
Updates a network adapter in a virtual machine.
Note The network adapter type can be nat, hostOnly, bridged, or
custom
. When the network adapter is
nat
,
hostOnly
, or
bridged
, the
Host nework parameter is not required. Only when the network adapter
type is custom, must you specify a value for the Host nework parameter.
For example, vmrun addNetworkAdapter .vmx file custom vmnet3.
You must name a custom virtual network with one of the names listed in
the Custom section of the Network settings panel of the virtual machine
or the Fusion Network Preferences panel.
deleteNetworkAdapter path to .vmx file
Network adapter
index
Removes a network adapter from a virtual machine.
The vmrun Host Network Commands and Parameters
Only Fusion Pro supports the host network commands.
Option Parameters Description
listHostNetworks Lists all networks on the host.
listPortForwardings host network name Lists all available port forwardings on a host network.
setPortForwarding host network name
protocol
host port
guest ip
guest port
[Description]
Sets a port forwarding on a host network.
Note To prevent the command from returning an error, use the sudo
utility with this option. For example, sudo vmrun setPortForwarding.
deletePortForwarding host network name
protocol
host port
Deletes a port forwarding on a host network.
Note To prevent the command from returning an error, use the sudo
utility with this option. For example, sudo vmrun deletePortForwarding.
The vmrun Guest Operating System Commands and Parameters
The timeout, which is the wait for VMware Tools, is five minutes for all guest‐related commands.
Using VMware Fusion
VMware by Broadcom 203

Option Parameters Description
runProgramInGuest path to .vmx file
[ -noWait |
-activeWindow |
-interactive
]
program name
[ program
arguments ]
Runs a specified program in the guest operating system. The -noWait
option returns a prompt immediately after the program starts in the
guest, rather than waiting for it to finish. This option is useful for
interactive programs. The
-activeWindow
option ensures that the
Windows GUI is visible, not minimized. It has no effect on Linux.
The -interactive option forces interactive guest login. The option
is useful for Windows Vista and Windows 7 or later guests to make
the program visible in the console window. You must provide the
full pathname of a program accessible to the guest. Also provide
fully accessible path names for any files specified in the program
arguments, according to the requirements of the program. VMware
Tools and a valid guest login are required.
fileExistsInGuest path to .vmx file Checks whether the specified file exists in the guest operating
system. VMware Tools and a valid guest login are required.
directoryExistsInGuest path to .vmx file
directory path on
guest
Checks whether the specified directory exists in the guest operating
system. VMware Tools and a valid guest login are required.
setSharedFolderState path to .vmx file
share name
path to folder on
host
writable | readonly
Modifies the writability state of a specified folder shared between
the host and a guest virtual machine. The value for the share name
parameter is a mount point in the guest file system. The value for
the
path to folder on host
parameter is the exported directory on
the host. To make a shared folder writable or read-only, include the
writable or readonly parameter.
addSharedFolder path to .vmx file
share name
path to folder on
host
Adds a folder to be shared between the host and guest. The
virtual machine must be running for the addSharedFolder option
to take effect. The value for the share name parameter is a
mount point in the guest file system. The value for the path
to folder on host
parameter is the exported directory on the
host. On Windows guests, a delay might occur before shared
folders are visible to the runProgramInGuest, fileExistsInGuest, and
directoryExistsInGuest options.
removeSharedFolder path to .vmx file
share name
Removes the guest virtual machine’s access to a shared folder
on the host. The virtual machine must be running for the
removeSharedFolder option to take effect. The value for the share
name
parameter is a mount point in the guest file system.
enableSharedFolders path to .vmx file
[runtime]
Allows the guest virtual machine, specified by the .vmx file, to
share folders with its host. After enabling, run the
addSharedFolder
option to specify each host folder to share. The optional [runtime]
argument limits the sharing of folders until the virtual machine is
powered off. Otherwise, the setting persists at the next power-on.
Note The enableSharedFolders option takes effect after the shut-
down and restart of the guest. No error message appears.
Using VMware Fusion
VMware by Broadcom 204

Option Parameters Description
disableSharedFolders path to .vmx file
[runtime]
Prevents the guest virtual machine, specified by the .vmx file, from
sharing folders with its host. The optional
[runtime] argument limits
the stop applied to the sharing of folders until the virtual machine is
powered off. Otherwise, the setting persists at next power on.
Note The disableSharedFolders option takes effect after the shut-
down and restart of the guest. No error message appears.
listProcessesInGuest path to .vmx file Lists all processes running in the guest operating system. VMware
Tools and a valid guest login are required. For example, you can use
the -gu and -gp options to log in to the guest.
killProcessInGuest path to .vmx file
process ID
Stops a specified process in the guest operating system. VMware
Tools and a valid guest login are required. For example, you can
use the -gu and -gp options to log in to the guest. The process
ID can be any number listed after pid= in the output of the
listProcessesInGuest
option.
runScriptInGuest path to .vmx file
[ -noWait |
-activeWindow |
-interactive
]
interpreter path
script text
Runs the specified command script in the guest operating system.
See the runProgramInGuest entry for an explanation of options. The
interpreter path option runs the script. Provide the complete text
of the script, not a filename. VMware Tools and a valid guest login
are required. For example, you can use the -gu and -gp options to
log in to the guest.
deleteFileInGuest path to .vmx file
path to file on
guest
Deletes the given file from the guest operating system. VMware
Tools and a valid guest login are required. For example, you can use
the -gu and -gp options to log in to the guest.
createDirectoryInGuest path to .vmx file
directory path on
guest
Creates the specified directory in the guest operating system.
VMware Tools and a valid guest login are required. For example, you
can use the -gu and -gp options to log in to the guest.
deleteDirectoryInGuest path to .vmx file
directory path on
guest
Deletes the specified directory from the guest operating system.
VMware Tools and a valid guest login are required. For example, you
can use the -gu and -gp options to log in to the guest
createTempfileInGuest path to .vmx file Creates a temporary file in the guest operating system, and
returns the path name of the temporary file created. The path
name varies according to the operating system. You can run the
deleteFileInGuest option to remove the file. VMware Tools and a
valid guest login are required. For example, you can use the
-gu
and
-gp options to log in to the guest.
listDirectoryInGuest path to .vmx file
directory path on
guest
Lists contents of the specified directory in the guest operating
system. VMware Tools and a valid guest login are required. For
example, you can use the -gu and -gp options to log in to the guest.
CopyFileFromHostToGuest path to .vmx file
file path on host
file path in guest
Copies a file from the host to the guest operating system. VMware
Tools and a valid guest login are required. For example, you can use
the -gu and -gp options to log in to the guest. Specify the source
filename, or host filename, before the destination filename, or guest
filename.
Using VMware Fusion
VMware by Broadcom 205

Option Parameters Description
CopyFileFromGuestToHost path to .vmx file
file path in guest
file path on host
Copies a file from the guest operating system to the host. VMware
Tools and a valid guest login are required. For example, you can use
the -gu and -gp options to log in to the guest. Specify the source
filename, or guest filename, before the destination filename, or host
filename.
renameFileInGuest path to .vmx file
original filename
new filename
Renames or moves a file in the guest operating system. VMware
Tools and a valid guest login are required. For example, you can use
the -gu and -gp options to log in to the guest. Specify the source
filename, or original filename, before the destination filename.
connectNamedDevice path to .vmx file
device name
Connects the device named in the command to the guest operating
system. You can only run this command when the virtual machine
is powered on. You can use device names, such as sound, serial0,
Ethernet0
,
sata0:1
, etc.
Note After you use the vmrun connectNamedDevice command to
connect a disconnected sound device to a running virtual machine,
powering off the virtual machine might disconnect the sound device
from the virtual machine, even though the virtual machine settings list
the sound device as connected.
disconnectNamedDevice path to .vmx file
device name
Disconnects the device named in the command from the guest
operating system. You can only run this command when the virtual
machine is powered on. You can use device names, such as sound,
serial0
,
Ethernet0
,
sata0:1
, etc.
Note After you use the vmrun disconnectNamedDevice command to
disconnect a connected sound device from a running virtual machine,
powering off the virtual machine might reconnect the sound device
to the virtual machine, even though the virtual machine settings list
the sound device as disconnected.
captureScreen path to .vmx file
output path on
host
Captures the screen of the virtual machine to a local file. The
specified output file on the host is in PNG format. A valid guest login
is required. For example, you can use the -gu and -gp options to log
in to the guest.
writeVariable path to .vmx file
[ guestVar |
runtimeConfig |
guestEnv ]
variable name
variable value
Writes a variable to the virtual machine state or guest. You can set
a non‐persistent guest variable, guestVar, a runtime configuration
variable,runtimeConfig, as stored in the .vmx file, or an environment
variable,
guestEnv, in the guest operating system. A guest variable
is a runtime‐only value that provides a simple way to pass runtime
values in and out of the guest. Environment variables require
VMware Tools and a valid guest login. For example, you can use the
-gu and -gp options to log in to the guest. With Linux, setting the
guest environment also requires root login.
Using VMware Fusion
VMware by Broadcom 206

Option Parameters Description
readVariable path to .vmx file
[ guestVar |
runtimeConfig |
guestEnv ]
variable name
Reads a variable from the virtual machine state or guest. You can
get a guest variable, a runtime configuration as stored in the .vmx
file, or environment variables in the guest operating system. Reading
the guestEnv variable requires a valid guest login. For example, you
can use the -gu and -gp options to log in to the guest. See the
writeVariable entry for a description of variable types.
getGuestIPAddress path to .vmx file
[ -wait ]
Retrieves the IP address of the guest.
When you use the [ -wait ] option, the command waits until the
IP address is available. For example, the IP address is not available
until the virtual machine powers on. If the network is not ready, the
command returns to the command-line prompt immediately.
The vmrun General Commands and Parameters
Option Parameters Description
list Lists all running virtual machines.
upgradevm path to .vmx file Upgrades a virtual machine to the current virtual hardware version.
Has no effect if the virtual hardware version is the most recent
supported.
Power off the virtual machine, such as with the vmrun stop command.
Wait a short period of time for the command to finish. Then run the
vmrun upgradevm command.
installTools path to .vmx file Prepares to install VMware Tools in the guest operating system. In
Windows guests with autorun enabled, the VMware Tools installer
starts by itself. In Linux guests without autorun, the command
connects the virtual CD‐ROM drive to the VMware Tools ISO image
suitable for the guest, but the installer does not start.
You must complete the installation with additional manual steps, as
described in the product documentation.
checkToolsState path to .vmx file Checks the status of VMware Tools in the guest. The possible states
are unknown, installed, and running.
deleteVM path to .vmx file Deletes a virtual machine.
clone path to .vmx file
destination .vmx file path
full|linked
[-snapshot=Snapshot Name]
[-cloneName=Name]
Only Fusion Pro supports the clone option.
Creates a copy of the virtual machine.
The vmrun Template Virtual Machine Commands and Parameters
Option
Parameters Description
downloadPhotonVM path to save the downloaded VM Downloads a VMware Project Photon operating system virtual
machine.
Using VMware Fusion
VMware by Broadcom 207
Examples of vmrun Commands
The command-line examples that follow work on VMware Fusion. Ubuntu16 is the virtual machine
example for Linux and Win10 is the virtual machine example for Windows.
Reboot Commands
n Reboot a virtual machine.
vmrun reset Win10.vmwarevm/Win10.vmx soft
Snapshot Commands
n Create a snapshot of a virtual machine
vmrun snapshot Ubuntu16.vmwarevm/Ubuntu16.vmx mySnapshot
n List snapshots on the virtual machine, showing the snapshot created in the previous
command.
vmrun listSnapshots Ubuntu16.vmwarevm/Ubuntu16.vmx
n Revert to the snapshot you made, which suspends the virtual machine, and restart to resume
operation.
vmrun revertToSnapshot Ubuntu16.vmwarevm/Ubuntu16.vmx mySnapshot
vmrun start Ubuntu16.vmwarevm/Ubuntu16.vmx
n Delete the snapshot by specifying its name.
vmrun deleteSnapshot Ubuntu16.vmwarevm/Ubuntu16.vmx mySnapshot
Network Adapter Commands
n List all network adapters on a virtual machine.
vmrun listNetworkAdapters Win10.vmwarevm/Win10.vmx
n Add a NAT network adapter to a virtual machine.
vmrun addNetworkAdapter Win10.vmwarevm/Win10.vmx nat
Host Network Commands
n List all networks on the host.
vmrun listHostNetworks
n Add a port forwarding on a host network with examples provided of the host network name,
protocol, host port, guest IP address, guest port, and description.
sudo vmrun setPortForwarding vmnet2 tcp 8082 1.1.1.2 88 portforwarding-description
Using VMware Fusion
VMware by Broadcom 208
Running Guest Applications
Most vmrun guest operations require VMware Tools to be installed on the guest operating
system.
n Start the command tool, minimized, on a Windows guest.
vmrun -gu guestUser -gp guestPassword runProgramInGuest Win10.vmwarevm/Win10.vmx
-interactive cmd.exe
n Start the command tool on a Windows guest as an active window on the desktop.
vmrun -gu guestUser -gp guestPassword runProgramInGuest Win10.vmwarevm/Win10.vmx
-activeWindow -interactive cmd.exe
n Run a script on a Windows guest, with Perl as the script interpreter. Two separate examples
follow.
vmrun -gu guestUser -gp guestPassword runScriptInGuest Win10.vmwarevm/Win10.vmx
-interactive "C:\perl\bin\perl.exe" "system('notepad.exe');"
vmrun -gu guestUser -gp guestPassword runScriptInGuest Win10.vmwarevm/Win10.vmx
-interactive "" "C:\perl\perl.exe C:\script.pl"
n Run a batch script and keep running afterwards. To use cmd.exe on Windows, you must
specify the script interpreter as null.
vmrun -gu guestUser -gp guestPassword runScriptInGuest Win10.vmwarevm/Win10.vmx ""
"cmd.exe /k \"C:\\Program Files\\Microsoft Visual Studio\\VC\\vcvarsall.bat\" x86"
n Run a Bash shell script file or Perl script on a Linux guest.
vmrun -gu guestUser -gp guestPassword runScriptInGuest Ubuntu16.vmwarevm/
Ubuntu16.vmx -interactive "" "/bin/bash myscript"
vmrun -gu guestUser -gp guestPassword runScriptInGuest Ubuntu16.vmwarevm/
Ubuntu16.vmx -interactive "/usr/bin/perl" "system('firefox');"
n Start an X clock on a Linux guest, which requires the -display option to appear on the
console.
vmrun -gu guestUser -gp guestPassword runProgramInGuest Ubuntu16.vmwarevm/
Ubuntu16.vmx /usr/bin/xclock -display :0
n Run the same X clock command, but return control back to the console immediately.
vmrun -gu guestUser -gp guestPassword runProgramInGuest Ubuntu16.vmwarevm/
Ubuntu16.vmx -noWait /usr/bin/xclock -display :0
n Run Firefox.
vmrun -gu guestUser -gp guestPassword runProgramInGuest Ubuntu16.vmwarevm/
Ubuntu16.vmx /usr/bin/firefox --display=:0
Using VMware Fusion
VMware by Broadcom 209

n Setting the guest environment with the guestEnv parameter requires root permission on Linux
because the change affects subsequent commands issued by other users.
vmrun -gu guestUser -gp guestPassword writeVariable Ubuntu16.vmwarevm/Ubuntu16.vmx
guestEnv SRC tmp.example.com:1666
n List processes in a Linux guest and end the process numbered 8192.
vmrun -gu guestUser -gp guestPassword listProcessesInGuest Ubuntu16.vmwarevm/
Ubuntu16.vmx
vmrun -gu guestUser -gp guestPassword killProcessInGuest UUbuntu16.vmwarevm/
Ubuntu16.vmx 8192
n Run a Perl script on a Linux guest to remove DOS-style carriage returns from a file.
vmrun -gu guestUser -gp guestPassword runProgramInGuest Ubuntu16.vmwarevm/
Ubuntu16.vmx /usr/bin/perl -e "open(FILE, '>/tmp/unix.txt'); while (<>) { s/
\r\n/\n/ ; print FILE}" /tmp/dos.txt
n Run a Perl script on a Windows guest to insert DOS-style carriage returns in a file.
vmrun -gu guestUser -gp guestPassword runProgramInGuest Win10.vmwarevm/Win10.vmx
C:\cygwin\bin\perl.exe -e "open(FILE, ‘>C:\Users\user\dos.txt’); while (<>) { s/\n/
\r\n/ ; print FILE}" C:\Users\guestUser\unix.txt
Guest to Host File Operations
n To copy a file from the host to a guest, the user must have write permission on the
destination.
vmrun -gu guestUser -gp guestPassword copyFileFromHostToGuest Ubuntu16.vmwarevm/
Ubuntu16.vmx ~/img.db /tmp/img.db
n To copy a file from a guest to the host, the user must have read permission on the source file.
vmrun -gu guestUser -gp guestPassword copyFileFromGuestToHost Ubuntu16.vmwarevm/
Ubuntu16.vmx /home/username/addr addr.txt
n To enable shared folders.
vmrun enableSharedFolders Ubuntu16.vmwarevm/Ubuntu16.vmx
n To share a folder on a Mac host with a particular Linux guest.
Note Before sharing folders, you must enable them with the enabledSharedFolders option,
or by selecting Enable Shared Folders in the Sharing Settings panel of the virtual machine.
On Linux guests, the /mnt/hgfs directory is available for sharing, but you can use a different
directory for shared folders.
vmrun addSharedFolder Ubuntu16.vmwarevm/Ubuntu16.vmx sharedFolderName ~/Share
Using VMware Fusion
VMware by Broadcom 210

n To make a shared folder read‐only or to delete the shared folder.
Note Shared folders are writable by default.
vmrun setSharedFolderState Ubuntu16.vmwarevm/Ubuntu16.vmx sharedFolderName ~/Share
readonly
vmrun removeSharedFolder Ubuntu16.vmwarevm/Ubuntu16.vmx sharedFolderName
Note On Windows Vista and Windows 7 or later guests, only the Administrator account
can use copyFileFromHostToGuest and deleteFileInGuest options to write and delete files in
the C:\ and system folders, or use the createDirectoryInGuest and deleteDirectoryInGuest
options to modify system directories. Regular users, even those with administrator privilege,
cannot perform these operations.
Guest Variables and Environment
n From the host, set a guest variable on the virtual machines.
vmrun writeVariable Win10.vmwarevm/Win10.vmx guestVar vmstartdate 21April2017
n On the guest operating systems, read the guest variable that you just set.
> rpctool.exe "info-get guestinfo.vmstartdate"
$ vmware-rpctool "info-get guestinfo.vmstartdate"
n From the host, set a guest environment variable on a Linux virtual machine and verify by
writing the environment variables into a temporary file.
vmrun writeVariable Ubuntu16.vmwarevm/Ubuntu16.vmx guestEnv LD_LIBRARY_PATH /usr/local/lib
Guest user: root
Guest password:
vmrun runScriptInGuest Ubuntu16.vmwarevm/Ubuntu16.vmx /bin/bash "/usr/bin/env > /tmp/
env.out"
Guest user: root
Guest password:
Note No output is sent to the host when you use the runScriptInGuest option with the
vmrun command. Find the output of the command in the /tmp/env.out file on the guest.
n On a Linux guest, determine the IP address and set it in a guest variable.
$ ipaddr=`ifconfig eth0 | grep inet.addr`
$ vmware-rpctool "info-set guestinfo.theip $ipaddr"
n From the host, retrieve the IP address that was just set to the guest.
vmrun readVariable Ubuntu10/Ubuntu10.vmx guestVar theip
Using VMware Fusion
VMware by Broadcom 211

General Commands
n List running virtual machines.
vmrun list
Total running VMs: 2
Absolute-path-to-virtual-machine.vmx
Absolute-path-to-virtual-machine.vmx
n Prepare to install VMware Tools.
vmrun installTools Ubuntu16.vmwarevm/Ubuntu16.vmx
The Template Virtual Machine Commands
n Download a VMware Project Photon operating system virtual machine.
vmrun downloadPhotonVM ~
Using VMware Fusion
VMware by Broadcom 212

Using vmcli to Control Virtual
Machines
11
You can use the vmcli command-line utility in VMware Fusion to interact with the hypervisor
from the macOS terminal window. By using vmcli commands, you can perform various virtual
machine operations like creating new virtual machine or virtual machine template.
Running the vmcli command-line utility
You can run the vmcli from the macOS terminal window. You can also create scripts to run
multiple commands.
To run the vmcli command and get the syntax to use the available functionality, run the
following command.
vmcli --help
After you run this command, you receive the following output.
vmcli --help
Usage: vmcli [-v | --version] [<vmx location>] <module> <command> [<args>] [--verbose] [-h |
--help] [<vmx location>]
Top level arguments:
-v, --version
Display the version information.
Global arguments:
<vmx location> (required for commands working with VMs)
Location of the vmx file to work with. Can be the first or last argument on the
command line.
--verbose
Enable verbose logging.
-h, --help
Display the help information
Available modules:
Chipset
Chipset options.
ConfigParams
Set VM configuration parameters.
Disk
Module to perform disk operations.
Ethernet
Setup the ethernet configuration in the guest.
VMware by Broadcom
213

Guest
guest ops
HGFS
HGFS options.
MKS
Mouse, keyboard and screen operations.
Nvme
Setup NVME ports in the guest.
Power
Set the power state of the vm.
Sata
Setup SATA ports in the guest.
Serial
Setup serial ports in the guest.
Snapshot
Snapshot configuration
Tools
Tools related configuration.
VM
VM related Operations
VMTemplate
Create and Deploy vm template
VProbes
Setup VProbes in the guest
To learn more about the syntax of each module or operation, for example the Power module, you
can run the following command.
vmcli Power --help
After you run this command, you receive the following output.
vmcli Power --help
Usage: vmcli [-v | --version] [<vmx location>] Power [--verbose] [-h | --help] query Start
Stop Pause Reset Suspend Unpause [<vmx location>]
Top level arguments:
-v, --version
Display the version information.
Global arguments:
<vmx location> (required for commands working with VMs)
Location of the vmx file to work with. Can be the first or last argument on the
command line.
--verbose
Enable verbose logging.
-h, --help
Display the help information
Module:
Power
Set the power state of the vm.
Arguments available to module "Power":
query
Query the power state of the VM.
Start
Using VMware Fusion
VMware by Broadcom 214

Start the virtual machine.
Stop
Stop the virtual machine.
Pause
Pause the virtual machine.
Reset
Rest the virtual machine.
Suspend
Suspend the virtual machine.
Unpause
Unpause the virtual machine.
You can also retrieve usage information for a specific operation of any module.
vmcli Power query --help
After you run this command, you receive the following output.
vmcli power query --help
Usage: vmcli [-v | --version] [<vmx location>] Power query [--verbose] [-h | --help] [-f |
--format <2, 1, 0>] [<vmx location>]
Top level arguments:
-v, --version
Display the version information.
Global arguments:
<vmx location> (required for commands working with VMs)
Location of the vmx file to work with. Can be the first or last argument on the
command line.
--verbose
Enable verbose logging.
-h, --help
Display the help information
Module:
query
Query the power state of the VM.
Arguments available to module "query":
-f, --format <2, 1, 0>
Sets the format of the output.
Using vmcli to create a template from an existing virtual
machine
You can create a virtual machine template from an existing virtual machine. You can later use this
template to create a new virtual machine with the same configuration.
You can use the following syntax.
vmwcli <source vmx path> vmtemplate create -p <template vmtx path> -n <template name>
Using VMware Fusion
VMware by Broadcom 215

Variable Description
source vmx path
Path to the source virtual machine vmx from which the
template will be created.
template vmtx path
Full path to the new vmtemplate folder along with file
name with the
.vmtx extension.
Example: "~/Virtual Machines.localized/
clonevmtest2.vmwarevm/clonevmtest2.vmtx"
template name
Name of the tamplate.
Using vmcli to deploy a virtual machine template
You can deploy the VMTemplate that was created by the vmcli command. By using the following
syntax, you can create a new virtual machine from the specified
VMTemplate at the same location.
VMTemplate Deploy -p <Full file path of vmtx file of existing VM template>
Using vmcli to create a new virtual machine
You can use the following syntax to create a new virtual machine.
VM Create -n <vm name> -d <path where vm will be created> -g <guest operating system>
Example:
VM Create -n myVM -d ~/Desktop/ -g windows9-64
Example of creating a virtual machine and attaching an ISO
to it
After performing the following steps, you can add a newly created virtual machine to the Virtual
Machine Library and then power the virtual machine on to start the guest installation process by
using the ISO file. You can use the syntax from the following example.
Example:
echo "----creating VM-----"
vmcli VM Create -n windowstest -d ~/Desktop/test -g windows9-64
vmcli ConfigParams SetEntry displayName "windowstest" ~/Desktop/test/windowstest.vmx
echo "----create Nvme vmdk related things-----"
vmcli nvme SetPresent nvme0 1 ~/Desktop/test/windowstest.vmx
vmcli Disk SetBackingInfo nvme0:0 disk windowstest.vmdk 1 ~/Desktop/test/windowstest.vmx
Using VMware Fusion
VMware by Broadcom 216

vmcli Disk SetPresent nvme0:0 1 ~/Desktop/test/windowstest.vmx
echo "----create sata disk for iso mounting-----"
vmcli Sata SetPresent sata0 1 ~/Desktop/test/windowstest.vmx
vmcli Disk SetBackingInfo sata0:0 cdrom_image ~/Documents/iso/
22621.1.220506-1250.ni_release_CLIENT_ENTERPRISES_OEM_x64FRE_en-us.iso 1 ~/Desktop/test/
windowstest.vmx
vmcli Disk SetPresent sata0:0 1 ~/Desktop/test/windowstest.vmx
echo "----create ethernet related things-----"
vmcli Ethernet query ~/Desktop/test/windowstest.vmx
vmcli Ethernet SetVirtualDevice ethernet0 vmxnet3 ~/Desktop/test/windowstest.vmx
vmcli Ethernet SetConnectionType ethernet0 nat ~/Desktop/test/windowstest.vmx
vmcli Ethernet SetAddressType ethernet0 generated "" ~/Desktop/test/windowstest.vmx
vmcli Ethernet SetLinkStatePropagation ethernet0 true ~/Desktop/test/windowstest.vmx
vmcli Ethernet SetPresent ethernet0 1 ~/Desktop/test/windowstest.vmx
vmcli ConfigParams SetEntry bios.bootOrder "cdrom,hdd" ~/Desktop/test/windowstest.vmx
echo "---------Done-------"
Using VMware Fusion
VMware by Broadcom 217

Using VMware Fusion REST API
12
Fusion REST API is available for both Fusion and Fusion Pro and enables you to interact
programmatically with the core VMware hypervisor and virtual machines.
Overview of Fusion REST API
You can send standard GET, PUT, POST, and DELETE requests through HTTP and HTTPS to control
configuration and deployment options. For example, you can use the Fusion REST API to perform
power operations. You can perform network-related operations, such as to create and update
virtual NIC configurations and to retrieve IP addresses from the virtual machine. You can also
configure shared folders. Response payloads are delivered in JSON format.
Fusion REST API Considerations
Keep the following considerations in mind when using the Fusion REST API.
n The Fusion REST API service depends on the vmrest process.
n The vmrest service runs as the user who starts it. For example, the sudo vmrest command
runs as the root user.
Read the following topics next:
n Use the VMware Fusion REST API Service
n Using VMware Fusion REST API Service to Manage Power Options of Encrypted Virtual
Machines
Use the VMware Fusion REST API Service
You can access the Fusion REST API from a local machine.
Note To view the Fusion API online, search VMware API Explorer for the appropriate version of
the VMware Fusion API.
Procedure
1 Install Fusion on your Mac.
VMware by Broadcom
218
2 Before you start the REST API service the first time, set up your credentials.
a In a terminal window, run the vmrest -C command.
b Enter a user name and password as prompted.
You do not need to set up credentials when you start the REST API on subsequent
occasions.
3 Configure the REST API service for HTTP and HTTPS access.
You can configure the REST API service to provide HTTP or HTTPS access locally.
n Provide HTTP service.
a In a terminal window, run the vmrest command.
The command returns the IP address and port number from which you can access the
HTTP service. The default IP address is 127.0.0.1:8697.
b Open a web browser and go to http://
address-returned-by-vmrest-command
.
c Click Authorize in the top-right corner of the Fusion API Explorer page.
d To authenticate, enter the user name and password you configured in Step 2.
n Provide HTTPS service.
In this situation, when you use the vmrest command to start the REST API service, you
must use the -c and -k options together to specify the certificate and private key.
a In a terminal window, run a command to generate a certificate and a private key.
The example command that follows, generates a self-signed OpenSSL-based
certificate and a private key.
openssl req -x509 -newkey rsa:4096 -keyout fusionapi-key.pem -out fusionapi-
cert.pem -days 365 -nodes
b To start the Fusion REST API service, run the command that follows. Replace the
placeholders with the full path to the certificate file and the full path to the private key
file.
vmrest -c certificate-file -k private-key-file
The command returns the address from which you can access the HTTPS service.
c Open a web browser and go to https://
address-returned-by-vmrest-command
.
d Click Authorize in the top-right corner of the Fusion API Explorer page.
e To authenticate, enter the user name and password you configured in Step 2.
Using VMware Fusion
VMware by Broadcom 219

Using VMware Fusion REST API Service to Manage Power
Options of Encrypted Virtual Machines
You can power on, power off, suspend, pause, unpause, or retrieve the state of an encrypted
virtual machine using the VMware Fusion REST API service.
Note To view the Fusion API online, search VMware API Explorer for the appropriate version of
the VMware Fusion API.
Prerequisites
You must perform the following steps before using the Fusion REST API services:
n Connect to the IP address from which you can access the HTTP/HTTPS services of Fusion
REST API. The default IP address is 127.0.0.1:8697.
n Authenticate using the credentials you configured for the API service.
For more information on how to set the credentials for the Fusion REST API service, see
#unique_285
Procedure
1 After you log in to the Fusion API service page, click VM Power Management from the list of
API services.
2 To retrieve the power state of the encrypted virtual machine, click the GET operation, and
then perform the following steps:
a Under the Parameters section, enter the ID and the encryption password of the virtual
machine.
b Click Try it Out!
The Fusion REST API service returns the power state of the encrypted virtual machine.
Using VMware Fusion
VMware by Broadcom 220
3 To manage the power options of the encrypted virtual machine, click the PUT operation, and
then perform the following steps:
a Under the Parameters section, enter the ID and the encryption password of the virtual
machine.
b Enter one of the following options in the operation field:
n on
n off
n shutdown
n suspend
n pause
n unpause
c Click Try it Out!
The Fusion REST API service performs the operation you choose for the encrypted virtual
machine.
Using VMware Fusion
VMware by Broadcom 221
Upgrading Fusion
13
You can upgrade to a new version of Fusion in several ways.
Use these procedures to upgrade Fusion.
Read the following topics next:
n Upgrade Fusion with Autoupdate
n Upgrade Fusion From a Download
n Upgrading VMware Tools
n Uninstalling Fusion
n Force Virtual Machine Processes to Quit
Upgrade Fusion with Autoupdate
Fusion has a built-in software updater that checks for updates to Fusion and VMware Tools and
downloads and installs the updates.
When the Automatically check for updates check box is selected in VMware Fusion >
Preferences, Fusion checks for updates each time it starts. If Fusion detects a new version, it
displays the Software Update window. The Software Update window has the following options.
Skip This Version
Select this option if you do not want to upgrade to the version described. Fusion ignores
this version in any later Autoupdate checks. If you change your mind later, you can select
VMware Fusion > Check for Updates to have Fusion display the Software Update window
again.
Remind Me Later
Fusion closes the Software Update window. The next time Fusion starts, the Software
Update window appears.
Download and Install
Fusion downloads the update files to your Mac and installs the updates.
VMware by Broadcom
222
Prerequisites
Verify that the Automatically check for updates check box is selected in VMware Fusion >
Preferences.
Although Fusion can shut down your running virtual machines as part of this procedure, VMware
recommends that you manually shut down or suspend your virtual machines before you begin.
Procedure
1 In the Software Update window, click Download and Install.
Fusion downloads the update files to your Mac.
2 At the Ready to install update prompt, shut down any running virtual machines and click
Install and Restart.
Fusion downloads the update files to your Mac, displays a progress bar during the
installation, and restarts when the installation is complete.
Upgrade Fusion From a Download
If you have an earlier version of Fusion, you can upgrade to the current version by manually
downloading the Fusion disk image from the VMware Web site.
If you are upgrading Fusion, VMware recommends that you first remove the version of Fusion
installed on your Mac. The process of installing, upgrading, and uninstalling Fusion does not
modify existing virtual machines.
Prerequisites
Verify that all of your virtual machines are shut down and that Fusion is not running.
Procedure
1 Drag the previous version of Fusion to the trash.
Fusion is in the Applications folder on your Mac.
2 Download Fusion from the VMware Web site at http://www.vmware.com/mac/.
a Click the Download link and follow the subsequent links for an Electronic Download
Distribution.
b Click the download link and save the application to your Mac.
The Fusion disk image is saved to your default download directory. The filename is VMware-
Fusion-x.x.x-xxxxxx_universal.dmg, where
x.x.x
is the application version and
xxxxxx
is
the build number for the download release.
3 Double-click the VMware-Fusion-x.x.x-xxxxxx_universal.dmg file to mount it.
4 Double-click the VMware Fusion icon to copy Fusion to your Mac and start it.
Using VMware Fusion
VMware by Broadcom 223

Upgrading VMware Tools
You can upgrade VMware Tools manually, or you can configure virtual machines to check for and
install newer versions of VMware Tools.
The guest operating system checks the version of VMware Tools when you power on a virtual
machine. The status bar of your virtual machine displays a message when a new version is
available.
For vSphere virtual machines,
A newer version of Tools is available for this VM
is displayed when the installed version of VMware Tools is out of date.
In Windows virtual machines, you can set VMware Tools to notify you when an upgrade is
available. If this notification option is enabled, the VMware Tools icon in the Windows taskbar
includes a yellow caution icon when a VMware Tools upgrade is available.
To install a VMware Tools upgrade, you can use the same procedure that you used for installing
VMware Tools the first time. Upgrading VMware Tools means installing a new version.
For Windows and Linux guest operating systems, you can configure the virtual machine to
automatically upgrade VMware Tools. Although the version check is performed when you
power on the virtual machine, on Windows guest operating systems, the automatic upgrade
occurs when you power off or restart the virtual machine. The status bar displays the message
Installing VMware Tools ... when an upgrade is in progress. The procedure is mentioned
below.
Note Upgrading VMware Tools on Windows guest operation systems automatically installs the
WDDM graphics drivers. The WDDM graphics driver allows the sleep mode available in guest OS
power settings to adjust the sleep options. For example, you can use the sleep mode setting
Change when the computer sleeps to configure your guest OS to automatically go to sleep
mode after a certain time or prevent your guest OS from automatically switching to sleep mode
after being idle for some time.
Some features in a particular release of a VMware product might depend on installing or
upgrading to the version of VMware Tools included in that release. Upgrading to the latest
version of VMware Tools is not always necessary. Newer versions of VMware Tools are
compatible with several host versions. To avoid unnecessary upgrades, evaluate whether the
added features and capabilities are necessary for your environment.
Uninstalling Fusion
Uninstalling Fusion does not modify existing virtual machines.
Uninstall Fusion
You can uninstall Fusion from the Applications folder.
Using VMware Fusion
VMware by Broadcom 224
Prerequisites
Power off or suspend all running virtual machines and quit Fusion.
Procedure
u Drag the VMware Fusion application from the Applications folder on your Mac to the trash.
Force Virtual Machine Processes to Quit
If your computer prevents you from upgrading or uninstalling Fusion, you might have to use the
Mac Activity Monitor to correct the problem.
In rare circumstances, the operating system in a virtual machine can quit unexpectedly in a
way that leaves some virtual machine processes running. This situation can prevent you from
upgrading or uninstalling Fusion. In this case, the installation or uninstallation Assistant might
display a message that indicates that you cannot install or uninstall Fusion. To work around this
problem, you can use the Mac Activity Monitor to force virtual machine processes to quit.
Procedure
1 In the Finder, select Applications > Utilities and double-click Activity Monitor to open the
Activity Monitor.
2 Select All Processes.
3 In the Process Name column, select VMware Fusion.
4 Select View > Quit Process.
5 In the Quit Process window, select Force Quit.
Using VMware Fusion
VMware by Broadcom 225
