
Oracle® Fusion Applications
Installation Guide
Release 12 (11.12.x.0.0)
E70513-05
September 2017
Oracle Fusion Applications Installation Guide, Release 12 (11.12.x.0.0)
E70513-05
Copyright © 2020, 2020, Oracle and/or its affiliates.
Primary Author: Luis Ramos
Contributors: Bor-Ruey Fu, Ronaldo Viscuso, Bill Jacobs, Jennifer Briscoe, Henriette Fux, Vickie Laughlin,
Karen Ram, Emilio Jasso, Vadim Milman, P.S.G.V.Sekhar, Nancy Schwab, Essan Ni, Subodh Nimbkar,
Shankar Raman, Janga Aliminati, Michael Rhys, Pradeep Bhat, Bruce Jiang, Xiao Lin, Sindhu Palakodety,
Kopal Sinha
This software and related documentation are provided under a license agreement containing restrictions on
use and disclosure and are protected by intellectual property laws. Except as expressly permitted in your
license agreement or allowed by law, you may not use, copy, reproduce, translate, broadcast, modify, license,
transmit, distribute, exhibit, perform, publish, or display any part, in any form, or by any means. Reverse
engineering, disassembly, or decompilation of this software, unless required by law for interoperability, is
prohibited.
The information contained herein is subject to change without notice and is not warranted to be error-free. If
you find any errors, please report them to us in writing.
If this is software or related documentation that is delivered to the U.S. Government or anyone licensing it on
behalf of the U.S. Government, then the following notice is applicable:
U.S. GOVERNMENT END USERS: Oracle programs (including any operating system, integrated software,
any programs embedded, installed or activated on delivered hardware, and modifications of such programs)
and Oracle computer documentation or other Oracle data delivered to or accessed by U.S. Government
end users are "commercial computer software" or “commercial computer software documentation” pursuant
to the applicable Federal Acquisition Regulation and agency-specific supplemental regulations. As such,
the use, reproduction, duplication, release, display, disclosure, modification, preparation of derivative works,
and/or adaptation of i) Oracle programs (including any operating system, integrated software, any programs
embedded, installed or activated on delivered hardware, and modifications of such programs), ii) Oracle
computer documentation and/or iii) other Oracle data, is subject to the rights and limitations specified in the
license contained in the applicable contract. The terms governing the U.S. Government’s use of Oracle cloud
services are defined by the applicable contract for such services. No other rights are granted to the U.S.
Government.
This software or hardware is developed for general use in a variety of information management applications.
It is not developed or intended for use in any inherently dangerous applications, including applications that
may create a risk of personal injury. If you use this software or hardware in dangerous applications, then you
shall be responsible to take all appropriate fail-safe, backup, redundancy, and other measures to ensure its
safe use. Oracle Corporation and its affiliates disclaim any liability for any damages caused by use of this
software or hardware in dangerous applications.
Oracle and Java are registered trademarks of Oracle and/or its affiliates. Other names may be trademarks of
their respective owners.
Intel and Intel Inside are trademarks or registered trademarks of Intel Corporation. All SPARC trademarks are
used under license and are trademarks or registered trademarks of SPARC International, Inc. AMD, Epyc,
and the AMD logo are trademarks or registered trademarks of Advanced Micro Devices. UNIX is a registered
trademark of The Open Group.
This software or hardware and documentation may provide access to or information about content, products,
and services from third parties. Oracle Corporation and its affiliates are not responsible for and expressly
disclaim all warranties of any kind with respect to third-party content, products, and services unless otherwise
set forth in an applicable agreement between you and Oracle. Oracle Corporation and its affiliates will not
be responsible for any loss, costs, or damages incurred due to your access to or use of third-party content,
products, or services, except as set forth in an applicable agreement between you and Oracle.

Contents
Preface
Audience xxvii
Documentation Accessibility xxvii
Related Documents xxvii
Conventions xxviii
News
New and Changed Features for Release 12 (11.12.x.0.0) xxix
1
Overview
1.1 Introduction to Installing Oracle Fusion Applications 1-1
1.2 Roles and Responsibilities 1-2
1.2.1 Business Sponsor 1-3
1.2.2 Project Manager 1-3
1.2.3 IT Director 1-4
1.2.4 Architect 1-4
1.2.5 System Administrator 1-5
1.2.6 Network Engineer 1-5
1.2.7 Database Engineer 1-6
1.2.8 Oracle Identity Management and Security Specialist 1-6
1.2.9 Oracle Fusion Applications Technical Lead or System Administrator 1-7
1.2.10 Oracle Fusion Applications Functional Lead 1-7
1.2.11 Oracle Fusion Applications Developer 1-7
1.2.12 Oracle Business Intelligence or Data Warehouse Reporting Specialist 1-7
1.2.13 Support Technician 1-8
1.2.14 Oracle Fusion Applications Systems Integrator 1-8
1.3 Prerequisites and Dependencies 1-8
1.3.1 Oracle Database 1-8
1.3.2 Oracle Business Intelligence 1-9
1.3.3 Oracle Identity Management 1-10
1.4 Features of Provisioning 1-10
iii

1.4.1 Oracle Fusion Applications Provisioning Repository 1-10
1.4.2 Oracle Fusion Applications Provisioning Framework 1-10
1.4.3 System Requirements 1-11
1.4.3.1 Download Instructions 1-11
1.4.4 Supported Platforms 1-11
1.4.5 Oracle Identity Management Provisioning Wizard 1-11
1.4.6 Oracle Fusion Applications Provisioning Wizard 1-12
1.4.7 Response File 1-13
1.4.8 Provisioning Configurations 1-14
1.5 Provision a Multiple Host Installation 1-14
1.5.1 Types of Hosts in a Multiple-Host Environment 1-14
1.5.2 Installation Phases 1-15
1.6 Plan for Provisioning 1-15
1.7 Next Steps 1-16
2
Understand What the Oracle Fusion Applications Environment
Looks Like
2.1 Introduction to What the Oracle Fusion Applications Environment Looks Like 2-1
2.1.1 Oracle Fusion Applications Product Families and Product Offerings 2-2
2.1.2 New Product Offerings, Applications, Oracle WebLogic Server Managed
Servers, and Clusters for Release 12 2-8
2.1.3 Oracle Fusion Middleware Infrastructure Components 2-9
2.1.4 Oracle Fusion Middleware Components 2-9
2.1.4.1 Products Installed to the Desktop 2-12
2.1.4.2 Other Related Products 2-12
2.1.5 Oracle Database 2-12
2.1.6 Oracle Fusion Applications Management Tools 2-13
2.2 Oracle Fusion Applications Topologies 2-13
2.2.1 Topology Tiers 2-13
2.2.1.1 Database Tier 2-14
2.2.1.2 Middle Tier 2-14
2.2.1.3 Web Tier 2-15
2.2.2 Network Components 2-15
2.2.3 Basic Topology 2-17
2.2.4 Enterprise Topology 2-19
2.2.5 Enterprise Topology with High Availability 2-22
2.3 Oracle Fusion Applications Directory Structure 2-24
2.3.1 Installation Repository 2-24
2.3.2 Oracle Identity Management Provisioning Framework Directory
Structure 2-25
2.3.3 Oracle Fusion Applications Provisioning Framework Directory Structure 2-27
iv

2.3.4 Oracle Identity Management Shared Directory Structure 2-28
2.3.5 Oracle Identity Management Local Directory Structure 2-30
2.3.6 Oracle Identity Management DMZ Directory Structure 2-30
2.3.7 Oracle Fusion Applications Shared Directory Structure 2-31
2.3.7.1 Applications Base Directory 2-33
2.3.7.2 Oracle Fusion Applications Oracle Home Directory 2-34
2.3.7.3 Oracle Fusion Applications Product Family Directory 2-35
2.3.8 Oracle Fusion Applications Local Directory Structure 2-36
2.3.9 Oracle Fusion Applications DMZ Directory Structure 2-36
2.4 Oracle Fusion Applications Runtime Processes 2-37
2.4.1 Database Instances and Other Processes 2-38
2.4.2 Oracle Application Server Instances 2-38
2.4.3 Oracle WebLogic Server Domains 2-39
2.5 Access Oracle Fusion Applications 2-40
2.6 Next Steps 2-40
3
Plan the Topology and Provisioning of the Installation
3.1 Introduction 3-1
3.1.1 Use the Oracle Fusion Applications Installation Workbook 3-2
3.1.1.1 Oracle Fusion Applications Installation Workbook Structure 3-2
3.1.2 Plan for Platform-Specific Considerations 3-3
3.1.2.1 Desktop Tools 3-3
3.1.2.2 Oracle Fusion Applications Repository Creation Utility (Oracle
Fusion Applications RCU) 3-3
3.1.2.3 OAM Modes Supported 3-3
3.1.2.4 BI Administration Tool 3-3
3.1.2.5 Print Servers 3-4
3.2 Environment: Complete the Environment Tab Entries 3-4
3.2.1 Oracle Identity Management Topologies 3-4
3.2.2 Oracle Fusion Applications Topologies 3-4
3.2.3 Complete the Environment Info Table 3-5
3.2.4 Complete the Email Server Table 3-6
3.2.5 Complete the Web Proxy Table of the Oracle Fusion Applications
Installation Workbook 3-7
3.3 Provisioning: Plan the Configuration of the Provisioned Installation 3-8
3.3.1 Provisioning: Indicate the Oracle Fusion Applications Offerings to Install 3-8
3.3.1.1 Complete the Oracle Fusion Applications Offerings Table 3-8
3.3.2 Provisioning: Describe the Oracle Identity Management Components 3-9
3.3.2.1 OIF 3-9
3.3.2.2 Complete the Oracle Identity Management Components Table 3-10
3.3.3 Provisioning: Select the Patches to Apply 3-10
v

3.3.4 Provisioning: Select the Post-Installation Tasks to Perform 3-10
3.3.4.1 Select Languages 3-11
3.4 Topology: Plan the Topology 3-12
3.4.1 Review Component and Server Allocation 3-12
3.4.2 Complete the Topology Tab of the Oracle Fusion Applications
Installation Workbook 3-12
3.4.3 Topology: Understand DMZ Requirements 3-14
3.4.3.1 Complete the DMZ Column in the Topology Table 3-16
3.5 Next Steps 3-16
4
Plan the Configuration of the Components of the Installation
4.1 Network- Virtual Hosts: Plan Network Configuration 4-1
4.1.1 Understand Internal vs. External URLs 4-2
4.1.2 Naming Conventions in Oracle Fusion Applications 4-2
4.1.2.1 Plan URL Naming Conventions 4-2
4.1.3 Plan Load Balancer Requirements 4-3
4.1.3.1 SSL Certificate Requirements 4-3
4.1.3.2 How the Load Balancer Option Affects the Environment Setup 4-3
4.1.3.3 Network Placement of Load Balancers/Reverse Proxy 4-6
4.1.3.4 Load Balancer Feature Requirements 4-8
4.1.4 Plan HTTP Server Requirements 4-9
4.1.4.1 Define Web Tier Virtual Host Mode 4-9
4.1.5 Define VIPs for Administration and Managed Servers 4-10
4.1.5.1 Define VIPs for Oracle Identity Management 4-11
4.1.5.2 Define VIPs for Oracle Fusion Applications 4-11
4.1.6 Complete the Network-Virtual Hosts Tab of the Oracle Fusion
Applications Installation Workbook 4-11
4.1.6.1 Complete the Web Tier Virtual Host Mode Table 4-11
4.1.6.2 Complete the FA Web Tier Virtual Hosts Table 4-12
4.1.6.3 Complete the IDM Web Tier Virtual Hosts Table 4-13
4.1.6.4 Complete the HTTP LBR Endpoints Table 4-13
4.1.6.5 Complete the LDAP Endpoints Table 4-13
4.1.6.6 Complete the UCM LBR Endpoint Table 4-13
4.1.6.7 Complete the AdminServer Virtual Hosts/VIPs Table 4-14
4.1.6.8 Complete the Managed Server Virtual Hosts/VIPs Table 4-14
4.2 Network-Ports: Plan Ports 4-14
4.2.1 Default vs. Custom Port Numbers 4-14
4.2.1.1 Complete the Network-Ports Tab of the Oracle Fusion
Applications Installation Workbook 4-14
4.3 Storage: Plan Storage Configuration 4-15
4.3.1 Recommended Minimum Disk Space 4-15
vi

4.3.2 Directory Storage Requirements 4-16
4.3.2.1 Shared Storage 4-17
4.3.2.2 Local Storage (if used) 4-18
4.3.2.3 DMZ Local Storage (if used) 4-18
4.3.2.4 Database Storage 4-18
4.3.2.5 Temporary Files Created During Installation (temp directory) 4-19
4.3.3 oraInventory Planning 4-19
4.3.4 Plan Directory Structure and Naming Conventions 4-20
4.3.5 Shared Storage Considerations 4-20
4.3.6 Local Storage Considerations 4-21
4.3.6.1 Local Config Storage Decision Tree 4-22
4.3.7 Complete the Storage Tab of the Oracle Fusion Applications Installation
Workbook 4-22
4.4 Database: Plan Database Configuration 4-23
4.4.1 RAC vs. Single Instance Planning 4-24
4.4.2 Plan for Database Requirements 4-24
4.4.2.1 Required Instance Parameters 4-25
4.4.2.2 Required Database Patches 4-25
4.4.2.3 Schema and Password Requirements 4-25
4.4.2.4 Oracle Fusion Applications RCU Directories 4-28
4.4.2.5 Oracle Identity Management Split Database Configuration 4-29
4.4.3 Complete the Database Tab of the Oracle Fusion Applications
Installation Workbook 4-29
4.5 Identity Management: Plan the Oracle Identity Management Configuration 4-30
4.5.1 Identity Store 4-30
4.5.2 LDAP Context 4-30
4.5.3 Location for Files Generated During Oracle Identity Management
Provisioning 4-31
4.5.4 Oracle Access Manager Transfer Mode 4-31
4.5.5 Oracle Internet Directory Password Policies 4-32
4.5.6 Complete the Identity Management Tab of the Oracle Fusion
Applications Installation Workbook 4-32
4.5.6.1 Complete the LDAP Table 4-32
4.5.6.2 Complete the IDM Provisioning Files Table 4-32
4.5.6.3 Complete the OAM Table 4-33
4.5.6.4 Complete the Identity Store/Policy Store Table: 4-33
4.6 SSL and Certificates 4-33
4.6.1 Out-of-the-Box SSL Configuration 4-33
4.6.2 SSL Certificate Requirements 4-34
4.7 Memory Requirements 4-34
4.8 Next Steps 4-35
vii

5
Prepare for an Installation
5.1 Prepare Storage Components 5-1
5.1.1 Prepare Shared Storage for Oracle Identity Management and Oracle
Fusion Applications 5-1
5.1.2 Mount the Shared Storage 5-2
5.1.3 Verify Install Directory Location 5-2
5.1.4 Verify the /etc/oraInst.loc File 5-2
5.2 Prepare the Oracle Identity Management Server 5-3
5.2.1 Ensure Software Install Location is 45 Characters or Fewer 5-3
5.2.2 Configure Kernel Parameters 5-3
5.2.3 Set the Open File Limit 5-5
5.2.4 Set Shell Limits 5-5
5.2.5 Enable Unicode Support 5-6
5.2.6 Synchronize Oracle Internet Directory Nodes 5-6
5.3 Prepare the Oracle Fusion Applications Server 5-6
5.3.1 Increase the Open Files Limit 5-7
5.3.2 Increase the Max User Processes 5-7
5.3.3 Define the Local Port Range 5-9
5.3.4 Synchronize the System Clocks 5-9
5.3.5 Synchronize Date Time Stamp 5-9
5.3.6 Set the Kernel Parameter Value 5-10
5.3.7 Unset LIBPATH Variable 5-11
5.3.8 Set the System Time Zone 5-11
5.3.9 Create the hwrepo Directory 5-11
5.3.10 Verify Swap Space (UNIX) 5-12
5.3.11 Edit Host Names (UNIX) 5-13
5.3.12 Default Shell (UNIX) 5-13
5.3.13 Install en_US.UTF-8 Locale (UNIX) 5-13
5.3.14 Increase Entropy Values (Linux) 5-14
5.3.15 Check for the Required Solaris Patch (Solaris Only) 5-15
5.4 Prepare the Network 5-16
5.4.1 Configure Name Resolution 5-16
5.4.1.1 Name Resolution for Oracle Fusion Applications Web Tier Virtual
Hosts 5-16
5.4.1.2 Name Resolution for HTTP LBR Endpoints 5-17
5.4.1.3 Name Resolution for LDAP Endpoints 5-18
5.4.1.4 Name Resolution for Other Endpoints 5-18
5.4.2 Configure Load Balancers/Reverse Proxy 5-19
5.4.2.1 Configure Load Balancer/ Reverse Proxy Settings 5-19
5.4.2.2 Configure Certificates and SSL 5-19
5.4.2.3 Configure Load Balancer/Reverse Proxy Mappings 5-20
viii

5.4.3 Configure Firewalls 5-22
5.5 Create the Oracle Fusion Applications Provisioning Repository 5-25
5.5.1 Obtain the Software 5-26
5.5.1.1 Xcopy Utility Should Not Be Used To Copy Fusion Application
Repositories and APPLTOP on Microsoft Windows 5-26
5.5.2 Download from the Oracle Software Delivery Cloud Portal 5-27
5.5.2.1 Download Language Pack Software 5-27
5.5.3 Obtain DVDs from My Oracle Support 5-27
5.5.4 Download and Unzip the BI Patch 25499241 into the FA Repository
(Solaris Only) 5-27
5.5.5 Download and Unzip the Latest OID Patch Bundle into the FA
Repository (Solaris x86-64 Only) 5-28
5.5.6 Verify Required Operating System Packages and Libraries 5-28
5.6 Next Steps 5-30
6
Install the Oracle Identity Management and Oracle Fusion
Applications Provisioning Frameworks
6.1 Introduction to Oracle Identity Management and Oracle Fusion Applications
Provisioning Frameworks 6-1
6.2 Install the Oracle Identity Management Provisioning Tools 6-1
6.2.1 Verify Java and Ant 6-2
6.2.2 Oracle Identity Management Provisioning Framework Installation
Checklist 6-2
6.2.3 Install the Oracle Identity Management Lifecycle Tools 6-2
6.3 Install the Oracle Fusion Applications Provisioning Framework 6-5
6.3.1 Oracle Fusion Applications Provisioning Framework Installation
Checklist 6-6
6.3.2 Run the Provisioning Framework Installer 6-6
6.3.3 Provisioning Installer Screens and Instructions 6-6
6.3.4 Provisioning Framework Components 6-8
6.4 Set Up a Demilitarized Zone (DMZ) for the Web Tier 6-9
6.5 Next Steps 6-10
7
Install Databases for Oracle Identity Management
7.1 Introduction to Installing Databases for Oracle Identity Management 7-1
7.2 Prerequisites for Installing Databases for Oracle Identity Management 7-2
7.2.1 Verifying Database Versions Supported 7-2
7.2.2 Patch the Oracle Database 7-2
7.2.2.1 Patch Requirements for Oracle Database 12c 7-2
7.2.2.2 Patch Requirements for Oracle Database 12c 7-3
7.2.3 About Initialization Parameters 7-3
ix

7.3 Oracle Identity Management Database Installation Checklist 7-4
7.4 Install Oracle Database 7-4
7.5 Install Oracle Real Application Clusters 7-5
7.6 Running the Oracle Fusion Middleware RCU for Oracle Identity Management 7-5
7.7 Validate the Oracle Identity Management Database Installation 7-8
7.8 Next Steps 7-8
8
Install Oracle Fusion Applications Transaction Database
8.1 Introduction to Installing Oracle Fusion Applications Transaction Databases 8-1
8.1.1 Process Overview 8-1
8.1.2 Oracle Data Pump 8-2
8.1.3 Single-Node Versus Multiple-Node Databases 8-2
8.2 Oracle Fusion Applications Transaction Database Requirements 8-3
8.2.1 General Oracle Database Prerequisites 8-3
8.2.2 Specific Oracle Fusion Applications Prerequisites 8-3
8.2.3 Oracle Fusion Applications Database Requirements 8-4
8.2.3.1 Components 8-4
8.2.3.2 Minimum Configuration Parameters for Oracle Database 8-4
8.2.3.3 Tuning Oracle Database 8-8
8.2.3.4 Mandatory Oracle Database Patches 8-8
8.2.3.5 DBA Directories 8-9
8.2.3.6 Make Oracle Fusion Applications RCU Software Available on the
Host where it is Run 8-9
8.2.3.7 Make dmp Files Available on the Database Server 8-9
8.3 Oracle Fusion Applications Database Installation Checklist 8-10
8.4 Install the Oracle Fusion Applications Transaction Database 8-10
8.4.1 Install Oracle Database Enterprise Edition with the Wizard 8-10
8.4.1.1 Start the Provisioning Wizard 8-11
8.4.1.2 Wizard Interview Screens and Instructions 8-12
8.4.1.3 Specify Database Installation Parameters 8-15
8.4.1.4 Complete Database Patch Postinstallation Tasks 8-17
8.4.2 Manual Installation of Oracle Database Enterprise Edition or Oracle
RAC 8-17
8.4.2.1 Install Oracle Database or Oracle RAC 8-17
8.4.2.2 Configure OCM 8-18
8.4.2.3 Configure and Start the Database Listener for Oracle Database
(NETCA) 8-18
8.4.2.4 Create a Transaction Database Instance Using Oracle Database
Configuration Assistant (DBCA) 8-18
8.4.2.5 Enable Database Audit 8-21
8.4.2.6 Run RUP Lite for RDBMS 8-22
x

8.4.2.7 Complete Database Patch Postinstallation Tasks 8-22
8.4.3 Validate the Oracle Fusion Applications Database 8-22
8.5 Oracle Fusion Applications RCU Installation Checklist 8-24
8.6 Run the Oracle Fusion Applications RCU to Create Oracle Fusion
Applications Database Objects 8-25
8.6.1 Functional Design 8-25
8.6.2 How Does the Oracle Fusion Applications RCU Work? 8-26
8.6.3 Run the Oracle Fusion Applications Repository Creation Utility Using
the Wizard 8-27
8.6.3.1 Start the Oracle Fusion Applications RCU 8-27
8.6.3.2 Wizard Screens and Instructions 8-27
8.6.3.3 Specify Database Connection Details 8-31
8.6.3.4 Manage Custom Variables 8-31
8.6.3.5 Map Tablespaces 8-33
8.6.4 Oracle Fusion Applications RCU Post-Installation Checklist 8-36
8.7 Next Steps 8-37
9
Troubleshoot Database Installations
9.1 Troubleshoot the Oracle Identity Management Database Installation and
Oracle Fusion Middleware RCU Operations 9-1
9.2 Troubleshoot Oracle Fusion Applications Database Installation and Oracle
Fusion Applications RCU Operations 9-1
9.2.1 General Troubleshooting Tips 9-1
9.2.2 Database Installation Log Files 9-2
9.2.3 Oracle Fusion Applications RCU Log Files 9-2
9.2.4 Oracle Fusion Applications RCU Taking a Long Time 9-5
9.2.5 Preverification Failure (UNIX) 9-7
9.2.6 Preverification Failure (Solaris) 9-7
9.2.7 Using the Cleanup Feature 9-7
9.3 What to Do Next 9-7
10
Oracle Identity Management Provisioning
10.1 Introduction to Oracle Identity Management Provisioning 10-1
10.2 Create an Oracle Identity Management Provisioning Profile 10-2
10.2.1 Welcome Page 10-3
10.2.2 Specify Inventory Directory Page 10-3
10.2.3 Identity Management Installation Options Page 10-3
10.2.4 Specify Security Updates Page 10-3
10.2.5 Product List Page 10-3
10.2.6 Response File Description Page 10-4
xi

10.2.7 Install Location Configuration Page 10-4
10.2.8 Node Topology Configuration Page 10-5
10.2.9 Virtual Hosts Configuration Page 10-6
10.2.10 Common Passwords Page 10-7
10.2.11 OID Configuration Page 10-7
10.2.12 ODSM Configuration Page 10-8
10.2.13 OHS Configuration Page 10-8
10.2.14 OAM Configuration Page 10-9
10.2.15 IDM DB Configuration Page 10-10
10.2.16 Load Balancer Page 10-11
10.2.17 Summary Page 10-13
10.2.18 Copy Required Files to DMZ Hosts 10-13
10.3 Provision an Oracle Identity Management Environment 10-13
10.3.1 Processing Order 10-14
10.3.2 Installation Phase Actions for Oracle Identity Management
Components 10-15
10.4 Perform Oracle Identity Management Provisioning 10-16
10.4.1 Perform Provisioning by Running the Provisioning Commands 10-16
10.4.2 Monitor Provisioning Using the Oracle Identity Management
Provisioning Wizard 10-17
10.4.2.1 Identity Management Installation Options Page 10-18
10.4.2.2 Install Location Configuration Page 10-18
10.4.2.3 Review Provisioning Configuration Page 10-19
10.4.2.4 Summary Page 10-19
10.4.2.5 Prerequisite Checks Page 10-19
10.4.2.6 Installation Page 10-19
10.4.2.7 Preconfigure Page 10-20
10.4.2.8 Configure Page 10-21
10.4.2.9 Configure Secondary Page 10-21
10.4.2.10 Postconfigure Page 10-21
10.4.2.11 Startup Page 10-22
10.4.2.12 Validation Page 10-22
10.4.2.13 IDM Provisioning Complete 10-22
10.5 Perform Mandatory Oracle Identity Management Post-Installation Tasks 10-23
10.5.1 Create ODSM Connections to Oracle Virtual Directory 10-23
10.5.2 Pass Configuration Properties File to Oracle Fusion Applications 10-23
10.6 Validate Provisioning 10-24
10.6.1 Validate the Administration Server 10-24
10.6.2 Validate the Oracle Access Manager Configuration 10-24
10.6.3 Validate Oracle Directory Services Manager (ODSM) 10-24
10.6.3.1 Validate Browser Connection to ODSM Site 10-24
10.6.3.2 Validate ODSM Connections to Oracle Internet Directory 10-25
xii

10.6.4 Validate WebGate and the Oracle Access Manager Single Sign-On
Setup 10-25
10.7 Manage the Topology for an Oracle Identity Management Enterprise
Deployment 10-26
10.7.1 Start and Stop Components 10-26
10.7.1.1 Startup Order 10-26
10.7.1.2 Start and Stop Servers 10-26
10.7.2 About Oracle Identity Management Console URLs 10-27
10.7.3 Perform Backups During Installation and Configuration 10-28
10.7.3.1 Back Up Middleware Home 10-28
10.7.3.2 Back Up LDAP Directories 10-28
10.7.3.3 Back Up the Database 10-29
10.7.3.4 Back Up the WebLogic Domain 10-29
10.7.3.5 Back Up the Web Tier 10-29
10.8 Next Steps 10-30
11
Troubleshoot Oracle Identity Management Provisioning
11.1 Get Started with Troubleshooting 11-1
11.1.1 Use the Log Files 11-1
11.1.2 Recover From Oracle Identity Management Provisioning Failure 11-1
11.2 Resolve Common Problems 11-2
11.2.1 Provisioning Fails 11-2
11.2.2 OID Account is Locked 11-2
11.2.3 Missing ODSM Instance Directory on Second Node 11-3
11.2.4 Null Error Occurs When WebLogic Patches Are Applied 11-3
11.2.5 Oracle Identity Management Patch Manager Progress Command
Shows Active Session After Provisioning 11-3
11.2.6 False OPatch Error Messages Printed to Log During Install Phase 11-4
11.2.7 Oracle Identity Management Provisioning Wizard Hangs (Linux and
UNIX) 11-4
11.2.8 Provisioning Fails During Install Phase (Linux) 11-4
11.3 Use My Oracle Support for Additional Troubleshooting Information 11-5
11.4 Next Steps 11-5
12
Create a Response File for a New Oracle Fusion Applications
Environment
12.1 Introduction to Creating a Response File 12-1
12.1.1 How Does the Response File Work? 12-1
12.1.2 Select Product Offerings 12-2
12.1.3 Wizard Actions for Oracle Identity Management Components 12-3
xiii

12.1.4 Create Installation-Specific Response Files 12-3
12.1.5 Update a Response File 12-3
12.2 Prerequisites to Creating a Response File 12-3
12.3 Create a Response File 12-4
12.3.1 Start the Provisioning Wizard 12-4
12.3.2 Wizard Screens and Instructions 12-5
12.3.3 Oracle WebLogic Server Node Manager Credentials and Installation
Locations 12-14
12.3.4 System Port Allocation 12-17
12.3.5 Domain Topology Configuration 12-17
12.3.6 Oracle Business Intelligence Configuration 12-19
12.3.7 Web Tier Configuration 12-20
12.3.8 Load Balancer Configuration 12-22
12.3.8.1 Virtual Hosts Configuration 12-23
12.3.9 Web Proxy Configuration 12-24
12.3.10 Distinguished Names 12-25
12.3.11 Oracle Identity Management Properties File 12-25
12.3.12 Identity Management Configuration 12-26
12.3.13 Access and Policy Management Configuration 12-28
12.3.14 Summary 12-31
12.4 Update an Existing Response File 12-31
12.5 Next Steps 12-32
13
Provision a New Oracle Fusion Applications Environment
13.1 Introduction to Provisioning a New Oracle Fusion Applications Environment 13-1
13.2 Installation Phases and Types of Hosts in a Multiple-Host Environment 13-2
13.3 Prerequisites to Provisioning a New Oracle Fusion Applications Environment 13-3
13.4 Provision a New Environment on Multiple Hosts 13-4
13.5 Perform the Installation 13-5
13.5.1 Start the Wizard and Prepare to Install 13-5
13.5.2 Install Oracle Fusion Applications 13-6
13.5.3 Installation Location Details 13-12
13.5.4 Oracle Fusion Applications Post-Installation Checklist 13-13
13.5.5 Perform a Manual Backup 13-14
13.5.6 Use the Command-Line Interface for Installations on the Primary and
Secondary Hosts 13-15
13.5.6.1 Add Arguments to Phase Commands 13-15
13.5.6.2 Run the Installation Phases 13-16
13.6 Next Steps 13-17
xiv

14
Troubleshoot an Oracle Fusion Applications Environment
14.1 General Troubleshooting 14-1
14.2 Provisioning Log Files 14-2
14.2.1 Modify the Default Log Level 14-3
14.2.2 Default Log Level for Managed Servers 14-4
14.3 Recovery After Failure 14-4
14.3.1 Automated Cleanup and Recovery 14-4
14.3.2 Run Cleanup and Restore 14-5
14.3.3 Handle Cleanup Failures 14-6
14.3.4 Handle Remnant Processes 14-7
14.3.5 Handle Restore Failures 14-7
14.4 Troubleshoot Preverify Phase Errors 14-8
14.4.1 Preverify Phase Prerequisite Condition Failed on Red Hat Enterprise 6 14-8
14.4.2 Preverify Phase Not Displaying All Validation Errors on non-Primordial
Hosts 14-11
14.4.3 Preverify Phase Required Free Space is Higher than Actually
Provisioned 14-11
14.4.4 Preverify Phase Failure for PS Package 14-12
14.4.5 Preverify Phase Warning 14-12
14.5 Troubleshoot Install Phase Errors 14-13
14.5.1 Cancel an Installation in Progress 14-13
14.5.2 Install Phase Failed with INST-07221: Specified connect string is not in
a valid format Error 14-13
14.6 Troubleshoot Postconfigure Phase Errors 14-15
14.6.1 Postconfigure Phase Oracle SOA Suite Server Startup Errors 14-15
14.7 Troubleshoot Startup Phase Errors 14-16
14.8 Troubleshoot Validate Phase Errors 14-18
14.8.1 Validate Phase Topology Manager Service Endpoint Invocation Error 14-18
14.8.2 Out-of-the-Box Configuration for B2BUI 14-19
14.9 What to Do Next 14-19
15
Complete Mandatory Common Post-Installation Tasks
15.1 Introduction to Completing Mandatory Post-Installation Tasks 15-1
15.2 Apply Patches to the New Environment 15-1
15.3 Update the MDS Schema Database Statistics 15-1
15.4 Set Up Notifications 15-2
15.4.1 Configure E-Mail Notification Using Oracle SOA Suite 15-2
15.5 Create a Custom Index for SYSAUX Segments 15-4
15.6 Next Steps 15-5
xv

16
Complete Conditional Common Post-Installation Tasks
16.1 Set Up Global Search 16-2
16.1.1 Oracle Fusion Applications Environment 16-2
16.1.2 Oracle Enterprise Crawl and Search Framework 16-2
16.1.2.1 Oracle Enterprise Crawl and Search Framework Management
Features 16-3
16.1.2.2 Key Oracle Enterprise Crawl and Search Framework Features 16-3
16.1.3 Validate the Oracle Enterprise Crawl and Search Framework
Environment 16-4
16.1.4 Configure Help Search: Highlights 16-6
16.1.5 Searchable Objects 16-6
16.1.6 Configure External Search Categories for Oracle Business Intelligence
and Oracle WebCenter Portal: Procedures 16-6
16.1.7 Make a Search Application Highly Available 16-8
16.2 Set Up Privacy Statement 16-8
16.3 Configure Oracle User Productivity Kit In-Application Support 16-8
16.3.1 Register Oracle UPK as an Enterprise Application 16-9
16.3.2 Deploy the Oracle UPK Player Package 16-10
16.4 Review and Configure Diagnostic Logging Settings and Diagnostic Testing
Features 16-10
16.4.1 Configure Settings for Log Files During Normal Operation 16-10
16.4.1.1 Manage Rotating Log File Space Usage for PL/SQL Applications 16-10
16.4.1.2 Manage Log File Space Usage for C Applications 16-12
16.4.2 Understand Oracle Fusion Applications Diagnostic Tests and the
Diagnostic Framework 16-13
16.4.2.1 Relationships Between Diagnostic Tests, Incidents, and Log
Messages 16-14
16.4.2.2 Standard Diagnostic Testing Administration Tasks and Tools 16-14
16.4.3 Configure the Diagnostic Testing Framework for Normal Operation 16-15
16.4.3.1 Control Access to Diagnostic Testing Functionality 16-16
16.4.3.2 Navigate to the Diagnostic Dashboard Application 16-17
16.4.4 Health Checking and Diagnostic Tasks 16-19
16.4.5 Configuration Tasks 16-19
16.5 Configure Oracle HTTP Server with Custom Certificates 16-20
16.5.1 Option 1 16-20
16.5.2 Option 2 16-21
16.6 Set Up Backup for Oracle Fusion Applications 16-22
16.7 Set up Oracle Enterprise Manager Cloud Control to Monitor and Manage
Oracle Fusion Applications 16-22
16.8 Complete Conditional Oracle Identity Management Post-Installation Tasks 16-22
16.8.1 Post-Provisioning Steps for Oracle Access Manager 16-22
16.8.1.1 Update Existing WebGate Agents 16-23
xvi

16.8.1.2 Update WebGate Configuration 16-23
16.8.2 Configure Oracle Identity Federation 16-23
16.8.2.1 Start Oracle Identity Federation Managed Servers 16-24
16.8.2.2 Validate Oracle Identity Federation 16-24
16.8.2.3 Configure the Enterprise Manager Agents 16-25
16.8.2.4 Enable and Disable Oracle Identity Federation 16-25
16.8.3 Configure Identity Integration with Active Directory 16-27
16.8.3.1 Create Adapters in Oracle Virtual Directory 16-27
16.8.3.2 Prepare Active Directory 16-30
16.8.3.3 Modify Oracle Identity Manager to Support Active Directory 16-34
16.8.3.4 Update the Username Generation Policy for Active Directory 16-34
16.8.4 Set up LDAP Split Profile and Enable Active Directory Users in Oracle
Fusion Applications 16-35
16.8.4.1 Create Adapters in Oracle Virtual Directory for consolidating
Active Directory and Oracle Internet Directory 16-36
16.8.4.2 Configure the Storable Attributes 16-43
16.8.4.3 Configure Oracle Access Manager and Oracle Identity Manager
for Split Profile 16-43
16.8.5 Set Up Oracle Identity Management Node Manager for SSL 16-47
16.8.5.1 Overview of the Node Manager 16-47
16.8.5.2 Configure Node Manager to Use SSL 16-48
16.8.5.3 Update Domain to Access Node Manager Using SSL 16-48
16.8.5.4 Update Start and Stop Scripts to Use SSL 16-48
16.8.5.5 Enable Host Name Verification Certificates for Node Manager 16-49
16.8.5.6 Update boot.properties Files 16-54
16.8.5.7 Start Node Manager 16-54
16.9 Install and Configure Oracle Business Intelligence Applications 16-55
16.10 Configure Oracle Transactional Business Intelligence 16-55
16.11 Set Up Report Delivery Servers 16-55
16.11.1 Navigate to the Oracle BI Publisher Administration Page 16-55
16.11.2 Configure Report Delivery Servers 16-56
16.12 Configure Oracle Data Integrator Studio 16-57
16.13 Set Up the Oracle Business Intelligence Administration Tool 16-58
16.14 Perform Optional Language Installations 16-58
16.14.1 Pre-Installation Steps - Before Down Time 16-58
16.14.1.1 Before Beginning 16-59
16.14.1.2 Confirm the Oracle Fusion Applications Installation is Complete 16-59
16.14.1.3 Maintain Versions of Customized BI Publisher Reports 16-59
16.14.1.4 Run Health Checker for Pre-Down Time Checks 16-59
16.14.2 Pre-Installation Steps - During Down Time 16-60
16.14.2.1 Run Health Checker for General System Health Checks 16-60
16.14.2.2 Back Up Oracle Fusion Applications 16-61
xvii

16.14.2.3 Apply Mandatory Prerequisite Patches 16-61
16.14.3 Install a Language 16-61
16.14.3.1 Run Language Pack Installer in Silent Mode 16-61
16.14.3.2 Run Language Pack Installer in GUI Mode 16-64
16.14.4 Complete the Post-Installation Tasks 16-70
16.14.4.1 Confirm Database Artifact Deployments Were Successful 16-70
16.14.4.2 Review Log Files for Errors or Exceptions 16-71
16.14.4.3 Run Health Checker for Post Installation Checks 16-71
16.14.4.4 Bounce All Servers and Verify the Status of Deployed
Applications 16-71
16.14.4.5 Reload Custom Templates for BI Publisher Reports 16-72
16.14.4.6 Perform Steps in NLS Release Notes 16-72
16.14.5 Troubleshoot Language Pack Installer Sessions 16-72
16.14.5.1 Log Directories for Language Pack Installer Tasks 16-72
16.14.5.2 Troubleshoot Failures During the Installation Phase 16-73
16.14.5.3 Language Pack Installer Configuration Assistants 16-73
16.14.5.4 General Troubleshooting During the Configuration Phase in
Silent Mode 16-75
16.14.5.5 General Troubleshooting During the Configuration Phase in
GUI Mode 16-75
16.14.5.6 Recover From a Language Pack Installer Session That Was
Shut Down 16-78
16.14.5.7 Troubleshoot Applying Middleware Patches 16-78
16.14.5.8 Troubleshoot Loading Database Components 16-78
16.14.5.9 Troubleshoot Deployment of Applications Policies 16-79
16.14.5.10 Troubleshoot Deployment of BI Publisher Artifacts 16-79
16.14.5.11 Resolve JAZN Conflicts Found by Health Checker 16-79
16.14.5.12 Installer Requirement Checks Fail 16-79
16.14.5.13 Language Pack Installer Fails Due To Thread Calls 16-79
16.15 Set Up Segregation of Duties 16-80
16.15.1 Set Up SOD 16-80
16.15.2 Turn Off SOD Checks 16-82
16.15.3 Modify the Segregation of Duties Routing Policies for Approving Role
Provisioning: Procedures 16-82
16.15.4 Modify Rules Using Oracle SOA Composer 16-82
16.15.5 Modify Rules Using JDeveloper 16-83
16.15.6 Troubleshoot Segregation of Duties for Role Provisioning: Procedures 16-84
16.15.7 Failure of Role Assignment Request 16-84
16.15.8 Task Details Missing 16-85
16.15.9 Configure Oracle Data Integrator Studio for External Authentication:
Explained 16-85
16.15.10 Prerequisites 16-86
16.15.11 Configuration for ESS 16-86
xviii

16.16 Configure Presence Servers 16-86
16.16.1 createExtAppConnection 16-87
16.16.2 addExtAppField 16-87
16.16.3 createIMPConnection 16-87
16.17 Configure Audit Trails for Oracle Fusion Middleware 16-88
16.18 Install Print Servers 16-90
16.18.1 External Applications 16-90
16.19 Configure Oracle HTTP Server for Privileged Port (UNIX Only with No Load
Balancer) 16-91
16.20 Use Default Oracle Database Vault Schemas 16-91
16.21 Next Steps 16-91
17
Complete Conditional Common High Availability Post-Installation
Tasks for Oracle Identity Management
17.1 Introduction to Completing Conditional Common High Availability Post-
Installation Tasks for Oracle Identity Management 17-1
17.2 Scale Identity Management 17-1
17.2.1 Scale Up the Topology 17-2
17.2.2 Scale Out the Topology 17-2
17.2.3 Scale Out the Database 17-2
17.2.4 Scale the Directory Tier 17-4
17.2.4.1 Scale Oracle Internet Directory 17-4
17.2.4.2 Scale Oracle Virtual Directory 17-12
17.2.5 Scale the Application Tier 17-21
17.2.5.1 Mount Middleware Home and Create a New Machine when
Scaling Out 17-21
17.2.5.2 Create a New Node Manager when Scaling Out 17-22
17.2.5.3 Scale ODSM 17-23
17.2.5.4 Scale Oracle Access Manager 11g 17-25
17.2.5.5 Scale Oracle Identity Manager 17-29
17.2.5.6 Scale Oracle Identity Federation 17-36
17.2.5.7 Run Pack/Unpack 17-40
17.2.5.8 Add New WebLogic Managed Server to Oracle HTTP Server
Configuration Files 17-40
17.2.6 Scale the Web Tier 17-41
17.2.6.1 Assemble Information for Scaling the Web Tier 17-41
17.2.6.2 Mount Middleware Home and Copy Oracle HTTP Server Files
when Scaling Out 17-42
17.2.6.3 Run the Configuration Wizard to Configure the HTTP Server 17-42
17.2.6.4 Register Oracle HTTP Server with WebLogic Server 17-43
17.2.6.5 Reconfigure the Load Balancer 17-44
xix

17.2.7 Post-Scaling Steps for All Components 17-44
17.3 Set Up Server Migration for Identity Management 17-44
17.3.1 Overview of Server Migration for an Enterprise Deployment 17-44
17.3.2 Set Up a User and Tablespace for the Server Migration Leasing Table 17-45
17.3.3 Create a Multi Data Source Using the Oracle WebLogic Administration
Console 17-45
17.3.4 Edit Node Manager's Properties File 17-47
17.3.5 Set Environment and Superuser Privileges for the wlsifconfig.sh Script 17-48
17.3.6 Configure Server Migration Targets 17-49
17.3.7 Test the Server Migration 17-49
17.3.8 Back Up the Server Migration Configuration 17-51
17.4 Set Up Fail Over for the Administration Server 17-51
17.4.1 Fail Over the Administration Server to IDMHOST2 17-51
17.4.2 Start the Administration Server on IDMHOST2 17-53
17.4.3 Validate Access to IDMHOST2 Through Oracle HTTP Server 17-53
17.4.4 Fail the Administration Server Back to IDMHOST1 17-54
17.5 Next Steps 17-55
18
Complete Conditional Common High Availability Post-Installation
Tasks for Oracle Fusion Applications
18.1 Introduction to Completing Conditional Common High Availability Post-
Installation Tasks for Oracle Fusion Applications 18-1
18.2 Scale Oracle Fusion Applications 18-1
18.2.1 Scale Out Oracle HTTP Server 18-1
18.2.1.1 Prerequisites for Performing the Scale Out 18-2
18.2.1.2 Install the Oracle Web Tier 18-2
18.2.1.3 Install Oracle Web Tier Patches 18-3
18.2.1.4 Configure Oracle Web Tier 18-3
18.2.1.5 Install WebGate 18-5
18.2.1.6 Install WebGate Patches 18-6
18.2.1.7 Configure WebGate 18-6
18.2.1.8 Validate Oracle HTTP Server on WEBHOST2 18-7
18.2.2 Scale Out Node Manager 18-8
18.2.2.1 Prerequisites for Setting Up Node Manager 18-9
18.2.2.2 Set Up Node Manager for SCALED_OUT_HOST 18-9
18.2.2.3 Create the Identity Keystore on SCALED_OUT_HOST 18-10
18.2.3 Perform Scale-Out Tasks Common to All Domains 18-12
18.2.3.1 Start SCALED_OUT_HOST Node Manager in SSL Mode 18-12
18.2.3.2 Add a New Machine In the Oracle WebLogic Server Console 18-12
18.2.3.3 Pack and Unpack the Managed Server Domain Home to
SCALED_OUT_HOST 18-13
xx

18.2.3.4 Clone Managed Servers and Assign Them to
SCALED_OUT_HOST 18-14
18.2.3.5 Configure Oracle HTTP Server 18-16
18.2.3.6 Configure Server Migration for the Managed Servers 18-17
18.2.3.7 Validate the System 18-18
18.2.4 Perform Scale-Out Tasks Specific to the Oracle Fusion Customer
Relationship Management Domain 18-19
18.2.4.1 Configure Data Quality for Scale Out 18-19
18.2.5 Perform Scale-Out Tasks Specific to the Common Domain 18-24
18.2.5.1 Clone Managed Servers and Assign Them to
SCALED_OUT_HOST 18-25
18.2.5.2 Remove Oracle Coherence Start-up Properties from the
wlcs_server1 Server 18-25
18.2.5.3 Configure Shared Content Folders for the UCM_server1 Server 18-26
18.2.5.4 Add a sip Data-Tier Channel to the wlcs_sipstate2 Server 18-27
18.2.5.5 Unpack the UCM_server2 Server 18-27
18.2.5.6 Configure Oracle WebCenter 18-27
18.2.5.7 Scale Out Oracle WebCenter Content Inbound Refinery Server 18-32
18.2.5.8 Add UCM_server1 and UCM_server2 to the Connection Pool 18-33
18.2.6 Configure Oracle Coherence for the odi_server Managed Server 18-34
18.2.7 Scale Out the Oracle Business Intelligence Domain 18-35
18.2.7.1 Overview of the Oracle Business Intelligence Domain 18-35
18.2.7.2 Prerequisites for Scaling the Oracle Business Intelligence
Domain 18-36
18.2.7.3 Start the Default Node Manager 18-37
18.2.7.4 Prerequisites for Scaling Oracle Business Intelligence on
BIHOST2 18-37
18.2.7.5 Scale Oracle Business Intelligence Components 18-40
18.2.7.6 Configure and Validate Oracle Essbase Clustering 18-60
18.2.7.7 Validate the System 18-61
18.2.8 Scale Up: Add Managed Servers to Existing Hosts 18-62
18.2.8.1 Scale Up Oracle Fusion Applications Managed Servers to an
Existing Host 18-62
18.2.8.2 Scale Up Oracle SOA Suite Server to an Existing Host 18-65
18.2.8.3 Scale Up Oracle Business Intelligence to an Existing Host 18-68
18.2.9 Procedures for Scaling Out Oracle SOA Suite Server 18-69
18.2.9.1 Scale Out the Oracle SOA Suite Server 18-69
18.2.9.2 Enable Virtual IPs on PROVISIONED_HOST and
SCALED_OUT_HOST 18-74
18.2.9.3 Set the Listen Address for soa_servern 18-75
18.2.9.4 Update the FusionVirtualHost Configuration File 18-75
18.2.9.5 Switch Oracle User Messaging Service to Use Oracle Advanced
Queuing 18-76
xxi

18.2.9.6 Configure JMS Servers with JDBC Store Persistence 18-76
18.2.9.7 Configure Oracle Coherence for Deploying Composites 18-78
18.2.9.8 Configure a JDBC Transaction Log Store for Transaction
Recovery 18-80
18.2.9.9 Disable Host Name Verification for the soa_servern Managed
Servers 18-81
18.2.9.10 Restart Node Manager on PROVISIONED_HOST 18-82
18.2.9.11 Start and Validate soa_server1 on PROVISIONED_HOST 18-82
18.2.9.12 Restart Node Manager on SCALED_OUT_HOST 18-82
18.2.9.13 Start and Validate soa_servern on SCALED_OUT_HOST 18-83
18.2.10 Configure Administration Server High Availability 18-83
18.2.10.1 Enable an Administrative Virtual Host on
PROVISIONED_HOST 18-84
18.2.10.2 Add a New Machine in the Oracle WebLogic Server Console 18-85
18.2.10.3 Enable an Administration Server to Listen on the Virtual IP
Address 18-86
18.2.10.4 Configure Oracle HTTP Server 18-86
18.2.10.5 Validate the Administration Server 18-87
18.2.10.6 Manual Fail Over the Administration Server to
SCALED_OUT_HOST 18-89
18.2.10.7 Fail the Administration Server Back to PROVISIONED_HOST 18-90
18.3 Set Up Server Migration for Oracle Fusion Applications 18-91
18.3.1 Prerequisites for Setting Up Server Migration 18-91
18.3.2 Migrate Oracle Fusion Applications 18-91
18.3.3 About Server Migration Configuration 18-92
18.3.4 Set Up a User and Tablespace for the Server Migration Leasing Table 18-92
18.3.5 Create a Multi-Data Source Using the Oracle WebLogic Server
Administration Console 18-93
18.3.6 Edit Node Manager's Properties File 18-95
18.3.7 Set Environment and Superuser Privileges for the wlsifconfig.sh Script
(for UNIX Only) 18-96
18.3.8 Configure Server Migration Targets 18-96
18.3.9 Test the Server Migration 18-97
18.4 Next Steps 18-98
19
Complete Oracle Fusion Customer Relationship Management Post-
Installation Tasks
19.1 Install and Configure the Bounce Handling Daemon 19-1
19.2 Set Up SMS Marketing 19-2
19.3 Set Up Implicit Personalization Behavior 19-3
19.3.1 Post-Deployment Activities 19-3
xxii

19.4 Next Steps 19-5
20
Complete Oracle Fusion Financials Post-Installation Tasks
20.1 Set Up the Financial Reporting Center 20-1
20.1.1 Components 20-2
20.1.2 Set Up the Financial Reporting Center: Critical Choices 20-2
20.1.3 Configure Financial Reporting Center 20-3
20.1.4 Install and Configure Financial Reporting Studio 20-3
20.1.5 Install Smart View 20-4
20.1.6 Configure Workspace Database Connections 20-5
20.1.7 Configure Oracle Fusion Transactional BI Dimensions 20-6
20.2 Set Up Oracle Document Capture and Oracle Forms Recognition 20-6
20.2.1 Configure the Oracle Webcenter: Imaging and Process Management
Input Directory Network Share 20-7
20.2.1.1 Verify the Oracle Webcenter: Imaging Input Directory Path 20-7
20.2.1.2 Configure the Network Share for the Oracle Webcenter: Imaging
Input Directory 20-7
20.2.1.3 Verify Oracle Webcenter: Imaging Input Agent 20-8
20.2.1.4 Configure the Windows Mapped Network Drive for the Input
Directory 20-8
20.2.2 Configure the Oracle Forms Recognition Project Network Share 20-9
20.2.2.1 Configure the Network Share for the Oracle Forms Recognition
AP Project Folder 20-9
20.2.2.2 Configure the Windows Mapped Network Drive for the AP
Project Folder 20-9
20.2.3 Install and Configure Oracle Document Capture and Oracle Forms
Recognition on Windows 20-10
20.2.3.1 Prerequisites 20-10
20.2.3.2 Run the Setup Utility 20-11
20.2.3.3 Install Oracle Document Capture 20-11
20.2.3.4 Configure Oracle Document Capture 20-12
20.2.3.5 Configure Oracle Document Capture Import Server for Importing
Images from E-Mail 20-14
20.2.3.6 Install Oracle Forms Recognition for Payables 20-16
20.2.3.7 Configure Oracle Forms Recognition for Payables 20-16
20.2.3.8 Configure Shared Drive Access for Oracle Forms Recognition
Runtime Service Manager 20-18
20.3 Oracle Fusion Advanced Collections Dunning 20-18
20.3.1 Add the E-Mail Server 20-18
20.4 Enable Encryption of Sensitive Payment Information 20-19
20.5 Configure a Communication Channel to a Payment System 20-19
20.5.1 Proxy Server 20-19
xxiii

20.5.2 Secure Sockets Layer Protocol 20-20
20.5.3 Unsecure Protocols 20-20
20.6 Configure Oracle B2B Inbound Flow to Receive Supplier Invoices in XML 20-20
20.6.1 Configure the Host Company 20-21
20.6.2 Configure the Supplier 20-23
20.7 Set Up Oracle B2B to Send Receivables Transactions in XML 20-24
20.7.1 Configure Trading Partners 20-24
20.7.2 Configure Agreements 20-25
20.8 Next Steps 20-26
21
Complete Oracle Fusion Applications Accounting Hub Post-
Installation Tasks
21.1 Set Up the Financial Reporting Center 21-1
21.2 Integrate with Other Products 21-1
21.2.1 Integrate with Oracle E-Business Suite and Oracle PeopleSoft:
Overview 21-1
21.2.1.1 Register Applications Coexistence Instances 21-2
21.2.2 How to Integrate with Data Relationship Management: Overview 21-3
21.2.3 How to Integrate with Hyperion Planning: Overview 21-3
21.3 Next Steps 21-3
22
Complete Oracle Fusion Human Capital Management Post-
Installation Tasks
22.1 Set Up Oracle Fusion Human Capital Management Coexistence 22-1
22.1.1 Prerequisites 22-2
22.1.2 Ensure Correct Token Replacement During Oracle Enterprise
Scheduler Service Deployment 22-2
22.1.3 Set Up an FTP Server 22-2
22.1.4 Set Up FTP Accounts 22-2
22.1.5 Set Up SOA FTP Adapter 22-3
22.1.6 Set Up Oracle Data Integrator 22-4
22.1.6.1 Prerequisites 22-4
22.1.6.2 Set Up Oracle Data Integrator for Oracle Fusion Human Capital
Management Coexistence 22-4
22.1.7 Create Oracle Data Integrator Directories 22-4
22.1.8 Validate the Topology Settings 22-5
22.1.9 Verify the Configuration of the Work Repository 22-5
22.1.10 Verify Database Connections 22-5
22.1.11 Configure File Technology Connections 22-6
22.1.12 Enable SQL*Loader for Oracle Data Integrator 22-6
xxiv

22.1.13 Configure the Oracle Web Services Manager for Interaction with the
Source Application Web Services 22-7
22.1.14 Set up the HCM Configuration for Coexistence Parameters 22-7
22.2 Recommended Memory Requirement for Oracle Fusion Human Capital
Management Workforce Reputation Management Product 22-8
22.3 Create and Update an ISAM Vertex Database 22-9
22.3.1 Create and Update an ISAM Database for Microsoft Windows 22-9
22.3.2 Create and Update an ISAM Database for UNIX 22-10
22.4 Next Steps 22-10
23
Complete Oracle Fusion Incentive Compensation Post-Installation
Tasks
23.1 Integrate Oracle Fusion Incentive Compensation with Geo Map Server 23-1
23.2 Next Steps 23-2
24
Complete Oracle Fusion Project Portfolio Management Post-
Installation Tasks
24.1 View Summarized Revenue and Invoice Amounts After Data Migration 24-1
24.2 Next Steps 24-1
25
Complete Oracle Fusion Supply Chain Management Post-
Installation Tasks
25.1 Install Oracle Enterprise Data Quality for Product Data Oracle DataLens
Server 25-1
25.1.1 Establish a Connection 25-1
25.2 Next Steps 25-2
26
Next Steps
26.1 Manage User Passwords for Login Access to Applications Components 26-1
26.2 Complete Common User Setup Tasks 26-1
26.3 Enable Product Offering Functionality 26-1
26.4 Troubleshoot Tips for Runtime Issues 26-1
26.4.1 OutOfMemory Error Due to PermGen Space (Solaris) 26-2
26.5 (Optional) Install Oracle Enterprise Manager Cloud Control 26-3
xxv

27
Extend an Oracle Fusion Applications Environment Using
Incremental Provisioning During Upgrade
27.1 Introduction to Extending an Oracle Fusion Applications Environment Using
Incremental Provisioning During Upgrade 27-3
27.2 Create an Extended Provisioning Response File 27-3
27.2.1 Before Starting the Provisioning Wizard 27-4
27.2.2 Start the Provisioning Wizard 27-4
27.2.3 Wizard Screens and Instructions 27-5
27.3 Perform Incremental Provisioning 27-10
27.4 Troubleshoot Incremental Provisioning 27-11
27.4.1 Troubleshoot Response File Creation Errors 27-11
27.4.2 Troubleshoot Preverify Phase Errors 27-12
27.4.3 Troubleshoot Install Phase Errors 27-12
27.4.3.1 Install Phase Errors Caused by Configuration Changes Done by
Other Privileged Users 27-12
27.5 Next Steps 27-13
28
Uninstall an Oracle Fusion Applications Environment
28.1 Introduction to Uninstall an Oracle Fusion Applications Environment 28-1
28.2 Prerequisites to Uninstall an Oracle Fusion Applications Environment 28-2
28.3 Uninstall Oracle Fusion Applications Using the Provisioning Wizard 28-2
28.3.1 Start the Provisioning Wizard 28-2
28.3.2 Wizard Interview Screens and Instructions 28-3
28.4 Uninstall Oracle Fusion Applications From the Command Line 28-5
28.5 Clean Up After Uninstalling Oracle Fusion Applications 28-5
28.6 Uninstall Oracle Identity Management 28-6
28.7 Delete the Database 28-6
28.8 Uninstall the Oracle Identity Management Provisioning Framework 28-6
28.9 Uninstall the Oracle Fusion Applications Provisioning Framework 28-7
28.9.1 Run the Provisioning Framework Deinstaller 28-8
28.9.2 Deinstaller Screens and Instructions 28-8
Glossary
xxvi

Preface
The Oracle Fusion Applications Installation Guide provides information about setting
up Oracle Fusion Applications Provisioning and using it to install and provision a new
Oracle Fusion Applications environment. It includes specific instructions for installing
prerequisite components; installing, configuring, and deploying applications product
offerings; and deinstalling an environment.
If Oracle VM environments are used, see the Oracle Fusion Applications Installing
and Managing in an Oracle VM Environment Installation Guide guide. This guide
describes how to install, configure, and manage instances of Oracle VM environments
created from the Oracle VM templates for Oracle Fusion Applications. This document
is applicable for the environments created from the official releases of Oracle VM
templates for Oracle Fusion Applications Release 12 (11.12.x.0.0) and higher. The
content is not applicable for any Oracle VM environments that are created using other
methods.
In this user guide, the nomenclature “11.12.x.0.0”, where “x” is a number, is used to
indicate the release and patch releases for which the guide is applicable. When using
this document, be sure to replace “x” with the number of the release that is being used.
Audience
This document is intended for users who are provisioning an Oracle Fusion
Applications environment and installing product offerings for the first time and who
are comfortable with system administration tasks such as installing Oracle Identity
Management, setting up and configuring Oracle Database 12c (12.1.0.2), and applying
patches on the computer where the product offerings are installed. Users installing on
a UNIX system need
root
access to run some of the scripts.
Documentation Accessibility
For information about Oracle's commitment to accessibility, visit the Oracle
Accessibility Program website at
http://www.oracle.com/pls/topic/lookup?
ctx=acc&id=docacc
.
Access to Oracle Support
Oracle customers have access to electronic support through My Oracle Support.
For information, visit
http://www.oracle.com/pls/topic/lookup?ctx=acc&id=info
or
visit
http://www.oracle.com/pls/topic/lookup?ctx=acc&id=trs
if you are hearing
impaired.
Related Documents
For more information, see the following documents:
xxvii

• Oracle Fusion Applications Administrator's Guide
• Oracle Fusion Applications Patching Guide
• Oracle Fusion Applications Upgrade Guide
• Oracle Fusion Applications Installing and Managing in an Oracle VM Environment
Installation Guide
• Oracle Fusion Applications Installation Workbook
• Oracle Business Intelligence Applications Installation Guide
• Oracle Database Installation Guide for a specific platform
• Oracle Fusion Applications Common Implementation Guide
Conventions
The following text conventions are used in this document:
Convention Meaning
boldface
Boldface type indicates graphical user interface elements associated
with an action, or terms defined in text or the glossary.
italic Italic type indicates book titles, emphasis, or placeholder variables for
which you supply particular values.
monospace
Monospace type indicates commands within a paragraph, URLs, code
in examples, text that appears on the screen, or text that you enter.
Preface
xxviii

News
This section introduces the new and changed installation features of Oracle Fusion
Applications that are described in this guide, and provides pointers to additional
information.
New and Changed Features for Release 12 (11.12.x.0.0)
Oracle Fusion Applications Release 12 (11.12.x.0.0) includes the following new and
changed features for this document.
• The nomenclature “11.12.x.0.0”, where “x” is a number, is used to indicate the
release and patch releases for which the guide is applicable.
• Added HED related schemas and also FUSION_OPSS schema to section
Schema and Password Requirements (page 4-25).
• Removed information about AIX platform as this operating system is not
supported.
• Updated recommended initialization parameters for Oracle Database. See
Minimum Configuration Parameteres for Oracle Database (page 8-4).
• Removed note about running the Fusion Applications provisioning wizard in
Windows platforms as it is not supported.
• Updated values for the Database Configuration screen in the Fusion Applications
provisioning wizard. See Wizard Screens and Instructions (page 12-5).
• Updated values for the Identity Management Configuration screen in the
Fusion Applications provisioning wizard. See Identity Management Configuration
(page 12-26).
• Updated values for the Access and Policy Management Configuration screen in
the Fusion Applications provisioning wizards. See Access and Policy Management
Configuration (page 12-28).
xxix

1
Overview
This section introduces Oracle Fusion Applications Provisioning and discusses how
its interrelated components orchestrate the installation, configuration, and deployment
of Oracle Fusion Applications database, product offerings and their middleware
dependencies.
It includes the following topics:
• Introduction to Installing Oracle Fusion Applications (page 1-1)
• Roles and Responsibilities (page 1-2)
• Prerequisites and Dependencies (page 1-8)
• Features of Provisioning (page 1-10)
• Provision a Multiple Host Installation (page 1-14)
• Plan for Provisioning (page 1-15)
• What to Do Next (page 1-16)
1.1 Introduction to Installing Oracle Fusion Applications
Provisioning is the entire set of operations required to install, configure, and deploy
applications product offerings from a system point of view. It performs these
operations:
• Installation provides the operations related to laying down all the component
needed to create an Oracle Fusion Applications environment
• Configuration tailors components based on the applications topology, the creation
of Oracle WebLogic Server Managed Servers and clusters, and the updating of
endpoints and virtual hosts
• Deployment starts the Managed Servers and clusters and facilitates the actual use
of product offerings
This orchestration by a single processing engine ensures that all components interact
smoothly and consistently in the applications environment.
The main tasks to be completed when provisioning an Oracle Fusion Applications
environment are:
• Planning: The first step to provisioning an Oracle Fusion Applications
environment is planning the environment, specifically its topology, including
the number and configuration of hardware units; and its components,
including: storage, network, database, Oracle Identity Management, and security
configuration. For more information about planning an environment, see Plan the
Topology and Provisioning of the Installation (page 3-1).
• Preparing: Prior to provisioning an Oracle Fusion Applications environment,
hardware and networking components must be prepared and configured, shared
disk storage must be set up. The relevant software dependencies must be
1-1

installed. For more information about preparing components for an installation,
see Prepare for an Installation (page 5-1).
• Installing Databases: The next step is installing the databases for Oracle
Fusion Applications, including the Oracle Identity Management and Oracle Fusion
Applications transaction databases. Repository creation utilities are provided
to help create the repositories required for an Oracle Fusion Applications
environment. For more information about installing the databases for Oracle
Fusion Applications, see Install Databases for Oracle Identity Management
(page 7-1) and Install Oracle Fusion Applications Transaction Database
(page 8-1).
• Provisioning: After the environment has been planned, prepared, and the
relevant databases installed, it is time to provision the Oracle Identity Management
and Oracle Fusion Applications environments. The provisioning process installs
and configures Oracle Identity Management and Oracle Fusion Applications
and all their related components, such as the product offerings to be installed
and the applications used to manage, monitor, and troubleshoot an Oracle
Fusion Applications environment. Provisioning frameworks are installed to help
accomplish this task. For more information about the provisioning procedure, see
Oracle Identity Management Provisioning (page 10-1) and Create a Response File
for a New Oracle Fusion Applications Environment (page 12-1).
• Completing Post-Install Tasks: Having provisioned a working Oracle Fusion
Applications environment, the next step is completing a set of post-installation
tasks. These tasks include a number of required and optional steps, and
specific steps required for particular product offerings. For more information
about the post-installation tasks, see Complete Mandatory Post-Installation Tasks
(page 15-1).
The process of provisioning is undertaken by a team composed of various specialists
and technicians, each taking on different roles and responsibilities, as discussed in
greater detail in Roles and Responsibilities (page 1-2). All told, a typical installation
and provisioning process can take about five to fourteen days, not counting post-
installation tasks.
1.2 Roles and Responsibilities
There are a number of roles and responsibilities to be undertaken in the context of
provisioning Oracle Fusion Applications. These include the following:
• Business sponsor
• Project manager
• IT director
• Architect
• System administrator
• Network engineer
• Database administrator
• Oracle Identity Management and security specialist
• Oracle Fusion Applications technical lead or system administrator
• Oracle Fusion Applications functional lead
• Oracle Fusion Applications developer
Chapter 1
Roles and Responsibilities
1-2

• Oracle Business Intelligence and DW reporting specialist
• Support technician
• Oracle Fusion Applications system integrator
Some of these roles may overlap, and the same individual may fulfill more than one
role. For example, many Oracle Fusion Applications technical leads are also database
administrators, and an IT director may also act as the project manager for the duration
of an Oracle Fusion Applications deployment. Similarly, Oracle Fusion Applications
technical leads may inherit support technician duties after most of the deployment
tasks have been completed.
On the other hand, it is common to have a number of people on call to fulfill a
particular role. For example, it is typical to have a pool of system or database
administrators on call at all times during the course of a deployment, as it is
critical for back-end systems to be available and responsive so as to complete
technical setup and configuration. For training purposes, several individuals may
share principal Oracle Fusion Applications technical or functional Lead responsibilities
among themselves.
The mapping of deployment tasks and responsibilities to organizational roles may vary
across different types of enterprises depending on corporate culture and organizational
structure.
1.2.1 Business Sponsor
The business sponsor is responsible for the Oracle Fusion Applications deployment,
and determines the business needs to be met by the deployment. As a business
sponsor, work with Oracle to determine licensing, sizing, functional requirements, and
selecting Oracle Fusion Applications components. Work also with systems integrators
who assist with deployment and functional setup.
In the context of the organization, determine the budget, scheduling, resource
allocation, and staffing for the deployment and ongoing support after rolling out the
system.
The primary tasks of a business sponsor are as follows:
• Communicating requirements, licensing, sizing
• Budgeting
• High level scheduling
• Managing system interfaces (functional)
• Staffing and project management
• Filling out the Oracle Fusion Applications Offerings table in the Provisioning tab in
the Oracle Fusion Applications Installation Workbook .
1.2.2 Project Manager
The project manager is responsible for the day-to-day management of the deployment
on several levels. This mainly involves reconciling the aggressive schedules set by
business sponsors with the realities of staffing resources.
The main tasks include creating and managing the detailed project schedule, breaking
down sets of tasks, and assigning them to team members acting in specialized
Chapter 1
Roles and Responsibilities
1-3

functional roles. Daily project management requires to monitor successful task
completion against milestone targets identified in the project schedule. The project
manager may need to re-allocate resources to keep the deployment project on
schedule. The project manager may also need to adjust the project schedule on
occasion due to unexpected events or changes in staffing resources.
The primary tasks of a project manager are:
• Coordinating among staff performing technical and functional roles
• Building the project time line and task list
• Monitoring completed tasks against the project time line
• Project status reporting
• Managing the completion of the Oracle Fusion Applications Installation Workbook
1.2.3 IT Director
The IT director oversees and prioritizes all past, present, and future IT projects.
The IT director works closely with business sponsors to assess organizational needs
and the importance of the Oracle Fusion Applications deployment relative to other
ongoing projects. The IT director also coordinates resource allocations and staffing
requirements with the project manager.
The primary tasks of an IT director are:
• Managing the following:
– Staffing and resource allocations
– Budgeting
– System interfaces
• Managing licensing and sizing
• Project management
• Making topology decisions
• Coordinating the completion of the Oracle Fusion Applications Installation
Workbook
1.2.4 Architect
The job of the enterprise architect straddles the middle ground between fulfillment
of business requirements and technical implementation. The enterprise architect is
responsible for making most of the key technical decisions after consulting with IT
specialists in the system administration, networking, security, and database roles.
Along with the system administrator, the enterprise architect ensures the technical
correctness and completeness of the system in its entirety, including the base Oracle
Fusion Applications installation and all extensions, customizations, and integrations
with other external systems.
The primary tasks of an enterprise architect are:
• Making topology decisions
• Managing system interfaces
Chapter 1
Roles and Responsibilities
1-4

• Delineating security requirements
• Filling out the following tabs in the Oracle Fusion Applications Installation
Workbook:
– Environment tab: Environment Info table
– Provisioning tab: Post-Install Tasks table
– Topology tab: All
– Network - Virtual Hosts tab: All
1.2.5 System Administrator
The system administrator is responsible for the critical hardware and operating
system layers of the Oracle Fusion Applications deployment. The system administrator
ensures that all hardware meets with organizational standards and, along with the
architect, that operating systems are configured in accordance with Oracle Fusion
Applications requirements.
The system administrator is also responsible for overall systems testing, and
coordinating all necessary system and subcomponent migrations from testing to QA,
and, finally, production platforms.
The primary tasks of the system administrator are:
• Procuring and setting up hardware
• Installing and configuring operating systems
• Filling out the following tabs in the Oracle Fusion Applications Installation
Workbook:
– Topology tab: All
– Storage tab: All
– Network - Ports tab: All
1.2.6 Network Engineer
The network engineer is responsible for the setup and ongoing maintenance and
monitoring of all components that facilitate communication among computers within
the enterprise computing infrastructure. The tasks of a network engineer include the
configuration and setup of machine interfaces such as hosts tables, network cards,
network interfaces, IP address allocations, and network equipment such as switches,
routers, gateways, and load balancers.
The primary tasks of a network engineer are:
• Setting up and configuring machine interfaces and network equipment
• Monitoring and maintaining the network infrastructure
• Filling out the following tabs in the Oracle Fusion Applications Installation
Workbook:
– Environment tab: Email Server table
– Environment tab: Web Proxy table
– Topology tab: Topology table
Chapter 1
Roles and Responsibilities
1-5

– Network - Virtual Hosts tab: All
– Storage tab: All
– Network - Ports tab: All
1.2.7 Database Engineer
The database engineer manages the database layer of the Oracle Fusion Applications
deployment, and fills out the Database tab in the Oracle Fusion Applications
Installation Workbook.
1.2.8 Oracle Identity Management and Security Specialist
A security specialist creates and maintains policies to protect corporate data and
computing resources from a variety of real and potential threats.
In the context of Oracle Identity Management, the tasks of a security specialist include
creating and managing the enterprise computing components that authenticate,
authorize, and account for individual access to computing resources and systems. The
security specialist also controls the corporate LDAP directories and their associated
AAA systems.
Oracle Fusion Applications deployments require creating and configuring identity
and policy stores that may differ from pre-existing Oracle Identity Management
components in the enterprise. As such, the security specialist must coordinate the
effort to install and manage Oracle Identity Management components bearing in mind
the effects the new components may have on existing components in the enterprise.
The primary tasks of a security specialist are:
• Creating and managing authentication and authorization enterprise computing
components
• Creating and configuring identity and policy stores for Oracle Identity
Management, in conjunction with existing Oracle Identity Management
components
• Managing security certificates
• Managing password policies (functional security)
• Managing roles and responsibilities (functional setup)
• Managing system account password maintenance policies
• Setting up the database (Vault, if applicable)
• Filling out the following tabs in the Oracle Fusion Applications Installation
Workbook:
– Provisioning tab: Oracle Identity Management Products table
– Identity Management tab: All
– SSL and Certificates tab: All
– Topology tab: DMZ column in the Topology table
– Environment tab: Web Proxy table
Chapter 1
Roles and Responsibilities
1-6

1.2.9 Oracle Fusion Applications Technical Lead or System
Administrator
The Oracle Fusion Applications technical lead works closely with other IT specialists,
including the database, network, and system administrators as they install and
configure the Oracle Fusion Applications infrastructure. The main responsibility of the
technical lead is the hands-on management of low-level tasks to be completed during
technical setup and validation.
The primary tasks of a technical lead are:
• Managing technical setup and validation tasks during Oracle Fusion Applications
deployment
• Managing system interfaces
1.2.10 Oracle Fusion Applications Functional Lead
The Oracle Fusion Applications functional lead is responsible for the functional setup
of Oracle Fusion Applications following the completion of its technical deployment.
The functional lead works closely with the business sponsor to ensure the system is
configured in accordance with business requirements, and with technical leads and
architects to ensure the successful completion of post-installation tasks.
It is useful to have a background in performing systems integration and specializing in
the Oracle Fusion Applications pillars being installed and configured.
The primary tasks of a functional lead are:
• Managing the functional setup of Oracle Fusion Applications
• Managing system interfaces
• Filling out the following tabs in the Oracle Fusion Applications Installation
Workbook :
– Provisioning tab: Post-Install Tasks table
1.2.11 Oracle Fusion Applications Developer
The Oracle Fusion Applications developer is responsible for extending or customizing
Oracle Fusion Applications pillars to meet specific enterprise business requirements.
Typically, Oracle Fusion Applications are customized and extended after the
provisioning the installation. However, it may be useful to participate in provisioning
so as to establish continuity between the installation and customization.
1.2.12 Oracle Business Intelligence or Data Warehouse Reporting
Specialist
If the organization's particular Oracle Fusion Applications deployment requires
reporting and data warehouse capabilities, a reporting specialist has a primary role
in the technical deployment. The expertise of the reporting specialist is mostly be
required for the functional setup of the project, after reporting requirements have been
determined and implemented.
Chapter 1
Roles and Responsibilities
1-7

The primary tasks of the reporting specialist are:
• Depending on the requirements of the organization, assisting in the technical
deployment and functional setup
• Filling out the following tabs in the Oracle Fusion Applications Installation
Workbook:
– Databases tab: Oracle Fusion Applications Data Warehouse Database
1.2.13 Support Technician
The support technician is responsible to assist end users with any computing
applications in the enterprise. The Oracle Fusion Applications deployment is usually
one of many systems the support technician might cover.
Many organizations have technical and functional areas of specialization within the
support technician role.
1.2.14 Oracle Fusion Applications Systems Integrator
Some organizations choose to hire Oracle Fusion Applications system integrators on
a consulting basis who can fill gaps in technical expertise when necessary. Depending
on the enterprise and the scope and scale of the deployment, an external Oracle
Fusion Applications system integrator might be hired for a short or long period. Ideally,
the systems integration consulting team is able to transfer substantial knowledge to
support staff.
1.3 Prerequisites and Dependencies
The following prerequisites are needed before provisioning an Oracle Fusion
Applications environment:
• Oracle Database
• Oracle Identity Management
• Oracle Business Intelligence
1.3.1 Oracle Database
A transaction database must have been installed and configured before installing
product offerings. The Provisioning Wizard can be used to create an empty, single-
instance database instance. This is a discrete and separate task from the other
provisioning options. Alternatively, the database can be installed manually without
using the wizard.
In either case, finish the database installation by running the Oracle Fusion
Applications Repository Creation Utility (Applications RCU) to load applications and
middleware content into the database. This process creates the applications and
middleware schemas, loads seed data, and creates the tablespaces, as well all other
required packages.
Chapter 1
Prerequisites and Dependencies
1-8

1.3.2 Oracle Business Intelligence
Oracle Business Intelligence is a portfolio of technology and applications
comprising an integrated toolset (for querying, reporting, analysis, alerts, mobile
analytics, data integration and management, and desktop integration), as well as
financial performance management, applications, operational business intelligence
applications, and data warehousing.
Typically, Oracle Business Intelligence products are integrated with, and accessible
from, other operational applications, such as Oracle Fusion Applications. This
integration provides business metrics in the context of an organization's business
function and industry.
The Oracle Business Intelligence products integrated with Oracle Fusion Applications
include:
• Oracle Business Intelligence Enterprise Edition (Oracle BI EE): A suite of business
intelligence tools that delivers a full range of analytic and reporting capabilities.
Oracle Business Intelligence Enterprise Edition is installed and provisioned as
part of the Oracle Fusion Applications installation and provisioning process. The
BI Provisioning step creates a WebLogic domain, the BI Web application (J2EE)
components, and the BI Server and BI Presentation Services, which are deployed
on the computer that hosts the domain. The resulting environment is referred to as
the "Business Intelligence domain" or "BI Domain."
• Oracle Business Intelligence Applications: Uses Oracle Business Analytics
Warehouse, a unified data repository for all customer-centric data that supports
the analytical requirements of Oracle Business Intelligence Applications. Oracle
Business Intelligence Applications supplies the warehouse database schema,
as well as the logic that extracts data from the Oracle Fusion Applications
transactional database and loads it to the warehouse.
The Oracle Fusion Applications installation and provisioning process installs the
Oracle BI Applications software components in the Business Intelligence Oracle
Home but does no further setup. To finish setting up Oracle BI Applications, follow
the instructions in Overview of Functional Configuration in Oracle BI Applications
in the Oracle Business Intelligence Applications Configuration Guide.
• Oracle Transactional Business Intelligence: An ad hoc query and self-service
reporting solution offered to all Oracle Fusion Applications customers. Paired
with Oracle BI EE, it provides business users with an easy-to-use interface
for performing current state analysis of their business applications. Constructed
queries and reports are executed in real time against the transactional schema
supported by a layer of view objects. This product is configured and deployed
during provisioning.
• Oracle Essbase: An online analytical processing (OLAP) server that provides an
environment for deploying prepackaged applications or developing custom analytic
and enterprise performance management applications.
• Oracle Business Intelligence Publisher: An enterprise reporting solution for
authoring, managing, and delivering reports from multiple data sources in multiple
formats via multiple channels.
For more information about reporting, see Managing Report Delivery Servers in
the Oracle Fusion Applications Administrator's Guide.
Chapter 1
Prerequisites and Dependencies
1-9

• Oracle Real-Time Decisions: A platform that combines both rules and predictive
analytics to apply real-time business intelligence at the point of contact. It
optimizes all interactions with the customers by infusing analytical decisions into
each transaction.
For more information Oracle Real-Time Decisions, see About Oracle Real-
Time Decisions Installation in the Oracle Real-Time Decisions Installation and
Administration Guide.
1.3.3 Oracle Identity Management
Oracle Identity Management enables enterprises to manage the end-to-end life cycle
of user identities across all enterprise resources — both within and beyond the firewall.
An installation of Oracle Fusion Applications relies on Oracle Identity Management
components to provide web Single Sign-on capability and to act as the policy,
credential, and identity store. Although the majority of these components fall within
the prerequisite environment, the resource WebGate that acts as the proxy for user
authentication must be provisioned along with the applications.
The Oracle Identity Management components required to be present in an Oracle
Fusion Applications environment are:
• Oracle Access Manager (OAM): Manages authentication and authentication
policies, including Oracle Single Sign-On, security functions, user self-service,
policy management, and delegated administration
• Oracle Internet Directory (OID): A general-purpose directory service that enables
fast retrieval and centralized management of information about dispersed users
and network resources
1.4 Features of Provisioning
Oracle Fusion Applications Provisioning is a full-featured process that provides all
the tool to set up a repository of installers and installation-related processes, present
product configurations that can be installed in an environment, provide a means to
collect configuration details about those offerings, and run the installation phases
necessary to perform configuration and deployment tasks.
1.4.1 Oracle Fusion Applications Provisioning Repository
The Oracle Fusion Applications software provides a repository of installers, each
called silently when needed to perform application-specific tasks during the
provisioning of the new environment. During the creation of the response file, indicate
the location of the repository in the Provisioning Wizard interview.
The provisioning repository must be on a network drive that is visible to all hosts
that are associated with the Oracle Fusion Applications environment. See Create the
Oracle Fusion Applications Provisioning Repository (page 5-25).
1.4.2 Oracle Fusion Applications Provisioning Framework
The provisioning installer (
faprov
) creates the Oracle Fusion Applications Provisioning
framework. It includes the following components:
Chapter 1
Features of Provisioning
1-10

• Provisioning Wizard: A question-and-answer interview that guides through the
process of installing a database, creating or updating a response file, and installing
or deinstalling the components of an Oracle Fusion Applications environment. The
Provisioning Wizard can only be used on the database host to install a single
instance database, or on the primordial host (refer to Types of Hosts in a Multiple-
Host Environment (page 1-14)) for the other provisioning options such as creating
a response file, updating a response file, provisioning an applications environment
and deinstalling an applications environment.
• Provisioning Command-Line Interface (CLI): Used for starting the provisioning
wizard and running installation phases on the primary, secondary, and DMZ hosts
(when present). Use also provisioning CLI on the primordial host for manual
cleanup and restore, and for running provisioning phases as needed.
• Provisioning-related files and utilities: Repository of ANT utilities, binary files,
library files, templates, locations of saved response files and provisioning build
scripts, and other provisioning utilities required for performing provisioning tasks.
Choose a location to install these utilities, for example,
framework_location/
provisioning
.
See Install the Oracle Identity Management and Oracle Fusion Applications
Provisioning Frameworks (page 6-1).
1.4.3 System Requirements
This release of Oracle Fusion Applications relies on supported platforms
documentation for Oracle Fusion Applications (page 1-11) to supply certified versions
of Oracle components. This documentation provides details about hardware and
software, minimum disk space and memory requirements, required system libraries,
packages, or patches, and minimum database requirements. Consult an Oracle
Fusion Applications sizing-certified representative to obtain specific, customized
system hardware requirements.
Please note that the self-signed certificate is set to three years when provisioning is
complete.
1.4.3.1 Download Instructions
To download the Oracle Fusion Applications Release 12 Media Pack, use
the UnZip / 7-Zip utility to extract the Oracle software to a preferred location
(REPOSITORY_LOCATION). UnZip is a freeware tool that is available on the Info-ZIP
website.
1.4.4 Supported Platforms
For information about the supported platforms for Oracle Fusion Applications, see the
latest certification information published at My Oracle Support.
As the Oracle Fusion Applications Release 12 Media Pack is specific for a platform,
Oracle Fusion Applications must be installed on the same platform. This includes the
Oracle Database, Oracle Identity Management, and Oracle Fusion Applications.
1.4.5 Oracle Identity Management Provisioning Wizard
The Oracle Identity Management Provisioning Wizard steps through all Identity
Management provisioning tasks. Using the wizard, create or update a response
Chapter 1
Features of Provisioning
1-11

file, configure the Identity Management environment, install an Identity Management
database, and configure a load balancer.
The wizard allows to accomplish the following tasks.
• Response File Creation. Create a response file before provisioning the Identity
Management environment. Use a pre-existing response file, if one exists, or create
a new one. Response file information includes the name, version, creation date,
and so on.
• Install Location Configuration. Specify the software repository and installation
locations, as well as the shared configuration location.
• Node Topology Configuration. Select Identity Management node configuration
options and provide information about hosts and products.
• Virtual Hosts Configuration. Configure virtual hosts for the Identity Management
servers, as required for Oracle Fusion Applications.
• Common Passwords. Set the common password for all administrative Identity
Management users and keystores.
• Oracle Internet Directory Configuration. Specify the distinguished name of the
Oracle Internet Directory realm.
• Oracle Directory Services Manager Configuration. Select configuration options
for Oracle Directory Services Manager (ODSM).
• Oracle HTTP Server for Identity Management Configuration. Change the
installation ports used for Oracle HTTP Server (OHS).
• Oracle Access Manager Configuration. Use the OAM Configuration Page to
select installation options for Oracle Access Manager.
• Oracle Identity Management Database Configuration Use the IDM DB
Configuration Page to enter information about the Database that contains the
schemas for Oracle Internet Directory and Oracle Access Manager.
• Load Balancer Configuration. Configure the load balancer for multiple host
installations.
1.4.6 Oracle Fusion Applications Provisioning Wizard
The Provisioning Wizard steps through all provisioning-related tasks. Using the wizard,
install a transaction database, create or update a response file, provision a new
environment, and deinstall an applications environment.
• Install an Applications Transaction Database. Install a database to hold
transactional data before creating a response file. Then, enter the database
configuration values set up during the database installation in the response file.
The provisioning process uses those values to connect the database to the
new applications environment. Complete the process by running Oracle Fusion
Applications RCU to create schemas and tablespaces, load seed data, and
perform other database configuration tasks.
• Create a New Applications Environment Response File. A response file
is a provisioning configuration file containing information about credentials,
applications, and middleware hosts; used to install a new environment. Specify
the location of this response file to provision the new environment. The wizard also
allows to update an existing response file.
Chapter 1
Features of Provisioning
1-12

• Update an Existing Response File. Select this option to add or change the
details in a partially completed response file or to update a completed response
file that has not yet been used to provision an applications environment.
• Provision an Oracle Fusion Applications Environment. Select this option
and specify the location of a response file as the first step in initiating the
installation, configuration, and deployment of the product offerings. In a multiple
host environment, the installation runs on each host individually, in phase order,
using a combination of the provisioning wizard and command line interface.
• Deinstall an Oracle Fusion Applications Environment. Selecting this option
removes all components installed to an existing Oracle Fusion Applications
environment using the wizard. Run this process on all hosts. The wizard does
not remove the database and LDAP.
1.4.7 Response File
With the Provisioning Wizard question-and-answer interview tool, specify one or more
provisioning configurations and collect details associated with the product offerings in
those configurations. These responses are the basis for creating a response file. This
response file contains the structural outline of the applications environment topology
that are being implemented. To provision the environment, specify the location of the
response file and initiate the installation process.
The wizard interview questions fall into the following general areas:
• Global and contextual
• Database configuration and application dependency
• Shared middleware services
Global and Contextual Questions
These questions set the context and define the focus of the questions to be asked
later in the interview. The approach is to progressively refine the scope of the
questions, starting with the most generic and narrowing down to a specific path based
on the selected provisioning configurations. For example, the Installation Location
screen captures global information about the location of installation and configuration
directories, and the Database Configuration screen records information about the
transactional database.
Database Configuration and Application Dependency Questions
The interview is tied directly to the provisioning of one or more product configurations.
With the product configuration chosen, the interview guides through the questions
related to the product offerings and their dependencies. Dependencies include
application and middleware products required by Oracle Fusion Applications, as
well as details about the transaction database. For example, the Domain Topology
Configuration screen collects information about the hosts where domains are to be
deployed.
Shared Middleware Questions
At the conclusion of the application interview, move to interview questions about
middleware services that are shared across domains, for example, the Web Tier
Configuration, Load Balancer Configuration, Web Proxy Configuration, Identity
Management Configuration, and IDM Database Configuration screens.
Chapter 1
Features of Provisioning
1-13

1.4.8 Provisioning Configurations
During the creation of a response file, select one or more offerings in any of the
provisioning configurations listed in the wizard interview. During the actual provisioning
process, all application and middleware products (components) associated with the
selections are installed, configured, and deployed. However, only the Managed
Servers for the product offerings that were selected are started.
Later, to start using an offering that was part of the initial provisioning configuration but
has not yet been enabled, navigate to the Oracle Fusion Applications Setup Manager
and start the Managed Servers for that offering.
For example, in the Oracle Fusion Customer Relationship Management configuration,
there are two product offerings: Oracle Sales and Oracle Marketing. If only Oracle
Sales is selected, the Managed Servers for that offering are started when the new
environment is provisioned. To enable Oracle Marketing later, use the Oracle Fusion
Applications Functional Setup Manager. There is no need to run provisioning a second
time.
See Select Product Offerings (page 12-2) for more information about provisioning
configurations.
1.5 Provision a Multiple Host Installation
Oracle Fusion Applications must be provisioned on multiple hosts for a production
deployment and installed from a shared drive that is accessible to all hosts. To
properly install all the necessary components for an applications environment on
multiple hosts, run the physical installation in phases across all hosts.
1.5.1 Types of Hosts in a Multiple-Host Environment
The classification of hosts in a multiple-host environment determines the order in
which the installation is run. The following types of hosts are available.
• Primordial host: Location of the common domain, specifically the administration
server of the common domain. There is one primordial host in each provisioned
environment where the administration server of the common domain will be.
• Primary host: Location of the administration server for a domain. Only one
primary host exists in a domain.
• Secondary host: Location of the managed servers for any application when they
are not on the same host as the administration server of the same domain. This
term is typically used along with primary host to differentiate the physical hosts
when a domain spans across them.
• DMZ host: A host that cannot access the shared storage behind the firewall is
said to be in a demilitarized zone (DMZ). Typically used to install Oracle HTTP
Server so as to enforce restrictions on communication with components behind the
firewall.
For information about Oracle Fusion Applications environments, see Oracle Fusion
Applications Topologies (page 2-13).
Chapter 1
Provision a Multiple Host Installation
1-14

1.5.2 Installation Phases
Installation actions are completed in phases, across all hosts, in a prescribed
phase order. Each phase must be completed on all hosts before running the next
phase. For example, the preverify phase must be completed on hosts A, B, and C
successfully before running the install phase on any other host. Any one phase can
run simultaneously on multiple hosts. For example, run the install phase on hosts A,
B, and C simultaneously. Oracle recommends to start the installation on the primordial
host.
The provisioning installation phases are as follows (listed in phase order). See
Installation Phases and Types of Hosts in a Multiple-Host Environment (page 13-2)
for complete details.
• Preverify: Checks to see that the prerequisites for an installation are met.
• Install: Installs middleware and applications components and applies database
patches shipped with provisioning (for databases created with the wizard).
• Preconfigure: Updates the Oracle Application Development Framework (Oracle
ADF) configuration.
• Configure: Creates domains, Managed Servers, and clusters. Configures data
sources and performs Node Manager registration of servers on the primordial and
primary hosts.
• Configure-secondary: Performs the configuration actions on a primary or
secondary host (or both), registers Managed Servers with the Node Manager
on secondary hosts, and creates a web tier instance. If there are no primary or
secondary hosts, or if there are only primary hosts, this phase runs, but takes no
action.
• Post-Configure: Configures Oracle SOA Suite composite deployment and Oracle
HTTP Server, and populates policies and grants. Configures middleware and
applications that require servers to be online.
• Startup: Starts the Administration Server and Managed Servers on the current
host. Performs online configuration, including global unique identifier (GUID)
reconciliation and Financial/IPM configuration.
• Validate: Validates the deployment configuration and starts the Managed Servers.
1.6 Plan for Provisioning
Before creating a response file for the new Oracle Fusion Applications environment,
decide what the topology should look like, including what product offerings to install,
port allocations, and the type and number of hosts that are configure in the domains
created for the product offerings. For example, Oracle recommends to choose a
separate host for each domain that is installed. However, even in that scenario, some
large product configurations must be split across multiple hosts.
Determine the necessary system requirements to complete the provisioning of a new
environment, based on how the environment is used. For example, if a single instance
database is being installed for use as a test system, the requirements differ from
the installation of a multi-instance database to use for the production environment.
Determine also the access privileges for the database administrator (DBA) or system
administrator who performs the provisioning tasks.
Chapter 1
Plan for Provisioning
1-15

Supply directory locations, user names, and passwords associated with the
prerequisite installations of Oracle Database and Oracle Identity Management
components. These installations must be completed before creating a response file.
1.7 Next Steps
Following is an overview of the Oracle Fusion Applications provisioning process flow.
Table 1-1 Provisioning Process Flow
Task Description Link
Planning This section describes how to plan
the topology and provisioning of an
installation, and the configuration of the
components of the installation: storage,
network, databases, and Oracle Identity
Management.
Plan the Topology and
Provisioning of the
Installation (page 3-1)
Preparing for
provisioning
This section describes the components
required to prepare for provisioning,
including storage, servers, the network,
and the provisioning repository; and how
to install the Oracle Fusion Applications
and Oracle Identity Management
provisioning frameworks.
Prepare for an Installation
(page 5-1)
Installing databases This section explains how to install
and troubleshoot databases for Oracle
Identity Management database, the
Oracle Fusion Applications transactional
databases, and the Oracle Fusion
Applications repository.
Install Database for
Oracle Identity Management
(page 7-1)
Provisioning Oracle
Identity Management
This section describes how to provision
and troubleshoot Oracle Identity
Management for basic and enterprise
topologies.
Oracle Identity Management
Provisioning (page 10-1)
Provisioning Oracle
Fusion Applications
This section describes how to
use the Provisioning Wizard to
create a response file, install the
provisioning framework, and provision
and troubleshoot Oracle Fusion
Applications.
Create a Response File
for a New Oracle Fusion
Applications Environment
(page 12-1)
Completing Post-
Installation tasks
After provisioning the Oracle Fusion
Applications installation, configure the
installed components to suit the
business and functional requirements.
This part describes the post-installation
tasks, both optional and required.
Complete Mandatory Post-
Installation Tasks (page 15-1)
Incremental
Provisioning
Incremental provisioning gives the
flexibility to add product offerings, either
newly introduced in the current release,
or existing ones from prior release
that have not been already provisioned,
using the same Provisioning Wizard
interview process.
Extend an Oracle Fusion
Applications Environment
Using Incremental
Provisioning During Upgrade
(page 27-1)
Chapter 1
Next Steps
1-16

Table 1-1 (Cont.) Provisioning Process Flow
Task Description Link
Uninstalling This section explains how to uninstall
Oracle Fusion Applications, clean up
after uninstalling, deleting the database,
and uninstalling the Oracle Fusion
Applications Provisioning Framework.
Uninstall an Oracle Fusion
Applications Environment
(page 28-1)
The next section explains in detail what the provisioned Oracle Fusion Applications
environment looks like. It covers topics such as sample topologies, directory
structures, and the products to be installed.
Chapter 1
Next Steps
1-17

2
Understand What the Oracle Fusion
Applications Environment Looks Like
This section describes the topology, directory structure, and installed products and
components of Oracle Fusion Applications.
It includes the following topics:
• Introduction to What the Oracle Fusion Applications Environment Looks Like
(page 2-1)
• Oracle Fusion Applications Topologies (page 2-13)
• Oracle Fusion Applications Directory Structure (page 2-24)
• Oracle Fusion Applications Runtime Processes (page 2-37)
• Access Oracle Fusion Applications (page 2-40)
• What to Do Next (page 2-40)
2.1 Introduction to What the Oracle Fusion Applications
Environment Looks Like
Once fully installed, the Oracle Fusion Applications environment contains several
Oracle as well as third party products which make up its technology stack. Oracle
Fusion Applications is built on the Oracle Fusion Middleware stack and uses Oracle
Database.
Understanding what the environment looks like after the installation process is
complete helps to better understand the installation process, and plan for the
installation so as to fit the desired environment configuration.
The Oracle Fusion Applications architecture is depicted in the following diagram.
2-1
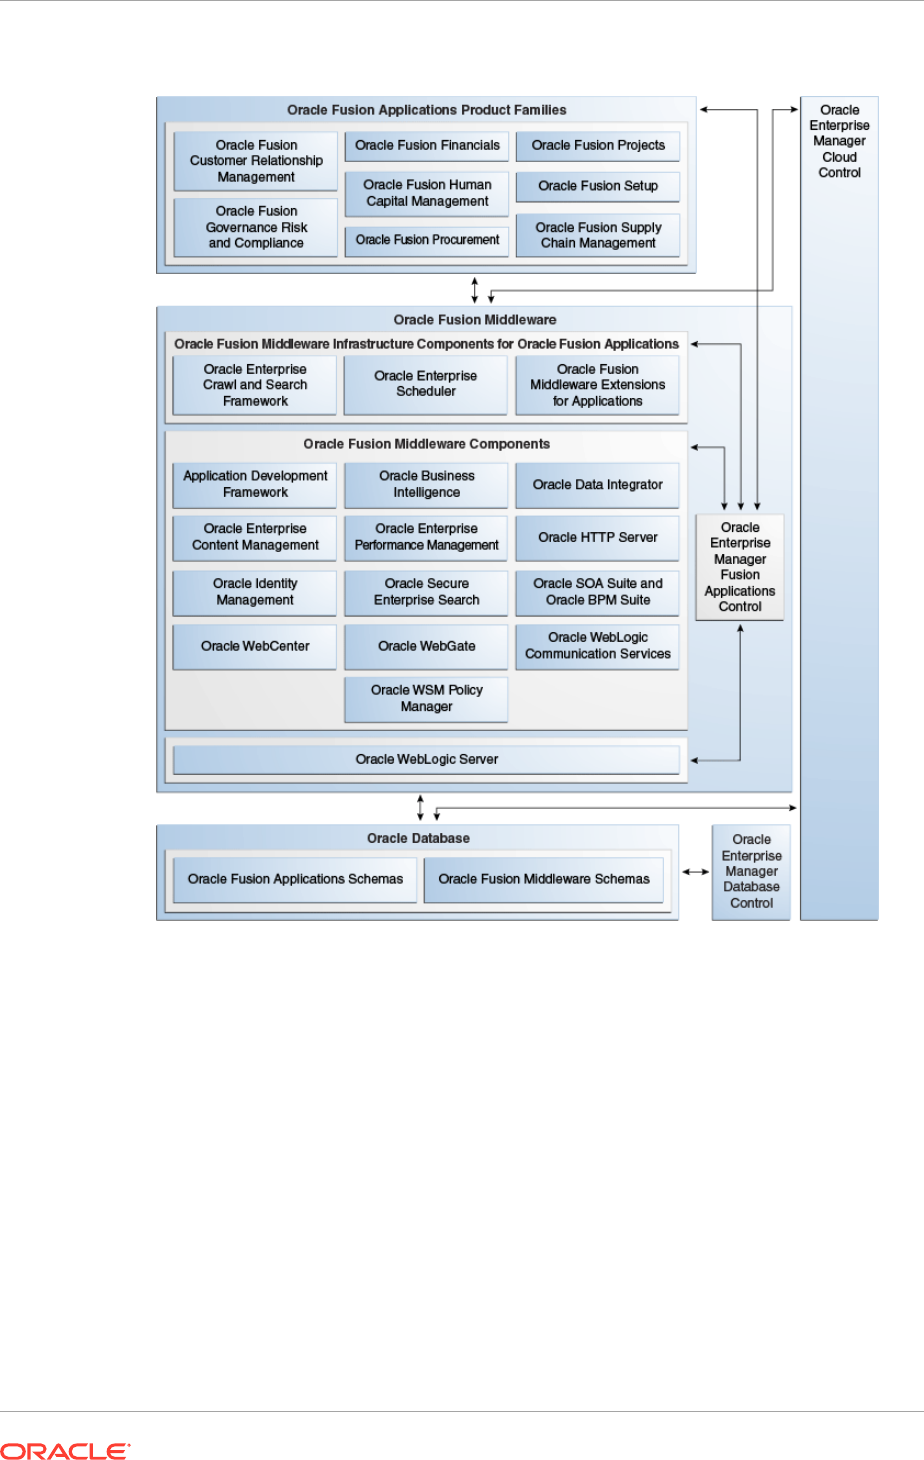
Figure 2-1 Oracle Fusion Applications Architecture
2.1.1 Oracle Fusion Applications Product Families and Product
Offerings
An installation of Oracle Fusion Applications is logically broken up into groups of
features. Each set of features is known as product offerings, which represent the
highest-level collection of functionality that can be licensed and implemented. A
product family is a collection of one or more product offerings. During installation,
select a product offering or a combination of offerings as a way to install the Oracle
Fusion Applications products to be used.
Product families are dependent on companion applications—for example, Oracle
Fusion Human Capital Management relies on Oracle Fusion Financials payroll—and
Oracle Fusion Middleware components such as Oracle SOA Suite. The wizard allows
for application and middleware configuration at the domain level during domain
topology configuration.
Chapter 2
Introduction to What the Oracle Fusion Applications Environment Looks Like
2-2

When selecting particular product offerings within a configuration rather than all
of them, the wizard starts the managed servers only for the selected offerings.
However, because the dependency details for the entire configuration are included
in the response file, additional functionality can be activated later using Oracle Fusion
Applications Functional Setup Manager to start the other managed servers.
Oracle Fusion Applications includes the product families and product offerings
described in the following table.
Table 2-1 Product Offerings
Oracle Fusion
Applications Product
Families
Oracle Fusion
Applications Product
Offerings
Description
Oracle Fusion
Customer Relationship
Management
• Sales
• Marketing
• Customer Data Hub
• Enterprise Contracts
Manages customers, contracts, and
resources, including data quality
configuration.
Oracle Fusion
Financials
• Financials
• Accounting Hub
Manages financial flows, including
assets, ledgers, cash cycle, invoices
and payments, accounts receivable,
collections, and setup of subledger
accounting and tax configuration.
Oracle Fusion
Governance, Risk, and
Compliance
(Not installed by Oracle
Fusion Applications.)
This product family is not
installed by Oracle Fusion
Applications. Download
the software from Oracle
Software Delivery Cloud
and install it separately.
Provides critical business controls
to manage risk, multi-regulatory
compliance, and controls enforcement.
The connector for Oracle Fusion
Applications provides a prebuilt solution
for managing Separation of Duties (SoD)
within and across product families. Use
also Oracle Fusion Governance, Risk,
and Compliance to analyze suspect
transactions and configuration settings
based on user defined conditions.
This allows organizations to actively
determine the risk that exists within
their application that can materially
impact the reliability of the information
that exists for reporting and decision
making purposes. Finally, Oracle Fusion
Governance, Risk, and Compliance can
apply preventive controls that will limit
what a user can see and do within an
Oracle Fusion Applications user interface
according to user-defined conditions.
The objective is to pro-actively mitigate
the risk of extraneous access or
improper transactions from existing.
Oracle Fusion Human
Capital Management
• Compensation
Management
• Workforce
Development
• Workforce
Development
Provides employee management for an
organization.
Chapter 2
Introduction to What the Oracle Fusion Applications Environment Looks Like
2-3

Table 2-1 (Cont.) Product Offerings
Oracle Fusion
Applications Product
Families
Oracle Fusion
Applications Product
Offerings
Description
Oracle Fusion
Procurement
Procurement Manages the procurement process
including requisitions, purchase orders,
and supplier negotiations.
Oracle Fusion Project
Portfolio Management
Projects Manages projects, including how to
plan, budget, forecast, collect costs, bill
customers, and report performance.
Oracle Fusion Supply
Chain Management
• Product Management
• Order Orchestration
• Manufacturing and
Supply Chain Material
Management
• Price Management
• Value Chain Planning
• Material Management
and Logistics
• Supply Chain
Financial
Orchestration
Integrates and automates all key supply
chain processes, from design, planning
and procurement to manufacturing and
fulfillment, providing a complete solution
set to enable companies to power
information-driven value chains.
Oracle Fusion Setup This product family is
installed along with all
product offerings.
Supports the other product families.
In addition to Oracle Fusion Functional
Setup Manager for setting up functional
data, this product family includes
applications to assist application users:
• The Oracle Fusion Home page
provides a Welcome dashboard
with a collection of portlets and
task flows for answering common
questions.
• Oracle Fusion Applications Help
delivers content users need to
complete their tasks. Optionally,
install a local version of Oracle
Fusion Applications Help, enabling
to extend and customize the help.
Table 2-2 Product Offering and Dependent Weblogic Server Domains
Oracle Fusion
Applications
Product Families
Oracle Fusion Applications
Product Offering
Provisioned Weblogic Server
Domains (Primary +
Dependent Domains)
Oracle Fusion
Customer
Relationship
Management
Customer Data Management Oracle Business Intelligence,
Common, Oracle Identity
Management,Oracle Fusion
Customer Relationship
Management, Oracle Fusion
Financials, Oracle Fusion
Human Capital Management
Chapter 2
Introduction to What the Oracle Fusion Applications Environment Looks Like
2-4

Table 2-2 (Cont.) Product Offering and Dependent Weblogic Server Domains
Oracle Fusion
Applications
Product Families
Oracle Fusion Applications
Product Offering
Provisioned Weblogic Server
Domains (Primary +
Dependent Domains)
Oracle Fusion
Customer
Relationship
Management
Enterprise Contracts Oracle Business Intelligence,
Common, Oracle Identity
Management,Oracle Fusion
Customer Relationship
Management, Oracle Fusion
Financials, Oracle Fusion
Human Capital Management
Oracle Fusion
Customer
Relationship
Management
Marketing Oracle Business Intelligence,
Common, Oracle Identity
Management,Oracle Fusion
Customer Relationship
Management, Oracle Fusion
Financials, Oracle Fusion
Human Capital Management,
Oracle Fusion Supply Chain
Management
Oracle Fusion
Customer
Relationship
Management
Sales Oracle Business Intelligence,
Common, Oracle Identity
Management,Oracle Fusion
Customer Relationship
Management, Oracle Fusion
Financials, Oracle Fusion
Human Capital Management,
Oracle Fusion Supply Chain
Management
Oracle Fusion
Incentive
Compensation
Incentive Compensation Oracle Business Intelligence,
Common, Oracle Identity
Management,Oracle Fusion
Customer Relationship
Management, Oracle Fusion
Financials, Oracle Fusion
Human Capital Management,
Oracle Fusion Incentive
Compensation
Oracle Fusion
Financials
Financials Oracle Business Intelligence,
Common, Oracle Identity
Management,Oracle Fusion
Customer Relationship
Management, Oracle Fusion
Financials, Oracle Fusion
Human Capital Management,
Oracle Fusion Project Portfolio
Management, Oracle Fusion
Supply Chain Management
Oracle Fusion
Financials
Fusion Accounting Hub Oracle Business Intelligence,
Common, Oracle Identity
Management,Oracle Fusion
Customer Relationship
Management, Oracle Fusion
Financials, Oracle Fusion
Human Capital Management
Chapter 2
Introduction to What the Oracle Fusion Applications Environment Looks Like
2-5

Table 2-2 (Cont.) Product Offering and Dependent Weblogic Server Domains
Oracle Fusion
Applications
Product Families
Oracle Fusion Applications
Product Offering
Provisioned Weblogic Server
Domains (Primary +
Dependent Domains)
Oracle Fusion
Human Capital
Management
Compensation Management Oracle Business Intelligence,
Common, Oracle Identity
Management,Oracle Fusion
Customer Relationship
Management, Oracle Fusion
Financials, Oracle Fusion
Human Capital Management
Oracle Fusion
Human Capital
Management
Workforce Deployment Oracle Business Intelligence,
Common, Oracle Identity
Management,Oracle Fusion
Customer Relationship
Management, Oracle Fusion
Financials, Oracle Fusion
Human Capital Management
Oracle Fusion
Human Capital
Management
Workforce Development Oracle Business Intelligence,
Common, Oracle Identity
Management,Oracle Fusion
Customer Relationship
Management, Oracle Fusion
Financials, Oracle Fusion
Human Capital Management
Oracle Fusion
Procurement
Procurement Oracle Business Intelligence,
Common, Oracle Identity
Management,Oracle Fusion
Customer Relationship
Management, Oracle Fusion
Financials, Oracle Fusion
Human Capital Management,
Oracle Fusion Project Portfolio
Management, Oracle Fusion
Supply Chain Management
Oracle Fusion
Project Portfolio
Management
Projects Oracle Business Intelligence,
Common, Oracle Identity
Management,Oracle Fusion
Customer Relationship
Management, Oracle Fusion
Financials, Oracle Fusion
Human Capital Management,
Oracle Fusion Procurement,
Oracle Fusion Project Portfolio
Management, Oracle Fusion
Supply Chain Management
Oracle Fusion Supply
Chain Management
Materials Management and Logistics Oracle Business Intelligence,
Common, Oracle Identity
Management,Oracle Fusion
Customer Relationship
Management, Oracle Fusion
Financials, Oracle Fusion
Human Capital Management,
Oracle Fusion Supply Chain
Management
Chapter 2
Introduction to What the Oracle Fusion Applications Environment Looks Like
2-6

Table 2-2 (Cont.) Product Offering and Dependent Weblogic Server Domains
Oracle Fusion
Applications
Product Families
Oracle Fusion Applications
Product Offering
Provisioned Weblogic Server
Domains (Primary +
Dependent Domains)
Oracle Fusion Supply
Chain Management
Order Orchestration Oracle Business Intelligence,
Common, Oracle Identity
Management,Oracle Fusion
Customer Relationship
Management, Oracle Fusion
Financials, Oracle Fusion
Human Capital Management,
Oracle Fusion Supply Chain
Management
Oracle Fusion Supply
Chain Management
Product Management Oracle Business Intelligence,
Common, Oracle Identity
Management,Oracle Fusion
Customer Relationship
Management, Oracle Fusion
Financials, Oracle Fusion
Human Capital Management,
Oracle Fusion Supply Chain
Management
Oracle Fusion Supply
Chain Management
Supply Chain Financial Orchestration Oracle Business Intelligence,
Common Oracle Identity
Management, Oracle Fusion
Customer Relationship
Management, Oracle Fusion
Financials, Oracle Fusion
Human Capital Management,
Oracle Fusion Supply Chain
Management
Oracle Fusion Supply
Chain Management
Manufacturing and Supply Chain
Material Management
Oracle Business Intelligence,
Common Oracle Identity
Management, Oracle Fusion
Customer Relationship
Management, Oracle Fusion
Financials, Oracle Fusion
Human Capital Management,
Oracle Fusion Supply Chain
Management
Oracle Fusion Supply
Chain Management
Price Management Oracle Business Intelligence,
Common Oracle Identity
Management, Oracle Fusion
Customer Relationship
Management, Oracle Fusion
Financials, Oracle Fusion
Human Capital Management,
Oracle Fusion Supply Chain
Management
Chapter 2
Introduction to What the Oracle Fusion Applications Environment Looks Like
2-7

Table 2-2 (Cont.) Product Offering and Dependent Weblogic Server Domains
Oracle Fusion
Applications
Product Families
Oracle Fusion Applications
Product Offering
Provisioned Weblogic Server
Domains (Primary +
Dependent Domains)
Oracle Fusion Supply
Chain Management
Value Chain Planning Oracle Business Intelligence,
Common, Oracle Identity
Management, Oracle Fusion
Customer Relationship
Management, Oracle Fusion
Financials, Oracle Fusion
Human Capital Management,
Oracle Fusion Supply Chain
Management
2.1.2 New Product Offerings, Applications, Oracle WebLogic Server
Managed Servers, and Clusters for Release 12
The following new product offerings, applications, Oracle WebLogic Server Managed
Servers, and clusters were added in this release.
Component On Premise SaaS Comments
Product Offering NA Student Management Available for SaaS
Product Offering NA Recruiting and
Candidate Experience
Available for SaaS
Domain NA HigherEd (HED) Available for SaaS
Applications NA (HED) Campus
Community
Available for SaaS
Applications NA (HED) Financials
Management
Available for SaaS
Applications NA (HED) Records
Management
Available for SaaS
Applications NA (HED) Ess Available for SaaS
Applications NA (HED) SOA Available for SaaS
Applications Applications Core Ess Applications Core Ess Available for on
premise and SaaS
Applications NA Learn Available for SaaS
Applications NA Recruiting and
Candidate Experience
Available for SaaS
Applications NA HCM Sem Search Available for SaaS
Managed Server /
Cluster
NA (HED) Campus
Community
Available for SaaS
Managed Server /
Cluster
NA (HED) Campus
Community
Available for SaaS
Managed Server /
Cluster
NA (HED) Records
Management
Available for SaaS
Chapter 2
Introduction to What the Oracle Fusion Applications Environment Looks Like
2-8

Component On Premise SaaS Comments
Managed Server /
Cluster
NA (HED) Ess Available for SaaS
Managed Server /
Cluster
NA (HED) SOA Available for SaaS
Managed Server /
Cluster
NA Recruiting Available for SaaS
Managed Server /
Cluster
NA Hcm Sem Search Available for SaaS
2.1.3 Oracle Fusion Middleware Infrastructure Components
The product families use the following common core framework and infrastructure for
Oracle Fusion Applications described in the following table.
Table 2-3 Oracle Fusion Middleware Infrastructure Components
Oracle Fusion Middleware
Infrastructure Component
Description
Oracle Fusion Middleware
Extensions for Applications
(Applications Core)
Provides design time and runtime infrastructure to help
standardize complex development patterns for Oracle Fusion
Applications. It simplifies the development process of these
patterns and provides a consistent user experience. Examples
of these patterns include extensibility (Flexfields), hierarchical
relationships (Trees), data security, and UI patterns. Applications
Core creates simplified methods of implementing these complex
requirements by providing robust metadata and comprehensive
UI components and services. All of the Applications Core
components have been intricately integrated with the rest of the
Oracle Fusion Middleware infrastructure so they are available
across every layer of the Oracle Fusion Applications platform.
Applications Core provides shared libraries referenced by all
the Oracle Fusion Applications, a standalone application for
application setup and configuration, an Oracle JDeveloper
extension to seamlessly integrate our components with the rest
of the Oracle Fusion Applications technology stack, PLSQL
APIs, C libraries, and common seed data.
Oracle Enterprise Scheduler Enables to manage and schedule jobs for Oracle Fusion
Applications.
Oracle Enterprise Crawl and
Search Framework (ECSF)
Oracle Enterprise Crawl and Search Framework (ECSF) enables
Oracle Fusion Applications Search for performing full-text
searches securely and simultaneously against multiple logical
business objects. Any application that connects to multiple
data sources or manages a significant amount of unstructured
(non-database) information—or both—needs advanced search
capabilities so that application users can easily locate and take
action on data that is relevant to them.
2.1.4 Oracle Fusion Middleware Components
A complete installation of Oracle Fusion Applications includes several Oracle and
third party products. The majority of installed products form the core of the Oracle
Chapter 2
Introduction to What the Oracle Fusion Applications Environment Looks Like
2-9

Fusion Applications environment, and are installed regardless of the offerings selected
during provisioning. Some products are installed only when selecting particular product
offerings, while others must be installed manually following provisioning.
Oracle Fusion Middleware includes the components described in the following table.
Except where otherwise stated, all products are installed during Oracle Fusion
Applications provisioning and are enabled by default.
MANDATORY: Install Oracle Database Server before running Oracle Fusion
Applications provisioning.
MANDATORY: Before running the Oracle Identity Management Provisioning Wizard,
install Oracle Java HotSpot and Oracle Database Server and run the Oracle Fusion
Middleware RCU.
Table 2-4 Oracle Fusion Middleware Components
Oracle Fusion Middleware
Components
Description
Oracle Access Manager Provides the core functionality of Web Single Sign On (SSO),
authentication, authorization, centralized policy administration
and agent management, real-time session management, and
auditing.
Installed by Oracle Identity Management provisioning.
Oracle Application
Development Framework
Provides an end-to-end application framework that builds on
Java Platform, Enterprise Edition (Java EE) standards and open-
source technologies to simplify and accelerate implementing
service-oriented applications.
Oracle BI Enterprise Edition
and Oracle Business
Intelligence Applications
Oracle Business Intelligence provides a complete, integrated
solution of analytics and reporting for Oracle Fusion Applications.
Oracle Business Intelligence Applications is installed manually
post-provisioning, and is not enabled by default. The Oracle
Fusion Applications installation and provisioning process installs
the Oracle BI Applications software components in the Business
Intelligence Oracle home but does no further setup. To
finish setting up Oracle BI Applications, follow the instructions
in Installing and Setting Up Oracle Business Intelligence
Applications in the Oracle Business Intelligence Applications
Installation Guide.
Oracle Database Server and
Client
The Oracle Database contains the schemas and tablespaces
required for both the Oracle Fusion Applications and for the
applications. Oracle Fusion Applications does not support other
databases.
Oracle Database Server must be installed before running
Oracle Fusion Applications provisioning and Oracle Identity
Management provisioning.
Oracle Data Integrator Oracle Data Integrator provides a comprehensive data
integration platform that covers bulk data movement
requirements for Oracle Fusion Applications.
Oracle Directory Services
Manager
Provides a graphical administrative interface for Oracle Internet
Directory.
Installed by Oracle Identity Management provisioning.
Chapter 2
Introduction to What the Oracle Fusion Applications Environment Looks Like
2-10

Table 2-4 (Cont.) Oracle Fusion Middleware Components
Oracle Fusion Middleware
Components
Description
Oracle Global Order
Promising
A comprehensive order promising solution that determines,
based on the current and projected demands and supplies
across a supply chain and on an extended supply chain, when a
customer order can be fulfilled.
This is installed only when selecting Oracle Supply Chain
Management.
Oracle HTTP Server Provides a web listener for applications and the framework for
hosting static and dynamic pages and applications over the
web. Based on the proven technology of the Apache HTTP
Server, Oracle HTTP Server includes significant enhancements
that facilitate load balancing, administration, and configuration.
Installed by Oracle Identity Management provisioning.
Oracle Internet Directory A general-purpose LDAPv3 compliant directory storage, Oracle
Internet Directory serves as the central user repository for Oracle
Identity Management.
Installed by Oracle Identity Management provisioning.
Oracle Java HotSpot Oracle Java HotSpot is installed by Oracle Fusion Applications
provisioning. Oracle Java HotSpot JDK must be installed prior to
running Oracle Identity Management provisioning.
Oracle Secure Enterprise
Search
Provides a search engine for Oracle Fusion Applications Search.
Oracle WebCenter Content Provides a comprehensive suite of digital content management
tools. These tools can be used across the enterprise to
cohesively track, manage, and dispose of content whether
written, in digital images, or as email.
Oracle WebCenter Portal Enables to create social applications, enterprise portals,
collaborative communities, and composite applications, built
on a standards-based, service-oriented architecture. Oracle
WebCenter Portal combines dynamic user interface technologies
with which to develop rich internet applications, the flexibility
and power of an integrated, multichannel portal framework,
and a set of horizontal Enterprise 2.0 capabilities delivered as
services that provide content, collaboration, presence, and social
networking capabilities. Based on these components, Oracle
WebCenter Portal also provides an out-of-the-box, enterprise-
ready customizable application, WebCenter Spaces, with a
configurable work environment that enables individuals and
groups to work and collaborate more effectively.
WebGate for Oracle Access
Manager
Acts as a communicator plug-in that accepts users requests
through Oracle HTTP Server and communicates with Oracle
Access Manager.
Installed by Oracle Identity Management provisioning.
Oracle WebLogic
Communication Services
Provides click-to-dial functionality for applications primarily
through contextual actions. Contextual actions provide related
information and actions to users within the immediate context of
the object instances upon which they act.
Chapter 2
Introduction to What the Oracle Fusion Applications Environment Looks Like
2-11

Table 2-4 (Cont.) Oracle Fusion Middleware Components
Oracle Fusion Middleware
Components
Description
Oracle WebLogic Server Supports the deployment of mission-critical applications in a
robust, secure, highly available, and scalable environment.
Oracle WebLogic Server is an ideal foundation for building
applications based on service-oriented architecture (SOA).
Installed by Oracle Identity Management provisioning.
Oracle Web Tier Includes components that interact with end users at the
outermost tier of application grid infrastructure, typically through
HTTP requests and responses. Hosts web pages and provides
security and high performance along with built-in clustering, load
balancing, and failover features
2.1.4.1 Products Installed to the Desktop
In addition to the server-side products installed by the provisioning tools, Oracle
Fusion Applications uses the following products that are installed on the desktop.
• Oracle BI Enterprise Edition plus client
• Oracle Data Integrator Studio
• Oracle JDeveloper
2.1.4.2 Other Related Products
The following Oracle and third-party products are sometimes used to interact directly
with Oracle Fusion Applications.
• Microsoft Active Directory: Used to integrate with Oracle Identity Management
to provide identity information to Oracle Fusion Applications.
• Other Applications: Additional applications such as Oracle eBusiness Suite,
Oracle PeopleSoft Human Capital Management, and Oracle Siebel Customer
Relationship Management can be configured to integrate with Oracle Fusion
Applications.
2.1.5 Oracle Database
The Oracle Database contains the schemas and tablespaces required for both the
Oracle Fusion Applications and for the applications. Oracle Fusion Applications does
not support other databases.
Oracle Fusion Applications encryption APIs mask data such as credit card numbers in
application user interface fields. For encryption and masking beyond that, Transparent
Data Encryption (TDE) and Oracle Database Vault (ODV) are certified but optional with
Oracle Fusion Applications.TDE and ODV provide information life cycle protections,
such as the following:
• Data access restrictions on database administrators and other privileged users
• Sensitive data at rest in database files and file backups
• Sensitive data in transit
Chapter 2
Introduction to What the Oracle Fusion Applications Environment Looks Like
2-12

• Sensitive attributes in non-production databases
ODV establishes limitations on the power of privileged users to access sensitive data
through segregation of duties policies on DBA roles and by securely consolidating
application data in the database. These limitations prevent DBAs and other privileged
users from overriding the protections placed on sensitive data by the Virtual Private
Database (VPD). Oracle Fusion Applications deploys with the ODV enabled when
it is installed. TDE prevents access to personally identifiable information in the file
system or on backups or disk. TDE protects confidential data, such as credit card and
social security numbers. TDE encrypts sensitive table data stored in data files at the
tablespace level.
2.1.6 Oracle Fusion Applications Management Tools
The primary administrative management tool for Oracle Fusion Applications is
Enterprise Manager Cloud Control. It provides an integrated interface to manage
the entire environment. For information about Enterprise Manager Cloud Contol, see
Get Started with Enterprise Manager Cloud Control in the Oracle Fusion Applications
Administrator’s Guide.
A collection of native tools, including Oracle Enterprise Manager Fusion Applications
Control and WebLogic Server Control, still exist in the environment. Information about
accessing them can be found in Use Other Oracle Fusion Applications Administration
Tools in the Oracle Fusion Applications Administrator’s Guide.
2.2 Oracle Fusion Applications Topologies
Both Oracle Identity Management and Oracle Fusion Applications provisioning
offer several topology options which allow to tailor the Oracle Fusion Applications
environment, including server allocation, networking, and availability.
There are numerous possible topological permutations, but most topologies fall into a
few categories with small variations (such as the use of a demilitarized zone, shared
servers, or reverse proxy). These categories are:
• Basic topology. This is the simplest type of topology possible directly out-of-the-
box.
• Enterprise topology. This type of topology is ideal for testing environments where
high availability is not necessary.
• Enterprise topology with high availability. This type of topology is ideal for
Oracle Fusion Applications production environments.
The diagrams in each topology example show logical units, rather than individual
servers, representing components of the Oracle Fusion Applications installation. Each
unit can be installed to its own server, or multiple units can share a single server,
depending on the needs of your enterprise.
2.2.1 Topology Tiers
The Oracle Fusion Applications topologies use a tier-based model that is logically
grouped into three tiers: the database tier, middle tier (split into directory and
application tiers in Oracle Identity Management), and web tier.
Chapter 2
Oracle Fusion Applications Topologies
2-13

This tier-based model is useful when mapping the Oracle Fusion Applications topology
to the type of environment created, fitting the topology to the corporate network
location policies, and, consequently, determining where the components should reside
in the network.
For example:
• The company may have a firewall-protected subnet reserved for all production
databases. Typically, this is where the databases are deployed, and the database
tier resides.
• The company may have a demilitarized zone (DMZ) where all externally-
accessible web servers reside. Typically, this is where the web tier resides, and
the web tier components such as the Oracle HTTP Servers and Webgate for
Oracle Access Manager are deployed.
• The company may have a policy that specifies that application-specific HTTP
servers may not reside in the DMZ. In such cases, the web tier should be
deployed to the internal network along with the mid tier, with a reverse proxy in
the DMZ that forwards all external requests to the web tier in the internal network.
Topology tiers are also related to high availability requirements. For a highly available
Oracle Fusion Applications environment, each tier must be handled and scaled out
independently.
2.2.1.1 Database Tier
In an Oracle Fusion Applications environment, the database tier includes all the
databases used for both Oracle Fusion Applications and Oracle Identity Management.
For more information about the databases that are part of the Oracle Fusion
Applications environment, see Database Instances and Other Processes (page 2-38).
2.2.1.2 Middle Tier
The middle tier includes all the components between the database tier and the
web tier. Components in the middle tier include Oracle WebLogic Servers and the
applications deployed on the servers, among other things.
Middle tier components are not accessible directly by end users. Access to the
applications in the middle tier is achieved through the web tier, which is ideal for
environments where complete isolation between end users and the application is
required.
The middle tier consumes information provided from all other tiers as well as itself:
1. The middle tier accesses data stored in any of the Oracle Fusion Applications
or Oracle Identity Management databases on the database tier via JDBC or
SQL*Net.
2. The middle tier directly accesses the Oracle Identity Management directory tier via
LDAP for identity, policy, and credential data.
3. Certain middle tier applications and components communicate amongst
themselves using direct calls via protocols such as T3, HTTP, and TCP sockets.
4. For HTTP requests, certain middle tier applications and components communicate
amongst each other through calls to the web tier, which then forwards the request
to other components in the middle tier.
Chapter 2
Oracle Fusion Applications Topologies
2-14

For Oracle Identity Management, the middle tier is split into two tiers: the directory tier
and application tier.
2.2.1.2.1 Oracle Identity Management Directory Tier
The Oracle Identity Management directory tier is the deployment tier where all the
LDAP services reside. This tier includes products such as Oracle Internet Directory.
The directory tier is managed by directory administrators providing enterprise LDAP
service support.
The Directory Tier stores identity information, which contains information about users
and groups.
Although the topology diagrams do not show LDAP directories other than Oracle
Internet Directory, use Microsoft Active Directory to store identity information. However,
always store policy information in Oracle Internet Directory. Store identity information
in Oracle Internet Directory or another directory.
2.2.1.2.2 Oracle Identity Management Application Tier
The Oracle Identity Management application tier is the place where Oracle Identity
Management Java EE applications are deployed. The main Java EE components
deployed to this tier include Oracle Directory Services Manager and Oracle Enterprise
Manager Fusion Middleware Control.
The Oracle Identity Management applications on the application tier interact with the
directory tier for enterprise identity information and, in some cases, for application
metadata. Oracle Enterprise Manager Fusion Middleware Control and Oracle Directory
Services Manager provide allow to manage and administer the components in the
application and directory tiers.
2.2.1.3 Web Tier
The web tier contains the Oracle HTTP Servers as well as Webgate for Oracle
Access Manager. It is the only tier that can be accessed by end users in Oracle
Fusion Applications, and forwards end-user HTTP requests to the applications and
components running in the middle tier.
In Oracle Fusion Applications, the web tier can have a load balancer or reverse proxy
as a front end. The load balancer or reverse proxy handle all HTTP requests meant for
the web tier.
The web tier can be placed in the DMZ if desired, providing end-user access to the
services from the middle tier on that side of the firewall.
2.2.2 Network Components
The enterprise and enterprise with high availability topologies involve the use of a load
balancer or reverse proxy.
• Reverse proxy: The reverse proxy stands between the Oracle Fusion
Applications web tier and HTTP clients (end users and external applications).
The main purpose of a reverse proxy is to act as a gateway to Oracle
Fusion Applications, particularly for network configurations in which clients are
using a different subnet from Oracle Fusion Applications. Reverse proxies are
recommended for environments using the enterprise topology.
Chapter 2
Oracle Fusion Applications Topologies
2-15

• Load balancer: The load balancer is the intermediary between the Oracle Fusion
Applications environment and both internal and external clients, where internal
clients are Oracle Fusion Applications components and external applications
include end users and external applications. The load balancer distributes HTTP
requests among servers in the web tier, and TCP requests among the LDAP
servers hosting the identity store, policy store, and Oracle Universal Content
Management. The load balancer also acts as a gateway for external clients to
the Oracle Fusion Applications environment, much like the reverse proxy.
From the perspective of provisioning, the configuration for a load balancer or
reverse proxy is essentially the same. The following table summarizes the differences
between using a reverse proxy and a load balancer in the context of Oracle Fusion
Applications.
Table 2-5 Load Balancer or Reverse Proxy
Functionality Load Balancer Reverse Proxy
Acts as an HTTP gateway to Oracle Fusion
Applications.
Yes Yes
Provides high availability through load
balancing.
Yes No
Used for external HTTP traffic. Yes Yes
Used for internal HTTP traffic. Yes Yes or no
Used for LDAP traffic. Yes No
Used for TCP traffic to Oracle WebCenter
Content (UCM).
Yes No
Chapter 2
Oracle Fusion Applications Topologies
2-16
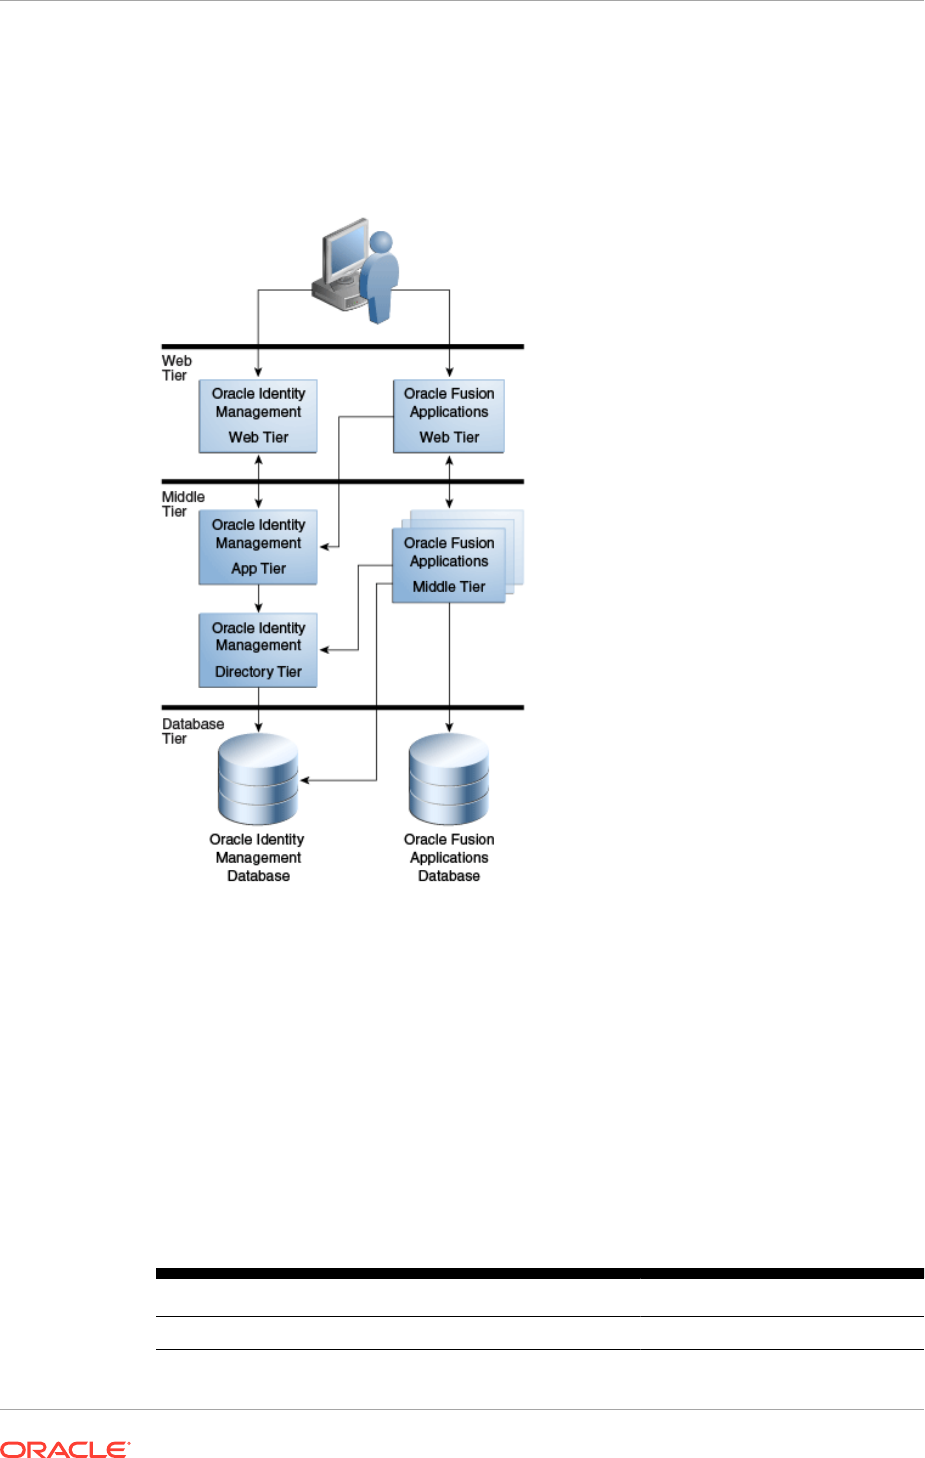
2.2.3 Basic Topology
Figure 2-2 Oracle Fusion Applications Basic Topology
The basic topology is the most rudimentary of possible Oracle Fusion Applications
environments, making it a good choice for development or demonstration or proof of
concept purposes. It is also the easiest to install, with minimal hardware requirements.
In fact, all the components can be installed to the same server, given sufficiently
robust hardware. Alternatively, Oracle Fusion Applications domains can be installed to
more than one machine so as to better support Oracle Fusion Applications memory
requirements. No additional network components are required as all communication is
server-to-server.
The features of an Oracle Fusion Applications environment with a basic topology are
shown in the following table.
Table 2-6 Features of the Basic Topology
Feature Used in Topology?
Nodes 2 or more
Chapter 2
Oracle Fusion Applications Topologies
2-17

Table 2-6 (Cont.) Features of the Basic Topology
Feature Used in Topology?
Oracle Identity Management and Oracle Fusion
Applications shared node for middle and web tiers
Yes
Oracle Identity Management and Oracle Fusion
Applications web tier DMZ setup
No
Reverse proxy or load balancer No
High availability No
Expandable post-installation Limited
Sample configurations of the basic topology are shown in the following table. The
following notation is used in the table:
• Oracle Fusion Applications: FA
• Oracle Identity Management: IDM
• Oracle Fusion Applications Database: FA DB
• Oracle Identity Management Database: IDM DB
The asterisk (*) following FA indicates that Oracle Fusion Applications can be split
among multiple nodes.
MANDATORY: Install Oracle Identity Management Middle Tier and Oracle Fusion
Applications Middle Tier on different hosts. Installing Oracle Identity Management and
Oracle Fusion Applications on the same host is not a supported topology.
MANDATORY: Do not share the same database instance for Oracle Identity
Management and Oracle Fusion Applications.
MANDATORY: The database instances must also be running on physical host(s).
Table 2-7 Sample Configurations of the Basic Topology
Number of
Nodes
Components per Node Sample Host Names
2 •
Node 1: FA*, FA DB
•
Node 2: IDM, IDM DB
fahostN.mycompany.com
idmhost.mycompany.com
3 •
Node 1: FA*
•
Node 2: IDM
•
Node 3: FA DB, IDM DB
fahostN.mycompany.com
idmhost.mycompany.com
dbhost.mycompany.com
3 •
Node 1: FA*
•
Node 2: FA DB
•
Node 3: IDM, IDM DB
fahostN.mycompany.com
fadbhost.mycompany.com
idmhost.mycompany.com
4 •
Node 1: FA*
•
Node 2: FADB
•
Node 3: IDM
•
Node 4: IDMDB
fahostN.mycompany.com
fadbhost.mycompany.com
idmhost.mycompany.com
Idmdbhost.mycompany.com
Chapter 2
Oracle Fusion Applications Topologies
2-18
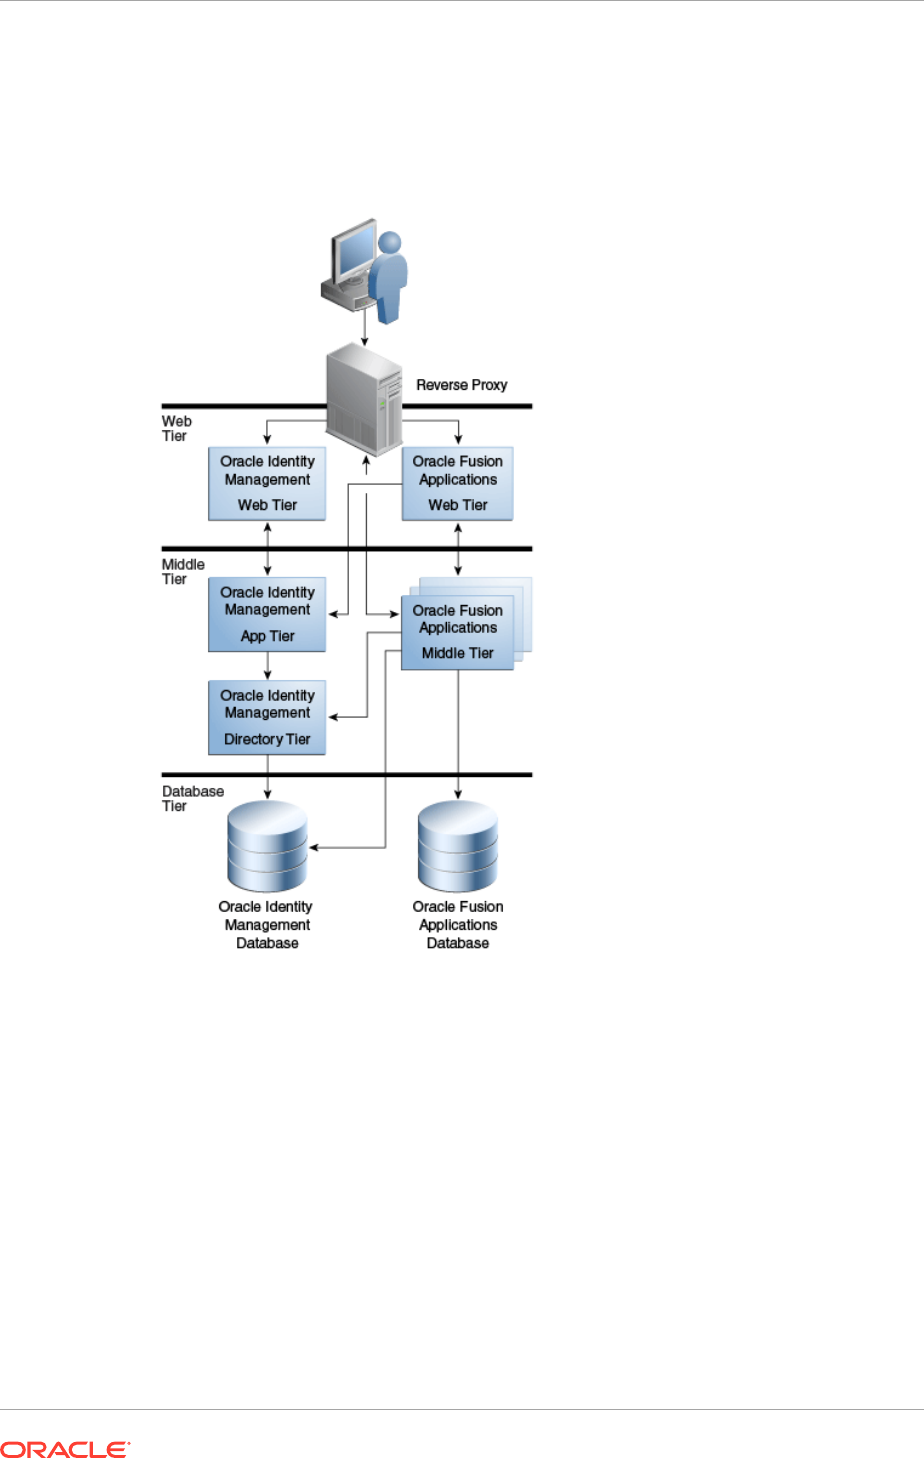
2.2.4 Enterprise Topology
Figure 2-3 Oracle Fusion Applications Enterprise Topology
The enterprise topology is the most flexible of Oracle Fusion Applications
environments, in that it can be expanded following installation. This topology is
useful for testing environments in which high availability is not required. The topology
features a clear differentiation amongst the web, application, and data tiers. Install
Oracle Fusion Applications domains to more than one machine so as to better support
memory requirements. The Oracle Identity Management middle tier can be installed to
a maximum of two nodes using the Oracle Identity Management Provisioning Wizard,
but additional nodes can be added manually post-install. The use of a reverse proxy is
recommended for greater flexibility.
The features of an enterprise topology Oracle Fusion Applications environment are
shown in the following table.
Chapter 2
Oracle Fusion Applications Topologies
2-19

Table 2-8 Features of the Enterprise Topology
Feature Used in Topology?
Nodes 4 or more
Oracle Identity Management and Oracle Fusion
Applications shared node for middle and web tiers
No
Oracle Identity Management and Oracle Fusion
Applications web tier DMZ setup
Optional
Reverse proxy or load balancer Recommended
High availability No
Expandable post-installation Yes
Sample configurations of the enterprise topology are shown in the following table. The
following notation is used in the table:
• Oracle Fusion Applications: FA Web
• Oracle Fusion Applications Middle Tier: FA Mid
• Oracle Identity Management: IDM Mid
• Oracle Identity Management Web Tier: IDM Web
• Oracle Fusion Applications Database: FA DB
• Oracle Identity Management Database: IDM DB
The asterisk (*) following FA Mid indicates that the Oracle Fusion Applications middle
tier can be split among multiple nodes. The asterisk (*) following IDM Mid indicates
that the Oracle Identity Management middle tier can be split amongst two nodes.
Table 2-9 Sample Configurations of the Enterprise Topology
Number of
Nodes
Node Contains Sample Host Names
4 •
Node 1: IDM Web, FA Web
•
Node 2: FA Mid*
•
Node 3: IDM Mid*
•
Node 4: FA DB, IDM DB
webhost.mycompany.com
fahost.mycompany.com
idmhost.mycompany.com
dbhost.mycompany.co
4 •
Node 1: IDM Web, FA Web
•
Node 2: FA Mid*
•
Node 3: IDM Mid*, IDM DB
•
Node 4: FA DB
webhost.mycompany.com
fahost.mycompany.com
idmhost.mycompany.com
fadbhost.mycompany.com
5 •
Node 1: IDM Web, FA Web
•
Node 2: FA Mid*
•
Node 3: IDM Mid*
•
Node 4: IDM DB
•
Node 5: FA DB
webhost.mycompany.com
fahost.mycompany.com
idmhost.mycompany.com
idmdbhost.mycompany.com
fadbhost.mycompany.com
Chapter 2
Oracle Fusion Applications Topologies
2-20

Table 2-9 (Cont.) Sample Configurations of the Enterprise Topology
Number of
Nodes
Node Contains Sample Host Names
6 •
Node 1: IDM Web
•
Node 2: FA Web
•
Node 3: FA Mid*
•
Node 4: IDM Mid*
•
Node 5: IDM DB
•
Node 6: FA DB
idmwebhost.mycompany.com
fawebhost.mycompany.com
fahost.mycompany.com
idmhost.mycompany.com
idmdbhost.mycompany.com
fadbhost.mycompany.com
Chapter 2
Oracle Fusion Applications Topologies
2-21
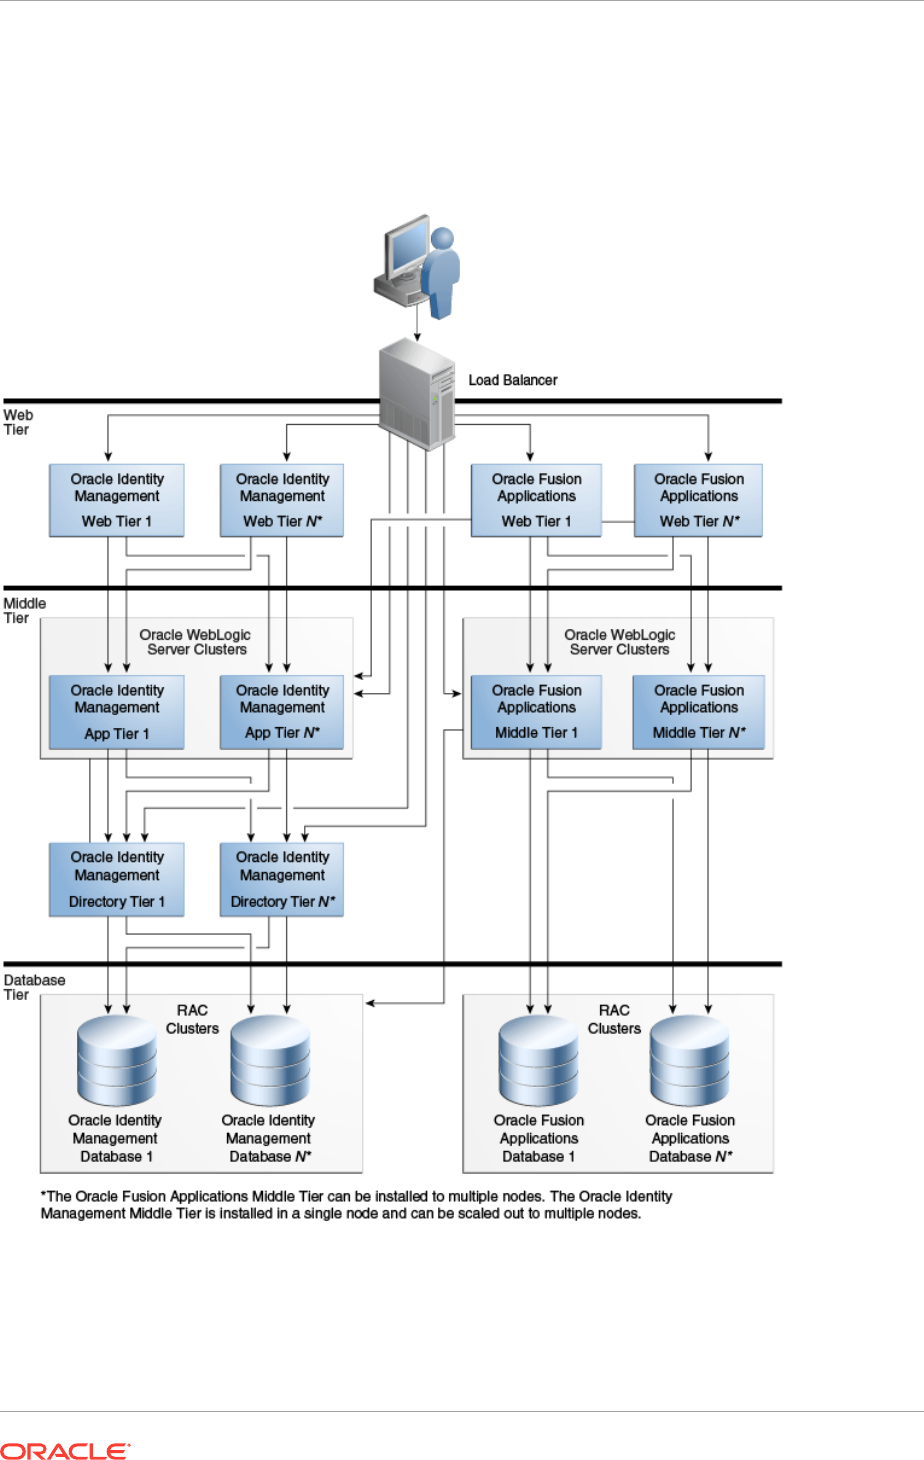
2.2.5 Enterprise Topology with High Availability
Figure 2-4 Oracle Fusion Applications Enterprise Topology with High Availability
The enterprise topology with high availability is the ideal Oracle Fusion Applications
topology for production environments. The topology features a clear differentiation
amongst the web, application, and data tiers. Install Oracle Fusion Applications
domains to more than one machine so as to better support memory requirements. The
Chapter 2
Oracle Fusion Applications Topologies
2-22

Oracle Identity Management middle tier can be installed to a maximum of two nodes
using the Oracle Identity Management Provisioning Wizard, but additional nodes can
be added manually post-installation. The use of a reverse load balancer is required to
manage HTTP and TCP traffic.
The features of an enterprise topology Oracle Fusion Applications environment with
high availability are shown in the following table.
Table 2-10 Features of the Enterprise Topology with High Availability
Feature Used in Topology?
Nodes 8 or more
Oracle Identity Management and Oracle Fusion
Applications shared node for middle and web
tiers
No
Oracle Identity Management and Oracle Fusion
Applications web tier DMZ setup
Optional
Reverse proxy or load balancer Yes
High availability Yes
Expandable post-installation Yes
Sample configurations of the enterprise topology with high availability are shown in the
following table. The following notation is used in the table:
• Oracle Fusion Applications: FA Web
• Oracle Fusion Applications Middle Tier: FA Mid
• Oracle Identity Management: IDM Mid
• Oracle Identity Management Web Tier: IDM Web
• Oracle Fusion Applications Database: FA DB
• Oracle Identity Management Database: IDM DB
The asterisk (*) following FA Mid indicates that the Oracle Fusion Applications middle
tier can be split among multiple nodes. The asterisk (*) following IDM Mid indicates
that the Oracle Identity Management middle tier can be split amongst two nodes.
Table 2-11 Sample Configurations of the Enterprise Topology with High
Availability
Number of
Nodes
Node Contains Sample Host Names
8 •
Nodes 1-2: IDM Web,
FA Web
•
Nodes 3-4: FA Mid*
•
Nodes 5-6: IDM Mid*
•
Nodes 7-8: FA DB, IDM
DB
webhost1.mycompany.com…
webhostN.mycompany.com
fahost1.mycompany.com…
fahostN.mycompany.com
idmhost1.mycompany.com…
idmhostN.mycompany.com
dbhost1.mycompany.com…
dbhostN.mycompany.com
Chapter 2
Oracle Fusion Applications Topologies
2-23

Table 2-11 (Cont.) Sample Configurations of the Enterprise Topology with High
Availability
Number of
Nodes
Node Contains Sample Host Names
8 •
Nodes 1-2: IDM Web,
FA Web
•
Nodes 3-4: FA Mid*
•
Nodes 5-6: IDM Mid*,
IDM DB
•
Nodes 7-8: FA DB
webhost1.mycompany.com…
webhostN.mycompany.com
fahost1.mycompany.com…
fahostN.mycompany.com
idmhost1.mycompany.com…
idmhostN.mycompany.com
fadbhost1.mycompany.com…
fadbhostN.mycompany.com
10 •
Nodes 1-2: IDM Web,
FA Web
•
Nodes 3-4: FA Mid*
•
Nodes 5-6: IDM Mid*
•
Nodes 7-8: IDM DB
•
Nodes 9-10: FA DB
webhost1.mycompany.com…
webhostN.mycompany.com
fahost1.mycompany.com…
fahostN.mycompany.com
idmhost1.mycompany.com…
idmhostN.mycompany.com
idmdbhost1.mycompany.com…
idmdbhostN.mycompany.com
fadbhost1.mycompany.com…
fadbhostN.mycompany.com
12 •
Nodes 1-2: IDM Web
•
Nodes 3-4: FA Mid
•
Nodes 5-6: FA*
•
Nodes 7-8: IDM Mid*
•
Nodes 9-10: IDM DB
•
Nodes 11-12: FA DB
idmwebhost1.mycompany.com…
idmwebhostN.mycompany.com
fawebhost1.mycompany.com…
fawebhostN.mycompany.com
fahost1.mycompany.com...
fahostN.mycompany.com
idmhost1.mycompany.com…
idmhostN.mycompany.com
idmdbhost1.mycompany.com…
idmdbhostN.mycompany.com
fadbhost1.mycompany.com…
fadbhostN.mycompany.com
2.3 Oracle Fusion Applications Directory Structure
After the Oracle Fusion Applications environment has been installed, the storage and
directory layout will vary depending on the following factors:
• Paths selected during the provisioning process
• Whether the local configuration option was selected during the provisioning
process
• Host names provided during the provisioning process
2.3.1 Installation Repository
The following diagram depicts the directory structure for the installation repository,
which is created from the Oracle Fusion Applications install zip files that are
Chapter 2
Oracle Fusion Applications Directory Structure
2-24
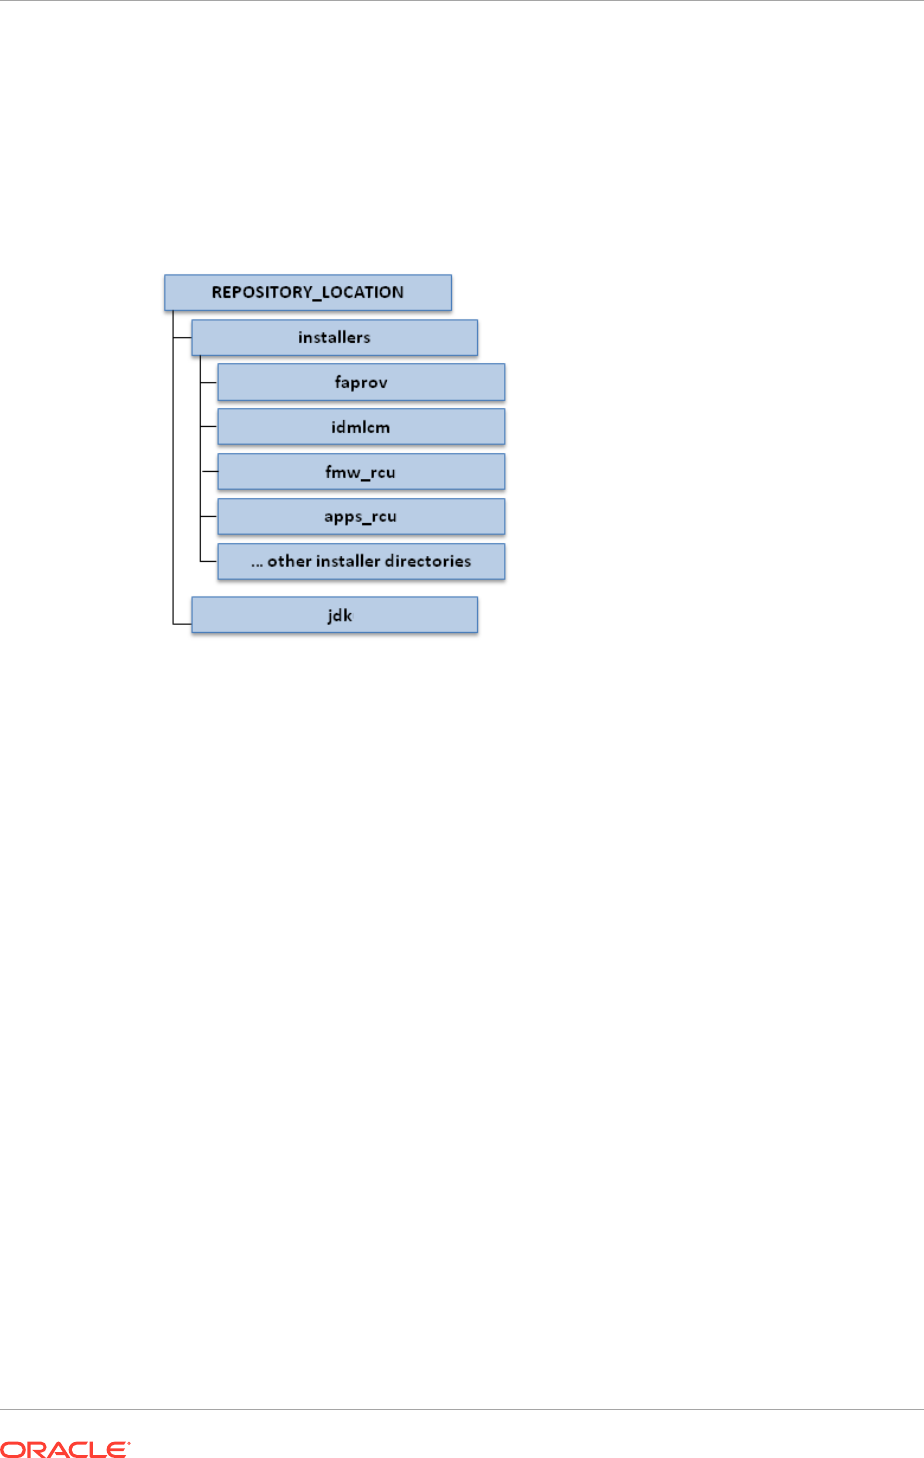
downloaded. The installation repository should be placed on a shared disk. The
installation repository is only required during the installation process. It is no longer
needed once the installation is complete.
The root directory for the installation repository is
REPOSITORY_LOCATION
.
Figure 2-5 Directory Structure for the Installation Repository
The directory structure is as follows, as shown in the previous diagram:
•
REPOSITORY_LOCATION
•
REPOSITORY_LOCATION/installers
•
REPOSITORY_LOCATION/installers/faprov
•
REPOSITORY_LOCATION/installers/idmlcm
•
REPOSITORY_LOCATION/installers/fmw_rcu
•
REPOSITORY_LOCATION/installers/apps_rcu
•
REPOSITORY_LOCATION/jdk
2.3.2 Oracle Identity Management Provisioning Framework Directory
Structure
The Oracle Identity Management provisioning framework should be installed on a
shared disk. The framework will have the directory layout shown in the following figure.
The directory to which the Oracle Identity Management provisioning framework is to be
installed is
IDMLCM_HOME
.
Chapter 2
Oracle Fusion Applications Directory Structure
2-25
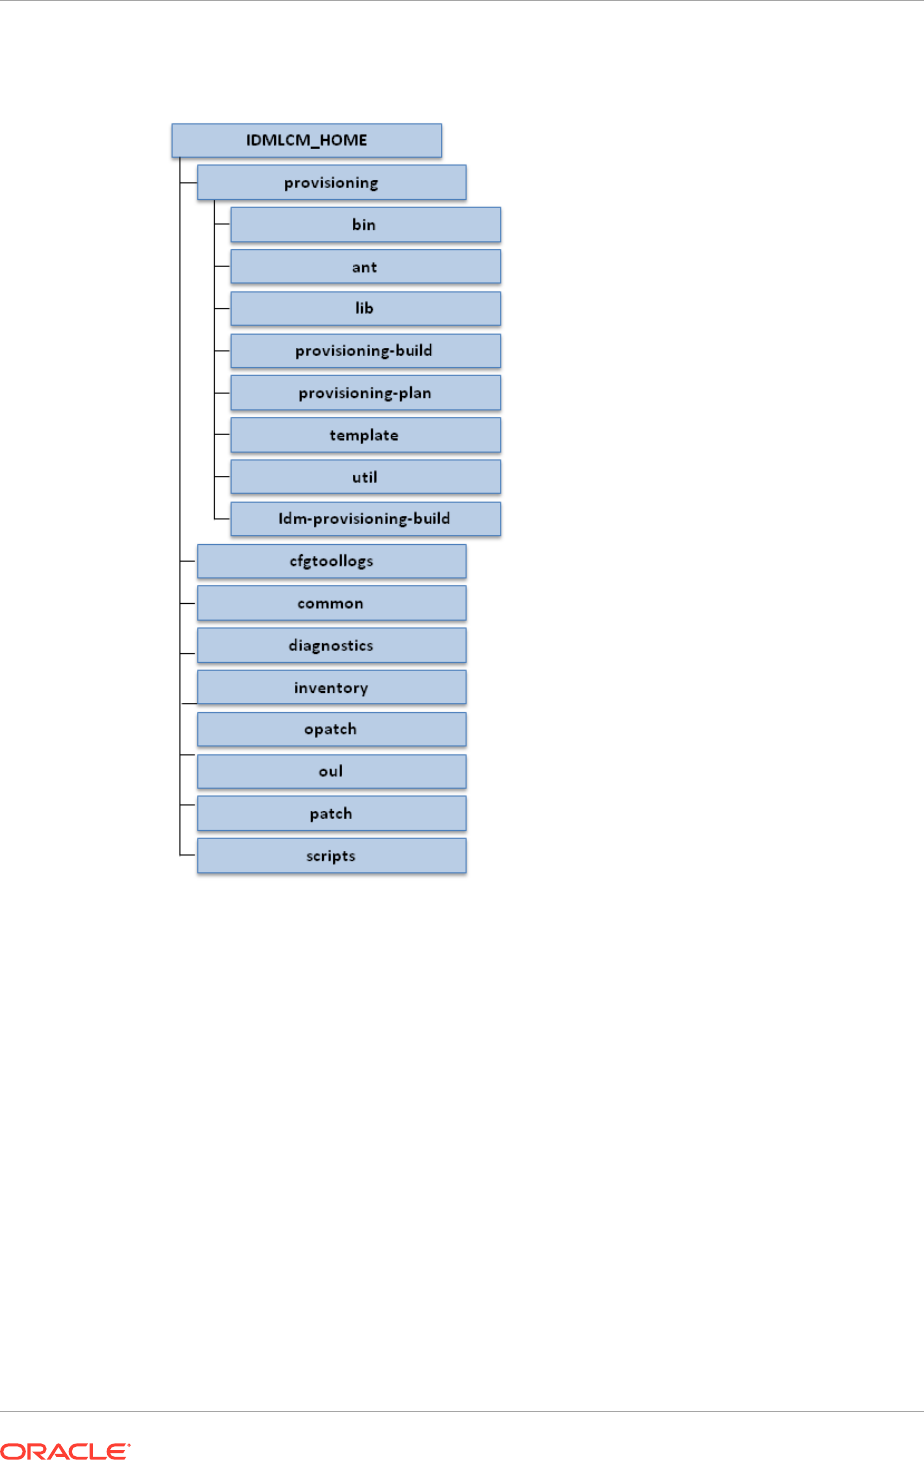
Figure 2-6 Oracle Identity Management Provisioning Framework Directory
Structure
The directory structure shown in the previous figure is listed as follows:
•
IDMLCM_HOME
•
IDMLCM_HOME/provisioning
•
IDMLCM_HOME/provisioning/bin
•
IDMLCM_HOME/provisioning/ant
•
IDMLCM_HOME/provisioning/lib
•
IDMLCM_HOME/provisioning/provisioning-build
•
IDMLCM_HOME/provisioning/provisioning-plan
•
IDMLCM_HOME/provisioning/template
•
IDMLCM_HOME/provisioning/util
•
IDMLCM_HOME/provisioning/idm-provisioning-build
•
IDMLCM_HOME/cfgtoollogs
Chapter 2
Oracle Fusion Applications Directory Structure
2-26
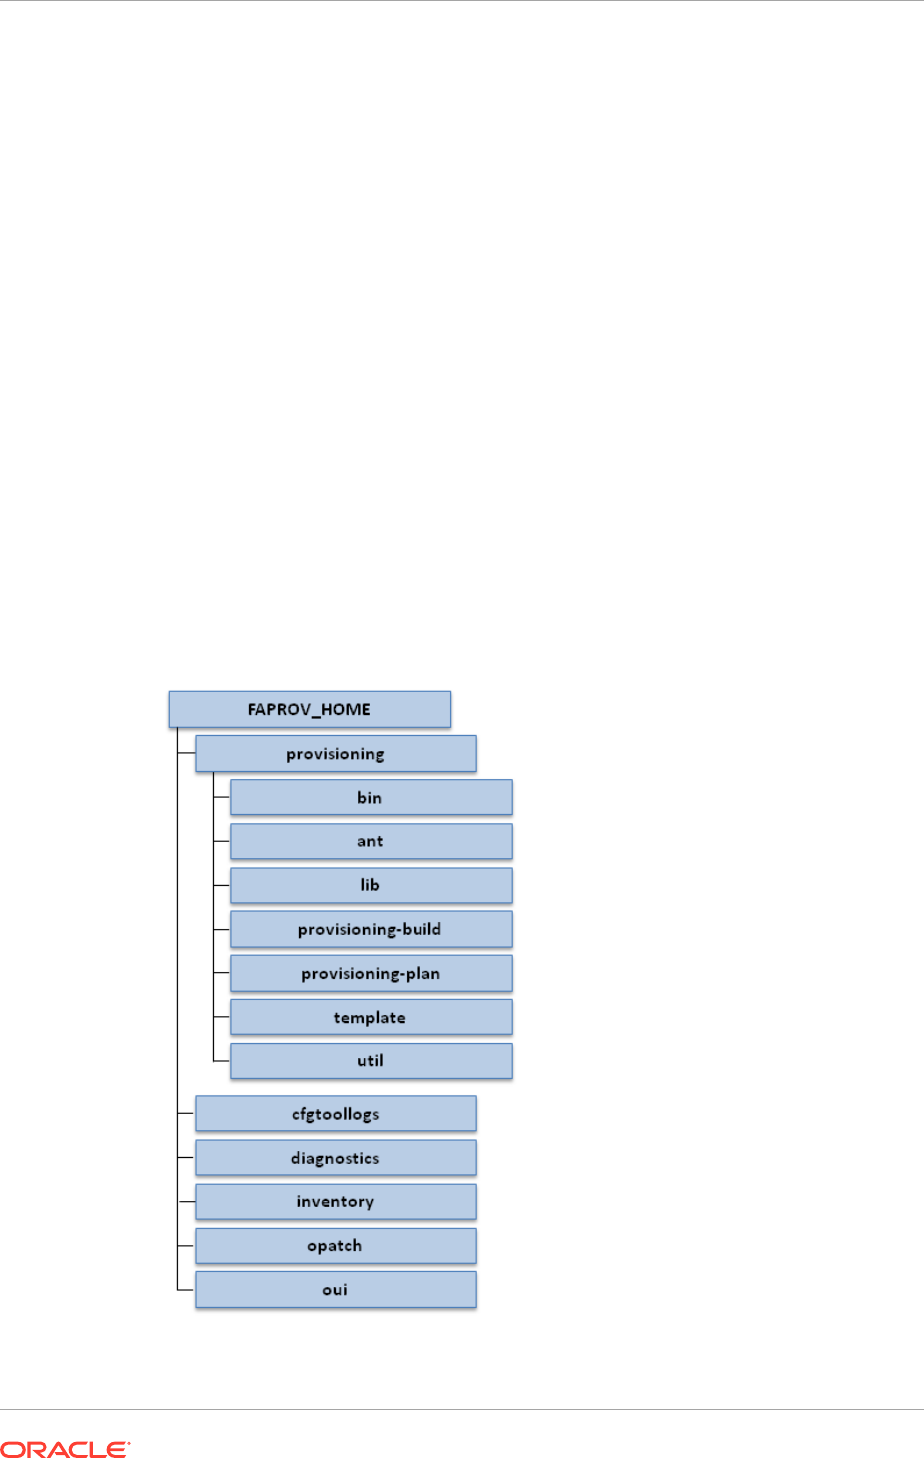
•
IDMLCM_HOME/common
•
IDMLCM_HOME/diagnostics
•
IDMLCM_HOME/inventory
•
IDMLCM_HOME/Opatch
•
IDMLCM_HOME/oui
•
IDMLCM_HOME/patch
•
IDMLCM_HOME/scripts
2.3.3 Oracle Fusion Applications Provisioning Framework Directory
Structure
The Oracle Fusion Applications provisioning framework should be installed on a
shared disk. The following diagram shows the directory structure of the provisioning
framework.
The directory to which the Oracle Fusion Applications provisioning framework is to be
installed is
FAPROV_HOME
.
Figure 2-7 Oracle Fusion Applications Provisioning Framework Directory
Structure
Chapter 2
Oracle Fusion Applications Directory Structure
2-27

The directory structure shown in the previous figure is listed as follows:
•
FAPROV_HOME
•
FAPROV_HOME/provisioning
•
FAPROV_HOME/provisioning/bin
•
FAPROV_HOME/provisioning/ant
•
FAPROV_HOME/provisioning/lib
•
FAPROV_HOME/provisioning/provisioning-build
•
FAPROV_HOME/provisioning/provisioning-plan
•
FAPROV_HOME/provisioning/template
•
FAPROV_HOME/provisioning/util
•
FAPROV_HOME/cfgtoollogs
•
FAPROV_HOME/diagnostics
•
FAPROV_HOME/inventory
•
FAPROV_HOME/Opatch
•
FAPROV_HOME/oui
2.3.4 Oracle Identity Management Shared Directory Structure
The Oracle Identity Management directory structure may be placed in shared storage
or in a combination of shared and local storage. The following diagram shows the
shared directory structure.
The root directory for Oracle Identity Management product binary files is
IDM_BASE
.
The root directory for Oracle Identity Management configuration and instance files is
IDM_CONFIG
.
The following diagram shows the structure of the shared Oracle Identity Management
directories.
Chapter 2
Oracle Fusion Applications Directory Structure
2-28
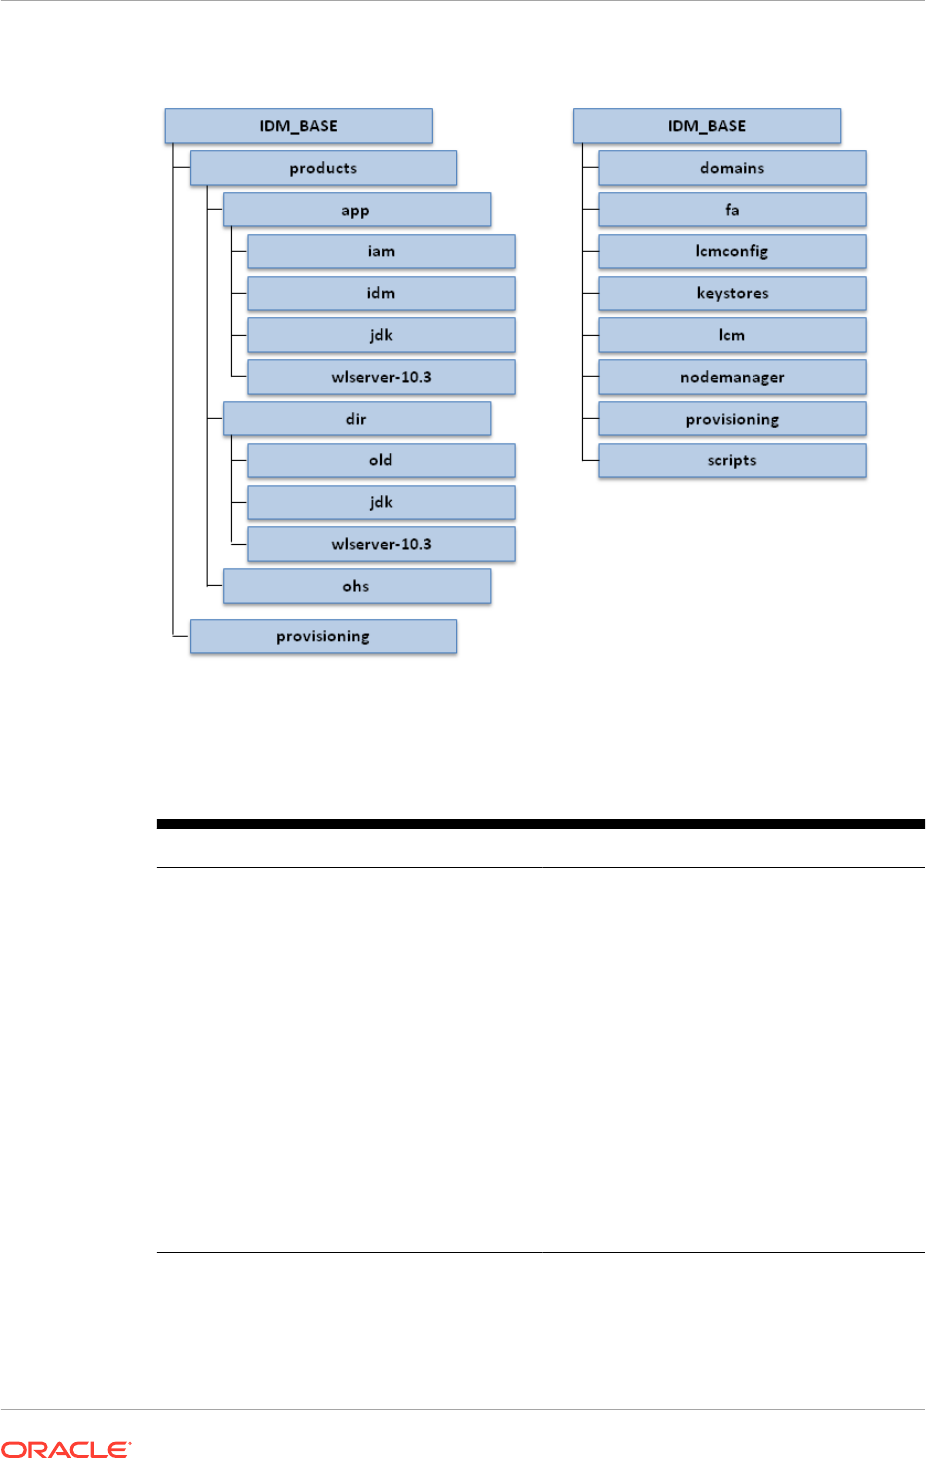
Figure 2-8 Oracle Identity Management Shared Directory Structure
The shared directory structure described in the previous diagram is listed here:
Table 2-12 Oracle Identity Management Shared Directory Structure
IDM_BASE IDM_CONFIG
•
IDM_BASE
•
IDM_BASE/products
•
IDM_BASE/products/app
•
IDM_BASE/products/app/iam
•
IDM_BASE/products/app/idm
•
IDM_BASE/products/app/jdk
•
IDM_BASE/products/app/
wlserver-10.3
•
IDM_BASE/products/dir
•
IDM_BASE/products/dir/oid
•
IDM_BASE/products/dir/jdk
•
IDM_BASE/products/dir/
wlserver_1.0.3
•
IDM_BASE/products/ohs
•
IDM_BASE/provisioning
•
IDM_CONFIG
•
IDM_CONFIG/domains
•
IDM_CONFIG/fa
•
IDM_CONFIG/lcmconfig
•
IDM_CONFIG/keystores
•
IDM_CONFIG/lcm
•
IDM_CONFIG/nodemanager
•
IDM_CONFIG/provisioning
•
IDM_CONFIG/scripts
Chapter 2
Oracle Fusion Applications Directory Structure
2-29
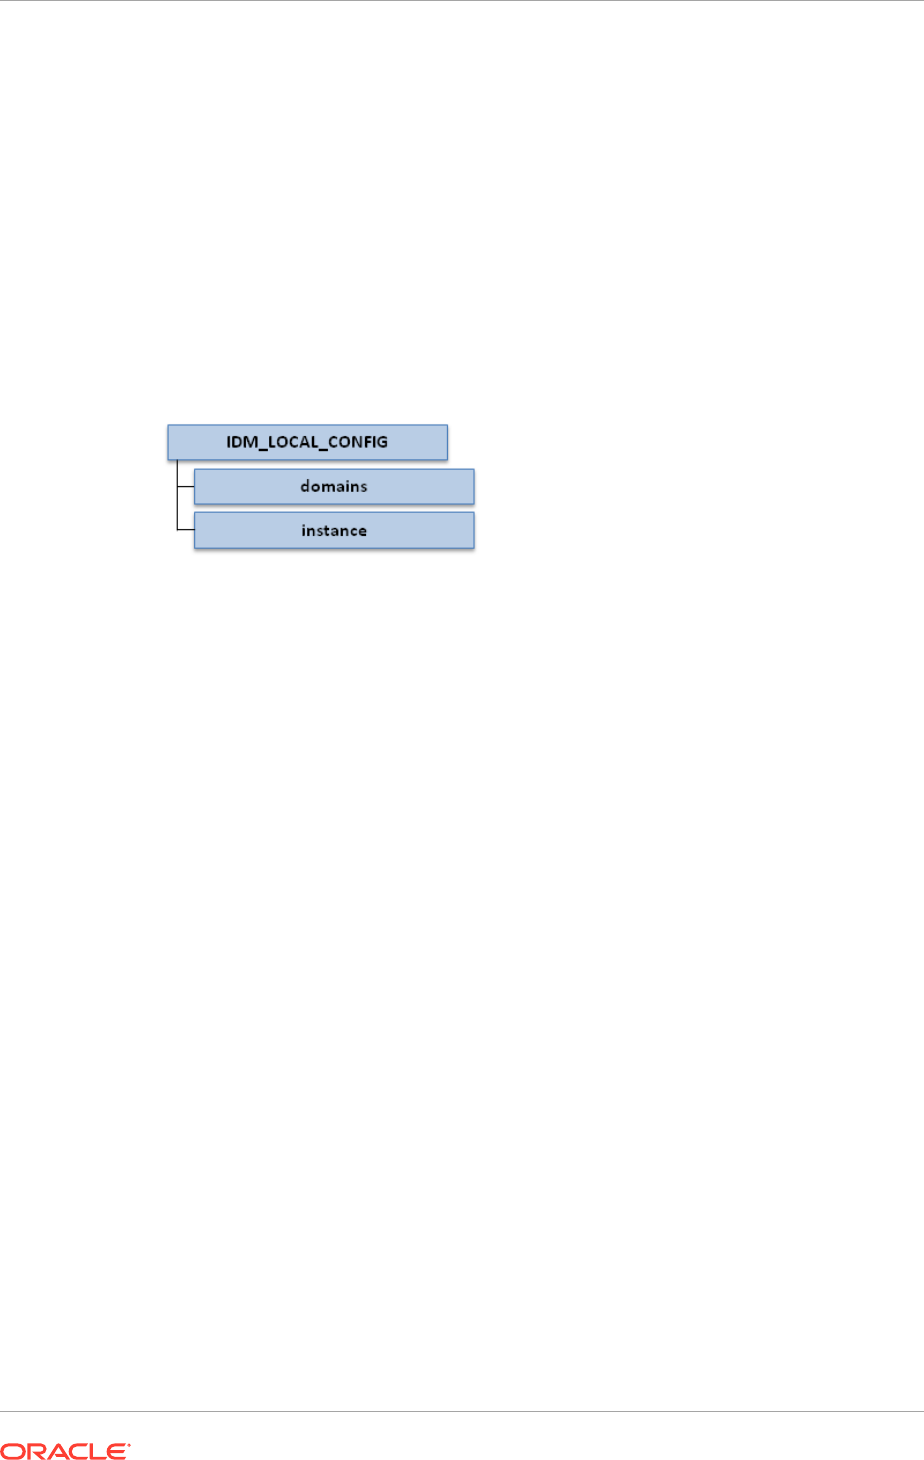
2.3.5 Oracle Identity Management Local Directory Structure
If local domain configuration is selected during Oracle Identity Management
provisioning (
INSTALL_LOCALCONFIG_ENABLE=true
), certain Oracle Identity
Management configuration directories are stored locally. All servers containing
WebLogic Server domains or Oracle Application Server instances contain this
directory.
The local root directory for Oracle Identity Management as defined by the provisioning
wizard is
IDM_LOCAL_CONFIG
. The directory structure is shown in the following diagram.
Figure 2-9 Oracle Identity Management Local Directory Structure
The Oracle Identity Management local directory structure shown in the previous
diagram is as follows:
•
IDM_LOCAL_CONFIG
•
IDM_LOCAL_CONFIG/domains
•
IDM_LOCAL_CONFIG/instances
If local domain configuration is not selected during Oracle Identity Management
provisioning, the Oracle Identity Management local directory structure is present in
the shared directory location itself.
2.3.6 Oracle Identity Management DMZ Directory Structure
If he DMZ option is selected during Oracle Identity Management provisioning
(
WEBTIER_DMZINSTALL_ENABLE=true
), the web tier Oracle Fusion Middleware home
as well as the OHS instance directory are stored locally to the DMZ. The directory
path used is the same as that for the shared storage, being
IDM_BASE
for the Fusion
Middleware home and
IDM_CONFIG
for the configuration directory.
The root directory in the local configuration as defined by the provisioning wizard is
IDM_LOCAL_CONFIG
.
Additionally, if the local domain configuration option is selected during Oracle Identity
Management provisioning (
INSTALL_LOCALCONFIG_ENABLE=true
), certain configuration
directories are stored locally under the directory defined for
IDM_LOCAL_CONFIG
.
The following diagram illustrates the Oracle Identity Management DMZ directory
structure.
Chapter 2
Oracle Fusion Applications Directory Structure
2-30
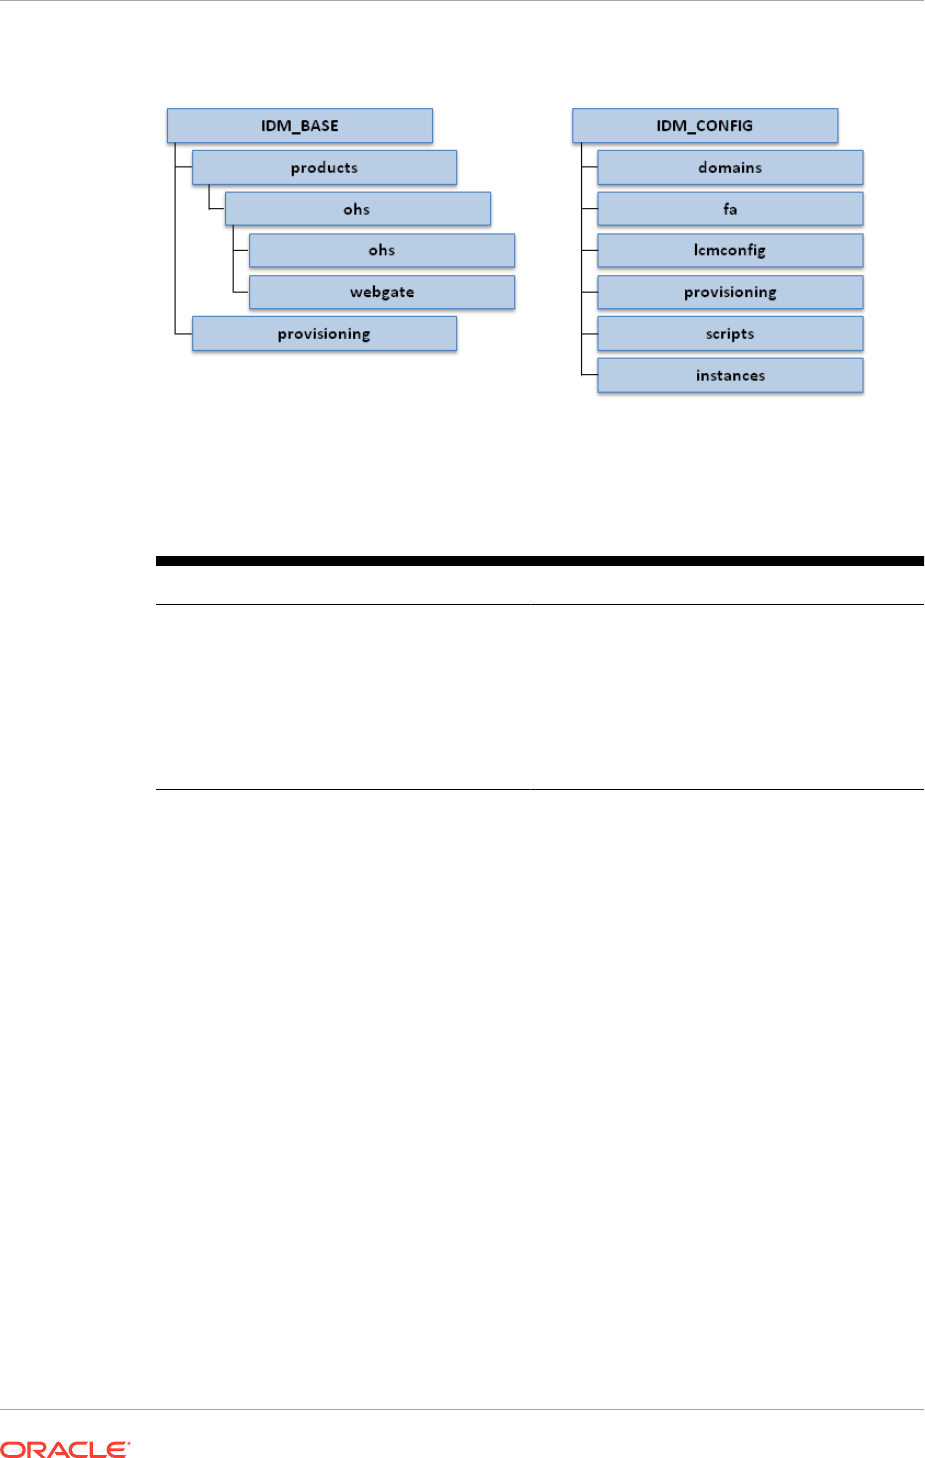
Figure 2-10 Oracle Identity Management DMZ Directory Structure
The directory structure shown in the previous diagram is as follows:
Table 2-13 Oracle Identity Management DMZ Directory Structure
IDM_BASE IDM_CONFIG
•
IDM_BASE
•
IDM_BASE/products
•
IDM_BASE/products/ohs
•
IDM_BASE/products/ohs/ohs
•
IDM_BASE/products/ohs/webgate
•
IDM_BASE/provisioning
•
IDM_CONFIG
•
IDM_CONFIG/domains
•
IDM_CONFIG/fa
•
IDM_CONFIG/lcmconfig
•
IDM_CONFIG/provisioning
•
IDM_CONFIG/scripts
•
IDM_CONFIG/instances
If the DMZ option is not selected during Oracle Identity Management provisioning, the
Oracle Identity Management DMZ directory structure is present in the shared directory
location itself.
2.3.7 Oracle Fusion Applications Shared Directory Structure
The Oracle Fusion Applications directory structure may be stored in a shared directory
or in a combination of shared and local storage.
The root directory for the Oracle Fusion Applications product binary files
is
APPLICATIONS_BASE
. The root directory for the Oracle Fusion Applications
configuration and instance files is
APPLICATIONS_CONFIG
.
The following diagram illustrates the Oracle Fusion Applications shared directory
structure.
Chapter 2
Oracle Fusion Applications Directory Structure
2-31
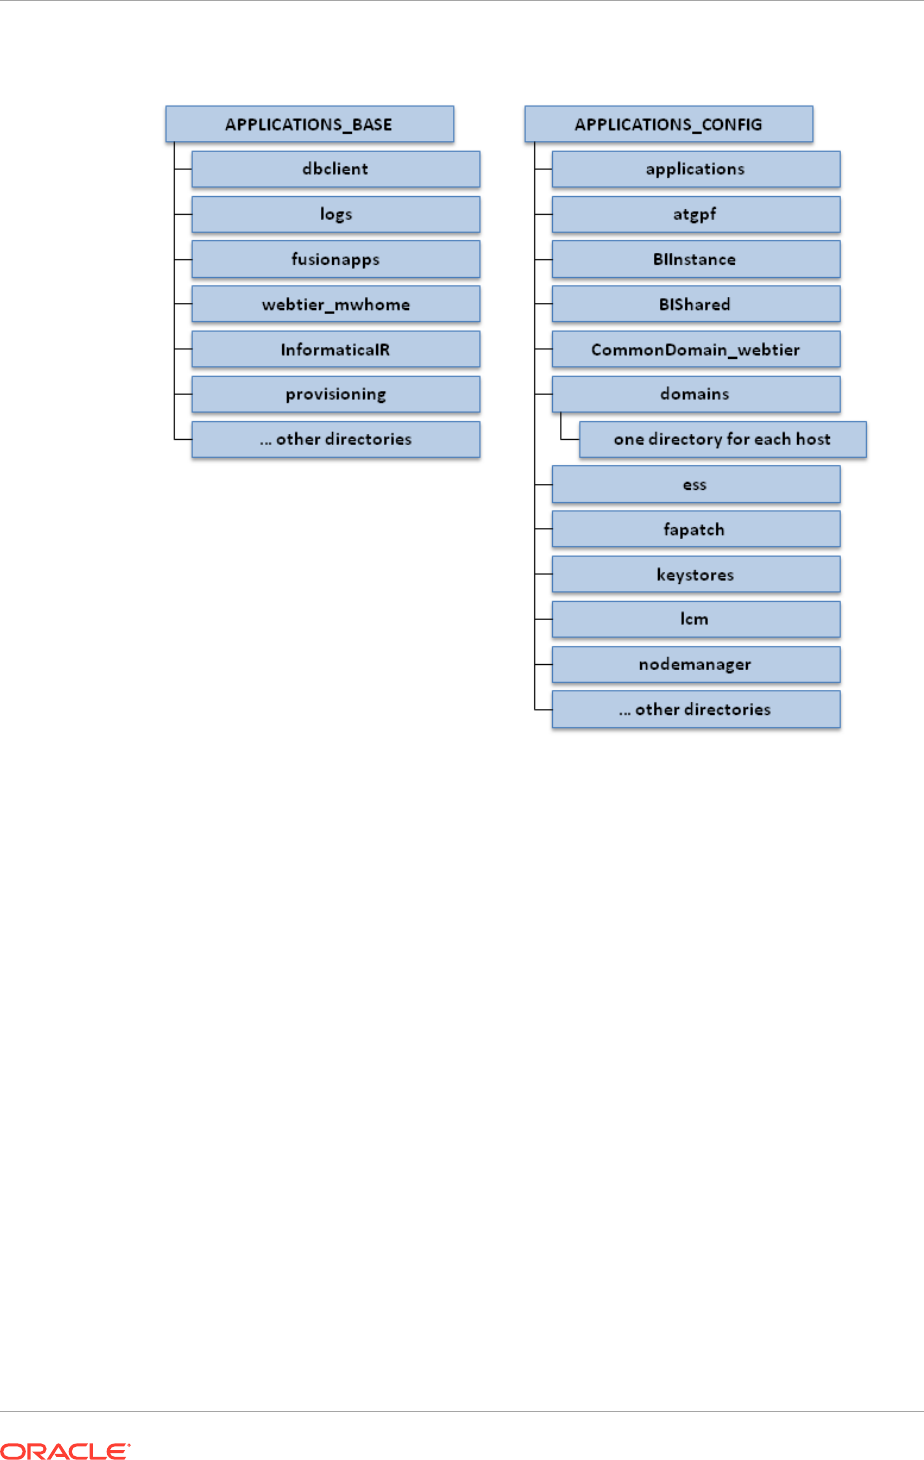
Figure 2-11 Oracle Fusion Applications Shared Directory Structure
The Oracle Fusion Applications shared directory structure shown in the previous
diagram is listed as follows.
Chapter 2
Oracle Fusion Applications Directory Structure
2-32

Table 2-14 Oracle Fusion Applications Shared Directory Structure
APPLICATIONS_BASE APPLICATIONS_CONFIG
•
APPLICATIONS_BASE
•
APPLICATIONS_BASE/dbclient
•
APPLICATIONS_BASE/logs
•
APPLICATIONS_BASE/fusionapps
•
APPLICATIONS_BASE/webtier_mwhome
•
APPLICATIONS_BASE/provisioning
• Other directories
•
APPLICATIONS_CONFIG
•
APPLICATIONS_CONFIG/
applications
•
APPLICATIONS_CONFIG/atgpf
•
APPLICATIONS_CONFIG/BIInstance
•
APPLICATIONS_CONFIG/BIShared
•
APPLICATIONS_CONFIG/
CommonDomain_webtier
•
APPLICATIONS_CONFIG/domains
•
APPLICATIONS_CONFIG/domains/
one
directory for each host
•
APPLICATIONS_CONFIG/ess
•
APPLICATIONS_CONFIG/fapatch
•
APPLICATIONS_CONFIG/keystores
•
APPLICATIONS_CONFIG/lcm
•
APPLICATIONS_CONFIG/nodemanager
• Other directories
The
BIIInstance
directory is placed on shared storage only if the local domains
configuration option is not selected.
The
CommonDomain_webtier
directory is placed in shared storage only if the DMZ
option is not selected.
2.3.7.1 Applications Base Directory
When an environment consists of multiple hosts, a central, shared provisioning
installation directory is required so that the location is visible to all provisioned hosts.
To achieve this setup, the use of full host names is required. Alias names are not
recommended.
The top-level directory for the Oracle Fusion Applications binaries is the applications
base. Specify a name for this directory at the time of provisioning. This
directory includes two mount points:
/net/mount1/appbase
(
APPLICATIONS_BASE
)
for components that remain read-only after provisioning, and
/net/mount2
(APPLICATIONS_CONFIG) to contain instances that are configurable after
provisioning. This structure aids performance issues and accommodates a "lock-down"
of binaries after provisioning. It ensures that the configurable components remain
available.
The applications base directory must not be set to the system root directory or set
to the root directory of a logical drive. Some life cycle management tools compute
directory names by backing up one directory level from the applications base directory
and then appending the appropriate subdirectory name. These tools will fail if the
applications base directory is set to the system root directory or set to the root
directory of a logical drive because it is not possible to back up one directory level
from the system root directory or from the root directory of a logical drive.
Chapter 2
Oracle Fusion Applications Directory Structure
2-33
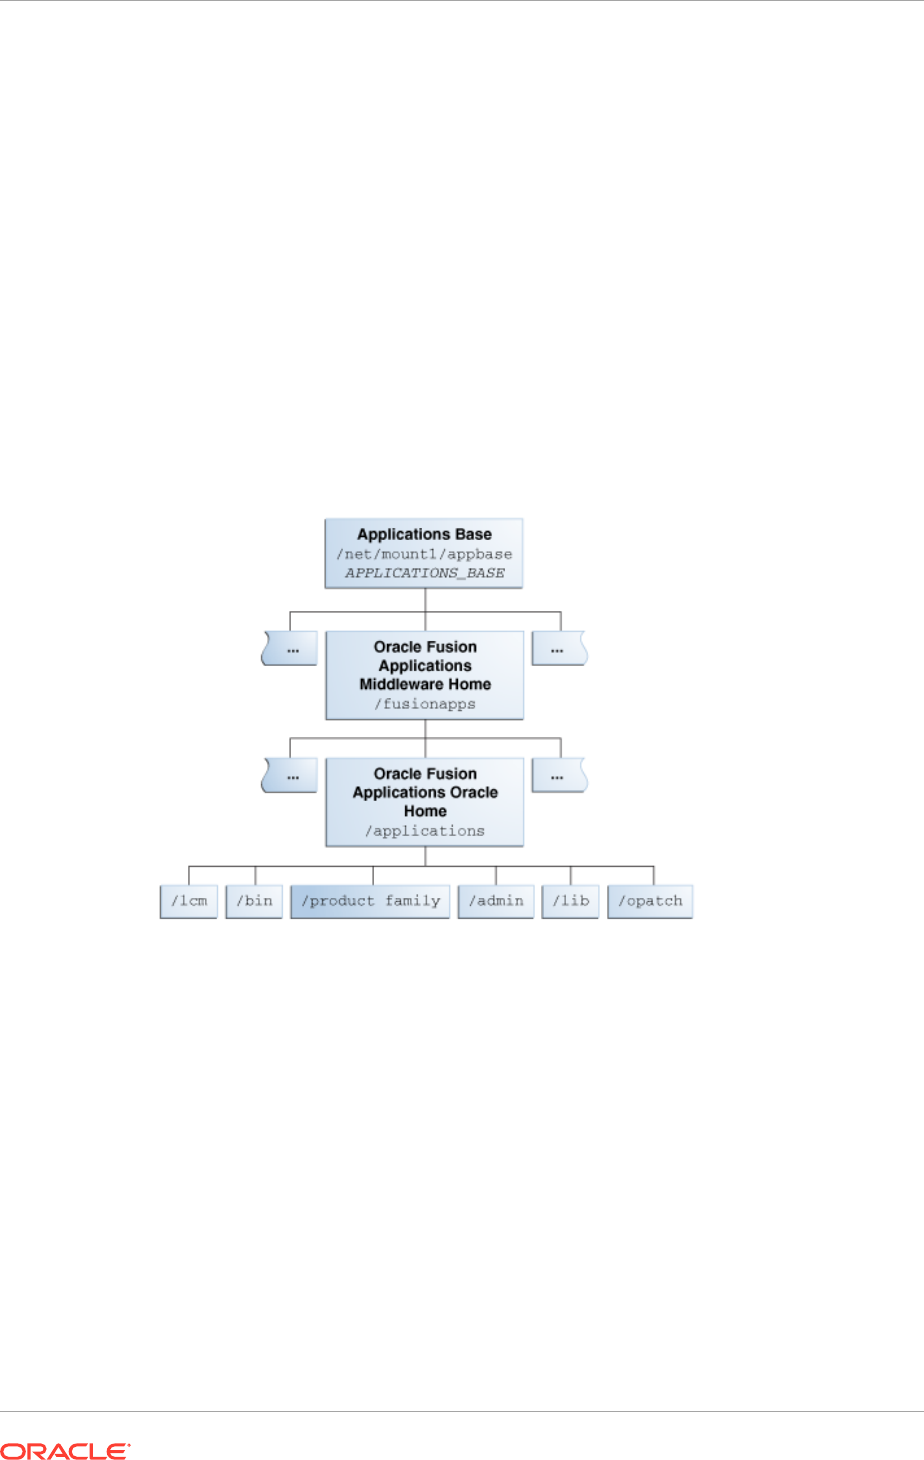
2.3.7.2 Oracle Fusion Applications Oracle Home Directory
In the context of Oracle Fusion Applications directory structures, the term home
directory generally refers to a directory that contains one or more Oracle Fusion
Middleware homes or Oracle Fusion Applications homes, which groups together
related Oracle product offerings.
As the home directory is read-only, update it only by using Oracle Fusion Applications
life cycle tools, such as Provisioning, Upgrade Orchestrator, and Patch Manager.
The Oracle Fusion Applications Oracle home directory (
FA_ORACLE_HOME
) is
located under the
APPLICATIONS_BASE/fusionapps
directory (
net/mount1/appbase/
fusionapps
). The
/fusionapps
directory is an Oracle Fusion Applications Middleware
home (
APPLICATIONS_BASE/fusionapps
). Figure 2-12 (page 2-34) shows this directory
structure.
Figure 2-12 Oracle Fusion Applications Oracle Home
The Oracle home contains the following subdirectories:
• /fusionapps/applications/lcm: The life cycle management directory. Contains the
patching framework artifacts in the following subdirectories:
– ../ad/bin: Patching framework software and executables, including C artifacts
and configuration scripts, that set the environment and start the corresponding
utility.
– ../ad/java: Java artifacts.
– ../ad/db/sql: Database artifacts and SQL files.
– ../ad/lib: Application libraries.
– ../ad/template: Configuration files or templates delivered and used by the
patching framework during configuration activities.
• /fusionapps/applications/bin: Executables called by Enterprise Scheduler
Service jobs.
Chapter 2
Oracle Fusion Applications Directory Structure
2-34
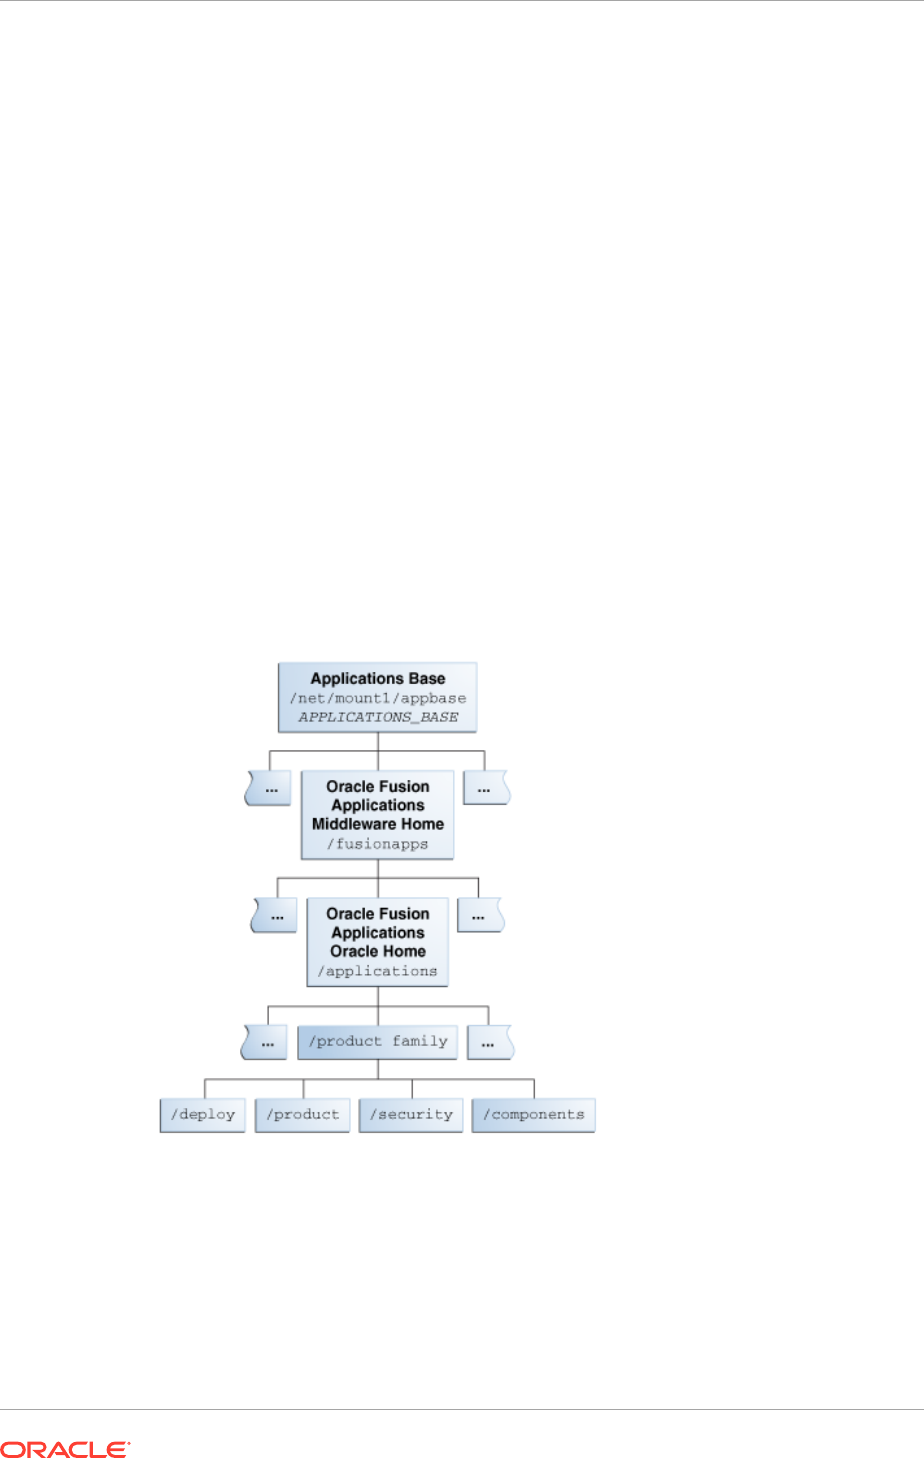
• /fusionapps/applications/product_family: Container directory for artifacts
specific to a product configuration, for example,
/ORACLE/fusionapps/fin
.
• /fusionapps/applications/admin: Patching framework environment properties
file (FUSION_env.properties), Oracle Fusion Applications AutoPatch, and the
patching logs, reports, and administration files. These files are required by Oracle
Fusion Applications Patch Manager.
• /fusionapps/applications/lib: Applications-specific libraries.
• /fusionapps/applications/OPatch: Contains the OPatch utility called by Oracle
Fusion Applications Patch Manager when patching middleware artifacts.
For complete information about patching the applications environment, see
Introduction to Patching Oracle Fusion Applications in the Oracle Fusion Applications
Patching Guide.
2.3.7.3 Oracle Fusion Applications Product Family Directory
The Oracle Fusion Applications
.../product_family
directory is located under the
FA_ORACLE_HOME
directory. This structure exists for each of the product configurations
(product families) deployed in the Oracle Fusion Applications environment during
provisioning. Figure 2-13 (page 2-35) shows this directory structure.
Figure 2-13 Oracle Fusion Applications Product Family Directory
The following subdirectories are located under the
.../product_family
directory:
• /fusionapps/applications/product_family/product: Product grouping within a
product family. For example,
/fusionapps/applications/fin/ar
represents the
Account Receivables product in the Financials product family.
– /db/plsql/: PL/SQL packages and bodies for a given product, for
example,
.../fin/ar/db/plsql/arp_process_line.pkh
.
Chapter 2
Oracle Fusion Applications Directory Structure
2-35
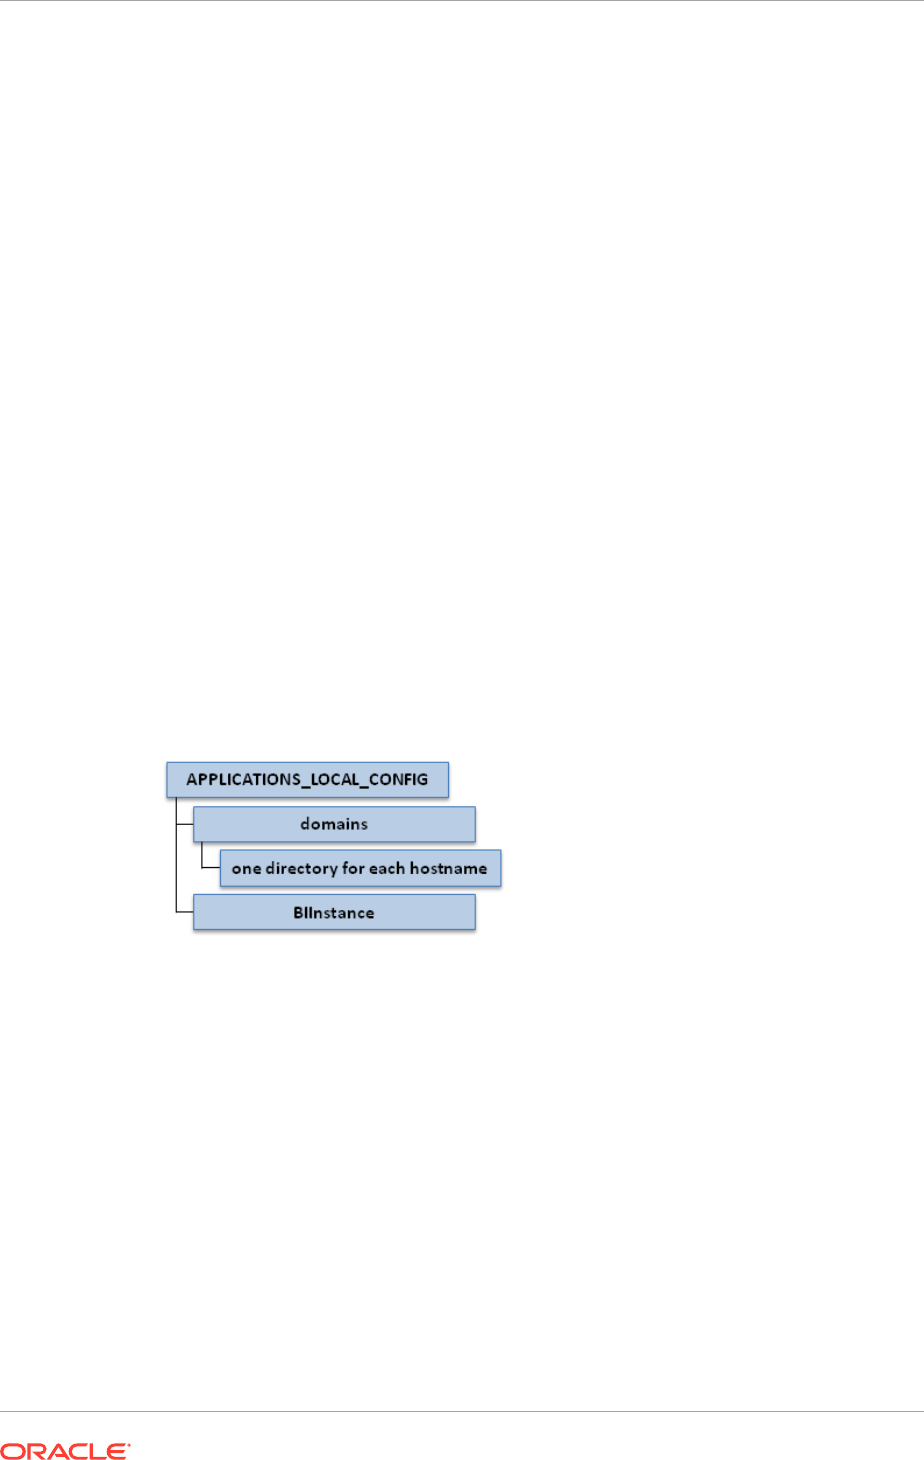
– /db/sql/: SQL scripts for a given product. For example,
.../fin/ar/db/sql/
ar_ar_rev_rec_typ_type.sql
.
– /db/data/lba/US/: Product-specific seed data files, striped by Logical
Business Area (LBA). Note that sub-directories could exist in the top-
level seed data directory because some LBAs can have sub-LBAs. For
example,
.../fin/ar/db/data/FinArCustomers/US/ArlookupTypeSD.xlf.
• /fusionapps/applications/product_family/deploy: Container directory for
deployable artifacts, composites, Java EE applications (such as Oracle Application
Development Framework and Oracle Enterprise Scheduler Service).
• /fusionapps/applications/product_family/security/: Product family directory
containing security-related files.
2.3.8 Oracle Fusion Applications Local Directory Structure
If the local domain configuration option is selected during Oracle Fusion Applications
provisioning (
INSTALL_LOCALCONFIG_ENABLE=true
), certain configuration directories
are stored locally. All servers containing domains or Oracle Application Server
instances will include this directory.
The local root configuration directory as defined in the provisioning wizard is
IDM_LOCAL_CONFIG
.
The following diagram illustrates the Oracle Fusion Applications shared directory
structure.
Figure 2-14 Oracle Fusion Applications Local Directory Structure
The directory structure shown in the previous diagram is listed here.
•
APPLICATIONS_LOCAL_CONFIG
•
APPLICATIONS_LOCAL_CONFIG/domains
•
APPLICATIONS_LOCAL_CONFIG/domains/
one directory for each host name
•
APPLICATIONS_LOCAL_CONFIG/BIInstance
2.3.9 Oracle Fusion Applications DMZ Directory Structure
If the DMZ option is selected during Oracle Fusion Applications provisioning
(
WEBTIER_DMZINSTALL_ENABLE=true
), the web tier Fusion Middleware home and the
OHS instance directory are stored locally to the DMZ. The directory path used is
the same as that defined for shared storage (
APPLICATIONS_BASE
for the Fusion
Middleware home and
APPLICATIONS_CONFIG
for the configuration directory).
Chapter 2
Oracle Fusion Applications Directory Structure
2-36

The tool local configuration directory as defined in the provisioning wizard is
APPLICATIONS_LOCAL_CONFIG
.
Additionally, if the local domain configuration option is selected during Oracle
Identity Management provisioning (
INSTALL_LOCALCONFIG_ENABLE=true
), certain
configuration directories are stored locally under the directory defined for
APPLICATIONS_LOCAL_CONFIG
.
The following diagram illustrates the Oracle Fusion Applications DMZ directory
structure.
Figure 2-15 Oracle Fusion Applications DMZ Directory Structure
The directory structure shown in the previous diagram is listed here.
Table 2-15 Oracle Fusion Applications DMZ Directory Structure
APPLICATIONS_BASE APPLICATIONS_CONFIG
•
APPLICATIONS_BASE
•
APPLICATIONS_BASE/webtier_mwhome
•
APPLICATIONS_BASE/
webtier_mwhome/webtier
•
APPLICATIONS_CONFIG
•
CommonDomain_webtier
2.4 Oracle Fusion Applications Runtime Processes
A running Oracle Fusion Applications environment includes the following runtime
processes:
• Databases: These include Oracle Fusion Applications and Oracle Identity
Management databases; Oracle Fusion Applications data warehouse.
• Oracle Application Server instances: Run C-based and Java SE components.
These include Oracle Internet Directory, Oracle Fusion Applications HTTP server,
Oracle Identity Management HTTP server, Oracle Global Order Processing, and
Oracle Business Intelligence.
• Oracle WebLogic Server domains: These run Java EE-based components, and
include administration and managed servers, as well as the node manager.
Chapter 2
Oracle Fusion Applications Runtime Processes
2-37

2.4.1 Database Instances and Other Processes
Both Oracle Identity Management and Oracle Fusion Applications have their own
databases, as listed in the following table.
Table 2-16 Database Instances in Oracle Fusion Applications
Provisioned
Environment
Database Sample Schemas Comments
Oracle Identity
Management
Oracle Identity
Management
Database
FA_OAM
Contains the
schemas for Oracle
Identity Management
products such as
Oracle Access
Manager.
Oracle Identity
Management
Oracle Internet
Directory Database
ODS
ODSSM
Contains the Oracle
Internet Directory
schemas. Optional as
a separate database,
otherwise the Oracle
Identity Management
database is used.
Oracle Fusion
Applications
Transactional
Database
FUSION
FUSION_RUNTIME
Contains the
transactional
schemas for Oracle
Fusion Applications.
Oracle Fusion
Applications
Data warehouse
Database
<prefix>_DW
is
the major data
warehouse schema,
where
<prefix>
is the
schema prefix selected
when the Oracle
Business Intelligence
Data warehouse RCU
runs.
Contains the
schemas for
the Oracle
Fusion Applications
Datawarehouse.
2.4.2 Oracle Application Server Instances
Oracle Application Server instances in the Oracle Fusion Applications environment are
listed here.
Application Server Instances in the Provisioned Oracle Identity Management
Environment
• Oracle Internet Directory
• Oracle Identity Federation
• Oracle HTTP Server
Application Server Instances in the Oracle Fusion Applications Environment
• Oracle Global Order Promising
• Oracle HTTP Server
Chapter 2
Oracle Fusion Applications Runtime Processes
2-38

• Oracle Business Intelligence
2.4.3 Oracle WebLogic Server Domains
The topology for an applications environment centers around a set of predefined
Oracle WebLogic Server domains. The provisioning process creates these domains
during the physical installation. It then deploys the product offerings selected
for installation in the associated product family domain. It also deploys common
applications for use by all product offerings and their dependent middleware
components.
After provisioning is complete, scale out Oracle Fusion Middleware components, such
as Oracle HTTP Server and Oracle SOA Suite, and product domains, such as Oracle
Fusion Customer Relationship Management domain, Oracle Fusion Common domain,
Oracle Fusion Human Capital Management domain, and so on.
A WebLogic Server domain is a logically related group of Oracle WebLogic Server
resources that is managed as a unit. It consists of an Administration Server and
one or more Managed Servers. A managed server hosts components and associated
resources that constitute each product configuration. The domains are predefined
to ensure that product offerings and their dependencies are always stored in a
standardized arrangement.
In each domain, every Managed Server belongs to a cluster. A cluster is a group of
Oracle WebLogic Servers that work together to provide scalability and high availability
for applications. A cluster appears as a single Oracle WebLogic Server instance. The
Managed Server instances that constitute a cluster can run on the same host or
be located on different hosts. Applications are deployed to the cluster, which implies
deployment to every Managed Server within the cluster.
The WebLogic Server domains run Java EE-based components and include
administration and managed servers, as well as the node manager.
The WebLogic Server domains that are part of a Oracle Fusion Applications
environment are listed here.
WebLogic Server Domains in the Provisioned Oracle Identity Management
Environment
•
IDMDomain
. Always available.
WebLogic Server Domains in the Provisioned Oracle Fusion Applications
Environment
• CommonDomain. Always available.
• HCMDomain. Always available.
• CRMDomain. Always available.
• FinancialsDomain. Always available.
• BIDomain. Always available.
• SCMDomain. Available only with the following offerings: Oracle Fusion Customer
Relationship Management, Oracle Fusion Financials, and Oracle Fusion Supply
Chain Management.
• ProcurementDomain. Available only with the following offerings: Oracle Fusion
Financials and Oracle Fusion Supply Chain Management.
Chapter 2
Oracle Fusion Applications Runtime Processes
2-39

• ProjectsDomain. Available only with the following offering: Oracle Fusion
Financials.
• ICDomain. Available only with the following offering: Oracle Fusion Incentive
Compensation.
• OSNDomain. Available only when Oracle Social Network is configured.
• HigherEdDomain. Available only in SaaS when Student Management is
configured.
For more information about the enterprise deployment of domains and instructions
about scale out, see Complete Conditional Common High Availability Post-Installation
Tasks for Oracle Fusion Applications (page 18-1).
2.5 Access Oracle Fusion Applications
End users access Oracle Fusion Applications through a set of URLs defined during the
provisioning process (the provisioning wizard calls them external URLs). Depending
on whether the topology includes a load balancer or reverse proxy, Oracle Fusion
Applications URL endpoints may be at the load balancer or reverse proxy, or directly at
the Oracle HTTP Server.
The main end user entry point to Oracle Fusion Applications is generally a URL similar
to the following:
https://fusionapps-common.mycompany.com/homePage
Each product family may have its own host name or port, depending on the web tier
and load balancer configuration in the provisioning wizard.
Administrators can access the administration consoles through a set of internal or
administrative URLs defined in the provisioning wizard. Administrators can use Oracle
Enterprise Manager Fusion Applications Control and Oracle Enterprise Manager Cloud
Control Console to manage the Oracle Fusion Applications environment.
As with all URLs in Oracle Fusion Applications, access is subject to authentication
through Oracle Access Manager.
For more information about using Fusion Applications Control and Cloud Control
Console, see Get Started with Enterprise Manager Cloud Control in the Oracle Fusion
Applications Administrator's Guide.
2.6 Next Steps
Now after having e a grasp of the basic process of provisioning, and an idea of
the structure and topologies of Oracle Fusion Applications environments, plan the
deployment. Proceed to the Planning section for more information.
Chapter 2
Access Oracle Fusion Applications
2-40

3
Plan the Topology and Provisioning of the
Installation
Planning an Oracle Fusion Applications installation is a prerequisite to a successful
install, and may involve a variety of users. To plan the installation fully, it might be
necessary to collaborate with database administrators, network engineers, and other
specialized administrators within the organization. This material also assumes that at
least one person is guiding the installation overall and is taking the role of the "Oracle
Fusion Applications Administrator".
The planning material is split into two sections, Plan the Topology and Provisioning
of the Installation (page 3-1), and Plan the Configuration of the Components of the
Installation (page 4-1). Though the material is divided, all the tasks are important and
relate sequentially to each other.
There is also a companion Microsoft Excel spreadsheet, the Oracle Fusion
Applications Installation Workbook, that is filled out during the planning phase.
3.1 Introduction
Planning includes the following subjects:
• Introduction (page 3-1) where the various sections are outlined and the Workbook
is introduced.
• Environment: Completing the Environment Tab Entries (page 3-4): Helps to define
the basic environment configuration and fill out the first tab of the Workbook.
• Provisioning: Planning the Configuration of the Provisioned Installation (page 3-8):
Helps to define the licensed offerings and components that are installed using
the Provisioning Wizard, and points to a list of post-provisioning tasks to be
performed.
• Topology: Planning the Topology (page 3-12): Helps to define the topology to be
used and how components are assigned to each node of the topology.
• Network- Virtual Hosts: Planning Network Configuration (page 4-1): Helps to
understand networking concepts used by Oracle Fusion Applications as well as
prerequisites and how to fulfill them before starting the provisioning process.
• Network-Ports: Planning Ports (page 4-14): Shows the default ports and where
they can be changed if necessary.
• Storage: Planning Storage Configuration (page 4-15): Helps to understand storage
requirements and plan for them.
• Database: Planning Database Configuration (page 4-23): Explains database usage
in Oracle Fusion Applications and helps to plan for the creation of the required
databases.
• Identity Management: Planning Oracle Identity Management Configuration
(page 4-30): Explains key concepts needed to plan for the Oracle Identity
3-1

Management provisioning and to understand its integration with Oracle Fusion
Applications and other components.
• SSL and Certificates (page 4-33): Gives tips on completing the SSL and
Certificates section of the Workbook.
While all of these areas are equally important, certain areas are more closely related
to certain roles, for example, the "Planning the Database" section is normally used by
the database administrator, while the "Planning the Network Configuration" section is
normally used by network engineers.
3.1.1 Use the Oracle Fusion Applications Installation Workbook
The Oracle Fusion Applications Installation Workbook is a companion document to this
guide. It is used by the architects, system engineers, and implementers to plan and
record all the details for an environment installation (such as server names, URLs,
port numbers, installation paths, etc.). The Oracle Fusion Applications Installation
Workbook is a single input for the entire process, allowing for:
• Separation of tasks between architects, system engineers and implementers
• Comprehensive planning before the implementation
• Validation of planned decisions before actual implementation
• Consistency during implementation
• A record of the environment for future use
A typical use case for the Oracle Fusion Applications Installation Workbook is:
• Architect(s) read through the first five sections of this guide, and fill in the
corresponding sections of the Oracle Fusion Applications Installation Workbook;
• The Oracle Fusion Applications Installation Workbook is validated by other
architects and system engineers;
• Architect uses the validated plan to initiate network and system change requests
with system engineering departments;
• Implementer or System Integrator uses the Oracle Fusion Applications Installation
Workbook and the subsequent sections of this guide as input/instructions to
perform the installation and configuration tasks.
3.1.1.1 Oracle Fusion Applications Installation Workbook Structure
The Oracle Fusion Applications Installation Workbook is divided into the tabs listed
below. Each section of Plan the Topology and Provision of the Installation (page 3-1)
and Plan the Configuration of the Components of the Installation (page 4-1) contains a
corresponding Oracle Fusion Applications Installation Workbook reference section, to
guide in filling out the worksheets step-by-step.
• Environment (Environment: Complete the Environment Tab Entries (page 3-4))
• Provisioning (Provisioning: Plan the Configuration of the Provisioned Installation
(page 3-8))
• Topology (Topology: Plan the Topology (page 3-12))
• Network - Virtual Hosts (Network- Virtual Hosts: Plan Network Configuration
(page 4-1))
Chapter 3
Introduction
3-2

• Network - Ports (Network-Ports: Plan Ports (page 4-14))
• Storage (Storage: Plan Storage Configuration (page 4-15))
• Databases (Database: Plan Database Configuration (page 4-23))
• Identity Management (Identity Management: Plan Oracle Identity Management
Configuration (page 4-30))
• SSL (SSL and Certificates (page 4-33))
3.1.2 Plan for Platform-Specific Considerations
There are specific platform requirements for desktop tools, the Repository Creation
Assistant, OAM modes, the Business Intelligence Applications tool, and print servers.
3.1.2.1 Desktop Tools
Windows only:
• Smart View
• ADF Desktop integration/ADFdi
• Hyperion Financial Reporting Studio
• Financial Reporting Center
• MS Project integrations
• Financials requires print servers on Windows for ODC / OFR
It is also necessary to have network sharing between Windows and non-Windows
platforms, in order to use the Windows-only applications.
Power-users may need to set up a Windows Remote Desktop Connection.
3.1.2.2 Oracle Fusion Applications Repository Creation Utility (Oracle Fusion
Applications RCU)
Windows or Linux only
The Oracle Fusion Applications RCU can run against databases on any platform.
However, the Oracle Fusion Applications RCU is only available on the Linux and
Windows platforms. This means if Oracle Fusion Applications is being installed on
another platform, plan to make a Linux or Windows host available specifically to run
the Oracle Fusion Applications RCU.
3.1.2.3 OAM Modes Supported
OAM modes support for Oracle Fusion Applications depends on the platform being
used. For all platforms, only Simple mode is supported. For more information about
OAM modes, see Oracle Access Manager Transfer Mode (page 4-31).
3.1.2.4 BI Administration Tool
The BI Administration tool is required to manage the Business Intelligence repository
and must be used to update database details for Business Intelligence connections.
Chapter 3
Introduction
3-3

This tool is only available on the Windows platform. Plan to make at least one
Windows host available to use this tool.
3.1.2.5 Print Servers
Oracle Financials requires print servers on Windows in order to use Oracle Data
Capture/Oracle Forms Recognition.
3.2 Environment: Complete the Environment Tab Entries
The Environment tab includes basic Environment Info, Email settings, and Web Proxy
information tables. The basic Info table requires understanding of the topologies
described in Oracle Identity Management Topologies (page 3-4) and Oracle Fusion
Applications Topologies (page 3-4).
3.2.1 Oracle Identity Management Topologies
The Oracle Identity Management Provisioning Wizard supports three topology types
for Oracle Identity Management. These topologies are related to the type of
environment being created (e.g. development, test, production) and the desired
availability (HA, non-HA). In the table below, the "Corresponding Sample Topolog[ies]"
are described in Oracle Fusion Applications Topologies (page 2-13).
Oracle Identity
Management
Topology Type
Corresponding
Sample Topology
Notes
Single Host Basic Recommended for dev/demo environments
only
Installs all tiers (Directory, Access, Web) on the
same host
No LBR required
Uses OID as the Identity Store
EDG Topology Enterprise Non-HA Recommended for enterprise environments
where high-availability is not required.
Provides the option to install the 3 tiers on up
to 3 different hosts.
LBR required
Uses OID as the Identity Store
EDG Topology +
Configure second
application instances
Enterprise HA Recommended for enterprise environments
with high availability requirements.
Provides the option to install the 3 tiers on
up to 6 different hosts (with 2 hosts per tier -
primary and secondary).
LBR required
Uses OID as the Identity Store
3.2.2 Oracle Fusion Applications Topologies
The Oracle Fusion Applications Provisioning Wizard supports three topology types as
well, but unlike the Oracle Identity Management topologies, Oracle Fusion Applications
topologies are not necessarily related to the type of environment being created
Chapter 3
Environment: Complete the Environment Tab Entries
3-4

(development, test, production) and none of them provides high availability out of
the box. (High availability for Oracle Fusion Applications components must be done
manually, as a post-install step). Instead, these topologies define how the various
Oracle Fusion Applications components are split across servers, so the main driver for
this decision should be server hardware capacity (memory and processing power).
Additionally, these topologies apply only to the Mid Tier. The Web Tier can use a
separate host or, if desired, share the same host with the Mid Tier.
Oracle Fusion
Applications Topology
Type
Notes
One host for all domains Recommended for environments where a single server can
handle the memory and CPU requirements for all Oracle Fusion
Applications mid tier components.
One host per domain Recommended for environments where a single server cannot
handle the memory and CPU requirements for all Oracle Fusion
Applications mid tier components, so splitting the domains across
different hosts is necessary. This topology allows to assign entire
domains to specific hosts, and different domains can share the
same host if desired.
One host per application
and Middleware
component
Recommended for environments where a single server cannot
handle the memory and CPU requirements for all Oracle Fusion
Applications mid tier components, so splitting the domains across
different hosts is necessary. This topology allows to assign each
individual component (WebLogic AdminServer or Managed Server)
to a specific host, allowing for maximum flexibility in component
assignment.
3.2.3 Complete the Environment Info Table
This area is informational and used to orient all the people who interacts with this
Workbook about the current installation environment.
Table 3-1 Environment
Name Required Description
Company Name No My Company
Environment Type Yes Select the operating systems used for
Oracle Fusion Applications, Oracle Identity
Management, and the database(s).
Oracle Fusion Applications
Version
Yes Enter the Oracle Fusion Applications
version number that is being installed, as
well as the Oracle Identity Management
version number. This is important for
patching.
Install Type No Entries such as "dev", "qa" or "prod" help
others understand the use case for this
particular installation.
Domain Name Yes
www.mycompany.com
Chapter 3
Environment: Complete the Environment Tab Entries
3-5

Table 3-1 (Cont.) Environment
Name Required Description
Topology Type for Oracle
Identity Management
Yes Select the corresponding type of Oracle
Identity Management installation to run:
Single Host, EDG (Enterprise), or EDG
with added nodes. See Oracle Identity
Management Topologies (page 3-4).
Topology Type for Oracle
Fusion Applications
Yes Select which type of provisioning-wizard
based installation is run for Oracle Fusion
Applications: One host, One host per
domain, or One host per application and
Middleware component. See Oracle Fusion
Application Topologies (page 3-4).
Load Balancer or Reverse
Proxy
Yes Select an option based on whether a load
balancer or reverse proxy is used or not
and the how the load balancer or reverse
proxy is used.
3.2.4 Complete the Email Server Table
During both Oracle Fusion Applications and Oracle Identity Management Provisioning,
email server information must be entered. Oracle Fusion Applications sends
emails to end-users and administrators for notification (business processes, Identity
Management) and, if CRM is installed, also for marketing purposes. An e-mail server
is required to send out these messages and normally the corporate e-mail server is
used for this purpose
If corporate email is used, fill in the appropriate part of the Oracle Fusion Applications
using the table below for guidance.
Table 3-2 Environment: Email
Name Sample Value Notes
SMTP Server Host
mail.mycompany
.com
N/A
SMTP Server Port 25 25 is the standard value; other ports can be
used.
SMTP Server Security open There are two possibilities: open or
authentication required. Applies to Oracle
Identity Management Provisioning only.
SMTP Username N/A This user name is only required if
server security is not open and requires
authentication. Applies to Oracle Identity
Management Provisioning only.
Chapter 3
Environment: Complete the Environment Tab Entries
3-6
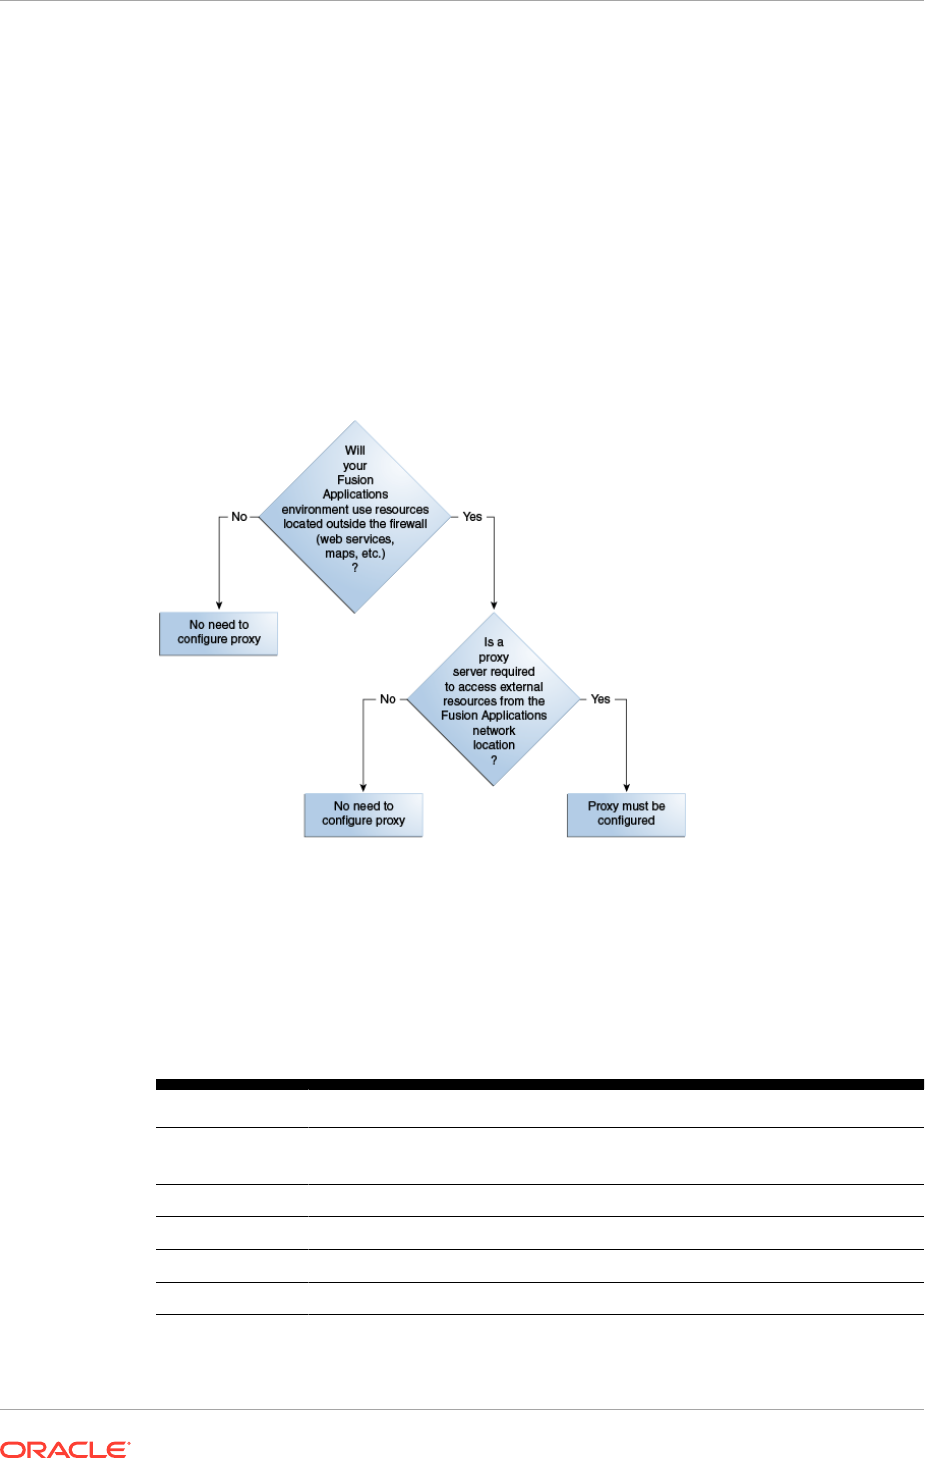
3.2.5 Complete the Web Proxy Table of the Oracle Fusion Applications
Installation Workbook
Oracle Fusion Applications supports configuring a web proxy host for use whenever
Oracle Fusion Applications must access resources (e.g. web services, maps, etc.)
that are located outside the firewall. Verify with the network administrator if a proxy
server is needed in order for Oracle Fusion Applications to access external resources;
if so, then web proxy information must be provided during Oracle Fusion Applications
Provisioning.
Figure 3-1 Web Proxy decision tree
Note that this proxy configuration is server-side and not related to the proxy
configuration available in end-user's web browsers.
To incorporate an existing web proxy into the Oracle Fusion Applications environment,
then enter the details in the Workbook, following the guidelines below.
Table 3-3 Environment: Web Proxy
Name Sample Value Description
Proxy Host
proxy.mycompany.
com
Proxy host name
Proxy Port 80 and 443 Standard non-SSL and SSL ports are the default
Secure Proxy yes | no SSL or non-SSL configuration
Proxy Exceptions N/A Any proxy exceptions
Proxy Username Used if secure proxy is enabled
Chapter 3
Environment: Complete the Environment Tab Entries
3-7

3.3 Provisioning: Plan the Configuration of the Provisioned
Installation
Oracle Fusion Applications is delivered as a suite, but can be adopted modularly. It
can be adopted as a single suite, as product offerings (the highest level collection of
functionality that can be licensed and implemented), or as solutions sets that work with
other Oracle Applications Unlimited product lines.
The offerings were licensed when Oracle Fusion Applications was purchased, and
in the Provisioning Wizard select the offerings planned to be installed as part of the
complete Oracle Fusion Applications install. The offerings selected define, among
other things:
• The product families and respective WebLogic domains that are configured
• The applications that are installed
• The tech stack components that are installed
3.3.1 Provisioning: Indicate the Oracle Fusion Applications Offerings to
Install
This table provides helpful reference for all users of the Oracle Fusion Applications
Installation Workbook.
3.3.1.1 Complete the Oracle Fusion Applications Offerings Table
Enter the Oracle Fusion Applications product offerings that were licensed by the
enterprise.
Family Offering Install?
Oracle Fusion
Customer Relationship
Management
Marketing Enter Yes or No
Oracle Fusion
Customer Relationship
Management
Sales Enter Yes or No
Oracle Fusion
Financials
Financials Enter Yes or No
Oracle Fusion
Financials
Procurement Enter Yes or No
Oracle Fusion
Financials
Projects Enter Yes or No
Oracle Fusion Human
Capital Management
Workforce Deployment Enter Yes or No
Oracle Fusion Human
Capital Management
Workforce Development Enter Yes or No
Oracle Fusion Human
Capital Management
Compensation Management Enter Yes or No
Chapter 3
Provisioning: Plan the Configuration of the Provisioned Installation
3-8

Family Offering Install?
Oracle Fusion Supply
Chain Management
Product Management Enter Yes or No
Oracle Fusion Supply
Chain Management
Order Orchestration Enter Yes or No
Oracle Fusion Supply
Chain Management
Manufacturing and Supply Chain Material
Management
Enter Yes or No
Oracle Fusion Supply
Chain Management
Price Management Enter Yes or No
Oracle Fusion Supply
Chain Management
Value Chain Planning Enter Yes or No
Oracle Fusion Supply
Chain Management
Material, Management and Logistics Enter Yes or No
Oracle Fusion Supply
Chain Management
Supply Chain Financial Orchestration Enter Yes or No
Oracle Fusion
Customer Data Hub
Not Applicable Enter Yes or No
Oracle Fusion
Enterprise Contracts
Not Applicable Enter Yes or No
Oracle Fusion
Accounting Hub
Not Applicable Enter Yes or No
Oracle Fusion Incentive
Compensation
Not Applicable Enter Yes or No
3.3.2 Provisioning: Describe the Oracle Identity Management
Components
The Oracle Identity Management installation also includes multiple components, all
of which are installed by default. Note that Oracle Identity Federation (OIF) is not
automatically configured and its use is optional.
To review the Oracle Identity Management Toplogies, see Oracle Identity Management
Topologies (page 3-4).
A brief discussion about whether to use OIF is below.
3.3.2.1 OIF
Oracle Identity Federation is installed by default, and can be used for federation.
The federation package of standard protocols allows Oracle Identity Management
to communicate with an external identity or service provider. See Configure Oracle
Identity Federation (page 16-23).
Chapter 3
Provisioning: Plan the Configuration of the Provisioned Installation
3-9
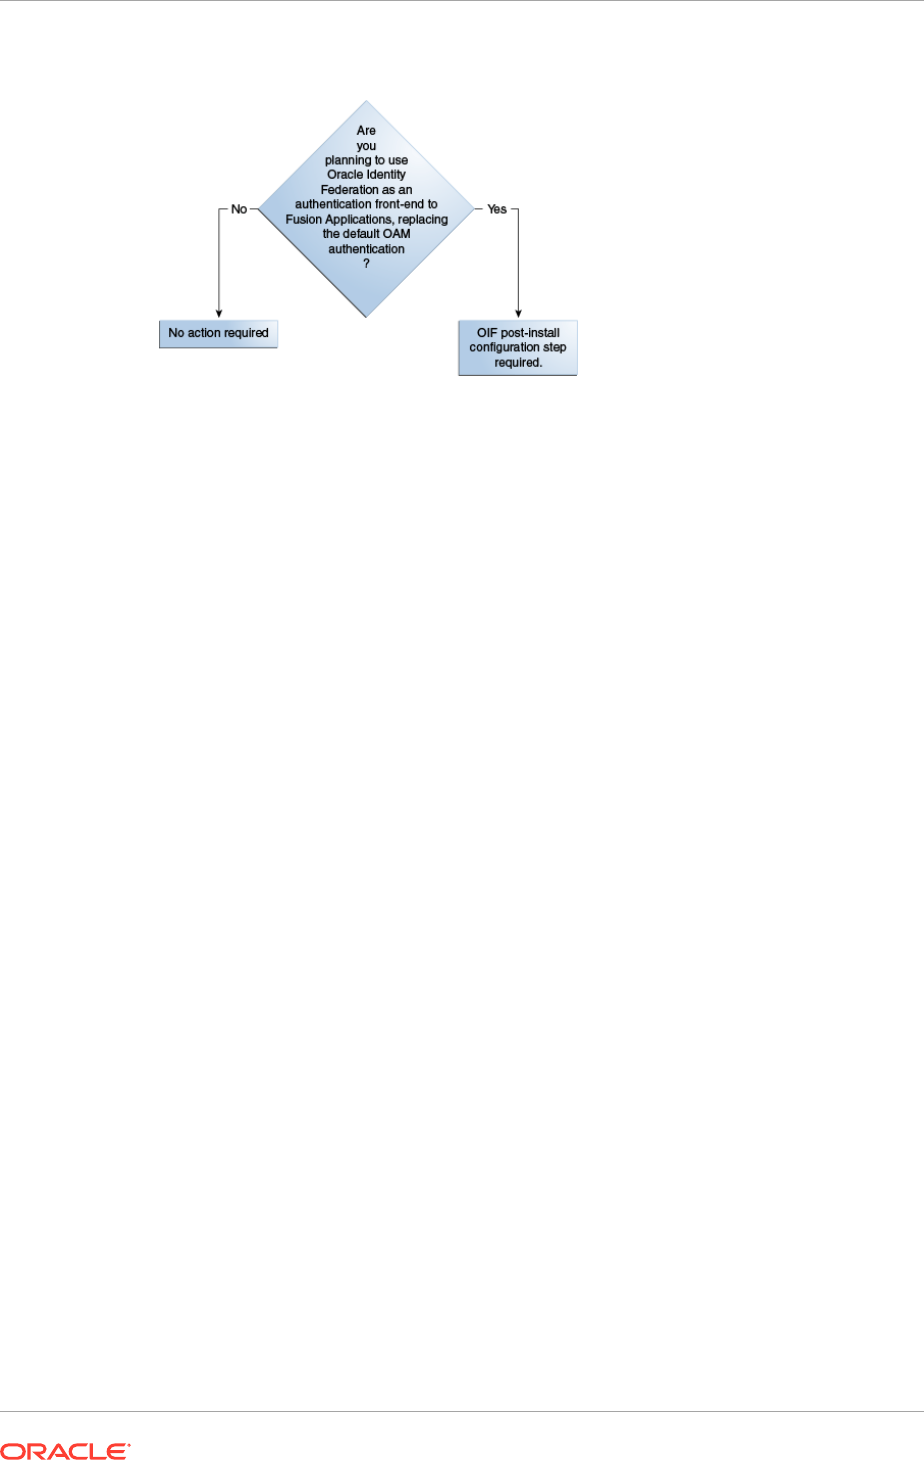
Figure 3-2 Oracle Federation Decision Tree
3.3.2.2 Complete the Oracle Identity Management Components Table
By default, all the components are installed by the Provisioning Wizard. Annotate the
decisions regarding topolgy and Identity Store in the workbook.
3.3.3 Provisioning: Select the Patches to Apply
Certain patches or bundles may be required for the installation, which are not included
in the downloaded install files. Check the Oracle Fusion Applications release notes
for mandatory patches to the Oracle Fusion Applications database, Oracle Identity
Management, and Oracle Fusion Applications core. To install any languages in
addition to US English, check the Oracle Fusion Applications NLS release notes for
mandatory patches for languages.
For general information about applying patches to an applications environment, see
Introduction to Patching Oracle Fusion Applications in the Oracle Fusion Applications
Patching Guide. For database patches, check:
• Oracle Identity Management: Patch the Oracle Database (page 7-2)
• Oracle Fusion Applications: Mandatory Oracle Database Patches (page 8-8)
3.3.4 Provisioning: Select the Post-Installation Tasks to Perform
The Post-Install Tasks table lists all of the mandatory and conditional post-installation
activities. These are described in Complete Mandatory Common Post-Installation
Tasks (page 15-1).
Conditional tasks are performed only if the environment meets the criteria defined for
those tasks. To determine whether conditional post-install tasks apply in this case,
review the following sections:
• Complete Conditional Common Post-Installation Tasks (page 16-1)
• Complete Conditional Common High Availability Post-Installation Tasks for Oracle
Identity Management (page 17-1)
• Complete Conditional Common High Availability Post-Installation Tasks for Oracle
Fusion Applications (page 18-1)
Chapter 3
Provisioning: Plan the Configuration of the Provisioned Installation
3-10

• Complete Oracle Fusion Customer Relationship Management Post-Installation
Tasks (page 19-1)
• Complete Oracle Fusion Financials Post-Installation Tasks (page 20-1)
• Complete Oracle Fusion Applications Accounting Hub Post-Installation Tasks
(page 21-1)
• Complete Oracle Fusion Human Capital Management Post-Installation Tasks
(page 22-1)
• Complete Oracle Fusion Incentive Compensation Post-Installation Tasks
(page 23-1)
• Complete Oracle Fusion Project Portfolio Management Post-Installation Tasks
(page 24-1)
• Complete Oracle Fusion Supply Chain Management Post-Installation Tasks
(page 25-1)
Enter the decisions as appropriate in the Workbook.
3.3.4.1 Select Languages
To install any languages in addition to US English, select the languages to install from
the following list of supported languages.
• Arabic (ar / AR)
• Chinese (Simplified) (zh_CN / ZHS)
• (Chinese (Traditional) (zh_TW / ZHT)
• Czech (cs / CS)
• Danish (da / DK)
• Dutch (nl / NL)
• Finnish (fi / SF)
• French (fr / F)
• French (Canadian) (fr_CA / FRC)
• German (de / D)
• Hebrew (iw / IW)
• Hungarian (hu / HU)
• Italian (it / I)
• Japanese (ja / JA)
• Korean (ko / KO)
• Norwegian (no / N)
• Polish (pl / PL)
• Portuguese (Brazilian) (pt_BR / PTB)
• Russian (ru / RU)
• Spanish (es / E)
• Swedish (sv / S)
Chapter 3
Provisioning: Plan the Configuration of the Provisioned Installation
3-11

• Turkish (tr / TR)
3.4 Topology: Plan the Topology
Topology planning refers to the tasks related to:
• Determining how many and what type of servers are going to be used for the
environment
• Defining their logical location in the network
• Defining which Oracle Fusion Applications component(s) run on each server
• Deciding how to handle the Demilitarized Zone (DMZ) is part of network and
topology planning. A special section is devoted to this topic when completing the
Topology tables in the Workbook.
While the number of nodes, their characteristics, and even component allocation
are likely to have already been defined during the sizing/licensing phase, this is the
moment in the planning phase where they are reviewed and any remaining topology
decisions or adjustments are made.
Remember that in case of choosing to clone a topology in order to maintain a test
or staging backup, the two environments must match from the beginning. It is not
possible to move from a Basic topology, used for development, to an Enterprise
topology for production, using cloning tools.
Therefore, in this case it is recommended that topology decisions consider not only the
immediate environment needs, but also future changes to this environment, as well as
other environments that will be created through cloning.
3.4.1 Review Component and Server Allocation
Component assignment to specific servers normally have already been done during
the sizing phase of the project, but this is a good time to review those decisions
since, once installed, Oracle Identity Management and Oracle Fusion Applications
components cannot usually be moved to other servers.
When reviewing component allocation, consider the following:
• CPU capacity
• Amount of memory available on the server vs. what is required by the assigned
components
• Network location (for example: DMZ)
• Access to shared storage
• Scale-out nodes should have the same characteristics as the corresponding
primary node
3.4.2 Complete the Topology Tab of the Oracle Fusion Applications
Installation Workbook
Follow the explanations for each column name to fill in the Topology table:
• Nodes: Typically, an installation consists of a minimum of three nodes: one for
the transactional database, one for Oracle Identity Management, and one for
Chapter 3
Topology: Plan the Topology
3-12

Oracle Fusion Applications (This would be the Basic topology). If this is not the
situation, list each component next to Node numbers 1-3, entering the Real Host
Name. If multiple hosts have been chosen for Oracle Fusion Applications, and/or
additional Oracle Identity Management or database hosts are used, then assign
each of them to an additional node number. The node number is simply used as a
reference number, for user ease, when filling in the Workbook.
• Real Host Name: This is the name assigned in the operating system. The
network administrator who sets up the server should provide this information.
(DMZ information may be applicable to the Oracle Identity Management Web
Tier (line 25) and/or the Oracle Fusion Applications Web Tier (line 35) of the
Component Assignment table.
• Abstract Host Name: If the DNS hostname used to address the host is different
from the hostname defined at the operating system, add it to this column as
the abstract hostname. The abstract hostname column can also be used to
configure Oracle Fusion Applications with hostnames defined in the hosts file of
the operating system (allowing the use of more generic names like
fadbhost
or
idmwebhost
) instead of the actual hostnames
• IP Address: Get this information from the network administrator. This column is
informational only and is not used during the install process.
• Operating System: Use this column to specify the operating system of the host.
Get this information from the network administrator. This column is informational
only and is not used during the install process.
• CPUs: Enter the CPUs on the table. This column is informational only and is not
used during the install process.
• RAM: Enter the amount of RAM available in this host. The command to retrieve
RAM information depends on the operating system. This column is informational
only and is not used during the install process.
• DMZ: The network administrator also knows whether the host is located in the
DMZ; for more information about that decision, see Topology: Understand DMZ
Requirements (page 3-14).
When the Topology table is complete, define which components reside on each host.
Remember that most of this was specified during the sizing phase. To fill in the
Component Assignment table:
• Check the Node numbers assigned to each host in the Topology table. For
example, if the 3-node setup is used, the following assignments could have been
made: Oracle Fusion Applications and Oracle Identity Management database =
Node 1 Oracle Identity Managementmid tier and web tier = Node 2 Oracle Fusion
Applications mid tier and web tier = Node 3
• Now it is possible to fill out the Component Assignment table by listing the
appropriate node for each component. In the Basic 3-node example we are using,
that would mean:
– FADB and IDMBDB: Add the number 1 to the " Node #" column for the rows
that contain the components FA DB and IDM DB.
– FADW (Data Warehouse): Leave the Node # column for this component blank
or add N/A.
– IDM Directory, IDM Identity and Access, and IDM Web Tier : Add the
number 2 to the " Node #" column for the rows that contain the Oracle Identity
Chapter 3
Topology: Plan the Topology
3-13

Management mid tier and web tier components (IDM Directory, IDM Identity
and Access, and IDM Web Tier).
– All remaining FA- components: Add the number 3 to the " Node #" column
for the rows that contain the Oracle Fusion Applications mid tier and web tier
components (all FA domains and the FA Web Tier). Adapt this example to
match the environment, using the HA/Scale-Out Node column if needed.
3.4.3 Topology: Understand DMZ Requirements
Oracle Fusion Applications Provisioning has the option automatically to configure the
Oracle Fusion Applications Web Tier for deployment on a Demilitarized Zone (DMZ).
However, in some cases it is more advantageous to handle the DMZ and security
in alternate ways. For example, if the enterprise already has a load balancer in the
DMZ, it is not necessary to duplicate that function by installing the Oracle Fusion
Applications Web Tier there.
Auto-deploying the Web Tier on a DMZ implies that:
• The Web Tier Middleware Home (binary files) and the OHS instance (including
WebGate) are installed on separate storage from the shared Oracle Fusion
Applications/ Oracle Identity Management storage.
• The Web Tier must be installed on a separate server.
• During Provisioning, the Web Tier install takes place separately from the main
install, taking into consideration the fact that the DMZ is isolated in terms of
storage, server and network.
When deciding whether to use this option, consider the following:
• Requirements: Is access from the outside network required, which would justify
providing an entry point into Oracle Fusion Applications on the DMZ?
• Maintenance: Is it worth the maintenance for servers residing in the DMZ given
the restricted server access and restricted access to storage, which can impact
maintenance, patching, debugging, etc.?
• Other Options: Is there an existing infrastructure to enable external access (VPN,
DMZ Web Servers, DMZ Load Balancers and Reverse Proxies, etc.)? Depending
on the requirements, it may be possible to provision Oracle Fusion Applications
without the Web Tier on the DMZ, simply using the existing infrastructure on the
DMZ to forward requests to the Oracle Fusion Applications Web Tier.
• Firewall Openings: Placing the Oracle Fusion Applications Web Tier on the DMZ
can have a bigger impact on required firewall openings, compared to placing the
Web Tier on the internal network and using a DMZ Web Server/Proxy to forward
requests to Oracle Fusion Applications, as the diagrams show.
Chapter 3
Topology: Plan the Topology
3-14
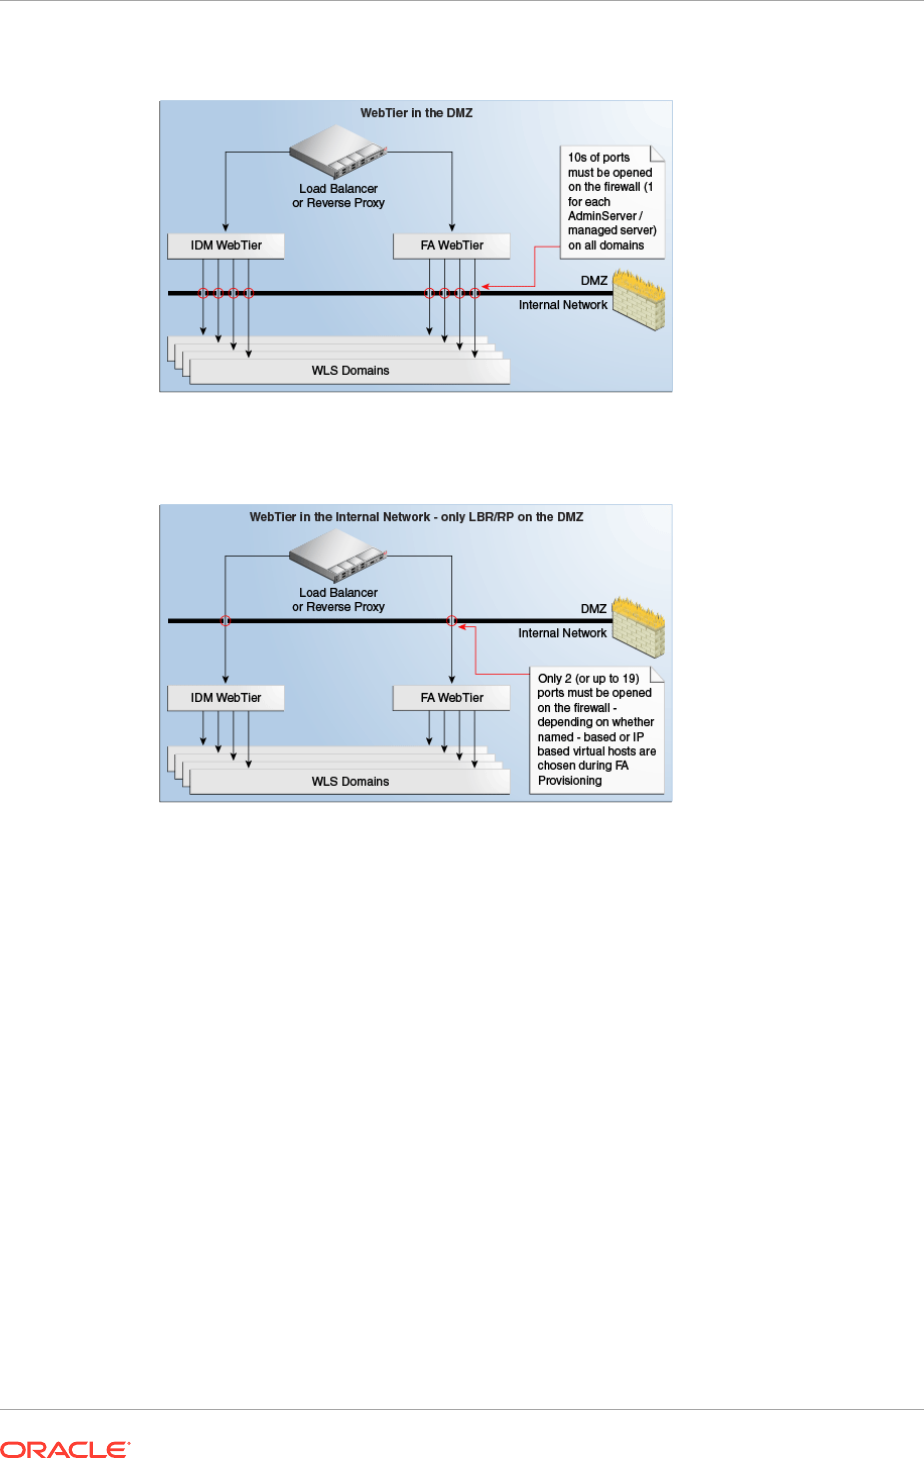
Figure 3-3 Port Openings Required with Web Tier in the DMZ
Figure 3-4 Port Openings Required when Web Tier is Not In DMZ
Note that from the Load Balancer/ Reverse Proxy going to the Web Tier, the number
of port openings is small and can be minimized by selecting certain options during
Provisioning. At a minimum, one port opening for Oracle Identity Management and one
port opening for Oracle Fusion Applications are required.
On the other hand, going from the Web Tier to the Mid Tier, port openings would
be required for each managed server that receives requests from the Web Tier. This
number cannot be minimized, as Oracle Fusion Applications uses different ports for
each managed server.
Chapter 3
Topology: Plan the Topology
3-15
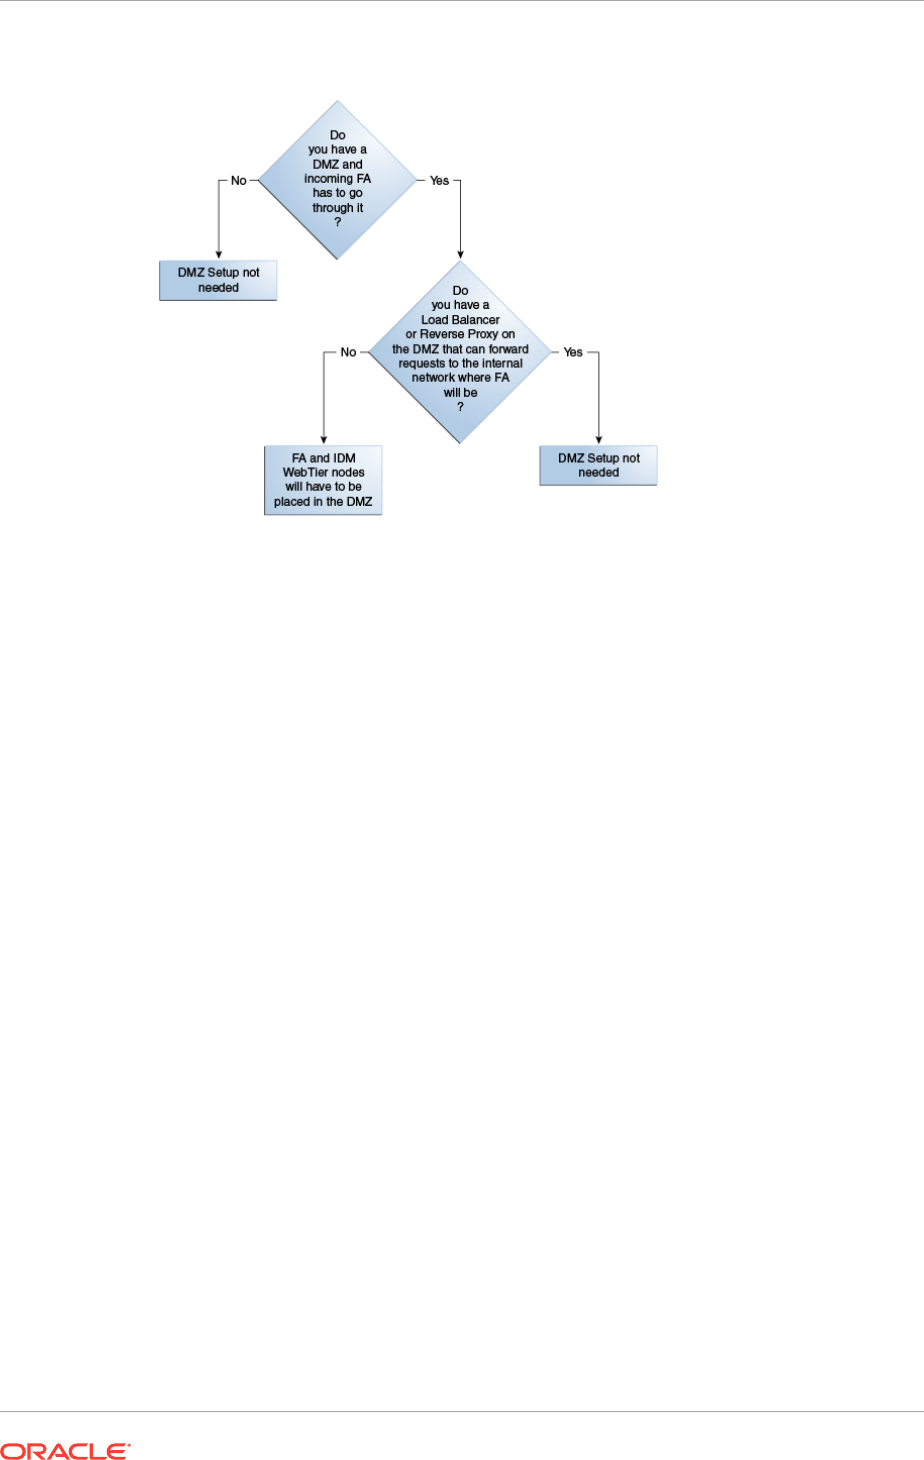
Figure 3-5 DMZ Decision Tree
3.4.3.1 Complete the DMZ Column in the Topology Table
Decide with the network administrator how to configure components in the DMZ based
on the considerations above, and enter Yes or No as appropriate in the DMZ column
for each node in the Topology table.
3.5 Next Steps
Proceed with Plan the Configuration of the Components of the Installation (page 4-1)
planning tasks to complete the plan and the Oracle Fusion Applications Installation
Workbook.
Chapter 3
Next Steps
3-16

4
Plan the Configuration of the Components
of the Installation
This section contains the following topics, each of which corresponds to a tab in the
Oracle Fusion Applications Installation Workbook:
• Network- Virtual Hosts: Plan Network Configuration (page 4-1)
• Network-Ports: Plan Ports (page 4-14)
• Storage: Plan Storage Configuration (page 4-15)
• Database: Plan Database Configuration (page 4-23)
• Identity Management: Plan Oracle Identity Management Configuration (page 4-30)
• SSL and Certificates (page 4-33)
• Memory Requirements (page 4-34)
• What to Do Next (page 4-35)
4.1 Network- Virtual Hosts: Plan Network Configuration
Filling in the Network-Virtual Hosts tab of the Oracle Fusion Applications Installation
Workbook entails understanding and deciding about a range of Oracle Fusion
Applications concepts and conventions.
• Internal vs External URLs: See Understand Internal vs. External URLs
(page 4-2), for information about to how Oracle Identity Management and Oracle
Fusion Applications provisioning use these concepts.
• Naming: All parts of the network-related decisions involve choosing appropriate
names for various endpoints. These are used throughout the installation, both
for internal communication between Oracle Fusion Applications components
and externally, to be viewed by users. Naming Conventions in Oracle Fusion
Applications (page 4-2), gives important orientation on how to name endpoints
throughout the installation.
• Load Balancer: Next, decide whether the availability and topology requirements
demand the use of Load Balancers (LBR) or a Reverse proxy. For an introduction
to the use of Load Balancers and Reverse proxy in Oracle Fusion Applications
topologies, see Network Components (page 2-15).
These decisions are further described in Plan Load Balancer Requirements
(page 4-3)
• Web Tier/HTTP Servers: Make also decisions about the Web Tier. Oracle HTTP
Servers (OHS) for Oracle Identity Management and Oracle Fusion Applications
are installed on the Web Tier. Again, decide where on the network they reside and
whether they are in the DMZ.
This is described in Plan HTTP Server Requirements (page 4-9).
4-1

The Virtual Host Mode is a property of the Web Tier that can be name-based,
port-based, or IP-based. These options are described in Define Web Tier Virtual
Host Mode (page 4-9).
• Virtual IPs (VIPs) for Administration and Managed Servers: VIPs apply
to all Enterprise topologies for Oracle Identity Management. For Oracle
Fusion Applications, VIPs apply only to Enterprise-HA topologies. VIP overview
information is described in Define VIPs for Administration and Managed Servers
(page 4-10).
• When each of these subjects has been reviewed and decisions about them have
been made, see Complete the Network-Virtual Hosts Tab of the Oracle Fusion
Applications Installation Workbook (page 4-11).
4.1.1 Understand Internal vs. External URLs
Both the Oracle Identity Management and the Oracle Fusion Applications install
procedures use the concept of internal and external HTTP endpoints as part of
their service-oriented architecture. External HTTP endpoints are used by end-users
to access the system and are used for the login screen, welcome pages, transaction
pages, online help, and so on. Internal HTTP endpoints are not meant to be seen by
end-users and instead are used for inter-component communication.
This distinction exists for security as well as topology reasons, allowing for maximum
flexibility when deploying Oracle Fusion Applications on an enterprise environment.
Since internal endpoints are not exposed externally, this provides a layer of security,
and since internal traffic can easily be restricted to specific network segments, there
is no need for extra security measures such as encryption. External HTTP endpoints
allow for maximum topology flexibility: since they are the only external entry points for
all Oracle Fusion Applications traffic, they are the only points in the topology that must
be directly accessible to the external world; all other components can be located inside
a firewall while still providing 100% access to end-users and other applications that
integrate with Oracle Fusion Applications.
Both external and internal endpoints can be configured directly at the HTTP Server
(in which case internal and external URLs will point at the HTTP Server) or can be
configured at a Load Balancer or Reverse Proxy (in which case internal and external
URLs will point at the LBR/RP and it in turn must be configured to point at the HTTP
Server).
4.1.2 Naming Conventions in Oracle Fusion Applications
These conventions are used when naming URLs/endpoints within Oracle Fusion
Applications, Oracle Identity Management, and in any load balancer that may be used.
4.1.2.1 Plan URL Naming Conventions
Naming conventions for network configuration are extremely important, since they
define the URLs that are used by end-users to access the system, as well as defining
all the internal "wiring."
When choosing hostnames for external HTTP endpoints, choose meaningful, easy-to-
remember names, as they are used by end-users.
When choosing hostnames for servers, virtual IP addresses (VIPs), and internal HTTP
endpoints, note the following:
Chapter 4
Network- Virtual Hosts: Plan Network Configuration
4-2

• These names are used for all Oracle Fusion Applications-Oracle Fusion
Applications addressing.
• Once chosen, these names cannot be changed!
• It is best to use environment-neutral (abstract) names, rather than names that
include clues such as "test" or "prod" or "staging". Since the names are used to
maintain internal wiring, they may be deployed on more than one environment
(for example, to clone an installation). Choose environment-neutral names to avoid
headaches later.
4.1.3 Plan Load Balancer Requirements
A Load Balancer (LBR) is required for scaled-out enterprise topologies. It is used to
balance and route:
• External HTTP traffic from end-users to the Oracle Fusion Applications and Oracle
Identity Management Web Tiers
• Internal HTTP traffic from the mid tiers to the Web Tiers (for both Oracle Fusion
Applications and Oracle Identity Management)
• Internal LDAP (TCP) traffic from mid tiers to the Identity and Policy Stores
(directory tier)
• Internal TCP traffic from the Oracle Fusion Applications mid tier to the Oracle
WebCenter Content (UCM) socket listeners
If the topology is not scaled out, an LBR/Reverse proxy is not mandatory, but it is
recommended for enterprise topologies with the following characteristics:
• External access requiring that traffic go through a DMZ with the Oracle Fusion
Applications Web Tier located in the internal network
• The environment is not currently scaled out but may be in the future
For development environments, an LBR/RP is normally not required or used. In this
case, the Provisioning framework can have the LBR option turned off which will set up
the Web Tier (OHS) as the HTTP endpoint for Oracle Fusion Applications.
4.1.3.1 SSL Certificate Requirements
Both Oracle Identity Management and Oracle Fusion Applications terminate SSL
connections at the LBR. Therefore, it is necessary to set up the appropriate SSL
certificates on the LBR prior to starting the provisioning process. See SSL and
Certificates (page 4-33).
4.1.3.2 How the Load Balancer Option Affects the Environment Setup
When Provisioning Oracle Identity Management
When running the Oracle Identity Management Provisioning Tool, the load balancer
option is not available with the "Single-host" install. The other alternative, "EDG"
topology, prompts for three IDM HTTP endpoints and three LDAP endpoints.
Chapter 4
Network- Virtual Hosts: Plan Network Configuration
4-3
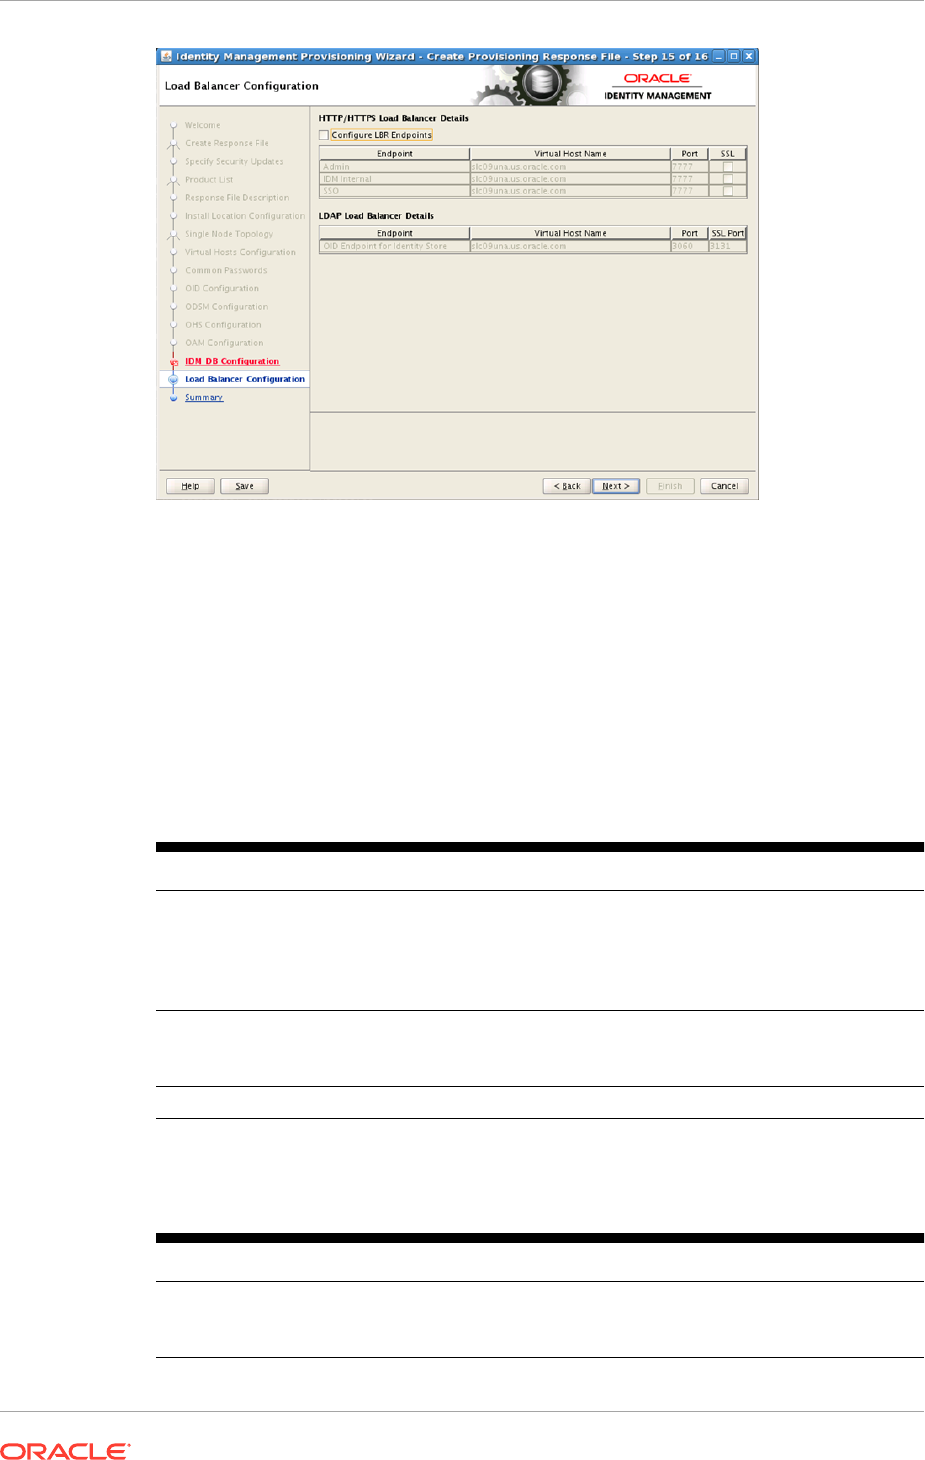
The requirements for this screen are described in the table below:
Configure LBR Endpoints: Select this option to configure the Admin, Internal
Callbacks, and SSO LBR endpoints for a single-node topology.
In a three-node topology, the Configure LBR Endpoints option is selected by default.
In a six-node enterprise deployment topology, the option is selected by default and
cannot be deselected.
HTTP/HTTPS Requirements
Table 4-1 Load Balancer SSL Requirements for HTTP
Endpoint Type SSL? Description
Admin Optional Defines the host configuration
on the Oracle HTTP Server
(specifically the ServerName
clause on the virtual host
configuration
.conf
files)
Internal Not allowed Defines the URLs configured
internally for the HTTP
endpoints
SSO Required Main application entry point
LDAP Requirements
Table 4-2 Load Balancer SSL Requirements for LDAP Endpoints
Endpoint Type Description
OID Endpoint LDAP LBR endpoints are only used for the
URLs configured internally for the LDAP
endpoints.
Chapter 4
Network- Virtual Hosts: Plan Network Configuration
4-4
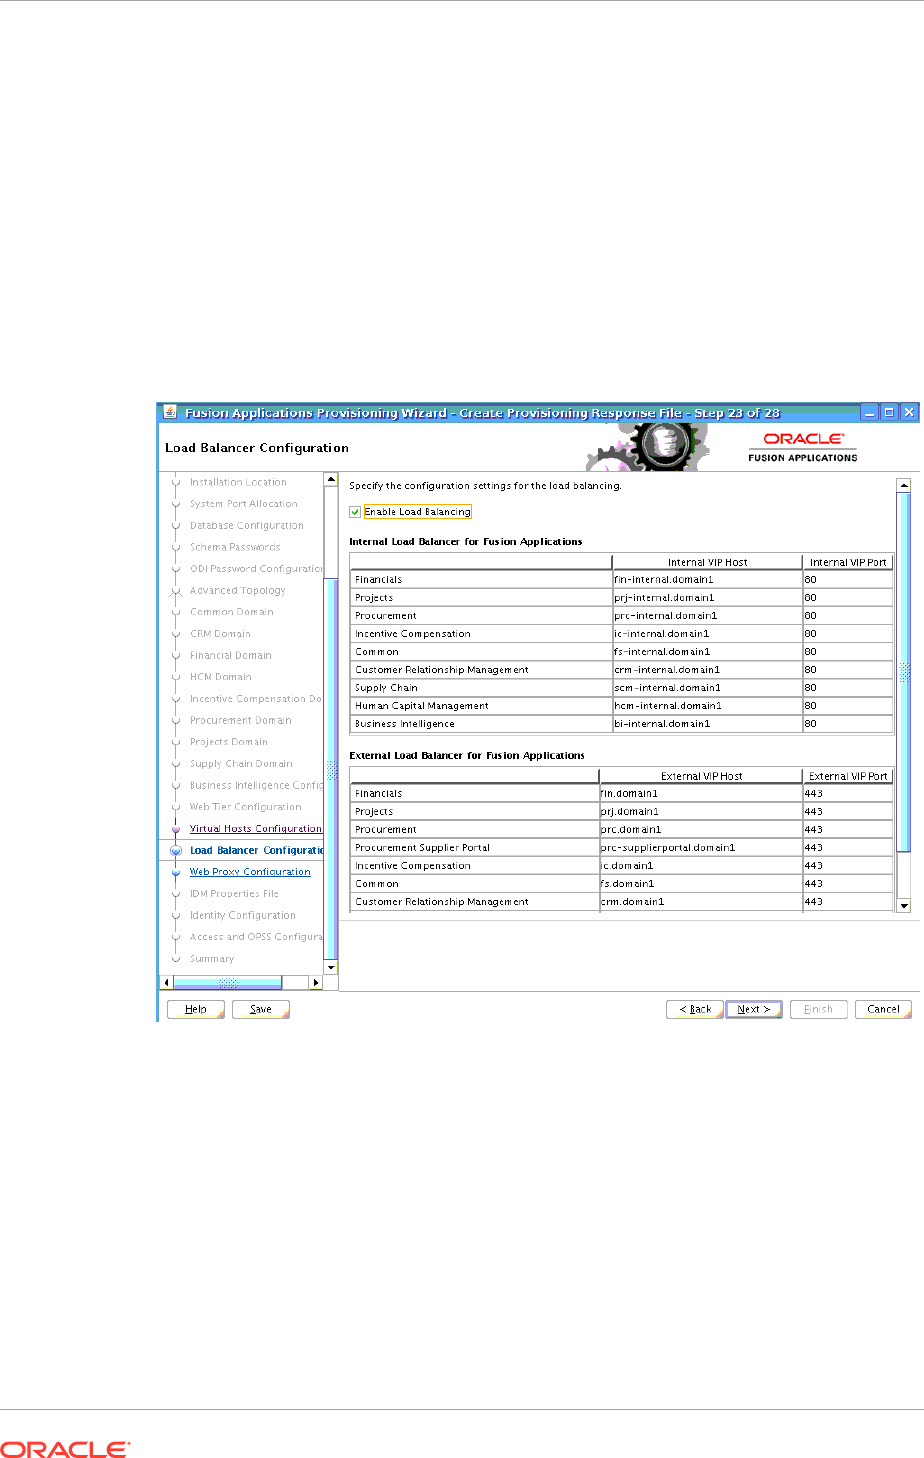
All load balancer configuration must be performed by the network administrators; the
Oracle Identity Management Provisioning process does not automate that or provide
any specific settings for load balancer/reverse proxy configuration.
When Provisioning Oracle Fusion Applications
For Oracle Fusion Applications provisioning, the load balancer option is available
for any topology. All load balancer configuration, adding internal and external virtual
IP host and port, must be performed by the network administrators before starting
provisioning Oracle Fusion Applications. The Oracle Fusion Applications Provisioning
process does not install load balancer or provide any specific settings for load
balancer/reverse proxy configuration. For more information about planning load
balancer requirements, see Plan Load Balancer Requirements (page 4-3).
If selected, this setting affect:
• Virtual host configuration on the Oracle HTTP Server (more specifically the
ServerName clause in the virtual host configuration
.conf
files)
• The URLs configured internally for the HTTP endpoints.
Whether or not the load balancer is selected has an affect on the SSL configuration at
the OHS. This is discussed in SSL Certificate Requirements (page 4-3).
Chapter 4
Network- Virtual Hosts: Plan Network Configuration
4-5
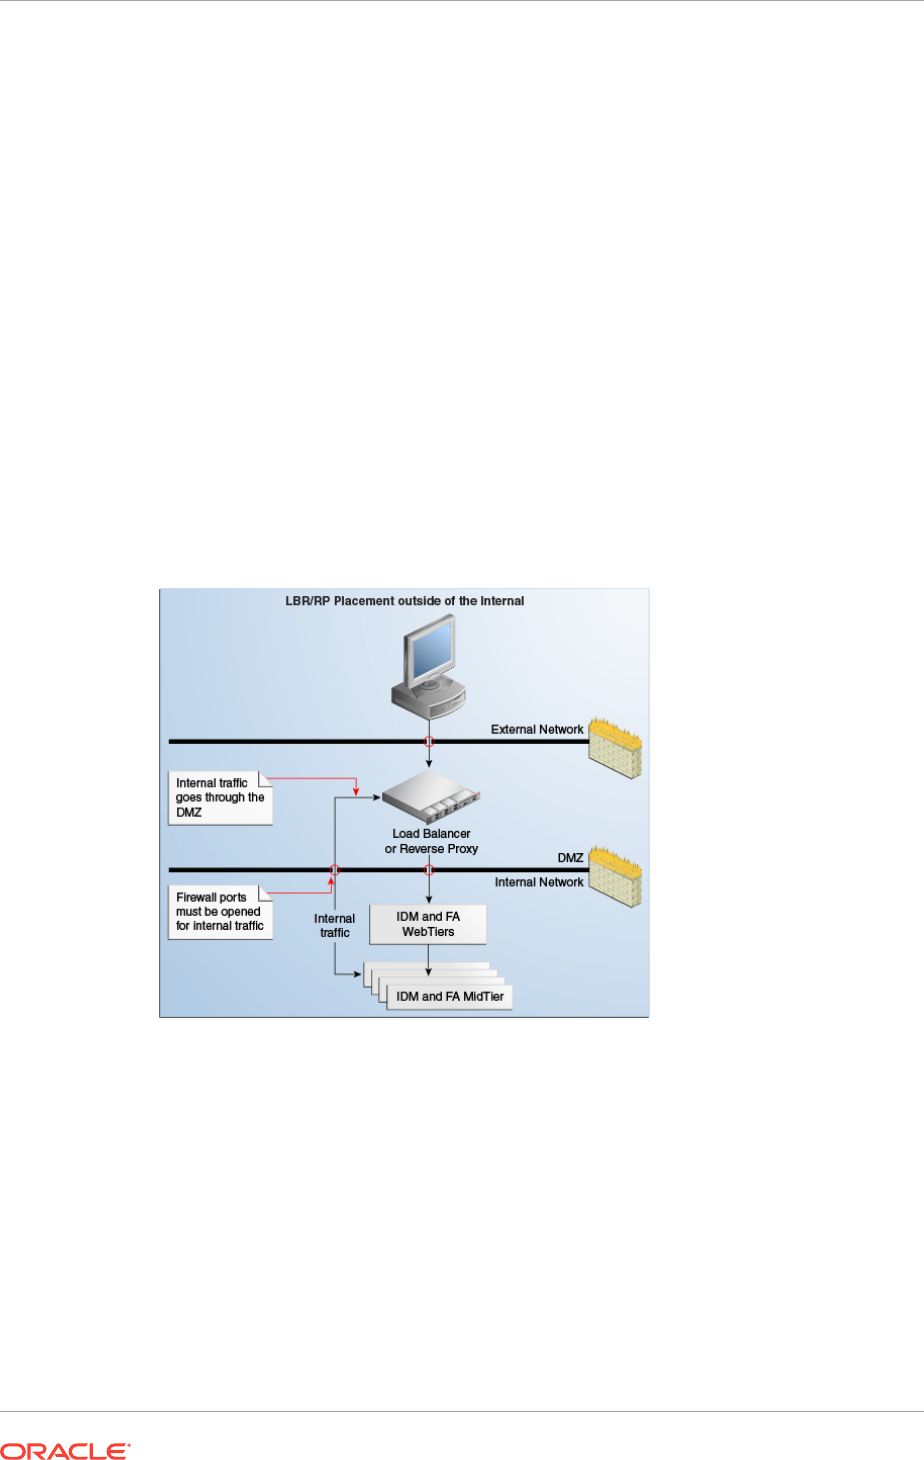
4.1.3.3 Network Placement of Load Balancers/Reverse Proxy
ITo use a load balancer/reverse proxy, it is important to consider where on the network
it should be placed, and whether firewalls exist between it and the Oracle Fusion
Applications mid tier and Web Tier.
For example, if a load balancer is placed in the DMZ and is configured for both internal
and external Oracle Fusion Applications traffic, this may be undesirable for security
reasons. (In this case, internal traffic from the Oracle Fusion Applications and Oracle
Identity Management mid tiers go through the DMZ to get to the respective web tiers).
Additionally, firewall ports may have to be opened for traffic from the internal network
to the DMZ, and TCP traffic (for LDAP and UCM) are going through the DMZ.
In this case, placing an additional load balancer on the internal network is
recommended for internal traffic (HTTP and TCP), to prevent it from going through
the DMZ.
The following diagrams show both scenarios in more detail:
Figure 4-1 Load Balancer Placed Outside the internal Network
Chapter 4
Network- Virtual Hosts: Plan Network Configuration
4-6

Figure 4-2 Internal/External LBR Configuration
Follow the decision tree to plan the usage and placement of a load balancer, and
to fill out the Oracle Fusion Applications Installation Workbook appropriately. Enter
decisions on the Environment tab, Environment Info table, Load Balancer/Reverse
proxy row.
Figure 4-3 Load Balancer/Reverse Proxy Decision Tree
Chapter 4
Network- Virtual Hosts: Plan Network Configuration
4-7

4.1.3.4 Load Balancer Feature Requirements
Several virtual servers and associated ports must be configured on the load balancer
for different types of network traffic and monitoring. These should be configured to
the appropriate real hosts and ports for the services running. Also, the load balancer
should be configured to monitor the real host and ports for availability so that the traffic
to these is stopped as soon as possible when a service is down. This ensures that
incoming traffic on a given virtual host is not directed to an unavailable service in the
other tiers.
If the topology uses a load balancer, it must have the following features:
• Ability to load-balance traffic to a pool of real servers through a virtual host
name: Clients access services using the virtual host name (instead of using actual
host names). The load balancer can then load-balance requests to the servers in
the pool.
• Port translation configuration
• Port monitoring (HTTP and HTTPS)
• Resource monitoring / port monitoring / process failure detection: The load
balancer must be able to detect service and node failures (through notification
or some other means) and to stop directing non-Oracle Web traffic to the failed
node. If the external load balancer has the ability to automatically detect failures, it
should be used.
• Ability to Preserve the Client IP Addresses: The load balancer must have the
capability to insert the original client IP address of a request in an
X-Forwarded-
For
HTTP header to preserve the Client IP Address.
• Virtual servers and port configuration: Ability to configure virtual server names
and ports on the external load balancer.
Note that there are also requirements for the virtual server names and ports, as
follows:
• The virtual server names must be associated with IP addresses and be part of the
DNS. Clients must be able to access the external load balancer through the virtual
server names.
• The load balancer should allow configuration of multiple virtual servers, and
for each virtual server, the load balancer should allow configuration of traffic
management on more than one port. For example, for Oracle WebLogic
Clusters, the load balancer must be configured with a virtual server and ports
for HTTP and HTTPS traffic.
The last list of features are recommended, though not required for every topology:
• It is recommended to configure the load balancer virtual server to return
immediately to the calling client when the back-end services to which it forwards
traffic are unavailable. This is preferred over the client disconnecting on its own
after a time-out based on the TCP/IP settings on the client machine.
• SSL termination is used in the Oracle Identity Management EDG topology as well
as all Oracle Fusion Applications topologies. This is the ability to terminate SSL
requests at the load balancer and forward traffic to the back-end real servers using
the equivalent non-SSL protocol. (For example, the load balancer must be able to
forward HTTPS requests as HTTP.)
Chapter 4
Network- Virtual Hosts: Plan Network Configuration
4-8

• Configure the virtual servers for the Directory Tier in the load balancer with a high
value for the connection time-out for TCP connections. This value should be more
than the maximum expected time over which no traffic is expected between Oracle
Access Manager and the Directory Tier.
• It is recommended to configure the load balancer to be in fault-tolerant mode.
• SSL acceleration is recommended, but not required. This refers to off-loading
the public-key encryption algorithms involved in SSL transactions to a hardware
accelerator.
• Have the ability to add
WL-Proxy-SSL: true
to the HTTP Request Header. Some
load balancers do this automatically.
4.1.4 Plan HTTP Server Requirements
Both Oracle Identity Management and Oracle Fusion Applications Provisioning install
their own Oracle HTTP Server, which is the primary endpoint for all HTTP traffic, both
internal and external. While each provisioning tool may configure its HTTP Server
slightly differently, it is important that the planning phase take both into consideration
when deciding:
• Naming convention for virtual hosts
• DMZ placement
• Port usage
Note the following default setups:
• Oracle Identity Management Provisioning requires hostnames for only the LBR
endpoint. The OHS listeners and name-based virtual hosts are set up with
wildcards. Oracle Fusion Applications, however, always requires hostnames for
the OHS endpoints even when using an LBR, and its virtual hosts are set up
using those hostnames. This has implications when choosing name-based vs. IP
or port-based virtual hosts for Oracle Fusion Applications.
• Both Oracle Identity Management and Oracle Fusion Applications Provisioning
terminate SSL connections at the LBR (external HTTP endpoints only). This
means that when the LBR option is selected during provisioning, the OHS virtual
hosts are not configured with an SSL listener and therefore the connection
between the LBR and OHS is always non-SSL and SSL certificates must be
set up at the LBR. On the other hand, if the LBR option is NOT selected, the
consequences differ.
For Oracle Identity Management, only the "Basic" topology allows no LBR. In this
case, OHS is configured with no SSL for all internal, external and admin virtual
hosts.
For Oracle Fusion Applications Provisioning, the OHS is set up with SSL on the
external virtual hosts, which requires installing SSL certificates.
4.1.4.1 Define Web Tier Virtual Host Mode
Oracle Identity Management Provisioning always uses name-based virtual hosts.
Oracle Fusion Applications Provisioning allows to choose a preferred method:
• Port-based
• Name-based
Chapter 4
Network- Virtual Hosts: Plan Network Configuration
4-9
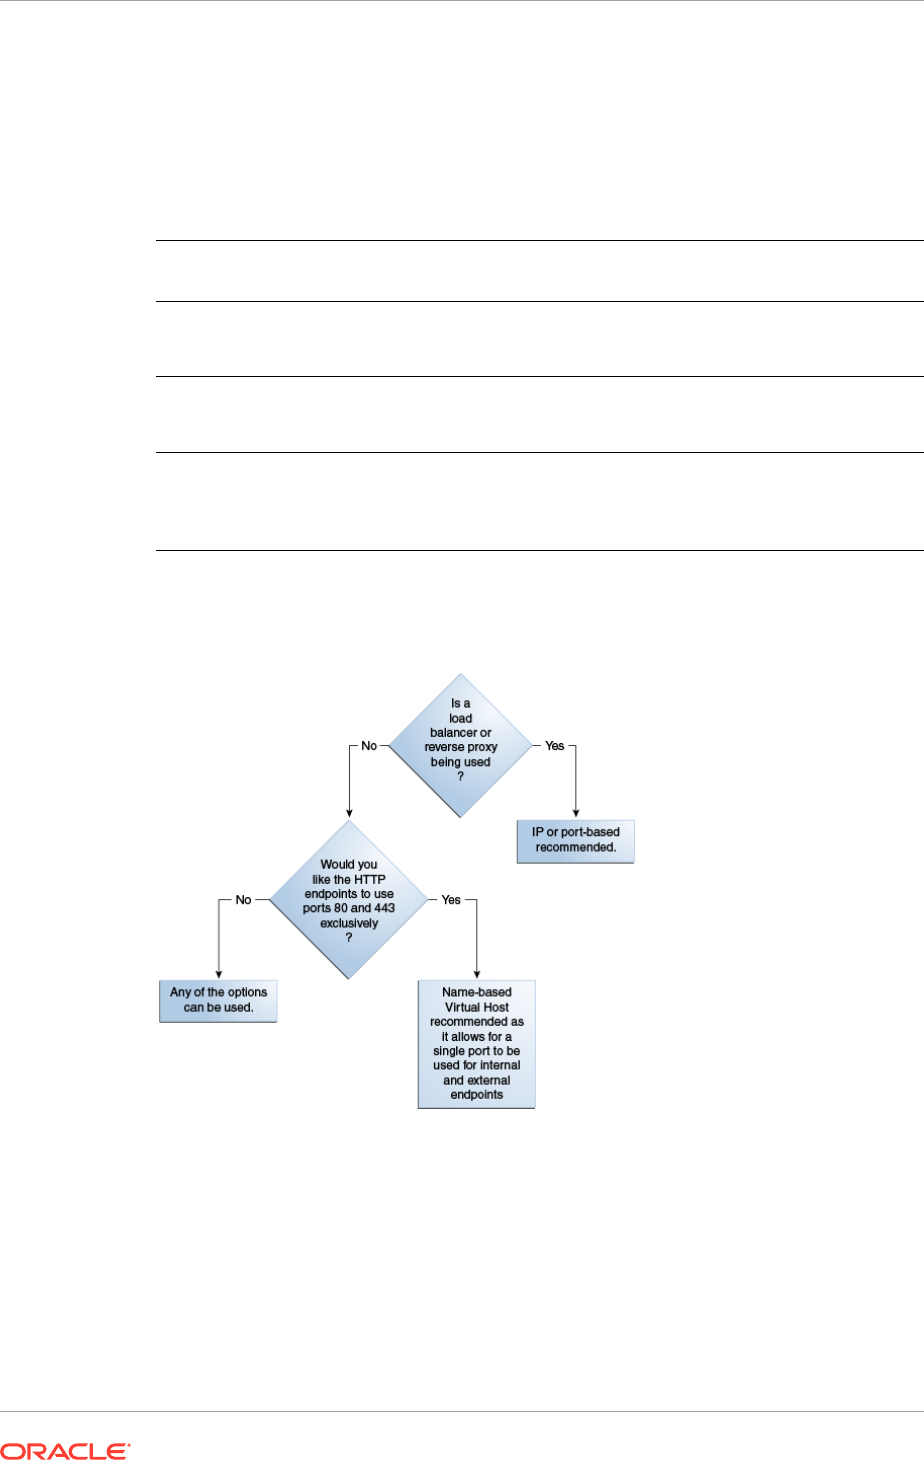
• IP-based
The choice depends on whether a load balancer is used or not, and the hostname/port
convention desired for endpoints.
If a load-balancer is used, then IP- or Port-based mode is used.
The following table shows the parameters.
Virtual Host
Configuration
Description # of Ports # of Host Names
Port-based Based on the
incoming port
2 per domain (one
internal and one
external)
No virtual hosts are
used
Name-based Based on the
incoming host name
2: one internal (non-
SSL) and one external
(SSL)
2 per domain (one
internal and one
external)
IP-based Based on IP:Port
combination
At least 1 and up
to 2 per domain
(one internal and one
external)
At least 1 and up
to 2 per domain
(one internal and one
external)
Figure 4-4 Choosing Virtual Host Mode; Name-, Port- or IP-Based
4.1.5 Define VIPs for Administration and Managed Servers
A virtual IP address is an unused IP Address which belongs to the same subnet as
the host's primary IP address. It is assigned to a host manually and Oracle WebLogic
Managed servers are configured to listen on this IP Address. In the event of the failure
of the node where the IP address is assigned, the IP address is assigned to another
node in the same subnet, so that the new node can take responsibility for running the
managed servers assigned to it.
Chapter 4
Network- Virtual Hosts: Plan Network Configuration
4-10

4.1.5.1 Define VIPs for Oracle Identity Management
The following is a list of the Virtual IP addresses required by Oracle Identity
Management:
• IDMDomain AdminServer: In Enterprise deployments, the WebLogic
Administration Server must be able to continue processing requests even if the
host on which it resides fails. A virtual IP address should be provisioned in
the Application Tier, so it can be bound to a network interface on any host in
the Application Tier. The WebLogic Administration Server is configured later to
listen on this virtual IP address. The virtual IP address fails over along with the
Administration Server from IDMHOST1 to IDMHOST2, or vice versa.
4.1.5.2 Define VIPs for Oracle Fusion Applications
Configure the Administration Server and the Managed Servers to listen on different
virtual IPs. Oracle Fusion Applications VIPs are required in Enterprise-HA topologies
to configure specific components:
• Virtual IPs for AdminServer are needed for every domain to configure
AdminServer in active-passive mode. These VIPs are shared across primary and
secondary hosts, depending on where the Administration Server is running.
• Virtual IPs for all Oracle SOA Suite servers in every domain, and Oracle Business
Intelligence servers in the Oracle Business Intelligence domain are needed to
support server migration. These components are implemented in active-active
mode, so these VIPs are needed for primary and secondary hosts.
4.1.6 Complete the Network-Virtual Hosts Tab of the Oracle Fusion
Applications Installation Workbook
The Network-Virtual Hosts tab includes the following tables:
• Complete the Web Tier Virtual Host Mode Table (page 4-11)
• Complete the FA Web Tier Virtual Hosts Table (page 4-12)
• Complete the IDM Web Tier Virtual Hosts Table (page 4-13)
• Complete the HTTP LBR Endpoints Table (page 4-13)
• Complete the LDAP Endpoints Table (page 4-13)
• Complete the UCM LBR Endpoint Table (page 4-13)
• Complete the AdminServer Virtual Hosts/VIPs Table (page 4-14)
• Complete the Managed Server Virtual Hosts/VIPs Table (page 4-14)
4.1.6.1 Complete the Web Tier Virtual Host Mode Table
Select the appropriate virtual host mode (name-, port-, or IP-based), as determined in
Define Web Tier Virtual Host Mode (page 4-9)
Chapter 4
Network- Virtual Hosts: Plan Network Configuration
4-11

4.1.6.2 Complete the FA Web Tier Virtual Hosts Table
Completing this table depends on the Virtual Host Mode chosen (Define Web Tier
Virtual Host Mode (page 4-9)). Each row of the table is described in FA Web Tier
Virtual Hosts Table Rows Defined (page 4-12); the mode-based usage is as follows:
Port-Based
• Internal and External Hostnames: They are not used. Leave them blank or mark
N/A.
• Ports: The Oracle Fusion Applications Installation Workbook provides the default
ports to be used; they are the same as the defaults presented on the Provisioning
Wizard. It is recommended to keep the defaults (see Use Default vs. Custom Port
Numbers (page 4-14)).
Name-Based
• Internal and External Hostnames: Select the external and internal hostnames
to be used for the Oracle Fusion Applications Web Tier. The Oracle Fusion
Applications Installation Workbook provides the defaul hostnames as presented
on the Provisioning Wizard. See Plan URL Naming Conventions (page 4-2). Note:
this virtual host mode is not recommend for use with a load balancer, as indicated
in Define Web Tier Virtual Host Mode (page 4-9).
• Ports: In name-based mode, do not use the Internal Port or External Port
columns. Make them blank or mark them N/A. The reason is that in this mode,
the default ports defined for the Oracle Fusion Applications HTTP Server are used
by the Provisioning Wizard as follows:
– Internal Port: In the Oracle Fusion Applications Installation Workbook open
the Network - Ports tab, then Fusion Applications Port Numbers, then FA
Oracle HTTP Server.
– External Port: In the Oracle Fusion Applications Installation Workbook open
the Network-Ports tab, then Fusion Applications Port Numbers , then FA
Oracle HTTP Server SSL.
IP-Based
This mode lets select both port and hostname and has the defaults as presented on
the Provisioning Wizard.
• Internal and External Hostnames: Select the external and internal hostnames
to be used for the Oracle Fusion Applications Web Tier. See Plan URL Naming
Conventions (page 4-2).
• Ports: It is recommended to keep the default port numbers, as mentioned in Use
Default vs. Custom Port Numbers (page 4-14).
In all three modes, the IP Address column should contain the IP address of the host
that runs the Oracle Fusion Applications Web Tier. They are normally all the same.
4.1.6.2.1 FA Web Tier Virtual Hosts Table Rows Defined
A general description of each row is below. How to use them depends on the Virtual
Host Mode, above.
Chapter 4
Network- Virtual Hosts: Plan Network Configuration
4-12

• FA Web Tier Internal Name: The internal and external names point to the
Oracle Fusion Applications Web Tier host or hosts. It can be advantageous/more
user-friendly to assign names that indicate their use; for example, the Financials
preceded by
fin-ext
(external) or
fin-int
(internal), as shown in the defaults. If
a name that differs from the default structure is assigned, it needs to be added to
the
/etc/hosts
file.
• Internal Port: The default ports are provided by the Provisioning Wizard and are
pre-entered in the Oracle Fusion Applications Installation Workbook. Change only
if necessary for the enterprise. Different ports must be assigned to each product.
• FA Web Tier External Name: The internal and external names point to the
Oracle Fusion Applications Web Tier host or hosts. It can be advantageous/more
user-friendly to assign names that indicate their use; for example, the Financials
preceded by
fin-ext
(external) or
fin-int
(internal), as shown in the defaults. If
a name that differs from the default structure is assigned, it needs to be added to
the
/etc/hosts
file.
• External Port: The default ports are provided by the Provisioning Wizard and are
pre-entered in the Oracle Fusion Applications Installation Workbook. Change only
if necessary for the enterprise. Different ports must be assigned to each product.
• IP Address: Provide the IP address of the Oracle Fusion Applications Web Tier.
4.1.6.3 Complete the IDM Web Tier Virtual Hosts Table
The Oracle Identity Management Web Tier hosts must share a common port. The IP
address points at the Oracle Identity Management Web Tier.
External, Internal and Admin hostnames cannot be chosen. They are default to the
hostname defined in the Topology tab, then Topology table for the component IDM
Web Tier, and are grayed out on the Provisioning Wizard.
4.1.6.4 Complete the HTTP LBR Endpoints Table
Select the external and internal hostnames to be used for the HTTP Endpoints at
the Load Balancer or Reverse proxy. The Oracle Fusion Applications Installation
Workbook provides the default hostnames as presented on the Provisioning Wizard.
See Plan URL Naming Conventions (page 4-2).
It is recommended to keep the default port numbers, as mentioned in Use Default vs.
Custom Port Numbers (page 4-14).
4.1.6.5 Complete the LDAP Endpoints Table
Enter the abstract hostname (or real hostname if not using an abstract one) for
the node where the IDM Directory component in the Topology tab was assigned.
The ports are predefined and should only be changed if required by the enterprise.
When running the Oracle Identity Management Provisioning Wizard, these values are
automatically pre-populated and greyed out; they cannot be changed.
4.1.6.6 Complete the UCM LBR Endpoint Table
If high availability is used, then an entry in the load balancer is needed to distribute the
load among UCM servers.
Chapter 4
Network- Virtual Hosts: Plan Network Configuration
4-13

• Hostname: The load balancer entry here is configured to distribute traffic among
UCM managed servers in the UCM cluster. Enter the load balancer virtual host
name used for UCM distribution.
• Port: Only change the default port if required by your enterprise. Port must be
configured for TCP traffic.
4.1.6.7 Complete the AdminServer Virtual Hosts/VIPs Table
The Oracle Identity Management-related entry is needed for all Enterprise topologies.
The Oracle Fusion Applications entries are only needed when planning for Enterprise
high availability (HA). Define only entries for the licensed products.
See Define VIPs for Oracle Identity Management (page 4-11) for general discussion.
• Virtual Host Name: For each domain, define a Virtual Hostname. The network
administrator will later need to set these up in DNS.
• Virtual IP Address: For each domain, define a Virtual IP.
4.1.6.8 Complete the Managed Server Virtual Hosts/VIPs Table
Like the Admin Server entries above, the Oracle Identity Management-related entries
are needed for all Enterprise topologies. The Oracle Fusion Applications entries are
only needed when planning for Enterprise high availability (HA). Define only entries
for the licensed products. For each managed server in the table, define a virtual host
name and IP for each scale-out node.
4.2 Network-Ports: Plan Ports
Default ports are provided by Oracle Identity Management and Oracle Fusion
Applications Provisioning, and are listed in the Oracle Fusion Applications Installation
Workbook. The network administrator of the enterprise determines whether these can
be used or should be changed; enter accordingly.
4.2.1 Default vs. Custom Port Numbers
The Provisioning tools include default port numbers for all components in their
Wizards. While it is possible to change these ports to any other value, keeping the
defaults guarantees consistency across different installations or environments and
may be helpful when following product documentation, since it uses these default ports
in its reference architectures and configuration examples.
When changing port numbers from their defaults, pay special attention to potential
conflicts for components running on the same server with the same port. While
the installers verify and warn about any potential port conflicts, ensuring there are
no conflicts before installation helps providing a more predictable and smoother
installation experience.
4.2.1.1 Complete the Network-Ports Tab of the Oracle Fusion Applications
Installation Workbook
The Network-Ports tab in the Oracle Fusion Applications Installation Workbook lists
all ports that can be changed in the Oracle Identity Management and Oracle Fusion
Chapter 4
Network-Ports: Plan Ports
4-14

Applications provisioning tools and includes default values. Change the defaults only if
required by existing conflicts in the enterprise's network setup.
4.3 Storage: Plan Storage Configuration
Storage planning refers to all planning activities related to:
• Determining how much storage is needed for Oracle Fusion Applications during
installation, runtime, and for upgrade
• Defining the file system directories where the software is installed
• Defining the type of storage to be used (local, shared), depending on the
requirements of both Oracle Fusion Applications and the enterprise.
This section focuses on software installation and initial use only. It does not address
long-term capacity planning for the Oracle Fusion Applications environment or space
management (e.g. periodic purging of logs).
4.3.1 Recommended Minimum Disk Space
It is recommended to maintain the minimum amount of free disk space specified in
Table 4-3 (page 4-15) to accommodate the initial installation, and a reasonable number
of incremental backups, daily or weekly thereafter, and subsequent upgrade activities
for future releases. If the environment does not meet the minimum requirements, a
warning message is recorded in the provisioning log. Continue with the installation but
may encounter insufficient disk space issues.
In Table 4-3 (page 4-15), the Installation/Upgrade Storage column represents the free
disk space required for completing installation and upgrade. The Base Storage column
is free disk space required to maintain a working application environment which takes
into account of storage growth due to transition data, and retention of diagnostic logs
for administration and troubleshooting.
Table 4-3 Recommended Minimum Disk Space
Host Base Storage (GB) Installation/Upgrade
Storage (GB)
Oracle Fusion Applications Web Tier Host 50 50
Oracle Fusion Applications Provisioning
Host
500 300
Oracle Fusion Applications Database
Host
600 200
Oracle Identity Management Web Tier
Host
50 50
Oracle Identity Management Provisioning
Host
200 100
Oracle Identity Management Database
Host
200 100
Chapter 4
Storage: Plan Storage Configuration
4-15

4.3.2 Directory Storage Requirements
Table 4-4 (page 4-16) outlines space recommendations for various components and
directories, several of which are detailed below. It does not include the storage
required for storing the Oracle Fusion Applications media packs and the provisioning
repository.
• Shared Storage (page 4-17)
• Local Storage (if used) (page 4-18)
• DMZ Local Storage (if used) (page 4-18)
• Database Storage (page 4-18)
• Temporary Files Created During Installation (temp directory) (page 4-19)
Table 4-4 Planning Storage Size
Directory Created Description Storage Size Usage
Estimate
DB HOME/oradata
Both the Oracle Fusion Applications
transaction database and the Oracle
Identity Management database(s)
may be on one machine or separate
machines. On the same machine,
they can share a DB Home.
Otherwise, there is a DB Home on
each database machine. DB Home
includes database directory files
and configuration files.
/oradata
contains the table spaces and logs.
The Oracle Fusion
Applications transaction
database DB Home
requirement: 50 GB.
The Oracle Identity
Management DB Home
requirement: 50 GB.
/oradata
for FA: 200
GB
/oradata
for IDM: 75
GB
IDM_BASE (shared),
IDM_CONFIG (shared),
IDM_LOCAL_CONFIG
(local)
IDM_BASE
contains the Oracle
Identity Management product
directory. It remains relatively
unchanged. It must use shared
storage and may use local storage
additionally.
20 GB
IDMLCM_HOME (shared) IDMLCM_HOME
contains the Oracle
Identity Management Configuration
directory which stores the
configuration files and is modified as
a result of the provisioning process. It
must use shared storage.
25 GB
FAPROV_HOME (shared)
A directory created just for the Oracle
Fusion Applications installing the
provisioning framework. Once Oracle
Fusion Applications is installed, it
can be deleted if there is no further
usage after provisioning.
10 GB
Chapter 4
Storage: Plan Storage Configuration
4-16

Table 4-4 (Cont.) Planning Storage Size
Directory Created Description Storage Size Usage
Estimate
APPLICATIONS_BASE
(shared),
APPLICATIONS_CONFIG
(shared),
APPLICATIONS_LOCAL_CONF
IG (local)
APPLICATIONS_BASE
is the top-
level directory containing the
Oracle Oracle Fusion Applications
executable.
APPLICATIONS_CONFIG
contains the instance details
for Oracle Fusion Applications.
It must use shared storage
and may use local storage
(
APPLICATIONS_LOCAL_CONFIG
)
additionally.
120 GB shared
/mnt/hwrepo (shared)
A required directory for Oracle
Fusion Human Capital Management
(Oracle Fusion HCM) which is
checked by the Provisioning Wizard
in the pre-verify stage of Oracle
Fusion Applications provisioning. It
has a large storage requirement
if the Workforce Reputation
Management feature is planned to
be used. Ignore the warning if
Workforce Reputation Management
feature is not used.
1 TB
/tmp (local)
For each provisioning host, ensure
that there is at least 4 GB free space
available for
/tmp
before installing
Oracle Fusion Applications on the
provisioning hosts. If the disk space
for
/tmp
is low, performance issues
are encountered. In this case, make
disk space available or restart the
hosts to clean up
/tmp
.
4 GB/host
4.3.2.1 Shared Storage
Shared storage space must be made available for use by all nodes running Oracle
Fusion Applications and Oracle Identity Management. The shared storage space
normally holds:
• The provisioning repository (see Installation Files and Provision Repository
(page 4-18)).
• All of the Oracle Identity Management and Oracle Fusion Applications software
(including their provisioning frameworks). An exception: some of the software are
stored elsewhere if Local Config is chosen during provisioning (see Local Storage
(if used) (page 4-18)) or select the DMZ option (see DMZ Local Storage, if used
(page 4-18)).
• Temporary backup files (see Temporary Backup Files (page 4-18)).
• The hwrepo directory (HCM only; see The hwrepo Directory (page 4-18)).
For more information about the directory structure of the shared storage please refer
to Oracle Fusion Applications Directory Structure (page 2-24).
Chapter 4
Storage: Plan Storage Configuration
4-17

4.3.2.1.1 Installation Files and Provision Repository
The Oracle Fusion Applications software from Oracle eDelivery is downloaded in
the form of several .zip files. Extract these into a directory called the provisioning
repository (REPOSITORY_LOCATION), which contains the
installers
directory
containing all installers required by Oracle Fusion Applications. This repository must
reside on shared storage. Space is needed for both the zip files and the extracted
repository; delete or move the zip files after the repository is created.
See Installation Repository (page 2-24).
4.3.2.1.2 Temporary Backup Files
The installation procedures described in this guide prompt to take temporary backup
files at several milestones of the installation process. Plan to make enough space
available to store those backups files for the duration of the installation process.
4.3.2.1.3 The hwrepo Directory
If the Oracle Fusion Human Capital Management (Oracle Fusion HCM) application
offerings are being provisioned, namely Workforce Development and Workforce
Deployment, and Workforce Reputation Management feature is planned to be used,
create a directory named
/mnt/hwrepo
on a shared disk for the provisioning hosts. If
this directory is not set up, a warning message is displayed in the provisioning log
during the pre-verify phase when the offerings for provisioning are selected. Proceed
with provisioning the environment and mount the shared disk after provisioning is
complete and before starting using the Workforce Reputation application.
4.3.2.2 Local Storage (if used)
If desired, certain runtime and configuration directories can be stored in local storage
instead of shared storage, for both Oracle Identity Management and Oracle Fusion
Applications components. See Local Storage Considerations (page 4-21).
For more information about the directory structure of the local storage, see Oracle
Fusion Applications Directory Structure (page 2-24).
4.3.2.3 DMZ Local Storage (if used)
If desired, the Middleware Home for OHS and Webgate, as well as other configuration
files, can be stored separately from the shared storage, for use in a DMZ. See
Topology: Understand DMZ Requirements (page 3-14) for information on how to
choose whether to use the DMZ option in Oracle Identity Management and Oracle
Fusion Applications provisioning wizards. If used, plan space for the DMZ servers.
For more information about the directory structure of the local storage, see Oracle
Fusion Applications Directory Structure (page 2-24).
4.3.2.4 Database Storage
Initial database storage requirements are provided in Table 4-4 (page 4-16), but
consider short and long-term storage requirements during the planning phase. Storage
Chapter 4
Storage: Plan Storage Configuration
4-18

is needed for both the Oracle database binaries and the data files and other
configuration files.
If using Real Application Clusters (RAC) for high-availability, the database storage
must be shared among all nodes for each database. Automatic Storage Management
(ASM) is the only supported database storage for RAC.
4.3.2.5 Temporary Files Created During Installation (temp directory)
Oracle Fusion Applications uses the system temporary directory to store certain files
used during the install, and that space is required throughout the installation process.
Since these files may also be used post-installation for patching or upgrade processes,
it is recommended to assign that space to the system temp directory permanently.
4.3.3 oraInventory Planning
The oraInventory is the location where the Oracle Universal Installer stores information
about all the Oracle software products installed on all
ORACLE_HOMES
and it is essential
for lifecycle events such as applying patches, upgrades, and de-installing components.
The following components require an oraInventory:
• Oracle Database
• Oracle Identity Management Provisioning tool
• Oracle Identity Management components
• Oracle Fusion Applications Provisioning tool
• Oracle Fusion Applications components
• Oracle HTTP Server (separate oraInventory when installed on a DMZ)
For more information about oraInventory (also called OUI Inventory in some
references), see Oracle Universal Installer (OUI) Inventory in the Oracle Fusion
Applications Patching Guide.
When planning the location of the oraInventory directories, consider the following:
• The oraInventory must be accessible from all the nodes that run software installed
against it. Therefore, when Oracle Fusion Applications is installed on multiple
nodes, the oraInventory for Oracle Fusion Applications must be located on shared
storage. The same applies to the oraInventory for Oracle Identity Management.
The database oraInventory locations are usually maintained separately from
Oracle Fusion Applications and Oracle Identity Management oraInventory; shared
storage is not applicable.
• Having a single oraInventory across all Oracle Fusion Applications components
brings the advantage of centralized management and eliminates guesswork when
applying patches. By default, the central oraInventory includes a known file
(
oraInst.loc
) that provides the location of the central oraInventory to Oracle
Fusion Applications lifecycle management utilities such as patching, upgrading, or
cloning tools.
For oraInventory planning, please define the inventory location for each of the
components below:
• Oracle Identity Management Provisioning Framework
• Oracle Fusion Applications Provisioning Framework
Chapter 4
Storage: Plan Storage Configuration
4-19

• Oracle Fusion Applications
• Oracle Identity Management
• Oracle Fusion Applications database
• Oracle Identity Management database
• OID database
• Oracle Fusion Applications Data Warehouse database
Define also whether each inventory is central or local:
• Central: The
/etc/oraInst.loc
file defines a server-wide location for a single
inventory. When this file is present, Oracle installers/provisioning tools do not
prompt for an inventory location and use the one defined in this file instead. This
works well if the same Inventory path is used for all components. If the
/etc/
oraInst.loc
file is not present, the first time an installer is run a central inventory
location and group owner are requested. The installer creates the file automatically
in the
/etc
directory, which requires root access. Copy manually that file to all
servers using that software.
• Local: No
/etc/oraInst.loc
file should be present. In this case, during install it
might necessary to:
1. Specify an inventory location and group owner when prompted by an installer,
and check the option to make it a local inventory. Be sure to use a path
in shared storage so it is visible to all servers running that software. No
root access is required in this case. The installer creates the local inventory
automatically in the specified location and adds an
oraInst.loc
file pointing
to that inventory in the
ORACLE_HOME
of the product.
2. When the local inventory and oraInst.loc file have been created by the
installer, use the option
–invPrtLoc
to specify the oraInst.loc file location when
invoking the installers/provisioning tools.
4.3.4 Plan Directory Structure and Naming Conventions
Ensure enough shared storage available and is accessible, and enough local storage
is available if using that option. When running the Provisioning Wizard, in addition to
oraInventory, it is necessary to plan for the locations listed in the table below:
Directory Conventions:
• Directory names should not contain spaces.
• Directory structure is maintained across sources and targets, so use environment-
neutral directory names and make them unique enough to guarantee this naming
is available on a potential subsequent clone target.
• All the directories must be owned by the installing (operating system) user. By
convention, most Oracle software installation are done with the operating system
user called "
oracle
".
4.3.5 Shared Storage Considerations
Oracle Fusion Applications and Oracle Identity Management use shared storage to
make the binary files, configuration files, and other files available to all its Mid Tier
nodes (and Web Tier nodes, if not using the DMZ option). The shared storage should
Chapter 4
Storage: Plan Storage Configuration
4-20

be mounted at the exact same location for each Mid Tier node (and Web Tier nodes, if
not using the DMZ option).
Shared storage must also be used for the:
• Provisioning repository
• Oracle Identity Management provisioning framework
• Oracle Fusion Applications provisioning framework
•
hwrepo
directory
• Database when using RAC
Shared storage may also be used temporarily during the installation process to hold
temporary backup files or other files used during the installation process.
Additional consideration for the shared storage:
• Shared storage can be a Network Attached Storage (NAS) or Storage Area
Network (SAN) device.
• NAS storage is only supported on NetApp and zFS.
• It is possible to set up separate volumes of shared storage, one for Oracle Fusion
Applications and another for Oracle Identity Management. The Oracle Fusion
Applications shared storage does not have to be mounted or visible to the Oracle
Identity Management nodes, and vice-versa.
• If provisioning Oracle Identity Management and Oracle Fusion Applications on a
single node, it is possible to use a local disk for shared storage, since it must only
be visible to one node.
• The shared drive such as, Network File System (NFS) or Common Internet File
System (CIFS) must support file locking. For NFS Version 3 and NFS Version 4,
the advisory locking must be configured for the NFS mount. This applies to all
UNIX platforms.
4.3.6 Local Storage Considerations
Both Oracle Identity Management and Oracle Fusion Applications Provisioning offer
the option of using local storage to run Managed Servers and local instances. This
storage location is a networked (local) disk on the host, visible only to the processes
running on that host, which may offer better performance than shared storage.
When deciding whether or not to use local configuration take the following into
account:
• Speed of local storage vs. shared storage
• Disk space available on the local storage
• IT processes (e.g. backup, storage mirroring) that require additional maintenance
due to the added drive location and its accessibility from the local server only.
If the Local Config Storage option is used, the following directories are created:
Chapter 4
Storage: Plan Storage Configuration
4-21
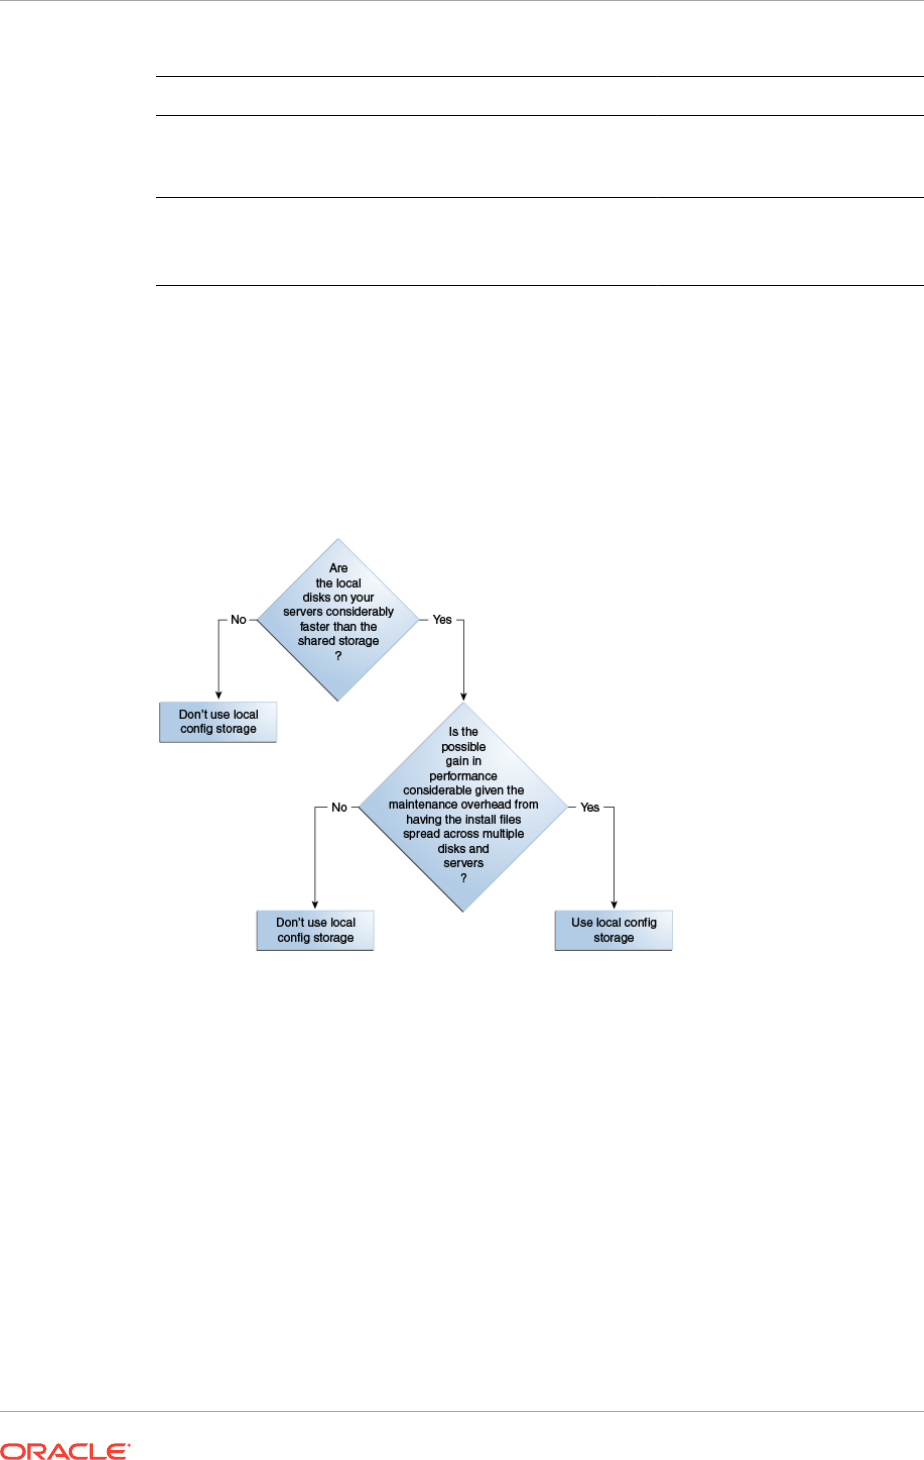
Installation Location Sub-Directories Includes
Oracle Identity
Management
IDM_LOCAL /instances
/domains
All instance configuration files
(for OID, ODSM, OHS)
All managed server files
Oracle Fusion
Applications
FA_LOCAL /applications
/BIInstances
/domains
BI Instance configuration files
UCM configuration files
All managed server files
4.3.6.1 Local Config Storage Decision Tree
The decision diagram outlines the key choice points when choosing whether to use
the Local Storage Config option available in the Oracle Fusion Applications and Oracle
Identity Management Provisioning Wizards.
Figure 4-5 Local Storage Decision Tree
4.3.7 Complete the Storage Tab of the Oracle Fusion Applications
Installation Workbook
To complete the Shared Storage table:
• Mount Point: The file system mount point for the Oracle Fusion Applications or
Oracle Identity Management shared storage.
• OS User Owner: The operating system user of the installation owner (e.g. oracle).
• OS Group Owner: The operating system group of the installation owner (e.g.
orainstall).
• NFS Parameters (UNIX only): NFS parameters as defined in
/etc/fstab
.
To complete the Install Directories Table:
Chapter 4
Storage: Plan Storage Configuration
4-22

• Enter the appropriate install directories, as described in Plan Directory Structure
and Naming Conventions (page 4-20).
To complete the Inventories Table:
Complete the Inventory path with the desired path for the inventories. See
oraInventory Planning (page 4-19).
To complete the Temporary Storage Table:
• Provisioning Repository: location for the provisioning repository.
• Installer Directory: when the Oracle Fusion Applications package is downloaded
from e-delivery, a multiple zip file is received. When this file is unzipped, it creates
the top-level directory called
Installers
.
• JAVA_HOME: location of the JAVA_HOME.
• Temporary Backup Location: plan space to back up during the provisioning
process. When everything is installed and validated, delete this.
4.4 Database: Plan Database Configuration
An Oracle Fusion Applications environment has, at minimum, two databases: one for
Oracle Identity Management (IDMDB) and another one for Oracle Fusion Applications
transactions (FADB). Since these two databases are subject to different patching and
maintenance requirements, it is recommended that they are installed on separate
ORACLE_HOMEs
.
Optionally, a database for the Data Warehouse is used to install Oracle BI Applications
(DWDB).
Oracle Identity Management Provisioning also permits a separate dedicated database
for OID (OIDDB). This database can be installed on the same
ORACLE_HOME
as the
IDMDB.
The following table summarizes the database requirements for Oracle Fusion
Applications
Database Purpose Mandatory Separate ORACLE_HOME
Recommended
FADB Oracle Fusion
Applications
transactional
database
yes yes
IDMDB Oracle Identity
Management
database
yes yes
OIDDB Oracle Identity
Management (OID
only)
no no
DWDB Data Warehouse for
Business Intelligence
no yes
Chapter 4
Database: Plan Database Configuration
4-23
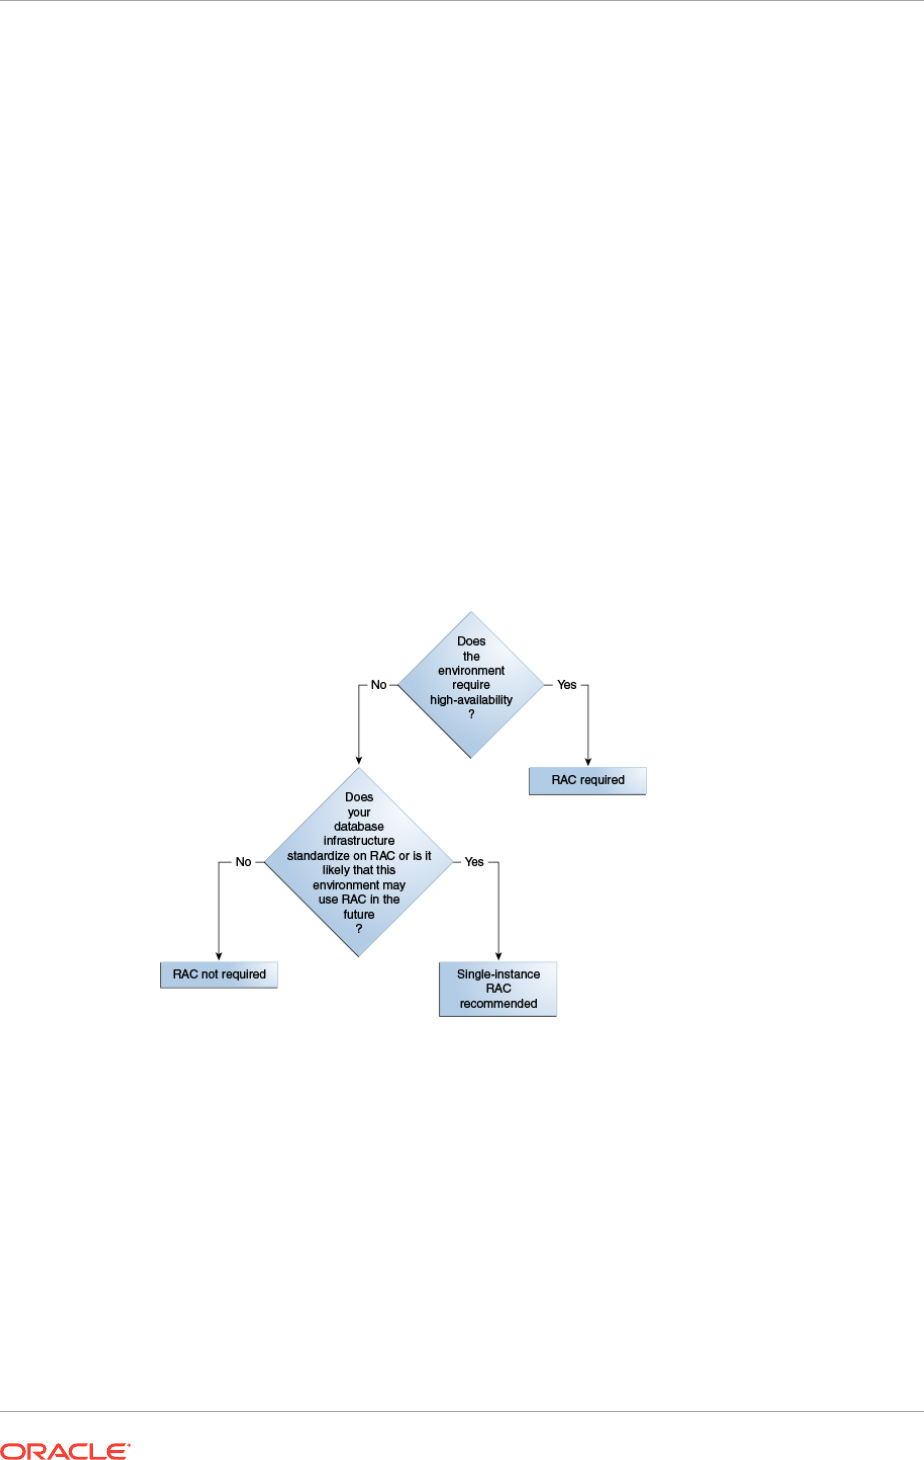
4.4.1 RAC vs. Single Instance Planning
For environments using the Basic or Enterprise (non-HA) topologies, a single-instance
database is used.
For environments with High Availability requirements, Oracle Fusion Applications
supports the use of Oracle Real Application Clusters (RAC).
MANDATORY: Use at least two nodes. RAC single-node functionality is not currently
supported.
When a provisioning response file is created using the Oracle Fusion Applications
Provisioning Wizard, if only one RAC node information is provided for the Oracle
Fusion Applications database, then an error is displayed during the install phase. The
error is generated due to a limitation in the Oracle Data Integrator (ODI) installer and
at least two RAC nodes must be provided. See Install Phase Failed with INST-07221:
Specified connect string is not in a valid format Error (page 14-13).
For more information on Oracle RAC, see the Oracle database library.
Figure 4-6 RAC or Single-instance Database Decision Tree
4.4.2 Plan for Database Requirements
When determining the database configuration, consider the required instances, the
required patching, listener configurations, schema and password requirements, and
RCU directories.
Two databases are recommended for Oracle Internet Directory and Oracle
Access Manager/Oracle Identity Manager because they are likely to have different
configuration requirements. If desired, they can be combined into a single database.
Chapter 4
Database: Plan Database Configuration
4-24

4.4.2.1 Required Instance Parameters
The Oracle Fusion Applications database has specific required instance parameters.
Validate Oracle-recommended database instance parameters for the Oracle Fusion
Applications and Oracle Identity Management databases against the enterprise
corporate guidelines for any potential issues and plan accordingly. For details, see:
Oracle Identity Management: About Initialization Parameters (page 7-3)
Oracle Fusion Applications: Minimum Configuration Parameters for Oracle Database
(page 8-4)
4.4.2.2 Required Database Patches
The Oracle Fusion Applications database has specific patch requirements, which
must be applied before starting the provisioning process. To determine your required
patches, per corporate guidelines (e.g. CPUs), see:
Oracle Identity Management: Patch Requirements for Oracle Database 12c
(page 7-2), and Patch Requirements for Oracle Database 12c (page 7-3)
Oracle Fusion Applications: Mandatory Oracle Database Patches (page 8-8)
Use these references to check for potential conflicts and plan accordingly. If
necessary, request merge patches from Oracle Support.
4.4.2.3 Schema and Password Requirements
All Oracle Identity Management and Oracle Fusion Applications schema names
for the Oracle Identity Management database or OID database and Oracle Fusion
Applications database are fixed and cannot be modified. They are created by the
Oracle Fusion Middleware RCU (Oracle Identity Management) and Oracle Fusion
Applications RCU.
MANDATORY: The Oracle Fusion Middleware RCU appears to provide an option to
choose a prefix for the schemas, but in this release the prefix must always be FA.
Therefore, on the topic of schemas, the only planning required is regarding password
selection. Oracle Identity Management and Oracle Fusion Applications Provisioning
Wizards give the option of choosing a different password for each schema, but the
same password can be also used for all schemas or groups of schemas as desired.
The Oracle Metadata Services (MDS) Repository is a particular type of repository
that contains metadata for some Oracle Fusion Middleware components. It can also
include custom Java EE applications developed by the organization.
Table 4-5 (page 4-26) lists all the Oracle Fusion Applications schemas created.
Chapter 4
Database: Plan Database Configuration
4-25

Table 4-5 Oracle Fusion Middleware and Oracle Fusion Applications Schema
Owners
Component Schema
Oracle Fusion Applications Includes:
• FUSION
• FUSION_DYNAMIC
• FUSION_RUNTIME
• FUSION_APM
• FUSION_AQ
• FUSION_BI
• FUSION_DQ
• FUSION_ODI_STAGE
• FUSION_SETUP
AS Common Schemas
• Enterprise Scheduler Service
• Metadata Services
Includes:
• FUSION_ORA_ESS
• CRM_FUSION_MDS_SOA
• FIN_FUSION_MDS_SOA
• HCM_FUSION_MDS_SOA
• OIC_FUSION_MDS_SOA
• PRC_FUSION_MDS_SOA
• PRJ_FUSION_MDS_SOA
• SCM_FUSION_MDS_SOA
• SETUP_FUSION_MDS_SOA
• HED_FUSION_MDS_SOA
• FUSION_MDS
• FUSION_MDS_ESS
• FUSION_MDS_SPACES
Secure Enterprise Search SEARCHSYS
Oracle Data Integrator
• Primary and Work Repository
FUSION_ODI
Enterprise Content Management
• Oracle Content Server 11g - Complete
• Oracle Imaging and Process Management
Includes:
• FUSION_OCSERVER11G
• FUSION_IPM
Oracle Business Intelligence (Platform) FUSION_BIPLATFORM
Oracle BI Applications Schemas
• Oracle Transactional BI
• Oracle BI Cloud Adapter
Includes:
• FUSION_OTBI
• FUSION_BIA_CLOUD
WebLogic Server Communication Services
• SIP Infrastructure Location Service
• Presence
• SIP Infrastructure Subscriber Data Service
Includes:
• FUSION_ORASDPLS
• FUSION_ORASDPXDMS
• FUSION_ORASDPSDS
Chapter 4
Database: Plan Database Configuration
4-26

Table 4-5 (Cont.) Oracle Fusion Middleware and Oracle Fusion Applications
Schema Owners
Component Schema
SOA and BPM Infrastructure
• User Messaging Service
• SOA Infrastructure
• SOA Infrastructure
• SOA Infrastructure
• SOA Infrastructure
• SOA Infrastructure
• SOA Infrastructure
• SOA Infrastructure
• SOA Infrastructure
Includes:
• FUSION_ORASDPM
• CRM_FUSION_SOAINFRA
• FIN_FUSION_SOAINFRA
• HCM_FUSION_SOAINFRA
• OIC_FUSION_SOAINFRA
• PRC_FUSION_SOAINFRA
• PRJ_FUSION_SOAINFRA
• SCM_FUSION_SOAINFRA
• SETUP_FUSION_SOAINFRA
• HED_FUSION_SOAINFRA
WebCenter Suite
• WebCenter Spaces
• Portlet Producers
• Activity Graph and Analytics
• Discussions
Includes:
• FUSION_WEBCENTER
• FUSION_PORTLET
• FUSION_ACTIVITIES
• FUSION_DISCUSSIONS
• FUSION_DISCUSSIONS_CRAWLE
R
Audit Includes:
• FUSION_IAU
• FUSION_IAU_APPEND
• FUSION_IAU_VIEWER
Oracle Social Network Includes:
• FUSION_RDF
• FUSION_SOCIAL
• FUSION_SOCIAL_CEF
• FUSION_SOCIAL_VIEWS
Fusion Data Integration Includes:
• FUSION_INTEGRATION_CURREN
T
• FUSION_INTEGRATION_PREVIOU
S
• FUSION_INTEGRATION_FINAL
Oracle Enterprise Data Quality Includes:
• FUSION_EDQFUSION
• FUSION_EDQCONFIG1
• FUSION_EDQRESULTS1
• FUSION_EDQCONFIG2
• FUSION_EDQRESULTS2
Fusion Applications Read Only Diagnostic FUSION_RO
FUSION_ERO
Fusion Risk and Controls FUSION_GRC
Chapter 4
Database: Plan Database Configuration
4-27

Table 4-5 (Cont.) Oracle Fusion Middleware and Oracle Fusion Applications
Schema Owners
Component Schema
Oracle Database Vault Includes:
• LCM_EXP_ADMIN
• LCM_OBJECT_ADMIN
• LCM_SUPER_ADMIN
• LCM_USER_ADMIN
• DVOWNER
• DVACCTMGR
Fusion Middleware Data Source Consolidation FMW_RUNTIME
Oracle Platform Security Services (OPSS) FUSION_OPSS
Table 4-6 (page 4-28) shows all the Oracle Identity Management schemas created:
Table 4-6 Oracle Identity Management Schemas
Component and
Database Name
Schema Service Name
Oracle Internet Directory
OIDDB
Includes:
• ODSSM
• ODS
OIDEDG.mycompany.com
Oracle Identity and
Access Management
IDMDB
Includes:
• FA_OAM
• FA_MDS
• FA_IAU
• FA_OPSS
IAMEDG.mycompany.com
4.4.2.4 Oracle Fusion Applications RCU Directories
The Oracle Fusion Applications transactional database requires the creation of several
DBA directories, listed in the following table. Directory creation is performed when the
Oracle Fusion Applications RCU is run.
To plan for these DBA directories, decide where the corresponding file system
directories are created on the database server and add those locations to the Oracle
Fusion Applications Installation Workbook. The locations are requested when the
Oracle Fusion Applications RCU is run.
DBA Directory Name Purpose Requirements
APPLCP_FILE_DIR Used by Oracle Enterprise
Scheduler to store the log
and output files.
Must be valid on the
database server with read-write
permissions to the database
owner. For Oracle RAC, must
point to a location that is shared
across all nodes.
Chapter 4
Database: Plan Database Configuration
4-28

DBA Directory Name Purpose Requirements
APPLLOG_DIR Location of the PL/SQL
log files from Oracle
Fusion Applications PL/SQL
procedures on the database
server.
Ensure that the database owner
has read-write privileges.
FUSIONAPPS_PROV_RECO
VERY_DIR (RCU OBIEE
Backup Directory)
Location of the Oracle
Business Intelligence
Enterprise Edition dump files.
These files are used for
enabling a restart action.
Ensure that the database owner
has read-write privileges. For
Oracle RAC, must point to a
location that is shared across all
nodes.
FUSIONAPPS_DBINSTALL_
DP_DIR
Directory where to copy the
Oracle Fusion Applications
database dump files.
Ensure that the database owner
has read-write privileges. For
Oracle RAC, must point to a
location that is shared across all
nodes.
OTBI_DBINSTALL_DUMP_DI
R (RCU OTBI Dump File
Directory)
Directory on the database
server where Oracle
Transactional Business
Intelligence dump file is
stored.
Ensure that the database owner
has read-write privileges. For
Oracle RAC, must point to a
location that is shared across all
nodes.
4.4.2.5 Oracle Identity Management Split Database Configuration
The Oracle Identity Management Provisioning tool allows to use a dedicated database
for OID (OIDDB), which holds the ODS and ODSSM schemas used by it. With this
configuration, only the ODS and ODSSM schemas are placed on a different database,
all other IDM schemas are still located in the IDMDB.
This configuration can be used for the Advanced replication features of the
Oracle Database to perform multi-primary replication across multiple OID instances.
Otherwise, a separate database for OID is not required.
4.4.3 Complete the Database Tab of the Oracle Fusion Applications
Installation Workbook
To complete the Fusion Applications Transactional Database table:
• FA DB Type: Select a database type from the list.
• FA DB Datafiles Location: Enter a location for the FA DB datafiles.
• FA DB Service Name: Enter the global database name, such as
fadb.mycompany.com
.
• FA DB Service Instance: Enter the FA DB instances. If RAC is used, separate the
instances with commas in the Oracle Fusion Applications Installation Workbook
table cell.
• RCU Directories: Enter the different RCU directories. When the Repository
Creation Utility is started to populate schemas for Oracle Fusion Applications, it
asks for these directories. Note that they are local to the database server. See
Run the Oracle Fusion Applications RCU to Create Oracle Fusion Applications
Database Objects (page 8-25).
Chapter 4
Database: Plan Database Configuration
4-29

To complete the IDM Database table:
• IDM DB TYPE: Select a database type from the list.
• IDM DB Oracle Home: Enter the directory of the IDM DB ORACLE_HOME.
• IDM DB Datafiles Location: Enter a location for the IDM DB datafiles.
• IDM DB Service Name: Enter the global database name, such as
fadb.mycompany.com
.
• IDM DB Service Instance: Enter the IDM DB instances. If a RAC is used,
separate the instances with commas in the Oracle Fusion Applications Installation
Workbook table cell.
• IDM DB Prefix: Enter FA in the Oracle Identity Management Provisioning Wizard
when prompted. This is for running the Oracle Fusion Middleware RCU utility.
To use the OID database or the Oracle Fusion Applications Data Warehouse, enter the
same parameters in their respective tables.
4.5 Identity Management: Plan the Oracle Identity
Management Configuration
The following topics provide concepts needed to plan an Oracle Identity Management
installation and to fill out the Identity Management tab in the Oracle Fusion
Applications Installation Workbook:
• Identity Store (page 4-30)
• LDAP Context (page 4-30)
• Location for Files Generated During Oracle Identity Management Provisioning
(page 4-31)
• Oracle Access Manager Transfer Mode (page 4-31)
4.5.1 Identity Store
Oracle Fusion Applications supports one type of Identity Store: OID. With the OID
option, identity information is physically stored in OID.
Integration with other products for single-sign -on (SSO) may have specific
requirements, e.g. Ebusiness Suite integration. OID offers additional options. One of
them is DIP (Directory Integration Platform), which performs synchronization between
OID and other directories.
4.5.2 LDAP Context
LDAP directories are used by Oracle Fusion Applications for storing identities -
users and groups (acting as the Identity Store), as well as authorization policies and
credentials (acting as the Policy Store/Credential Store).
Oracle Identity Management Provisioning provides the option to choose the context
root for the Identity Store, i.e. the starting point in the directory tree for storing user and
group information. Normally, the ID Store context root is based on the domain name,
e.g. for a company with domain name "mycompany.com", the ID Store context root
Chapter 4
Identity Management: Plan the Oracle Identity Management Configuration
4-30

chosen is normally
"dc=mycompany,dc=com"
. Provisioning then creates sub-contexts
for Users (
cn=Users
), groups (
cn=Groups
) among others.
For the Policy Store, Oracle Identity Management Provisioning automatically
creates contexts for the two policy stores (IDM and FA), under
cn=jpsroot
and
cn=FAPolicies
, respectively. Oracle Identity Management Provisioning does not allow
to change them. During Oracle Fusion Applications Provisioning, context root for the
FA Policy Store is requested, and although it is possible to choose a different one
(Oracle Fusion Applications Provisioning can create it if necessary), it is recommended
to use the one previously created by Oracle Identity Management Provisioning.
The table below provides a summary of the LDAP context roots used by Oracle Fusion
Applications:
Service Default Directory Type Can be User-
Defined?
Identity Store (Oracle Fusion
Applications/Oracle Identity
Management) Realm DN
dc=mycompany,dc=com
(example)
OID Yes
IDM Policy Store
cn=jpsroot
OID No.
Fusion Applications Policy
Store
cn=FAPolicies
OID Yes
4.5.3 Location for Files Generated During Oracle Identity Management
Provisioning
Oracle Identity Management Provisioning automatically generates files to be used
during Oracle Fusion Applications Provisioning, providing a more streamlined
integration between the two.
Once the Oracle Identity Management Provisioning process finishes, the generated
files can be found under
IDM_INSTALL_APPCONFIG_DIR/fa
. These files must be copied
to a directory accessible from all Oracle Fusion Applications nodes before Oracle
Fusion Applications Provisioning, so planning for this involves simply defining the
location where these files are and adding the information to the Oracle Fusion
Applications Installation Workbook.
4.5.4 Oracle Access Manager Transfer Mode
Oracle Access Manager (OAM) Transfer Mode refers to the transport security modes
for communication between the Oracle Access Manager Server (OAM Server) and
the Web gates. While OAM in general supports three different mode options (Open,
Simple and Cert), the only available mode for Oracle Fusion Applications Provisioning
is "Simple" for all platforms.
The table below provides a summary of OAM Transfer Modes and availability in
Oracle Fusion Applications Provisioning. A single mode must be selected for the
entire installation (including Oracle Identity Management) in accordance to the table. In
simpler terms: all platforms require Simple mode.
Chapter 4
Identity Management: Plan the Oracle Identity Management Configuration
4-31

Table 4-7
OAM Mode Description Available in
Fusion Applications
Provisioning
Open Uses un-encrypted communication No
Simple Uses encrypted communication through
SSL with a public key certificate issued by
Oracle
Yes
Cert Uses encrypted communication through
SSL with a public key certificate issued by
a trusted third-party certificate authority.
No
4.5.5 Oracle Internet Directory Password Policies
By default, Oracle Internet Directory passwords expire in 120 days. Users who do
not reset their passwords before expiration can no longer authenticate to Oracle
Internet Directory. Note that this includes administrative users, such as
oamadmin
,
and the Oracle Identity Management environment cannot work properly unless these
users can authenticate. For information about changing Oracle Internet Directory
password policies, see Managing Password Policies in the Oracle Fusion Middleware
Administrator's Guide for Oracle Internet Directory .
4.5.6 Complete the Identity Management Tab of the Oracle Fusion
Applications Installation Workbook
The Oracle Fusion Applications Installation Workbook provides sample values to make
many of these entries self-explanatory.
4.5.6.1 Complete the LDAP Table
Review LDAP Context (page 4-30) to obtain the information required for the DN
entries in this table.
• Identity Store Realm DN: Format described in the table in LDAP Context
(page 4-30).
• LDAP User DN: The User DN is a subtree of the Identity Store Realm DN
(above). Naming format is fixed:
cn=Users
• LDAP Group DN: The Group DN is a subtree of the Identity Store Realm DN
(above). Naming format is fixed:
cn=Groups
• FA JPS root DN: Refer to the table in LDAP Context (page 4-30) to derive.
4.5.6.2 Complete the IDM Provisioning Files Table
• IDM Properties file location: When Oracle Identity Management Provisioning
is complete, a file is created in the
IDM Shared Configuration Location/fa
directory (as defined on the Storage tab, Install Directories table). This file
must be made available to the Oracle Fusion Applications Provisioning process.
If the original location is accessible to the Oracle Fusion Applications Provisioning
Chapter 4
Identity Management: Plan the Oracle Identity Management Configuration
4-32

tool, enter that location in the Oracle Fusion Applications Installation Workbook.
Otherwise, copy the file to an accessible location and note the new location here.
• IDM Keystore file location: Not used in this release.
4.5.6.3 Complete the OAM Table
Only one field in this table can be edited, and it is generally not necessary to do even
that one.
• OAM Administrator User name: It is recommended to keep the default
(
OAMAdminUser
) unless explicitly instructed to change this.
4.5.6.4 Complete the Identity Store/Policy Store Table:
Most of the fields in this table cannot be edited. The exceptions are below:
• FA Node Manager Username: Use the default or edit if desired.
• LDAP Password Expiration Interval:
Enter the number of days left for the LDAP password to expire.
4.6 SSL and Certificates
This section describes requirements that apply to the SSL and Certificates tab in the
Oracle Fusion Applications Installation Workbook.
4.6.1 Out-of-the-Box SSL Configuration
Out of the box, the Oracle Identity Management and Oracle Fusion Applications
Provisioning frameworks configure their respective components to use SSL
connections between the end users and the load balancer or reverse proxy (or Web
Tier if an load balancer or reverse proxy is not used). This is mandatory and cannot be
changed.
Oracle Identity Management Provisioning provides the option to select SSL or
non-SSL for the
IDM Admin
HTTP endpoint, as noted in the Oracle Fusion
Applications Installation Workbook. Select yes to have the endpoint configured for
SSL automatically during Oracle Identity Management Provisioning.
If a load balancer is used, the connection between the LBR and the Web Tier is
configured as non-SSL, out of the box. Therefore, the HTTP listener on the Oracle
HTTP Server is non-SSL.
If a load balancer is not used, Oracle Identity Management behaves differently from
Oracle Fusion Applications:
• Oracle Fusion Applications: The end-user (external) connections are still SSL,
but they terminate at the Web Tier instead. (FA OHS is configured to listen to SSL
traffic.)
• Oracle Identity Management: All external endpoints are non-SSL. (IDM OHS is
configured to listen to regular HTTP traffic.)
Chapter 4
SSL and Certificates
4-33

4.6.2 SSL Certificate Requirements
SSL Certificate requirements depend on whether the topology uses a load balancer/
reverse proxy or not.
If using an LBR/RP: Because both Oracle Identity Management and Oracle Fusion
Applications terminate SSL connections at the load balancer, it is necessary to
set up the appropriate SSL certificates on the load balancer BEFORE starting the
provisioning process. The certificates should be created and provisioned to the
LBR/RP according to the policies and procedures, along with the instructions provided
by the load balancer or reverse proxy manufacturer.
If not using an load balancer or reverse proxy: SSL terminates at OHS, which is
configured with a default dummy certificate. As the dummy certificate is not trusted
by browsers, end users get certificate warning messages when they access any
external URL. To avoid this, configure OHS to use certificate(s) signed by a trusted
certificate authority (CA). This can be an external certificate authority such as Verisign,
or an internal certificate authority whose root certificate is trusted by the browser. See
Configure Oracle HTTP Server with Custom Certificates (page 16-20).
4.7 Memory Requirements
Table 4-8 (page 4-34) lists the default memory settings for WebLogic administration
and managed servers in the Oracle Fusion Applications environment. Follow Table 4-8
(page 4-34) to plan for the memory requirements of the provisioning hosts. Pplan for
additional memory for operating system and reserve enough spare memory to give
room for future growth and scale out.
Table 4-8 Memory Requirements for WebLogic Administration and Managed
Servers
Memory Specifics Requirements
Memory per Managed Servers 2.75GB (2816MB) multiplied by the number of managed
servers in the environment, plus 4GB.
Memory Per Administration
Servers
1GB multiplied by the number of administration servers in
the environment, if the WebLogic domain is not a product
family of the product offerings that are selected (see Table 2-2
(page 2-4)).
2GB multiplied by the number of administration servers in the
environment, if the WebLogic domain is a product family of the
product offerings that are selected (see Table 2-2 (page 2-4)).
Business Intelligence Cluster
(bi_cluster / BIDomain)
6GB multiplied by the number of managed servers in the
environment.
Oracle Enterprise Data
Quality Cluster (EDQCluster /
CommonDomain)
16GB for one instance of EDQ WebLogic managed server
created out-of-the-box if any of the product offerings listed
below are selected:
• CRM: Sales, Marketing, Customer Data Management,
Enterprise Contracts.
• Financials: Financials, Procurement
• SCM: Product Management, Material Management,
Logistics, and Supply Chain Financial Orchestration
Chapter 4
Memory Requirements
4-34

Table 4-8 (Cont.) Memory Requirements for WebLogic Administration and
Managed Servers
Memory Specifics Requirements
Workforce Reputation Cluster
(WorkforceReputationCluster /
HCMDomain)
8GB multiplied by the number of managed servers in the
environment if any of the product offerings listed below are
selected:
• Workforce Deployment
• Workforce Development
See Recommended Memory Requirement for Oracle
Fusion Human Capital Management Workforce Reputation
Management Product (page 22-8).
4.8 Next Steps
When the Oracle Fusion Applications Installation Workbook is entirely filled out,
proceed with Prepare for an Installation (page 5-1).
Chapter 4
Next Steps
4-35

5
Prepare for an Installation
This section describes the prerequisites for provisioning a new applications
environment. Before creating the new environment, review the actions described in
the following sections to help ensure a smooth installation.
This section includes the following topics:
• Prepare Storage Components (page 5-1)
• Prepare the Oracle Identity Management Server (page 5-3)
• Prepare the Oracle Fusion Applications Server (page 5-6)
• Prepare the Network (page 5-16)
• Create the Oracle Fusion Applications Provisioning Repository (page 5-25)
• What to Do Next (page 5-30)
5.1 Prepare Storage Components
This section describes the following topics:
• Prepare Shared Storage for Oracle Identity Management and Oracle Fusion
Applications (page 5-1)
• Mount the Shared Storage (page 5-2)
• Verify Install Directory Location (page 5-2)
• Verify the /etc/oraInst.loc File (page 5-2)
5.1.1 Prepare Shared Storage for Oracle Identity Management and
Oracle Fusion Applications
Prepare the shared storage for Oracle Identity Management and Oracle Fusion
Applications as defined in the Oracle Fusion Applications Installation Workbook.
Ensure the shared storage has the required space as defined in Storage: Plan Storage
Configuration (page 4-15) and that they are configured according to the instructions
detailed in Shared Storage Considerations (page 4-20).
Tip:
The shared storage property value is available in the Oracle Fusion
Applications Installation Workbook, then in the Storage tab, and then the
Shared Storage section .
5-1

5.1.2 Mount the Shared Storage
Mount the shared storage on each server according to the information defined in the
Oracle Fusion Applications Installation Workbook , the in the Storage tab , and the in
the Shared Storage table. Ensure that the file system is mounted as read-write.
If different shared storage are used for Oracle Identity Management and Oracle Fusion
Applications, follow these steps to mount each shared drive:
• The Oracle Identity Management shared storage should be mounted on the
servers running Oracle Identity Management components (see the Topology tab
in the Oracle Fusion Applications Installation Workbook).
• The Oracle Fusion Applications shared storage should be mounted on the servers
running Oracle Fusion Applications components (see the Topology tab in the
Oracle Fusion Applications Installation Workbook).
5.1.3 Verify Install Directory Location
Ensure the locations defined for the Install Directories and Temporary Shared Storage
are owned by the appropriate user, are read/write and can be created later during
install. They may include both shared and local file systems.
For servers located in the DMZ, which normally don't have access to the shared
storage, the same base path used for the other servers (as defined in the Oracle
Fusion Applications Installation Workbook) is applicable.
Tip:
The directory location values are available in the Oracle Fusion Applications
Installation Workbook , then the Storage tab, then Temporary Shared
Storage table, and then the Installers Directory Location field.
5.1.4 Verify the /etc/oraInst.loc File
Ensure there is no
oraInst.loc
file present in the
/etc
directory unless using
a central inventory and preferring to not have the installer create it later (which
requires root access). In this case, ensure the
oraInst.loc
file points at the location
defined for
oraInventory
in the Oracle Fusion Applications Installation Workbook. The
oraInst.loc
file contains the following two lines:
inventory_loc=<oraInventory path>
inst_group=<oraInventory owner group>
The file must be present and have the correct
oraInventory
and group owner values
for all servers.
Chapter 5
Prepare Storage Components
5-2

Tip:
The planned inventory location values are available in the Oracle Fusion
Applications Installation Workbook , then the Storage tab, and then
Inventories table.
5.2 Prepare the Oracle Identity Management Server
This section describes tasks must be performed before running the Oracle Identity
Management Provisioning Wizard. Many of these tasks are platform-specific.
5.2.1 Ensure Software Install Location is 45 Characters or Fewer
When planning the Oracle Identity Management deployment, ensure that the Software
Installation Location directory path is 45 characters or fewer in length. Specify this
directory on the Installation and Configuration page when the provisioning profile is
created. A longer path name can cause errors during Oracle Identity Management
provisioning. See Null Error Occurs When WebLogic Patches Are Applied (page 11-3).
5.2.2 Configure Kernel Parameters
UNIX: The kernel parameter and shell limit values shown below are recommended
values only. For production database systems, Oracle recommends to tune these
values to optimize the performance of the system. See the operating system
documentation for more information about tuning kernel parameters.
Kernel parameters must be set to a minimum of those below on all nodes in the
cluster.
The values in the following table are the current Linux recommendations. See the
Oracle Fusion Middleware System Requirements and Specifications.
To deploy a database onto the host, it might be necessary to modify additional kernel
parameters.
Table 5-1 UNIX Kernel Parameters
Parameter Value
kernel.sem 256 32000 100 142
kernel.shmmax 4294967295
Linux:
To set these parameters:
1. Log in as
root
and add or amend the entries in
/etc/sysctl.conf
.
2. Save the file.
3. Activate the changes by issuing the command:
4.
/sbin/sysctl -p
Chapter 5
Prepare the Oracle Identity Management Server
5-3

Solaris:
The table lists the recommended kernel parameters on Solaris. Verify that the kernel
parameters shown in the table are set to values greater than or equal to the minimum
value shown.
Table 5-2 Solaris Kernel Parameters
Resource Control Minimum Value
project.max-sem-ids 100
process.max-sem-nsems 256
project.max-shm-memory 4294967295
project.max-shm-ids 100
To verify the current value of kernel parameters:
1. Retrieve the project id:
Example:
$ /bin/id -p
uid=100(oracle) gid=100(dba) projid=1 (group.dba)
, where
group.dba
is the
project ID
2. Execute
prctl
command with the project ID to get the current value:
/bin/prctl -n project.max-sem-ids -i project <project-id>
/bin/prctl -n process.max-sem-nsems -i project <project-id>
/bin/prctl -n project.max-shm-memory -i project <project-id>
/bin/prctl -n project.max-shm-ids -i project <project-id>
If any value listed for privileged is below the recommended value, increase it:
1. Use
projmod
command to set the value with root.
/usr/sbin/projmod -s -K "process.max-sem-
nsems=(privileged,VALUE,deny)" <project-id> -
/usr/sbin/projmod -s -K "project.max-shm-ids=(privileged,VALUE,deny)"
<project-id> -
/usr/sbin/projmod -s -K "process.max-sem-ops=(privileged,VALUE,deny)"
<project-id> -
/usr/sbin/projmod -s -K "project.max-shm-
memory=(privileged,VALUE,deny)" <project-id> -
2. After setting the parameters, check the values in
/etc/project
using below
command:
$cat /etc/project
. The following line will be added:
project:::project.max-shmmemory=(privileged,2147483648,deny)
3. To verify that the parameter is active, login as the project user and run the
following commands:
/bin/id -p
/bin/prctl -n <Kernel parameter> -i process $$
Chapter 5
Prepare the Oracle Identity Management Server
5-4

Example:
$ /bin/id -p
uid=100(oracle) gid=100(dba) projid=1 (group.dba)
$ /bin/prctl -n project.max-sem-ids -i process $$
process: 24679: -tcsh
NAME PRIVILEGE VALUE FLAG ACTION RECIPIENT
project.max-sem-ids privileged 100 - deny - system 16.8M max deny
5.2.3 Set the Open File Limit
On all UNIX operating systems, the minimum Open File Limit should be 150000.
The following examples are for Linux operating systems. For other operating systems,
consult the respective documentation to determine the commands to be used.
Linux: See how many files are open with the following command:
/usr/sbin/lsof | wc -l
To check the open file limits, use the following commands:
C shell:
limit descriptors
Bash:
ulimit -n
Solaris:
See how many files are open with the following command:
/usr/local/bin/lsof | wc -l
To check the open file limits, use the following command:
/bin/ulimit -n
5.2.4 Set Shell Limits
UNIX:
To change the shell limits, login as
root
and edit the
/etc/security/limits.conf
file.
Add the following lines:
* soft nofile 150000
* hard nofile 150000
* soft nproc 327679
* hard nproc 327679
If installing on Oracle Linux Server release 6, edit
/etc/security/limits.d/90-
nproc.conf
to make sure it has the following line:
* soft nproc 327679
Chapter 5
Prepare the Oracle Identity Management Server
5-5

After editing the file, reboot the machine.
Solaris:
To change the shell limits, login as
root
and edit the
/etc/system
file.
To set shell limits parameter:
rlim_fd_cur 150000
rlim_fd_max 150000
maxuprc 327679
max_nprocs 327679
After editing the file, reboot the machine.
5.2.5 Enable Unicode Support
The operating system configuration can influence the behavior of characters supported
by Oracle Fusion Middleware products.
On UNIX operating systems, Oracle highly recommends to enable Unicode support
by setting the
LANG
and
LC_ALL
environment variables to a locale with the UTF-8
character set. This enables the operating system to process any character in Unicode.
If the operating system is configured to use a non-UTF-8 encoding, some components
may function in an unexpected way. Oracle does not support problems caused by
operating system constraints.
5.2.6 Synchronize Oracle Internet Directory Nodes
Synchronize the time on the individual Oracle Internet Directory nodes using
Greenwich Mean Time so that there is a discrepancy of no more than 250 seconds
between them.
If OID Monitor detects a time discrepancy of more than 250 seconds between the two
nodes, the OID Monitor on the node that is behind stops all servers on its node. To
correct this problem, synchronize the time on the node that is behind in time. The
OID Monitor automatically detects the change in the system time and starts the Oracle
Internet Directory servers on its node.
5.3 Prepare the Oracle Fusion Applications Server
Before creating the new environment, review the following actions in this section to
help ensure a smooth installation.
• Increase the Open Files Limit (page 5-7)
• Define the Local Port Range (page 5-9)
• Synchronize the System Clocks (page 5-9)
• Synchronize Date Time Stamp (page 5-9)
• Set the Kernel Parameter Value (page 5-10)
• Unset LIBPATH Variable (page 5-11)
Chapter 5
Prepare the Oracle Fusion Applications Server
5-6

• Set the System Time Zone (page 5-11)
• Create the hwrepo directory (page 5-11)
• Verify Swap Space (UNIX) (page 5-12)
• Edit Host Names (UNIX) (page 5-13)
• Default Shell (UNIX) (page 5-13)
• Install en_US.UTF-8 Locale (UNIX) (page 5-13)
• Increase Entropy Values (Linux) (page 5-14)
• Check for the Required Solaris Patch (Solaris Only) (page 5-15)
5.3.1 Increase the Open Files Limit
Increase the limit of open files to 327679 or higher for the operating system.
For Linux x86-64:
Modify
/etc/security/limits.conf
to read as follows:
•
FUSION_USER_ACCOUNT soft nofile 327679
•
FUSION_USER_ACCOUNT hard nofile 327679
Edit
/etc/ssh/sshd_config
as follows:
1. Set
UsePAM
to
Yes
.
2. Restart
sshd
.
3. Logout (or reboot) and log in again.
Increase the maximum open files limit.
Edit
/proc/sys/fs/file-max
and set it to 6553600. The change becomes effective
immediately but does not persist after a reboot. To make the change permanent
edit
/etc/sysctl.conf
and set
fs.file-max
= 6553600
. This change does not be
effective until the
sysctl
command is run or the server is rebooted.
For Oracle Solaris on SPARC (64-bit):
Edit
/etc/system
and set as follows:
set rlim_fd_cur=327679
set rlim_fd_max=327679
5.3.2 Increase the Max User Processes
For all platforms, typically, have max user processes set to 16384:
$ulimit -u 16384
Increase the maximum user process to 16384 or higher.
Linux:
To check the max user processes:
$ulimit -u
Chapter 5
Prepare the Oracle Fusion Applications Server
5-7

16384
To change the max user processes:
Modify
/etc/security/limits.conf
to read as follows:
FUSION_USER_ACCOUNT soft nproc 16384
FUSION_USER_ACCOUNT hard nproc 16384
Solaris:
To check the max user processes:
$ulimit -u
16384
To change the maximum user processes:
Modify below parameter in
file /etc/system
:
maxuprc = 16384
max_nprocs = 16384
After editing the file, reboot the machine.
The value of 16384 for max user processes is the recommended starting value
for installing Oracle Fusion Applications in a multi-host topology. Depending on the
hardware topology for the Oracle Fusion Applications environment planned for setup,
a higher number for max user processes might need to be used when allocating
more WebLogic domains and managed servers into a fewer number of hosts. Is is
recommended to go through a proper sizing exercise to determine the configuration.
When a host reaches the limit of the max user processes during provisioning of Oracle
Fusion Applications, the following error messages might be encountered while starting
additional managed server processes even when the IP address and port number are
valid.
Node Manager log:
2013-12-28 03:31:57.932 NOTIFICATION
[logStatus] STATE=BUILD_ERROR!TIMESTAMP=2013-12-28
03:31:57 GMT!TARGET=common-apps-startup!CATEGORY=BUILD_ERROR!
DOMAIN=HCMDomain!HOSTNAME=<host>!PRODUCTFAMILY=hcm!PRODUCT=HCM-Talent!
TASK=nodeManagerStartServer!TASKID=hcm.HCM-Talent.BUILD_ERROR.common-apps-
startup.nodeManagerStartServer!MESSAGE=Node Manager Start Server operation
could not be carried out. Please check the log files
in the Managed Server directory <file path to a managed
server directory>/logs/ and the NodeManager log at <APPLICATIONS_CONFIG>/
nodemanager/<host>/nodemanager.log to find out details of the
problem.!DETAIL=Process execution failed with return code: 1.
Check the logs for more information.!BUILDFILE=<FAPROV_HOME>/provisioning/
provisioning-build/common-lifecycle-build.xml!LINENUMBER=68!
Failed Managed Server log:
####<Dec 28, 2013 3:31:39 AM GMT> <Error> <Server> <host>
<TalentManagementServer_1> <DynamicListenThread[Default]> <<WLS Kernel>>
<> <> <1388201499505> <BEA-002606> <Unable to create a server socket
Chapter 5
Prepare the Oracle Fusion Applications Server
5-8

for listening on channel "Default". The address <ip address> might be
incorrect or another process is using port <port>: java.net.BindException:
Address already in use.>
####<Dec 28, 2013 3:31:39 AM GMT> <Critical> <WebLogicServer>
<host> <TalentManagementServer_1> <Main Thread> <<WLS Kernel>> <> <>
<1388201499517> <BEA-000362> <Server failed. Reason: Server failed to bind
to any usable port. See preceeding log message for details.>
5.3.3 Define the Local Port Range
Define the local port range to ensure that it does not overlap with the ports used by
the Java Virtual Machines (JVMs) and other servers. This action avoids port conflicts
during server startup. To view and modify
localRange
:
Linux:
To view:
$cat /proc/sys/net/ipv4/ip_local_port_range
To modify:
$echo "32768 61000" > /proc/sys/net/ipv4/ip_local_port_range
To make the local port range permanent after server restart, add (or update) the
following line in
/etc/sysctl.conf
:
net.ipv4.ip_local_port_range = 32768 61000
Solaris:
To view:
#/usr/sbin/ndd /dev/tcp tcp_smallest_anon_port tcp_largest_anon_port
To modify:
#/usr/sbin/ndd -set /dev/tcp tcp_smallest_anon_port
32768
#/usr/sbin/ndd -set /dev/tcp tcp_largest_anon_port
61000
5.3.4 Synchronize the System Clocks
All engine and data tier servers (including SIP) must accurately synchronize their
system clocks to a common time source, to within one or two milliseconds. Large
differences in system clocks can cause severe problems.
5.3.5 Synchronize Date Time Stamp
Before provisioning, ensure that the provisioning server and the computer hosting
Oracle Access Server have the same date and time stamp settings. The WebGate
installation fails with an Oracle Access Manager certificate error if the date and time
settings on the provisioning server are different from the Oracle Access Server.
Chapter 5
Prepare the Oracle Fusion Applications Server
5-9

5.3.6 Set the Kernel Parameter Value
Before installing the Oracle Database using the Provisioning Wizard, ensure that the
value of the kernel parameter
shmmax
on the database host is greater than the value of
the System Global Area (SGA) Memory.
The value of SGA Memory (sga_target) is 9 GB in the default Database Configuration
Assistant (DBCA) template for the Starter database. If DBCA is run using the
production DBCA template packaged with Oracle Fusion Applications Provisioning,
the value of the SGA Memory is 18 GB. Ensure that
shmmax
> (
shmall * shmmni
) >
SGA Memory
, where
shmmax
,
shmall
,
shmmni
are kernel parameters.
Linux:
For example, to retrieve the values of these kernel parameters, use the following
command:
user@host> /sbin/sysctl -a | grep shm
kernel.shmmni = 4096
kernel.shmall = 3145728
kernel.shmmax = 12884901888
To set the value of a kernel parameter:
user@host> /sbin/sysctl -w sys.kernel.shmmax=value
Solaris:
To check the current values of these kernel parameters:
1. Execute
id
to get the project ID.
Example:
$ /bin/id -p
uid=100(oracle) gid=100(dba) projid=1 (group.dba),
where
group.dba
is the
project ID
2. Execute
prctl
with the resource control and project ID to get the current value:
/bin/prctl -n project.max-shm-memory -i project <project-id>
/bin/prctl -n project.max-shm-ids -i project <project-id>
If any value listed for
privileged
is below the recommended value, increase it using
the following commands:
1. Execute
projmod
(as root) to set to a new value:
/usr/sbin/projmod -s -K "project.max-shm-ids=(privileged,100,deny)"
<project-id>
/usr/sbin/projmod -s -K "project.max-shm-
memory=(privileged,4294967295,deny)" <project-id>
2. Confirm that the following values are set in
/etc/project
:
Example:
$ cat /etc/project
Check for
project.max-shm-ids=(privileged,100,deny)
, within the line for the
project ID to confirm
project.max-shm-ids
was set correctly.
Chapter 5
Prepare the Oracle Fusion Applications Server
5-10

3. Verify that the parameter is active by logging in as the project user and executing
the following commands:
/bin/id -p
/bin/prctl -n <resource control> -i process $$
Example:
$ /bin/id -p
uid=100(oracle) gid=100(dba) projid=1 (group.dba)
$ /bin/prctl -n project.max-sem-ids -i process $$
NAME PRIVILEGE VALUE FLAG ACTION RECIPIENT
project.max-sem-ids
privileged 100 - deny -
system 16.8M max deny -
4.
5.3.7 Unset LIBPATH Variable
Before provisioning an Oracle Fusion Applications environment make sure the
LIBPATH variable is not set. See Start the Wizard and Prepare to Install (page 13-5).
UNIX:
• Use
env
or
echo $LIBPATH
to check if the variable is set.
• Use
unsetenv LIBPATH
to unset the variable.
5.3.8 Set the System Time Zone
All server machines must have the same time zone settings as described in the
following paragraph:
• The time zone should be the standard time zone for the instance.
• Set the
TZ
environment variable on Linux or an equivalent on other operating
systems to have a valid time zone ID.
• Check the time zone setting using the command:
echo $TZ
. The tzselect tool may
be handy if the setting needs to be changed.
• Oracle WebLogic Server and Oracle Database then derive the default VM and
database time zones from the system, respectively, unless otherwise configured.
JVMs and the database need to be running in the same time zone.
5.3.9 Create the hwrepo Directory
If the Oracle Fusion Human Capital Management (Oracle Fusion HCM) application
offerings are being provisioned, namely Workforce Development and Workforce
Deployment, and the Workforce Reputation Management feature is planned to be
used, perform the following tasks after provisioning is complete:
1. Create a directory named
/mnt/hwrrepo
for the provisioning hosts.
2. Mount a shared disk as needed by the Workforce Reputation (HWR) application.
Chapter 5
Prepare the Oracle Fusion Applications Server
5-11

3. Grant directory permission to the user/group who owns the Oracle Fusion
Applications WLS domain(s). This user can start or shut down the Oracle Fusion
Applications environment.
UNIX: Run this shell command as root and replace
<user id>:<group id>
with
appropriate user and group identifiers:
chown <user id>:<group id> /mnt/hwrrepo
4. Change read/write permission for the directory
/mnt/hwrrepo
to be globally
readable/writable.
UNIX: Run this shell command as root:
chmod 750 /mnt/hwrrepo
A warning message is displayed in the provisioning log during the preverify
phase when the Workforce Development and Workforce Deployment offerings are
selected for provisioning if the directory is not setup. The warning message is a
reminder. Proceed with provisioning the environment and mount the shared disk
after provisioning is complete and before starting using the Workforce Reputation
application.
5.3.10 Verify Swap Space (UNIX)
For UNIX platforms, ensure that the provisioning hosts have a miminum of 1 GB of
swap space. During the provisioning of an Oracle Fusion Applications environment,
a validation test is performed in the preverify phase. An error message is displayed
if the provisioning hosts do not have at least 1 GB of swap space. This error must
be resolved by increasing the swap space before proceeding with provisioning the
environment.
UNIX:
Use
free
or
top
command to verify swap space. Refer to the respective Operating
System manual for details about how to increase swap space.
A warning is received if there is at least 1 GB of swap space but less than the larger of
2 GB and 10% of memory allocated to the host. This means if a host has less than 20
GB of memory, then the swap space must be at least 2 GB. If a host has more than 20
GB of memory, then the swap space must be at least 10% of the memory.
The decision on whether to set swap space higher than 10% of the memory is a
performance tuning exercise that can be made at a later time. Under certain conditions
in some platforms, it might be necessary to increase swap space to 30% of the
memory in order to complete provisioning an environment.
On the provisioning host where the Oracle Business Intelligence domain is
provisioned, ensure it has at least 7 GB of swap space.
Solaris:
To see how many files are open, use the following command:
/usr/local/bin/lsof | wc -l
To check the open file limits, use the command below.
/bin/ulimit -n
Chapter 5
Prepare the Oracle Fusion Applications Server
5-12

5.3.11 Edit Host Names (UNIX)
For UNIX platforms, confirm that the host names are correctly formatted in
/etc/
hosts
, for each host that is participating in provisioning. Review
/etc/hosts
for
each participating host and edit any host entries that do not meet the following
recommendations:
1. The format for each host entry should follow this format:
IP_address canonical_hostname [aliases]
The
canonical_hostname
should be the same as the fully qualified host name.
Errors can occur if a short version, or alias, of the host name is specified first
in
/etc/hosts
. The usage of aliases is optional and can be left empty. Examples of
correct and incorrect entries follow:
(Correct) 141.80.151.100 myMachine.company.com myMachine
(Incorrect) 141.80.151.100 myMachine myMachine.company.com
2. If the machine name is a logical host name and is different from the physical host
name specified in
/etc/sysconfig/network
, then the entry for the logical machine
should be listed before the entry of the physical host name in
/etc/hosts
. If the
machine is always accessed using its logical host name, there is no need to have
an entry for the physical host name in /etc/hosts. Examples of entries in the correct
order follow:
141.80.151.100 myLogicalMachine.company.com myLogicalMachine
141.80.151.100 myPhysicalMachine.company.com myPhysicalMachine
If the order of host names is reversed from what is shown in the example, then
there may be errors in retrieving the logical host name.
WARNING: Do not enter multiple host aliases into a single line in the
/etc/hosts
file.
There are some software components which do not process a line with more than 700
characters. Some error messages might be encountered during provisioning phases,
such as "UNABLE TO OPEN CREDENTIAL STOREFAILED TO ADUTPSINITIALIZE"
caused by incorrect resolution of the host names. If a host has many aliases, then limit
the line to 700 characters and break it down into separate lines. Ensure that each line
begins with the IP_address and canonical_hostname, then the aliases.
5.3.12 Default Shell (UNIX)
Ensure that
/bin/bash
shell is installed on the hosts before provisioning an Oracle
Fusion Applications environment. Ensure that the provisioning hosts have bash shell
version 3.2 or higher when upgrading the environment at a later time.
5.3.13 Install en_US.UTF-8 Locale (UNIX)
To provision on UNIX platforms, ensure that the
en_US.UTF-8
locale is installed
on the operating system of the provisioning hosts. Oracle Business Intelligence
expects the
en_US.UTF-8
locale in the operating system before provisioning the Oracle
Fusion Applications environment. Use the
locale
command to list the locale-specific
information of the operating system.
Chapter 5
Prepare the Oracle Fusion Applications Server
5-13

If the
en-US.UTF-8
locale is not installed, an error is encountered during the
provisioning configure phase. The
runProvisioning-bi-configure.log
displays the
following error message:
FAILED:Distributing Repository
Error:
<APPLICATIONS_BASE>/fusionapps/bi/bifoundation/provision/scripts/bidomain/
bi-install.xml:274: exec returned: 1
.
Inspecting the oraInventory logs, it indicates that the
EN_US.UTF-8
locale must be
installed on the provisioning host for Oracle Business Intelligence. The error message
is:
Executing Task: Distributing Repository
[CONFIG]:Distributing Repository
ReEncrypting RPD: [nQSError: 46116] The locale EN_US.UTF-8 needs to be
installed on the machine for the Oracle BI locale setting english-usa
specified in
NQSConfig.INI.
j
avax.management.RuntimeMBeanException:javax.management.Runt
imeMBeanException: Repository File '<APPLICATIONS_CONFIG>/BIInstance/tmp/
OracleBIApps.rpd' does not exist or is not accessible.
If this error is encountered during the configure phase, install the missing locale and
then retry the configure phase to complete the task.
5.3.14 Increase Entropy Values (Linux)
Make sure the hosts have enough entropy values in the provisioning hosts. If this
value is less than 1000, increase it to a value to a greater value using the
rngd
command. Run these commands as the root user for the current session:
To check the entropy value:
cat /proc/sys/kernel/random/entropy_avail
To increase the entropy value:
rngd -r /dev/urandom -o /dev/random
To set the
rngd
service to start automatically after rebooting the host, enter the
following text into a script, such as,
start.rngd
, and run the script as root user:
#! /usr/bin/perl -w
# minimum required bytes to be happy with the device
my $want_bytes = 8192;
# list of commands to check
my clist = qw(/sbin/rngd /usr/sbin/rngd); S
# list of device names to check
my slist = qw(
/dev/hwrandom /dev/hw_random /dev/hwrng /dev/intel_rng /dev/i810_rng
/dev/urandom
);
Chapter 5
Prepare the Oracle Fusion Applications Server
5-14

use Fcntl qw(O_RDONLY);
# find the rngd binary
my $command;
foreach (clist) {
-x && ($command = $_) && last;
}
# stop if rngd isn't installed
defined $command || die "$0 error: rngd is not installed\n";
# look for a hw random device
my $source;
my $continue = 1;
$SIG{'ALRM'} = sub { $continue = 0 };
foreach my $test (slist) {
-e $test || next;
alarm 2;
$continue = 1;
my $bytes = 0;
sysopen FILE, $test, O_RDONLY or next;
while ($continue) {
sysread FILE, $_, 4096 or last;
$bytes += length $_;
}
close FILE;
if ($bytes > $want_bytes) {
$source = $test;
last;
}
}
# use the select command and source
print "starting $command with $source... ";
system "$command -r $source";
print "done.\n";
exit 0;
5.3.15 Check for the Required Solaris Patch (Solaris Only)
For Solaris 10 Only
For Oracle Solaris on SPARC (64-bit) platforms, ensure that the Solaris Operating
System patch 150400-xx is installed on the servers.
For Oracle Solaris on x86-64 (64-bit) platforms, ensure that the Solaris x64 Operating
System patch 150401-xx is installed on the servers.
These patches can be obtained from My Oracle Support.
For Solaris 11 Only
Chapter 5
Prepare the Oracle Fusion Applications Server
5-15

Ensure that the Solaris Package SUNWttf-bh-luxi is installed on the FA servers for
both Oracle Solaris on SPARC (64-bit) and Oracle Solaris on x86-64 (64-bit) platforms.
The Solaris 11 Update 3 on SPARC or x86-64 requires the Support Repository Update
(SRU) 11.3.3.6.0 or later (mandatory patch).
5.4 Prepare the Network
This section describes the network environment configuration required by Oracle
Fusion Applications, more specifically these three areas:
• Name Resolution: Configure Name Resolution (page 5-16)
• Load Balancers or Reverse Proxy: Configure Load Balancers/Reverse Proxy
(page 5-19)
• Firewall: Configure Firewalls (page 5-22)
While name resolution configuration applies to all topologies, the remaining topics
(load balancer/reverse proxy and firewall) apply only if any of those are present in the
topology.
5.4.1 Configure Name Resolution
At this point, configure name resolution for all endpoints in the environment. This
includes:
• Web Tier Virtual Hosts (Internal and External), if used
• HTTP LBR Endpoints (Internal and External), if used
• LDAP Endpoints
• Oracle WebCenter Content (UCM) LBR Endpoint, if the environment is highly
available
• AdminServer VIPs, if used
• Managed Server VIPs, if used
Name resolution can be done in DNS or in the Hosts file. Each table has a column
called Name Resolution which defines if that specific endpoint should be resolved via
DNS or Hosts file.
5.4.1.1 Name Resolution for Oracle Fusion Applications Web Tier Virtual Hosts
Use Table 5-3 (page 5-17) along with the information in the Oracle Fusion Applications
Installation Workbook to create the necessary DNS or Hosts entries for name
resolution for the environment.
Chapter 5
Prepare the Network
5-16

Table 5-3 Name Resolution for Oracle Fusion Applications Web Tier Virtual
Hosts
Name resolution for Name for HTTP Endpoint Points at IP Address
Oracle Fusion
Applications (for each
component: Financials,
Projects, Procurement,
Supplier Portal, IC,
Common, CRM, SCM,
HCM, BI)
Oracle Fusion Applications Installation
Workbook , Network - Virtual Hosts
tab, FA WebTier Virtual Hosts table,
•
FA WebTier Internal Name
column (for each component)
•
FA WebTier External Name
column (for each component)
FA WebTier
Oracle Fusion
Applications Installation
Workbook, Network -
Virtual Hosts tab. FA
WebTier Virtual Hosts
table, IP Endpoint
column
Oracle Identity
Management (IDM and
IDM Admin)
Oracle Fusion Applications Installation
Workbook, Network - Virtual Hosts
tab, IDM WebTier Virtual Hosts table,
•
IDM WebTier Internal Name
column (for each component)
•
IDM WebTier External Name
column (for each component)
IDM WebTier
Oracle Fusion
Applications Installation
Workbook, Network -
Virtual Hosts tab, IDM
WebTier Virtual Hosts
table, IP Endpoint
column
5.4.1.2 Name Resolution for HTTP LBR Endpoints
Use Table 5-4 (page 5-17) along with the information in the Oracle Fusion Applications
Installation Workbook to create the necessary DNS or Hosts entries for name
resolution for the environment:
Table 5-4 Name Resolution for HTTP LBR Endpoints
Name resolution for Name for HTTP Endpoint Points at IP Address
External Oracle Fusion Applications Installation
Workbook, Network - Virtual Hosts
tab, HTTP LBR Endpoints table,
External Name column (for each
component)
External Load Balancer /
Reverse Proxy
Oracle Fusion
Applications Installation
Workbook, Network -
Virtual Hosts tab, HTTP
LBR Endpoints table,
External IP Endpoint
column
Internal Oracle Fusion Applications Installation
Workbook , Network - Virtual Hosts
tab, HTTP LBR Endpoints table,
Internal Name column (for each
component)
Internal Load Balancer /
Reverse Proxy
Oracle Fusion
Applications Installation
Workbook, Network -
Virtual Hosts tab, HTTP
LBR Endpoints table,
Internal IP Endpoint
column
Chapter 5
Prepare the Network
5-17

5.4.1.3 Name Resolution for LDAP Endpoints
Use Table 5-5 (page 5-18) along with the information in the Oracle Fusion Applications
Installation Workbook to create the necessary DNS or Hosts entries for name
resolution for the environment:
Table 5-5 Name Resolution for LDAP Endpoints
Name resolution for Name for LDAP Endpoint Points at IP Address
Policy Store (OID) Oracle Fusion Applications Installation
Workbook, Network - Virtual Hosts
tab, LDAP Endpoints table, Hostname
column
Internal Load Balancer, if
using one; otherwise OID
Oracle Fusion
Applications Installation
Workbook, Network -
Virtual Hosts tab, HTTP
LBR Endpoints table, IP
Endpoint column
5.4.1.4 Name Resolution for Other Endpoints
Use Table 5-6 (page 5-18) along with the information in the Oracle Fusion Applications
Installation Workbook to create the necessary DNS or Hosts entries for name
resolution for the environment:
Table 5-6 Name Resolution for Other Endpoints
Name Resolution for Name for Endpoint Points at IP Address
UCM LBR Endpoint Oracle Fusion Applications Installation
Workbook, Network - Virtual Hosts
tab, UCM LBR Endpoint table,
Hostname column
Internal Load Balancer, if
using one; otherwise not
necessary
Oracle Fusion
Applications Installation
Workbook, Network -
Virtual Hosts tab, UCM
LBR Endpoint table, IP
Endpoint column
AdminServer Virtual
Hosts / VIPs
Oracle Fusion Applications Installation
Workbook, Network - Virtual Hosts
tab, AdminServer Virtual Hosts / VIPs
table, Virtual Hostname column (for
each component)
Active AdminServer host
for each domain
Oracle Fusion
Applications Installation
Workbook, Network -
Virtual Hosts tab,
AdminServer Virtual
Hosts / VIPs table,
Virtual IP column (for
each component)
Chapter 5
Prepare the Network
5-18

Table 5-6 (Cont.) Name Resolution for Other Endpoints
Name Resolution for Name for Endpoint Points at IP Address
Managed Server Virtual
Hosts/ VIPs
Oracle Fusion Applications Installation
Workbook, Network - Virtual Hosts
tab, Managed Server Virtual Hosts/
VIPs table, Virtual Hostname column
(for each component) (multiple columns
for HA)
Oracle Fusion
Applications Installation
Workbook, Network -
Virtual Hosts tab,
Managed Server Virtual
Hosts/ VIPs table, Virtual
IP column (for each
component) (multiple
columns for HA)
5.4.2 Configure Load Balancers/Reverse Proxy
If the Oracle Fusion Applications Topology includes the use of a Load Balancer or
Reverse Proxy, they must be configured appropriately for Oracle Fusion Applications,
which has specific requirements for:
• Load balancing settings
• SSL termination
• Mappings
The instructions provided distinguish between internal traffic (to Internal HTTP
endpoints and TCP/LDAP endpoints) and external traffic (External HTTP endpoints),
so they can be used for topologies with one or two load balancer devices deployed
separately on each network (internal and external). For more information about
load balancer placement on the network, see Network Placement of Load Balancers/
Reverse Proxy (page 4-6).
If the topology has a single load balancer device deployed on a single network, ensure
the security implications of this have been fully considered and ensure the relevant
firewall ports are opened to allow traffic through it. For more information about how to
configure the firewall, see Configure Firewalls (page 5-22).
5.4.2.1 Configure Load Balancer/ Reverse Proxy Settings
If a load balancer or reverse proxy is being used, follow the guidelines from Load
Balancer Feature Requirements (page 4-8) along with the requirements to configure
their settings.
5.4.2.2 Configure Certificates and SSL
Oracle Fusion Applications configures SSL to terminate at the Load Balancer/Reverse
Proxy, so you may also have to configure certificates, as appropriate, on the load
balancer or reverse proxy.
The Oracle Fusion Applications Installation Workbook, SSL and Certificates tab
contains the SSL Communication table which lists the communication that will be
SSL-enabled during installation. In the current release of Oracle Fusion Applications
there are two options for SSL termination:
• External HTTP Endpoints (mandatory)
Chapter 5
Prepare the Network
5-19

• IDM Admin HTTP Endpoint (optional)
If a load balancer is used, set up certificates appropriately and ensure that SSL
termination is configured for the endpoints that will use SSL when executing the next
section.
5.4.2.3 Configure Load Balancer/Reverse Proxy Mappings
Once name resolution for endpoints is configured, the load balancer or reverse proxy
mappings must be configured if one is being used. Use Table 5-7 (page 5-20) along
with the information in the Oracle Fusion Applications Installation Workbook to create
the necessary Load Balancer/Reverse Proxy mappings:
5.4.2.3.1 External HTTP LBR Endpoints
These should be configured at the load balancer or reverse proxy that provides
external access to Oracle Fusion Applications (for end-users and external integrations
as shown in Table 5-7 (page 5-20)).
Table 5-7 External HTTP LBR Endpoints
External LBR
Mapping for
Hostname on
LBR/RP
Port on LBR/RP Maps to (Node) Maps to (Port)
Oracle Fusion
Applications (for
each
component:
Financial,
Projects,
Procurement,
Supplier Portal,
IC, Common,
CRM, SCM,
HCM, BI)
Oracle Fusion
Applications
Installation
Workbook ,
Network - Virtual
Hoststab, HTTP
LBR Endpoints
table, External
Name column (for
each component)
Oracle Fusion
Applications
Installation
Workbook.
Network - Virtual
Hosts tab, HTTP
LBR Endpoints
table, External
Port column (for
each component)
Oracle Fusion
Applications
Installation
Workbook,
Topology tab,
Topology table,
All nodes
containing the
component FA
Web Tier
Oracle Fusion
Applications
Installation
Workbook ,
Network - Virtual
Hosts tab, FA
WebTier Virtual
Hosts table,
External Port
column (for each
component)
Oracle Identity
Management
(IDM)
Oracle Fusion
Applications
Installation
Workbook,
Network - Virtual
Hosts tab, HTTP
LBR Endpoints
table, External
Name column
Oracle Fusion
Applications
Installation
Workbook ,
Network - Virtual
Hosts tab, HTTP
LBR Endpoints
table, External
Port column
Oracle Fusion
Applications
Installation
Workbook ,
Topology tab,
Topology table,
All nodes
containing the
component IDM
Web Tier
Oracle Fusion
Applications
Installation
Workbook ,
Network - Virtual
Hosts tab, IDM
WebTier Virtual
Hosts table,
External Port
column
5.4.2.3.2 Internal HTTP Endpoints
The default configuration when using the load balancer option during Oracle Fusion
Applications provisioning is for the source environment to also have internal endpoints
at the load balancer. In this case, create also appropriate mappings. Note that internal
and external Load Balancer/Reverse Proxy(s) may be different.
Chapter 5
Prepare the Network
5-20

Table 5-8 Internal HTTP Endpoints
Internal LBR Mapping for Hostname on
LBR/RP
Port on
LBR/RP
Maps to
(Node)
Maps to
(Port)
Oracle Fusion Applications
(for each component:
Financial, Projects,
Procurement, Supplier
Portal, IC, Common, CRM,
SCM, HCM, BI)
Oracle Fusion
Applications
Installation
Workbook ,
Network - Virtual
Hosts tab, HTTP
LBR Endpoints
table, Internal
Name column (for
each component)
Oracle
Fusion
Applications
Installation
Workbook ,
Network -
Virtual
Hosts tab,
HTTP LBR
Endpoints
table,
Internal Port
column (for
each
component)
Oracle
Fusion
Applications
Installation
Workbook ,
Topology
tab,
Topology
table, All
nodes
containing
the
component
FA Web Tier
Oracle
Fusion
Applications
Installation
Workbook ,
Network -
Virtual
Hosts tab,
FA WebTier
Virtual
Hosts table,
Internal Port
column (for
each
component)
Oracle Identity Management
(IDM and IDM Admin)
Oracle Fusion
Applications
Installation
Workbook ,
Network - Virtual
Hosts tab, HTTP
LBR Endpoints
table, Internal
Name column (for
each component)
Oracle
Fusion
Applications
Installation
Workbook ,
Network -
Virtual
Hosts tab,
HTTP LBR
Endpoints
table,
Internal Port
column (for
each
component)
Oracle
Fusion
Applications
Installation
Workbook ,
Topology
tab,
Topology
table, All
nodes
containing
the
component
IDM Web
Tier
Oracle
Fusion
Applications
Installation
Workbook ,
Network -
Virtual
Hosts tab,
IDM WebTier
Virtual
Hosts table,
Internal Port
column (for
each
component)
5.4.2.3.3 TCP/LDAP Endpoints
In a highly-available or scaled-out topology, the load balancer is used to route requests
to the various instances of Oracle Internet Directory and WebCenter Content. The
communication protocol in this case is TCP (more specifically LDAP for OID).
Chapter 5
Prepare the Network
5-21

Table 5-9 TCP/LDAP Endpoints
TCP LBR Mapping for Hostname on
LBR/RP
Port on
LBR/RP
Maps to
(Node)
Maps to (Port)
OID Identity Store (OID) Oracle Fusion
Applications
Installation
Workbook,
Network -
Virtual Hosts
tab, LDAP
Endpoints
table,
Hostname
column
Oracle Fusion
Applications
Installation
Workbook ,
Network -
Virtual Hosts
tab, LDAP
Endpoints
table, Port
column
Oracle Fusion
Applications
Installation
Workbook,
Topology tab,
Topology table,
All nodes
containing the
component IDM
Identity and
Access (or all
nodes that
contain OID)
Oracle Fusion
Applications
Installation
Workbook,
Network -
Ports tab,
Identity
Management
Port Numbers
table, Port
Number column
for Component
OID
UCM (Oracle
WebCenter Content)
Oracle Fusion
Applications
Installation
Workbook,
Network -
Virtual Hosts
tab, UCM LBR
Endpoint table,
Hostname
column
Oracle Fusion
Applications
Installation
Workbook,
Network -
Virtual Hosts
tab, UCM LBR
Endpoint table,
Port column
Oracle Fusion
Applications
Installation
Workbook,
Topology tab,
Topology table,
All nodes
containing the
component FA
Common
Domain (or all
nodes that
contain the
UCM_server
Managed
Server)
UCM port is
defined during
Oracle Fusion
Applications
Provisioning
(defaults to
7012 when
Oracle Fusion
Applications
base port has
the default value
7000)
5.4.3 Configure Firewalls
If the Oracle Fusion Applications environment is deployed in a topology where its tiers
are separated by firewalls, configure the firewall to allow traffic through certain ports in
order to install and use the environment.
For more information about different Oracle Fusion Applications topologies and tiers,
see Oracle Fusion Applications Topologies (page 2-13).
Firewalls are normally found between the following tiers:
• End User and Web Tier (DMZ)
• Web Tier (DMZ) and Mid Tier
• Mid Tier and IDM Directory Tier
• Mid Tier and Database Tier
Table 5-10 (page 5-23) lists the expected traffic between the different tiers in Oracle
Fusion Applications. Use it with the Oracle Fusion Applications Installation Workbook
and information about the environment's firewall configuration to determine which ports
must be opened.
Chapter 5
Prepare the Network
5-22

Table 5-10 Expected Traffic between different tiers in Oracle Fusion
Applications
From To Ports Protocol Notes
End user External
Load
Balancer/
Reverse
Proxy
Oracle Fusion Applications
Installation Workbook,
Network - Virtual Hosts tab,
HTTP LBR Endpoints table,
External Port column (for each
component)
HTTP Applicable if a
Load Balancer/
Reverse Proxy is
used for external
HTTP traffic
End User FA Web
Tier
Oracle Fusion Applications
Installation Workbook,
Network - Virtual Hosts tab,
FA WebTier Virtual Hosts
table:
FA WebTier Internal Port
column (for each component)
FA WebTier External Port
column (for each component)
HTTP Applicable if no
Load Balancer/
Reverse Proxy is
used
End User IDM Web
Tier
Oracle Fusion Applications
Installation Workbook,
Network - Virtual Hosts tab,
IDM WebTier Virtual Hosts
table:
IDM WebTier Internal Port
column (for each component)
IDM WebTier External Port
column (for each component)
HTTP Applicable if no
Load Balancer/
Reverse Proxy is
used
External
Load
Balancer /
Reverse
Proxy
FA Web
Tier
Oracle Fusion Applications
Installation Workbook,
Network - Virtual Hosts tab,
FA WebTier Virtual Hosts
table:
FA WebTier Internal Port
column (for each component)
FA WebTier External Port
column (for each component)
HTTP Applicable if a
Load Balancer/
Reverse Proxy is
used for external
HTTP traffic
External
Load
Balancer /
Reverse
Proxy
IDM Web
Tier
Oracle Fusion Applications
Installation Workbook,
Network - Virtual Hosts tab,
IDM WebTier Virtual Hosts
table:
IDM WebTier Internal Port
column (for each component)
IDM WebTier External Port
column (for each component)
HTTP Applicable if a
Load Balancer/
Reverse Proxy is
used for external
HTTP traffic
FA Web
Tier
FA Mid Tier All AdminServer and Managed
Server ports in all Oracle
Fusion Applications WebLogic
Domains
HTTP / TCP(T3) T3 traffic: OHS
registration with
the
AdminServers
Chapter 5
Prepare the Network
5-23

Table 5-10 (Cont.) Expected Traffic between different tiers in Oracle Fusion
Applications
From To Ports Protocol Notes
FA Web
Tier
IDM
Application
Tier
Oracle Fusion Applications
Installation Workbook,
Network - Ports tab,
Identity Management Port
Numberstable, IDMDomain
OAM AAA Server Port field
TCP (OAP) OAP traffic:
WebGate to
OAM Server
IDM Web
Tier
IDM
Application
Tier
All AdminServer and Managed
Server ports in the WebLogic
IDMDomain field
HTTP / TCP
(T3) / TCP (OAP)
T3 traffic: OHS
registration with
the
AdminServers
OAP traffic:
WebGate to
OAM Server
FA Mid Tier IDM Web
Tier
If not using an Load Balancer/
Reverse Proxy for Internal
HTTP traffic:
Oracle Fusion Applications
Installation Workbook,
Network - Virtual Hosts tab,
IDM WebTier Virtual Hosts
table, IDM WebTier Internal
Port column (for IDM and IDM
Admin)
If using a Load Balancer/
Reverse Proxy for Internal
HTTP traffic:
Oracle Fusion Applications
Installation Workbook,
Network - Virtual Hosts tab,
HTTP LBR Endpoints table,
Internal Port column (for IDM
and IDM Admin)
HTTP
FA Mid Tier IDM
Directory
Tier
Oracle Fusion Applications
Installation Workbook,
Network - Virtual Hosts tab,
LDAP Endpoints table, Port
and SSL Port columns for
Policy Store (OID)
TCP (LDAP)
FA Mid Tier FA Mid Tier
(via LBR)
UCM port is defined during
Oracle Fusion Applications
Provisioning (defaults to
7012 when Oracle Fusion
Applications base port is at
the default value 7000)
TCP Applicable only
for HA
environments
where UCM has
a load balancer
as frontend
Chapter 5
Prepare the Network
5-24

Table 5-10 (Cont.) Expected Traffic between different tiers in Oracle Fusion
Applications
From To Ports Protocol Notes
IDM Mid
Tier
FA Web
Tier
If not using a Load Balancer/
Reverse Proxy for Internal
HTTP traffic:
Oracle Fusion Applications
Installation Workbook,
Network - Virtual Hosts tab,
FA WebTier Virtual Hosts
table, FA WebTier Internal
Port column (for HCM)
If using a load balancer or
reverse proxy for Internal
HTTP traffic:
Oracle Fusion Applications
Installation Workbook,
Network - Virtual Hosts tab,
HTTP LBR Endpoints table,
Internal Port column (for
HCM)
HTTP
IDM
Application
Tier
IDM
Directory
Tier
Oracle Fusion Applications
Installation Workbook,
Network - Virtual Hosts tab,
LDAP Endpoints table, Port
and SSL Port columns for ODI
Identity Store (OID)
TCP (LDAP)
FA Mid Tier FA
Database
Oracle Fusion Applications
Installation Workbook,
Database tab, FA
Transactional Database
table, Ports for each one of
the FA DB Instances
SQL*Net / JDBC
FA Mid Tier IDM
Database
Oracle Fusion Applications
Installation Workbook,
Database tab, IDM Database
table, Ports for each one of
the IDM DB Instances
SQL*Net / JDBC
FA Mid Tier FA Data
Warehouse
Database
Oracle Fusion Applications
Installation Workbook,
Database tab, FA Data
Warehouse Database table,
Ports for each one of the FA
DW DB Instances
SQL*Net / JDBC Applies only if a
Data Warehouse
database is used
5.5 Create the Oracle Fusion Applications Provisioning
Repository
The provisioning repository contains all the installers required to provision a
new Oracle Fusion Applications environment. Download the repository from
Chapter 5
Create the Oracle Fusion Applications Provisioning Repository
5-25

the Oracle Fusion Applications Product Media Package to a preferred location
(
repository_location
).
The Oracle Identity Management Lifecycle Tools and the Oracle Fusion Applications
provisioning wizard are packaged in the same Oracle Fusion Applications Media
Packs downloaded from Oracle Software Delivery Cloud as detailed in Download from
the Oracle Software Delivery Cloud Portal (page 5-27). Oracle Identity Management
is in the
idmlcm
folder and the Oracle Fusion Applications provisioning wizard is
in the
faprov
folder. When installing Oracle Identity Management ensure that the
provisioning repository is accessible to the Oracle Identity Management hosts.
To set up a demilitarized zone (DMZ) for the web tier in the new environment, see
Set Up a Demilitarized Zone (DMZ) for the Web Tier (page 6-9) before creating the
repository.
5.5.1 Obtain the Software
Oracle groups its software releases by product area. A Product Media Pack refers to
those groupings. Each media pack may also include a zipped file containing electronic
documentation files or Quick Install files, which facilitate the initial installation of the
software.
For installations of Oracle Fusion Applications, have available the complete set of
software contained in the product media pack. Individual pieces cannot be installed.
Therefore, to install from media that is no longer available on Oracle Software Delivery
Cloud, contact My Oracle Support to obtain the complete media pack.
After the software licensing agreements have been completed, obtain the Oracle
Fusion Applications software using one of these two methods:
• Oracle Software Delivery Cloud Portal: Provides a readme document that helps
to determine which media is needed to fulfill the purchased license. Download only
the necessary media. This is the default delivery method.
• My Oracle Support: Provides a complete set of the software in DVD format. Use
only the DVDs covered by thesoftware licensing agreement.
Using either method, obtain the Oracle Fusion Applications Provisioning repository
and gain access to the Oracle Fusion Applications documentation library.
If Oracle Fusion Applications Release 12 Media Pack is downloaded for the following
platforms, then use the following version (and above) of the UnZip / 7-Zip utility to
extract the Oracle software to a preferred location (REPOSITORY_LOCATION). UnZip
is freeware that is available at:
http://www.info-zip.org
.
• Linux x86-64 (64-bit) - Info-ZIP version 6.0
• Oracle Solaris on SPARC (64-bit) - Info-ZIP version 6.0
• Oracle Solaris on x86-64 (64-bit) - Info-ZIP version 6.0
• Microsoft Windows x64 (64-bit) - 7-Zip version 9.20
5.5.1.1 Xcopy Utility Should Not Be Used To Copy Fusion Application
Repositories and APPLTOP on Microsoft Windows
The Microsoft Windows utility Xcopy does not copy long path names. Therefore, do
not use Xcopy to copy Oracle Fusion Applications repositories and APPLTOP.
Chapter 5
Create the Oracle Fusion Applications Provisioning Repository
5-26

Resolution: Use Robocopy instead of Xcopy.
Windows:
ROBOCOPY <source dir> <destination dir> /MIR
5.5.2 Download from the Oracle Software Delivery Cloud Portal
Go to the E-Delivery website and follow these instructions:
1. Sign in to the Oracle Software Delivery Cloud . For new users, create an Oracle
account using the online form.
2. On the Search page, specify the product pack or release and platform to identify
the media pack to download.
3. Choose the appropriate media pack from the search results and download the
provisioning repository (in zipped format). Download the repository to a preferred
location.
4. Extract the contents of all the zipped files to the same target directory. The
directory must be on a networked drive or shared disk so that it is accessible
to all the hosts in the new environment. By default, the unzip process places the
installers in
repository_location/installers
.
Create the repository location name so that unzipping the files does not run into
the Windows MAX_PATH limitation.
WARNING: Do not unzip different versions of Oracle Fusion Applications Media
Packs into the same location. This causes errors when the Oracle Fusion
Applications files are provisioned.
5.5.2.1 Download Language Pack Software
To use languages other than US English and install these languages during the initial
installation process, perform the steps in this section.
Download the Oracle Fusion Applications NLS Release 12 software for each language
to be installed. This is available from the NLS DVD media or from Oracle Software
Delivery Cloud. The software for Release 12 is a zip file that contains a repository
of the translated Oracle Fusion Applications files plus the installation utilities that are
required to install the software.
Download the language pack repository to a preferred location. Extract the contents
of all zipped files to the same target directory. This directory is referred to as
REPOSITORY_LOCATION.
5.5.3 Obtain DVDs from My Oracle Support
Order a complete set of the software in DVD format by contacting My Oracle Support.
Use only the DVDs covered by the software licensing agreement.
5.5.4 Download and Unzip the BI Patch 25499241 into the FA
Repository (Solaris Only)
The BI patch 25499241 application fails during the Fusion Applications (FA) installation
in Release 11.12.x.0.0. To resolve this issue, perform the following steps:
Chapter 5
Create the Oracle Fusion Applications Provisioning Repository
5-27

1. Download the patch 25499241 from ARU to any temporary directory (outside the
FA repository) on the machine where the FA repository is present.
2. Remove the patch 25499241 from the FA repository as follows:
rm -rf <REPOSITORY_LOCATION>/installers/biappsshiphome/patch/25499241
3. Extract the patch downloaded in Step 2 to the FA repository as shown in the
following example:
cd <REPOSITORY_LOCATION>/installers/biappsshiphome/patch
unzip <PATCH_LOCATION>/p25499241_111190_SOLARIS64.zip (for Solaris Sparc)
unzip <PATCH_LOCATION>/p25499241_111190_Solaris86-64.zip (for Soalrisx86-64)
5.5.5 Download and Unzip the Latest OID Patch Bundle into the FA
Repository (Solaris x86-64 Only)
On Solaris 11 hosts (Solaris on x86-64 systems), the OID startup may fail with core
dump during Fusion Applications (FA) installation in Release 11.12.x.0.0. To resolve
the OID startup failure, follow the below steps to patch the FA repository with the fix
(not applicable for Solaris SPARC systems):
1. Download the OID bundle patch 25838345 from P4FA FOR FA REL 12.1
ONEOFFS SYSTEM PATCH 11.12.1.0.170628 from My Oracle Support.
2. Extract the patch bundle zip file into the following FA repository location:
<REPOSITORY_LOCATION>/installers/pltsec/patch
5.5.6 Verify Required Operating System Packages and Libraries
Oracle Fusion Applications require specific operating system packages and libraries in
the hosts where the software is installed. During the preverify phase of provisioning an
Oracle Fusion Applications environment as detailed in Provision a New Oracle Fusion
Applications Environment (page 13-1), the Provisioning Wizard and the provisioning
command line verifies if the hosts have the required packages, libraries, and other
requirements such as swap space, free space, and kernel parameters. Any issues
during the check are reported in the provisioning log. To perform the manual checks
ahead of time, follow these steps after creating the provisioning repository.
For Database Host
1. Navigate to REPOSITORY_LOCATION
/installer/database/Disk1
.
2. Run the command:
UNIX:
./runInstaller -executePrereqs -silent
3. Review the output located at:
oraInventory/logs/
installAction<timestamp>.log
. For example,
oraInventory/logs/
installActionyyyy-mm-dd_hh-mm-ssPM.log
.
Other Oracle Fusion Applications Hosts
1. Navigate to REPOSITORY_LOCATION
/installer/<product>/Disk1
, where
<product> represents:
• atgf
• biappsshiphome
Chapter 5
Create the Oracle Fusion Applications Provisioning Repository
5-28

• bishiphome
• dbclient
• ecm_bucket2
• fusionapps
• odi
• soa
• wc
• webgate
• webtier
Optionally, include also the following products:
• bhd
• gop
2. Run the command:
UNIX:
./runInstaller -sv -jreLoc REPOSITORY_LOCATION\jdk
3. Review the output located at:
oraInventory/logs/install<timestamp>.out
. For
example,
oraInventory/logs/installyyyy-mm-dd_hh-mm-ssAM.out
.
4. Repeat Step 1 to Step 3 for all products listed in Step 1.
Example 5-1 Sample Output
If any of the stated library (or package) is not found, obtain and install the library (or
package) in order to continue after the preverify phase of the provisioning process.
Note: The list of libraries and version are example values. Thus, refer to the actual
output from the environment for the correct values.
$$$$$DEBUG>>>>Packages
Checking for binutils-2.17.50.0.6; found binutils-2.17.50.0.6-20.el5_8.3-
x86_64. Passed
Checking for compat-libstdc++-33-3.2.3-x86_64; found compat-libstdc+
+-33-3.2.3-61-x86_64. Passed
Checking for compat-libstdc++-33-3.2.3-i386; found compat-libstdc++-33-3.2.3-61-
i386. Passed
Checking for elfutils-libelf-0.125; found elfutils-libelf-0.137-3.el5-x86_64.
Passed
Checking for elfutils-libelf-devel-0.125; found elfutils-libelf-
devel-0.137-3.el5-x86_64. Passed
Checking for gcc-4.1.1; found gcc-4.1.2-54.el5-x86_64. Passed
Checking for gcc-c++-4.1.1; found gcc-c++-4.1.2-54.el5-x86_64. Passed
Checking for glibc-2.5-12-x86_64; found glibc-2.5-107.el5_9.5-x86_64. Passed
Checking for glibc-2.5-12-i686; found glibc-2.5-107.el5_9.5-i686. Passed
Checking for glibc-common-2.5; found glibc-common-2.5-107.el5_9.5-x86_64.
Passed
Checking for glibc-devel-2.5-x86_64; found glibc-devel-2.5-107.el5_9.5-
x86_64. Passed
Checking for glibc-devel-2.5-12-i386; Not found. Failed <<<<
Checking for libaio-0.3.106-x86_64; found libaio-0.3.106-5-x86_64. Passed
Checking for libaio-0.3.106-i386; found libaio-0.3.106-5-i386. Passed
Checking for libaio-devel-0.3.106; found libaio-devel-0.3.106-5-i386. Passed
Checking for libgcc-4.1.1-x86_64; found libgcc-4.1.2-54.el5-x86_64. Passed
Checking for libgcc-4.1.1-i386; found libgcc-4.1.2-54.el5-i386. Passed
Chapter 5
Create the Oracle Fusion Applications Provisioning Repository
5-29

Checking for libstdc++-4.1.1-x86_64; found libstdc++-4.1.2-54.el5-x86_64.
Passed
Checking for libstdc++-4.1.1-i386; found libstdc++-4.1.2-54.el5-i386. Passed
Checking for libstdc++-devel-4.1.1; found libstdc++-devel-4.1.2-54.el5-
x86_64. Passed
Checking for make-3.81; found make-1:3.81-3.el5-x86_64. Passed
Checking for sysstat-7.0.0; found sysstat-7.0.2-12.0.1.el5-x86_64. Passed
Check complete. The overall result of this check is: Failed <<<<
Check Name:Kernel
Check Description:This is a prerequisite condition to test whether the minimum
required kernel parameters are configured.
Checking for VERSION=2.6.18; found VERSION=2.6.18-348.4.1.0.1.el5. Passed
Checking for hardnofiles=4096; found hardnofiles=327679. Passed
Checking for softnofiles=4096; found softnofiles=327679. Passed
Check complete. The overall result of this check is: Passed
Kernel Check: Success.
Checking for VERSION=2.6.18; found VERSION=2.6.18-348.4.1.0.1.el5. Passed
Checking for hardnofiles=4096; found hardnofiles=327679. Passed
Checking for softnofiles=4096; found softnofiles=327679. Passed
Check complete. The overall result of this check is: Passed
Check Name:GLIBC
Check Description:This is a prerequisite condition to check whether the
recommended glibc version is available on the system
Expected result: ATLEAST=2.5-12
Actual Result: 2.5-107.el5_9.5
Check complete. The overall result of this check is: Passed
GLIBC Check: Success.
Expected result: ATLEAST=2.5-12
Actual Result: 2.5-107.el5_9.5
Check complete. The overall result of this check is: Passed
5.6 Next Steps
Install the Oracle Identity Management Lifecycle Tools and the Oracle Fusion
Applications Provisioning Framework. Go to Install the Oracle Identity Management
and Oracle Fusion Applications Provisioning Frameworks (page 6-1) to get started.
Chapter 5
Next Steps
5-30

6
Install the Oracle Identity Management and
Oracle Fusion Applications Provisioning
Frameworks
This section describes how to install the Oracle Identity Management and Oracle
Fusion Applications provisioning frameworks.
This section includes the following topics:
• Introduction to Oracle Identity Management and Oracle Fusion Applications
Provisioning Frameworks (page 6-1)
• Install the Oracle Identity Management Provisioning Tools (page 6-1)
• Install the Oracle Fusion Applications Provisioning Framework (page 6-5)
• Set Up a Demilitarized Zone (DMZ) for the Web Tier (page 6-9)
• What to Do Next (page 6-10)
6.1 Introduction to Oracle Identity Management and Oracle
Fusion Applications Provisioning Frameworks
The Oracle Identity Management Provisioning Framework which consists of the
Oracle Identity Management Provisioning Wizard and related tools was developed to
automate Oracle Identity Management Provisioning and reduce the time required to
configure Oracle Identity Management for Oracle Fusion Applications.
The Oracle Fusion Applications Provisioning installer (faprov) is delivered with the
other installers in the provisioning repository. The purpose of faprov is to create
the Oracle Fusion Applications Provisioning framework consisting of the Provisioning
Wizard, Provisioning Command-line interface and Provisioning-related files and
utilities.
6.2 Install the Oracle Identity Management Provisioning
Tools
The Oracle Identity Management Provisioning tools share a repository with the Oracle
Fusion Applications Provisioning tools.
The software required by Oracle Identity Management is located in the Oracle
Fusion Applications repository. If the repository has not been already created, follow
the instructions in Create the Oracle Fusion Applications Provisioning Repository
(page 5-25) to create one.
6-1

6.2.1 Verify Java and Ant
Ensure that the Provisioning Repository contains Java and Ant. Java should reside in
a directory called
jdk
. Ant should reside in a directory called
ant
. The paths should be:
UNIX:
REPOSITORY_LOCATION/jdk
REPOSITORY_LOCATION/provisioning/ant
For more information about the contents of the provisioning framework, see Table 6-3
(page 6-9).
6.2.2 Oracle Identity Management Provisioning Framework Installation
Checklist
Before initiating the Oracle Identity Management Provisioning Framework installation,
verify the following checklist:
• Necessary infrastructure
– Access to the server console is provided for the OS User (VNC
recommended).
– The provisioning repository or Oracle Database installer are available and
accessible from the node where the Oracle Identity Management Provisioning
Framework is installed.
• Prerequisites for the host where the Oracle Identity Management Provisioning
Framework is installed.
6.2.3 Install the Oracle Identity Management Lifecycle Tools
The Oracle Identity Management Provisioning Wizard is a component of the
Oracle Identity Management Lifecycle Tools, which also includes the Oracle Identity
Management Patching Framework. Install the tools by running an installer, which is
located in the provisioning repository.
In a multi-host environment, the Oracle Identity Management Lifecycle Tools must be
visible to each host in the topology.
The installation script for the Oracle Identity Management Lifecycle Tools resides in the
directory:
REPOSITORY_LOCATION/installers/idmlcm/idmlcm/Disk1
where REPOSITORY_LOCATION is the Oracle Fusion Applications provisioning
repository, as described in Create the Oracle Fusion Applications Provisioning
Repository (page 5-25).
To begin installing the tools, change to that directory and start the script.
UNIX:
cd REPOSITORY_LOCATION/installers/idmlcm/idmlcm/Disk1
export JAVA_HOME=repository_location/jdk
Chapter 6
Install the Oracle Identity Management Provisioning Tools
6-2

./runInstaller -jreLoc REPOSITORY_LOCATION/jdk
Then proceed as follows in Table 6-1 (page 6-3):
Table 6-1 Oracle Identity Management Lifecycle Tools Installation Screen Flow
Screen Description and Action Required
Specify Inventory Directory
(UNIX)
If this is the first Oracle installation on this host, specify the
location of the Inventory Directory. The inventory directory
is used by the installer to keep track of all Oracle products
installed on this host
In the Operating System Group Name field, select the group
whose members need to be granted access to the inventory
directory. All members of this group can install products on this
host. Click OK to continue.
The Inventory Location Confirmation dialog prompts to run
the
inventory_directory/createCentralInventory.sh
script as
root
to create the
/etc/oraInst.loc
file. This file
is a pointer to the central inventory and must be present for
silent installations. It contains two lines:
inventory_loc=path_to_central_inventory
inst_group=install_group
The standard location for this file is
/etc/oraInst.loc
, but
it can be created anywhere. Note that the default for Linux
platforms is
/etc/oraInst.loc
. For Solaris, the default value
is
/var/opt/oracle/oraInst.loc
. If the file is created
in a directory other than
/etc
, include the -
invPtrLoc
argument and enter the location of the inventory when the
provisioningWizard
or the
runProvisioning
scripts are
run.
Note:
In Solaris platforms, the following
error message may appear at
the end of execution of the
createCentralInventory.sh
script as root user:
ERROR: ./
createCentralInventory.s
h: line 53: syntax
error at line 54: 'zero
byte' unexpected
Ignore the error and proceed
further.
To continue the installation without
root
access on this host,
select Continue installation with local inventory.
Click OK to continue.
Chapter 6
Install the Oracle Identity Management Provisioning Tools
6-3

Table 6-1 (Cont.) Oracle Identity Management Lifecycle Tools Installation
Screen Flow
Screen Description and Action Required
Welcome No action is necessary on this read-only screen.
Click Next to continue.
Install Software Updates Search the latest software updates, including important security
updates, via a My Oracle Support account.
•
Skip Software Updates: Select this option to skip this
screen. The installer does not check for updates that might
be applicable to the current product installation.
•
Search My Oracle Support for Updates: Select this
option to automatically search for and download applicable
software updates from My Oracle Support.
Enter a valid My Oracle Support account name and
password, and click Search for Updates.
Before searching for updates, test the login credentials
and the connection to My Oracle Support by clicking Test
Connection. Click Proxy Settings to configure a proxy
server if one is required.
•
Search Local Directory for Updates: Select this
option if the latest software updates have been already
downloaded. This option is used to search a local directory
for updates applicable to the products about to be
installed.
If this option is selected, the installer displays an additional
field and Browse button. This button is used to identify the
local directory where the updates are located.
Prerequisite Checks An analysis of the host computer is performed to ensure
that specific operating system prerequisites have been met. If
any prerequisite check fails, the screen displays a short error
message at the bottom. Fix the error and click Retry.
To ignore the error or warning message, click Continue.
Click Abort to stop the prerequisite check process for all
components.
Click Next to continue.
Specify Installation Location Specify a location where the provisioning framework is
installed. Enter the following information:
•
Oracle Middleware Home: This is the parent directory
of the directory where the Oracle Identity Management
Provisioning Wizard is installed. In a multi-host Oracle
Identity Management environment, this must be on shared
storage.
•
Oracle Home Directory: This is a subdirectory of the
Oracle Middleware Home directory where the wizard is
installed.
The installation process creates a logical directory called the
Oracle home. This location is where software binaries are
stored. No runtime process can write to this directory. The
directory must initially be empty.
Click Next to continue.
Chapter 6
Install the Oracle Identity Management Provisioning Tools
6-4

Table 6-1 (Cont.) Oracle Identity Management Lifecycle Tools Installation
Screen Flow
Screen Description and Action Required
Installation Summary A summary of the selections made during this installation
session is presented. To change this configuration before
installing, select a screen from the left navigation pane or click
Back to return to a previous screen. Click Save to create a text
file (response file) to use to perform the same installation later.
Click Install to begin installing this configuration.
Installation Progress The progress indicator shows the percentage of the installation
that is complete, and indicates the location of the installation
log file.
Click Next when the progress indicator shows 100 percent.
Installation Complete A summary of the installation that was just completed is
presented. To save the details to a text file, click Save and
indicate a directory to save the file.
Click Finish to dismiss the screen and exit the installer.
6.3 Install the Oracle Fusion Applications Provisioning
Framework
The Oracle Fusion Applications Provisioning installer (
faprov
) is delivered with the
other installers in the provisioning repository. The purpose of
faprov
is to create
the Oracle Fusion Applications Provisioning framework, which contains the following
components:
• Provisioning Wizard: A question-and-answer interview that guides through the
process of installing a database, creating or updating a response file, and
provisioning or deinstalling an Oracle Fusion Applications environment.
WARNING: Run the Provisioning Wizard on the primordial host to create a
provisioning response file. If the Provisioning Wizard is run on a non-primordial
host to create a provisioning response file, the validation assumes that the host is
the primordial host. Ensure that the validation errors are interpreted correctly as
they may not be applicable to the non-primordial host.
WARNING: When provisioning a new environment, run only the Provisioning
Wizard on the primordial host and the Provisioning Command-line Interface on
non-primordial hosts
• Provisioning Command-Line Interface (CLI): Used for starting the wizard and
running installation phases on the Primary host, Secondary host, and DMZ host
(when present).
• Provisioning-Related Files and Utilities: The ANT utilities, binary files, library
files, templates, locations of saved response files and provisioning build scripts,
and other provisioning utilities required for performing provisioning tasks.
Because the provisioning installer is a customized version of the Oracle Universal
Installer (OUI), its behavior closely resembles that of the OUI.
Chapter 6
Install the Oracle Fusion Applications Provisioning Framework
6-5

6.3.1 Oracle Fusion Applications Provisioning Framework Installation
Checklist
Before initiating the Oracle Fusion Applications provisioning framework installation,
verify the following checklist:
• Necessary infrastructure
– Access to the server console is provided for the OS User (VNC
recommended).
– The provisioning repository or Oracle Database installer are available and
accessible from the node where the Oracle Fusion Applications provisioning
framework is installed.
• Prerequisites for the host where the Oracle Fusion Applications provisioning
framework is installed.
6.3.2 Run the Provisioning Framework Installer
To install the provisioning framework, locate the directory
REPOSITORY_LOCATION/
installers/faprov/Disk1
and run the script,
runInstaller
or
setup.exe
, depending
on the hardware platform. Note that
REPOSITORY_LOCATION
is the directory where the
provisioning repository was created.
WARNING: Do not run the scripts,
runInstaller
or
setup.exe
, located in
REPOSITORY_LOCATION/installers/fusionapps/Disk1
. These scripts are used and
run by the Provisioning Wizard and Provisioning Command-line Interface when
needed. They are not meant for installing the provisioning framework.
• Use this command to start OUI from the command line to install the Provisioning
Wizard. Ensure that
REPOSITORY_LOCATION
is replaced with the full file path to the
provisioning repository:
UNIX:
runInstaller -jreLoc REPOSITORY_LOCATION/jdk
If
-jreLoc REPOSITORY_LOCATION/jdk
is not specified in the command line, enter
the file path on the command prompt.
Ensure the 8-character file path format is used for
REPOSITORY_LOCATION
.
6.3.3 Provisioning Installer Screens and Instructions
Table 6-2 (page 6-7) lists the steps for running the provisioning framework installer.
Chapter 6
Install the Oracle Fusion Applications Provisioning Framework
6-6

Table 6-2 Provisioning Framework Installation Screen Flow
Screen Description and Action Required
Specify Inventory Directory
(UNIX)
If this is the first Oracle installation on this host, specify the
location of the Inventory Directory. The inventory directory
is used by the installer to keep track of all Oracle products
installed on this host
Tip: This value is available in the Oracle Fusion Applications
Installation Workbook , Storage tab, Inventories table, FA
Provisioning Framework row.
In the Operating System Group Name field, select the group
whose members need to be granted access to the inventory
directory. All members of this group can install products on this
host. Click OK to continue.
Tip: This value is available in the Oracle Fusion Applications
Installation Workbook, Storage tab, Shared Storage table, FA
Shared row, OS Group Owner column.
The Inventory Location Confirmation dialog prompts to run
the
inventory_directory/createCentralInventory.sh
script as
root
to create the
/etc/oraInst.loc
file. This file
is a pointer to the central inventory and must be present for
silent installations. It contains two lines:
inventory_loc=path_to_central_inventory
inst_group=install_group
The standard location for this file is
/etc/oraInst.loc
, but
it can be created anywhere. Note that the default for Linux
platforms is
/etc/oraInst.loc
. For Solaris, the default value
is
/var/opt/oracle/oraInst.loc
. If the file is created
in a directory other than
/etc
, include the -
invPtrLoc
argument and enter the location of the inventory when the
provisioningWizard
or the
runProvisioning
scripts are
run.
Note:
In Solaris platforms, the following
error message may appear at
the end of execution of the
createCentralInventory.sh
script as root user:
ERROR: ./
createCentralInventory.s
h: line 53: syntax
error at line 54: 'zero
byte' unexpected
Ignore the error and proceed
further.
Chapter 6
Install the Oracle Fusion Applications Provisioning Framework
6-7

Table 6-2 (Cont.) Provisioning Framework Installation Screen Flow
Screen Description and Action Required
To continue the installation without
root
access on this host,
select Continue installation with local inventory.
Click OK to continue.
Welcome No action is necessary on this read-only screen.
Click Next to continue.
Prerequisite Checks An analysis of the host computer is performed to ensure
that specific operating system prerequisites have been met. If
any prerequisite check fails, the screen displays a short error
message at the bottom. Fix the error and click Retry.
To ignore the error or warning message, click Continue.
Click Abort to stop the prerequisite check process for all
components.
Click Next to continue.
Installation Location
In the Location field, specify where the provisioning framework
is installed. This is the location where the Provisioning Wizard
and the start command for provisioning are installed. This
location is denoted as FAPROV_HOME. Choose any location
if it is on a shared disk in a location that is accessible to all
hosts in the new environment.
Tip: This value is available in the Oracle Fusion Applications
Installation Workbook, Storage tab, Install Directories table,
FA Provisioning Framework Location row.
The installation process creates a logical directory called the
Oracle home. This location is where software binaries are
stored. No runtime process can write to this directory. The
directory must initially be empty.
Click Next to continue.
Installation Summary Summarizes the selections made during this installation
session. To change this configuration before installing, select
one of the screens from the left navigation pane or click Back
to return to a previous screen. Click Save to create a text
file (response file) that can be used to perform the same
installation later.
Click Install to begin installing this configuration.
Installation Progress The progress indicator shows the percentage of the installation
that is complete, and indicates the location of the installation
log file.
Click Next when the progress indicator shows 100 percent.
Installation Complete Summarizes the installation just completed. To save the details
to a text file, click Save and indicate a directory where to save
the file.
Click Finish to dismiss the screen and exit the installer.
6.3.4 Provisioning Framework Components
Table 6-3 (page 6-9) shows the components in the
FAPROV_HOME/provisioning
directory.
Chapter 6
Install the Oracle Fusion Applications Provisioning Framework
6-8

Table 6-3 Contents of the Provisioning Framework
Component Type Component Name General Use
ANT ant Java processes for installing binaries,
configuring domains and subsystems
(JDBD and SOA composites), deploying
applications, and domain startup
Binary files bin Executable files, compiled programs,
system files, spreadsheets, compressed
files, and graphic (image) files
Library files lib Previously defined functions that have
related functionality or are commonly used,
stored in object code format
Location of saved
response files
provisioning-
response file
Location for completed or partially
completed response files
Location of provisioning
build scripts
provisioning-build Location for build scripts that are available
when called for during the provisioning of
an environment
Location of templates template Start parameters, single sign-on
configuration, and database templates
Location of utility files util Other provisioning utilities
6.4 Set Up a Demilitarized Zone (DMZ) for the Web Tier
The web tier contains Oracle HTTP Server, which can be installed on the same shared
file system (inside the firewall) as the other components, or exist on a host in a DMZ.
If the web tier is installed in a DMZ, the web tier host cannot be the same as any other
host deployed, regardless of domain.
Installing the web tier in a DMZ enables to impose more restrictions on communication
within the portion of the system that is within the firewall, including the following:
• The DMZ host cannot access the shared storage that is accessible by the hosts
within the firewall (in the
APPLICATIONS_BASE
area where the Middleware homes
are installed or the shared area).
• The DMZ host may not be able to communicate with the CommonDomain
AdminServer through the firewall. If this is the case, web tier running on the DMZ
is non-managed; that is, it is not associated with the CommonDomain running
inside the firewall.
However, the
APPLICATIONS_BASE
(Oracle Fusion Applications) or IDM_BASE (Oracle
Identity Management) file path and the directory structure under it remain the same on
the DMZ host as for the other hosts that exist inside the firewall.
To set up and configure the web tier in DMZ, go to the web tier host and follow these
directions:
WARNING: On a DMZ host, do not have any symlink or mount points that point to a
repository or
APPLICATIONS_BASE
residing inside the firewall, that is, the repository and
APPLICATIONS_BASE
should be accessible from the DMZ host.
1. Copy the provisioning repository zipped files to a location on the web tier host to
be designated as a demilitarized zone.
Chapter 6
Set Up a Demilitarized Zone (DMZ) for the Web Tier
6-9

2. Run the provisioning framework installers for Oracle Identity Management and
Oracle Fusion Applications as described in Install the Oracle Identity Management
Provisioning Tools (page 6-1) and Install the Oracle Fusion Applications
Provisioning Framework (page 6-5) on the DMZ host. Alternatively, copy the
provisioning framework (
IDMLCM_HOME
or
FAPROV_HOME
) to the DMZ host.
3. When e the response file is created for this environment, indicate this web tier
configuration by selecting the Install Web Tier in DMZ checkbox. See Create a
Response File (page 12-4).
4. When the preverify phase is successful on the primordial host, place a copy
of the response file and the generated provisioning plan (
<APPLICATIONS_BASE>/
provisioning/plan/provisioning.plan
) on the DMZ host.
6.5 Next Steps
Install the Oracle Identity Management and Oracle Fusion Applications database. See
Install Databases for Oracle Identity Management (page 7-1).
Consider installing Oracle Enterprise Governance, Risk and Compliance (GRC) with
Oracle Fusion Applications. Although not required, GRC can serve as part of the user
provisioning flow to ensure that proper controls for security exist.
Chapter 6
Next Steps
6-10

7
Install Databases for Oracle Identity
Management
This section describes how to install and configure the Oracle Identity Management
database repositories.
• Introduction to Installing Databases for Oracle Identity Management (page 7-1)
• Prerequisites for Installing Databases for Oracle Identity Management (page 7-2)
• Oracle Identity Management Database Installation Checklist (page 7-4)
• Installing Oracle Database (page 7-4)
• Installing Oracle Real Application Clusters (page 7-5)
• Running the Oracle Fusion Middleware RCU for Oracle Identity Management
(page 7-5)
• Validating the Oracle Identity Management Database Installation (page 7-8)
• What to Do Next (page 7-8)
7.1 Introduction to Installing Databases for Oracle Identity
Management
The Oracle Identity Management components in the enterprise deployment use
database repositories. This section describes how to perform the following steps:
• Verify the database requirements as described in Plan for Database Requirements
(page 4-24).
• Verify all decisions that have been made regarding the database and documented
in the Oracle Fusion Applications Installation Workbook. See Plan for Database
Requirements (page 4-24).
One or two Oracle Identity Management databases may exist, based on the
decision made during the planning phase and documented in the Oracle Fusion
Applications Installation Workbook, Database tab, IDM Database table, IDM
DB Type row. See Oracle Identity Management Split Database Configuration
(page 4-29). The prerequisites in this section apply to both databases unless
stated otherwise.
• Install and configure the Oracle database repositories. See Install Oracle
Database (page 7-4).
• Create the required Oracle schemas in the database using the Oracle Fusion
Middleware Repository Creation Utility (Oracle Fusion Middleware RCU). See Run
the Oracle Fusion Middleware RCU for Oracle Identity Management (page 7-5).
7-1

7.2 Prerequisites for Installing Databases for Oracle Identity
Management
An overview of databases and their schemas is in Plan for Database Requirements
(page 4-24). All details in the sections below apply to those databases.
Before loading the metadata repository into thedatabases, check that they meet the
requirements described in these subsections:
• Verify Database Versions Supported (page 7-2)
• Patch the Oracle Database (page 7-2)
• About Initialization Parameters (page 7-3)
7.2.1 Verifying Database Versions Supported
To check if the database is certified or to see all certified databases, see the latest
certification information published at https://support.oracle.com.
To determine the version of the installed Oracle Database, execute the following query
at the SQL prompt:
select version from sys.product_component_version where product like 'Oracle%';
7.2.2 Patch the Oracle Database
Patches are required for some versions of Oracle Database. This section describes
the patch details for different versions of the Oracle Database.
7.2.2.1 Patch Requirements for Oracle Database 12c
Table 7-1 (page 7-2) lists patches required for Oracle Identity Manager configurations
that use Oracle Database 12c. Before configuring Oracle Identity Manager 12c, be
sure to apply the patches to the Oracle Database 12c database.
Table 7-1 Required Patches for Oracle Database 12c
Platform Patch Number and Description on My Oracle Support
Linux 7614692: BULK FEATURE WITH 'SAVE EXCEPTIONS' DOES NOT
WORK IN ORACLE 11G
Linux 7000281: DIFFERENCE IN FORALL STATEMENT BEHAVIOR IN 11G
Linux 8327137: WRONG RESULTS WITH INLINE VIEW AND AGGREGATION
FUNCTION
Linux 8617824: MERGE LABEL REQUEST ON TOP OF 11.1.0.7 FOR BUGS
7628358 7598314
Chapter 7
Prerequisites for Installing Databases for Oracle Identity Management
7-2

7.2.2.2 Patch Requirements for Oracle Database 12c
If Oracle Database 12c is used, make sure to download and install the appropriate
version (based on the platform) for the RDBMS Patch Number 10259620. This is a
prerequisite for installing the Oracle Identity Manager schemas.
Table 7-2 (page 7-3) lists the patches required for Oracle Identity Manager
configurations that use Oracle Database 12c. Make sure to download and install the
following patches before creating Oracle Identity Manager schemas.
Table 7-2 Required Patches for Oracle Database 12c
Platform Patch Number and Description on My Oracle Support
Linux x86 (64-bit) RDBMS Interim Patch#10259620.
If this patch is not applied, then problems might occur in user and role search and
manager lookup. In addition, search results might return empty result.
Apply this patch in ONLINE mode. Refer to the readme.txt file bundled with the patch
for the steps to be followed.
In some environments, the RDBMS Interim Patch has been unable to resolve the
issue, but the published workaround works. Refer to the metalink note Wrong
Results on 11.2.0.2 with Function-Based Index and OR Expansion due to fix for
Bug:8352378 [Metalink Note ID 1264550.1] for the workaround. This note can be
followed to set the parameters accordingly with the only exception that they need to be
altered at the Database Instance level by using
ALTER SYSTEM SET <param>=<value>
scope=<memory>
or
<both>
. To query initialization parameters, use the command
SHOW
PARAMETERS <parameter-name>
.
7.2.3 About Initialization Parameters
To query database for initialization parameters, run the following command:
SHOW PARAMETERS <parameter-name>;
The database must have the following minimum initialization parameters defined:
Table 7-3 Minimum Initialization Parameters for the Oracle Database
Parameter Value
aq_tm_processes 1
dml_locks 200
job_queue_processes 12
open_cursors 1500
session_max_open_files 50
sessions 500
processes 2500
Chapter 7
Prerequisites for Installing Databases for Oracle Identity Management
7-3

Table 7-3 (Cont.) Minimum Initialization Parameters for the Oracle Database
Parameter Value
sga_target 4G
pga_aggregate_target 2G
sga_max_size 4G
session_cached_cursors 500
_b_tree_bitmap_plans FALSE
parallel_max_servers 1
shared_servers 0
_active_session_legacy
_behavior
TRUE
The
parallel_max_servers
parameter is only required for Oracle Internet Directory
databases where the Oracle RAC system has more than 32 CPUs
The size of the redo log files is 0.5G. A minimum of 2G for each redo log file is
recommended to improve redo log performance.
For guidelines on setting up optimum parameters for the Database, see Tune
Database Initialization Parameters in the Oracle Fusion Applications Administrator’s
Guide.
7.3 Oracle Identity Management Database Installation
Checklist
Before initiating the Oracle Identity Management database installation, verify the
following checklist:
• Necessary infrastructure
– Access to the database server console is provided for the database OS User
as well as root/pseudo access (VNC recommended).
– The provisioning repository or Oracle database installers are available and
accessible from the database nodes.
• Prerequisites for the database server
– General Oracle database prerequisites have been satisfied.
• Planning
– Oracle Fusion Applications Installation Workbook, Databases tab, Identity
Management Database table has information that is used for the database
installation.
7.4 Install Oracle Database
For more information about installing Oracle Database Enterprise Edition with the
Wizard, see Install Oracle Database Enterprise Edition with the Wizard (page 8-10).
Chapter 7
Oracle Identity Management Database Installation Checklist
7-4

7.5 Install Oracle Real Application Clusters
Install and configure the database repository as follows:
Oracle Clusterware
• For 10g Release 2 (10.2), see Related Documents in the Oracle Database Oracle
Clusterware and Oracle Real Application Clusters Installation Guide for a specific
platform.
• For 11g Release 1 (11.1), see the Installing Oracle Clusterware in the Oracle
Clusterware Installation Guide for a specific platform.
Automatic Storage Management
• For 10g Release 2 (10.2), see Related Documents in the Oracle Database Oracle
Clusterware and Oracle Real Application Clusters Installation Guide for a specific
platform.
• For 11g Release 1 (11.1), see the Installing Oracle Clusterware in the Oracle
Clusterware Installation Guide for a specific platform.
• When the installer is run, select the Configure Automatic Storage Management
option in the Select Configuration screen to create a separate Automatic Storage
Management home.
Oracle Real Application Clusters
• For 10g Release 2 (10.2), see Related Documents the Oracle Database Oracle
Clusterware and Oracle Real Application Clusters Installation Guide for a specific
platform.
• For 11g Release 1 (11.1), see Oracle RAC Installation Checklist in the Oracle Real
Application Clusters Installation Guide for a specific platform.
Oracle Real Application Clusters Database
Create a Real Applications Clusters Database with the following characteristics:
• Database must be in archive log mode to facilitate backup and recovery.
• Optionally, enable the Flashback database.
• Create UNDO tablespace of sufficient size to handle any rollback requirements
during the Oracle Identity Manager reconciliation process.
• Database is created with ALT32UTF8 character set.
7.6 Running the Oracle Fusion Middleware RCU for Oracle
Identity Management
Unzip the Oracle Fusion Middleware RCU zip file Linux:
REPOSITORY_LOCATION/
installers/fmw_rcu/linux/rcuHome.zip
or
Windows:
REPOSITORY_LOCATION/installers/fmw_rcu/windows/rcuHome.zip
Chapter 7
Install Oracle Real Application Clusters
7-5

to:
REPOSITORY_LOCATION/installers/rcu
where
REPOSITORY_LOCATION
is the Oracle Fusion Applications provisioning repository,
as described in Create the Oracle Fusion Applications Provisioning Repository
(page 5-25).
Use the Oracle Identity Management version of RCU, which now exists in that
directory.
The Oracle Fusion Middleware RCU needs to be set up for the ODS and OAM
components. Use FA as the prefix for the schema names.
Recommendation for Release 12 is to only use a single database for both ODS and
OAM. However, it is recommended to create two separate service names (for the
same database instance) and use one service name for OID application and the
other for OAM applications. This will be used later in IDM DB Configuration Page
(page 10-10).
Select a single password for all the schema while running the Oracle Fusion
Middleware RCU.
The Oracle Fusion Middleware RCU is available only on Windows and Linux
platforms. For Solaris, install and run the Oracle Fusion Middleware RCU from a
Windows or Linux machine.
Run the Oracle Fusion Middleware RCU to create the collection of schemas used by
Oracle Identity Management and Management Services.
1. Start the Oracle Fusion Middleware RCU by issuing this command:
UNIX: FMW_RCU_HOME/bin/rcu &
Windows: FMW_RCU_HOME\bin\rcu.bat
2. On the Welcome screen, click Next.
3. On the Create Repository screen, select the Create operation to load component
schemas into a database. Then click Next.
4. On the Database Connection Details screen, provide the information required to
connect to an existing database. For example:
Database Type:
Oracle Database
• Host Name: Enter one of the Oracle RAC nodes. Enter the VIP address of
one of the RAC database nodes or the database SCAN address, for example:
DB-SCAN.mycompany.com
• Port: The port number for the database listener (DB_LSNR_PORT). For
example:
1521
• Service Name: The service name of the database. For example
OIDEDG.mycompany.com
.
• Username:
sys
• Password: The sys user password
• Role:
SYSDBA
Click Next.
5. On the Check Prerequisites screen, click
OK
after the prerequisites have been
validated.
Chapter 7
Running the Oracle Fusion Middleware RCU for Oracle Identity Management
7-6

6. On the Select Components screen, provide the following values:
Create a New Prefix: Enter a prefix to be added to the database schemas, for
example, enter
FA
.
All schemas except for the ODS schema are required to have a prefix. In this
release, the Oracle Fusion Middleware RCU prefix must be
FA
.
Components: Select the schemas shown in the following table:
Product Oracle Fusion
Middleware RCU
Option
Service Name Comments
Oracle Internet
Directory
Identity Management–
Oracle Internet
Directory
Oracle Fusion
Applications
Installation Workbook -
Database tab,
IDM Database table,
Service name (if not
using a separate OID
DB)
OID Database, Service
Name (if using a
separate OID DB)
NA
Oracle Access
Manager
Identity Management–
Oracle Access
Manager
Oracle Fusion
Applications
Installation Workbook ,
Database tab, IDM
Database table,
Service name
Audit Services is also
selected.
Click Next.
If the topology requires more than one database, the following important
considerations apply:
• Be sure to install the correct schemas in the correct database.
• Run the Oracle Fusion Middleware RCU more than once to create all the
schemas for a given topology, if necessary.
• Review the tables in Plan for Database Requirements (page 4-24),
which provide the recommended mapping between the schemas and their
corresponding databases. Refer to Table 4-6 (page 4-28) to ensure that the
correct details are entered in this screen.
7. On the Check Prerequisites screen, click OK after the prerequisites have been
validated.
8. On the Schema Passwords screen, enter the passwords for the schemas. Choose
to use either the same password for all the schemas or different passwords
for each of the schemas. Oracle recommends choosing different passwords for
different schema's to enhance security
Click Next.
9. On the Map Tablespaces screen, accept the defaults and click Next.
10. On the confirmation screen, click OK to allow the creation of the tablespaces.
Chapter 7
Running the Oracle Fusion Middleware RCU for Oracle Identity Management
7-7

11. On the Creating tablespaces screen, click OK to acknowledge creation of the
tablespaces.
12. On the Summary screen, the summary and verify that the details provided are
accurate. Click Create to start the schema creation process.
13. On the Completion summary screen, verify that the schemas were created.
Click Close to exit.
7.7 Validate the Oracle Identity Management Database
Installation
To verify if the Oracle Identity Management database installation has been completed
successfully, check the following:
• The database is up and running on all nodes.
• The database listener is up and running.
• The database installation includes the required components.
• Use SQL*Plus or another tool to check that the system user is able to connect to
the database remotely.
• Run
opatch –lsinventory
on the database to verify that patches have been
applied according to the document for the specific platform.
• Complete the manual postinstallation tasks detailed in the database patch readme
files. See Complete Database Patch Postinstallation Tasks (page 8-17).
• The password policy has been defined and the passwords defined for the Oracle
Identity Management database schemas are in line with the policy.
7.8 Next Steps
When the Oracle Identity Management database installation has been completed,
see Install Oracle Fusion Applications Transaction Database (page 8-1) for complete
information to install the Oracle Fusion Applications transaction database.
Chapter 7
Validate the Oracle Identity Management Database Installation
7-8

8
Install Oracle Fusion Applications
Transaction Database
This section describes how to install and configure a transaction database for use
with an Oracle Fusion Applications environment. It also describes the Oracle Fusion
Applications Repository Creation Utility (Oracle Fusion Applications RCU), which
creates a repository for applications schemas and tablespaces and loads seed data
into the database.
This section includes the following topics:
• Introduction to Installing Oracle Fusion Applications Transaction Databases
(page 8-1)
• Oracle Fusion Applications Transaction Database Requirements (page 8-3)
• Oracle Fusion Applications Database Installation Checklist (page 8-10)
• Install the Oracle Fusion Applications Transaction Database (page 8-10)
• Oracle Fusion Applications RCU Installation Checklist (page 8-24)
• Run the Oracle Fusion Applications RCU to Create Oracle Fusion Applications
Database Objects (page 8-25)
• What to Do Next (page 8-37)
8.1 Introduction to Installing Oracle Fusion Applications
Transaction Databases
A transaction database holds the business transactions generated as the Oracle
Fusion Applications products offerings are used. This section includes overview
information related to installing Oracle Database. The Provisioning Wizard installs
12.1.0.2.0 database. For a manual installation of the database, install Oracle Database
12.1.0.2.0.
8.1.1 Process Overview
Install Oracle Database Enterprise Edition on a physical host before creating a
response file. The database must be created using the database template that is
shipped with Oracle Fusion Applications software. The template contains the database
structure and features, but is not seeded. It is generic for use across platforms.
For a small-scale, single-node database, use the Install an Applications Transaction
Database option in the Provisioning Wizard to install a single-node instance of Oracle
Database Enterprise Edition. Or, install the database manually (interactively) for a
production-scale, multiple-node database. Oracle Fusion Applications also supports
Oracle Real Application Clusters (Oracle RAC).
To finish any database installation, use the Oracle Fusion Applications RCU to perform
the following actions:
8-1

• Create Oracle Fusion Middleware schema and tablespace users and define the
tables, views, and other artifacts that the schema user owns.
• Create empty tablespaces for Oracle Fusion Applications components and the
schema owners. The owners do not own any tables or data initially.
• Import default seed data values for the schema users using Oracle Data Pump
files.
See Run the Oracle Fusion Applications RCU to Create Oracle Fusion Applications
Database Objects (page 8-25) for details about running the Oracle Fusion Applications
RCU.
8.1.2 Oracle Data Pump
Oracle Data Pump provides high-speed, parallel, bulk data and metadata movement
of Oracle Database contents. The Data Pump dump files (.dmp) that contain the table
definitions are delivered as part of the provisioning framework installation to make
them available to the Oracle Fusion Applications RCU.
When using Oracle Data Pump to import data and metadata for an Oracle RAC
installation, note that the directory that holds the dump files must be accessible from
all Oracle RAC nodes. In addition, keep the following considerations in mind:
• To use Data Pump or external tables in an Oracle RAC configuration, ensure that
the directory object path is on a cluster-wide file system.
The directory object must point to shared physical storage that is visible to, and
accessible from, all instances where Data Pump and/or external table processes
may run.
• The default Data Pump behavior is that worker processes can run on any
instance in an Oracle RAC configuration. Therefore, workers on those Oracle
RAC instances must have physical access to the location defined by the directory
object, such as shared storage media.
• Under certain circumstances, Data Pump uses parallel query workers to load or
unload data. In an Oracle RAC environment, Data Pump does not control where
these workers run, and they may run on other instances in the Oracle RAC,
regardless of what is specified for
CLUSTER
and
SERVICE_NAME
for the Data Pump
job. Controls for parallel query operations are independent of Data Pump. When
parallel query workers run on other instances as part of a Data Pump job, they
also require access to the physical storage of the dump file set.
8.1.3 Single-Node Versus Multiple-Node Databases
A single-node instance of Oracle Database Enterprise Edition is typically used for
medium-sized installations, or for training and demonstrations. The Provisioning
Wizard database installation interview collects details such as the database listener
port and the location of the database home, the database software, the database files,
the database password, and the global name of the database. The wizard performs
prerequisite validation checks, reports the status of the checks, and summarizes the
actions to be performed during the database installation.
Oracle Real Application Clusters (Oracle RAC) enables multiple database instances,
linked by an interconnect, to share access to Oracle Database. This configuration
enables to increase the scale of the applications environment. This type of database is
typically used for production environments.
Chapter 8
Introduction to Installing Oracle Fusion Applications Transaction Databases
8-2

8.2 Oracle Fusion Applications Transaction Database
Requirements
This section describes the requirements for Oracle Fusion Applications transaction
databases. Read and understand the information in the following sections and perform
any tasks outlined there before beginning a database installation.
8.2.1 General Oracle Database Prerequisites
General Oracle database prerequisites must be satisfied before proceeding with
the database installation for Oracle Fusion Applications. See the Oracle Database
Installation Guide for the required prerequisites and pre-installation tasks. Use
the guide that corresponds to the platform the database is running on http://
docs.oracle.com/database/122/nav/install-and-upgrade.htm.
8.2.2 Specific Oracle Fusion Applications Prerequisites
The following prerequisites are specific to Oracle Fusion Applications:
• The provisioning repository must be created, see Create the Oracle Fusion
Applications Provisioning Repository (page 5-25).
• Do not share the same database instance for Oracle Identity Management and
Oracle Fusion Applications. Oracle Fusion Applications should be in a separate
database instance.
• The database instance must also be running on a physical host.
• Even if performing a manual database installation, install the Oracle Fusion
Applications provisioning framework (see Install the Oracle Fusion Applications
Provisioning Framework (page 6-5)) to obtain the DBCA template needed for the
database creation.
• If performing a manual install, the appropriate DBCA template from the
Provisioning Framework must be copied to the database host.
• Ensure there is enough free disk space for Oracle Fusion Applications database
tablespaces.
• Designate a Linux or Windows server for the Oracle Fusion Applications RCU if
installing Oracle Fusion Applications on another platform.
The Oracle Fusion Applications RCU is supported only on Linux x86-64 and
Microsoft Windows x64 (64-bit) platforms. However, it can run from any host
that can access the database, it does not have to run from the database server
itself. So, if the database is installed on other platforms, start the Oracle Fusion
Applications RCU from the supported Linux x86-64 and Microsoft Windows x64
(64-bit) platforms to connect to the database.
• Download database software and patches separately if the database platform is
different from the Fusion Applications platform.
If the database platform is different from the platform Oracle Fusion Applications
and Oracle Identity Management are running on, the Provisioning Framework and
the Oracle Database installer and patches that ship as part of the Oracle Fusion
Applications installers cannot be used and it is recommended to download the
Chapter 8
Oracle Fusion Applications Transaction Database Requirements
8-3

Oracle Database software and patches for that specific platform and perform the
database install manually.
8.2.3 Oracle Fusion Applications Database Requirements
Read and understand the information in the following sections and perform any tasks
outlined there during or after a database installation, before running the Oracle Fusion
Applications RCU.
For more information about database installation requirements, see Certification in
the Oracle Fusion Applications Release Notes. The Provisioning Wizard performs
prerequisite validation checks to ensure that those requirements are met.
MANDATORY: Before installing Oracle database using the Oracle Fusion Applications
Provisioning Wizard, shut down all Oracle and Oracle-related services on the
database host. Failure to do so results in database installation errors.
8.2.3.1 Components
Oracle Fusion Applications requires Oracle Database Enterprise Edition or Oracle
Real Application Clusters Database. If Oracle Database Enterprise Edition installer
is installed manually (not using the provisioning Wizard), the installation requires the
enabling of specific components, several of which are selected by default:
• Oracle Partitioning (default)
• Oracle Data Mining RDBMS Files (default)
To verify that the system meets all minimum requirements associated with the
database, see the Oracle Database Installation Guide for details about a specific
platform.
8.2.3.2 Minimum Configuration Parameters for Oracle Database
Table 8-1 (page 8-4) shows the commonly recommended initialization parameters.
Table 8-1 Recommended Initialization Parameters
Expected
Database Size
Parameter Name DB Default Value Recommended
Value for Oracle
Fusion Applications
Small and large
audit_trail
NONE DB, EXTENDED
Small and large
plsql_code_type
INTERPRETED NATIVE
Small and large
nls_sort
Derived from
NLS_LANGUAGE
BINARY
Small and large
open_cursors
50 500
Small and large
session_cached_cursor
s
50 500
Small and large
_b_tree_bitmap_plans
TRUE FALSE
Small and large
db_securefile
PERMITTED ALWAYS
Small and large
disk_asynch_io
TRUE TRUE
Chapter 8
Oracle Fusion Applications Transaction Database Requirements
8-4

Table 8-1 (Cont.) Recommended Initialization Parameters
Expected
Database Size
Parameter Name DB Default Value Recommended
Value for Oracle
Fusion Applications
Small and large
filesystemio_options
Platform Dependent
("none" for Linux)
Use default value
("none" for Linux)
Small and large
SYSTEM
1900 1900
Small and large
SYSAUX
1100 1100
Small and large
parallel_max_servers
8 12
Small and large
job_queue_processes
8 12
Small and large
RESOURCE_MANAGER_PLAN
NONE FUSIONAPPS_PLAN
Small and large
AUDIT_SYS_OPERATIONS
TRUE FALSE
Small and large
parallel_force_local
N/A TRUE
Small and large
parallel_adaptive_mul
ti_user
N/A FALSE
Small and large
_optimizer_batch_tabl
e_access_by_rowid
N/A FALSE
Small and large
event
N/A 45053 trace name
context forever, level
127
Starter - Single-
node, small
sga_target
0 9 GB
Starter - Single-
node, small
pga_aggregate_target
0 4 GB
Starter - Single-
node, small
_fix_control
5483301:ON,6708183:
OFF
14545269:OFF,14764
860:ON,6708183:ON,
17799716:ON,197101
02:ON,18134680:ON
Starter - Single-
node, small
processes
100 5000
Starter - Single-
node, small
undo tablespace
0 6 GB; autoextend ON
Starter - Single-
node, small
temp tablespace
0 6 GB; autoextend ON
Starter - Single-
node, small
redo log
0 Three 2 GB Groups
Starter - Single-
node, small
SYSTEM
1900 1900
Starter - Single-
node, small
SYSAUX
1100 1100
Starter - Single-
node, small
parallel_max_servers
12 12
Starter - Single-
node, small
job_queue_processes
12 12
Chapter 8
Oracle Fusion Applications Transaction Database Requirements
8-5

Table 8-1 (Cont.) Recommended Initialization Parameters
Expected
Database Size
Parameter Name DB Default Value Recommended
Value for Oracle
Fusion Applications
Starter - Single-
node, small
RESOURCE_MANAGER_PLAN
NONE FUSIONAPPS_PLAN
Starter - Single-
node, small
AUDIT_SYS_OPERATIONS
TRUE FALSE
Starter - Single-
node, small
pga_aggregate_limit
N/A 0
Starter - Single-
node, small
db_cache_size
N/A 2GB
Starter - Single-
node, small
shared_pool_size
N/A 2GB
Single-node,
large
sga_target
0 18 GB
Single-node,
large
pga_aggregate_target
0 8 GB
Single-node,
large
_fix_control
5483301:ON,6708183:
OFF
14545269:OFF,14764
860:ON,6708183:ON,
17799716:ON,197101
02:ON,18134680:ON
Single-node,
large
processes
100 5000
Single-node,
large
undo tablespace
0 12 GB; autoextend ON
Single-node,
large
temp tablespace
0 9 GB; autoextend ON
Single-node,
large
redo log
0 Three 2 GB Groups
Single-node,
large
SYSTEM
1900 1900
Single-node,
large
SYSAUX
1100 1100
Single-node,
large
parallel_max_servers
8 12
Single-node,
large
job_queue_processes
8 12
Single-node,
large
RESOURCE_MANAGER_PLAN
NONE FUSIONAPPS_PLAN
Single-node,
large
AUDIT_SYS_OPERATIONS
TRUE FALSE
Single-node,
large
pga_aggregate_limit
N/A 0
2-node Oracle
RAC, large
sga_target
0 18 GB
Chapter 8
Oracle Fusion Applications Transaction Database Requirements
8-6

Table 8-1 (Cont.) Recommended Initialization Parameters
Expected
Database Size
Parameter Name DB Default Value Recommended
Value for Oracle
Fusion Applications
2-node Oracle
RAC, large
pga_aggregate_target
0 8 GB
2-node Oracle
RAC, large
_fix_control
5483301:ON,6708183:
OFF
14545269:OFF,14764
860:ON,6708183:ON,
17799716:ON,197101
02:ON,18134680:ON
2-node Oracle
RAC, large
processes
100 5000
2-node Oracle
RAC, large
undo tablespace
0 12 GB; autoextend ON
2-node Oracle
RAC, large
temp tablespace
0 9 GB; autoextend ON
2-node Oracle
RAC, large
redo log
0 Three 2 GB Groups
per instance
2-node Oracle
RAC, large
SYSTEM
1900 1900
2-node Oracle
RAC, large
SYSAUX
1100 1100
2-node Oracle
RAC, large
parallel_max_servers
8 12
2-node Oracle
RAC, large
job_queue_processes
8 12
2-node Oracle
RAC, large
RESOURCE_MANAGER_PLAN
NONE FUSIONAPPS_PLAN
2-node Oracle
RAC, large
AUDIT_SYS_OPERATIONS
TRUE FALSE
2-node Oracle
RAC, large
pga_aggregate_limit
N/A 0
WARNING:
When the Provisioning Wizard is used to install the database using the dbca template,
the default values for the
disk_asynch_io
and
filesystemio_options
parameters are
as follows:
disk_asynch_io
is set to TRUE
filesystemio_options
is set to the default value based on the platform where the
database is installed. It could be either none, setall, asynch, or diskio. To verify that the
filesystemio_options
parameter is using the default value, run the following query:
"
select isdefault from v$parameter where name='filesystemio_options
". If it
returns TRUE, the default value is set.
If the parameter value is changed from the original default value to another value and
then change it back to the original default value, the default value still remains FALSE.
Chapter 8
Oracle Fusion Applications Transaction Database Requirements
8-7

The following Warning messages is displayed based on the values set:
If
disk_asynch_io
is set to FALSE and
filesystemio_options
is set to the
default value, a Warning message is displayed recommending setting the value for
disk_asynch_io to TRUE.
If
disk_asynch_io
is set to FALSE and
filesystemio_options
is not set to the
default value, a Warning message is displayed recommending setting the value for
disk_asynch_io
to TRUE for the best performance optimization.
Due to the addition of Fusion Applications Read Only Diagnostic schemas, the
database audit trail is turned on via the
audit_trail=DB, EXTENDED
initialization
parameter to monitor all database activities with the
FUSION_RO
and
FUSION_ERO
schema users. To minimize impact to performance, it is also recommended that
auditing system operations be excluded via the
AUDIT_SYS_OPERATIONS = FALSE
initialization parameter. Furthermore, if the Fusion Applications database is created
manually (and the Provisioning Wizard is not used) it is recommended to move the
AUDIT
segment from the
SYSTEM
tablespace to the
SYSAUX
tablespace and create a
custom index for audit. Do so as a post installation task after provisioning the Oracle
Fusion Applications Environment.
For more information about setting the kernel parameter value, see Set the Kernel
Parameter Value (page 5-10).
8.2.3.3 Tuning Oracle Database
For more information about tuning Oracle database, see Manage Oracle Database for
Oracle Fusion Applications in the Oracle Fusion Applications Administrator's Guide.
8.2.3.4 Mandatory Oracle Database Patches
Table 8-2 (page 8-8) lists the mandatory Oracle Database (Enterprise Edition and
RAC) patches required for Oracle Fusion Applications. The list is organized by
operating system platforms.
• If Oracle Database is installed using the Provisioning Wizard, these patches are
automatically applied.
• If Oracle Database is installed manually, apply the mandatory database patches
by following the instructions detailed in Run RUP Lite for RDBMS (page 8-22).
For both scenarios described above, ensure that the following steps are completed
before running the Oracle Fusion Applications RCU:
• Complete the manual postinstallation tasks detailed in the patch readme file
(Complete Database Patch Postinstallation Tasks (page 8-17)).
• Refer to Oracle Database patch details listed in Additional Patches for the Tech
Stack in the latest Oracle Fusion Applications Release Notes for any additional
patches required for the current release.
Table 8-2 Mandatory Oracle Database Patches
Operating System Patches
linux64
12.1.0.2.161223FA-DBBP
Chapter 8
Oracle Fusion Applications Transaction Database Requirements
8-8

Table 8-2 (Cont.) Mandatory Oracle Database Patches
Operating System Patches
solaris64
12.1.0.2.161223FA-DBBP
solaris_sparc64
12.1.0.2.161223FA-DBBP
8.2.3.5 DBA Directories
Create directories in the file system accessible by the database which is referenced
by the DBA directories used by Oracle Fusion Applications. These directories are
specified in the Oracle Fusion Applications Installation Workbook, Database tab, FA
transaction Database table and they are:
•
RCU APPLCP_FILE_DIR
•
RCU APPLLOG_DIR
•
RCU FUSIONAPPS_PROV_RECOVERY_DIR
(OBIEE Backup Dir)
•
RCU OTBI_DBINSTALL_DUMP_DIR
(OTBI Dump File Directory)
•
RCU FUSIONAPPS_DBINSTALL_DP_DIR
(FA Dump File Directory)
For more information about the specific requirements for these directories, see Oracle
Fusion Applications RCU Directories (page 4-28).
8.2.3.6 Make Oracle Fusion Applications RCU Software Available on the Host
where it is Run
Complete the following steps to make the Oracle Fusion Applications software
available in the host where it is run.
• Locate the appropriate Oracle Fusion Applications RCU software for
a specific platform. For Linux, go to
REPOSITORY_LOCATION/installers/
apps_rcu/linux
to find the rcuHome_fusionapps_linux.zip file. For Windows,
go to
REPOSITORY_LOCATION/installers/apps_rcu/windows
and locate the
rcuHome_fusionapps_win.zip
file. These files were staged when the installer
repository was created.
• Extract the contents of
rcuHome_fusionapps_linux.zip
(or
rcuHome_fusionapps_win.zip
) to a directory (
APPS_RCU_HOME
) on a Windows or
Linux machine where the Oracle Fusion Applications RCU is run. All dependent
components that the Oracle Fusion Applications RCU needs are included in this
zipped file.
8.2.3.7 Make dmp Files Available on the Database Server
Complete the following steps to make dmp files available on the database server. If the
Oracle Fusion Applications database is configured as multiple RAC nodes, make sure
the dmp files are accessible from all RAC nodes.
• Locate the file
APPS_RCU_HOME/rcu/integration/fusionapps/
export_fusionapps_dbinstall.zip
.
Chapter 8
Oracle Fusion Applications Transaction Database Requirements
8-9

• Unzip
export_fusionapps_dbinstall.zip
to the directory specified for
FUSIONAPPS_DBINSTALL_DP_DIR
.
• Go to
APPS_RCU_HOME/rcu/integration/biapps/schema
and locate the
otbi.dmp
file.
• Copy
otbi.dmp
to
OTBI_DBINSTALL_DUMP_DIR
.
8.3 Oracle Fusion Applications Database Installation
Checklist
Before initiating the Oracle Fusion Applications database installation process, verify
the following checklist:
• Necessary infrastructure
– Access to the database server console is provided for the database OS user
as well as root/pseudo access (VNC recommended).
– The provisioning repository or Oracle database installers are available and
accessible from the database nodes.
– Database patches are available and accessible from the database nodes.
– The Oracle Fusion Applications Provisioning Framework has been installed.
– (Wizard Install only) The Oracle Fusion Applications Provisioning Wizard can
be run from the database host.
– (Manual Install only) The appropriate DBCA template from the Provisioning
Framework has been copied to the database host.
• Prerequisites for the database server
– General Oracle database prerequisites have been satisfied.
• Planning
– Oracle Fusion Applications Installation Workbook, Database tab, FA
Transactional Database table has been filled out with information that will
be used for the database installation.
8.4 Install the Oracle Fusion Applications Transaction
Database
Install the Oracle Fusion Applications transaction database using the provisioning
wizard or manually as described in this section.
• Install Oracle Database Enterprise Edition with the Wizard (page 8-10)
• Manual Installation of Oracle Database Enterprise Edition or Oracle RAC
(page 8-17)
8.4.1 Install Oracle Database Enterprise Edition with the Wizard
As a part of the provisioning process, the Provisioning Wizard performs prerequisite
and validation checks. These validations must pass before creating a response file.
Chapter 8
Oracle Fusion Applications Database Installation Checklist
8-10

User Input Validations
The Provisioning Wizard:
• Validates the service name or global database name.
• Validates the installer location. In the Preverify phase, validates that the database
is present.
• Validates that the database password value and the password confirmation match.
• Performs specific user ID and password validations for all Oracle Fusion
Middleware schema owners.
Preinstallation Validations
The Provisioning Wizard:
• Checks to see if the specified database file location has sufficient disk space for
the initial database provisioning and performs an Oracle home space check.
• Performs a port availability check.
• Performs a platform check. There is no validation that specific platform packages
have been installed.
Postinstallation Validations
The Provisioning Wizard ensures that a JDBC connection can be established.
Install a single-node instance of Oracle Database Enterprise Edition using the
Provisioning Wizard. The wizard uses the database template delivered with the
software. The database is initially empty. After the installation is complete, the
Provisioning Wizard has applied the required database patches for Oracle Fusion
Applications automatically. However, run any manual postinstallation tasks that are
required by the database patches as described in the patch's readme files, then
run the Oracle Fusion Applications RCU to create schemas and tablespaces. For
more information about manual postinstallation tasks, see Complete Database Patch
Postinstallation Tasks (page 8-17).
The wizard invokes the database build script and performs the following tasks:
• Installs database software.
• Generates an Oracle Universal Installer (OUI) response file based on the
configuration specified.
• Accesses the provisioning repository and invokes the database installer in silent
mode. If the applications environment does not meet the database installation
requirements, the wizard terminates the process.
• Requests a copy of the nonseeded database template.
• Creates an instance of Oracle Database12.1.0.2.0 using the configuration settings
entered in the wizard interview, and the database template.
8.4.1.1 Start the Provisioning Wizard
Note the following requirement when installing a transaction database on a UNIX
platform:
Chapter 8
Install the Oracle Fusion Applications Transaction Database
8-11
• Verify that the length of the PATH environment variable is less than 900
characters. Use this command to check the character count:
env | grep ^PATH= | wc -m
To start the Provisioning Wizard, do the following:
1. Set the
JAVA_HOME
environment variable to point to the JDK location in the
provisioning repository, for example:
UNIX:
export
JAVA_HOME
=
REPOSITORY_LOCATION
/
jdk
Tip:
For the REPOSITORY_LOCATION value, see Oracle Fusion
Applications Installation Workbook, Storage tab, Temporary Shared
Storage table, Installers Directory Location row.
export
PATH
=$
JAVA_HOME/bin:$PATH
2. Verify that the
LIBPATH
value is null.
3. Run the following command on the machine where the database is planned to
reside:
UNIX:
Tip:
For the FAPROV_HOME value, see Oracle Fusion Applications
Installation Workbook, Storage tab, Install Directories table, FA
Provisioning Framework Location row.
./provisioningWizard.sh
Solaris:
Use
bash provisioningWizard.sh
instead of
./provisioningWizard.sh
.
8.4.1.2 Wizard Interview Screens and Instructions
Table 8-3 (page 8-12) shows the steps necessary to install a transaction database. For
help with any of the interview screens, click Help.
If the values required are not entered correctly, the error and warning messages are
displayed at the bottom of the screen.
Table 8-3 Interview Flow for Database Installation
Screen Description and Action Required
Welcome No action is required on this read-only screen.
Click Next to continue.
Chapter 8
Install the Oracle Fusion Applications Transaction Database
8-12

Table 8-3 (Cont.) Interview Flow for Database Installation
Screen Description and Action Required
Specify Central
Inventory Directory
This screen displays only if one or more of the following conditions
are not met:
•
The
-invPtrLoc
option is used to specify the central inventory
location. Thus, the default value for the platform is not
used. Note that the default value for Linux platforms is
/etc/
oraInst.loc
. For Solaris, the default value is
/var/opt/
oracle/oraInst.loc
.
• The Central Inventory Pointer File is readable.
• The Central Inventory Pointer File contains a value for
inventory_loc
.
•
The
inventory_loc
directory is writable.
•
The
inventory_loc
directory has at least 150K of space.
•
inventory_loc
is not an existing file.
Specify the location of the Central Inventory Directory that meets
the previous criteria. The
inventory_loc
directory can be created
by the
createCentralInventory.sh
script and does not have to
exist at the time its location is specified.
Tip: This value is available in the Oracle Fusion Applications
Installation Workbook , Storage, tab Inventories table, FA
Provisioning Framework row.
For non-Windows platforms, in the Operating System Group ID
field, select or enter the group whose members are granted access to
the inventory directory. All members of this group can install products
on this host. Click OK to continue.
Tip: This value is available in the Oracle Fusion Applications
Installation Workbook , Storage tab, Shared Storage table, FA
Shared row, OS Group Owner column.
The Inventory Location Confirmation dialog prompts to run the
inventory_directory
/
createCentralInventory.sh
script as
root, to confirm that all conditions are met and to create the default
inventory location file, such as
/etc/oraInst.loc
. After this script
runs successfully, return to the interview and click OK to proceed with
the installation.
To continue the installation without root access, select Continue
installation with local inventory. Click OK to proceed with the
installation.
Click Next to continue.
Installation Options
Presents the list of valid installation actions that can be performed
using the wizard. Select Install an Applications Transaction
Database.
Click Next to continue.
Chapter 8
Install the Oracle Fusion Applications Transaction Database
8-13

Table 8-3 (Cont.) Interview Flow for Database Installation
Screen Description and Action Required
Specify Security
Updates
Set up a notification preference for security-related updates
and installation-related information from My Oracle Support. This
information is optional.
•
Email: Enter a valid email address to have updates sent by this
method.
•
Agree to receive security updates via My Oracle Support:
Select this option to have updates sent directly to a My Oracle
Support account. Enter a valid My Oracle Support Password if
this option is selected.
Note: If invalid My Oracle Support (MOS) credentials are
provided, a dialog box is displayed informing that the user will
be anonymously registered. Complete the following steps before
continuing with provisioning the new environment:
1. Cancel and exit the Provisioning Wizard.
2. Obtain the correct MOS credentials.
3. Restart the Provisioning Wizard to update the provisioning
response file with the correct MOS credentials or uncheck the
checkbox next to I wish to receive security updates via My
Oracle Support. Save the provisioning response file and then
exit the Provisioning Wizard.
4. Restart the Provisioning Wizard to provision the Oracle Fusion
Applications environment.
Click Next to continue.
Database Install
Configuration
Specify the configuration details about the database that is being
installed. See Specify Database Installation Parameters (page 8-15).
Click Next to continue.
Prerequisite Checks
The Prerequisite Checks list shows each prerequisite check
performed. The status of the prerequisite checking can be one of the
following:
•
Block: Processing has not yet started on this host for the named
phase.
•
Clock: Performing the build for a phase.
•
Check mark: The build was completed successfully.
•
x mark: The build has failed for this phase. Correct the errors
before continuing.
•
Restricted symbol: The validation process has stopped due to a
failure within another process.
Click an x or a Restricted symbol to display information about
failures. Click the Log file for details about the validation. Fix
any issues reported. Click Retry to run the prerequisite checks
again. If recovery is necessary, see Troubleshooting Oracle Fusion
Applications Database Installation and Oracle Fusion Applications
RCU Operations (page 9-1).
When prerequisite checking has finished with no errors, click Next to
continue.
Summary
Click Save to create and save a text file to use as a record of this
configuration. Click Install to start the installation.
Note: Record the name and location of the file. Supply these details
when the response file is being created.
Chapter 8
Install the Oracle Fusion Applications Transaction Database
8-14

Table 8-3 (Cont.) Interview Flow for Database Installation
Screen Description and Action Required
Database Installation
Progress
The installation Progress is reported by phase:
•
Preconfigure: Applies patches to the installed database. The
patches are located in the repository_location
/installers/
database/patch directory
.
•
Configure: Creates services used to connect to the database
and applies the database template to set system parameters.
•
Postconfigure: Performs any necessary postconfigure steps.
•
Startup: Starts any installed components that are not already
started.
•
Validation: Connects to the database to verify the integrity of the
installation.
The progress of the installation phases is listed. A message appears
after the installation phase is complete directing to run
root.sh
.
Follow this instruction and click OK to continue the installation.
The central log file location is displayed below the Progress bar.
Click a Log icon to view phase log files. Click Retry if a failure
occurs. If recovery is necessary, see Troubleshoot Oracle Fusion
Applications Database Installation and Oracle Fusion Applications
RCU Operations (page 9-1).
Click Next to continue.
Installation Complete A summary of the actions and validations performed for this
installation is presented. Click Save to record the database summary
information in a text file.
Record the name and location of this file. Supply these details when a
response file is created. The system administrator may also need this
information as they perform maintenance tasks.
Click Close to dismiss the screen and exit the wizard.
8.4.1.3 Specify Database Installation Parameters
On the Database Install Configuration interview screen, specify values for these
database configuration parameters.
• Database Listener Port: The port number designated for the database server.
The default port for Oracle Database is 1521.
Tip:
This value is available in the Oracle Fusion Applications Installation
Workbook, Database tab, FA Transactional Database table, FA DB
Instances row.
• Installers Directory Location: Enter the path to the
REPOSITORY_LOCATION
directory created when the provisioning repository was downloaded.
Chapter 8
Install the Oracle Fusion Applications Transaction Database
8-15
Tip:
This value is available in the Oracle Fusion Applications Installation
Workbook, Storage tab, Temporary Shared Storage table, Installers
Directory Location row.
• Oracle Base: Enter the top-level directory for Oracle software installations. The
path can be changed based on the requirements.
Tip:
This value is available in the Oracle Fusion Applications Installation
Workbook, Database tab, FA Transactional Database table, FA DB
Oracle Home (The ORACLE_BASE is part of the ORACLE_HOME).
• Software Location: Accept the default value or enter the Oracle home directory
path that points to where the data files reside. The directory path must not contain
spaces.
Tip:
This field is automatically filled. This value is available in the
Oracle Fusion Applications Installation Workbook, Database tab, FA
Transactional Database table, FA DB Oracle Home row.
• Database File Location: Accept the default value or enter the path to
the .dbf, .dtl, and .log files.
Tip:
This value is available in the Oracle Fusion Applications Installation
Workbook, Database tab, FA Transactional Database table, FA DB
Datafiles Location row.
• OSDBA Group: The UNIX operating system group that the database
administrator is a member of. This field is displayed only if the platform detected
by the installer is UNIX.
Tip:
If the database is installed on the FA shared storage as defined in the
Oracle Fusion Applications Installation Workbook, Storage tab, Shared
Storage table, FA Shared row, OS Group Owner column.
• Global Database Name: Enter a name to distinguish this database instance from
other Oracle Database instances running on the same host. The name can be
Chapter 8
Install the Oracle Fusion Applications Transaction Database
8-16

written as database name or database name.domain name. This is the database
service name.
Tip:
This value is available in the Oracle Fusion Applications Installation
Workbook, Database tab, FA Transactional Database table, FA DB
Service Namerow.
• Administrative Password: Specify a valid password. Retype the password to
Confirm.
8.4.1.4 Complete Database Patch Postinstallation Tasks
After the database installation, run the
datapatch
utility as the only postinstallation
task. The
datapatch
utility is run using the following command:
sh $ORACLE_HOME/OPatch/datapatch
8.4.2 Manual Installation of Oracle Database Enterprise Edition or
Oracle RAC
Though Oracle Fusion Applications Provisioning automates the installation and
configuration of a transaction database for use with Oracle Fusion Applications
environments, manually install a single-node instance of Oracle Database or Oracle
Real Application Clusters to meet specific requirements.
To manually install and configure a transaction database, complete the following steps:
1. Install Oracle Database or Oracle RAC (page 8-17)
2. Configure OCM (page 8-18)
3. Configure and Start the Database Listener for Oracle Database (NETCA)
(page 8-18)
4. Create a Transaction Database Instance Using Oracle Database Configuration
Assistant (DBCA) (page 8-18)
5. Run RUP Lite for RDBMS (page 8-22)
6. Complete Database Patch Postinstallation Tasks (page 8-22)
8.4.2.1 Install Oracle Database or Oracle RAC
The first step in creating a custom transaction database instance is to install the
database software.
How to Install Oracle Database
If Oracle Database is being installed manually (interactively) instead of using the
Provisioning Wizard, see the Oracle Database Installation Guide for details about a
specific platform.
When performing the installation, ensure that the following components are enabled:
Chapter 8
Install the Oracle Fusion Applications Transaction Database
8-17

• Oracle Partitioning (default)
• Oracle Data Mining RDBMS Files (default)
If these components are not enabled, application functionality does not work.
When performing the installation, choose the Software Only option. Create the
database instance manually and configure the database.
To verify that the system meets all minimum requirements associated with the
database, see the Oracle Database Installation Guide for details about a specific
platform.
How to Install Oracle RAC
For complete information about installing and configuring Oracle RAC, see the Oracle
Database Installation Guide for details about a specific platform. This library contains
installation guides for Oracle RAC, as well as Oracle Database installations for all
platforms.
MANDATORY: For a RAC database, the passwords for all schemas must be the same
across all RAC instances.
When Oracle RAC is installed, note that by default the database listener creates a
log file in the grid ORACLE_HOME, that is, GRID_HOME. If the GRID_HOME and
database instance owners are different, and if the database listener is started by the
database instance operating system user from the GRID_HOME, then set diagnostic
destination for the listener in the
listener.ora
file to avoid any core dump issues in
the Web Tier host by adding the following line:
ADR_BASE_<name of the LISTENER>=<a
file path / location where the database instance owner has the read/write
permission>
8.4.2.2 Configure OCM
For more information about configuring OCM, see Introduction to Oracle Configuration
Manager in the Oracle Configuration Manager Installation and Administration Guide.
8.4.2.3 Configure and Start the Database Listener for Oracle Database
(NETCA)
• Configure the database listener as described in the Oracle 11g Release 2
Documentation Library.
• After completing the configuration, start the database listener.
8.4.2.4 Create a Transaction Database Instance Using Oracle Database
Configuration Assistant (DBCA)
Use the Oracle Database Configuration Assistant (DBCA) to create the transaction
database from the database template that is shipped with Oracle Fusion Applications
software. This template contains the database structure and features, but is not
seeded. It is generic for use across platforms.
Instructions on database installation and configuration can be found in the Oracle 12c
Release 1 Documentation Library.
Chapter 8
Install the Oracle Fusion Applications Transaction Database
8-18

If the database template is not used, ensure that the database configuration
parameters are aligned with the values specified in Minimum Configuration
Parameters for Oracle Database (page 8-4).
Use DBCA to manually create an instance of Oracle Database from the nonseeded
database template that is shipped with Oracle Fusion Applications software.
To create a single-node Oracle Database instance:
1. Review and edit the nonseeded database template at
FAPROV_HOME/provisioning/template/dbca/empty_database_12.1.dbt
or
empty_database_12.1.large.dbt
(for a large database instance).
2. Navigate to the database ORACLE_HOME
/bin
directory and execute the
following command. Make appropriate changes based on the selected database
template.
dbca -silent -createDatabase -templateName\
FAPROV_HOME/provisioning/template/dbca/empty_database_12.1.large.dbt \
-gdbName "ORACLE_SID" \
-sid "ORACLE_SID" \
-sysPassword "SYS_PASSWORD" \
-systemPassword "SYSTEM_PASSWORD" \
-emConfiguration "NONE" \
-characterSet "AL32UTF8" - \
-nationalCharacterSet "AL16UTF16" \
-variables ORACLE_BASE=ORACLE_BASE, ORACLE_HOME=ORACLE_HOME \
-datafileDestination DATAFILE_LOC
Use the following steps to set the
AUDIT_TRAIL
parameter:
a. Login to SQL*Plus using the sys as sysdba identity.
b. Run the following command to set
AUDIT_TRAIL
parameter:
alter system set
AUDIT_TRAIL=db,extended scope=spfile;
c. Restart the database by running the following commands:
shutdown immediate
startup
Replace the following variables with the appropriate values:
• FAPROV_HOME: Home of Oracle Fusion Applications Provisioning
framework.
• ORACLE_SID: Global database name of the Oracle Fusion Applications
database.
• SYS_PASSWORD: Password for the SYS user. The SYS schema is the
location of base tables and views.
• SYSTEM_PASSWORD: User SYSTEM password. The user can create
additional tables and views.
• ORACLE_BASE: Top-level directory for the database installation.
• ORACLE_HOME: Oracle home of the database installation.
• DATAFILE_LOC: Physical location of the files that store the data of all logical
structures in the database.
How to Create an Oracle RAC Database Instance from the Template
Chapter 8
Install the Oracle Fusion Applications Transaction Database
8-19

Use DBCA to manually create a database instance for each Oracle RAC node using
the nonseeded database template that is shipped with Oracle Fusion Applications
software.
To create an Oracle RAC database instance:
1. Review and edit the nonseeded database template at
FAPROV_HOME/provisioning/template/dbca/empty_database_12.1.dbt
or
empty_database_12.1.large.dbt
(for a large database instance).
2. For each RAC node, navigate to the database ORACLE_HOME
/bin
directory of
the RAC node and execute the following command. Make appropriate changes
based on the selected database template.
dbca -silent -createDatabase \
-templateName FAPROV_HOME/provisioning/template/dbca/
empty_database_12.1.dbt \
-gdbName "ORACLE_SID" \
-sid "ORACLE_SID" \
-sysPassword "SYS_PASSWORD" \
-systemPassword "SYSTEM_PASSWORD" \
-emConfiguration "NONE" \
-characterSet "AL32UTF8" - \
-nationalCharacterSet "AL16UTF16" \
-variables ORACLE_BASE=ORACLE_BASE, ORACLE_HOME=ORACLE_HOME \
-datafileDestination DATAFILE_LOC \
-nodeinfo node1,node2
Use the following steps to set the
AUDIT_TRAIL
parameter:
a. Login to SQL*Plus using the sys as sysdba identity.
b. Run the following command to set
AUDIT_TRAIL
parameter:
alter system set
AUDIT_TRAIL=db,extended scope=spfile;
c. Restart the database by running the following commands:
shutdown immediate
startup
Replace the following variables with the appropriate values:
• FAPROV_HOME: Home of Oracle Fusion Applications Provisioning
framework.
• ORACLE_SID: Global database name of the Oracle Fusion Applications
database.
• SYS_PASSWORD: Password for the SYS user. The SYS schema is the
location of base tables and views.
• SYSTEM_PASSWORD: User SYSTEM password. The user can create
additional tables and views.
• ORACLE_BASE: Top-level directory for the database installation.
• ORACLE_HOME: Oracle home of the database installation.
• DATAFILE_LOC: Physical location of the files that store the data of all logical
structures in the database.
MANDATORY: In the nonseeded database template, the following common
attributes required by the Oracle Fusion Applications RCU must be set as follows:
Chapter 8
Install the Oracle Fusion Applications Transaction Database
8-20

<option name="OMS" value="true"/>
<option name="JSERVER" value="true"/>
<option name="SPATIAL" value="true"/>
<option name="IMEDIA" value="true"/>
<option name="XDB_PROTOCOLS" value="true">
<tablespace id="SYSAUX"/>
</option>
<option name="ORACLE_TEXT" value="true">
<tablespace id="SYSAUX"/>
</option>
<option name="SAMPLE_SCHEMA" value="false"/>
<option name="CWMLITE" value="false">
<tablespace id="SYSAUX"/>
</option>
<option name="EM_REPOSITORY" value="true">
<tablespace id="SYSAUX"/>
</option>
<option name="APEX" value="false"/>
<option name="OWB" value="false"/>
<option name="DV" value="false"/>
8.4.2.5 Enable Database Audit
Perform these steps to enable database audit for the Oracle Fusion Applications
database.
1. Move audit segments from SYSTEM to SYSAUX tablespace: Execute the
following sql commands as
sys
:
begin
dbms_audit_mgmt.set_audit_trail_location(
audit_trail_type => dbms_audit_mgmt.audit_trail_db_std,
audit_trail_location_value => 'SYSAUX');
end;
/
begin
dbms_audit_mgmt.set_audit_trail_location(
audit_trail_type => dbms_audit_mgmt.audit_trail_fga_std,
audit_trail_location_value => 'SYSAUX');
end;
/
Chapter 8
Install the Oracle Fusion Applications Transaction Database
8-21

2. Create a custom index for audit segment on
SYS.AUD$
table: Execute the following
sql command as
sys
:
create index sys.i_aud3 on sys.aud$(ntimestamp#) tablespace SYSAUX;
8.4.2.6 Run RUP Lite for RDBMS
See Run RUP Lite for RDBMS in a Single Instance Database in the Oracle Fusion
Applications Upgrade Guide.
8.4.2.7 Complete Database Patch Postinstallation Tasks
See Complete Database Patch Postinstallation Tasks (page 8-17).
8.4.3 Validate the Oracle Fusion Applications Database
To verify if the Oracle Fusion Applications database installation has been completed
successfully, check the following:
• The database is up and running on all nodes.
To check the database status:
srvctl status database -d <db service name>
• The database listener is up and running.
To check the listener status:
$ORACLE_HOME/bin/lsnrctl status <listener-name>
To start listener:
$ORACLE_HOME/bin/lsnrctl start <listener-name>
• The database installation includes the required components.
Validation Task 1: Validating the Database Installation
Verify that the database installation includes the required components.
Prerequisites
The only prerequisite is that the database has been installed according to
the instructions in Install Oracle Database Enterprise Edition with the Wizard
(page 8-10).
How to Validate the Database Installation
Verify that all the required components have been installed.
– Correct version of Enterprise Edition or RAC
– Oracle Partitioning
– Data Mining
Verify that the components are correctly installed via any of the following methods.
– Run the following query from SQL*Plus:
select * from PRODUCT_COMPONENT_VERSION;
– Run the following query from SQL*Plus:
Chapter 8
Install the Oracle Fusion Applications Transaction Database
8-22

select COMP_NAME, VERSION, STATUS from dba_registry;
– Start SQL*Plus and examine the initial output that lists the installed options.
Expected Results
All components should be present in the installed database directory.
The queries return a list of installed components along with version and status,
such as the following:
Connected to:
Oracle Database 11g Enterprise Edition Release 12.1.0.2.0 - 64bit Production
With the Partitioning, Data Mining
and Real Application Testing options
Corrective Actions
Install any missing components.
1. Run the database installation wizard.
2. Make sure to select all the required components.
See Installing Oracle Database Enterprise Edition with the Wizard (page 8-10).
• Use SQL* Plus or another tool to check that the system user is able to connect to
the database remotely.
• Ensure that the minimum database parameters have been configured.
Validation Task 2: Verifying Database Parameter Configuration
Verify that the minimum database parameters have been configured.
Prerequisites
Make sure Validation Task 1: Validating the Database Installation has been
completed.
How to Verify the Configuration of Database Parameters
Review the initialization parameters listed in Table 8-1 (page 8-4) to those in
the installed database. Update any initialization parameters to meet minimum
requirements as necessary.
– Login to SQL*Plus using the sys as sysdba identity.
– Run either of the following commands.
To check a parameter value:
show parameter <parameter>
To update a parameter value:
alter system set <parameter> = <value>
For example:
alter system set processes = 1500 scope = SPFILE
Adding the scope directive writes the updated parameter value to the
database spfile. Restart the database to enable the change.
Expected Results
Chapter 8
Install the Oracle Fusion Applications Transaction Database
8-23

All initialization parameters should meet minimum specifications. The initialization
parameters are listed in Table 8–1. Check the release notes to see if any
parameters have been added.
Corrective Actions
Set initialization parameters to meet minimum requirements as needed.
• Run
opatch -lsinventory
on the database to verify that patches have been
applied according to the document for the specific platform.
Validation Task 3: Verifying Database Patching
Verify that all mandatory patches have been applied to the database.
Prerequisites
Make sure Validation Task 2: Verifying Database Parameter Configuration has
been completed.
How to Verify Database Patching
Check the database patches that have been installed against the list of patches in
Table 8-2 (page 8-8).
– Compare the patch list against the output of opatch lsinventory.
From the database
ORACLE_HOME
, run the command opatch lsinventory to get
a list of patches that have been applied to the database. In the following
example,
ORACLE_HOME
is set to the database home.
$ORACLE_HOME/OPatch/opatch lsinventory
The output from this command lists all patches applied to date.
Expected Results
All required patches must be installed, and all patch post-processing
tasks must be completed, as described in each individual patch README
document. The patch README text or HTML files are located in the top level
patch directory after the patch zip file has been unzipped.
Corrective Actions
Apply any patches that may have been overlooked, and confirm that all post-
processings tasks have been completed.
• Manual patch post-installation steps have been performed on all patches.
• The password policy has been defined and the passwords defined for the Oracle
Fusion Applications database schemas are in line with the policy.
• The file system directories for the DBA directories have been created on
the database server and are accessible (read-write) from all database nodes.
Specifically, check the directory paths assigned to the directory names
APPLCP_FILE_DIR
and
APPLLOG_DIR
in the
ALL_DIRECTORIES
database table
existing in the file system.
8.5 Oracle Fusion Applications RCU Installation Checklist
Before running the Oracle Fusion Applications RCU, verify the following checklist:
• Necessary infrastructure
Chapter 8
Oracle Fusion Applications RCU Installation Checklist
8-24

– Oracle Fusion Applications database is available and has passed post-install
validation.
– Access to the server console is provided for the OS user (VNC
recommended).
• Prerequisites for the host running the Oracle Fusion Applications RCU.
• Planning
– Oracle Fusion Applications Installation Workbook, Databases tab, FA
Transactional Database table has been filled out with information that is used
for the database installation.
– Passwords have been chosen for the Oracle Fusion Applications schemas.
8.6 Run the Oracle Fusion Applications RCU to Create
Oracle Fusion Applications Database Objects
The Oracle Fusion Applications Repository Creation Utility (Oracle Fusion Applications
RCU) is a self-sufficient tool that runs from a graphical interface or from the command
line. It creates applications-specific schemas and tablespaces for Oracle Database
Enterprise Edition or Oracle Real Application Clusters.
The Oracle Fusion Applications RCU components are included in the zipped Oracle
Fusion Applications RCU file delivered in the provisioning framework. The Oracle
Fusion Applications RCU offers these features:
• Integrates Oracle Fusion Middleware and Oracle Fusion Applications schema and
storage definitions using declarative XML.
• Runs locally or remotely as a standalone tool.
• Lets modify or use custom tablespaces for the default Oracle Fusion Applications
schemas.
• Performs checks against both global and component-level prerequisites at
runtime. If a prerequisite is not met, the Oracle Fusion Applications RCU may
issue a warning and allow the procedure to continue (soft stop), or it may notify
you that a prerequisite must be met (hard stop).
• Creates a resource plan, called
FUSIONAPPS_PLAN
, to manage Oracle Fusion
Applications queries. See Configure the Database Resource Manager in the
Oracle Fusion Applications Administrator’s Guide.
8.6.1 Functional Design
The Oracle Fusion Applications RCU is designed to:
• Be completely self-contained. It has all the technical components necessary to
perform the operations required (Oracle Client, binaries, scripts, data, and PL/SQL
packages).
• Support Oracle Database 12.1.0.2.0 and database configurations such as ASM
and Oracle RAC.
• Operate on remote databases.
• Connect to an existing database, read existing tablespace definitions, and create
schema owners and new tablespaces.
Chapter 8
Run the Oracle Fusion Applications RCU to Create Oracle Fusion Applications Database Objects
8-25

Some limitations of the Oracle Fusion Applications RCU are as follows:
• The database it runs on must be empty. If applications-related schemas already
exist, the option to modify them is grayed out.
• The Oracle Fusion Applications RCU does not provision delta schemas and does
not perform database upgrades.
• The Oracle Fusion Applications RCU supports the import of full schemas only.
• The Oracle Fusion Applications RCU does not support the dropping of a
component schema. However, drop the entire instance directly through the
database, if required.
8.6.2 How Does the Oracle Fusion Applications RCU Work?
Use the Oracle Fusion Applications RCU to create a repository of applications-specific
schemas and tablespaces for Oracle Database.
Internally, the Oracle Fusion Applications RCU performs actions related to Oracle
Fusion Middleware components and Oracle Fusion Applications components. In
addition, the utility takes appropriate action to see that the tables are enabled to store
repository resources.
Oracle Fusion Middleware Components
The Oracle Fusion Applications RCU loops through all the middleware components in
the component definition file and applies the relevant ones to the database. For each
component, the Oracle Fusion Applications RCU creates the appropriate middleware
tablespace and schema user. After creating the schema user, it defines the tables,
views, and other artifacts that the schema owner owns.
Oracle Fusion Applications Components
The Oracle Fusion Applications RCU creates empty tablespaces for the Oracle Fusion
Applications components. It then creates the schema owners (for example, FUSION
and FUSION_RUNTIME). These schema owners are initially empty — they do not own
any tables or data.
The Oracle Fusion Applications RCU employs Oracle Data Pump to import the seed
data and the dump files containing tables, views, and other artifact definitions that
belong to the schema users it has created. All dump files are packaged with the Oracle
Fusion Applications RCU.
XML Schema Registration
When tables are created as part of an XML schema registration, by default the tables
are enabled for hierarchy; that is, repository resources can be stored in the tables.
Several triggers are created for this purpose. If resources are created, updated, or
deleted based on the registered XML schema, the corresponding
XMLtype
rows in the
tables are inserted, updated, or deleted.
Tables are disabled for the hierarchy before they are exported in dumpfile mode
because some of the special features that make these tables store resources may not
be meaningful in the target database. Disabling the hierarchy drops some triggers so
that they do not show up in the target database after import of the dump files.
Chapter 8
Run the Oracle Fusion Applications RCU to Create Oracle Fusion Applications Database Objects
8-26

8.6.3 Run the Oracle Fusion Applications Repository Creation Utility
Using the Wizard
Use the information in this section to prepare to run the Oracle Fusion Applications
RCU and complete the wizard screens necessary to create schemas and tablespaces.
The Oracle Fusion Applications RCU is available only on Windows and Linux
platforms. For other platforms, such as Solaris, install and run the Oracle Fusion
Applications RCU from a Windows or Linux machine.
If there is a failure in the Oracle Fusion Applications RCU, see General
Troubleshooting Tips (page 9-1) to confirm if it is possible to restart the Oracle Fusion
Applications RCU. In some cases, it is necessary to start from the beginning by
installing an empty database or using the Database Configuration Assistant and then
running the Oracle Fusion Applications RCU.
8.6.3.1 Start the Oracle Fusion Applications RCU
After completing the steps in Getting Ready, run the Oracle Fusion Applications RCU
from (UNIX)
APPS_RCU_HOME/bin
or (Windows)
APPS_RCU_HOME\bin
with the following
command:
UNIX:
./rcu
Windows:
rcu.bat
The Oracle Fusion Applications RCU is available only on Linux and Windows
platforms. On Windows systems, do not extract the rcuHome_fusionapps_win.zip file
to a directory whose name contains spaces.
8.6.3.2 Wizard Screens and Instructions
Table 8-4 (page 8-27) lists the steps for running the Oracle Fusion Applications RCU.
For help with any of the screens, click Help.
Table 8-4 Running the Oracle Fusion Applications Repository Creation Utility
Screen Description and Action Required
Welcome
No action is necessary on this read-only screen. Click Skip this
Page Next Time to avoid showing this screen the next time the
Oracle Fusion Applications RCU is accessed.
Click Next to continue.
Create Repository
Select Create to create and load component schemas into the
database. See Schema and Password Requirements (page 4-25)
for a list of schemas.
Click Next to continue.
Database Connection
Details
Specify the database connection details. See Specify Database
Connection Details (page 8-31).
Click Next to continue.
Chapter 8
Run the Oracle Fusion Applications RCU to Create Oracle Fusion Applications Database Objects
8-27

Table 8-4 (Cont.) Running the Oracle Fusion Applications Repository Creation
Utility
Screen Description and Action Required
Select Components The Oracle Fusion Applications RCU retrieves the names of the
Oracle Fusion Middleware and the Oracle Fusion Applications
components. The schema owner names cannot be changed on
this screen. By default, all components are checked so that they
are included in the prerequisite check process. Click Next to
begin the process.
The Oracle Fusion Applications RCU verifies the global
prerequisites. When the progress bar reports 100 percent
complete and all prerequisites report a check mark, click OK.
Click Next to continue.
If the provisioning wizard is used to install the database using the
dbca template, the default values for the
disk_asynch_io
and
filesystemio_options
parameters are as follows:
disk_asynch_io
is set to TRUE
filesystemio_options
is set to the default value based
on the platform where the database is installed. It could
be either none, setall, asynch, or diskio. To verify that the
filesystemio_options
parameter is using the default value,
run the following query:
select isdefault from v$parameter where
name='filesystemio_options
If it returns TRUE, the default value is set.
If the parameter value is changed from the original default value
to another value, and then changed back to the original default
value, the default value still remains FALSE.
The following warning messages are displayed based on the
values set:
If
disk_asynch_io
is set to FALSE and
filesystemio_options
is set to the default value, a warning
message is displayed recommending setting the value for
disk_asynch_io
to TRUE.
If
disk_asynch_io
is set to FALSE and
filesystemio_options
is not set to the default value,
a warning message is displayed recommending setting the
value for
disk_asynch_io
to TRUE for the best performance
optimization.
Chapter 8
Run the Oracle Fusion Applications RCU to Create Oracle Fusion Applications Database Objects
8-28

Table 8-4 (Cont.) Running the Oracle Fusion Applications Repository Creation
Utility
Screen Description and Action Required
Schema Passwords To specify the passwords for main and additional (auxiliary)
schemas, select one of the following options:
•
Use same passwords for all schemas: Specify a single
password for both schemas. Retype to Confirm.
•
Use main schema passwords for auxiliary schemas:
Specify a different password to use for each main schema
and for the associated auxiliary schema. Only the main
schemas are visible. Retype the password to Confirm.
•
Specify different passwords for all schemas: Specify a
unique password for each main schema and its auxiliary
schema. All schemas are visible. Retype to Confirm.
Passwords must have a minimum length of eight characters and
contain alphabetic characters combined with numbers or special
characters.
Note the passwords that are entered. The passwords must be
supplied when the response file is created.
Click Next to continue.
Custom Variables Each Oracle Database directory object has a value represented
by a physical directory on the database server. Custom variables
are pre-defined, platform-specific directory objects that the
Oracle Fusion Applications RCU creates. In the Value column,
enter a pre-existing physical directory (located on the database
server) for each custom variable. See Manage Custom Variables
(page 8-31) for a list of variables.
Click Next to continue.
Map Tablespaces To start the tablespace create process without making any
changes, click Next on this screen. A message informs that any
tablespaces that do not already exist are created. Click OK to
continue. The Creating Tablespaces progress screen appears.
Click OK when the operation is completed.
However, before creating the tablespaces, the following
operations can be performed:
• Change Default and Temporary Tablespaces
• View and Change Additional Tablespaces
• Manage Tablespaces and Datafiles (add, modify, or remove)
See Map Tablespaces (page 8-33).
If changes are made, click Next when changes are completed,
then click OK to create the tablespaces. Click OK when the
operation is complete.
Summary
Review the information and click Create. If the information is
correct, click Create to begin creating schemas. The Oracle
Fusion Applications RCU displays the Repository Creation
Utility – Create screen, showing the schema creation process.
Typically, it takes 1 to 10 minutes to create each schema;
however, the process may run for an additional half hour or more.
A Clock indicates which schema creation is in progress. A
Check indicates that the schema has been created successfully.
To stop creating the schemas, click Stop.
Chapter 8
Run the Oracle Fusion Applications RCU to Create Oracle Fusion Applications Database Objects
8-29

Table 8-4 (Cont.) Running the Oracle Fusion Applications Repository Creation
Utility
Screen Description and Action Required
Completion Summary The names of the log files for each component are listed in the
Logfile column.
If problems are encountered during the Create operation, check
the log files for details. For more information about log files, see
Troubleshoot Database Installations (page 9-1).
If errors occur during the Create operation, or if a Create
operation fails for any component, the Cleanup for failed
components checkbox appears on this page and is selected
by default. If the checkbox is selected, the Oracle Fusion
Applications RCU automatically performs cleanup operations for
the components that failed. Click Close to dismiss the screen
and exit the Oracle Fusion Applications RCU.
8.6.3.2.1 Database Schema User Password Complexity Rules
For all Oracle Fusion Applications versions higher than Release 7 (11.1.7.0.0), Oracle
Fusion Applications Life Cycle Management installs a custom PL/SQL password
complexity checking function in the SYS schema. This password complexity checking
function enforces a uniform set of minimum password complexity rules for all
passwords in the database. This happens uniformly because the custom password
complexity function is associated with the DEFAULT profile, which is used directly
by most schemas in an FA database. The few schemas in an FA database that do
not use the DEFAULT profile have their PASSWORD_VERIFY_FUNCTION profile
attribute set to DEFAULT, which means the use of the rules defined in the DEFAULT
profile.
The password complexity requirements for all schemas in an FA database are the
following:
• Valid characters are: alphabetic (both upper and lower case), numeric, and special
($, #, or _). Special characters other than $, #, and _ are not allowed
• Minimum length is 8 characters.
• Maximum length is 30 characters.
• The password must start with an alphabetic character. Uppercase characters are
allowed but not required
• The password must contain at least one alphabetic character and either one
numeric or one special character.
• The password must differ from the previous password by at least three characters.
• Special-case checks:
– The password cannot be the same as the schema name or the schema name
with the numbers 1 through 100 appended.
– The password cannot be the same as schema name reversed.
– The password cannot be the same as the database name or the database
name with the numbers 1 through 100 appended.
Chapter 8
Run the Oracle Fusion Applications RCU to Create Oracle Fusion Applications Database Objects
8-30

– The password cannot be 'oracle' or 'oracle' with the numbers 1 through 100
appended.
– The password cannot be one of the following elements: 'welcome1',
'database1', 'account1', 'user1234', 'password1', 'oracle123', 'computer1',
'abcdefg1', 'change_on_install'.
Note:
All of the special-case checks above are case-insensitive.
You are also allowed to install your own password complexity checking function.
8.6.3.3 Specify Database Connection Details
Specify the following connection credentials:
• Database Type: Select the database type.
• Host Name: Enter the name of the node on which the database resides, for
example,
myhost.mydomain.com
. For Oracle RAC, specify the VIP name or one of
the node names as the host name.
• Port: Specify the listener port number for the database. The default port number is
1521.
• Service Name: This is the global database name. To obtain the service name,
see the
SERVICE_NAMES
parameter in the database initialization file. If the service
name is not in the database initialization file, use the global name in
DB_NAME
and
DB_DOMAIN
. For Oracle RAC, specify the service name of one of the nodes, for
example,
examplehost.exampledomain.com
.
Tip:
This value is available in the Oracle Fusion Applications Installation
Workbook, Database tab, FA Transactional Database table.
• User Name: Supply the name of the user with DBA or SYSDBA privileges. The
default user name with SYSDBA privileges is
SYS
.
• Password: Enter the password for the database user.
• Role: Select Normal or SYSDBA. All schemas installed for Oracle Database
require the
SYSDBA
role. For Oracle Internet Directory (OID) database schemas,
use
SYS
and
SYSDBA
.
8.6.3.4 Manage Custom Variables
Enter a pre-existing physical directory on the database server where the custom
variables for each component should be created.
• FUSIONAPPS_DBINSTALL_DP_DIR: The directory on the database server
where the
export_fusionapps_dbinstall.zip
is unzipped and the
otbi.dmp
file is
copied (see Make dmp Files Available on the Database Server (page 8-9)).
Chapter 8
Run the Oracle Fusion Applications RCU to Create Oracle Fusion Applications Database Objects
8-31
Tip:
This value is available in the Oracle Fusion Applications Installation
Workbook, Database tab, FA Transactional Database table, RCU
OTBI_DBINSTALL_DUMP_DIR row.
• APPLCP_FILE_DIR: Used by Oracle Enterprise Scheduler to store the log and
output files. This directory must be valid on the database server with read-write
permissions to the database owner. For Oracle RAC, must point to a location that
is shared across all nodes.
Tip:
This value is available in the Oracle Fusion Applications Installation
Workbook, Database tab, FA Transactional Database table, RCU
APPLCP_FILE_DIR row.
• APPLLOG_DIR: Location of the PL/SQL log files from Oracle Fusion Applications
PL/SQL procedures on the database server. Ensure that the database owner has
read-write privileges. For Oracle RAC, this value must point to the same location
that exists in each node or a location shared across all nodes.
Tip:
This value is available in the Oracle Fusion Applications Installation
Workbook, Database tab, FA Transactional Database table, RCU
APPLLOG_DIR row.
• OBIEE Backup Directory: Location of the Oracle Business Intelligence Enterprise
Edition dump files. These files are used for enabling a restart action.
MANDATORY: Directories must be manually created on the database server and
enter the full file path to the directories as the corresponding custom variable.
This value is available in the Oracle Fusion Applications Installation
Workbook, Database tab, FA Transactional Database table, RCU
FUSIONAPPS_PROV_RECOVERY_DIR row.
Secure Enterprise Search
• Do you have Advanced Compression Option (ACO) License? Yes (Y) or No
(N): Default is No.
• Do you have Oracle Partitioning option License? Yes (Y) or No (N): Default is
No.
Primary and Work Repository
Note: The default values are the only valid values. If any of these values is changed,
the ODI-related provisioning process does not work.
• Primary Repository ID: Default = 501
• Supervisor Password: Enter and confirm the ODI supervisor password.
Chapter 8
Run the Oracle Fusion Applications RCU to Create Oracle Fusion Applications Database Objects
8-32

• Work Repository Type: (D) Development or (R). Default = D
• Work Repository ID: Default = 501
• Work Repository Name: Default = FUSIONAPPS_WREP
• Work Repository Password: Enter and confirm the Work Repository supervisor.
Oracle Transactional BI
• Directory on the database server where Oracle Transactional Business
Intelligence import and export files are stored.
Tip:
This value is available in the Oracle Fusion Applications Installation
Workbook, Database tab, FA Transactional Database table, RCU
OTBI_DBINSTALL_DUMP_DIR row
Activity Graph and Analytics
• Install Analytics with Partitioning (Y/N): Default is N.
8.6.3.5 Map Tablespaces
Several operations can be performed from the Map Tablespaces screen including
view, add, modify, or remove tablespaces. These actions are also available for
additional tablespaces or datafiles.
8.6.3.5.1 Default Tablespace Mappings
In the Default Tablespace and Temp tablespace columns, click a cell to select from a
list of available additional tablespace names. The default tablespaces are as follows:
•
BIACMTS
: For Oracle BI Applications Configuration Manager tables.
•
FUSION_DYN_TS
: For dynamically generated PL/SQL statements.
•
FUSION_GRC
: Associated with Fusion Risk and Controls tables and indexes.
•
FUSION_GRC_TEMP
: For Fusion Risk and Controls temporary tables.
•
FUSION_IAS_ORASDPM_AQ
: For advanced queuing JMS data and indexes.
•
FUSION_RDF
: Associated with Oracle Spatial and Graph tables and indexes.
•
FUSION_TEMP
: For temporary tables.
•
FUSION_TS_AQ
: For advanced queuing JMS data and indexes.
•
FUSION_TS_ARCHIVE
: For tables and objects that are no longer used.
•
FUSION_TS_DQ
: For data quality data and indexes.
•
FUSION_TS_INTERFACE
: For temporary or interface data and indexes.
•
FUSION_TS_MEDIA
: Contains multimedia objects such as text, video, and graphics.
•
FUSION_TS_NOLOGGING
: For materialized views and other temporary or scratch pad
objects.
Chapter 8
Run the Oracle Fusion Applications RCU to Create Oracle Fusion Applications Database Objects
8-33

•
FUSION_TS_QUEUES
: For advanced queuing and dependent tables and indexes.
•
FUSION_TS_SEED
: For seed or reference data and indexes.
•
FUSION_TS_SUMMARY
: For summary management objects.
•
FUSION_TS_TOOLS
: Associated with Oracle Fusion Middleware data and indexes.
•
FUSION_TS_TX_DATA
: For transactional data.
•
FUSION_TS_TX_IDX
: Indexes for transactional data.
•
IAS_IAU
: For audit services data.
•
IAS_TEMP
: For audit services temporary data.
•
SEARCH_DATA
: For Secure Enterprise Search-related tables.
•
SEARCH_INDEX
: Indexes for Secure Enterprise Search-related tables.
•
SEARCH_TEMP
: For Secure Enterprise Search-related temporary tables.
•
SYSAUX
: Created automatically when the database is created to serve as an
auxiliary tablespace to the SYSTEM tablespace.
•
SYSTEM
: Created automatically when the database is created to contain the data
dictionary tables for the entire database.
For tablespaces that need to be created, the datafile defaults to
%DATAFILE LOCATION%
\%sid%\%tablespace_name%.dbf
. Selection from existing tablespaces is possible, if
they are already defined in the database.
8.6.3.5.2 Set the Size of Tablespace Datafiles
The default out-of-the-box Oracle Fusion Applications tablespace sizes are optimal.
To use different tablespace sizes, update the sizes of the tablespace (datafiles) on
the Manage Tablespaces screen, accessed from the Map Tablespaces screen in the
Oracle Fusion Applications RCU interface.
Due to a limitation in the framework used by Oracle Fusion Applications RCU, the size
for the tablespaces
FUSION_TS_TX_DATA
and
FUSION_TS_TX_IDX
from Oracle Fusion
Applications RCU cannot be updated because their respective datafile names exceed
29 characters. Thus, change manually the datafile size using SQL. For example, to
resize the datafile to 2000 MB, use:
ALTER DATABASE DATAFILE '<full file path
and file name of the datafile (file.dbf)>' RESIZE 2000M;
Table 8-5 (page 8-34) lists the sizes of the optimal and out-of-the-box tablespaces.
Make changes during the running of Oracle Fusion Applications RCU.
Table 8-5 Tablespace Optimal and OOTB Sizes
Tablespace Name # of
data
files
Name of datafile Size (MB)
per datafile
Optimal/
out-of- the-
box size
(MB)
FUSION_DYN_TS
1 fusion_dyn_01.dbf 20 20
FUSION_IAS_ORASDPM_AQ
1 fusion_ias_sdpmqa_01.d
bf
20 20
FUSION_TS_AQ
1 fusion_aq_01.dbf 200 200
Chapter 8
Run the Oracle Fusion Applications RCU to Create Oracle Fusion Applications Database Objects
8-34

Table 8-5 (Cont.) Tablespace Optimal and OOTB Sizes
Tablespace Name # of
data
files
Name of datafile Size (MB)
per datafile
Optimal/
out-of- the-
box size
(MB)
FUSION_TS_ARCHIVE
1 fusion_archive_01.dbf 20 20
FUSION_TS_DQ
1 fusion_dq_01.dbf 20 20
FUSION_TS_INTERFACE
1 fusion_interface_01.dbf 750 750
FUSION_TS_MEDIA
1 fusion_media_01.dbf 20 20
FUSION_TS_NOLOGGING
1 fusion_nologging_01.dbf 20 20
FUSION_TS_QUEUES
1 fusion_queues_01.dbf 20 20
FUSION_TS_SEED
2 fusion_seed_01.dbf and
fusion_seed_02.dbf
2048 and
1152
3200
FUSION_TS_SUMMARY
1 fusion_summary_01.dbf 20 20
FUSION_TS_TOOLS
4 fusion_tools_01.dbf -
fusion_tools_04.dbf
2048, 2048,
2048, 1556
7700
FUSION_TS_TX_DATA
3 fusion_transaction_table_
01.dbf -
fusion_transaction_table_
03.dbf
2048, 2048,
354
4450
FUSION_TS_TX_IDX
2 fusion_transaction_index
_01.dbf and
fusion_transaction_index
_02.dbf
2048 and
1352
3400
FUSION_RDF
1 fusion_rdf.dbf 20 20
FUSION_GRC
1 fusion_grc.dbf 20 20
FUSION_GRC_TEMP
1 fusion_grc_temp.dbf 20 20
8.6.3.5.3 Change Default and Temporary Tablespace Names
To change the default tablespace name for a component, select the name in the
Default Tablespace column. Then select the tablespace name from the list. Optionally,
assign components to use any number of default tablespaces.
To change a temporary tablespace for a component, select a tablespace name in the
Temp Tablespace column. Then, select the tablespace name from the list.
8.6.3.5.4 View and Change Additional Tablespaces
When components have additional tablespaces associated with their schemas, the
Additional Tablespaces button is active. Click this button to view or modify additional
tablespaces.
To change a tablespace, click in the Tablespace Name column and select the
tablespace from the list.
Click OK to continue.
Chapter 8
Run the Oracle Fusion Applications RCU to Create Oracle Fusion Applications Database Objects
8-35

8.6.3.5.5 Manage Tablespaces and Datafiles
Click Manage Tablespaces to add, modify, or remove tablespaces. Only tablespaces
that have not yet been created can be modified or removed. Existing tablespaces are
visible, but grayed out and cannot be modified or removed.
Only tablespaces used by a component are created. A new tablespace can be
specified, but unless it is used by a component, it is not created.
To edit a tablespace, select it from the navigation tree. Complete the following:
• Name: Specify a new name for the tablespace.
• Type: Indicate whether this tablespace is temporary or permanent.
• Block Size: The block size (in kilobytes) to be used for data retrieval.
• Storage Type: Select Use Bigfile Tablespace to use single large files. Select Use
Automatic Segment Space Management to use bitmaps to manage free space
within segments.
To Add a tablespace, specify the same details as for modifying one. Select a
tablespace from the navigation tree and click Remove to prevent it from being created.
Manage Datafiles
Click the Plus (+) icon and complete the Add Datafile details:
• File Name: The name of the datafile.
• File Directory: The location where the datafile resides.
• Size: The initial size of the datafile.
• Automatically extend datafile when full (AUTOEXTEND): Select this option to
extend the datafile size automatically when it becomes full. In the Increment field,
select the size by which the datafile should be increased.
• To limit maximum size, specify a value in the Maximum Size field.
Select a datafile and click the pencil icon. Modify the information on the Edit Datafile
screen. Select a datafile and click the X icon to delete the file.
Edit the Size of a Datafile
To change the size of a tablespace:
1. Click a tablespace name to select it.
2. Click the pencil icon to bring up the Edit Datafile screen.
3. In the Size field, enter a new file size. For tablespaces with multiple data files,
such as
FUSION_TS_TX_DATA
, delete the additional data files using the Remove
Data File icon (X).
4. Click OK when all the tablespaces have been configured to return to the Map
Tablespaces screen.
Click OK to dismiss the screen.
8.6.4 Oracle Fusion Applications RCU Post-Installation Checklist
After running the Oracle Fusion Applications RCU, complete the following tasks:
Chapter 8
Run the Oracle Fusion Applications RCU to Create Oracle Fusion Applications Database Objects
8-36

• Use SQL*Plus or another tool to verify that the Oracle Fusion Applications
schemas have been created. Run this SQL statement to get the list of schema
owners in the database instance. Ensure that the list contains all schema
owners listed in Table 4-5 (page 4-26) except the DVOWNER and DVACCTMGR
schemas:
select username from dba_users where default_tablespace not in
('SYSTEM','SYSAUX');
• Use SQL* Plus or another tool to verify that the Oracle Fusion Applications DBA
directories have been created. Run this SQL statement to get the list of defined
directory names:
select * from ALL_DIRECTORIES;
• Use SQL*Plus or another tool to verify the ability to connect as one of the Oracle
Fusion Applications schema users.
8.7 Next Steps
When the database installation is completed and the schema and tablespace
creation, follow the instructions in Troubleshoot Database Installations (page 9-1) to
troubleshoot any issues.
Chapter 8
Next Steps
8-37

9
Troubleshoot Database Installations
Follow the instructions described in this section if any issues are encountered during
database installation for Oracle Identity Management or Oracle Fusion Applications.
It also describes troubleshooting tips for the Oracle Fusion Middleware Repository
Creation Utility (used for Oracle Identity Management) and Oracle Fusion Applications
Repository Creation Utility operations.
This section contains the following topics:
• Troubleshoot the Oracle Identity Management Database Installation and Oracle
Fusion Middleware RCU Operations (page 9-1)
• Troubleshoot Oracle Fusion Applications Database Installation and Oracle Fusion
Applications RCU Operations (page 9-1)
• What to Do Next (page 9-7)
9.1 Troubleshoot the Oracle Identity Management Database
Installation and Oracle Fusion Middleware RCU Operations
For more information about troubleshooting Oracle Database, see Troubleshooting in
the Oracle Database Installation Guide for Linux.
For more information about troubleshooting the Oracle Fusion Middleware RCU,
see Troubleshooting Repository Creation Utility in the Oracle Fusion Middleware
Repository Creation Utility User's Guide.
9.2 Troubleshoot Oracle Fusion Applications Database
Installation and Oracle Fusion Applications RCU Operations
This section contains troubleshooting tips for database installation and the Oracle
Fusion Applications RCU operations. It is divided into sections for general tips and
sections about log files and cleanup features.
9.2.1 General Troubleshooting Tips
If an error is displayed during the creation of applications schemas and tablespaces,
take note of the following:
• Oracle Fusion Applications release notes may contain additional information about
this release, such as mandatory Oracle Database server and client patches that
must be applied to the environment.
• This release of Oracle Fusion Applications relies on specific system requirements
that are explained in Certification in the Oracle Fusion Applications Release Notes.
9-1

• If abnormal program termination is encountered and the error log displays:
Java
Exception: java.lang.StackOverflowError occurred
while installing Oracle
database, then see document id 1056200.1 at My Oracle Support.
• Ensure that the database is up and running.
• If there is a failure in the Oracle Fusion Applications RCU during the creation of
the tablespaces and loading of the Fusion schemas, start from the beginning by
installing an empty database or using the Database Configuration Assistant. There
is no drop option.
• Clean up these areas before redoing the installation. For information about the log
files, see Oracle Fusion Applications RCU Log Files (page 9-2).
– /tmp
– old log file directories
– /oraInventory folder contents
– ORACLE_HOME (or remove the ORACLE_HOME to re-use the directory)
• If incorrect information is entered on one of the Oracle Fusion Applications RCU
screens, use the navigation pane on the left side of the graphical interface to
return to that screen.
• If an error occurred while the Oracle Fusion Applications RCU was running:
1. Note the error and review the Oracle Fusion Applications RCU log files.
2. Correct the issue that caused the error. Depending on the type of error, either
continue with the operation or restart the Oracle Fusion Applications RCU.
3. Continue or restart the Oracle Fusion Applications RCU to complete the
desired operation.
9.2.2 Database Installation Log Files
The database installation log file reports what happened during each of the phases
in a database installation. Click a log file symbol on the Database Installation
Progress screen in the Provisioning Wizard to view the log file for that phase. Log files
are located in
tmp_directory
/
dbInstall
_
time_stamp
_
provtop/logs/provisioning
/
host. An example on a Linux platform is
/tmp/dbInstall_20120216092937_provtop/
logs/provisioning/host123
. The
tmp
directory may differ depending on what is
considered to be the temporary directory for various platforms. The location of the
plan file for the database flow is to tmp_directory/
dbInstall
_time_stamp_
provtop
/
dbInstall
_time_stamp.
plan
.
9.2.3 Oracle Fusion Applications RCU Log Files
Log files describe what happened during the schema and tablespace creation process,
including any failures that occurred. The main Oracle Fusion Applications RCU log
file (rcu.log) is written to (Linux)
APP_RCU_HOME/rcu/log/logdir.date_timestamp
or
(Windows)
APP_RCU_HOME\rcu\log\logdir.date_timestamp
. For example, the log file
on a Linux operating system is:
APP_RCU_HOME/rcu/log/logdir.2010-01-02_03-00/rcu.log
The custom_comp_create_tbs.log file lists the PL/SQL statements that created the
tablespaces.
Chapter 9
Troubleshoot Oracle Fusion Applications Database Installation and Oracle Fusion Applications RCU Operations
9-2

In the
fusionapps
schema, three types of log files are created:
• fusionapps.log: Lists the PL/SQL that was run.
• fusionapps_runimport.log: The Oracle Data Pump import log file.
• fusionapps_verify.log: Lists verification errors if objects created are not what was
expected.
In addition to the general log files, each component writes a log file of its own. The
file name is in the form of component_name.log. For example, the log file for the
BIAPPS_OTBI_RUNIMPORT
component is biapps_otbi_runimport.log. All component log
files are written to the same directory as the main log file.
The following list shows the log files in alphabetical order, by component name:
• biapps_otbi_runimport.log
• crm_fusion_mds_soa.log
• crm_fusion_soainfra.log
• fin_fusion_mds_soa.log
• fin_fusion_soainfra.log
• fmw_runtime.log
• fusion_activities.log
• fusionapps.log
• fusion_bia_cloud.log
• fusion_biplatform.log
• fusion_discussions.log
• fusion_edqconfig1.log
• fusion_edqconfig2.log
• fusion_edqfusion.log
• fusion_edqresults1.log
• fusion_edqresults2.log
• fusion_ero.log
• fusion_grc.log
• fusion_iau.log
• fusion_intg_current.log
• fusion_intg_final.log
• fusion_intg_previous.log
• fusion_ipm.log
• fusion_mds_ess.log
• fusion_mds.log
• fusion_mds_spaces.log
• fusion_ocserver11g.log
• fusion_odi.log
Chapter 9
Troubleshoot Oracle Fusion Applications Database Installation and Oracle Fusion Applications RCU Operations
9-3

• fusion_opss.log
• fusion_ora_ess.log
• fusion_orasdpls.log
• fusion_orasdpm.log
• fusion_orasdpsds.log
• fusion_orasdpxdms.log
• fusion_otbi.log
• fusion_portlet.log
• fusion_rdf.log
• fusion_ro.log
• fusion_social_cef.log
• fusion_social.log
• fusion_social_views.log
• fusion_webcenter.log
• hcm_fusion_mds_soa.log
• hcm_fusion_soainfra.log
• hed_fusion_mds_soa.log
• hed_fusion_soainfra.log
• lcm_exp_admin.log
• lcm_object_admin.log
• lcm_super_admin.log
• lcm_user_admin.log
• odi-seed.log
• oic_fusion_mds_soa.log
• oic_fusion_soainfra.log
• prc_fusion_mds_soa.log
• prc_fusion_soainfra.log
• prj_fusion_mds_soa.log
• prj_fusion_soainfra.log
• scm_fusion_mds_soa.log
• scm_fusion_soainfra.log
• searchsys.log
• setup_fusion_mds_soa.log
• setup_fusion_soainfra.log
• dvacctmgr.log
• dvowner.log
Chapter 9
Troubleshoot Oracle Fusion Applications Database Installation and Oracle Fusion Applications RCU Operations
9-4

9.2.4 Oracle Fusion Applications RCU Taking a Long Time
When installing all components, including the FUSIONAPPS component, Oracle
Fusion Applications RCU should complete in four hours or less. If it is running more
than four hours, you can safely cancel the run and perform the post-cancellation steps
described below.
Post-Cancellation Steps
Follow the steps and ensure each step is completed successfully. If any prerequisite is
not satisfied, do not proceed to the next step.
1. Verify that the Oracle Fusion Applications Apps RCU has completed importing the
data from the dump files. If you do not see the expected line in the log, do not
proceed and wait for this import to complete.
cd $RCU/rcu/log/logdir.YYYY-MM-DD.HH-MM
tail fusionapps_runimport.log
verify that the last line in the log has this:
> Job "SYS"."FUSIONDBJOB" completed with XX error(s) at
<day> HH:MM:SS YYYY elapsed 0 HH:MM:SS
2. Verify that Oracle Fusion Applications Apps RCU has completed the import
integrity check. If the integrity check log does not exist, do not proceed and wait
for the verification process to be completed. If there are errors, Oracle Fusion
Applications RCU will display the error in the UI.
cd $RCU/rcu/log/logdir.YYYY-MM-DD.HH-MM
ls fusionapps_verify.log
> fusionapps_verify.log
3. Stop the Oracle Fusion Applications Apps RCU. When you stop this run, the SQL
process that performs histogram optimization will be running in the background.
Proceed to the next step.
Click on "Stop" button
Click on "Yes" button when you get "Repository Creation Utility -
Warning"
dialog with the message "Do you want to stop the current operation?"
It may take a while for the stop operation to complete
Uncheck the box for "Cleanup for failed components"
Click on "Close" button
4. Perform these steps manually on the machine where the database is running.
Ensure that
$ORACLE_HOME
and
$ORACLE_SID
are set correctly to connect to the
database.
a. Recompile database packages.
cd $RCU/integration/fusionapps/sql
$ORACLE_HOME/bin/sqlplus "/as sysdba"
> @fusionapps_recompile_packages
> exit
Chapter 9
Troubleshoot Oracle Fusion Applications Database Installation and Oracle Fusion Applications RCU Operations
9-5

b. Update FND tablespaces.
cd $RCU/fusionapps/sql
$ORACLE_HOME/bin/sqlplus "/as sysdba"
> @fusionapps_update_fnd_tablespaces FUSION_TS_TX_DATA
FUSION_TS_TX_DATA
FUSION_DYN_TS FUSION_DYN_TS FUSION_IAS_ORASDPM_AQ
FUSION_IAS_ORASDPM_AQ
FUSION_TS_AQ FUSION_TS_AQ FUSION_IAS_ORASDPM_AQ
FUSION_IAS_ORASDPM_AQ FUSION_TS_ARCHIVE FUSION_TS_ARCHIVE
FUSION_TS_DQ FUSION_TS_DQ FUSION_TS_INTERFACE
FUSION_TS_INTERFACE
FUSION_TS_MEDIA FUSION_TS_MEDIA FUSION_TS_NOLOGGING
FUSION_TS_NOLOGGING
FUSION_TS_QUEUES FUSION_TS_QUEUES FUSION_TS_SEED FUSION_TS_SEED
FUSION_TS_SUMMARY FUSION_TS_SUMMARY FUSION_TS_TOOLS
FUSION_TS_TOOLS
FUSION_TS_TX_IDX FUSION_TS_TX_IDX
> exit
Verify the command completes with a "PL/SQL procedure successfully
completed." message. If you get a different message indicating any error,
review it and contact Oracle support to resolve the issue.
c. Register Oracle Fusion Applications RCU components in the database.
$ORACLE_HOME/bin/sqlplus "/as sysdba"
> update schema_version_registry set status="VALID" where
comp_id in
> ('FUSIONAPPS', 'FUNCTIONAL_SETUP_MANAGER', 'TOPOLOGY_MANAGER');
Verify the command completes with a "3 rows updated" message. If you get a
different message, contact the Oracle support.
d. Verify that Fusion Oracle Applications RCU components are registered
properly.
$ORACLE_HOME/bin/sqlplus "/as sysdba"
select comp_id, status from schema_version_registry where
comp_id in
('FUSIONAPPS', 'FUNCTIONAL_SETUP_MANAGER', 'TOPOLOGY_MANAGER');
Verify the output is:
COMP_ID STATUS
------------------------------ -----------
FUNCTIONAL_SETUP_MANAGER VALID
FUSIONAPPS VALID
TOPOLOGY_MANAGER VALID
Chapter 9
Troubleshoot Oracle Fusion Applications Database Installation and Oracle Fusion Applications RCU Operations
9-6

9.2.5 Preverification Failure (UNIX)
The following errors might be ecountered while running the preverification phase on
Unix systems:
PRODUCTFAMILY=dbserver!PRODUCT=RDBMS_11gR2!TASK=Checking pre-req files
and directories!TASKID=dbserver.RDBMS_11gR2.NONE.preverify.NONE!MESSAGE=!
DETAIL=After validating the patch directory, $REPOSITORY/installers/
database/patch', it has been determined that no patches will be applied
during this install|Opatch Directory Validation Requires:| (1)$REPOSITORY/
installers/database/patch must be a valid DIRECTORY|(2) $REPOSITORY/
installers/database/patch must contain NO FILES, only subdirectories|(3)
Patches must be unzipped in $REPOSITORY/installers/database/patch
Solution: Ignore the error and proceed with the database installation.
9.2.6 Preverification Failure (Solaris)
During provisioning, the preverify phase (target) may display a message that some
of the Solaris operating system (version 9 and 10) patches are missing. On Solaris
x86-64, the following preverify failures may be reported:
WARNING: Check:Patches failed.
Checking for 127111-02; Not found. Failed <<<<
Checking for 137111-04; Not found. Failed <<<<
These failure messages can be ignored.
9.2.7 Using the Cleanup Feature
If there is a failure in creation of the tablespaces or schemas for any component, the
Cleanup for failed components checkbox appears on the Completion Summary
screen. Select this option to clean up tablespaces and schemas for the failed
components.
If an environment (such as the database server) is running out of space, correct it
and rerun the software. Any components that are not applied successfully are still
enabled (not grayed out) in the interface. Rerun the Oracle Fusion Applications RCU
as described in Run the Oracle Fusion Applications RCU to Create Oracle Fusion
Applications Database Objects (page 8-25).
9.3 What to Do Next
Follow the instructions in Oracle Identity Management Provisioning (page 10-1) to
create a response file and provision an Oracle Identity Management environment.
Chapter 9
What to Do Next
9-7

10
Oracle Identity Management Provisioning
This section describes the tasks that must be completed to implement Oracle Identity
Management Provisioning for both the Single Host and Enterprise (EDG) topologies.
The Single Host topology is recommended only for test environments, whereas the
Enterprise topology, which is more complex, is suitable for staging, QA, and production
deployments.
This section contains the following topics:
• Introduction to Oracle Identity Management Provisioning (page 10-1)
• Create an Oracle Identity Management Provisioning Profile (page 10-2)
• Provision an Oracle Identity Management Environment (page 10-13)
• Perform Oracle Identity Management Provisioning (page 10-16)
• Perform Provisioning by Running the Provisioning Commands (page 10-16)
• Monitor Provisioning Using the Oracle Identity Management Provisioning Wizard
(page 10-17)
• Perform Mandatory Oracle Identity Management Post-Installation Tasks
(page 10-23)
• Validate Provisioning (page 10-24)
• Manage the Topology for an Oracle Identity Management Enterprise Deployment
(page 10-26)
• What to Do Next (page 10-30)
10.1 Introduction to Oracle Identity Management
Provisioning
The Oracle Identity Management Provisioning Wizard and related tools were
developed to automate Oracle Identity Management Provisioning and reduce the time
required to configure Oracle Identity Management for Oracle Fusion Applications.
MANDATORY: All server machines in an Oracle Identity Management Provisioning
environment must be running the same operating system major version and patch
level. Heterogeneous operating system deployments are not supported.
Before provisioning Oracle Identity Management, ensure that the following tasks have
been completed:
1. Follow the instructions in Install the Oracle Identity Management and Oracle
Fusion Applications Provisioning Frameworks (page 6-1), and successfully install
the Oracle Identity Management Provisioning framework.
2. Create an Oracle Identity Management provisioning profile as described in Create
an Oracle Identity Management Provisioning Profile (page 10-2).
The Oracle Identity Management Provisioning process itself consists of two tasks:
10-1

1. Running the Oracle Identity Management Provisioning Wizard, a graphical
user interface that uses an interview process to gather information about the
environment and store it in a Provisioning Response file. This task is described in
Monitor Provisioning Using the Oracle Identity Management Provisioning Wizard
(page 10-17).
2. Executing command-line tools to set up the environment on the selected host
machines. In many cases, the progress of the command-line tools can be
monitored by using the wizard. This task is described in Perform Provisioning by
Running the Provisioning Commands (page 10-16).
After provisioning, perform the tasks in Perform Mandatory Oracle Identity
Management Post-Installation Tasks (page 10-23).
10.2 Create an Oracle Identity Management Provisioning
Profile
Before performing provisioning, provide information about the topology to the Oracle
Identity Management Provisioning Wizard. Once all the necessary input has been
provided, the wizard creates a provisioning file called
provisioning.rsp
that is used
to perform the provisioning operation.
Even if a single node install is selected, the screens in the Oracle Identity
Management Provisioning Wizard show multinode items such as Virtual Host
Configuration and Load Balancer Configuration. Ignore the unused fields.
Before running the provisioning tool, set the following environment variables:
• Set
JAVA_HOME
to:
REPOSITORY_LOCATION/jdk
• On UNIX systems, set the
DISPLAY
environment variable to an active and
authorized display.
To start the Oracle Identity Management Provisioning Wizard, execute the following
commands from:
IDMLCM_HOME/provisioning/bin
, where
IDMLCM_HOME
is the place
where the Oracle Home Directory for Oracle Identity Management was installed, using
the installation script for the Oracle Identity Management Provisioning Wizard and
Oracle Identity Management Patching Tools, as described in Install the Oracle Identity
Management Lifecycle Tools (page 6-2).
Linux or UNIX:
./idmProvisioningWizard.sh
idmProvisioningWizard.bat
When the wizard starts, proceed as described in the following sections:
• Welcome Page (page 10-3)
• Specify Inventory Directory Page (page 10-3)
• Identity Management Installation Options Page (page 10-3)
• Specify Security Updates Page (page 10-3)
• Product List Page (page 10-3)
• Response File Description Page (page 10-4)
Chapter 10
Create an Oracle Identity Management Provisioning Profile
10-2

• Install Location Configuration Page (page 10-4)
• Node Topology Configuration Page (page 10-5)
• Virtual Hosts Configuration Page (page 10-6)
• Common Passwords Page (page 10-7)
• OID Configuration Page (page 10-7)
• ODSM Configuration Page (page 10-8)
• OHS Configuration Page (page 10-8)
• OAM Configuration Page (page 10-9)
• IDM DB Configuration Page (page 10-10)
• Load Balancer Page (page 10-11)
• Summary Page (page 10-13)
10.2.1 Welcome Page
Use the Welcome page to learn more about the wizard, including some prerequisites
for using it.
The Welcome page provides a brief overview of the wizard and lists some
requirements that must be met.
Click Next to continue.
10.2.2 Specify Inventory Directory Page
If the Specify Inventory Directory page is presented, proceed as described in Step 2 in
Install the Oracle Identity Management Lifecycle Tools (page 6-2).
Click OK to continue.
10.2.3 Identity Management Installation Options Page
Select Create a New Identity Management Environment Provisioning Response
File to create a response file for the first time.
Update an Existing Identity Management Environment Provisioning Response
File is not supported.
Click Next to continue.
10.2.4 Specify Security Updates Page
The checkbox should be unchecked, as this feature is not supported.
Click Next to continue.
10.2.5 Product List Page
The Product List page is purely informational. It displays the list of products that are
installed and configured by the Oracle Identity Management Provisioning Wizard.
Chapter 10
Create an Oracle Identity Management Provisioning Profile
10-3

Click Next to continue.
10.2.6 Response File Description Page
Specify descriptive information to identify this response file. This description is not
associated in any way with the executable plan file, or the summary file, saved at the
end of the response file creation process.
• Response File Name: The Oracle Identity Management Provisioning Wizard
provides the default title Oracle Identity Management Provisioning Response File.
This file can be changed.
• Response File Version: The Oracle Identity Management Provisioning Wizard
provides a default value, which can be change. Use this to keep track of different
file versions.
• Created By: Defaults to the operating system user who invoked the Provisioning
Wizard. Set when the response file is initially created and cannot be modified for
the current response file.
• Created Date: Defaults to the date that the response file was initially created. Set
when the response file was initially created and cannot be modified for the current
response file.
• Response File Description: Provide a description of this response file. This is an
optional field.
Click Next to continue.
10.2.7 Install Location Configuration Page
Use the Install Location Configuration page to supply the location of the various
directories required for installation and configuration actions.
Installation and Configuration
• Software Repository Location: Specify the location of the software repository,
either by typing it in the field or by clicking the Browse button, navigating to
the desired location, and selecting it. This location must contain a folder named
installers
, which contains the software to install.
Tip:
This value is available in the Oracle Fusion Applications Installation
Workbook, Storage tab, Temporary Shared Storage table,
Provisioning Repository Location row.
• Software Installation Location: Specify the location on shared storage for the
Middleware Homes, either by typing it in the field or by clicking the Browse button,
navigating to the desired location, and selecting it. In a multinode scenario, this
folder must be shared across all machines.
Ensure that this directory path is 45 characters or fewer in length. A longer path
name can cause errors during Oracle Identity Management provisioning.
Chapter 10
Create an Oracle Identity Management Provisioning Profile
10-4
Tip:
This value is available in the Oracle Fusion Applications Installation
Workbook, Storage tab, Install Directories table, IDM Software
Installation Location row.
• Shared Configuration Location: Specify the shared configuration location, either
by typing it in the field or by clicking the Browse button, navigating to the desired
location, and selecting it.
In a single host environment, the shared configuration location is not actually
shared.
For the Enterprise topology, this is where the artifacts to be shared across all
hosts, such as keystores, scripts to start/stop services, and life cycle management
information, are created. In a multi-node scenario, this folder must be shared
across all machines.
Tip:
This value is available in the Oracle Fusion Applications Installation
Workbook, Storage tab, Install Directories table, IDM Shared
Configuration Location row.
• Enable Local Configuration Location: Select this option only when provisioning
the Enterprise topology.
Depending on the decision made during the planning phase this option is available
in the Oracle Fusion Applications Installation Workbook, Storage tab, Install
Directories table, IDM Local Configuration Location row. If the value is not
specified in the Oracle Fusion Applications Installation Workbook, clear this
checkbox.
– Local Configuration Location: Specify the location for the local domain
directory to be set up, either by typing it in the field or by clicking the Browse
button, navigating to the desired location, and selecting it. This field is required
if the option Enable Local Applications Configuration is selected. The
specified directory must initially be empty. This folder should not be shared
across hosts.
Tip:
This value is available in the Oracle Fusion Applications Installation
Workbook, Storage tab, Install Directories table, IDM Local
Configuration Location row.
Click Next to continue.
10.2.8 Node Topology Configuration Page
Use the Node Topology Configuration page to select configuration options and provide
information about hosts and products.
Chapter 10
Create an Oracle Identity Management Provisioning Profile
10-5

Tip:
This value is available in the Oracle Fusion Applications Installation
Workbook, Environment tab, Environment Info table, IDM Topology Type
row.
• Single Host: Select to provision a simple, single host topology. This topology is
recommended only for test and development environments.
– Host Name: Specify the host where Oracle Identity Management is
provisioned, as a fully-qualified host name.
• EDG Topology: One Node: Select to install Oracle Identity Management on a
single host.
– Product(s): This field cannot be edited. It specifies the product that be
installed and configured on the host.
– Host Name: Specify each host where the corresponding product is
provisioned, as a fully-qualified host name.
• EDG Topology: Two Node: Select to provision a multiple host topology. This
option configures two instances of the product. Selecting this option provisions a
highly-available environment.
– Product(s) - First and Second Instance: This field cannot be edited and
specifies the instance of the product that is installed and configured on the
host.
– Host Name: Specify the host where the first and second instance of these
applications are provisioned, as a fully-qualified host name. To install Oracle
Identity Management on a single host, specify the same host name for all
instances.
Tip:
This value is available in the Oracle Fusion Applications Installation
Workbook, Topology tab:
* Abstract Hostname (or real Hostname if no Abstract) from
Topology table row that matches the following components:
* IDM Directory
* IDM Identity and Access
* IDM WebTier
Click Next to continue.
10.2.9 Virtual Hosts Configuration Page
Use the Virtual Hosts Configuration page to select virtual host configuration options. If
Single Host is selected, the Virtual Hosts Configuration page cannot be edited.
Chapter 10
Create an Oracle Identity Management Provisioning Profile
10-6

Associate the Administration Server, Oracle Identity Manager and Oracle SOA Suite
servers with virtual IP addresses. If Configure second application instances is
selected on the Node Topology Configuration page, having a virtual IP address allows
the Administration Server to be started on a different host if the primary host fails.
Virtual IP addresses and virtual host names are required to enable server migration
on Oracle Identity Manager andOracle SOA Suite servers. Server migration must be
configured for the Oracle Identity Manager and Oracle SOA Suite managed servers for
high availability.
Specify the configuration settings for the virtual hosts required by Oracle Fusion
Applications.
• Configure Virtual Hosts?: Select to configure virtual hosts.
• Server: Identifies each server.
• Virtual Host Name: Specify the virtual host name for the server.
Tip:
The value for the Admin Server is available in the Oracle Fusion
Applications Installation Workbook, Network - Virtual Hosts tab,
AdminServer Virtual Hosts/VIPs table, IDMDomain AdminServer row.
For the Enterprise topology, specify the virtual host name from the
Oracle Fusion Applications Installation Workbook for each managed
server in the topology. For example:
Admin Server:
ADMINVHN.mycompany.com
Click Next to continue.
10.2.10 Common Passwords Page
Use the Common Passwords page to select a common password.
• Common Identity Management Password: Specify a password to be used for all
administrative users in the Oracle Identity Management Suite and for keystores.
The password must be at least eight characters long and must contain at least one
uppercase letter and at least one number.
• Confirm Common Identity Management Password: Reenter the password.
Click Next to continue.
10.2.11 OID Configuration Page
Use the OID Configuration page to select configuration options for Oracle Internet
Directory.
Oracle Internet Directory Configuration Parameters
Identity Store Realm DN: Specify the Distinguished Name of the Oracle Internet
Directory realm, for example:
dc=mycompany,dc=com
.
Chapter 10
Create an Oracle Identity Management Provisioning Profile
10-7

Tip:
This value is available in the Oracle Fusion Applications Installation
Workbook, Identity Management tab , LDAP table, Identity Store Realm
DN row.
Authentication Directory Type
Select one of the following authentication directories:
• Oracle Internet Directory
• Oracle Virtual Directory
Click Next to continue.
10.2.12 ODSM Configuration Page
Use the ODSM Configuration page to select configuration options for Oracle Directory
Services Manager (ODSM). Information about the second host appears on the page
for EDG topology or if Configure Second Instances Topology was selected in the Node
Topology Configuration Page (page 10-5).
• ODSM Host: This field is purely informational. The value is determined by the host
entered in the Node Topology Configuration Page (page 10-5).
• Port: Specify the port to be used by the first ODSM instance.
Tip:
This value is available in the Oracle Fusion Applications Installation
Workbook, Network - Ports tab, Identity Management Port Numbers
table, IDMDomain ODSM row.
• Second ODSM Host: This field is purely informational. The value is determined by
the host entered in the Node Topology Configuration Page (page 10-5).
• Second ODSM Port: Specify the port to be used by the second ODSM instance.
Click Next to continue.
10.2.13 OHS Configuration Page
Use the OHS Configuration page to change the installation ports used for Oracle
HTTP Server (OHS). Information about the second host appears on the page
only if Configure Second Instances Topology was selected in the Node Topology
Configuration Page (page 10-5).
Oracle HTTP Server for Identity Management Configuration Parameters
• Host: This field is purely informational. The value is determined by the host
entered in the Node Topology Configuration Page (page 10-5).
• Port: Specify the non-SSL port number to be used for the first instance of the
Oracle HTTP Server.
Chapter 10
Create an Oracle Identity Management Provisioning Profile
10-8
Tip:
This value is available in the Oracle Fusion Applications Installation
Workbook, Network - Ports tab, Identity Management Port Numbers
table, IDM Oracle HTTP Server row.
• SSL Port: Specify the SSL port number to be used for the first instance of the
Oracle HTTP Server.
Tip:
This value is available in the Oracle Fusion Applications Installation
Workbook, Network - Ports tab, Identity Management Port Numbers
table, IDM Oracle HTTP Server SSL row.
• Instance Name: This field is purely informational. It displays the instance name of
the first Oracle HTTP Server.
• Second OHS Host: This field is purely informational. The value is determined by
the host entered in the Node Topology Configuration Page (page 10-5).
• Second OHS Port: Specify the non-SSL port number to be used for the second
instance of the Oracle HTTP Server.
• Second OHS SSL Port: Specify the SSL port number to be used for the second
instance of the Oracle HTTP Server.
• Second Instance Name: This field is purely informational. It displays the instance
name of the second Oracle HTTP Server.
• Protocol: This field is purely informational.
Click Next to continue.
10.2.14 OAM Configuration Page
Use the OAM Configuration page to select installation options for Oracle Access
Manager. Information about the second host appears on the page only if Configure
Second Instances Topology was selected in the Node Topology Configuration Page
(page 10-5).
Oracle Access Manager Configuration Parameters
• OAM Host: This field is purely informational. The value is determined by the host
entered in the Node Topology Configuration Page (page 10-5).
• OAM Port: Specify the port number of the first instance.
Tip:
This value is available in the Oracle Fusion Applications Installation
Workbook, Network - Ports tab, Identity Management Port Numbers
table, IDMDomain OAM row.
Chapter 10
Create an Oracle Identity Management Provisioning Profile
10-9
• Second OAM Host: This field is purely informational. The value is determined by
the host entered in the Node Topology Configuration Page (page 10-5).
• Second OAM Port: Specify the port number of the second instance.
• OAM Transfer Mode: Specify the transfer mode to be used by Oracle Access
manager. This must be
Simple
on all platforms.
Tip:
This value is available in the Oracle Fusion Applications Installation
Workbook, Identity Management tab, OAM table, OAM Transfer Mode
row.
16708977
• Cookie Domain: Specify the cookie domain. For example:
.mycompany.com
Tip:
This value is available in the Oracle Fusion Applications Installation
Workbook, Environment tab, Environment Info table, Domain name
row.
Click Next to continue.
10.2.15 IDM DB Configuration Page
The same database instance is used but pass the two distinct service names created:
one service name for OID and another for OAM.
Use the IDM DB Configuration page to enter information about the database that
contains the schemas for Oracle Internet Directory and Oracle Access Manager.
OID Schema Details
• Service Name: Specify the service name of the database service, for example:
oiddb.mycompany.com
• Schema User Name: This field specifies the name of the schema user,
ODS
. This
name cannot be changed.
• Schema Password: For creating the ODS schema, specify the password used
when creating the Oracle Internet Directory schema using the Oracle Fusion
Middleware RCU.
OAM Schema Details
• Service Name: Specify the service name of the database service, for example:
oamdb.mycompany.com
.
• Schema User Name: This field specifies the name of the schema user,
FA_OAM
.
This name cannot be changed.
Chapter 10
Create an Oracle Identity Management Provisioning Profile
10-10

• Schema Password: For creating the FA_OAM schema, specify the password
used when creating the Oracle Internet Directory schema using the Oracle Fusion
Middleware RCU.
Single DB: Select if a single Oracle Database is used.
• Host VIP Name: Specify the host name of the Oracle Database.
• Listener Port: Specify the database listener port.
RAC DB: Select if an Oracle RAC Database is used.
• Host VIP Name: Specify the host name of the RAC database instance.
• Listener Port: Specify the database listener port.
• Instance Name: Specify the database instance name, for example, idmdb1.
Click Next to continue.
10.2.16 Load Balancer Page
The Load Balancer page is editable only if the EDG topology option has been
selected.
The Load Balancer page is arranged in the following sections:
• HTTP/HTTPS Load Balancer Details
• LDAP Load Balancer Details
HTTP/HTTPS Load Balancer Details
The HTTP/HTTPS Load Balancer Details section of the Load Balancer Configuration
page enables to enter configuration information about the HTTP/HTTPS Load
Balancer.
• Configure LBR Endpoints: Select this option to configure the Admin, Internal
Callbacks, and SSO LBR endpoints for a single-node topology.
In a three-node topology, the Configure LBR Endpoints option is selected by
default. In a six-node enterprise deployment topology, the option is selected by
default and cannot be deselected.
• Endpoint: This column lists the HTTP/HTTPS Load Balancer endpoints. These
are:
– Admin: Admin Virtual Host, for example:
admin.mycompany.com
Tip:
This value is available in the Oracle Fusion Applications Installation
Workbook, Network - Virtual Hosts tab, HTTP LBR Endpoints
table, IDM Admin row, Internal Name and Internal Port columns.
– Internal Callbacks: Internal call back virtual host, for example:
Identity
Managementinternal.mycompany.com
Chapter 10
Create an Oracle Identity Management Provisioning Profile
10-11
Tip:
This value is available in the Oracle Fusion Applications Installation
Workbook, Network - Virtual Hosts tab, HTTP LBR Endpoints
table, IDM row, Internal Name and Internal Port columns.
– SSO: Main application entry point, for example:
sso.mycompany.com
.
Tip:
This value is available in the Oracle Fusion Applications Installation
Workbook, Network - Virtual Hosts tab, HTTP LBR Endpoints
table, IDM row, External Name and External Port columns.
• Virtual Host Name: Specify the virtual host name that corresponds with this
endpoint. Examples are shown in the Endpoint descriptions.
• Port: Specify the port used by the endpoint. This port is either HTTP or HTTPS,
depending on whether the SSL box is checked or not.
If the Configure LBR Endpoints option has not been selected, the virtual host
name and port for the three endpoints are automatically populated with the Oracle
HTTP Server host name and port 7777.
• SSL: Select this box if this endpoint uses SSL. This box is editable only for Admin
endpoint.
Tip:
This value is available in the Oracle Fusion Applications Installation
Workbook, SSL and Certificates tab, SSL Communication table, End
User - -> IDM Admin HTTP Endpoint row.
LDAP Load Balancer Details
The LDAP Load Balancer Details section of the Load Balancer Configuration page
enables to enter configuration information about the LDAP Load Balancer.
The OID Endpoint for Identity Store field is not editable because the Identity Store
and Policy Store is the same Oracle Internet Directory. See Identity Store Planning
(page 4-30).
Tip:
This value is available in the Oracle Fusion Applications Installation
Workbook, Network - Virtual Hosts tab, LDAP Endpoints table.
• Endpoint: This column lists the LDAP Load Balancer endpoints.
Chapter 10
Create an Oracle Identity Management Provisioning Profile
10-12

• Virtual Host Name: Specify the virtual host name that corresponds with this
endpoint.
• Port: Specify the port used by the endpoint.
• SSL Port: Specify the SSL port used by the endpoint.
Click Next to continue.
10.2.17 Summary Page
Use the Summary page to view a summary of the selections and enter additional
information.
• Response File Name: Provide the name of the response file to be created.
• Provisioning Summary: Provide the name of the provisioning summary file to be
created.
• Directory: Specify the directory to save the Provisioning Response File in.
10.2.18 Copy Required Files to DMZ Hosts
The process described in this section creates a provisioning file in the directory
specified on the Summary screen in the Summary Page (page 10-13). This
process also creates a folder named
responsefilename_data
, for example:
provisioning_data
. This folder contains
cwallet.sso
, which has encryption and
decryption information.
The provisioning response file and the folder containing
cwallet.sso
must be
available to each host in the topology. If a shared provisioning directory exists,
then these files are automatically available. If, however, the deployment directory
has not been shared, perform a manual copy of the deployment response file
(
provisioning.rsp
) and the folder containing
cwallet.sso
(
provisioning_data
) to
the same location on the DMZ hosts, WEBHOST1 and WEBHOST2.
WARNING: If the deployment response file and the folder containing
cwallet.sso
are
not copied to the DMZ hosts, the deployment process might fail in the preverify phase.
10.3 Provision an Oracle Identity Management Environment
After creating the provisioning response file, use it to provision an Oracle Identity
Management environment.
There are eight stages to provisioning. These stages must be run in the following
order:
1. Preverify - This checks that each of the servers being used in the topology
satisfies the minimum requirements of the software being installed and configured.
2. Install - This installs all of the software and related patches present in Provisioning
Repository.
3. Preconfigure - This does the following:
• Creates OID and seeds it with Users/Groups.
• Configures ODSM
• Creates the WebLogic Domain
Chapter 10
Provision an Oracle Identity Management Environment
10-13

• Creates OHS instance
4. Configure - This does the following:
• Starts managed servers as necessary
• Associates OAM with OID
5. Configure-Secondary - This does the following:
• Integrates Weblogic Domain with Web Tier
• Register Web Tier with domain
6. Postconfigure - This does the following:
• Register OID with Weblogic Domain
• SSL Enable OID
• Tune OID
• Generate OAM Keystore
• Configure OIF
• Configure WebGate
7. Startup - This starts up all components in the topology
8. Validate - This performs a number of checks on the built topology to ensure that
everything is working as it should be.
Specify the stage using the
-target
option to the
runIDMProvisioning.sh
or
runIDMProvisioning.bat
command. Each stage must be completed before the next
stage can begin. Failure of a stage necessitates a cleanup and restart.
It is important to take a backup of the filesystems and databases at the following
points:
1. Prior to starting provisioning.
2. At the end of the installation phase.
3. Upon completion of provisioning
It is not possible to restore a backup at any phase other than those three.
Provisioning is accomplished by using either the command line or the Oracle Identity
Management Provisioning Wizard.
10.3.1 Processing Order
Process hosts in the following order. Each provisioning phase needs to be run only
once on each host, even if multiple products are configured on a single host.
1. LDAP Host 1
2. LDAP Host 2 (if using the EDG topology with the Configure second application
instances option)
3. Identity and Access Management Host 1
4. Identity and Access Management Host 2 (if using the EDG topology with the
Configure second application instances option)
5. Web Host 1
Chapter 10
Provision an Oracle Identity Management Environment
10-14

6. Web Host 2 (if using the EDG topology with the Configure second application
instances option)
10.3.2 Installation Phase Actions for Oracle Identity Management
Components
During installation, the Provisioning Wizard performs actions that are associated
with the Oracle Identity Management components previously installed. This section
contains a summary of those actions, arranged by the installation phase where the
action is performed.
Provisioning phases
The wizard performs the following actions:
• Preverify phase
Verifies the existence of the system administrators group (if it was declared as
existing during the wizard interview) and the existence of the designated super
user in the identity store.
• Preconfigure phase
Prepares the Oracle Identity Management components for configuring as follows:
– Uploads the LDIF files to the identity store. These files contain entries that
represent the application administrator groups used to update the identity
store.
– Creates the system administrator group (according to what is indicated in the
interview).
– Makes the super user a member of the administrators group and all the
application family directory groups.
– Seeds the bootstrap of
AppID
and gives it membership in the system
administrator group.
• Configure phase
Configures the Oracle Identity Management components as follows:
– Creates the Oracle Fusion Applications domains using the default Oracle
WebLogic Server template, with the bootstrap
AppID
as an administrator.
– Disables the default authenticator and enables the LDAP authenticator.
– Starts the Oracle WebLogic Server domain using the bootstrap
AppID
.
• Postconfigure phase
Following configuration, the system administrator groups are assigned the
appropriate enterprise roles at the product family level. Therefore, the super user
has:
– Administrator privileges for all Oracle WebLogic Server domains and all
middleware
– Functional setup privileges for all Oracle Fusion Applications offerings
– Administration privileges to Oracle Fusion Applications offerings, excluding
transactional privileges
Chapter 10
Provision an Oracle Identity Management Environment
10-15

10.4 Perform Oracle Identity Management Provisioning
Provisioning is accomplished by using either the command line or the Oracle Identity
Management Provisioning Wizard.
This section contains the following topics:
• Perform Provisioning by Running the Provisioning Commands (page 10-16)
• Monitor Provisioning Using the Oracle Identity Management Provisioning Wizard
(page 10-17)
10.4.1 Perform Provisioning by Running the Provisioning Commands
To use the command line, run the command
runIDMProvisioning.sh
or
runIDMProvisioning.bat
a number of times, specifying the provisioning stage with
the
-target
option.
MANDATORY: complete each command, in order, before running the next command.
Before running the provisioning tool, set the following environment variables:
• Set
JAVA_HOME
to:
REPOSITORY_LOCATION/jdk
• Check whether the
TNS_ADMIN
environment variable is set on the Oracle Internet
Directory hosts.
env | grep TNS_ADMIN
If it is set, unset it.
Bash
unset TNS_ADMIN
Csh
unsetenv TNS_ADMIN
• On Linux systems, set the DISPLAY environment variable to an active and
authorized display.
On Solaris platforms, unset the DISPLAY environment variable on the system.
This is required for all targets of the Oracle Identity Management provisioning.
The command syntax for the provisioning tool on UNIX is:
runIDMProvisioning.sh -responseFile RESPONSE_FILE -target STAGE
Where:
RESPONSE_FILE
is the provisioning response file. The file name and directory are
specified on the Summary page when the wizard is run to create the file. See
Summary Page (page 10-13). The default value is
IDMLCM_HOME/provisioning/bin/
provisioning.rsp
on UNIX.
STAGE
is one of the stages listed in Provision an Oracle Identity Management
Environment (page 10-13).
Chapter 10
Perform Oracle Identity Management Provisioning
10-16

10.4.2 Monitor Provisioning Using the Oracle Identity Management
Provisioning Wizard
To use the Oracle Identity Management Provisioning Wizard to monitor the progress of
provisioning, follow these steps:
1. Set
JAVA_HOME
to:
REPOSITORY_LOCATION/jdk
2. Invoke
idmProvisioningWizard.sh
on Linux or UNIX.
3. Select Provision an Identity Management Environment in the Oracle Identity
Management Installation Options page and specify the
provisioning.rsp
file
created in Create an Oracle Identity Management Provisioning Profile (page 10-2).
MANDATORY:
• Use the Oracle Identity Management Provisioning Wizard for provisioning for a
single node topology.
• Use the command line (runIDMProvisioning) for provisioning for a multiple node
topology.
• Use the Oracle Identity Management Provisioning Wizard to monitor the
provisioning for a multiple node install. Run the Oracle Identity Management
Provisioning Wizard only on the primordial host, IDMHOST1.
Then proceed as described in the following sections.
In the Prerequisite Checks, Installation, Preconfigure, Configure, Configure Secondary,
Postconfigure, and Startup pages, the Status of each build is indicated by one of these
icons:
• Block: Processing has not yet started for the named phase.
• Clock: Performing the build for a phase.
• Check mark: The build was completed successfully.
• x mark: The build has failed for this phase. Correct the errors beforecontinuing.
Click an x to display information about failures. Click the host-level Log file for details
about this phase. Click a build Log file to see details specific to that build.
In case of errors, manually clean up everything. Kill all running processes, delete the
directories, rerun RCU, and start over from the beginning.
• Identity Management Installation Options Page (page 10-18)
• Install Location Configuration Page (page 10-18)
• Review Provisioning Configuration Page (page 10-19)
• Summary Page (page 10-19)
• Prerequisite Checks Page (page 10-19)
• Installation Page (page 10-19)
• Preconfigure Page (page 10-20)
• Configure Page (page 10-21)
• Configure Secondary Page (page 10-21)
Chapter 10
Perform Oracle Identity Management Provisioning
10-17

• Postconfigure Page (page 10-21)
• Startup Page (page 10-22)
• Validation Page (page 10-22)
• Install Complete (page 10-22)
10.4.2.1 Identity Management Installation Options Page
Select Provision an Identity Management Environment to use an existing
provisioning response file to provision the environment.
If the Oracle Identity Management topology spans multiple hosts, make the
provisioning response file accessible to all hosts (preferrably by including it on
shared storage) and run the provisioning tool on each host other than the primordial
host, where the Oracle Identity Management Provisioning Wizard is running. This is
explained in more detail on the Installation page.
In the Response File field, specify the path name of the file to be used, either by
typing it in the field or by clicking the Browse button, navigating to the desired file, and
selecting it.
Click Next to continue.
10.4.2.2 Install Location Configuration Page
The Install Location Configuration page allows to modify the details entered previously
when the response file was created. For details about the settings on this page, see
Install Location Configuration Page (page 10-4).
Installation and Configuration.
• Software Repository Location: Specify the location of the software repository,
either by typing it in the field or by clicking the Browse button, navigating to the
desired location, and selecting it.
• Software Installation Location: Specify the location on shared storage where
the Middleware Home is placed, either by typing it in the field or by clicking the
Browse button, navigating to the desired location, and selecting it.
• Shared Configuration Location: Specify the shared configuration location, either
by typing it in the field or by clicking the Browse button, navigating to the desired
location, and selecting it.
• Enable Local Configuration Location: Do not select this checkbox if a single
host environment is being provisioned.
Select this checkbox to run Managed Servers from a local disk on the host, visible
only to the processes running on that host. If this option is enabled, the Oracle
Identity Management Provisioning Wizard copies the domain configuration from
the shared location and places it on the local disk specified. This configures all
Managed Servers to run from the non-networked location.
– Local Configuration Location: Specify the location for the local domain
directory to be set up, either by typing it in the field or by clicking the Browse
button, navigating to the desired location, and selecting it. This field is required
if the option Enable Local Applications Configuration is selected. The
specified directory must initially be empty.
Chapter 10
Perform Oracle Identity Management Provisioning
10-18

10.4.2.3 Review Provisioning Configuration Page
The Review Provisioning Configuration page enables to select configurations you
want to review. Select a configuration and click Next to view the corresponding
configuration page.
• Node Topology Configuration
• Virtual Hosts Configuration
• Common Passwords
• OID: Oracle Internet Directory Configuration
• ODSM: Oracle Directory Services Manager Configuration
• OHS: Oracle HTTP Server Configuration
• OAM: Oracle Access Manager Configuration
• OIM: Oracle Identity Manager Configuration
• Load Balancer Configuration
Click Next to continue.
10.4.2.4 Summary Page
Use the Summary page to view a summary of the selections and enter additional
information.
Review the information displayed to ensure that the installation details are correct. To
make changes, click Back to return to previous screens in the interview.
Click Next to continue.
10.4.2.5 Prerequisite Checks Page
Use the Prerequisite Checks page to observe the progress of the preverification
steps. During this stage, the Oracle Identity Management Provisioning Wizard checks
for the basic prerequisites, such as free disk space, port availability, and Database
connections.
See the note at the beginning of Monitor Provisioning Using the Oracle Identity
Management Provisioning Wizard (page 10-17) for information about viewing build
status on this page.
Click Next to continue.
10.4.2.6 Installation Page
Use the Installation page to install the Oracle Fusion Middleware products. The host
is marked with a Home symbol in the Host column. The Domains column lists the
domains deployed in the new environment.
For the EDG topology, if the provisioning directory is not shared onto the WEBHOSTs,
manually copy the following directories from IDMHOST1 to the local provisioning
directories on those hosts. Do this BEFORE running the install on those hosts and
AFTER completing the install phase on IDMHOST2.
Chapter 10
Perform Oracle Identity Management Provisioning
10-19

Please note EDG Topology is only supported on Linux or UNIX platforms.
IDM_CONFIG/lcmconfig/topology
IDM_CONFIG/lcmconfig/credconfig
For example:
scp -r IDM_CONFIG/lcmconfig/topology WEBHOST1:IDM_CONFIG/lcmconfig/
scp -r IDM_CONFIG/lcmconfig/credconfig WEBHOST1:IDM_CONFIG/lcmconfig/
During this stage, the Oracle Identity Management Provisioning Wizard installs the
software bits and applies the patches present in the repository.
In a terminal session on the hostprimary, secondary, and DMZ host (if present), run the
install phase with the command:
Linux or UNIX:
runIDMProvisioning.sh -responseFile IDMLCM_HOME/provisioning/bin/
provisioning.rsp -target install
See the note at the beginning of Monitoring Provisioning Using the Oracle Identity
Management Provisioning Wizard (page 10-17) for information about viewing build
status on this page.
For Solaris only, after the IDM provisioning installation target completes, perform the
following steps to manually replace the OPatch under IDM oracle homes:
• Download the latest OPatch from My Oracle Support (patch number 25816288) to
any local storage on the provisioning host.
• Manually replace the OPatch directory in all IDM oracle homes as shown below:
cd <ORACLE_HOME>
mv -f OPatch OPatch_orig
unzip <Patch_location>/p25816288_122001_Generic.zip
Below is the list of oracle homes to be updated:
/u01/products/dir/oid
/u01/products/dir/oracle_common
/u01/products/app/idm
/u01/products/app/iam
/u01/products/app/oracle_common
/u01/products/ohs/ohs
/u01/products/ohs/webgate
/u01/products/ohs/oracle_common
Click Next to proceed.
10.4.2.7 Preconfigure Page
During this stage, the Oracle Identity Management Provisioning Wizard configures
Oracle Internet Directory, Oracle Virtual Directory, and Oracle Directory Services
Manager. It also creates the domain and extends it for all the necessary components.
Chapter 10
Perform Oracle Identity Management Provisioning
10-20

In a terminal session on the hostprimary, secondary, and DMZ host (if present), run the
preconfigure phase with the command:
runIDMProvisioning.sh -responseFile IDMLCM_HOME/provisioning/bin/
provisioning.rsp -target preconfigure
Linux or UNIX:
runIDMProvisioning.bat -responseFile IDMLCM_HOME\provisioning/bin/
provisioning.rsp -target preconfigure
Note: Each new phase must run sequentially; that is, a new phase cannot be started
until the previous phase has been completed successfully on all the hosts.
See the note at the beginning of Monitoring Provisioning Using the Oracle Identity
Management Provisioning Wizard (page 10-17) for information about viewing build
status on this page.
Note: If a DMZ host is present, recopy the response file to the DMZ host.
Click Next. The Oracle Identity Management Provisioning Wizard starts the configure
phase on the primordial host and displays the Configure screen.
10.4.2.8 Configure Page
During this stage, the Oracle Identity Management Provisioning Wizard performs OIM
configuration.
See the note at the beginning of Monitor Provisioning Using the Oracle Identity
Management Provisioning Wizard (page 10-17) for information about viewing build
status on this page.
Click Next. The Oracle Identity Management Provisioning Wizard starts the Configure-
secondary phase on the primordial host and displays the Configure Secondary screen.
10.4.2.9 Configure Secondary Page
During this stage, the Oracle Identity Management Provisioning Wizard performs
Oracle Identity Manager-Oracle Access Manager integration.
See the note at the beginning of Monitor Provisioning Using the Oracle Identity
Management Provisioning Wizard (page 10-17) for information about viewing build
status on this page.
Click Next. The Oracle Identity Management Provisioning Wizard starts the
Postconfigure phase on the primordial host and displays the Postconfigure screen.
10.4.2.10 Postconfigure Page
During this stage, the Oracle Identity Management Provisioning Wizard performs
tuning and enables the environment for SSL communication. Oracle Identity
Federation is configured in this stage.
Copying WebGate Configuration Files to WEBHOST1 and WEBHOST2
This is applicable only for EDG topology when the OHS is on a DMZ host. EDG
Topology is only supported on Linux or UNIX platforms.
Chapter 10
Perform Oracle Identity Management Provisioning
10-21

When configuring WebGate during the postconfigure stage, the provisioning tool
requires access to files created on the primordial host. So BEFORE postconfigure
is run on WEBHOST1 and WEBHOST2, copy the entire directory IDM_CONFIG/
domains/IDMDomain/output to the same location on WEBHOST1 and WEBHOST2.
For example:
scp -r IDMHOST1:$
IDM_CONFIG/domains/IDMDomain
/output
WEBHOST1:$
IDM_CONFIG/domains/IDMDomain
Before making the copy, it might be necessary to manually create the
directory IDM_CONFIG/domains/IDMDomain on WEBHOST1 and WEBHOST2. After
provisioning is complete, remove this directory from WEBHOST1 and WEBHOST2.
See the note at the beginning of Monitor Provisioning Using the Oracle Identity
Management Provisioning Wizard (page 10-17) for information about viewing build
status on this page.
Click Next. The Oracle Identity Management Provisioning Wizard starts the Startup
phase on the primordial host and displays the Startup screen.
10.4.2.11 Startup Page
During this stage, the Oracle Identity Management Provisioning Wizard starts or
restarts all the services except for Oracle Identity Federation. To use Oracle Identity
Federation, run it manually as a post-installation task described in Configure Oracle
Identity Federation (page 16-23).
The Domains column lists the domains deployed in the new environment.
See the note at the beginning of Monitor Provisioning Using the Oracle Identity
Management Provisioning Wizard (page 10-17) for information about viewing build
status on this page.
Click Next. The Oracle Identity Management Provisioning Wizard starts the Validate
phase on the primordial host and displays the Validation screen.
10.4.2.12 Validation Page
During this stage, the Oracle Identity Management Provisioning Wizard performs the
basic validations, such as server status and Oracle Internet Directory connectivity.
The host is marked with a Home symbol in the Host column. The Domains column lists
the domains deployed in the new environment.
See the note at the beginning of Monitor Provisioning Using the Oracle Identity
Management Provisioning Wizard (page 10-17) for information about viewing build
status on this page.
Click Next. The Oracle Identity Management Provisioning Wizard starts the Validate
phase on the host and displays the Validation screen.
10.4.2.13 IDM Provisioning Complete
This page appears after provisioning has completed successfully. It shows a summary
of the products that have been installed.
Chapter 10
Perform Oracle Identity Management Provisioning
10-22

Click Finish to save the summary and exit the Oracle Identity Management
Provisioning Wizard.
10.5 Perform Mandatory Oracle Identity Management Post-
Installation Tasks
This section describes tasks that must be performed after Oracle Identity Management
is provisioned.
10.5.1 Create ODSM Connections to Oracle Virtual Directory
Before managing Oracle Virtual Directory, create connections from ODSM to each of
the Oracle Virtual Directory instances. To do this, proceed as follows:
1. Access ODSM through the load balancer at:
http://ADMIN.mycompany.com/odsm
2. To create connections to Oracle Virtual Directory, follow these steps. Create
connections to each Oracle Virtual Directory node separately. Using the Oracle
Virtual Directory load balancer virtual host from ODSM is not supported:
a. Create a direct connection to Oracle Virtual Directory on LDAPHOST1
providing the following information in ODSM:
Host
:
LDAPHOST1.mycompany.com
Port
:
8899
(The Oracle Virtual Directory proxy port,
OVD_ADMIN_PORT
)
Enable the SSL option.
User
:
cn=orcladmin
Password
: password_to_connect_to_OVD
b. Create a direct connection to Oracle Virtual Directory on LDAPHOST2
providing the following information in ODSM:
Host
:
LDAPHOST2.mycompany.com
Port
:
8899
(The Oracle Virtual Directory proxy port)
Enable the SSL option.
User
:
cn=orcladmin
Password
: password_to_connect_to_OVD
10.5.2 Pass Configuration Properties File to Oracle Fusion
Applications
Oracle Fusion Applications requires a property file which details the Oracle Identity
Management deployment. After provisioning, this file can be found at the following
location:
IDM_CONFIG/fa/idmsetup.properties
Chapter 10
Perform Mandatory Oracle Identity Management Post-Installation Tasks
10-23

10.6 Validate Provisioning
The provisioning process includes several validation checks to ensure that everything
is working correctly. This section describes additional checks that can be performed for
additional sanity checking
10.6.1 Validate the Administration Server
Validate the WebLogic Administration Server as follows by verifying connectivity
Verify that the administration console can be accessed from the following URL:
http://admin.mycompany.com/console
and logging in as the user weblogic_idm.
Verify that all managed servers are showing a status of Running.
Verify that Oracle Enterprise Manager Fusion Middleware Control can be accessed
from the URL:
http://admin.mycompany.com/em
and logging in as the user weblogic_idm.
10.6.2 Validate the Oracle Access Manager Configuration
To validate that this has completed correctly.
1. Access the OAM console at:
http://ADMIN.mycompany.com/oamconsole
2. Log in as the Oracle Access Manager user.
3. Click the System Configuration tab
4. Expand Access Manager Settings - SSO Agents - OAM Agents.
5. Click the open folder icon, then click Search.
6. See the WebGate agents
Webgate_IDM
,
Webgate_IDM_11g
and
IAMSuiteAgent
.
10.6.3 Validate Oracle Directory Services Manager (ODSM)
This section describes how to validate the connection to the ODSM site in a browser
and also ODSM connections to Oracle Internet Directory.
10.6.3.1 Validate Browser Connection to ODSM Site
Follow these steps to validate that the Oracle Directory Services Manager (ODSM) site
can be accessed:
1. In a web browser, verify it is possible to connect to ODSM at:
http://
HOSTNAME
.mycompany.com:port/odsm
For example, on IDMHOST1, enter this URL, where
7005
is
ODSM_PORT
http://IDMHOST1.mycompany.com:7005/odsm
and on IDMHOST2, enter this URL:
http://IDMHOST2.mycompany.com:7005/odsm
Chapter 10
Validate Provisioning
10-24

2. In a web browser, verify that ODSM can be accessed through the load balancer
address:
http://ADMIN.mycompany.com/odsm
10.6.3.2 Validate ODSM Connections to Oracle Internet Directory
Validate that Oracle Directory Services Manager can create connections to Oracle
Internet Directory.
Create a connection to the Oracle Internet Directory on each ODSM instance
separately. Even though ODSM is clustered, the connection details are local to each
node. Proceed as follows:
1. Launch Oracle Directory Services Manager from IDMHOST1:
http://IDMHOST1.mycompany.com:7005/odsm
2. Create a connection to the Oracle Internet Directory virtual host by providing the
following information in ODSM:
• Server:
OIDSTORE.mycompany.com
• Port:
636
(
LDAP_LBR_SSL_PORT
)
• Enable the SSL option
• User:
cn=orcladmin
• Password:
ldap-password
3. Launch Oracle Directory Services Manager from IDMHOST2.
Follow Step 3 to create a connection to Oracle Internet Directory from IDMHOST2
http://IDMHOST2.mycompany.com:7005/odsm
4. Create a connection to the Oracle Internet Directory virtual host by providing the
corresponding information in ODSM
Accept the certificate when prompted.
10.6.4 Validate WebGate and the Oracle Access Manager Single
Sign-On Setup
To validate that WebGate is functioning correctly, open a web browser and go the
OAM console at:
http://ADMIN.mycompany.com/oamconsole
The Oracle Access Manager Login page is displayed. Enter the OAM administrator
user name (for example,
oamadmin
) and password and click Login. Then, see the
Oracle Access Manager console displayed.
To validate the single sign-on setup, open a web browser and go the WebLogic
Administration Console at
http://ADMIN.mycompany.com/console
and to Oracle
Enterprise Manager Fusion Middleware Control at:
http://ADMIN.mycompany.com/em
The Oracle Access Manager Single Sign-On page displays. Provide the credentials for
the
weblogic_idm
user to log in.
Chapter 10
Validate Provisioning
10-25

10.7 Manage the Topology for an Oracle Identity
Management Enterprise Deployment
This section describes the operations to perform after setting up the Oracle Identity
Management topology.
10.7.1 Start and Stop Components
This section describes how to start, stop and restart the various components of the
Oracle Enterprise Deployment for Oracle Identity Management.
This section contains the following topics:
• Startup Order (page 10-26)
• Start and Stop Servers (page 10-26).
10.7.1.1 Startup Order
When starting up the entire infrastructure, start the components in the following order,
ignoring those not in the topology:
1. Database(s)
2. Database Listener(s)
3. Oracle Internet Directory
4. Node Manager
5. WebLogic Administration Server
6. Oracle Access Manager Server(s)
7. Oracle HTTP Server(s)
10.7.1.2 Start and Stop Servers
During provisioning, scripts are created in the
SHARED_ROOT/config/scripts
directory
to start and stop all the servers in the environment. Two of the scripts are available to
use from the command line to start and stop all Oracle Identity Management servers.
The remaining scripts are used internally and must not be invoked from the command
line.
These scripts do NOT stop or start the database.
10.7.1.2.1 Start All Servers
Provisioning created a file called
startall.sh
for Linux. To start everything in the
correct order run the command on hosts in the following order:
• LDAPHOST1
• LDAPHOST2
• IDMHOST1
• IDMHOST2
Chapter 10
Manage the Topology for an Oracle Identity Management Enterprise Deployment
10-26

• WEBHOST1
• WEBHOST2
To start the services on a single host, execute the command on that host.
Before invoking this script, set
JAVA_HOME
to
JAVA_HOME
.
During execution the Weblogic and Node Manager administrator passwords are
requested.
The script starts the servers in the following order:
1. Node Manager1
2. AdminServer
3. wls_ods1
4. wls_oam1
5. wls_oif1
6. ohs1
7. oid1
8. oid2
9. ohs2
10. Node Manager 2
11. wls_ods2
12. wls_oam2
13. wls_oif2
10.7.1.2.2 Stop All Servers:
The script to stop all servers is
stopall.sh
for Linux.
Before invoking this script, set
JAVA_HOME
to
JAVA_HOME
.
During execution the Weblogic and Node Manager administrator passwords are
requested.
10.7.2 About Oracle Identity Management Console URLs
Table 10-1 (page 10-27) lists the administration consoles used in this guide and their
URLs.
Table 10-1 Console URLs
Domain Console URL
IDMDomain WebLogic
Administration
Console
http://ADMIN.mycompany.com/console
IDMDomain Enterprise Manager
FMW Control
http://ADMIN.mycompany.com/em
IDMDomain OAM Console
http://ADMIN.mycompany.com/oamconsole
Chapter 10
Manage the Topology for an Oracle Identity Management Enterprise Deployment
10-27

Table 10-1 (Cont.) Console URLs
Domain Console URL
IDMDomain ODSM
http://ADMIN.mycompany.com/odsm
10.7.3 Perform Backups During Installation and Configuration
It is an Oracle best practices recommendation to create a backup after successfully
completing the installation and configuration of each tier, or at another logical point.
Create a backup after verifying that the installation so far is successful. This is a
quick backup for the express purpose of immediate restoration in case of problems
in later steps. The backup destination is the local disk. Discard this backup when the
enterprise deployment setup is complete. After the enterprise deployment setup is
complete, initiate the regular deployment-specific Backup and Recovery process.
See Introducing Backup and Recovery in the Oracle Fusion Middleware Administering
Oracle Fusion Middleware.
For information on database backups, see Introduction to Backup and Recovery in the
Oracle Database Backup and Recovery User's Guide.
This section contains the following topics:
• Back Up Middleware Home (page 10-28)
• Back Up LDAP Directories (page 10-28)
• Back Up the Database (page 10-29)
• Back Up the WebLogic Domain (page 10-29)
• Back Up the Web Tier (page 10-29)
10.7.3.1 Back Up Middleware Home
Back up the Middleware homes whenever a new one is created or a components is
added to it. The Middleware homes used in this guide are Oracle Identity Management
and Oracle Identity and Access Management.
10.7.3.2 Back Up LDAP Directories
Whenever an action, which updates the data in LDAP, is performed, back up the
directory contents.
This section contains the following topics:
• Back up Oracle Internet Directory (page 10-28)
• Back up Oracle Virtual Directory (page 10-29)
• Back Up Third-Party Directories (page 10-29)
10.7.3.2.1 Back up Oracle Internet Directory
To back up an Oracle Internet Directory instance:
Chapter 10
Manage the Topology for an Oracle Identity Management Enterprise Deployment
10-28

1. Shut down the instance using
opmnctl
located under the
OID_ORACLE_INSTANCE/bin
directory:
OID_ORACLE_INSTANCE/bin/opmnctl stopall
2. Back up the Database hosting the Oracle Internet Directory data and the Oracle
Internet Directory instance home on each host.
3. Start up the instance using
opmnctl
located under the
OID_ORACLE_INSTANCE/bin
directory:
OID_ORACLE_INSTANCE/bin/opmnctl startall
10.7.3.2.2 Back up Oracle Virtual Directory
To back up an Oracle Virtual Directory instance:
1. Shut down the instance using
opmnctl
located under the
OVD_ORACLE_INSTANCE/bin
directory:
OVD_ORACLE_INSTANCE/bin/opmnctl stopall
2. Back up the Oracle Virtual Directory Instance home on each LDAP host.
3. Start up the instance using
opmnctl
located under the
OVD_ORACLE_INSTANCE/bin
directory:
OVD_ORACLE_INSTANCE/bin/opmnctl startall
10.7.3.2.3 Back Up Third-Party Directories
Refer to the operating system vendor's documentation for information about backing
up directories.
10.7.3.3 Back Up the Database
Whenever you create add a component to the configuration, back up the IDMDB
database. Perform this backup after creating domains or adding components such as
Access Manager or Oracle Identity Manager.
10.7.3.4 Back Up the WebLogic Domain
To back up the WebLogic domain, perform these steps:
1. Shut down the WebLogic administration server and any managed servers running
in the domain as described in Start and Stop Components (page 10-26).
2. Back up the
ASERVER_HOME
directory from shared storage.
3. Back up the
MSERVER_HOME
directory from each host.
4. Restart the WebLogic Administration Server and managed servers.
10.7.3.5 Back Up the Web Tier
To back up the Web Tier, perform these steps:
1. Shut down the Oracle HTTP Server as described in Start and Stop Components
(page 10-26).
2. Back up the Oracle HTTP Server.
Chapter 10
Manage the Topology for an Oracle Identity Management Enterprise Deployment
10-29

3. Start the Oracle HTTP Server as described in Start and Stop Components
(page 10-26).
10.8 Next Steps
Go to Troubleshoot Oracle Identity Management Provisioning (page 11-1) which
describes common problems that might be encountered when using Oracle Identity
Management Provisioning and explains how to solve them.
Chapter 10
Next Steps
10-30

11
Troubleshoot Oracle Identity Management
Provisioning
This section describes common problems that might be encountered when using
Oracle Identity Management Provisioning and explains how to solve them.
In addition to this section, review the Oracle Fusion Middleware Error Messages guide
for information about the encountered error messages.
This section contains the following topics:
• Get Started with Troubleshooting (page 11-1)
• Resolve Common Problems (page 11-2)
• Use My Oracle Support for Additional Troubleshooting Information (page 11-5)
• What To Do Next (page 11-5)
11.1 Get Started with Troubleshooting
This section describes how to use the log files and how to recover from provisioning
failures. It contains the following topics:
• Use the Log Files (page 11-1)
• Recover From Oracle Identity Management Provisioning Failure (page 11-1)
11.1.1 Use the Log Files
To monitor provisioning using the wizard, click the icon under the Log field from any
phase screen to see the logs for the current phase. The logs are searchable using the
search box at the top of this new window. The log window does not refresh on its own,
so click Refresh besides the search box at the top of this window to refresh the logs.
To check why a phase failed when the wizard is not running, check the corresponding
logs files present under the logs directory using the following commands.
On Linux:
INSTALL_APPCONFIG_DIR/provisioning/logs/hostname
.
11.1.2 Recover From Oracle Identity Management Provisioning Failure
Oracle Identity Management Provisioning does not have any backup or recovery
mechanism, so it is necessary to start from the beginning in case of a failure.
If a workaround that requires to rerun Oracle Identity Management Provisioning is
performed, clean up the environment before rerunning it. Do the following:
1. Reboot the hosts to ensure that all running Oracle Identity Management processes
are stopped.
2. Delete the content of the following directories on all hosts:
11-1

•
Software Install Location
•
Shared Configuration Location
•
Local Configuration Location
3. Drop the database schema using Oracle Fusion Middleware RCU. While dropping
the schema, ensure that t the ODS schema is selected. Oracle Identity
Management Provisioning fails when it is run the next time. By default, all
schemas except ODS schema are selected.
4. Create the database schema using Oracle Fusion Middleware RCU.
11.2 Resolve Common Problems
This section describes common problems and solutions. It contains the following
topics:
• Provisioning Fails (page 11-2)
• OID Account is Locked (page 11-2)
• Missing ODSM Instance Directory on Second Node (page 11-3)
• Null Error Occurs When WebLogic Patches Are Applied (page 11-3)
• Oracle Identity Management Patch Manager Progress Command Shows Active
Session After Provisioning (page 11-3)
• False OPatch Error Messages Printed to Log During Install Phase (page 11-4)
• Oracle Identity Management Provisioning Wizard Hangs (Linux and UNIX)
(page 11-4)
• Provisioning Fails During Install Phase (Linux) (page 11-4)
11.2.1 Provisioning Fails
Problem
Provisioning fails.
Solution
Check the provisioning logs located in the directory:
INSTALL_APPCONFIG_DIR
/provisioning/logs/
hostname
where
hostname
is the host where the provisioning step failed.
11.2.2 OID Account is Locked
Problem
Investigation into the OID logs shows that the OID account is locked.
This is generally caused by the load balancer. The load balancer is continually polling
OID to see if it is available using the given credentials. During setup, this can cause
the account to become locked.
Solution
Chapter 11
Resolve Common Problems
11-2

Disable the OID load balancer monitor during preconfiguration. Then enable it when
provisioning is complete. Another alternative is to reduce the check frequency.
11.2.3 Missing ODSM Instance Directory on Second Node
Problem
After running the Oracle Identity Management Provisioning Wizard, only one instance
directory for Oracle Directory Services Manager is installed.
Solution
The absence of the ODSM instance directory on the second node does not result in
any loss of function.
11.2.4 Null Error Occurs When WebLogic Patches Are Applied
Problem
During Oracle Identity Management Provisioning, patches are applied to all products
provisioned, including WebLogic. This entails running the Smart Update
bsu
command. This command may fail without producing a detailed error message.
Cause
In this case, the failure is likely caused by directory paths that are longer than what
the
bsu
command supports. Verify this by running the
bsu
command manually, passing
it the
-log
option, and looking for a stack trace containing a message such as the
following:
java.lang.IllegalArgumentException:
Node name?a?very?long?path?which?may?cause?problems?leading?to?an?IDMTOP?
products?dir?utils?bsu?cache_dir too long
See Using the Command Line Interface in the Oracle Smart Update Applying Patches
to OracleWebLogic Server guide.
Solution
When planning the Oracle Identity Management deployment, ensure that the
IDM_TOP
path is 45 characters or fewer in length.
11.2.5 Oracle Identity Management Patch Manager Progress
Command Shows Active Session After Provisioning
Problem
If the Oracle Identity Management Patch Manager
progress
command is run after
Oracle Identity Management Provisioning completes, the output shows an active
session specific to Oracle Identity Management Provisioning, which is listed as
ACTIVE, and contains a set of PLANNED steps.
Solution
Safely ignore this output. The provisioning-driven patch session is complete, and all
steps which needed to run have run. Creating a new patch session silently replaces
this special session without error.
Chapter 11
Resolve Common Problems
11-3

11.2.6 False OPatch Error Messages Printed to Log During Install
Phase
Problem
During the install phase of provisioning, a message
Starting binary patching
for all-binary-patch components ...
might be displayed, followed by a series of
OPatch failure messages prefaced with the string
prepatch
within the provisioning log.
These errors contain the string
Failed to load the patch object
.
Solution
These messages are harmless and can be safely ignored.
11.2.7 Oracle Identity Management Provisioning Wizard Hangs (Linux
and UNIX)
Problem
The Oracle Identity Management Provisioning Wizard hangs. Neither the Next nor the
Back button is active.
Cause
This problem is due to stale Network File System (NFS) file handles.
Solution
On Linux or UNIX, issue the following command:
df –k
Record the output of the
df
command, even if it is successful, in case further analysis
is necessary. For example, take a screenshot.
If the
df
command hangs or is unsuccessful, work with the system administrator fix the
NFS problem.
After the NFS problem has been resolved and the
df
command finishes successfully,
run provisioning again.
11.2.8 Provisioning Fails During Install Phase (Linux)
Problem
Provisioning fails during the Install phase.
Cause
Some 32-bit libraries such as
crt1.o
are missing.
Solution
There are two ways to fix this. Do one of the following:
• Copy the 32-bit libraries
gcrt1.o
,
crtn.o
,
crti.o,
crt1.o
,
Scrt1.o
, and
Mcrt1.o
from
/usr/lib/
on another machine running the same version.
Chapter 11
Resolve Common Problems
11-4

• Install the missing package
glibc-devel.i686
11.3 Use My Oracle Support for Additional Troubleshooting
Information
Use My Oracle Support (formerly MetaLink) to help resolve Oracle Fusion Middleware
problems. My Oracle Support contains several useful troubleshooting resources, such
as:
• Knowledge base articles
• Community forums and discussions
• Patches and upgrades
• Certification information
Use My Oracle Support to log a service request. Access My Oracle Support at
https://support.oracle.com
.
11.4 Next Steps
Go to Create a Response File (page 12-1) which describes the process of creating a
response file for a new Oracle Fusion Applications environment using the Provisioning
Wizard interview process.
Chapter 11
Use My Oracle Support for Additional Troubleshooting Information
11-5

12
Create a Response File for a New Oracle
Fusion Applications Environment
This section describes the process of creating a response file for a new Oracle Fusion
Applications environment using the Provisioning Wizard interview process.
This section includes the following topics:
• Introduction to Creating a Response File (page 12-1)
• Prerequisites to Creating a Response File (page 12-3)
• Create a Response File (page 12-4)
• Update an Existing Response File (page 12-31)
• What to Do Next (page 12-32)
12.1 Introduction to Creating a Response File
Oracle Fusion Applications Provisioning orchestrates the physical installation and
configuration of the selected product offerings and deploys those offerings and their
dependent middleware components to a predetermined Oracle WebLogic Server
Domain. To perform the installation tasks, provisioning requires the provisioning
repository of installers, the provisioning framework, and a response file.
When a response file is created, choose provisioning configurations and specify
the configuration details for the product offerings and their dependent middleware
components. Save the response file and specify its location when it is ready to be
used to provision a new environment.
12.1.1 How Does the Response File Work?
The provisioning repository must have been downloaded, the provisioning framework
must be installed, and a database and the identity management components must
be also installed before creating a response file. See Preparing the Oracle Fusion
Applications Server (page 5-6) for provisioning prerequisites.
After the prerequisite setup is complete, run the Provisioning Wizard and select the
Create a New Applications Environment Response File option. During the interview
process, choose the product offerings to install. The wizard knows which middleware
dependencies must be installed for each product offering, and which host must be
provisioned first. It detects common products that each offering relies on, as well
as the presence of the transaction database and identity-related components, and
prompts for the appropriate configuration parameters.
Using a question and answer interview format, the wizard collects information about:
• Provisioning configurations (product offerings)
• Node Manager credentials and installation and configuration directories
• Database connections and schema passwords
12-1

• Host names and ports for the offerings and their middleware dependencies
• Common configuration details for components, such as web tier, virtual hosts,
email, and identity management
After completing the response file, save it. Then, to perform the physical installation,
choose the Provision a New Environment option from the Provisioning Wizard and
indicate the location of the response file. The wizard uses the details in the response
file as a guide to what must be retrieved from the provisioning repository.
12.1.2 Select Product Offerings
An installation of Oracle Fusion Applications is logically broken up into groups of
features known as product offerings, which represent the highest-level collection of
functionality that can licensed and implemented. A provisioning configuration is a
collection of one or more product offerings.
Product offerings have interdependencies on companion applications (for example
Oracle Fusion Human Capital Management relies on Oracle Financials payroll), as
well as middleware dependencies (for example, Oracle SOA Suite) required for
runtime execution. The wizard prompts for applications and middleware configuration
details at the domain level during Domain Topology Configuration.
When individual product offerings are selected within a configuration instead of
selecting all offerings within the configuration, the wizard starts the Managed Servers
only for the offerings selected. However, because the interdependent details for the
entire configuration are included in the response file, it is possible to activate additional
functionality later by using the Oracle Fusion Applications Functional Setup Manager
to start the other Managed Servers.
The provisioning configurations are as follows:
• Oracle Fusion Customer Relationship Management (Sales and Marketing)
• Oracle Fusion Financials (Financials, Oracle Fusion Procurement, and Oracle
Fusion Projects)
• Oracle Fusion Accounting Hub
• Oracle Fusion Human Capital Management (Workforce Deployment, Workforce
Development, and Compensation Management)
• Oracle Fusion Supply Chain Management (Product Management, Order
Orchestration, Material Management and Logistics, Supply Chain Financial
Orchestration, Manufacturing and Supply Chain Material Management, Price
Management)
Choose also several standalone product offerings. For this group of offerings, only the
direct dependencies are installed, configured, and deployed:
• Customer Data Hub
• Enterprise Contracts
• Oracle Fusion Accounting Hub
• Oracle Fusion Incentive Compensation
• Value Chain Planning
Chapter 12
Introduction to Creating a Response File
12-2

12.1.3 Wizard Actions for Oracle Identity Management Components
During the Provisioning Wizard interview process, the wizard collects information that
is necessary to connect to the Oracle Identity Management components previously
installed and configured. This information includes:
• The user designated as the Super User. This user must already exist in the policy
store.
• The existence of the system administrators group. This information determines
if the group was created during the Oracle Identity Management component
installation and configuration process, or if it must be created during provisioning.
• The distinguished name (DN) of the system administrators group (if it exists).
• The authenticator that serves as the LDAP identity store: Oracle Internet Directory
(OIDAuthenticator).
12.1.4 Create Installation-Specific Response Files
There are numerous scenarios for the environments than can be created from a
small demonstration system to a full production system provisioned on multiple hosts.
The Provisioning Wizard can accommodate the creation of response files for specific
environments so that a separate response file can be created for each type of
environment. Note that all occurrences of a
hostname
should use the same name
in the response file.
12.1.5 Update a Response File
Frequently, details for a response file are not final, and so cannot be specified during
a single pass through the Provisioning Wizard interview. Or, a completed response
file has not been implemented, and requires changes before it is. The wizard options
include the choice to save a partially completed response file and update it later. Note
that a response file is not complete or available for provisioning until clicking Finish on
the Summary screen.
However, after selecting product offerings and saving them in a response file,
regardless of whether it is partially or fully complete, the product offerings cannot be
updated or changed in that response file. To add or change the mix of offerings, create
a new response file and specify the new or additional offerings.
12.2 Prerequisites to Creating a Response File
Before creating a response file, the following tasks must be completed:
1. Read and understand the concepts in Overview (page 1-1).
2. Perform the prerequisite tasks outlined in Prepare for an Installation (page 5-1).
3. Install a transaction database as described in Install Oracle Fusion Applications
Transaction Database (page 8-1).
4. Complete Oracle Identity Management provisioning. See Oracle Identity
Management Provisioning (page 10-1).
Chapter 12
Prerequisites to Creating a Response File
12-3

5. To enable load balancer as described in Load Balancer Configuration (page 12-22),
ensure that the load balancer configuration is completed as described in Plan
Load Balancer Requirements (page 4-3) before proceeding.
12.3 Create a Response File
Complete the wizard interview screens and save the response file in a location that is
accessible to the various installers. Record the location, as it must be supplied during
the provisioning of the environment. Note that he response file should be created on
the Primordial host, which is the host that contains the Administration Server of the
Common domain.
The wizard warns if it cannot connect to the database or any of the hosts specified in
the response file and if any of the passwords are not valid. If this warning represents
an exception, ignore it and continue creating the response file. However, all issues
flagged in the warnings must fixed before starting to provision an environment.
Provisioning cannot be successfully run until all validations have passed.
12.3.1 Start the Provisioning Wizard
The Provisioning Wizard supports the following command line options:
Table 12-1 Provisioning Wizard Command Line Options
Command Line Option Description Default Value
-invPtrLoc [inventory
pointer file name]
Location of the
oraInst.loc
file.
/etc/
oraInst.loc
-
ignoreSysPrereqs
[true|false]
Disables validation for database, schema
and hosts. Most validation errors are
ignored.
Note:
-ignoreSysPrereqs true
is the
same as
-ignoreSysPrereqs
with no
value specified.
false
-help
Displays help text.
Note: The
-multitenant
option is
displayed when the
-help
option is used.
This option is not available for 11g Release
11 (11.1.11) and is reserved for future use.
Usage:
provisioningWizard.sh -invPtrLoc <inventory pointer location file>
-ignoreSysPrereqs {true|false}
-help
To start the Provisioning Wizard, do the following on the primordial host:
1. Set the
JAVA_HOME
environment variable to point to the JDK location in the
provisioning repository, for example:
UNIX:
Chapter 12
Create a Response File
12-4

export
JAVA_HOME
=
repository_location
/
jdk
export
PATH
=$
JAVA_HOME/bin:$PATH
This environment variable is not required while creating a response file. However,
it is required for provisioning an environment. See Start the Wizard and Preparing
to Install (page 13-5).
2. Verify that the
LIBPATH
value is null.
3. On UNIX systems, set the DISPLAY environment variable to an active and
authorized display.
4. Run the following command on the primordial host. See Types of Hosts in a
Multiple-Host Environment (page 1-14).
UNIX:
cd framework_location/provisioning/bin
./provisioningWizard.sh
Solaris:
cd framework_location/provisioning/bin
bash provisioningWizard.sh
Example 12-1
provisioningWizard.sh -invPtrLoc /oracle/oraInst.loc
-ignoreSysPrereqs
12.3.2 Wizard Screens and Instructions
Table 12-2 (page 12-5) shows the steps necessary to create a response file using the
Provisioning Wizard. For help with any of the screens, click Help.
WARNING: If the correct values required are not entered, the error and warning
messages are displayed at the bottom of the screen.
Table 12-2 Creating a Response File
Screen Description and Action Required
Welcome No action is required on this read-only screen.
Click Next to continue.
Chapter 12
Create a Response File
12-5

Table 12-2 (Cont.) Creating a Response File
Screen Description and Action Required
Specify Central Inventory
Directory
This screen displays only if one or more of the following
conditions are not met:
•
The
-invPtrLoc
option is used to specify the central
inventory location. Thus, the default value for the
platform is not used. Note that the default value for
Linux platforms is
/etc/oraInst.loc
. For Solaris,
the default value is
/var/opt/oracle/oraInst.loc
.
• The Central Inventory Pointer File is readable.
• The Central Inventory Pointer File contains a value for
inventory_loc
.
•
The
inventory_loc
directory is writable.
•
The
inventory_loc
directory has at least 150K of
space.
•
inventory_loc
is not an existing file.
Specify the location of the Central Inventory Directory that
meets the previous criteria. The
inventory_loc
directory
can be created by the
createCentralInventory.sh
script and does not have to exist at the time its location is
specified.
For non-Windows platforms, in the Operating System
Group ID field, select or enter the group whose members
are granted access to the inventory directory. All members
of this group can install products on this host. Click OK to
continue.
The Inventory Location Confirmation dialog
prompts to run the
inventory_directory
/
createCentralInventory.sh
script as root, to confirm
that all conditions are met and to create the default
inventory location file, such as
/etc/oraInst.loc
. After
this script runs successfully, return to the interview and click
OK to proceed with the installation.
To continue the installation without root access, select
Continue installation with local inventory. Click OK to
proceed with the installation.
For Windows platforms, this screen displays if the inventory
directory does not meet requirements.
For more information about inventory location files, see
Oracle Universal Installer Inventory in the Oracle Universal
Installer User's Guide.
Click Next to continue.
Installation Options
Presents the list of valid installation actions that can
be performed using the wizard. Select Create a New
Applications Environment Response File.
Click Next to continue.
Chapter 12
Create a Response File
12-6

Table 12-2 (Cont.) Creating a Response File
Screen Description and Action Required
Specify Security Updates Set up a notification preference for security-related updates
and installation-related information from My Oracle Support.
This information is optional.
•
Email: Enter a valid email address to have updates
sent by this method.
•
Agree to receive security updates via My Oracle
Support: This option is used to have updates sent
directly to a My Oracle Support account. However, in
this release, this feature is not supported. Thus, this
option should not be selected.
Click Next to continue.
Provisioning Configurations Select one or more offerings, either within a configuration,
or from the list of standalone product offerings.
Tip: This value is available in the Oracle Fusion
Applications Installation Workbook, Provisioning tab,
Fusion Applications Offerings table.
Select individual product offerings within a configuration,
without selecting all available offerings. When individual
product offerings are specified, provisioning starts the
Managed Servers only for the offerings that have been
selected. However, because interdependent details have
been specified for the entire configuration, additional
functionality can be turned on later. The additional
functionality are turned on by using the Oracle Fusion
Applications Functional Setup Manager to start the other
Managed Servers.
Click Details in the message pane to see a breakdown of
servers for each offering.
After clicking Next, selections cannot be changed on this
screen. To make changes, click Cancel, open a new wizard
session, and create a new response file
Click Next to continue.
Chapter 12
Create a Response File
12-7

Table 12-2 (Cont.) Creating a Response File
Screen Description and Action Required
Response File Description Enter information to describe this response file. This
description is not associated in any way with the executable
plan file, or the summary file, that has been saved at the
end of the response file creation process.
•
Response File Name: Specify a name to identify this
response file.
•
Response File Version: Assign a version number
to this response file. The version is intended for
documentation only.
•
Created By: Defaults to the operating system user
who invoked the wizard. Set when the response file is
initially created and cannot be modified for the current
response file.
•
Created Date: Defaults to the date that the response
file was initially created and saved. Set when the
response file was initially created and cannot be
modified for the current response file.
•
Response File Description: Provide a description of
this response file.
To stop creating this response file and resume later, click
Save. This action creates a partial response file. A partial
response file cannot be used to provision an environment.
Click Next to continue.
Installation Location Specify credentials for the Node Manager and supply the
location of the various directories required for installation
and configuration actions.
To stop creating this response file and resume later, click
Save. This action creates a partial response file. A partial
response file cannot be used to provision an environment.
Click Next to continue.
System Port Allocation Accept the default values or set a custom value for the
Applications Base Port. The application domain port
ranges are derived from this value. If the base port value
is changed, the domain port ranges adjust accordingly.
Ranges must not overlap and must be set in ascending
order.
Ports listed under Other Ports are not derived from the
Applications Base Port value. These individual ports can
be defined using custom port values.
To stop creating this response file and resume later, click
Save. This action creates a partial response file. A partial
response file cannot be used to provision an environment.
Click Next to continue.
Chapter 12
Create a Response File
12-8

Table 12-2 (Cont.) Creating a Response File
Screen Description and Action Required
Database Configuration Enter the database parameters established when the Oracle
Database was installed. The wizard validates whether the
installed database is a single-instance or Oracle Real
Application Clusters (Oracle RAC). If a Single Instance
Database, enter:
•
User Name (SYSDBA Role): The user name of the
sysdba
role. This user name is used to upgrade
schemas during the configuration phase. Note that the
sysdba
fields are not validated. Thus, ensure that the
correct values are entered.
•
Password: The password of the
sysdba
role.
•
Host Name: The name of the host where the database
is installed.
•
Port: The listening port for the database.
•
Default Application Service Name: The global
database name for the database that is installed. This
service name is used to distinguish this database
instance from other instances of Oracle Database
running on the same host.
•
Batch Application Service Name: The database
service name for the instance of Oracle Fusion
Applications database to be used for all back jobs, BI,
Essbase, and SOAP services.
•
XA Application Service Name: The database service
name for the instance of Oracle Fusion Applications
database to be used for all XA transactions, supporting
the two-phase commit protocol.
If Oracle RAC has been installed using Multi Data Sources,
select Multi Data Sources Real Application Clusters
Database and enter the following values:
•
User Name (SYSDBA Role): The user name of the
sysdba
role. This user name is used to upgrade
schemas during the configuration phase. Note that the
sysdba
fields are not validated. Thus, ensure that the
correct values are entered..
•
Password: The password of the
sysdba
role.
•
Service Name: The global database name for the
database that is installed.
•
Host Name: The name of the host for each Oracle RAC
instance.
•
Port: The listening port of the database.
•
Instance Name: The name of the Oracle RAC instance
used to manage this database. Due to a limitation
in the Oracle Data Integrator (ODI) installer, if Real
Application Clusters Database is selected, at least two
rows must be entered in the table. See Install Phase
Failed with INST-07221: Specified connect string is not
in a valid format Error (page 14-13).
Click Add to create a new row in the table for each instance.
Select a row and click Remove to delete it.
Chapter 12
Create a Response File
12-9

Table 12-2 (Cont.) Creating a Response File
Screen Description and Action Required
Tip: This value is available in the Oracle Fusion Applications
Installation Workbook , Database tab, FA Transactional
Database table.
To stop creating this response file and resume later, click
Save. This action creates a partial response file. A partial
response file cannot be used to provision an environment.
Click Next to continue.
Schema Passwords The database that is installed contains preloaded schemas
required for runtime execution. Select one of the following
options and enter the database schema passwords set up
when the Oracle Fusion Applications Repository Creation
Utility was run. See Run the Oracle Fusion Applications
Repository Creation Utility (page 8-27).
•
Use the same password for all accounts: Select this
option a single password is setup for all accounts. Enter
the value in the Password field. This option is the
default..
•
Use a different password for each account: Select
this option if individual passwords are setup for each
Account. Password values were set up for Fusion
Applications and AS Common Schemas. Enter those
values in the Password field.
To stop creating this response file and resume later, click
Save. This action creates a partial response file. A partial
response file cannot be used to provision an environment.
Click Next to continue.
ODI Password Configuration Enter and confirm the ODI supervisor password. The
ODI Supervisor Password is the Supervisor Password
entered on the Custom Variables page during execution of
Applications RCU under the Primary and Work Repository
component.
To stop creating this response file and resume later, click
Save. This action creates a partial response file. A partial
response file cannot be used to provision an environment.
Click Next to continue.
Chapter 12
Create a Response File
12-10

Table 12-2 (Cont.) Creating a Response File
Screen Description and Action Required
Domain Topology Configuration To determine the flow for the remaining wizard interview
screens, choose one of the options.
The types of possible topologies are:
•
Basic Topology: One host for all domains
•
Medium Topology: One host per domain
•
Advanced Topology: One host per application and
middleware component
Note that all hosts must use the same operating system.
For example, domain1 cannot be installed on Windows and
domain2 on Linux. Note that any of the Oracle Identity
Management hosts cannot be used as the host in the
Domain Topology Configuration. Installing Oracle Identity
Management and Oracle Fusion Applications on the same
host is not a supported topology.
See Domain Topology Configuration (page 12-17).
To stop creating this response file and resume later, click
Save. This action creates a partial response file. A partial
response file cannot be used to provision an environment.
Click Next to continue.
Common Domain
Note: Individual domain screens appear only if the One
host per application and middleware component option
is selected on the Domain Topology Configuration
screen.
Specify values for this domain and its middleware
dependencies. All hosts must use the same operating
system and share a common mount point for network
storage. The host specified for the Admin Server is the
default for all servers. The default host can be changed.
•
Host Name: Specify the host where the Managed
Servers for this domain is installed and configured.
Note that this host cannot be the same Oracle Identity
Management host.
•
Port: Port for internal communications only. The wizard
assigns values based on values on the System Port
Allocation screen. Port values can be edited. However,
these values must be unique within the domain and fall
within the range previously specified. For example, in a
range of 7401 to 7800, a value of 8444 generates an
error.
•
UCM Intradoc Server Port: Port where the Universal
Content Management Server listens.
•
InBound Refinery Server Port: Used for calling top-
level services.
To stop creating this response file and resume later, click
Save. This action creates a partial response file. A partial
response file cannot be used to provision an environment.
Click Next to continue.
Chapter 12
Create a Response File
12-11

Table 12-2 (Cont.) Creating a Response File
Screen Description and Action Required
Product Family Domains
Note: Individual domain screens appear based on
which options are selected on the Domain Topology
Configuration screen. For example, the Incentive
Compensation Domain screen does not appear unless
that product offering is selected for installation. All product
family domain screens prompt for the same types of values.
Specify values for this domain and its middleware
dependencies. All hosts must use the same operating
system and share a common mount point for network
storage. The host specified for the Admin Server is the
default for all servers. The default host can be changed.
•
Host Name: Specify the host where the Managed
Servers for this domain is installed and configured.
Note that this host cannot be the same Oracle Identity
Management host.
•
Port: Port for internal communications only. The wizard
assigns values based on values on the System Port
Allocation screen. Port values can be edited. However,
these values must be unique within the domain and fall
within the range previously specified. For example, in a
range of 7401 to 7800, a value of 8444 generates an
error.
Note: See Oracle Business Intelligence Configuration
(page 12-19) for Oracle Business Intelligence configuration
requirements.
To stop creating this response file and resume later, click
Save. This action creates a partial response file. A partial
response file cannot be used to provision an environment.
Click Next to continue.
Web Tier Configuration
Use this screen to configure Oracle HTTP Server and
choose a virtual host type. The web tier can be deployed
to a host inside the firewall, or outside the firewall
(demilitarized zone, known as DMZ).
See Web Tier Configuration (page 12-20) for the list of
parameters.
To stop creating this response file and resume later, click
Save. This action creates a partial response file. A partial
response file cannot be used to provision an environment.
Click Next to continue.
Virtual Hosts Configuration Provisioning determines the application domains to be
deployed based on the product offering choices and lists
them on this screen. Specify domain-specific values for the
type of virtual host mode that are selected on the Web Tier
Configuration screen.
See Virtual Hosts Configuration (page 12-23) for the list of
parameters.
To stop creating this response file and resume later, click
Save. This action creates a partial response file. A partial
response file cannot be used to provision an environment.
Click Next to continue.
Chapter 12
Create a Response File
12-12

Table 12-2 (Cont.) Creating a Response File
Screen Description and Action Required
Load Balancer Configuration Load balancing enables the distribution of a workload evenly
across two or more hosts, network links, CPUs, hard drives,
or other resources. Check Enable Load Balancing to take
advantage of this feature, and specify:
•
Internal Load Balancer Configuration: The host and
port for the internal Virtual IP (VIP).
•
External Load Balancer Configuration: The host and
port for external Virtual IP (VIP). It must have a publicly
available address to be usable.
To stop creating this response file and resume later, click
Save. This action creates a partial response file. A partial
response file cannot be used to provision an environment.
Click Next to continue.
Web Proxy Configuration
Create Proxy Settings to enable users who want to
use a proxy server to connect to the Internet. See Web
Proxy Configuration (page 12-24). Take note of the special
instructions for Oracle Customer Relationship Management
customers.
To stop creating this response file and resume later, click
Save. This action creates a partial response file. A partial
response file cannot be used to provision an environment.
Click Next to continue.
IDM Properties File When a response file is created or an incomplete response
file is updated without updates to this page, the IDM
properties file can be selected to load IDM configuration
data. After the file is selected, the content can be reviewed
and a decision to proceed with this file can be made.
WARNING: The file can be reviewed and a different file
can be selected, if it is required on this screen. An IDM
properties file cannot be selected after clicking Next, as the
screen displays read-only fields.
Disable loading IDM Configuration from IDM Properties
file: Select this option to avoid loading the IDM configuration
data from the IDM properties file.
Load IDM Configuration from IDM Properties file:
Select this option to set the values on the Identity
Management Configuration screen and the Access
and Policy Management Configuration screen to the
default values in the IDM properties file (for example,
idmsetup.properties
).
IDM Properties file: Enter the location of
the file, for example,
SHARED_CONFIG_DIR/fa/
idmsetup.properties
, where
SHARED_CONFIG_DIR
is
the shared configuration location that was selected in the
Install Location Configuration page of the Oracle Identity
Management Provisioning Wizard.
IDM Properties file contents: If a valid IDM properties file
is selected, the contents are displayed. This field is read-
only and cannot be modified.
Click Next to continue.
Chapter 12
Create a Response File
12-13

Table 12-2 (Cont.) Creating a Response File
Screen Description and Action Required
Identity Management
Configuration
Provisioning loads the roles, policies, and application IDs
that are created during the prerequisite Oracle Identity
Management installation. To share the identity management
environment across multiple Oracle Fusion Applications
installations, and make the policies and roles accessible
to all environments, populate identity management
configuration details during the first installation.
See Identity Management Configuration (page 12-26) for
the list of parameters. See also Distinguished Names
(page 12-25) for information about Distinguished Names
conventions.
To stop creating this response file and resume later, click
Save. This action creates a partial response file. A partial
response file cannot be used to provision an environment.
Click Next to continue.
Access and Policy Management
Configuration
Configure Oracle Fusion Applications for integration with
existing Oracle Access Manager components.
See Access and Policy Management Configuration
(page 12-28) for the list of parameters.
To stop creating this response file and resume later, click
Save. This action creates a partial response file. A partial
response file cannot be used to provision an environment.
Click Next to continue.
Summary Displays the applications and middleware components that
are installed when a physical installation is performed using
this response file. Includes details such as required disk
space and the installation locations.
See Summary (page 12-31) for a description of the
parameters.
Click Finish to save the response file. The response file is
complete and can be used as the basis for provisioning of a
new environment.
12.3.3 Oracle WebLogic Server Node Manager Credentials and
Installation Locations
Specify credentials for the Node Manager and supply the location of the various
directories required for installation and configuration actions on the Installation
Location screen. The credentials provided are used to configure the NodeManager,
secure WebLogic Server and OWSM keystores and wallets on the file system.
Ensure to use the specified user name and password to connect to the NodeManager
for starting and stopping servers.
Node Manager Credentials
• User Name: Specify a user name for the Node Manager role.
Chapter 12
Create a Response File
12-14
Tip:
This value is available in the Oracle Fusion Applications Installation
Workbook, Identity Management tab, Identity Store / Policy Store
table, FA Node Manager Username row.
• Password: Specify a password for the Node Manager and retype it in the Confirm
Password field.
Installation and Configuration
Provide locations of various directories that the administrator needs access to. Enter
the full file path in the Provisioning Wizard UI when asked to provide any file path,
such as Oracle Fusion Applications Home, Applications Configuration Directory, and
so on. Using symbolic link paths causes provisioning to fail in later phases.
• Installers Directory Location: Enter the path to the
repository_location
directory where the Oracle Fusion Applications software is extracted. This
software is obtained from the media pack downloaded from the Oracle Software
Delivery Cloud Portal.
Tip:
This value is available in the Oracle Fusion Applications Installation
Workbook, Storage tab, Temporary Shared Storage table, Installers
Directory Location row.
• Applications Base: Enter the directory path to the applications base directory.
The top-level directory for the Oracle Fusion Applications binaries is the
applications base and is referred to as the
APPLICATIONS_BASE
directory
(
net/mount1/appbase
). See Oracle Fusion Applications Oracle Home Directory
(page 2-34).
The applications base directory must not be set to the system root directory or set
to the root directory of a logical drive. Some lifecycle management tools compute
directory names by backing up one directory level from the applications base
directory and then appending the appropriate subdirectory name. These tools fail if
the applications base directory is set to the system root directory or set to the root
directory of a logical drive because it is not possible to back up one directory level
from the system root directory or from the root directory of a logical drive.
During creation of a provisioning plan in a UNIX environment, ensure that
the absolute file path of the
APPLICATIONS_BASE
directory does not exceed 59
characters before provisioning a new application environment.
Tip:
This value is available in the Oracle Fusion Applications Installation
Workbook, Storage tab, Install Directories table, FA Applications
Base row.
Chapter 12
Create a Response File
12-15
• Applications Configuration: This directory is automatically populated based on
the value specified in the Applications Base field. It is the path to the directory
where the configuration files for the domain are written. It is possible to specify a
different location instead of using the location automatically populated by the UI.
This directory must be empty.
Tip:
This value is available in the Oracle Fusion Applications Installation
Workbook, Storage tab, Install Directories table, FA Applications
Configuration Location row.
• Enable Local Applications Configuration: Select this checkbox to run the
Managed Servers from a non-networked (local) disk on the host, visible only to
the processes running on that host. If this option is enabled, the wizard copies the
domain configuration from the shared location and places it on the specified local
disk. This configures all Managed Servers to run from the non-networked location.
• Local Applications Configuration: Specify the location for the local domain
directory to be set up. This field is required if the option Enable Local
Applications Configuration is selcted. The specified directory must exist and
initially be empty on every host that participates in the domain topology. Ensure
the directory has sufficient disk space. During the Preverify phase, provisioning
displays an error if the local configuration directory does not have sufficient disk
space.
Tip:
This value is available in the Oracle Fusion Applications Installation
Workbook, Storage tab, Install Directories table, FA Local
Applications Configuration Location row.
Middleware Dependencies
• Font Directory: Appears only if Oracle Sales, Oracle Marketing, or Oracle
Financials offerings are selected. Enter the directory where the TrueType fonts
are installed. The location varies on different operating systems, but is typically
found here:
– Linux x86-64:
/usr/X11R6/lib/X11/fonts/TTF
– Oracle Solaris:
/usr/X11R6/lib/X11/fonts/TrueType
Some systems may not have TrueType fonts installed. If the fonts cannot be
located on the system, verify that they have been installed. In addition, use the
fonts directory shipped as part of the JRE installed in the repository. Regardless of
which path is specified, access to.ttf files.
Oracle Business Intelligence Repository Password
RPD Password: Specify and Confirm a password to allow access to the metadata
repository (RPD) for both Oracle Business Intelligence Applications and Oracle
Transactional Business Intelligence. The password must be between 8 and 30
characters and contain at least one digit. It can include letters, numbers, pound sign
(#), dollar sign ($), or underscore (_). Toinclude two consecutive dollar signs ($$) in the
Chapter 12
Create a Response File
12-16

RPD password, enter one additional dollar sign ($) as the escape character before the
second dollar sign in the password. This means it is necessary to enter three dollar
signs ($$$) for this field in the Provisioning Wizard to indicate two consecutive dollar
signs. Provisioning sets up this password, but does not actually access the repository.
12.3.4 System Port Allocation
Accept the default values or set a custom value for the Applications Base Port. The
application domain port ranges are derived from this value. If the base port value is
changed, the domain port ranges adjust accordingly. Ranges must not overlap and
must be set in ascending order.
Tip:
This value is available in the Oracle Fusion Applications Installation
Workbook, Network - Ports tab, Fusion Applications Port Numbers table,
Fusion Applications Base row.
Ports listed under Other Ports are not derived from the Applications Base Port value.
These individual ports can be defined using custom port values.
Tip:
Node Manager: This value is available in the Oracle Fusion Applications
Installation Workbook, Network - Ports tab, Fusion Applications Port
Numbers table, FA Node Manager row.
To stop creating this response file and resume later, click Save. This action creates
a partial response file. A partial response file cannot be used to provision an
environment. Click Next to continue.
If there are other software running on the provisioning hosts, ensure that the system
port allocation value in the provisioning response file is not a port already used
by other software. The system port allocation cannot be changed after starting
provisioning a new Oracle Fusion Applications environment. If a port conflict is
detected during provisioning phases, restart provisioning from the beginning with a
correct set of system port allocation. See Installation Phases and Types of Hosts in a
Multiple-Host Environment (page 13-2).
To display a list of network connections including the port numbers and process
identifier holding the ports, run these commands:
UNIX:
netstat -anp
12.3.5 Domain Topology Configuration
To determine the flow for the remaining wizard interview screens, choose one of the
topology types. Note that all occurrences of a
hostname
should use the same name in
the response file. A machine name could be a logical or virtual host name. It can either
Chapter 12
Create a Response File
12-17

be in fully qualified form,
mymachine.mycompany.com
, or short form,
myMachine
, if it is
consistent throughout the response file. See Edit Host Names (UNIX) (page 5-13).
The types of possible topologies are:
• Basic Topology: One host for all domains
• Medium Topology: One host per domain
• Advanced Topology: One host per application and middleware component
MANDATORY: Install Oracle Identity Management and Oracle Fusion Applications on
different hosts. Installing Oracle Identity Management and Oracle Fusion Applications
on the same host is not a supported topology.
• One host for all domains: Select this option to specify the Host Name to
provision all applications domains and their middleware dependencies on a single
host. The wizard continues the interview at the Web Tier Configuration screen
after clicking Next.
Tip:
This value is available in the Oracle Fusion Applications Installation
Workbook, Environment tab, Environment Info table, FA Topology
Type row :
For Basic topology, Select One Host For All Domains.
This value is available in the Oracle Fusion Applications Installation
Workbook, Topology tab, Component Assignment table:
All Components below must have the same node number in the Oracle
Fusion Applications Installation Workbook, use the abstract hostname
(or real hostname if absract is blank) that corresponds to that node # in
the Topology table:
– FA Common Domain
– FA CRM Domain
– FA Financials Domain
– FA HCM Domain
– FA IC Domain
– FA Procurement Domain
– FA Projects Domain
– FA Supply Chain Domain
– FA Business Intelligence Domain
• One host per domain: Select this option and then select a Host Name for each
domain to be created. Provisioning installs and configures the Managed Servers
for each Application Domain and the middleware dependencies on the host that
is specified. The wizard continues the interview at the Web Tier Configuration
screen after clicking Next.
Chapter 12
Create a Response File
12-18

Tip:
This value is available in the Oracle Fusion Applications Installation
Workbook, Environment tab, Environment Info table, FA Topology
Type row:
For Enterprise topology, select One Host Per Domain.
This value is available in the Oracle Fusion Applications Installation
Workbook, Topology tab, Component Assignment table:
Use the abstract hostname (or real hostname if abstract is blank) that
corresponds to the node # for the following components in the Topology
table:
– FA Common Domain
– FA CRM Domain
– FA Financials Domain
– FA HCM Domain
– FA IC Domain
– FA Procurement Domain
– FA Projects Domain
– FA Supply Chain Domain
– FA Business Intelligence Domain
• One host per application and middleware component: Select this option to
specify the host for each application and middleware component individually. The
wizard displays the Common Domain screen after clicking Next, and includes all
domain-specific screens in the interview.
This topology is not covered in the Oracle Fusion Applications Installation
Workbook by default, but it possible to use it as part of an Enterprise or Enterprise
HA example topology.
If the last option is selected, the selections cannot be changed on this screen after
clicking Next. Click Cancel, open a new wizard session, and create a new response
file to change the configuration domain topology later.
12.3.6 Oracle Business Intelligence Configuration
Oracle Business Intelligence products are integrated with, and accessible from, Oracle
Fusion Applications. Products include:
• Oracle Business Intelligence Enterprise Edition
• Oracle Business Intelligence Applications
• Oracle Transactional Business Intelligence
• Oracle Essbase
• Oracle Business Intelligence Publisher
• Oracle Real-Time Decisions
Chapter 12
Create a Response File
12-19

Enter the Host where the Oracle Business Intelligence products are installed. An RPD
password is specified on the Installation Location screen. Provisioning creates this
password and makes it available so that Oracle Business Intelligence Applications and
Oracle Transactional Business Intelligence can access the metadata repository in the
new environment.
The Oracle Fusion Applications installation and provisioning process installs the
Oracle BI Applications software components in the Business Intelligence Oracle home
but does no further setup. To finish setting up Oracle BI Applications, follow the
instructions in the Installing and Setting Up Oracle BI Applications in the Oracle
Business Intelligence Applications Installation Guide.
12.3.7 Web Tier Configuration
Virtual hosts can be created on a single web tier. There are three options (IP-based,
name-based, and port-based) for each domain that is created during installation. The
values assigned during installation are derived from the default HTTP port specified on
this screen. Note that all occurrences of a hostname should use the same name in the
response file. A machine name could be a logical or virtual host name. It can either
be in fully qualified form,
mymachine.mycompany.com
, or short form,
myMachine
, if it is
consistent throughout the response file. See Edit Host Names (UNIX) (page 5-13).
Web Tier
Install Web Tier in DMZ: Select this option if a separate host is setup for web tier
installation as a demilitarized zone (DMZ). This host does not have access to the
shared file system. It cannot be used for any other host deployed, regardless of
domain. See Setting Up a Demilitarized Zone (DMZ) for the Web Tier (page 6-9).
Tip:
This value is available in the Oracle Fusion Applications Installation
Workbook, Topology tab: Verify if the DMZ (Yes/No) column has the value
Yes for the node that corresponds to the component FA WebTier.
Fusion Applications Web Tier
• Host: Enter the name of the host where Oracle HTTP Server is installed and
configured.
Tip:
This value is available in the Oracle Fusion Applications Installation
Workbook, Topology tab: Use the Abstract Host Name column (or
real hostname if abstract is blank) for the node that corresponds to the
component FA WebTier.
• Virtual Host Mode: Select one of the following:
– IP Based: Created on the basis of an IP or IP:host combination (the default).
– Name Based: Create new DNS entries, such as
fin.example.com
and
crm.example.com
to use as virtual hosts.
Chapter 12
Create a Response File
12-20
– Port Based: Created based on the internal and external port for each domain.
WARNING: In the Provisioning Wizard, do not choose the Name Based virtual
host mode if it has been planned to specify Load Balancer Configuration details
on the next page. This combination is not recommended as it requires manual
changes during Oracle Fusion Applications Provisioning. Setting up Name Based
virtual hosts is not recommended if a Load Balancer is used.
Tip:
This value is available in the Oracle Fusion Applications Installation
Workbook, Network - Virtual Hosts tab, WebTier Virtual Host Mode
table, FA WebTier row, Mode column.
• Domain Name: Specify a domain name (using the format my.example.com) to
configure the domain in which Oracle Fusion Applications receives requests. This
value is also used as the default domain name for name-based virtual hosts.
Tip:
This value is available in the Oracle Fusion Applications Installation
Workbook, Environment tab, Environment Info table, Domain name
row.
• HTTP Port: The default port for the web tier. UNIX: Do not specify a port that
requires operating system administrator privileges.
Tip:
This value is available in the Oracle Fusion Applications Installation
Workbook, Network - Ports tab, Fusion Applications Port Numbers
table, FA Oracle HTTP Server row.
• HTTPS (SSL) Port: Secure port for the web tier. UNIX: Do not specify a port that
requires operating system administrator privileges.
WARNING: On UNIX platforms, using a port below 1024 requires root privileges
and Provisioning is not run as root user, so a HTTP/HTTPS port below 1024
should not be specified.
Tip:
This value is available in the Oracle Fusion Applications Installation
Workbook, Network - Ports tab, Fusion Applications Port Numbers
table, FA Oracle HTTP Server SSL row.
CRM Marketing Web Tier
Chapter 12
Create a Response File
12-21

If the Oracle Fusion Customer Relationship Management offering is selected in the
Provisioning Configurations Screen, the CRM Marketing Web Tier group with the
following fields is displayed:
• Host: Enter the name of the host where the Oracle HTTP Server dedicated for
CRM Marketing web tier is installed and configured.
• Virtual Host Mode: Select one of the following:
– IP Based: Created on the basis of an IP or IP:host combination.
– Name Based: Create new DNS entries, such as
fin.example.com
and
crm.example.com
to use as virtual hosts.
– Port Based: Created based on the internal and external port for each domain.
The default is to create an IP-based host.
• Domain Name: Specify a domain name (using the format my.example.com) to
configure the domain in which Oracle Fusion Applications receives requests. This
value is also used as the default domain name for name-based virtual hosts.
• HTTP Port: The default port for the web tier. It should not require operating system
administrator privileges.
• HTTPS (SSL) Port: Secure port for the web tier. It should not require operating
system administrator privileges.
SMTP Server
• Host: Specify the host for email marketing. This field appears only if the Oracle
Fusion Customer Relationship Management offering.
Tip:
This value is available in the Oracle Fusion Applications Installation
Workbook, Environment tab, Email Server table, SMTP Server Host
row.
• Port: Default port for the SMTP server.
12.3.8 Load Balancer Configuration
Load balancing enables to distribute a workload evenly across two or more hosts,
network links, CPUs, hard drives, or other resources.
Load Balancing Enabled: This checkbox is selected by default. Keep it checked if
load balancer is used in front of the Oracle Fusion Applications environment. Ensure
that the load balancer configuration is completed as described in Planning Load
Balancer Requirements (page 4-3) before proceeding and then specify the following:
• Internal Load Balancer Configuration: The host and port for the internal Virtual
IP (VIP).
Chapter 12
Create a Response File
12-22
Tip:
This value is available in the Oracle Fusion Applications Installation
Workbook, Network - Virtual Hosts tab, HTTP LBR Endpoints table.
• External Load Balancer Configuration: The host and port for external Virtual IP
(VIP). It must have a publicly available address to be usable.
Tip:
This value is available in the Oracle Fusion Applications Installation
Workbook, Network - Virtual Hosts tab, HTTP LBR Endpoints table.
To stop creating this response file and resume later, click Save. This action creates
a partial response file. A partial response file cannot be used to provision an
environment.
Click Next to continue.
12.3.8.1 Virtual Hosts Configuration
Specify the configuration parameters for the domains to be installed on the virtual
hosts that are selected on the Web Tier Configuration page. Note that all occurrences
of a
hostname
should use the same name in the response file. A machine name
could be a logical or virtual host name. It can either be in fully qualified form,
mymachine.mycompany.com
, or short form,
myMachine
, if it is consistent throughout the
response file.
If the Oracle Fusion Customer Relationship Management offering is selected in the
Provisioning Configurations Screen, the corresponding section IP-Based Virtual
Host for CRM Marketing with the following fields are displayed:
• Application Domain: The name of the Oracle Fusion Applications domain to be
provisioned.
• External Name: The host name or IP address for the external virtual host for this
domain or middleware dependency. The host:port should be visible from outside
the firewall.
• External Port: Port to be used for this external virtual host. The host:port should
be visible from outside the firewall.
If the IP Based option is selected, specify the following information for each
application domain listed:
Tip:
These values are available in the Oracle Fusion Applications Installation
Workbook, Network - Virtual Hosts tab, FA WebTier Virtual Hosts table.
• Internal Name: The host name where the web tier listens on the internal virtual
host for this domain. The host name can consist of letters A through Z (upper or
Chapter 12
Create a Response File
12-23

lower case), digits 0 through 9, minus sign (-) and period (.). The first character
must be a letter and the last character must not be a minus sign or a period.
• Internal Port: The port for this internal virtual host. Visible only from inside the
firewall.
• External Name: The host name for the external virtual host for this domain or
middleware dependency. The host name can consist of letters A through Z (upper
or lower case), digits 0 through 9, minus sign (-) and period (.). The first character
must be a letter and the last character must not be a minus sign or a period. The
host:port should be visible from outside the firewall.
• External Port: The port to be used for this external virtual host. The
host:port
should be visible from outside the firewall.
If the Name Based option is selected, specify the following information for each
domain listed:
• Internal.Name: The DNS name for this internal virtual host. For example, for
Oracle Fusion Financials, the name might be
fin-internal
.
• External.Name: The DNS name for this external virtual host. For example, for
Oracle Fusion Financials, the name might be
fin
.
If the Port Based option is selected, specify the following information for each domain
listed:
• Internal Port: The port that is visible only from inside the firewall for this domain.
• External Port: The port that is visible from outside the firewall for this domain.
12.3.9 Web Proxy Configuration
Create Proxy Settings to enable users who want to use a proxy server to connect to
the Internet.
Tip:
These values are available in the Oracle Fusion Applications Installation
Workbook, Environment tab, Web Proxy table.
• Enable Web Proxy: Select to enable proxy-related values to set up access to
the Internet. Note: For CRM customers, who have a web proxy for external
HTTP(S) traffic, select Enable Web Proxy on this screen and specify the web
proxy configuration.
• Web Proxy Host: Enter the name of the host where the proxy server is installed.
• Web Proxy Port: The listening port assigned to the proxy server.
• Enable Secure Web Proxy: Select to have the proxy server SSL-enabled. If this
check box is selected, the Secure Web Proxy Host and Secure Web Proxy Port
fields are enabled and become mandatory.
• Secure Web Proxy Host: Enter the SSL host used for secure communications.
• Secure Web Proxy Port: Enter the SSL port used for internal communications.
Chapter 12
Create a Response File
12-24

• No Proxy Hosts: Defaults to hosts that are connected directly. If there are
multiple hosts, they are listed and separated by a vertical bar (|). A wildcard
character (*) can be used to specify hosts that should be bypassed. For example,,
*.example.com
would bypass all hosts whose name ends with
.example.com
. The
localhost
value cannot be entered.
• Proxy Server Requires Authentication: To enable authentication for the proxy
server, select this option.
• User Name: Enter the user name that is set up for accessing the proxy server.
• Password: Enter the password that is set up for accessing the proxy server.
12.3.10 Distinguished Names
A Distinguished Name (DN) identifies an entry in a Lightweight Directory Access
Protocol (LDAP) directory. Because directories are hierarchical, DNs identify the entry
by its location as a path in a hierarchical tree (much as a path in a file system identifies
a file). Generally, a DN begins with a specific common name, and proceeds with
increasingly broader areas of identification until the country name is specified.
Table 12-3 (page 12-25) provides definitions for distinguished name components
(defined in the X.520 standard).
Table 12-3 Distinguished Name Components
Component Definition
Common Name (CN) Identifies the person or object defined by the entry. For example,
cn=John Doe
. Or
cn=corpDirectory.example.com
.
Organizational Unit (OU)
Identifies a unit within the organization. For example,
ou=scm
.
Organization (O) Identifies the organization where the entry resides. For example,
o=My Corporation
.
Locality (L) Identities the place where the entry resides. The locality can
be a city, county, township, or any other geographic region. For
example,
l=City
.
State of Province Name (ST) Identifies the state or province in which the entry resides. For
example,
st=State
.
Country (C) Identifies the name of the country where the entry resides. For
example,
c=US
Domain Component (DC) Identifies the components of a domain. For example, if the
domain is
example.com
, the domain components would be:
dc=example, dc=com
.
12.3.11 Oracle Identity Management Properties File
When a response file is created or an incomplete response file is updated without
updates to this page, it is possible to select the IDM properties file to load Oracle
Identity Management configuration data. After selecting the file, review the content and
decide if proceeding or not with this file.
WARNING: Review the file and select a different file if required on this screen. An IDM
properties file cannot be selected after clicking Next, as the screen displays read-only
fields.
Chapter 12
Create a Response File
12-25
• Do not load IDM Configuration from IDM Properties file: Select this option to
avoid loading the IDM configuration data from the IDM properties file.
• Load IDM Configuration from IDM Properties file: Select this option to
default the values on the Identity Management Configuration screen and the
Access and Policy Management Configuration screen to the values in the IDM
properties file (for example,
idmsetup.properties
). For more information about
the IDM properties file, see Pass Configuration Properties File to Oracle Fusion
Applications (page 10-23).
• IDM Properties file: Enter the location of the file, for example,
SHARED_CONFIG_DIR/fa/idmsetup.properties
, where
SHARED_CONFIG_DIR
is the
shared configuration location selected on the Install Location Configuration
page of the Oracle Identity Management Provisioning Wizard.
Tip:
This value is available in the Oracle Fusion Applications Installation
Workbook, Identity Management tab, IDM Provisioning Files tables,
IDM Properties File Location row.
• IDM Properties file contents: If a valid IDM properties file is selected, the
contents are displayed. This field is read-only and cannot be modified.
12.3.12 Identity Management Configuration
Enter the parameters necessary to integrate applications with a previously installed
Oracle Identity Management infrastructure. If the values in the IDM properties file (for
example, idmsetup.properties) are chosen on the IDM Properties File screen to be
used, they appear as defaults in the corresponding fields. The default values can be
changed if the original configuration has changed.
• Super User Name: By default this field contains the value
FAAdmin
. Enter the
name of an existing user that should be granted administrator and functional setup
privileges. The
uid
attribute must be set to be the same as the
cn
attribute.
Tip:
This value is available in the Oracle Fusion Applications Installation
Workbook, Identity Management tab, Identity Store / Policy Store
table, FA Super User Name row.
• Create Administrators Group: Indicate whether an Administrators group was
created, whose members have specialized privileges for all Oracle Fusion
Middleware components. If this group is not already present in the identity store,
this box should be checked.
• Create Monitors Group: Indicate whether a Monitors group was created, whose
members have read-only administrative privileges to Oracle WebLogic Server
domains. If this group is not already present in the identity store, this box should
be checked.
Chapter 12
Create a Response File
12-26

• Create Operators Group: Indicate whether an Operators group was created,
whose members have Monitors privileges to Oracle WebLogic Server domains. If
this group is not already present in the identity store, this box should be checked.
• Identity Store Server Type: Indicate the type of identity store that was set
up during Oracle Identity Management provisioning. The available options are
OID (Oracle Internet Directory) or OVD (Oracle Virtual Directory). If OVD is
selected, the Default to Identity Store check box in Oracle Platform Security
Services Configuration must be unchecked and the policy store cannot be the
same instance as the identity store. Using OVD for policy store is not currently
supported.
Tip:
This value is available in the Oracle Fusion Applications Installation
Workbook, Identity Management tab, Identity Store / Policy Store
table, ID Store Type row.
• Use SSL to Communicate With Identity Store: This feature is not enabled in this
release.
• Identity Store Host: Enter the host or DNS name for the identity store LDAP
service. This can be the host name of the identity server or the host name for the
load balancer endpoint load balancing multiple identity servers.
• Identity Store Port: The port assigned to the identity store. This can be the port
of the identity server or the port for the load balancer endpoint load balancing
multiple identity servers.
Tip:
The value for the Identity Store Port is available in the Oracle Fusion
Applications Installation Workbook, Network - Ports tab, Identity
Management Port Numbers table.
• Identity Store Secure Port: The SSL port assigned to the identity store. This
feature is not enabled for this release. This can be the secure port of the identity
server or the secure port for the load balancer endpoint load balancing multiple
identity servers.
• Identity Store User DN: Enter the Distinguished Name of the user that is set up
with read-write access to the LDAP.
• Identity Store Password: Enter the password that is set up for the user with
read-write access to the LDAP.
• Identity Store Read-only User DN: Enter the Distinguished Name (DN) of the
user that is set up with read-only access to the Identity Store LDAP.
• Identity Store Read-only Password: Enter the password that is set up for the
identity store read-only user.
• Identity Store User Name Attribute: Choose the type of user name attribute that
is configured in the identity store. Valid values are: user ID (uid), common name
(CN), or email address.
Chapter 12
Create a Response File
12-27

• Identity Store User Login Attribute: Enter the name of the attribute that needs to
match for the user to be authenticated.
• Identity Store User DN Attribute: Enter the attribute that defines the
Distinguished Name (DN) of the user.
• Identity Store Object Classes For User Creation: Enter the object classes to be
assigned to a new user created in identity store, in a comma-separated list of user
object class names.
• Identity Store Object Classes For Group Creation: Enter the object classes to
be assigned to a new group created in identity store, in a comma-separated list of
group object class names.
• Identity Store User Base DN: Enter the root Distinguished Name assigned to the
upload of applications user data. This is the root for all the user data in the identity
store.
• Identity Store Group Base DN: Enter the root Distinguished Name for all the
group data in the identity store.
• IDM Weblogic Admin Username: Enter the Weblogic administrator user name for
the IDM Weblogic domain. Accept the default value if the IDM was created using
the IDM provisioning.
• IDM Weblogic Admin Password: Enter the password for the Weblogic
administrator user in the IDM Weblogic domain.
The wizard warns if it cannot connect to the database. If this warning represents
an exception, ignore it and continue creating the response file. However, all issues
must be fixed before starting to provision an environment. Provisioning cannot be run
successfully until all validation have passed.
Tip:
This value is available in the Oracle Fusion Applications Installation
Workbook:
For Basic topology: Topology tab, Topology table, Abstract Host Name
column (or real if abstract is blank) for node corresponding to the IDM
Identity and Access component. For Enterprise/Enterprise HA: Network -
Virtual Hosts tab, HTTP LBR Endpoints table, IDM row.
12.3.13 Access and Policy Management Configuration
Enter the parameters necessary to integrate applications with a previously installed
Oracle Identity Management infrastructure. If the values in the IDM properties file (for
example,
idmsetup.properties
) are chosen on the IDM Properties File screen to be
used, they appear as defaults in the corresponding fields. Replace the defaults if the
original configuration has changed.
Oracle Access Manager Configuration
• OAM Admin Server Host: Enter the name of the host where the Administration
Server for Oracle Access Manager exists.
Chapter 12
Create a Response File
12-28
Tip:
This value is available in the Oracle Fusion Applications Installation
Workbook:
For Basic topology: Topology tab, Topology table, Abstract Host
Name column (or real if abstract is blank) for node corresponding to
the IDM Identity and Access component. For Enterprise/Enterprise HA:
Network -Virtual Hosts tab, AdminServer Virtual Hosts/VIPs table,
IDMDomain AdminServer row.
• OAM Admin Server Port: Enter the port number for the Oracle Access Manager
Administration Server.
Tip:
This value is available in the Oracle Fusion Applications Installation
Workbook, Network - Ports tab, Identity Management Port Numbers
table, IDMDomain AdminServer row.
• OAM Administrator User Name: Enter the name assigned to this user when
Oracle Access Manager was installed.
Tip:
This value is available in the Oracle Fusion Applications Installation
Workbook, Identity Management tab, OAM table, OAM Administrator
User Name row.
• OAM Administrator Password: Enter the password assigned to this user when
Oracle Access Manager was installed.
• OAM HTTP Internal Endpoint URL: The internal access point on the Oracle
HTTP Server for Oracle Access Manager.
• OAM HTTP(S) External Endpoint URL: The access point to use for accessing
the Oracle Access Manager application using a browser.
• OAM AAA Server Host: Enter the name of the proxy host where the Oracle
Access Manager is installed.
Tip:
This value is available in the Oracle Fusion Applications Installation
Workbook, Topology tab, Topology table, Abstract Host Name (or
Real if abstract is blank) for node corresponding to the IDM Identity and
Access component.
• OAM AAA Server Port: The port number for the Oracle Access Manager listener
on the OAM proxy host.
Chapter 12
Create a Response File
12-29
Tip:
This value is available in the Oracle Fusion Applications Installation
Workbook, Network - Ports tab, Identity Management Port Numbers
table, IDMDomain OAM AAA Server Port row.
• Access Server Identifier: Name used to identify the Oracle Access Server.
Tip:
This value is available in the Oracle Fusion Applications Installation
Workbook, Identity Management tab, OAM table, Access Server
Identifier row.
• Enable Second Primary Oracle Access Manager: Select this checkbox to name
a second Primary Oracle Access Manager for high availability.
• Second Access Server Identifier: This defaults to
aaa2
, the name of the second
Primary Oracle Access Manager Server.
Tip:
This value is available in the Oracle Fusion Applications Installation
Workbook, Identity Management tab, OAM table, Second Access
Server Identifier row.
• Webgate Password: Specify a password for the Resource WebGate. It must
contain at least eight alphanumeric characters and at least one digit or punctuation
mark. Retype to Confirm the password. If seeding of security data is disabled, the
password must be the existing WebGate password.
Oracle Platform Security Services Configuration
• OPSS Policy Store JPS Root Node: This is the Distinguished Name of the node
to be used as the OPSS policy root for Oracle Fusion Applications. This field is
read-only and the default value is set as cn=FAPolicies.
Tip:
This value is available in the Oracle Fusion Applications Installation
Workbook, Identity Management tab, LDAP table, FA JPS Root DN
row.
Identity Management Keystore Configuration
The IDM Keystore file and password value fields are enabled if either
the Identity Store, the OPSS Store, or the OIM endpoint is SSL-enabled.
These fields are populated by the values from the IDM properties file (
for
example,idmsetup.properties
), if the file that contains these values exists. Edit these
values if the fields are enabled.
Chapter 12
Create a Response File
12-30

• IDM Keystore File: Enter the location of the JKS keystore containing the
certificates for the Oracle Identity Management components.
• IDM Keystore Password: Enter the password that is set up for the IDM Keystore
File.
Note: The wizard warns if it cannot connect to the database. If this warning represents
an exception, ignore it and continue creating the response file. However, all issues
must be fixed before starting to provision an environment. Provisioning cannot be run
successfully until all validation have passed.
12.3.14 Summary
Verify that the installation represented on this screen is correct. Click Back to return to
the interview screens that require changes. Complete the following information:
• Response File Name: Specify a unique file name for this response file. This is the
executable file that is supplied to the wizard when prompted for other options.
• Provisioning Summary: Specify a unique name for the summary details file. This
file cannot be used to execute the response file.
• Directory: Enter the directory path where this response file and the summary file
will be saved. Choose a location that is visible to all servers accessing shared
storage. Make sure the location is not read-only.
Record the name of the response file and its location. Supply it to the system
administrator to use when performing system maintenance tasks.
12.4 Update an Existing Response File
During the response file creation process, it is possible to create a partial response
file, which contains an incomplete set of configuration details. To create a partial
response file, click Save at any point during the interview. To continue with the creation
of the response file, start the wizard and select Update an Existing Response File
from the Installation Options screen. Page through the screens and continue where it
was left off.
Clicking Cancel is another way to create a partial response file, or, alternatively, exit
the wizard without saving any response file details:
1. Start the Provisioning Wizard and choose Create a New Applications
Environment Response File from the Installation Options screen.
2. Begin the interview process and continue to the point to end the session. Click
Cancel.
3. Choose one of the following options:
• Save and Exit: Save the details created for this response file. Creates a
partial response file.
• Exit: Exits the wizard without saving any details. Does not create a partial
response file.
• Cancel: Does not exit the wizard and stays in the current page. Continue
with the interview by returning to the Welcome screen in the wizard interview.
Does not save the details entered and does not create a partial response file.
Chapter 12
Update an Existing Response File
12-31

4. Choose Save and Exit. The partial response file is saved in the directory where
the wizard is started.
5. To add more details to the response file, start the Provisioning Wizard and choose
Update an Existing Response File. Specify the Response File location, or click
Browse to navigate to the partial response file.
6. Page through the interview screens until coming to the point where the last
session was stopped and move through the rest of the interview as described
in Table 12-2 (page 12-5) until the process is finished.
Save a partial response file and return to the wizard as many times as necessary to
complete it. The wizard does not recognize a response file as being complete or valid
until clicking Finish on the Summary screen.
Update also a completed response file if it has not been implemented. Note that after
selecting product offerings for a partial or completed response file, the mix cannot be
changed by updating the response file. Start a new wizard session and create a new
response file.
12.5 Next Steps
After saving the response file, return to the Installation Options screen and select the
Provision an Applications Environment option to perform the physical installation.
Or, create another response file to use for another type of installation, for example, to
create a test or demonstration environment.
• To create another response file, repeat the tasks in Create a Response File
(page 12-4). Save the new response file.
• To use a response file to provision a new environment, go to Provision a New
Oracle Fusion Applications Environment (page 13-1).
Chapter 12
Next Steps
12-32

13
Provision a New Oracle Fusion
Applications Environment
This section describes in detail the tasks necessary to perform a physical installation,
configuration, and deployment of the product offerings specified in the response file.
This section includes the following topics:
• Introduction to Provisioning a New Oracle Fusion Applications Environment
(page 13-1)
• Installation Phases and Types of Hosts in a Multiple-Host Environment (page 13-2)
• Prerequisites to Provisioning a New Oracle Fusion Applications Environment
(page 13-3)
• Provision a New Environment on Multiple Hosts (page 13-4)
• Perform the Installation (page 13-5)
• What to Do Next (page 13-17)
13.1 Introduction to Provisioning a New Oracle Fusion
Applications Environment
In the response file that is created, the configuration details necessary to run a
physical installation of Oracle Fusion Applications product offerings are specified. For
full-scale environments, typically the offerings must be provisioned on multiple hosts,
and the installation must be run from a shared drive that is accessible to all hosts.
The installation process is run in phases, in an assigned order. Complete each
phase, in order, on each host, before moving to the next phase. All phases must be
completed successfully on all the hosts in the environment to create a fully operational
applications environment.
If a failure is encountered with any of the provisioning phases, see Troubleshoot an
Oracle Fusion Applications Environment (page 14-1), for information about how to
recover from failure, by automatically completing the cleanup phase on all provisioning
hosts, followed by the restore phase on all provisioning hosts.
After the cleanup and restore phases are complete without failure on all provisioning
hosts, rerun the provisioning phase on the provisioning hosts that failed previously,
then continue with the remaining provisioning phases. Do not rerun the provisioning
phase on the provisioning hosts that were successful.
13-1

13.2 Installation Phases and Types of Hosts in a Multiple-
Host Environment
Provisioning provides scripts that read from the response file and take action for each
installation phase (target). As each phase is run, its progress is tracked on a related
screen in the Provisioning Wizard user interface.
Run the Provisioning Wizard on the primordial host to create a provisioning response
file. If the Provisioning Wizard is run on a non-primordial host to create a provisioning
response file, the validation assumes that the host is the primordial host. Ensure that
the validation errors are interpreted correctly as they may not be applicable to the
non-primordial host.
When provisioning a new environment, the Provisioning Wizard should only be run on
the primordial host and the Provisioning Command-Line Interface on non-primordial
hosts.
Installation phases and the names of the tracking screens are as follows:
• Preverify: Checks to see that all prerequisites are present. Tracked on the
Prerequisite Checks screen.
• Install: Installs applications, middleware, and database components. Creates the
applications Oracle home directory. Tracked on the Installation screen.
The database schema owner password complexity check is run at the end
of the Install phase. See Database Schema User Password Complexity Rule
(page 8-30).
• Preconfigure: Prepares application and middleware components for deployment
and creates
appid
users and groups. Modifies the Oracle Application Development
Framework (Oracle ADF) configuration file in the applications enterprise archive
(EAR) files to use the database as the Oracle Metadata Services (MDS)
Repository. Also updates the connections.xml file in all applications EAR files with
endpoint information. Tracked on the Preconfigure screen.
• Configure: Creates and configures Oracle WebLogic Server domains, Managed
Servers, and clusters; applies templates; creates and configures data sources,
queues, and topics; configures middleware (wiring); and deploys applications
product offerings to domains. Tracked on the Configure screen.
• Configure-secondary: Performs the configure actions on a primary or secondary
host or both. If there is no primary or secondary host, or if there is only a primary
host, this phase runs, but takes no action. Tracked on the Configure Primary/
Secondary screen.
• Postconfigure: Performs online tasks, such as configuring the Node Manager,
deploying the service-oriented architecture (Oracle SOA Suite) composite,
establishing Oracle HTTP Server wiring, seeding policies, and setting up
postdeployment security configuration. Tracked on the Postconfigure screen.
• Startup: Starts the Administration Server and Managed Servers for each domain
on the host where this phase is running. Tracked on the Startup screen.
• Validate: Performs a variety of post-provisioning validations, such as server and
application availability, successful loading of identity credentials, and validation of
data source. Tracked on the Validation screen.
Chapter 13
Installation Phases and Types of Hosts in a Multiple-Host Environment
13-2

Actions related to Oracle Identity Management components are performed only in
specific phases. See Installation Phase Actions for Oracle Identity Management
Components (page 10-15).
If a failure is encountered and the automatic cleanup and restore phases are
executed, the cleanup and restore phase runs these tasks automatically:
Cleanup: Shuts down processes started during a failed phase and performs the
necessary cleanup actions. If the automated cleanup fails, manually stop all processes
except the Node Manager on all hosts including OPMN and Java EE processes
before running the restore action. Note, however, all processes must be stopped if
the cleanup action is running on the configure phase.
Restore: The necessary restore actions required for a given provisioning phase. This
action deletes and restores the instance directory, and, if necessary (and available),
restarts the Common domain Administration Server and Oracle HTTP Server.
See Recovery After Failure (page 14-4) for more information about cleanup and restore
actions.
The number of hosts and their purpose determines the order in which the applications
environment is provisioned.
• Primordial host: Location of the Common domain (specifically the Administration
Server of the Common domain). Only one primordial host exists in each
environment.
• Primary host: Location where the Administration Server for a domain runs. Only
one primary host exists in a domain.
• Secondary host: Location where the Managed Servers for any application reside
when they are not on the same host as the Administration Server of the same
domain. The term, secondary host, is meaningful when a domain spans across
more than one physical server. The server(s) that does not have the administration
server is(are) called secondary host(s).
• DMZ host: A host that cannot access the shared storage within the firewall is said
to be in a demilitarized zone (DMZ). Typically used to install Oracle HTTP Server
so that restrictions on communication with components within the firewall can be
enforced. See Set Up a Demilitarized Zone (DMZ) for the Web Tier (page 6-9).
Run the Provisioning Wizard on the primordial host to create a provisioning response
file. If the Provisioning Wizard is run on a non-primordial host to create a provisioning
response file, the validation assumes that the host is the primordial host. Ensure that
the validation errors are interpreted correctly as they may not be applicable to the
non-primordial host.
When provisioning a new environment, the Provisioning Wizard should only be run on
the primordial host and the Provisioning Command-Line Interface on non-primordial
hosts.
13.3 Prerequisites to Provisioning a New Oracle Fusion
Applications Environment
Before beginning the physical installation, ensure that the following tasks have been
completed:
• All setup details as described in Prepare for an Installation (page 5-1)
Chapter 13
Prerequisites to Provisioning a New Oracle Fusion Applications Environment
13-3

• All installation tasks associated with the transaction database as described in
Install Oracle Fusion Applications Transaction Database (page 8-1)
• A response file with the required configuration details as described in Create a
Response File (page 12-1)
For Solaris 11 Only
Ensure that the Solaris Package SUNWttf-bh-luxi is installed on the FA servers. Do
this for both Oracle Solaris on SPARC (64-bit) and Oracle Solaris on x86-64 (64-bit)
platforms.
For Solaris 11.3, ensure that the OS level packages installed are of version 11.3.3.6.0
or higher.
13.4 Provision a New Environment on Multiple Hosts
To provision a new environment, start the Provisioning Wizard on the primordial host,
make a selection from the options menu, and indicate the location of the response file.
The wizard presents a review of the details in the response file on a series of interview
screens.
Changes can be made to most of the response file details on the interview screens.
However, changes cannot be made to the product offerings. A new response file must
be created to change the offering mix.
After completing the preverify phase successfully on all the hosts in the environment,
and clicking Next to start the install phase on the primordial host, it is not longer
possible to modify any sections of the response file.
Run the phases in order, and complete each phase on all hosts in the environment
before beginning the next phase. The Provisioning Wizard enables to monitor the
progress and success of each phase across all hosts.
If a separate DMZ host is setup for the web tier, open a separate terminal session
for that host and run all provisioning phases (except the preverify phase). To ignore
preverify phase errors, use the command line argument
-ignoreSysPrereqs
true in the
runProvisioning command. It is not possible to view the build processes on the DMZ
host on the primordial host interface because the DMZ host does not have access to
the shared network drive.
For example, if there are three hosts — Host A (primordial host), Host B (primary host)
and Host C (secondary host) — the process of provisioning those hosts works like this:
1. Open a terminal session on Host A, Host B, and Host C. Log in to each host.
2. Start the Provisioning Wizard on Host A, select Provision an Applications
Environment, and specify the location of the response file.
3. Page through the wizard screens and make any necessary changes to the
response file details displayed. If the option to view individual domain details on
the Provisioning Configuration screen is selected, those screens are also added
to the interview. Review the summary of installation actions that is taken for this
response file.
4. When clicking Next on the Summary screen, the wizard initiates the preverify
phase on Host A and displays the Prerequisite Checks screen. Track the
progress of this phase on this screen.
Chapter 13
Provision a New Environment on Multiple Hosts
13-4

5. From the command line on the Host B and Host C terminal sessions, enter the
syntax to run the preverify phase. (Do not wait for a phase to run to completion on
the primordial host before starting the same phase on any of the other hosts.)
6. View the results of the preverify phase for all hosts on the Prerequisite Checks
screen. The Next button is not enabled until the preverify phase has been
completed successfully on all hosts. Click Back to navigate through previous
screens to fix errors. Resolve all errors before continuing.
After clicking Next to move to the Installation screen (the install phase), it is not
longer possible to go back to previous screens.
7. When there are no errors, click Next to initiate the install phase on Host A.
8. From the command line on the Host B and Host C terminal sessions, enter the
syntax to run the install phase.
9. View the results on the Installation screen on Host A. When the phase has
been completed successfully on all hosts, click Next on the Installation screen
to initiate the next phase and display the next tracking screen. The phases are
listed in Installation Phases and Types of Hosts in a Multiple-Host Environment
(page 13-2).
10. Repeat this process for the remaining phases until all have been completed
successfully.
A full backup of the provisioning and configuration state is performed automatically
at the end of each successfully completed phase. The backup is saved in
APPLICATIONS_BASE/restart/
.
13.5 Perform the Installation
To provision an environment, start the Provisioning Wizard and page through the
installation screens to initiate each phase and monitor the build processes. Note that
Oracle Fusion Middleware Oracle homes and Oracle Fusion Applications Oracle home
are read-only, and customers are not expected to update or install any components
manually to these home directories. These home directories can be updated only by
Oracle Fusion Applications lifecycle tools, such as Provisioning, RUP Installer, and
Patch Manager.
WARNING: If any warnings were ignored during the creation of the response file,
fix all issues stated in the warnings before successfully provisioning an environment.
Make those changes in this installation interview. The wizard saves the changes to the
original response file and proceeds with the new instructions. All validations must pass
before running the install phase.
13.5.1 Start the Wizard and Prepare to Install
Ensure that the inventory pointer file (
oraInst.loc
) was created when the provisioning
framework was installed. If the file was created in
/etc
, ignore the -
invPtrLoc
command line argument. If the file was created in another location, add the -
invPtrLoc
argument to the command line syntax and indicate the location of the inventory. See
Use the Command-Line Interface for Installations on the Primary and Secondary Hosts
(page 13-15).
To start provisioning the new environment:
1. Open a terminal session and log in to the primordial host.
Chapter 13
Perform the Installation
13-5

2. Open a terminal session and log in to each of the other hosts in the environment,
including the DMZ host (if present).
3. Set the
JAVA_HOME
environment variable to point to the JDK location in the
provisioning repository. For example:
UNIX:
export
JAVA_HOME
=
repository_location
/
jdk
export
PATH
=$
JAVA_HOME/bin:$PATH
4. Verify that the LIBPATH value is null.
5. On UNIX systems, set the DISPLAY environment variable to an active and
authorized display.
6. Run the following command on the primordial host:
UNIX:
cd framework_location/provisioning/bin
./provisioningWizard.sh
Solaris:
Use
bash provisioningWizard.sh
instead of
./provisioningWizard.sh
.
MANDATORY: Steps 3 to 6 must be applied on the primordial host and also on all
other provisioning hosts specified in the provisioning response file.
In UNIX, by default, the provisioning framework uses the directory specified in
the environment variable
$PROVTMP
, as the location to write temporary files during
provisioning. If it is not defined then the value specified in the following environment
variables is used:
$TMPDIR
,
$TMP
,
$TEMP
. If none of these is set, then
/tmp
is used.
To change the temporary location, set the
$PROVTMP
environment variable before
starting the Provisioning Wizard and provisioning command line.
13.5.2 Install Oracle Fusion Applications
Table 13-1 (page 13-6) illustrates the steps required to provision a new environment
on multiple hosts. Notice that after running the first phase (preverify) on all hosts, the
steps to run the remaining phases are the same. Move to each subsequent phase, in
the assigned order.
In the table, UI denotes a step performed in the Provisioning Wizard, and CLI denotes
a step performed on the command line.
For help with any of the Provisioning Wizard screens, click Help.
When the Provisioning Wizard is run to provision an applications environment and any
issue occurs during provisioning, the error and warning messages are displayed at the
bottom of the screen.
Table 13-1 Provisioning a New Applications Environment
Interface (UI or CLI) Action Required
UI: Welcome Screen No action is required on this read-only screen.
Click Next to continue.
Chapter 13
Perform the Installation
13-6

Table 13-1 (Cont.) Provisioning a New Applications Environment
Interface (UI or CLI) Action Required
UI: Specify Central Inventory
Location
This screen displays only if one or more of the following
conditions are not met:
•
The
-invPtrLoc
option is used to specify the central
inventory location on non-Windows platforms. Thus, the
default value for the platform is not used. Note that the
default value for Linux platforms is
/etc/oraInsta.loc
.
For Solaris, the default value is
/var/opt/oracle/
oraInst.loc
.
• The Central Inventory Pointer File is readable.
• The Central Inventory Pointer File contains a value for
inventory_loc
.
•
The
inventory_loc
directory is writable.
•
The
inventory_loc
directory has at least 150K of space.
•
inventory_loc
is not an existing file.
Specify the location of the Central Inventory Directory that
meets the previous criteria. The
inventory_loc
directory can
be created by the
createCentralInventory.sh
script and
does not have to exist at the time its location is specified.
For non-Windows platforms, in the Operating System Group
ID field, select or enter the group whose members are granted
access to the inventory directory. All members of this group can
install products on this host. Click OK to continue.
The Inventory Location Confirmation dialog prompts to run
the
inventory_directory
/
createCentralInventory.sh
script as root, to confirm that all conditions are met and
to create the default inventory location file, such as
/etc/
oraInst.loc
. After this script runs successfully, return to the
interview and click OK to proceed with the installation.
To continue the installation without root access, select Continue
installation with local inventory. Click OK to proceed with
the installation. For information about setting the Inventory
Directory, see oraInventory Planning (page 4-19). Note that the
directory specified for
inventory_loc
in the
oraInst.loc
file must be created already. Otherwise, the preverify phase
reports this as an error and it must be corrected by creating the
directory in the file system before continuing.
For more information about inventory location files, see Oracle
Universal Installer Inventory in the Oracle Universal Installer
User's Guide.
Click Next to continue.
UI: Installation Options
Screen
Presents the list of valid installation options that can be
performed using the provisioning wizard. Select Provision an
Applications Environment.
Enter the path in the Response File field to the response file
to be used to provision the environment. Or click Browse to
navigate to the response file location.
Click Next to continue.
Chapter 13
Perform the Installation
13-7

Table 13-1 (Cont.) Provisioning a New Applications Environment
Interface (UI or CLI) Action Required
UI: Response File
Description Screen
This is the information entered when the response file was
initially created. It is not associated in any way with the
executable plan file, or the summary file, that is saved when this
response file was initially created. It is possible to change the
response file name, version, and description before provisioning
is run.
•
Response File Name: Specify a name to identify this
response file.
•
Response File Version: Assign a version to this response
file. Version numbers are intended only for documentation
purposes.
•
Created By: Defaults to the operating system user who
invoked the wizard. Set when the response file is initially
created and cannot be modified for the current response
file.
•
Created Date: Defaults to the date that the response file
was initially created and saved. Set when the response file
was initially created and cannot be modified for the current
response file.
•
Response File Description: Provide a description of this
response file.
Click Next to continue.
UI: Installation Location
Screen
Displays the credentials for the Node Manager and the directory
locations entered in the response file. If these values have
changed, make corrections on this screen. See Installation
Location Details (page 13-12).
Click Next to continue.
UI: Review Provisioning
Configuration Screen
Lists the wizard interview screens where the domain-specific
parameters were originally specified for this response file.
Changes can be made to this information if necessary.
Note: If any warnings are ignored during the creation of this
response file, all issues stated in the warnings must be fixed
before successfully provisioning an environment. Select any
of the screens displayed here to make changes for a product
domains with warnings. All validations must pass before running
the install phase.
Product offerings cannot be added or deleted to this response
file. To change product offerings, create a new response file.
Select one or more options from the list. After clicking Next, the
screens selected are added to the flow. Note that in case of
returning to this screen after running the preverification checks,
those verification checks are invalidated. Thus, run the Preverify
phase again.
Click Next to continue.
Chapter 13
Perform the Installation
13-8

Table 13-1 (Cont.) Provisioning a New Applications Environment
Interface (UI or CLI) Action Required
UI: Summary Screen Review the information displayed to ensure that the installation
details are correct. To make changes, click Back to return to
previous screens in the interview.
Click Next to initiate the preverify phase. The wizard displays
the Prerequisite Checks screen, and creates a current copy
of this response file. The response file is saved in the directory
indicated in the message pane.
Click Next to continue.
UI: Prerequisite Checks
Screen
The preverify phase performs prerequisite checks for Oracle
Fusion Applications provisioning on the primordial host. The
host is marked with a Home symbol in the Host column. The
Domains column lists the domains that are being deployed.
After this phase has been inititated on the primary and
secondary hosts (from the command line), the build processes
for those hosts are also shown. The Status column indicates
the progress of each phase for each host:
•
Block: Processing has not yet started on this host for the
named phase.
•
Clock: Performing the build for a phase.
•
Check mark: The build was completed successfully.
•
x mark: The build has failed for this phase. Correct the
errors before continuing.
•
Restricted symbol: The validation process has stopped
due to a failure within another process.
Click an x or a Restricted symbol to display messages about
failures. Click the host-level Log file for details about this phase.
Click a build Log file to see details specific to that build.
Changes can be made to the interview screens and rerun the
preverify phase as many times as is necessary. Note that
when changes to the response file are made and preverify is
rerun, Oracle Fusion Applications Provisioning requires that the
application configuration directory be empty.
Click Retry to rerun this phase if errors are reported. Fix all
errors before continuing. See Troubleshooting Preverify Phase
Errors (page 14-8).
Chapter 13
Perform the Installation
13-9

Table 13-1 (Cont.) Provisioning a New Applications Environment
Interface (UI or CLI) Action Required
CLI and UI: Run the
preverify phase on primary
and secondary hosts from the
command line and monitor
progress in the UI.
In the terminal session for the primary and secondary host, run
the preverify phase with this command:
UNIX:
path_to_script/runProvisioning.sh -
responseFile provisioning_response_file_location
-target preverify
Note: The same provisioning phases can be run in parallel
on all hosts simultaneously if the provisioning process has
been started in the primordial host first. However, each new
provisioning phase must be run in the specific order listed
in Installation Phases and Types of Hosts in a Multiple-Host
Environment (page 13-2). Thus, a new phase cannot be started
until the previous phase has been completed successfully on all
the hosts.
Monitor the progress of the preverify phase using the
Prerequisite Checks screen on the primordial host. Click Retry
to rerun this phase if errors are reported. See Troubleshoot
Preverify Phase Errors (page 14-8).
When this phase is complete with no errors on all hosts, click
Next. The wizard starts the install phase on the primordial host
and displays the Installation screen.
When the preverify phase is successful on the primordial
host, place a copy of the response file and the generated
provisioning plan (APPLICATIONS_BASE
/provisioning/
plan/provisioning.plan
) on the DMZ host.
Note: If an incremental provisioning is performed, see Extend
an Oracle Fusion Applications Environment Using Incremental
Provisioning During Upgrade (page 27-1). If the webtier is
placed in DMZ, then in addition of copying the generated
provisioning.plan
from incremental provisioning to the DMZ
host, it is also necessary to copy the introspect response
file (
introspect.rsp)
located in
APPLICATIONS_BASE/
provisioning/introspect/introspect.rsp
.
Note: After clickingNext, the response file cannot longer be
modified.
UI: Installation Screen
Displays the progress of the install phase on the primordial
host. Build messages and Log icons track the progress for
all phases in the same manner as described for the preverify
phase.
CLI and UI: Run the
install phase on the primary,
secondary, and DMZ (if
present) hosts and monitor
the progress in the UI.
In the terminal session, run the install phase on the primary,
secondary, and the DMZ host (if present) with this command:
UNIX:
path_to_script/runProvisioning.sh -
responseFile provisioning_response_file_location
-target install
Monitor the progress on the Installation screen on the primordial
host.
Chapter 13
Perform the Installation
13-10

Table 13-1 (Cont.) Provisioning a New Applications Environment
Interface (UI or CLI) Action Required
CLI and UI: Copy the
webtier_dmz_artifacts.z
ip
file to the DMZ host (if
present).
After the install phase is complete,
copy the
webtier_dmz_artifacts.zip
file from
APPLICATIONS_BASE/
directory on the non-DMZ host to the
APPLICATIONS_BASE/
directory on the DMZ host (if present).
Click Next to initiate the preconfigure phase on the primordial
host. The wizard displays the Preconfigure screen.
UI: Preconfigure Screen
Displays the progress of the preconfigure phase on the
primordial host.
CLI and UI: Run the
preconfigure phase on the
primary, secondary, and DMZ
(if present) hosts and monitor
the progress in the UI.
In the terminal session, run the preconfigure phase on the
primary, secondary, and the DMZ host (if present) with this
command:
UNIX:
path_to_script/runProvisioning.sh -
responseFile provisioning_response_file_location
-target preconfigure
Monitor the progress on the Preconfiguration screen on the
primordial host.
UI and CLI: Initiate the
remaining phases (in order)
on the primordial, primary,
secondary, and DMZ (if
present) hosts.
After the preconfigure phase reports a successful completion
on each host in the environment, return to the primordial host
and click Next to initiate the next phase. As each new phase
is started on the primordial host, on the command line, enter
the command to run that phase on the primary, secondary, and
DMZ host (if present) on the command line. See Table 13-4
(page 13-16) for a list of all the phases, and the command-line
syntax.
The associated screens, in phase order, are as follows:
•
Configure (configure phase)
•
Configure Primary/Secondary (configure-secondary
phase)
•
Postconfigure (postconfigure phase)
•
Startup (startup phase)
After the phases are complete with no errors, click Next on the
Startup screen to initiate the validate phase and then start this
phase on the other hosts.
UI: Validation When the validate phase is complete with no errors on all hosts,
click Next.
UI: Installation Complete This screen displays the configuration of the new environment.
Click Finish. The wizard automatically saves a summary file
that describes this installation. The file is saved to the response
file directory as follows:
framework_location/provisioning/provisioning-
responseFile/provisioning_response_file_name-
timedate
.
summary
.
Note that if a new environment is provisioned on a single host, ignore the steps that
run from the command line. Each phase starts automatically on the primordial host
when clicking Next.
Chapter 13
Perform the Installation
13-11

13.5.3 Installation Location Details
The wizard displays the Node Manager credentials and the locations of the various
directories entered when this response file was created. You can change these values,
if necessary.
Node Manager Credentials
• User Name: Specify a user name for the Node Manager role.
• Password: Specify a password for the Node Manager and retype it in the Confirm
Password field.
Provide locations of various directories that the administrator needs access to.
Installation and Configuration
• Installers Directory Location: Enter the path to the
repository_location
directory created when the provisioning repository was downloaded.
• Applications Base: Enter the directory path to the Oracle home specified when
the provisioning framework was installed. This directory is the Fusion Applications
Oracle home. It is the
root
directory for all Oracle Fusion Applications and Oracle
Fusion Middleware products.
The applications base directory must not be set to the system root directory or set
to the root directory of a logical drive. Some lifecycle management tools computed
directory names by backing up one directory level from the applications base
directory and then appending the appropriate subdirectory name. These tools fail if
the applications base directory is set to the system root directory or set to the root
directory of a logical drive because it is not possible to back up one directory level
from the system root directory or from the root directory of a logical drive.
In a UNIX environment, this name cannot exceed 59 characters.
• Applications Configuration: This directory is automatically populated based on
the value specified in the Applications Base field. This value is the path to the
directory where the configuration files for the domain are written.Enable Local
Applications Configuration: Select this checkbox to run the Managed Servers
from a non-networked (local) disk on the host, visible only to the processes
running on that host. If this option is enabled, the wizard copies the domain
configuration from the shared location and places it on the local disk you specify.
This configures all Managed Servers to run from the non-networked location.
• Enable Local Applications Configuration: Select this check box to run the
Managed Servers from a non-networked (local) disk on the host, visible only to
the processes running on that host. If this option is enabled, the wizard copies the
domain configuration from the shared location and places it on the specified local
disk. This configures all Managed Servers to run from the non-networked location.
• Local Applications Configuration: Specify the location for the local domain
directory that is set up. This field is required if the Enable Local Applications
Configuration option is selected. The specified directory must be empty.
Middleware Dependencies
• Font Directory: Appears only if the Oracle Sales, Oracle Marketing, or Oracle
Financials offerings are selected. Enter the directory where the TrueType fonts are
installed. The location varies on different operating systems, but is typically found
here:
Chapter 13
Perform the Installation
13-12

– Linux x86-64:
/usr/X11R6/lib/X11/fonts/TTF
– Oracle Solaris:
/usr/X11R6/lib/X11/fonts/TrueType
Some systems may not have TrueType fonts installed. If the fonts cannot be
located on the system, verify that they have been installed. In addition, the fonts
directory shipped as part of the JRE installed in the repository can be used.
Regardless of which path are specified, access to .ttf (.TTF) files is necessary.
Oracle Business Intelligence Repository Password
RPD Password: Specify and Confirm a password to allow access to the metadata
repository (RPD) for both Oracle Business Intelligence Applications and Oracle
Transactional Business Intelligence. The password must be between 8 and 30
characters and contain at least one digit. It can include letters, numbers, pound sign
(#), dollar sign ($), or underscore (_). To include a dollar sign ($) in the RPD password,
enter one additional dollar sign ($) as the escape character before the dollar sign ($)
in the password. Provisioning sets up this password, but does not actually access the
repository.
13.5.4 Oracle Fusion Applications Post-Installation Checklist
This checklist is an addition to the automated validation that takes place during the
validate phase of Oracle Fusion Applications Provisioning. See Perform Validation
Steps in the Oracle Fusion Applications Cloning Administrator's Guide.
The Oracle Fusion Applications Administrator should also perform a final environment
validation of the entire stack. Table 13-2 (page 13-13) gives a high-level list of such
tasks.
Table 13-2 Technical Stack Validation
Component Task Expected Outcome
WLS Console (Oracle
Identity Management)
Connect to the WLS Console
of the IDMDomain using a
browser (point directly at the WLS
AdminServer port).
Connect successfully and check
the status of the servers in the
domain.
EM Console
(Oracle Fusion
Applications)
Connect to the EM Console of
each Fusion Applications Domain
using a browser (point directly at
the WLS AdminServer port).
Connect successfully and check
the status of the Fusion
Middleware components (including
BI, WebCenter, ESS, SOA) as
well all the Fusion Applications
managed servers for each domain.
SSO/Home Page
(Oracle Fusion
Applications)
Open the Fusion Applications
Homepage using a browser (point
at the CommonDomain OHS host/
port or LBR if the environment has
one).
Redirection to the OAM SSO login
screen. After logging in, see the
Fusion Applications Homepage
and no error messages. If there
are error messages, attempt to
refresh the page as they may
simply be timeouts since this is
the first time the page is being
accessed.
Functional Setup Navigate to Setup and
Maintenance page using the
Navigator Menu.
See the Setup and Maintenance
page with no error messages.
Chapter 13
Perform the Installation
13-13

Table 13-2 (Cont.) Technical Stack Validation
Component Task Expected Outcome
Scheduled Jobs Navigate to the Scheduled Jobs
page using the Navigator Menu. *
See the Scheduled Jobs page with
no error messages.
Reports and Analytics Navigate to the Reports and
Analytics page using the Navigator
Menu. *
See the Reports and Analytics
page with no error messages.
Click on the folders to display the
available reports.
* If the Scheduled Jobs or Reports and Analytics links do not appear in the Navigator
Menu, enable them in Functional Setup:
• Navigate to Setup and Maintenance using the Navigator Menu.
• Use the Search box to search for the Work Menu. The results are displayed on
the right and should include Manage Menu Customizations.
• Click on Go to Task (next to Manage Menu Customizations).
• Find the Scheduled Jobs or Reports and Analytics menu items on the tree and
make sure they are configured as visible/rendered.
13.5.5 Perform a Manual Backup
A manual backup can be performed, for example, if the automated backup after a
phase fails.
Run these commands for each phase, preverify through postconfigure, and for each
host in the environment.
For Linux x86-64:
/bin/tar -C $APPLICATIONS_CONFIG/instance -cf $APPLICATIONS_CONFIG/restart/
backup_
phase_name
/instance.tar
If local configuration is enabled, also run these commands for each host:
/bin/tar -C $LOCAL_CONFIG/domains -cf $APPLICATIONS_CONFIG/restart/
backup_local_
phase_name
/
hostname
/domains/localdomains.tar
/bin/tar -C $LOCAL_CONFIG/applications -cf $APPLICATIONS_CONFIG/restart/
backup_local_
phase_name
/
hosthame
/applications/localapplications.tar
/bin/tar -C $LOCAL_CONFIG/biinst -cf $APPLICATIONS_CONFIG/restart/
backup_local_
phase_name
/
hostname
/biinst/BIInstance.tar
For Oracle Solaris:
/bin/tar -cEf $APPLICATIONS_CONFIG/restart/backup_
phase_name
/instance.tar -C
$APPLICATIONS_CONFIG/instance
If local configuration is enabled, also run these commands for each host:
/bin/tar -cEf $APPLICATIONS_CONFIG/restart/backup_local_
phase_name
/
hostname
/
domains/localdomains.tar -C $LOCAL_CONFIG/domains
/bin/tar -cEf $APPLICATIONS_CONFIG/restart/backup_local_
phase_name
/
hostname
/
Chapter 13
Perform the Installation
13-14

applications/localapplications.tar -C $LOCAL_CONFIG/applications
/bin/tar -cEf $APPLICATIONS_CONFIG/restart/backup_local_
phase_name
/
hostname
/
biinst/BIInstance.tar -C $LOCAL_CONFIG/biinst
13.5.6 Use the Command-Line Interface for Installations on the
Primary and Secondary Hosts
The installation phases on the primary and secondary hosts are run from the
command line, using specific arguments to further define the necessary actions.
13.5.6.1 Add Arguments to Phase Commands
Table 13-3 (page 13-15) shows valid arguments used when running installation phases.
Table 13-3 Command-Line Syntax for Phase Arguments
Syntax Description
path_to_script
Directory path to the location of the build scripts. This
directory is set up when the provisioning framework
is installed, for example
framework_location/
provisioning
.
-responseFile
Provide the location of a previously saved response file.
Input is:
response_file_location
-target
Indicates that the script should run a specific installation
phase (target). Any
phase_name
is a valid argument, for
example,
-target
perverify
.
-
ignoreSysPrereqs
Options:
true|false
Default:
false
.
-ignoreSysPrereqs true
is the
same as
-ignoreSysPrereqs
with no value.
Adding this argument disables validation for database,
schema, and hosts, and enables to progress to the
install phase without having to fix failure issues. Checks
continue to be performed, but failures are ignored.
Can be used as an argument with both the
provisioningWizard
and the
runprovisioning
commands. If specified with
runprovisioning -
target install
, the Oracle Universal Installer
exceptions are ignored.
If this argument is specified for the preverify phase,
specify it for all the remaining phases (install,
preconfigure, configure, configure-secondary,
postconfigure, startup, and validate). If it is not
specified for the remaining phases, a phase guard
exception will be raised.
Chapter 13
Perform the Installation
13-15

Table 13-3 (Cont.) Command-Line Syntax for Phase Arguments
Syntax Description
-
invPtrLoc
Specifies the location of the Oracle Inventory directory,
which is used by the installers to keep track of which
Oracle products are installed on a host.
For example, the
runProvisioning
command with this
argument would be:
UNIX:
path_to_script/runProvisioning.sh -
invPtrLoc /home/oracle/oraInst.loc
.
Note that the
-plan
argument in previous releases was replaced by the -
responseFile
argument.
13.5.6.2 Run the Installation Phases
Table 13-4 (page 13-16) shows the command-line syntax for running the various
installation phases.
In the command syntax, ensure that
path_to_script
is a local drive and not an UNC
path.
Table 13-4 Installation Phase Syntax
Phase (Target) Command Syntax
Preverify
UNIX:
path_to_script/runProvisioning.sh -responseFile
provisioning_response_file_location -target preverify
Install
UNIX:
path_to_script/runProvisioning.sh -responseFile
provisioning_response_file_location -target install
Preconfigure
UNIX:
path_to_script/runProvisioning.sh -responseFile
provisioning_response_file_location -target preconfigure
Configure
UNIX:
path_to_script/runProvisioning.sh -responseFile
provisioning_response_file_location -target configure
Configure-
secondary
UNIX:
path_to_script/runProvisioning.sh -responseFile
provisioning_response_file_location -target configure-
secondary
Postconfigure
UNIX:
path_to_script/runProvisioning.sh -responseFile
provisioning_response_file_location -target postconfigure
Startup
UNIX:
path_to_script/runProvisioning.sh -responseFile
provisioning_response_file_location -target startup
Validate
UNIX:
path_to_script/runProvisioning.sh -responseFile
provisioning_response_file_location -target validate
Cleanup-
phase_name
UNIX:
path_to_script/runProvisioning.sh -responseFile
provisioning_response_file_location
-target cleanup
-
phase_name
Substitute phase_name with the appropriate provisioning phase (install,
preconfigure, configure, configure-secondary, or postconfigure) to perform
a cleanup action.
Chapter 13
Perform the Installation
13-16

Table 13-4 (Cont.) Installation Phase Syntax
Phase (Target) Command Syntax
Restore-
phase_name
UNIX:
path_to_script/runProvisioning.sh -responseFile
provisioning_response_file_location
-target restore
-
phase_name
Note: Substitute phase_name with the appropriate provisioning phase
(install, preconfigure, configure, configure-secondary, or postconfigure,
startup, validate) to perform a restore action.
13.6 Next Steps
After completeing provisioning a new Oracle Fusion Applications environment,
proceed to Troubleshoot Your Oracle Fusion Applications Environment (page 14-1) for
troubleshooting instructions.
Chapter 13
Next Steps
13-17

14
Troubleshoot an Oracle Fusion
Applications Environment
This section describes how to troubleshoot an Oracle Fusion Applications
environment. There are various resources available to help with errors that occur
during the provisioning of a new Oracle Fusion Applications environment.
• General Troubleshooting (page 14-1)
• Provisioning Log Files (page 14-2)
• Recovery After Failure (page 14-4)
• Troubleshoot Preverify Phase Errors (page 14-8)
• Troubleshoot Install Phase Errors (page 14-13)
• Troubleshoot Postconfigure Phase Errors (page 14-15)
• Troubleshoot Startup Phase Errors (page 14-16)
• Troubleshoot Validate Phase Errors (page 14-18)
• What to Do Next (page 14-19)
14.1 General Troubleshooting
General Troubleshooting Tips
The following are some general troubleshooting tips:
• This release of Oracle Fusion Applications relies on certified versions of supported
platforms documentation for Oracle Fusion Applications for details about hardware
and software, minimum disk space and memory requirements, required system
libraries, packages, or patches, and minimum database requirements.
• If incorrect information is entered on one of the installation screens, return to that
screen by clicking Back until the screen is shown.
• When an environment is provisioned, provisioning writes debug information to the
debug directory (APPLICATIONS_BASE
/provisioning/debug
).
– Do not delete any files from this directory.
– Troubleshoot errors using the files in this directory.
• The Classloader Analysis Tool (CAT) is a Web-based class analysis tool which
simplifies filtering classloader configuration and aids in analyzing classloading
issues, such as detecting conflicts, debugging application classpaths and class
conflicts, and proposes solutions to help to resolve them. CAT is deployed to every
WebLogic domain out of the box. For more information about the Classloader
Analysis Tool, see Using the Classloader Analysis Tool (CAT) in the Oracle Fusion
Middleware Developing Applications for Oracle Weblogic Server Guide.
14-1

Backup Tar Creation
During the postconfigure phase, a "Value too large for defined data type" error
message might be displayed while creating the backup tar.
[2016-11-16T00:18:06.695-08:00] [runProvisioning-postconfigure] [WARNING]
[] [runProvisioning-postconfigure] [tid: 4881] [ecid:
0000LXgDiJbFW73LVmc9yc1OAcO70000KP,0] [exec] tar: ./domains/<hostname>/
CommonDomain/ucm/cs/vault/timesize.test: Value too large for
defined data type [2016-11-16T00:18:37.455-08:00] [runProvisioning-
postconfigure] [NOTIFICATION] [] [runProvisioning-postconfigure]
[tid: 1] [ecid: 0000LXa6sikFW73LVmc9yc1OAcO7000001,0] [logStatus]
State=Error!Timestamp=2016-11-16 00:18:37 PST!
Target=backup-instance!Category=backup!Domain=None!Host Name=<hostname>!
Product Family=orchestration!Product=orchestration!Task=backup!Task
ID=orchestration.orchestration.None.backup-instance.None!Message=Unable to
create backup of /scratch/mwport/FAREL12/APPTOP/instance at /scratch/
mwport/FAREL12/APPTOP/provisioning/restart/backup_postconfigure: exec
returned: 1!Detail=!Build File=/scratch/mwport/REL12_ST12/provisioning/
provisioning-build/common-restart -build.xml!Line Number=662!
Resolution
Follow these steps to resolve the issue:
• Review the error and find out the file causing the "Value too large for defined data
type" error
• Open that file using the file editor and close it
• Run cleanup and restore for postconfigure target
• Rerun postconfigure target
14.2 Provisioning Log Files
Log files contain information about both normal and problematic events. They can help
to diagnose and address some problems. For example, log messages that state that a
service cannot be reached might indicate a hardware failure.
If a more complex issue is discovered, My Oracle Support personnel may use log
files to trace the execution code paths of relevant requests as part of diagnosing the
problem. Log files are particularly helpful if the Oracle Fusion Applications environment
contains custom code that needs debugging, especially when using a debugger is not
feasible (such as on a production system).
During each provisioning phase, the Provisioning Wizard writes the actions of the build
processes to a log file created for each domain. Click the Log file icon to see details
and error messages. In the log file, search for a specific text string, or move forward
and backward through the content. The wrap feature enables text to be easily printed,
or even forwarded by email.
In some cases, it might be important to review the log files written by provisioning
to find out more about the errors that are encounter and recommended corrective
actions. For example, any error during cleanup or restore. Provisioning writes log files
to the following location:
UNIX:
Chapter 14
Provisioning Log Files
14-2

APPLICATIONS_BASE/logs/provisioning
/
host_name
This shared location is accessible from all hosts, and contains the following log files:
•
runProvisioning-default-main.log
: The main log file.
•
runProvisioning
-phase_name
.log
: The main log file for a given phase,
containing the output and error streams. These logs are used by the wizard to
keep track of internal information. For example, for runProvisioning-preverify.log,
each provisioning thread then writes its own log to runProvisioning-product_family-
phase_name.log.
•
runProvisioning
-product_family-phase_name.
log
: Displayed in the Provisioning
Wizard as a Log icon for preconfigure, configure, configure-secondary,
postconfigure, and startup phases. The files contain detailed information about the
phase. For example, runProvisioning-fin-preverify.log contains information about
the preverify actions taken while creating the Oracle Fusion Financials domain.
Because all reference roles must be provided in each product log file, expect to see
duplicate reference role entries.
Provisioning also relies on the Oracle Universal Installer (OUI), which writes log files
as follows:
UNIX:
Oracle_Inventory_Location/logs
If the location of the Oracle Inventory directory is unknown, it is possible to find it at:
UNIX:
/etc/oraInst.loc
Note that
APPLICATIONS_BASE
is the root directory under which the provisioned
environment resides. Except for the web tier host, this physical location must be on
a shared drive.
In addition to log file locations discussed in this section, note these log file locations
associated only with the preconfigure, configure, configure-secondary, postconfigure,
and startup phases:
• Oracle WebLogic Server:
UNIX:
APPLICATIONS_CONFIG/domains/host_name/domain_name/servers/
server_name/logs
• Oracle WebLogic Server Node Manager:
UNIX:
APPLICATIONS_BASE/fusionapps/wlserver_10.3/common/nodemanager/
host_name/
14.2.1 Modify the Default Log Level
The default log level for provisioning is TRACE:1 and NOTIFICATION:1 for messages
written to provisioning log files and console, respectively. The definition of loggers
controlling the log level for provisioning log files and console are described as:
<logger name="runProvisioning-default-main" level="TRACE:1">
<handler name="default-main"></handler>
</logger>
Chapter 14
Provisioning Log Files
14-3

<logger name="runProvisioning-console" level="NOTIFICATION:1">
<handler name="prov-cons-handler"></handler></logger>
</loggers>
To change the log level, modify the corresponding logger definition in the
framework_location/provisioning/bin/prov-logging-config.xml
file.
For more information about log level attributes, see Setting the Level of Information
Written to Log Files in the Oracle Fusion Middleware Administering Oracle Fusion
Middleware.
14.2.2 Default Log Level for Managed Servers
The default log level for standard out, that is, output to the command line console,
for managed servers is set to
NOTIFICATION
to provide additional information when
investigating issues, particularly around start up for managed servers.
14.3 Recovery After Failure
The wizard performs automated cleanup and recovery actions. If those processes
cannot clean up and restore the session, perform the actions manually.
See Start and Stop Components in the Oracle Fusion Applications Administrator's
Guide for complete instructions for stopping and starting components.
14.3.1 Automated Cleanup and Recovery
Recovery is intended to be systemwide. If a failure occurs on one server, cleanup
and recovery steps must be performed on all servers, including the hosts on which
the phase completed successfully. During the installation, errors may occur during the
running of any of the installation phases. To use the abort feature, it might necessary
to perform some cleanup tasks as well.
A Retry button is available on each provisioning phase interview screen to initiate
cleanup on the primordial host for that phase, or on a non-primordial host if that is
where provisioning was started. Initiating the retry operation affects the full phase,
beginning with the primordial host or the host from which provisioning was started. The
Retry UI explicitly tells on which hosts execute cleanup, and specifies the command
to use to run cleanup. A message displays that tells which host the cleanup target is
being run on. If additional cleanup is required on other hosts, those host names are
specified after the cleanup target completes. The wizard indicates what cleanup tasks
are required, enables the Continue button, and waits until clicking Continue after
completing the additional cleanup. Clicking Continue initiates a process to confirm
whether the cleanup is complete. If no additional cleanup is required, the Continue
button remains disabled, and the wizard starts executing the restore action.
When the restore completes on the current host, a message again displays that
tells which hosts execute restore, along with the command to run. The OK button
is enabled when the restore is done on the current host. When clicking OK, a process
checks again to confirm whether the restore is complete and an error message
displays if the restore is not complete. When the restore is done, the phase restarts on
the current host if needed. If the phase does not need to run, the retry window closes
and the information from the previous run of the phase displays. In the hosts table at
the top of the screen, all hosts that were either in a failed or aborted state before the
Chapter 14
Recovery After Failure
14-4

retry is started, are reset when the retry window closes. Then, restart the phase from
the command line for all hosts with a reset status.
The wizard detects hosts that require cleanup and displays a message informing of
the host names. Perform the cleanup action from the command line on these hosts
before initiating any restore action. Command-line syntax for the cleanup action takes
the following form:
UNIX:
path_to_script/runProvisioning.sh -responseFile
provisioning_response_file_location
-target cleanup
-
phase_name
The command-line syntax for the restore action takes the following form:
UNIX:
path_to_script/runProvisioning.sh -responseFile
provisioning_response_file_location
-target restore
-
phase_name
These actions are available for the preverify, install, preconfigure, configure, configure-
secondary, postconfigure, startup, and validate phases. They are also available for
shutdown and deinstall actions.
14.3.2 Run Cleanup and Restore
When a failure occurs during one of the provisioning phases, fix the cause of the error
and then retry the provisioning phase on the hosts that previously failed using the
Provisioning Wizard and the provisioning command-line interface if the failed hosts are
primary or secondary hosts.
To retry a provisioning phase, initiate it starting with the primordial host by clicking
Retry on the Provisioning Wizard. The wizard starts the cleanup phase on the
primordial host.
• When prompted, execute a cleanup phase from the command line on each of the
hosts that failed the provisioning phase. Do so simultaneously on all failed hosts.
• After the cleanup phase completes successfully on all the hosts, continue with
the restore phase followed by a retry of the provisioning phase. Start the restore
phase first from the primordial host through the Provisioning Wizard, and run the
restore phase from the command line on the other hosts from the terminal session.
Do so simultaneously on all hosts.
• After the restore phase is successful on all hosts, rerun the failed provisioning
phase.
When a failure occurs during one of the provisioning phases, do the following:
1. Click Retry to run the cleanup action on the primordial host (Common domain
host).
2. If the environment contains additional hosts, the wizard displays a message giving
the names of the other hosts.
3. Run the cleanup action from the command line on the other hosts in the terminal
session. This can be done in parallel.
UNIX:
path_to_script/runProvisioning.sh -responseFile
provisioning_response_file_location
-target cleanup
-
phase_name
4. Click Continue. If all cleanup steps are completed on all hosts where required,
the wizard starts the restore action on the primordial host or prompts to complete
steps that have not been completed. Click Continue again when finished to start
the restore action on the primordial host.
Chapter 14
Recovery After Failure
14-5

5. If the environment contains other hosts, the wizard displays a message giving the
names of the other hosts.
6. Run the restore action from the command line on the other hosts from the terminal
session for each host. This action can run in parallel.
UNIX:
path_to_script/runProvisioning.sh -responseFile
provisioning_response_file_location
-target restore
-
phase_name
7. Click OK on the primordial host to start the next phase. The wizard displays the
same messages as described in Step 4 (page 14-5) if all additional hosts have not
been restored.
14.3.3 Handle Cleanup Failures
The automated cleanup and restore actions cannot handle every type of failure.
Sometimes manual steps are needed. This is true, for example, when the configure
phase fails and any of the following situations exists:
• Node Manager is not yet configured
• Node Manager is configured with an invalid trust key
• Administration Server is not yet registered with the Node Manager
• Administration Server is not running
Under any of these circumstances, the Node Manager will not be able to shut down
the Administration Server and the Managed Servers during
cleanup-phase_name
. Shut
down manually all servers before continuing with the
restore-phase_name
.
1. Shut down Web Tier processes, if any, with this command:
UNIX:
APPLICATIONS_CONFIG/CommonDomain_webtier/bin/opmnctl shutdown
.
This applies to
cleanup-configure
,
cleanup-configure-secondary
, and
cleanup-postconfigure
.
2. Shut down Oracle Business Intelligence processes, if any, by running:
UNIX:
BI_CONFIG_HOME/bin/opmnctl shutdown
.
This applies to
cleanup-configure
,
cleanup-configure-secondary
, and
cleanup-postconfigure
.
3. Shut down Global Order Promising (GOP) (if provisioned) with this command:
UNIX:
gop_instance_base/bin/opmnctl shutdown
.
This applies to
cleanup-postconfigure
.
4. Shut down Java EE applications using the method recommended for the Oracle
WebLogic Server.
This applies to
cleanup-configure
,
cleanup-configure-secondary
, and
cleanup-postconfigure
.
5. Shut down Node Manager only if it was not configured correctly. See Restart Node
Manager on PROVISIONED_HOST (page 18-82).
Errors during cleanup of a target produce messages that inform of the error and
display the contents of the associated log file. When scrolling through a message,
additional messages can be viewed, including the manual steps that should be taken
to fix the problem.
Chapter 14
Recovery After Failure
14-6

Note that failures during
cleanup-install
require the following specific cleanup tasks:
1. Run the Oracle Universal Installer deinstall process for each component against
the same
oraInventory
that provisioning uses.
2. Delete the install phase guards. Find them under
APPLICATIONS_CONFIG/
provisioning/phaseguards/
.
14.3.4 Handle Remnant Processes
Provisioning cannot reliably stop all grandchild processes associated with failures
during the running of a phase. Occasionally, remnant processes are present after a
failure. Oracle recommends to manually check and stop all remnant processes that
start from the
APPLICATIONS_BASE
and the
framework_location/provisioning
folder,
except for Node Manager and the Provisioning Wizard.
Take this action after completing the cleanup action for any phase, and before running
a restore action for that phase. Without this additional cleanup action, unwanted
interference may be experienced with the restore action and subsequent rerun logic.
This is especially true for long-running child processes such as LDAP policy migration.
Identify remnant processes in the APPLICATIONS_BASE as follows:
Linux:
ps -ef | grep APPLICATIONS_BASE/folder_name
Identify remnant processes in the
framework_location/provisioning
folder as
follows:
Linux:
ps -ef | grep framework_location/provisioning/folder_name
Remember, do not stop the Node Manager and UI processes.
14.3.5 Handle Restore Failures
If the automated restore operation fails, complete these manual steps for all phases,
except as noted:
1. Delete the restart phase guard (phase_name
.grd
) file associated with the failure.
It is located under
APPLICATIONS_BASE/restart/
.
2. Restore the
instance
directory from the backup, located as follows:
UNIX:
APPLICATIONS_BASE/restart/backup_phase_name/
i
nstance.tar
Execute the following commands to restore the
instance
directory:
UNIX:
rm -rf
CONFIG_HOME
mkdir
CONFIG_HOME
tar -xfv
path_to_instance.tar/instance.tar -C
CONFIG_HOME
3. When a local application configuration has been enabled, manually restore
the
localdomains
and
localapplications
configuration directories on every
local_application_config_host
:
UNIX:
APPLICATIONS_BASE/restart/backup_phase_name/
local_application_config_host
/
localdomains.tar
and...
Chapter 14
Recovery After Failure
14-7

UNIX:
APPLICATIONS_BASE/restart/backup_phase_name/
local_application_config_host
/
localapplications.tar
In addition, restore the following file related to Oracle Business Intelligence:
UNIX:
APPLICATIONS_BASE/restart/backup_phase_name/local
application_config_host/biinst/BIInstance.tar
4. For
restore-configure-secondary
and
restore-postconfigure
only, start the
CommonDomain Administration Server.
5. For
restore-postconfigure
only, start Oracle HTTP Server by running
WT_CONFIG_HOME/bin/opmnctl startall
. Oracle HTTP Server must be started
from the host where it is installed. It cannot be started from any other host.
6. For
restore-configure
and
restore-postconfigure
, check the restore logs to
see if the Oracle Business Intelligence schema restore operation is complete.
Perform the restore operation for the database contents first.
14.4 Troubleshoot Preverify Phase Errors
Some errors might be encountered during the preverify phase. This section details
troubleshooting information for the preverify phase errors.
14.4.1 Preverify Phase Prerequisite Condition Failed on Red Hat
Enterprise 6
The following error message is displayed during the preverify phase if Oracle Fusion
Applications is installed on the Red Hat Enterprise 6 platform:
[2013-03-22T12:13:01.241+05:30] [runProvisioning-preverify]
[NOTIFICATION] [] [runProvisioning-preverify]
[tid: 10] [ecid:0000JqGpNU12JRbptGc9yX1HIzpD000000,0]
[validateInstallersPrerequisite] Check Name:CertifiedVersions
[2013-03-22T12:13:01.243+05:30] [runProvisioning-preverify]
[NOTIFICATION] [] [runProvisioning-preverify]
[tid: 10] [ecid:0000JqGpNU12JRbptGc9yX1HIzpD000000,0]
[validateInstallersPrerequisite] Check Description:This is a prerequisite
condition to test whether the Oracle software is certified on the current
O/S or not.
[2013-03-22T12:13:03.175+05:30] [runProvisioning-preverify] [NOTIFICATION]
[] [runProvisioning-preverify] [tid: 10]
[ecid:0000JqGpNU12JRbptGc9yX1HIzpD000000,0]
[validateInstallersPrerequisite] Expected result: One of
oracle-6,oracle-5.6,enterprise-5.4,enterprise-4,enterprise-5,redhat-5.4,re
dhat-4,redhat-5,SuSE-10,SuSE-11
[2013-03-22T12:13:03.178+05:30] [runProvisioning-preverify]
[NOTIFICATION] [] [runProvisioning-preverify]
[tid: 10] [ecid:0000JqGpNU12JRbptGc9yX1HIzpD000000,0]
[validateInstallersPrerequisite] Actual Result: redhat-Red
[2013-03-22T12:13:03.180+05:30] [runProvisioning-preverify]
[NOTIFICATION] [] [runProvisioning-preverify]
Chapter 14
Troubleshoot Preverify Phase Errors
14-8

[tid: 10] [ecid:0000JqGpNU12JRbptGc9yX1HIzpD000000,0]
[validateInstallersPrerequisite] Check complete. The overall result of
this check is: Failed <<<<
[2013-03-22T12:13:16.718+05:30] [runProvisioning-preverify]
[NOTIFICATION] [] [runProvisioning-preverify] [tid:
10] [ecid:0000JqGpNU12JRbptGc9yX1HIzpD000000,0] [logStatus]
STATE=BUILD_ERROR!TIMESTAMP=2013-03-22 12:13:16 IST!TARGET=private-
preverify-installers-prerequisite!CATEGORY=BUILD_ERROR!DOMAIN=NONE!
HOSTNAME=in-mum-orafus02.corp.capgemini.com!PRODUCTFAMILY=orchestration!
PRODUCT=orchestration!TASK=validateInstallersPrerequisite!
TASKID=orchestration.orchestration.BUILD_ERROR.private-preverify-
installers-prerequisite.validateInstallersPrerequisite!MESSAGE=The OUI
installer prerequisite check failed:: Product :
webtier Product : wc Product : soa Product : ecm_bucket2
Product: atgpf Product : odi Product : fusionapps Product : gop !
DETAIL=The OUI installer prerequisite check failed :: Product : webtier|
Product : wc|Product: soa|Product : ecm_bucket2|Product : atgpf|Product :
odi|Product : fusionapps|Product : gop|!BUILDFILE=/u04/prov/provisioning/
provisioning-build/common-preverify-build.xml!LINENUMBER=1354!
[2013-03-22T12:13:16.793+05:30] [runProvisioning-preverify] [ERROR]
[FAPROV-01045] [runProvisioning-preverify] [tid: 10]
[ecid:0000JqGpNU12JRbptGc9yX1HIzpD000000,0] *** Validation Error! ***[[]]
[2013-03-22T12:13:16.797+05:30] [runProvisioning-preverify]
[ERROR] [] [runProvisioning-preverify] [tid: 10]
[ecid:0000JqGpNU12JRbptGc9yX1HIzpD000000,0] The OUI installer prerequisite
check failed :: Product : webtier[[Product : wc
Product : soa
Product : ecm_bucket2
Product : atgpf
Product : odi
Product : fusionapps
Product : gop
]]
This is caused by an error in the operating system validation. Apply the following
workaround to resolve the issue:
1. Locate the file
common-preverify-build.xml
in provisioning
framework location, FRAMEWORK_LOCATION
/provisioning/provisioning-
build/ common-preverify-build.xml
.
2. Comment out the following block of code by adding "<!-- comment out per
workaround" at the beginning and "-->" at the end, as shown below.:
<if>
<isfalse value="$
{provisioning.setup.common.core.disable.preverify.prerequisite}"/>
<then>
Chapter 14
Troubleshoot Preverify Phase Errors
14-9

<logStatus state="BUILD_STARTED" category="installers"
task="validateInstallersPrerequisite"/>
<!-- bug fix 12771983 -->
<if>
<os family="windows"/>
<then>
<antcall target="private-preverify-installers-prerequisite"/>
</then>
<else>
<trycatch property="error-message">
<try>
<envAntCall target="private-preverify-installers-prerequisite"
AdditionalAntOpts="-d64" RunWlstEnvScript="false"/>
</try>
<catch>
<simulateValidationError message="${error-message}"/>
</catch>
</trycatch>
</else>
</if>
<logStatus state="BUILD_COMPLETE" category="installers"
task="validateInstallersPrerequisite"/>
</then>
</if>
TO:
<!-- comment out per workaround
<if>
<isfalse value="${provisioning.setup.common.core.
disable.preverify.prerequisite}"/>
<then>
<logStatus state="BUILD_STARTED" category="installers"
task="validateInstallersPrerequisite"/>
<!-- bug fix 12771983 -->
<!-- comment out per workaround
<if>
<os family="windows"/>
<then>
Chapter 14
Troubleshoot Preverify Phase Errors
14-10

<antcall target="private-preverify-installers-prerequisite"/>
</then>
<else>
<trycatch property="error-message">
<try>
<envAntCall target="private-preverify-installers-prerequisite"
AdditionalAntOpts="-d64" RunWlstEnvScript="false"/>
</try>
<catch>
<simulateValidationError message="${error-message}"/>
</catch>
</trycatch>
</else>
</if>
<logStatus state="BUILD_COMPLETE" category="installers"
task="validateInstallersPrerequisite"/>
</then>
</if>
-->
3. Save the file and retry the preverify phase.
14.4.2 Preverify Phase Not Displaying All Validation Errors on non-
Primordial Hosts
When there is a build error in the preverify phase in the primordial host, not all
validation errors in the non-primordial hosts will be accounted for in the Provisioning
Wizard. This is because a build error, which is a much more severe error than
validation, occurs in the primordial host before the logic to count validation errors.
After fixing the issue that caused the build error and rerunning preverify phase, the
validation errors are counted and displayed correctly. This is normal and expected.
Resolve the issue that caused the build error in the primordial host first and rerun
preverify phase to find out if there are other validation errors among the hosts. Fix
the validation errors where appropriate until validation errors are resolved before
proceeding to the next phase.
14.4.3 Preverify Phase Required Free Space is Higher than Actually
Provisioned
During the preverify phase, an error might be displayed saying provisioning requires
more free space for the local application configuration directory in the current host like
the log below:
Chapter 14
Troubleshoot Preverify Phase Errors
14-11

[2012-02-03T23:11:27.659-08:00] [runProvisioning-preverify]
[NOTIFICATION] [] [runProvisioning-preverify] [tid: 12]
[ecid: 0000JL7CzeGBDCAnv^n3F11FBDbj000003,0]
[logStatus] STATE=BUILD_ERROR!TIMESTAMP=2012-02-
03
23:11:27PST!TARGET=private-preverify-filesystem-Free-space!CATEGORY=BUILD_ERROR!
DOMAIN=NONE!HOSTNAME=adcdk16!PRODUCTFAMILY=orchestration!PRODUCT=orchestration!
TASK=validateFileSystem!TASKID=orchestration.orchestration.BUILD_ERROR.private-
preverify-filesystem-free-space.validateFileSystem!MESSAGE=The file system /
scratch/aime/rc4 only has 44271 MB, but 76800 MB is needed!
DETAIL=The file system /scratch/aime/rc4 only has 44271
MB, but 76800 MB is needed!BUILDFILE=/net/adcgei13/
scratch/aime/rc4/FAINTEG_MAIN_PLATFORMS_120131.1600/provisioning/provisioning-
build/common-preverify-build.xml!LINENUMBER=1392!
[2012-02-03T23:11:27.698-08:00] [runProvisioning-preverify] [ERROR]
[FAPROV-01045] [runProvisioning-preverify] [tid: 12] [ecid:
0000JL7CzeGBDCAnv^n3F11FBDbj000003,0] *** Validation Error! ***[[ ]]
After provisioning completes, it might be possible that only a fraction of the required
file system is being used. This is normal. The 77 GB free space is the Oracle
recommended value derived from the performance benchmark. It includes projection
of disks required for storing diagnostic logs and other information in the local domain
over a long period.
14.4.4 Preverify Phase Failure for PS Package
During the preverify phase in Solaris 5.11 environments, an error might be displayed
saying that PS version 0.5.11 is not available.
[2016-11-15T14:00:45.485+00:00] [runProvisioning-preverify] [ERROR]
[] [runProvisioning-preverify] [tid: 22] [ecid:
0000LXcIVwd6ATI5Irg8yf1OAlGw000003,0] PS version 0.5.11 required for
Provisioning on Sun Solaris 5.11 is not available. Please install the correct
UCB PS package
Execute the below commands to find out the version of the PS package in the
environment:
PS_UCB_PKG=`pkg search -l -r /usr/ucb/ps|grep pkg|awk '{print $4}'`
PS_UCB_VERSION=`echo $PS_UCB_PKG | cut -f2 -d"@" | cut -f1 -d"-"`
echo PS_UCB_VERSION=${PS_UCB_VERSION}
If the PS_UCB_VERSION value is 0.5.11, then the above error does not have any
functional impact and can be ignored.
To ignore the error, run the preverify target with the command line argument '-
ignoreSysPrereqs true' in the runProvisioning command.
14.4.5 Preverify Phase Warning
If the Human Capital Management (HCM) application offerings is being provisioned,
namely Workforce Development and Workforce Deployment, and the
/mnt/hwrrepo
directory does not exist, a warning message is displayed.
• Continue with the provisioning process if the Workforce Reputation (HWR)
application is not needed.
Chapter 14
Troubleshoot Preverify Phase Errors
14-12

• If the HWR application is required, follow the instructions in Create the hwrepo
directory (page 5-11) to prepare the shared mount. Complete provisioning the
environment first then prepare the shared mount before starting using the HWR
application.
14.5 Troubleshoot Install Phase Errors
This section includes troubleshooting information for install phase errors.
14.5.1 Cancel an Installation in Progress
Interrupt the installation process while it is in progress by clicking Cancel, or by
clicking the X icon next to a build that has failed. If Cancel is clicked, all processes
running in the background are terminated and put in a Failed status.
Start the wizard again after initiating a Cancel action. The wizard detects that the
installation has been partially completed, and presents two options:
• Resume from where it was left off. The wizard asks to resume. Click Yes.
The wizard takes to the screen where Cancel was clicked and created the failure.
Restart the installation at that point by clicking the Retry button. The wizard
performs cleanup and recovery actions.
• Clean up the errors manually and rerun the Provision a New Applications
Environment option for the response file from the beginning.
14.5.2 Install Phase Failed with INST-07221: Specified connect string
is not in a valid format Error
When a provisioning response file is created using the Oracle Fusion Applications
Provisioning Wizard, if only one RAC node information is provided for the Oracle
Fusion Applications database, then the following error is shown during the install
phase in the
runProvisioning-install.log
. The error is generated due to a limitation
in the Oracle Data Integrator (ODI) installer and at least two RAC nodes must be
provided.
[2012-08-21T10:40:21.365-04:00] [runProvisioning-install] [NOTIFICATION]
[] [runProvisioning-install] [tid: 31] [ecid:
0000J_9c8_p7U8lCgvq2So1GCtIP00000M,0] Starting Oracle Universal
Installer...[[
Checking if CPU speed is above 300 MHz. Actual 1600 MHz Passed
Checking Temp space: must be greater than 300 MB. Actual 7107 MB Passed
Checking swap space: must be greater than 512 MB. Actual 14527 MB Passed
Preparing to launch Oracle Universal Installer
from /tmp/OraInstall2012-08-21_10-40-14AM. Please wait ...Log: /u01/app/
oraInventory/logs/install2012-08-21_10-40-14AM.log
Copyright (c) 1999, 2011, Oracle and/or its affiliates. All rights
reserved.
Reading response file..
Chapter 14
Troubleshoot Install Phase Errors
14-13

Verifying data......
[VALIDATION] [ERROR]:INST-07221: Specified connect string is not in a
valid format
[VALIDATION] [SUGGESTION]:Provide the value in the following format.
Format: hostname:port:servicename , For Real Application Cluster Database
hostname1:port1^hostname2:port2@servicename
installation Failed. Exiting installation due to data validation
failure.]]
[2012-08-21T10:40:21.387-04:00] [runProvisioning-install]
[NOTIFICATION] [] [runProvisioning-install] [tid:
10] [ecid: 0000J_9V7RD7U8lCgvq2So1GCtIP000000,0]
[logStatus] STATE=BUILD_ERROR!TIMESTAMP=2012-08-21
10:40:21 EDT!TARGET=install!CATEGORY=none!DOMAIN=NONE!
HOSTNAME=<host.com>!PRODUCTFAMILY=orchestration!PRODUCT=orchestration!
TASK=none!TASKID=orchestration.orchestration.NONE.install.NONE!MESSAGE=An
Error Occured: !DETAIL=The following error occurred while
executing this line:|<FRAMEWORK_LOCATION>/provisioning/provisioning-build/
orchestration-build.xml:3132: The following error occurred while
executing this line:|<FRAMEWORK_LOCATION>/provisioning/provisioning-build/
common-misc-build.xml:109: An Error Occured: The following error
occurred while executing this line:
|<FRAMEWORK_LOCATION>/provisioning/provisioning-build/ base-product-
family-build.xml:85: The following error occurred while
executing this line:|<FRAMEWORK_LOCATION>/provisioning/provisioning-
build/fs-build.xml:281: The following error occurred while
executing this line:|<FRAMEWORK_LOCATION>provisioning/provisioning-
build/fs-build.xml:1448: The following error occurred
while executing this line:|<FRAMEWORK_LOCATION>/provisioning/
provisioning-build/base-techstack-build.xml:62: The following error
occurred while executing this line:|<FRAMEWORK_LOCATION>/
provisioning/provisioning-build/ odi-build.xml:326: OUI installer
failed: <REPOSITORY_LOCATION>/installers/odi/Disk1/runInstaller!
BUILDFILE=<FRAMEWORK_LOCATION>/provisioning/provisioning-build/ common-
misc-build.xml!LINENUMBER=107!
Resolution
Provide the information for at least two RAC nodes on the Database Configuration
page of the Provisioning Wizard, save the response file, and then restart the
provisioning process to deploy a new Oracle Fusion Applications environment as
detailed in the following steps:
1. If the Provisioning Wizard is still active, close the window and exit.
2. Delete the entire contents of the
APPLICATIONS_CONFIG
folder including the folder.
This is the location for Oracle Fusion Applications Home displayed on the
Installation Location page of the Provisioning Wizard. If Local Applications
Configuration is enabled, ensure that the
Local Applications Configuration
directory and its contents are deleted.
3. Start the Provisioning Wizard and select the Update an Existing Provisioning
Response file option. Select the existing Provisioning Response file.
Chapter 14
Troubleshoot Install Phase Errors
14-14

4. Navigate to the Database Configuration page.
5. To use a single node RAC database, select Single-Instance Database and enter
the database host, port and service name. To use a multi-node RAC database,
ensure that the RAC nodes are available and enter the database host, port and
service name. If Real Application Clusters Database is selected, enter at least
two rows in the table.
6. Complete the remaining steps to finish creating a response file.
7. Follow the instructions to begin provisioning a new Oracle Fusion Applications
environment starting with the preverify phase. Note that it is not necessary to
restore the Oracle Fusion Applications database instances or the Oracle Identity
Management databases from backup because the provisioning framework does
not update the databases at this time.
14.6 Troubleshoot Postconfigure Phase Errors
The following section describes the steps to troubleshoot postconfigure phase errors.
14.6.1 Postconfigure Phase Oracle SOA Suite Server Startup Errors
During the postconfigure phase, some error messages might be encountered
in the provisioning log for a domain (for example, in
runProvisioning-crm-
postconfigure.log
).
[2013-12-02T01:51:38.122-08:00] [runProvisioning-crm-postconfigure]
[NOTIFICATION] [] [runProvisioning-crm-postconfigure] [tid: 94]
[ecid:0000KAmi6CyEGRK5IVd9if1Ib5CC00001L,0] Starting
serversoa_server1 ........................................................
..........................................................................
..........................................................................
.........................................................Exception while
starting server 'soa_server1'[[No stack trace available.
This Exception occurred at Mon Dec 02 01:51:38 PST 2013.
weblogic.management.scripting.ScriptException: Error occured while
performing start : Server with name soa_server1 failed to be started
Problem invoking WLST - Traceback (innermost last):
File "/scratch/aime/FINS_IP/
apptop/provisioning/debug/<host_name>/postconfigure_02_12_13_01_29_43/
nodeManagerStartServer_CRMDomain4661859561054870083.py", line 329, in ?
File "/scratch/aime/FINS_IP/
apptop/provisioning/debug/<host_name>/postconfigure_02_12_13_01_29_43/
nodeManagerStartServer_CRMDomain4661859561054870083.py", line 187, in
startServer
File "<iostream>", line 1279, in start
File "<iostream>", line 1847, in raiseWLSTException
Chapter 14
Troubleshoot Postconfigure Phase Errors
14-15

WLSTException: Error occured while performing start : Error starting
the server : Error occured while performing start : Server with name
soa_server1 failed to be started
Use dumpStack() to view the full stacktrace
This can be because the ODI server and the domain admin server are on different
hosts
and
either the ODI server is the last Oracle Fusion Middleware server to be configured
or
the ODI server is isolated on a separate host when the Advanced Topology option
is selected on the Domain Topology Configuration screenduring the creation of the
Oracle Fusion Applications provisioning response file to specify the placement of each
servers on the provisioning hosts.
Resolution
Follow these steps to resolve the issue:
1. Run
cleanup-postconfigure
and then
restore-postconfigure
.
2. Log in to the respective domain admin console for which server startup failed.
3. Fix the Node Manager details of the host being used by the ODI server. Change
the Listen Address of the host to the ODI server address using the following steps:
a. Select Environment -> Machines from the Domain Structure menu.
b. Click the machine name link.
c. In the Settings for <a machine name> window, select Configuration ->
Node Manager.
d. Update the Listen Address by entering the host name of the ODI server
address. Click Lock & Edit located in the top left corner of the Change Center
panel.
e. Enter the host address, click Save and then click Release Configuration.
f. Continue rerunning the postconfigure phase.
14.7 Troubleshoot Startup Phase Errors
The following section describes the steps to troubleshoot startup phase errors.
Startup Phase Failed with “EQA-15011: The plug-in manager raised an
unexpected error”
If you enable local application configuration for a multihost environment, errors may
occur during the startup phase with the following messages in the provisioning log:
(<APPLICATIONS_BASE>/logs/provisioning/<host name>/runProvisioning-
startup.log)
Chapter 14
Troubleshoot Startup Phase Errors
14-16

The errors are due to the timing between the startup of managed servers that
happened before the time required for permission grants to propagate from the policy
store to the affected managed servers.
1. Plug-in manager error
[2013-07-18 15:04:53 PDT] Orchestration: private-configure-
webcenter-ses-task synchronized - BUILD_ERROR
:
<FRAMEWORK_LOCATION>/provisioning/provisioning-build/webcenter-
build.xml:2570: Unable to create SES source object
with name: SecureWebCenterRssSource due to error: EQA-15011:
The plug-in manager raised an unexpected error.
[2013-07-18 15:04:54 PDT] Orchestration: private-startup
synchronized - BUILD_ERROR : <FRAMEWORK_LOCATION>/provisioning/
provisioning-build/orchestration-build.xml:2152: The following
error occurred while executing this line: <FRAMEWORK_LOCATION>/
provisioning/provisioning-build/webcenter-build.xml:2435: Process
execution failed with return code: 1. Check the
logs for more information.
2. SES Error
[2013-07-23T23:20:46.182-07:00] [runProvisioning-startup]
[NOTIFICATION] [FAPROV-01161] [runProvisioning-startup] [tid:
10] [ecid: 0000K0FLNcF3Z7P_Idt1if1Hvr8A000000,0] [arg:
<FRAMEWORK_LOCATION>/provisioning/provlocks/ses.lck] [arg: 23 Jul
2013 23:20:46 PDT] Released lock on file <FRAMEWORK_LOCATION>/
provisioning/provlocks/ses.lck at time 23 Jul 2013 23:20:46 PDT
[2013-07-23T23:20:46.266-07:00] [runProvisioning-startup]
[NOTIFICATION] [] [runProvisioning-startup] [tid:
10] [ecid: 0000K0FLNcF3Z7P_Idt1if1Hvr8A000000,0]
[logStatus] STATE=BUILD_ERROR!TIMESTAMP=2013-07-23
23:20:46 PDT!TARGET=private-configure-webcenter-
ses-task!CATEGORY=BUILD_ERROR!DOMAIN=NONE!HOSTNAME=adcdav01!
PRODUCTFAMILY=orchestration!PRODUCT=orchestration!TASK=synchronized!
TASKID=orchestration.orchestration.BUILD_ERRO. private-configure-
webcenter-ses-task.synchronized!MESSAGE=<FRAMEWORK_LOCATION>/
provisioning/provisioning-build/webcenter-build.xml:2570: Unable
to create SES source object with name: SecureWebCenterRssSource
due to error: EQA-15011: The plug-in manager raised
an unexpected error.!DETAIL=Unable to create SES source object with
name: SecureWebCenterRssSource due to error: EQA-15011: The plug-in
manager raised an unexpected error.!BUILDFILE=<FRAMEWORK_LOCATION>/
provisioning/provisioning-build/webcenter-build.xml!LINENUMBER=2445!
[2013-07-23T23:20:46.266-07:00] [runProvisioning-startup]
[ERROR] [FAPROV-00298] [runProvisioning-startup] [tid:
10] [ecid: 0000K0FLNcF3Z7P_Idt1if1Hvr8A000000,0] An
Error Occured:[[<FRAMEWORK_LOCATION>/provisioning/provisioning-
build/webcenter-build.xml:2570: Unable to create SES
source object with name: SecureWebCenterRssSource due
to error: EQA-15011: The plug-in manager raised an unexpected error.
Chapter 14
Troubleshoot Startup Phase Errors
14-17

Resolution
1. Wait for 10 minutes after the error occurs.
2. Restart these managed servers in the Common Domain from the WebLogic
Admin Console:
UCM_server1
(in UCMCluster),
WC_Spaces
(FS_SPACECluster),
and
search_server1
(SESCluster) using the Node Manager credentials that
you entered in the provisioning response file. You can find the URL for the
Command Domain WebLogic Admin Console (
http://host:port/console
) in the
provisioning summary file (the file name is
provisioning.summary
) located in the
same place as the provisioning response file. The following example shows what
the entries in the provisioning summary might look like:
Common Domain
Admin Server
Host: host_name
Managed Server Port: port_number
Admin Console
http://<host>:<port>/console
Enterprise Manager Welcome Page
http://<host>:<port>/em
3. After all three affected managed servers are restarted, rerun the provisioning
startup phase
14.8 Troubleshoot Validate Phase Errors
The following section describes the steps to troubleshoot Validate phase errors.
14.8.1 Validate Phase Topology Manager Service Endpoint Invocation
Error
During the Validate phase, the following errors might be encountered:
INFO: WSM-09004 Component auditing cannot be initialized error
and
SEVERE: Error while invoking endpoint "http://<host>:<7004>/
topologyManagerService/ProvisionConfigurationService" from client.
The log messages in the r
unProvisioning-fs-postconfigure.log
files are as follows:
[2012-12-11T01:24:08.130-08:00] [runProvisioning-fs-postconfigure]
[TRACE] [] [runProvisioning-fs-postconfigure] [tid:
402] [ecid: 0000Ji9Ho1B3r2GLIyT4if1GljTr000069,0] [SRC_CLASS:
oracle.apps.fnd.provisioning.ant.taskdefs.util.logger.ProvisioningLogger]
[SRC_METHOD: log] Attempt 1 of 20 for importProvisionDeployedInfo
[2012-12-11T01:24:10.767-08:00] [runProvisioning-fs-postconfigure] [ERROR]
[] [runProvisioning-fs-postconfigure] [tid: 403] [ecid:
0000Ji9Hp6F3r2GLIyT4if1GljTr00006A,0] INFO: WSM-09004 Component auditing
cannot be initialized.
[2012-12-11T01:24:10.772-08:00] [runProvisioning-fs-postconfigure] [ERROR]
[] [runProvisioning-fs-postconfigure] [tid: 403] [ecid:
Chapter 14
Troubleshoot Validate Phase Errors
14-18

0000Ji9Hp6F3r2GLIyT4if1GljTr00006A,0] INFO: WSM-09004 Component auditing
cannot be initialized.
[2012-12-11T01:24:11.676-08:00] [runProvisioning-fs-postconfigure]
[ERROR] [] [runProvisioning-fs-postconfigure] [tid: 403]
[ecid: 0000Ji9Hp6F3r2GLIyT4if1GljTr00006A,0] SEVERE: Error
while invoking endpoint "http://<host>:<port>/topologyManagerService/
ProvisionConfigurationService" from client.
This error message occurs when the validation is initiated by the provisioning
framework before the Oracle Web Service Manager (OWSM) is fully initialized. The
provisioning framework will retry up to a predetermined number of times, therefore
such error messages can be ignored. However, if validation fails after 20 attempts,
investigate the issue.
14.8.2 Out-of-the-Box Configuration for B2BUI
Post provisioning, Business to Business UI (B2BUI) is stopped, or in a
PREPARED
state
on all domains, except the
CommonDomain
. The B2BUI is in an ACTIVE state on the
CommonDomain
.
14.9 What to Do Next
To prepare the Oracle Fusion Applications installation for functional implementation,
perform several configuration tasks, some of which are common for all Oracle Fusion
Applications or multiple components of the Oracle Fusion Applications suite, and some
are specific to the individual components.
Chapter 14
What to Do Next
14-19

15
Complete Mandatory Common Post-
Installation Tasks
This section describes the mandatory post-installation tasks to complete before
starting working with Oracle Fusion Applications.
This section contains the following topics:
• Introduction to Completing Mandatory Post-Installation Tasks (page 15-1)
• Apply Patches to the New Environment (page 15-1)
• Update the MDS Schema Database Statistics (page 15-1)
• Update the MDS Schema Database Statistics (page 15-1)
• Set Up Notifications (page 15-2)
• Create a Custom Index for SYSAUX Segments (page 15-4)
• Next Steps (page 15-5)
15.1 Introduction to Completing Mandatory Post-Installation
Tasks
After successfully completing the installation phases on all the hosts in the
environment, perform the following required manual steps described in this section.
Some components in the Oracle Fusion Applications environment are dependent on
one another. Therefore, it is important to start and stop components in the proper
order. In the course of normal IT operations, common operations include shutting
down computers and starting them back up. Therefore, it is crucial to start and stop
Oracle Fusion Applications in a sequential manner. See Start and Stop an Oracle
Fusion Applications Environment in the Oracle Fusion Applications Administrator's
Guide.
15.2 Apply Patches to the New Environment
Refer to Oracle Fusion Applications release notes for mandatory post-installation
steps, including the application of all mandatory patches. For general information
about applying patches to an applications environment, see Introduction to Patching
Oracle Fusion Applications in the Oracle Fusion Applications Patching Guide.
15.3 Update the MDS Schema Database Statistics
After Oracle Fusion Applications is deployed and provisioned, ensure optimized query
plans for Oracle Metadata Services (MDS) queries are generated so that performance
does not decline until the next automatic statistics collection window. For each MDS
schema, execute the following statements in SQL*Plus as a privileged database user,
for example SYS.
15-1

1. Execute the following command to regather the statistics:
execute dbms_stats.gather_schema_stats(
ownname =>
'schemaOwner',
estimate_percent =>dbms_stats.auto_sample_size,
method_opt =>'for all columns size auto',
cascade => true);
Replace schemaOwner with the name of the schema, for example FUSION_MDS.
Also, place the entire command in a single line at the time of execution.
2. If there is no performance improvement after collecting statistics, then flush the
shared pool to clear the execution plan for the database and generate a new query
plan, using the following command:
alter system flush shared_pool;
alter system flush buffer_cache;
Perform this action only when the system is not being actively used as it may
affect the performance of production systems.
15.4 Set Up Notifications
Oracle User Messaging Service is a component of Oracle SOA Suite, which enables
to receive notifications sent from SOA applications.
Applications in the following product families receive approval notifications and
complete approvals and rejections of requests through e-mail:
• Oracle Fusion Customer Relationship Management
• Oracle Fusion Financials
• Oracle Fusion Human Capital Management
• Oracle Fusion Supply Chain Management
• Oracle Fusion Procurement
• Oracle Fusion Project Portfolio Management
Before proceeding, ensure that an e-mail server exists. If the bulk e-mail feature of
Oracle Fusion Customer Relationship Management is intended to be used, set up
the e-mail to handle bulk e-mail. To configure an e-mail server, see Adding an E-Mail
Server in the Oracle Fusion Middleware Administrator's and Developer's Guide for
Oracle Business Intelligence Publisher.
15.4.1 Configure E-Mail Notification Using Oracle SOA Suite
Configure Oracle SOA Suite as follows to enable e-mail notifications:
1. For existing users, associate the users with their e-mail addresses in the domain.
2. For new users, do the following:
a. Add user profile in the domain.
b. Create e-mail account in the e-mail server for the added user.
c. Associate the user profile with the respective e-mail address.
Chapter 15
Set Up Notifications
15-2

3. Configure e-mail driver properties.
To enable the workflow participants to receive and forward notifications, configure
Oracle User Messaging Service by setting the appropriate driver instances with
Oracle Enterprise Manager Fusion Applications Control.
a. In the navigation pane, expand farm - User Messaging Service -
usermessagingdriver-email.
b. Go to User Messaging Email Driver - Email Driver Properties. The Email
Driver Properties page displays.
c. In the Driver-Specific Configuration, modify the Outgoing and Incoming
properties with the following:
Modify
OutgoingMailServer
,
OutgoingMailServerPort
,
OutgoingDefaultFromAddr
,
OutgoingUsername
, and
OutgoingPassword
.
Modify
IncomingMailServer
,
IncomingMailServerPort
,
IncomingMailIDs
,
IncomingUserIDs
,
IncomingUserPasswords
, and
receivefolder
.
d. Select the ImapAuthPlainDisable checkbox.
e. Click Apply to save the changes.
To configure e-mail driver properties for other usermessagingdriver-email
services under farm - User Messaging Service, repeat Steps a to e.
4. Configure notification properties to enable workflow e-mail notifications using
Oracle Enterprise Manager Fusion Applications Control:
5. a. In the navigation pane, expand farm - SOA.
b. Go to SOA Infrastructure - SOA Administration - Workflow Notification
Properties. The Workflow Notification Properties page displays.
c. From the Notification Mode list, choose All.
d. In the Notification Service section, specify the notification channel values.
These properties are used to notify the users of any changes to the state of a
task. Workflow notifications can use three types of addresses:
From Address: For sending notifications.
Actionable Address: For receiving actionable responses. The Actionable
Address is the account in which task action-related e-mails are received and
processed by human workflow.
Reply To Address: For receiving reply notifications.
e. Click Apply to save the changes.
To configure workflow notification properties for other Oracle SOA Suite servers,
repeat Steps 3a to 3e.
6. Specify the actionable e-mail account name using Oracle Enterprise Manager
Fusion Applications Control:
a. In the navigation pane, expand farm - SOA.
b. Go to SOA Infrastructure - SOA Administration - Workflow Task Service
Properties. The Workflow Task Service Properties page displays.
c. In the Actionable Email Account field, specify the incoming actionable e-mail
account to use. The default account name is
Default
, which is the account
Chapter 15
Set Up Notifications
15-3

configured in Step 3. If a different account name is specified in the Actionable
Email Account field, then create and configure that account.
For more information on configuring human workflow notification properties,
see Configuring Human Workflow Notification Properties in the Oracle Fusion
Middleware Administering Oracle SOA Suite and Oracle Business Process
Management Suite guide.
Repeat Steps 2 to 4 to configure e-mail notification separately for each product
family such as Oracle Fusion CRM, Oracle Fusion HCM, and so on.
7. Restart the Oracle WebLogic Server Managed Servers for the domains in the
product families:
a. Stop the Managed Servers by using one of the following scripts from the
Oracle Fusion Applications Middleware home directory. In these scripts,
managed_server_name
specifies the name of the Managed Server and
admin_url
specifies the listen address and port number of the domain's
administration server. The listen address is the host name, IP address, or
domain name server (DNS) name. When prompted, enter the user name and
password.
Platform Script
UNIX
FA_MW_HOME/user_projects/domains/
domain_name/bin/stopManagedWebLogic.sh
managed_server_name admin_url
b. Start the Oracle WebLogic Server Managed Servers for the product families
using one of the following scripts from the fusionapps Middleware directory.
In these scripts,
managed_server_name
specifies the name of the Managed
Server and
admin_url
specifies the listen address (host name, IP address,
or DNS name) and port number of the domain's administration server. When
prompted, enter the user name and password.
Platform Script
UNIX
FA_MW_HOME/user_projects/domains/
domain_name/bin/startManagedWebLogic.sh
managed_server_name admin_url
For more information about performing administrative activities, see Perform Basic
Administrative Tasks in the Oracle Fusion Applications Administrator's Guide.
8. Add the host name and address of the e-mail server to the
/etc/hosts
file on the
server hosting the SOA managed servers where the drivers are running.
15.5 Create a Custom Index for SYSAUX Segments
Because the database audit trail feature is activated, it is recommended to create a
custom index for audit segments on SYSAUX tables to improve the performance of any
audit reporting that may occur. Skip this task if the Fusion Applications database is
created using the Provisioning Wizard. If the Provisioning Wizard is not used to create
the Fusion Applications database, perform this task.
Before creating a custom index, complete the task described in Moving an AUDIT
segment from the SYSTEM to the SYSAUX Tablespace.
Chapter 15
Create a Custom Index for SYSAUX Segments
15-4

1. Login as a SYS user
2. Execute the following SQL statement:
create index sys.i_aud3 on sys.aud$(ntimestamp#) tablespace SYSAUX;
Depending on the audit reporting needs regarding the SYSAUX tables, it is
recommended to review and adjust the custom index as meeded.
15.6 Next Steps
Review and complete the conditional common post-installation tasks to perform before
proceeding to the product specific post-installation tasks. Go to Complete Conditional
Common Post-Installation Tasks (page 16-1) to get started.
Chapter 15
Next Steps
15-5

16
Complete Conditional Common Post-
Installation Tasks
This section describes the conditional post-installation tasks that must be reviewed
and completed as required.
After successfully completing the mandatory post-installation tasks, review and
perform the following conditional tasks. Some components in the Oracle Fusion
Applications environment are dependent on one another. Therefore, it is important to
start and stop components in the proper order. In the course of normal Information
Technology (IT) operations, common operations include shutting down computers
and starting them back up. Therefore, it is crucial to start and stop Oracle Fusion
Applications in a sequential manner.
• Set Up Global Search (page 16-2)
• Set Up Privacy Statement (page 16-8)
• Configure Oracle User Productivity Kit In-Application Support (page 16-8)
• Review and Configuring Diagnostic Logging Settings and Diagnostic Testing
Features (page 16-10)
• Configure Oracle HTTP Server with Custom Certificates (page 16-20)
• Set Up Backup for Oracle Fusion Applications (page 16-22)
• Set up Oracle Enterprise Manager Cloud Control to Monitor and Manage Oracle
Fusion Applications (page 16-22)
• Complete Conditional Oracle Identity Management Post-Installation Tasks
(page 16-22)
• Install and Configuring Oracle Business Intelligence Applications (page 16-55)
• Configure Oracle Transactional Business Intelligence (page 16-55)
• Set Up Report Delivery Servers (page 16-55)
• Configure Oracle Data Integrator Studio (page 16-57)
• Set Up the Oracle Business Intelligence Administration Tool (page 16-58)
• Perform Optional Language Installations (page 16-58)
• Set Up Segregation of Duties (page 16-80)
• Configure Presence Servers (page 16-86)
• Configure Audit Trails for Oracle Fusion Middleware (page 16-88)
• Install Print Servers (page 16-90)
• Configure Oracle HTTP Server for Privileged Port (UNIX Only with No Load
Balancer) (page 16-91)
• Use Default Oracle Database Vault Schemas (page 16-91)
• What to Do Next (page 16-91)
16-1

16.1 Set Up Global Search
Oracle Fusion Applications Search provides the search framework to manage
enterprise-wide searches. Each product family within Oracle Fusion Applications
such as Oracle Fusion Customer Relationship Management, Oracle Fusion Human
Capital Management, and Oracle Fusion Supply Chain Management has its own
set of seeded searchable objects that are packaged into its corresponding search
application. For example, the seeded searchable objects for Oracle Fusion Customer
Relationship Management such as leads, opportunities, and contacts are packaged
in the Oracle Fusion Customer Relationship Management search application. To
support the lifecycle management of searchable objects for a particular product family,
provision the Oracle Fusion Applications environment.
This task is not applicable to Oracle Cloud implementations.
16.1.1 Oracle Fusion Applications Environment
Provisioning the Oracle Fusion Applications environment is mandatory before you can
manage the searchable objects of any product family. See Provision a New Oracle
Fusion Applications Environment (page 13-1).
16.1.2 Oracle Enterprise Crawl and Search Framework
Oracle Fusion Applications Search functionality is fundamentally made possible by
the integration of three systems, each playing a role in forming the complete search
platform:
• Oracle Fusion Applications Search leverages the Oracle Enterprise Crawl and
Search Framework (ECSF) to enable search on transactional business objects.
Therefore, validating the environment for Enterprise Crawl and Search Framework
involves the recommended checks for establishing Oracle Fusion Applications
Search. See Validate the Oracle Enterprise Crawl and Search Framework
Environment (page 16-4).
• Managing search involves making seeded searchable objects available for search,
maintaining search categories, and so on.
• To make the Oracle Fusion Applications search components appear on the user
interface, enable the relevant profile option.
ECSF is an Oracle Fusion Middleware search framework that enables the exposure
of application context information on various business objects to enable full-text
transactional search. Benefits of ECSF include:
• Transparent integration of applications with search engines, which minimizes
development time and maximizes the user experience with search
• Code reuse, through use of a well designed set of abstract classes, to reduce long
design cycles
• Basic platform for developing search, which helps new developers to grasp the
conceptual flow of work easily
• Centralized process and control mechanism, which enhances search functionality
• Wide range of optimizations that offer better control to leverage search results
Chapter 16
Set Up Global Search
16-2

16.1.2.1 Oracle Enterprise Crawl and Search Framework Management
Features
ECSF management features include:
• Runtime server, a metadata-driven runtime engine that serves as an integration
framework between enterprise data sources and Oracle Secure Enterprise Search
(Oracle SES). It enables crawling, indexing, and the security service. It also serves
as the semantic engine that provides "smart" search features, such as faceted
navigation, actionable results, and related search.
• Oracle Enterprise Manager Fusion Applications Control (Fusion Applications
Control), an administration user interface for configuring and administering the
ECSF runtime server, managing the searchable object lifecycle, and synchronizing
with Oracle SES. Support for a command line administration option is also
provided. See ECSF Command Line Administration Utility in the Oracle Fusion
Applications Developer's Guide.
16.1.2.2 Key Oracle Enterprise Crawl and Search Framework Features
Key ECSF features that are built on top of Oracle SES and enhance the Oracle Fusion
Applications user experience with search include:
• Basic search, which allows query based on keyword and search category
• Advanced search, which allows query based on keyword, search category, and up
to 100 attribute filters
• Faceted navigation, which allows the filtering of search results based on attributes
of the business objects. Users can navigate a search result set based on a set
of predefined facets, or dimensions. This feature returns a list of facets and their
associated set of available values with the search result. Users can select a value
for each facet, which is then submitted with the search query to narrow down the
result set
• Actionable results, which are search results with action links associated with the
searchable objects. From the search results users can either go straight to the
page displaying the record they selected, or they can invoke a specific task on a
search result
• Saved searches, which allows saved search criteria for later use. Users can create
new saved search entries, edit and delete existing saved search entries, and
retrieve user-specified or public saved search entries
• File attachments, which allow the crawling of attachments that are associated with
Oracle Fusion Applications transactional objects or records
• Crawling Oracle WebCenter Portal tags, which supports crawling searchable
objects that contain Oracle WebCenter Portal tags
• Crawling tree structures, which supports search functionality on source systems
containing data that is organized in a tree structure (for example, Oracle Business
Intelligence Catalog)
• Search support for external data sources, which allows querying against search
groups that contain external data sources, which are non-ECSF related data
sources, such as wiki pages and blogs, that are directly crawled by Oracle SES
Chapter 16
Set Up Global Search
16-3

16.1.3 Validate the Oracle Enterprise Crawl and Search Framework
Environment
Before beginning to manage search with ECSF, make sure that the environment is set
up properly for using ECSF.
To validate the ECSF setup, follow the procedures in the following sections.
Task 1 Make Sure That Oracle Fusion Applications Includes Search
Functionality
Oracle Fusion Applications Search should be embedded within Oracle Fusion
Applications, but it must be enabled in the user interface by setting the profile option
FUSION_APPS_SEARCH_ENABLED
to
Y
.
To make sure that Oracle Fusion Applications includes search functionality:
1. Log in to Oracle Fusion Applications. In case of any problems to log in to Oracle
Fusion Applications, contact the installation team.
2. Verify that the Enterprise Search box is available at the top of every Oracle
Fusion Applications page.
3. View the Search Categories dropdown list. There should be no search
categories listed.
4. Log out.
Task 2 Make Sure That Oracle SES Is Installed and Configured Properly
Oracle SES provides the fundamental search capability that includes crawling,
indexing, and querying. For more information about Oracle SES, see Introduction
to Oracle Secure Enterprise Search in the Oracle Secure Enterprise Search
Administrator's Guide.
To make sure that Oracle SES is installed and configured properly:
1. Check the administration endpoint by logging in to the Oracle SES Administration
GUI with the administration username and password at the following URL.
http: host_name:7777/search/admin/index.jsp
The default port number is 7777. Make sure to use the correct port number for
the installation. In case of any issues to access the Oracle SES search engine,
contact the installation team.
2. Make sure that the Oracle SES identity plug-in has been registered.
3. Make sure that the federated trusted entities are created. Depending on what
product families are installed, it should possible to see one to three proxy users
listed. The valid values are:
•
FUSION_APPS_CRM_ECSF_SEARCH_APPID
•
FUSION_APPS_FSCM_ECSF_SEARCH_APPID
•
FUSION_APPS_HCM_ECSF_SEARCH_APPID
Task 3 Make Sure That Fusion Applications Control Is Available
Fusion Applications Control must be available for configuring and administering the
ECSF runtime server, managing the searchable object lifecycle, and synchronizing
with Oracle SES.
Chapter 16
Set Up Global Search
16-4

To make sure that Fusion Applications Control is available:
1. Log in to Oracle Enterprise Manager.
2. From the navigation pane, expand the farm and then the Enterprise Crawl and
Search Framework folder.
3. Select the application engine instance that contains the searchable objects that
are managed to open the Enterprise Crawl and Search Framework Configuration
Settings page.
The search engine types (Oracle SES) should be listed.
4. Click the Oracle SES search engine type name link in the Search Engine Types
table to open the Search Engine Instance administration page, and validate the
Oracle SES search engine instance parameters.
5. From the table of search engine instances, select a search engine instance
record, and then select the Searchable Objects tab to view the table of
searchable objects, and validate the list of searchable objects for the application.
For a list of seeded searchable objects.
6. Select the Search Categories tab to view the table of search categories, and
validate the list of search categories and objects associated with the search
categories for the application. For a list of seeded search categories.
7. From the navigation pane, re-select the application to open the Enterprise Crawl
and Search Framework Configuration Settings page, then click the Search
Application Service Component link to open the Search Application Service
Component administration page, and validate that the search applications for the
product families are installed.
Task 4 Provide Access to ECSF Pages in Fusion Applications Control
To access the ECSF pages in Fusion Applications Control, users must have Operator
privileges in Oracle WebLogic Server. Add the users to the Operator group and above
on Oracle WebLogic Server.
Task 5 Validate the Application Identities
Oracle Fusion Applications include seven search-related application identities that are
seeded and are stored in the identity store:
•
FUSION_APPS_CRM_SES_CRAWL_APPID
•
FUSION_APPS_CRM_ECSF_SEARCH_APPID
•
FUSION_APPS_FSCM_SES_CRAWL_APPID
•
FUSION_APPS_FSCM_ECSF_SEARCH_APPID
•
FUSION_APPS_HCM_SES_CRAWL_APPID
•
FUSION_APPS_HCM_ECSF_SEARCH_APPID
•
FUSION_APPS_ECSF_SES_ADMIN_APPID
ECSF is powered by Oracle SES. To integrate with Oracle SES, several integration
identities known as application identities are used. For each Oracle Fusion
Applications application, there are a pair of application identities, for example,
FUSION_APPS_HCM_SES_CRAWL_APPID
and
FUSION_APPS_HCM_ECSF_SEARCH_APPID
. The
CRAWL
application identities are used by Oracle SES to interact with ECSF for crawling
and security requests, while the
SEARCH
application identities are used by Oracle SES
to query Oracle SES as proxy users.
Chapter 16
Set Up Global Search
16-5

FUSION_APPS_ECSF_SES_ADMIN_APPID
is the application identity used by ECSF to
integrate with Oracle SES for administration tasks, such as deployment, scheduling,
and so on.
Application identities are provisioned as users in the Oracle Fusion Applications
identity store. They often have high level privileges, and their credentials are
generated and stored in the credential store. These users are used mainly for
machine to machine (application to application) integration.
The Lightweight Directory Access Protocol (LDAP) credential store stores the
passwords for the identities that Oracle Fusion Applications and ECSF uses to
retrieve passwords for Oracle SES integration.
View the LDAP credential store to make sure the application identities exist.
16.1.4 Configure Help Search: Highlights
It is possible to include Help in the list of search categories for the search in the global
area of Oracle Fusion Applications. This search is of type Oracle Fusion Applications
Search, and administering this search involves tasks in Oracle Enterprise Crawl and
Search Framework.
This task is not applicable to Oracle Cloud implementations.
The search in Oracle Fusion Applications Help and the navigators, for example Search
by Business Process, are based on other search functionality and do not require
configuration.
Oracle Enterprise Crawl and Search Framework administration is described fully in
Understand Key Oracle Enterprise Crawl and Search Framework Features in the
Oracle Fusion Applications Administrator's Guide. While reading content from that
guide, keep in mind that Oracle Fusion Applications Search is not used only for Oracle
Fusion Applications Help; therefore, the content is not specific to help.
16.1.5 Searchable Objects
• Deploy and activate the TopicSearchPVO searchable object, associate it with the
Help category and deploy the category, and deploy and start index schedules.
Each crawl picks up customizations and patches for help, so the frequency
depends on how often you help is added, managed or patched.
• Do not modify the TopicSearchPVO searchable object itself.
16.1.6 Configure External Search Categories for Oracle Business
Intelligence and Oracle WebCenter Portal: Procedures
To perform global search within Oracle Business Intelligence and Oracle WebCenter
Portal, create the appropriate external search categories in Oracle Fusion
Applications. For general instructions on making external search categories available
for search, see Make External Search Categories Available for Federated Search in
the Oracle Fusion Applications Administrator's Guide.
However, before proceeding with the configuration of external search categories
for Oracle Business Intelligence and Oracle WebCenter Portal, create manually the
Business Intelligence data source.
Chapter 16
Set Up Global Search
16-6

Perform the search-related configuration tasks using Oracle Enterprise Crawl and
Search Framework. To configure external search categories for Oracle Business
Intelligence and Oracle WebCenter Portal, follow these instructions.
1. Log in to Oracle Enterprise Manager Fusion Applications Control.
2. From the navigation pane, open Farm - Enterprise Crawl and Search
Framework folder.
3. Select the application engine instance SES 11.2.1. It contains the searchable
objects that are managed to open the Enterprise Crawl and Search Framework
Configuration Settings page.
4. From the Search Engine Types table, click Oracle Fusion Application Search
engine SES 11.2.1 to open the Search Engine Instance administration page.
5. On the External Search Categories tab, click Import.
6. In the Available Categories column, select the checkbox of the external search
categories to be imported, and click Move to shuttle the selection to the Selected
Categories column.
• To import Oracle Business Intelligence, select bi_search
• To import Oracle WebCenter Portal, select Collaboration
7. Click OK to import the selected external search categories.
8. Associate the Application ID with the imported external categories:
• To associate with Oracle Business Intelligence, in the Application ID column
corresponding to the imported external search category (bi_search), enter BI.
• To associate with Oracle WebCenter Portal, in the Application ID column
corresponding to the imported external search category (Collaboration), enter
WC.
9. Click Save External Search Category to save the selected record.
10. Associate the Application ID with the Search Service component:
a. From the navigation pane on the left side, select Enterprise Crawl and
Search Framework folder. The Enterprise Crawl and Search Framework
Settings page appears.
b. From the context menu of Enterprise Crawl and Search Framework, select
Home.
c. Select the first active service component and note down the search engine
instance that is associated with the active service component.
d. In the
ECSF_QUERY_SERVICE_APP_IDS
field, enter the Application ID in comma
separated string format:
• To configure external search category for Business Intelligence, enter BI.
• To configure external search category for Oracle WebCenter Portal, enter WC
11. Save the changes.
12. Restart the Search application from the WebLogic Server Console.
Chapter 16
Set Up Global Search
16-7

16.1.7 Make a Search Application Highly Available
Each installation of Oracle Fusion Applications can provision one or more offerings
such as Oracle Fusion Customer Relationship Management (Oracle Fusion CRM),
Oracle Fusion Human Capital Management (Oracle Fusion HCM), and so on. Each
offering has its own search application such as CRM Search Application, HCM Search
Application and so on. However, the application architecture restricts running only
one search application at a time and only that search application is registered as
the identity plug-in end point of Oracle Secure Enterprise Search (Oracle SES). The
identity plug-in end point of Oracle SES is a critical part of Oracle Fusion Search and
is used in authenticating all users using the search functionality. Therefore, to mitigate
the risk of any down time, it is necessary to identify and make the registered search
application highly available by adding more managed WebLogic servers to the cluster.
Depending on the provisioned offerings, the actual search application registered as
the identity plug-in endpoint varies. The following instructions help identify the search
application and add more managed WebLogic servers to the existing cluster.
1. Log in to the Oracle SES Administration page.
2. On the Global Settings tab, click Identity Management Setup. Review the
protocol identified by the HTTP end point for authentication and the current search
application indicated by one of the following values for User ID:
• User ID =
FUSION_APPS_CRM_ECSF_SEARCH_APPID
: indicates CRM Search
Application is used
• User ID =
FUSION_APPS_FSCM_ECSF_SEARCH_APPID
: indicates FSCM Search
Application is used
• User ID =
FUSION_APPS_HCM_ECSF_SEARCH_APPID
: indicates HCM Search
Application is used
3. Identify the search application and add more managed servers to the cluster.
16.2 Set Up Privacy Statement
The Privacy Statement link is disabled by default.
Enable the Privacy Statement link in the About this Page dialog available from the
Settings and Actions menu and configure it to link to a customer-defined page by
setting the
PRIVACY_PAGE
profile option value to a full URL. See About Setting and
Accessing Profile Values in the Oracle Fusion Applications Developer's Guide.
16.3 Configure Oracle User Productivity Kit In-Application
Support
This section describes the procedures for setting up the Oracle User Productivity Kit
In-Application Support.
Users may need to access and take advantage of the Oracle User Productivity Kit
(UPK) content while working with Oracle Fusion Applications. To make the Oracle UPK
content available for users, enable and configure the UPK link under the Settings
and Actions menu of Oracle Fusion Applications, using the Oracle UPK In-Application
Support functionality.
Chapter 16
Set Up Privacy Statement
16-8

To perform this task, have the role of a System Administrator and have relevant
privileges on the environment where the UPK link is enabled and configured.
Configuring the Oracle UPK In-Application Support involves the following activities:
1. Registering Oracle UPK as an Enterprise Application.
2. Deploying the Oracle UPK package on a HTTP server.
16.3.1 Register Oracle UPK as an Enterprise Application
The system administrator must have security access to use Oracle Fusion Functional
Setup Manager to complete the steps that follow.
To complete the configuration:
1. From the Oracle Fusion Applications home page, navigate to Navigator, Tools,
Setup and Maintenance to access the Setup and Maintenance work area.
2. In the Tasks list, select Topology Registration, Register Enterprise
Applications to access the Register Enterprise Applications work area.
3. In the Register Enterprise Applications work area, do one of the following:
• To modify an existing configuration, click the Name link of the registered
application.
For example: Oracle User Productivity Kit
• If this is a new configuration, click Add (+) to register Oracle UPK as a new
application in Oracle Fusion Applications.
4. In the Add Enterprise Application work area, in the Basic Information section,
do the following:
a. In the Enterprise Environment drop-down list, select the environment.
For example: Oracle
b. In the Enterprise Application drop-down list, select the enterprise
application.
For example: Oracle User Productivity Kit
c. In the Name field, enter the name of the enterprise application to be
registered.
For example: Oracle User Productivity Kit
5. In the Server Details section, do the following:
a. In the Server Protocol drop-down list, select the appropriate protocol for the
server that is planned to be used to launch UPK content.
The UPK Player supports both HTTP and HTTPS.
b. In the External Server Host field, enter the full DNS name of the server host.
For example: content.mycompany.com
c. In the External Server Port field, enter the appropriate port for either HTTP or
HTTPS. It could be either the default value 80/443 or customer configured port
location.
The Context Root name is the name of the virtual directory used in the URL
that launches the UPK content.
Chapter 16
Configure Oracle User Productivity Kit In-Application Support
16-9

d. Click Save and Close when the process is done.
6. Click Regenerate Domain Connections.
7. Log out of Oracle Fusion Applications and log in again.
8. Click the Settings and Actions menu on the Oracle Fusion Applications Home
page to verify if the Oracle User Productivity Kit is now available as a menu item.
16.3.2 Deploy the Oracle UPK Player Package
Deploy the Oracle UPK Player Package to any server that uses the HTTP or HTTPS
protocols.
The content root directory must be configured to the location of the Oracle UPK Player
on the web server.
For example:
http(s)://<server>:<port>/<directory>
Test access to the content.
If the Oracle UPK Player launches with all topics, continue to Oracle Fusion
Applications for In-Application Support.
16.4 Review and Configure Diagnostic Logging Settings and
Diagnostic Testing Features
The infrastructure for health checking and troubleshooting Oracle Fusion Applications
is provided along with provisioning. However, before beginning any production activity
on Oracle Fusion Applications, perform the following configuration tasks.
This task is not applicable to Oracle Cloud implementations.
16.4.1 Configure Settings for Log Files During Normal Operation
Although critical business logic sections of Oracle Fusion Applications may write more
information to log files than less critical areas of the application code, the amount
of information that Oracle Fusion Applications log depends primarily on how the
environment is configured. Oracle supplies default values for log settings, but different
setting values can be specified to adjust the amount of information to be logged.
Most Oracle Fusion Applications components use a standard set of log configuration
settings.
In busy computing environments, the amount of disk space used by log files can
become a concern. Large log files can also affect system performance. Oracle Fusion
applications that are written in PL/SQL address this concern using automatic log file
rotation.
16.4.1.1 Manage Rotating Log File Space Usage for PL/SQL Applications
For Oracle Fusion Applications modules that are implemented using PL/SQL, when a
diagnostic.log
file reaches a specific size, the
diagnostic.log
file is automatically
renamed, and a new
diagnostic.log
file is created. If the
AFLOG_PLSQL_FILENAME
profile option is set so that the logging framework uses a log file name other than
Chapter 16
Review and Configure Diagnostic Logging Settings and Diagnostic Testing Features
16-10

diagnostic.log,
then the file name that the profile option specifies is used, instead of
diagnostic.log.
Use the following profile options settings to specify the maximum log file size:
(KSQ: revisit this section: is ordered list procedure needed? Looks like FAC for profile
option changing, yes?)
•
AFLOG_MAX_FILE_SIZE:
This setting specifies the size in megabytes beyond which
a PL/SQL log file name is automatically renamed and a new log file is started. The
default value is 10 megabytes.
If the
AFLOG_BUFFER_MODE
profile option is set to a value larger than 0, enabling
asynchronous buffering of PL/SQL log entries, then the actual maximum size
of any single PL/SQL log file is the value of
AFLOG_MAX_FILE_SIZE
plus the
number of megabytes that are flushed from the buffer. This value is approximate,
because the amount of information that can accumulate in the buffer is set using
the
AFLOG_BUFFER_SIZE
setting, which specifies a specific number of log records,
rather than a specific number of megabytes.
•
AFLOG_NUMBER_OF_LOG_FILES:
This setting specifies the maximum number of
PL/SQL log files the system keeps at any one time. The default value is 10 files.
PL/SQL log rotation is currently done only on the basis of file size, not on the basis of
the passage of a specified amount of time.
When a PL/SQL log file is renamed, the new name depends on whether the
AFLOG_PLSQL_FILENAME
profile option is set:
• If the profile option is set, then the new log file name is of the format
AFLOG_PLSQL_FILENAME_value-n.log,
where
n
is a positive integer.
• If the profile option is not set, then the new log file name is of the format
diagnostic-n.log,
where
n
is a positive integer.
The value of
n
depends on the names of the log files that are already present in
the directory. If the directory contains no previously renamed log files, then the first
renamed log file is called
diagnostic-1.log
or
AFLOG_PLSQL_FILENAME_value-1.log
.
If other log files exist, then
n
is set to the next higher integer after the highest integer
that is already in use. For example, if the directory contains
diagnostic-1.log
through
diagnostic-8.log
at the time when the
diagnostic.log
file surpasses the size
limit set in the
AFLOG_MAX_FILE_SIZE
profile option, then the
diagnostic.log
file is
renamed to
diagnostic-9.log.
When the number of log files reaches the value specified using the
AFLOG_NUMBER_OF_LOG_FILES
profile option, then older log files are deleted
automatically, to prevent the disk space usage of the log file directory from getting
too large.
Over time, the value of
n
in
diagnostic-n.log
or
AFLOG_PLSQL_FILENAME_value-
n.log
can become large enough to cause usability challenges or exceed the number
of characters that the operating system allows in a file name. To have the value of
n
start over at 1, move all existing log files except the currently active
diagnostic.log
file
or
AFLOG_PLSQL_FILENAME_value.log
file into another directory. When the active
file surpasses the size limit and the log rotation code finds no previously renamed log
files in the directory, the active file is renamed using a value of 1 for
n.
Chapter 16
Review and Configure Diagnostic Logging Settings and Diagnostic Testing Features
16-11

If the Oracle Fusion Applications environment includes multiple database nodes such
as Oracle Real Application Clusters (RAC), then each database node corresponds to a
server instance that has its own location for log files.
If an incident is created, then the server instance that creates the incident handles
all subsequent jobs related to that incident. Identifiers for incidents are unique within
a specific instance, but not across instances. For more information about working
with incidents, see Prepare to Troubleshoot Using Incidents, Logs, QuickTrace, and
Diagnostic Tests in the Oracle Fusion Applications Administrator's Guide.
(KSQ: consider moving this info to the troubleshooting chapter, since it seems more
useful for troubleshooting than normal operation?)
16.4.1.2 Manage Log File Space Usage for C Applications
Oracle Fusion Applications modules that are implemented in C currently produce log
files that continually increase in size.
Writer note: PM says it's very important to include this section, despite not seeing
a corresponding section in the FMW Admin Guide that Thomas K. designated as a
model for this book, because Oracle Fusion Applications that are implemented in C do
not have a log management facility.
To manage log file space usage for log files created by Oracle Fusion Applications
modules that are written in C:
1. Navigate to the directory that contains the log files:
• If the
AFLOG_FILENAME
profile option is set, then navigate to the location
designated by the profile option value.
• If the
AFLOG_FILENAME
profile option is not set, then navigate to the location
set by Oracle Enterprise Scheduler Service.
Use Fusion Applications Control to determine the location of Oracle Enterprise
Scheduler log files, as follows:
a. In the navigation pane, expand the farm part of the navigational tree,
then expand Scheduling Services, and then select an Oracle Enterprise
Scheduler server as the target.
b. In the context pane, from the Scheduling Service dropdown menu,
choose Logs, View Log Messages.
c. Click Target Log Files to view a list of log files associated with the
selected server.
For example, a typical path and file name might be the following,
where
APPLICATIONS_CONFIG/domain/<domain_name>
is the domain home
directory,
SERVER_HOME
is the server home directory, and
serverName
is
the name of the Oracle Enterprise Scheduler server:
APPLICATIONS_CONFIG/domain/<domain_name>/servers/SERVER_HOME/logs/
serverName-diagnostic.log
(REVIEWER: Correct? On the PRC system where I saw this on 02/10/11,
http://example.country.oracle.com:8201/em,
where
example.country
was
adcdbc13.us,
there were also ESS log file names in the format
serverName.log
and
serverName.log0000n,
but the downloaded files
Chapter 16
Review and Configure Diagnostic Logging Settings and Diagnostic Testing Features
16-12

with
diagnostic
in the file name were the ones that referred to the
product such as PRC or PRJ.)
2. Rename the log file that is currently in use.
For example, if the current log file is called
Cdiagnostic.log,
it might be
renamed to
Cdiagnostic_MMDDYYYY.log,
where
MMDDYYYY
is the current date.
3. Delete any previously renamed log files that are no longer need.
16.4.2 Understand Oracle Fusion Applications Diagnostic Tests and
the Diagnostic Framework
Incidents are collections of information about error conditions. It is strongly
recommended to follow Information Technology Infrastructure Library (ITIL) best
practices by establishing a help desk or service desk within the organization to support
Oracle Fusion Applications, and have the help desk personnel use incidents to track
the troubleshooting and resolution of all problems. Some incidents are created and
gather information automatically when problems occur. For example, the information
associated with an automatically created incident may include detailed operational
information collected by the QuickTrace (in-memory logging) feature for Oracle Fusion
Applications. For problems that do not automatically create incidents, administrators
or help desk personnel can manually create incidents and manually gather and add
related system information.
Log files contain information about both normal and problematic events. Log files can
help both to monitor normal operations and to diagnose and address some problems.
For example, log messages that state that a service cannot be reached might indicate
a hardware failure. If r a more complex issue is discovered, then Oracle Support
personnel may use log files to trace the execution code paths of relevant requests,
as part of diagnosing the problem. Log files are particularly helpful if the Oracle
implementation contains custom code that needs debugging, especially when using
a debugger is not feasible, such as on a production system.
The QuickTrace (in-memory logging) feature continuously records a specified level
of log detail in an area of memory. The memory is recycled on an ongoing basis,
with the oldest information being deleted or overwritten first. Because QuickTrace
writes to memory instead of to a log file, it can gather operational information
continuously without significantly affecting system performance. The information that
QuickTrace stores in memory is written to disk only when an incident occurs or when
an administrator manually dumps the contents of a QuickTrace buffer.
Diagnostic tests are executables that are designed to exercise particular aspects of
Oracle Fusion applications, to determine whether they are operating correctly and to
help identify and resolve any problems. The Oracle Fusion Applications Diagnostic
Testing Framework (Diagnostic Testing Framework) lets execute diagnostic tests and
collects the results into detailed diagnostic reports. Oracle provides diagnostics tests
that are installed along with Oracle Fusion Applications releases and patches.
Use diagnostic tests along with information from log files and the collections of error
condition information that are called incidents.
In Cloud Control, Support Workbench helps investigate, report, and resolve problems
(critical errors). Use Support Workbench to perform the following kinds of operations:
• View summary information about recent problems and incidents
• View detailed diagnostic data that was gathered automatically
Chapter 16
Review and Configure Diagnostic Logging Settings and Diagnostic Testing Features
16-13

• Manually trigger additional dumps of diagnostic data
• Connect to the Oracle Fusion Applications Diagnostic Dashboard (Diagnostic
Dashboard), which provides additional diagnostic tests that can be run
• Create or update service requests with Oracle Support, including uploading
diagnostic data to Oracle
16.4.2.1 Relationships Between Diagnostic Tests, Incidents, and Log Messages
Oracle developers create diagnostic tests that can be used to help diagnose and
resolve Oracle Fusion application problems.
Oracle developers use mechanisms such as application programming interface (API)
calls in Oracle Fusion Applications code to record application operations in log files
and to provide error messages as appropriate. A diagnostic test may or may not be
associated with a particular error message.
If an Oracle Fusion application handles a particular error in a way that triggers the
creation of an incident, then any diagnostic tests that are associated with the error
message for the incident run automatically. Oracle developers accomplish this by
setting the value of each diagnostic test's
APPS_MSG_ID
tag to match the identifier of
any error message that should trigger the automatic execution of that test. There is no
configuration setting for disabling this automatic execution of diagnostic tests.
The results of any automatically run diagnostic test are automatically associated with
the related incident, and the identity of the user who received the error message is
recorded.
For more information about using diagnostic tests and log files to help diagnose
a problem, see Prepare to Troubleshoot Using Incidents, Logs, QuickTrace, and
Diagnostic Tests in the Oracle Fusion Applications Administrator's Guide.
It is important to be familiar with the following additional concept that Seed data is
information that Oracle provides in the form of database records. Diagnostic tests are
included in seed data.
16.4.2.2 Standard Diagnostic Testing Administration Tasks and Tools
Under normal circumstances, the following administrative tasks are associated with
Oracle Fusion Applications diagnostic tests:
• Configuring security to provide appropriate access to diagnostic tests. Job roles
can be assigned to particular users to grant those users the ability to perform
various diagnostic operations.
In the current release, a job role for diagnostic operations grants the user the
ability to perform the specified operations for all diagnostic tests that are provided
with Oracle Fusion Applications. When choosing whether to grant a diagnostic job
role to specific users, be aware that some diagnostic tests may include sensitive
information in their results.
(Writer note: this information is current as of early December 2010. Depending
on technical and scheduling constraints, future releases may or may not add the
ability to control access to individual diagnostic tests.
• Running diagnostic tests. Diagnostic tests can be used for the following purposes:
– Routinely checking the health of the Oracle Fusion applications
Chapter 16
Review and Configure Diagnostic Logging Settings and Diagnostic Testing Features
16-14

– Troubleshooting a problem with an Oracle Fusion application
– Collecting detailed data that may help Oracle Support to resolve a problem
Some diagnostic tests require a specific Oracle Fusion application to be running while
the test is performed—these diagnostic tests are called internal diagnostic tests.
Other diagnostic tests can perform their functions even if the Oracle Fusion application
to be tested is not running—these tests are called external diagnostic tests.
(Writer note: PM says customer administrators do not need to know the technical
differences between what internal means for Java tests and what it means for PL/SQL
tests. I.e., a Java internal diagnostic test reuses or refers to code modules, entity
objects, or view objects from a Fusion application, but a PL/SQL internal diagnostic
test runs using the data security context of the Fusion application.)
The distinction between internal and external tests is important because it affects both
when the tests can be run and which interfaces can be used to run the tests. The
Diagnostic Testing Framework provides two interfaces:
• The Oracle Fusion Applications Diagnostic Dashboard application (Diagnostic
Dashboard) provides a graphical user interface that allows to perform the following
tasks:
– Execute and monitor both internal and external diagnostic tests for Oracle
Fusion applications
– Purge diagnostic test results
– Register any special-purpose diagnostic tests that Oracle Support may provide
– Work with categorization tags to keep the diagnostic tests organized
(Writer note: references to custom tags hidden for v1 per PM request, as we
do not yet have a supported migration path for custom tags.)
• The
diagctl
command-line interface allows to perform the following tasks:
– Execute external diagnostic tests (tests that do not require a specific Oracle
Fusion application to be running)
Technical constraints prevent the
diagctl
command-line interface from
returning useful results for internal diagnostic tests (tests that require a specific
Oracle Fusion application to be running when the test is performed). Use
Diagnostic Dashboard to run any internal diagnostic tests.
Use also Diagnostic Dashboard to determine whether a particular test is an
internal or an external test.
– View diagnostic test results
– Register any special-purpose diagnostic tests that Oracle Support may provide
16.4.3 Configure the Diagnostic Testing Framework for Normal
Operation
Diagnostic tests can be used to check normal system health and to troubleshoot
system problems. The Oracle Fusion Applications environment can be configured to
run all Oracle Fusion Applications diagnostic tests using the Diagnostic Dashboard
application, and to run external diagnostic tests using the
diagctl
command-line
interface.
Chapter 16
Review and Configure Diagnostic Logging Settings and Diagnostic Testing Features
16-15

Technical constraints prevent the
diagctl
command-line interface from returning
useful results for internal diagnostic tests (tests that require a specific Oracle Fusion
application to be running when the test is performed). Use Diagnostic Dashboard to
run any internal diagnostic tests.
Use also Diagnostic Dashboard to determine whether a particular test is an internal or
an external test.
Both the Diagnostic Dashboard application and the
diagctl
command-line interface
are automatically installed as part of the Oracle Fusion Applications installation.
However, assign appropriate job roles to specific users to give them the ability to
display and perform operations using the Diagnostic Dashboard application. Access to
the
diagctl
command-line interface is controlled at the level of the server operating
system.
For proper operation of the
diagctl
command-line interface, set also certain
environment variables.
To help to locate diagnostic tests for specific purposes, the diagnostic tests that are
received with Oracle Fusion applications are all assigned to predefined categories.
(Writer note: references to custom tags hidden for v1 per PM request, as we do not yet
have a supported migration path for custom tags.)
If preferred, define also custom categories and use categorization tags to assign tests
to the custom categories.
The custom categories to which the diagnostic tests are assigned can be changed,
and the custom categorization tags and tag values from the database can be removed.
The tag name and tag value assignments that Oracle uses to categorize diagnostic
tests cannot be changed, and those tag names or tag values from the database
cannot be removed. The following related links in the Task pane of the Diagnostic
Dashboard application are intended for use by Oracle personnel only:
• Add New Tag
• Add New Tag Value
• Assign Tags to Tests
• Unassign Tags from Tests
• Remove Tag
• Remove Tag Value
WARNING: Do not attempt to modify the diagnostic test seed data provided by
Oracle. Unauthorized modification of this seed data may prevent diagnostic tests from
functioning correctly, lengthening the amount of time required to resolve both current
and future problems.
16.4.3.1 Control Access to Diagnostic Testing Functionality
Access to diagnostic testing functionality is controlled separately for Diagnostic
Dashboard and the
diagctl
command-line interface.
For the
diagctl
command-line interface, access is controlled at the level of the server
operating system. If a user can log in to the server where
diagctl
is stored, and if that
user has operating system permissions to read and execute
diagctl,
then that user
Chapter 16
Review and Configure Diagnostic Logging Settings and Diagnostic Testing Features
16-16

can use
diagctl
to perform all diagnostic operations that the command-line interface
supports.
For Diagnostic Dashboard, Oracle Identity Manager can be used to assign specific
users to any of the four preconfigured job roles that grant users access to Diagnostic
Dashboard. Each of these four job roles provides access to a different amount of the
functionality of the dashboard.
Oracle Fusion Applications display the Troubleshooting, Run Diagnostic Tests
command in the Settings and Actions menu only for users who are associated with
the preconfigured job roles that grant access to Diagnostic Dashboard operations.
• The
Diagnostic Viewer
job role can view and analyze diagnostic test results for
Oracle Fusion applications.
• The
Diagnostic Regular User
job role can execute diagnostic test runs and view
diagnostic test results for Oracle Fusion applications, and cancel diagnostic test
runs that were started by the current user.
• The
Diagnostic Advanced User
job role can schedule and execute diagnostic
test runs, view diagnostic test results, attach test results to application incidents
for Oracle Fusion applications, and cancel diagnostic test runs that were started
by the current user. In general, this job role is recommended for running Oracle
Fusion Applications diagnostic tests, because its added capabilities allow users to
work with administrators more flexibly during troubleshooting.
• The
Diagnostic Administrator
job role can use all of the diagnostic testing
functionality provided for Oracle Fusion applications, including purging test results
from the database and canceling test runs started by other users.
In the current release, any job role for diagnostic operations grants the user the ability
to perform the role's specified operations for all diagnostic tests that are provided with
Oracle Fusion applications. When choosing whether to grant any diagnostic job role to
specific users, be aware that some diagnostic tests may include sensitive information
in their results.
To grant specific users permission to use Diagnostic Dashboard:
1. Decide which users need the capabilities of each of the four preconfigured job
roles for diagnostic operations.
2. Use Oracle Identity Manager to assign the appropriate job role to each user.
3. For each external role that was created or found in Step 2, use Oracle
Authorization Policy Manager to map the external role to the specific diagnostic
duty role that allows the needed operations.
16.4.3.2 Navigate to the Diagnostic Dashboard Application
The Diagnostic Dashboard application for Oracle Fusion Applications provides a
graphical user interface that lets execute and monitor diagnostic tests, display and
purge test results, and register any special-purpose diagnostic tests that Oracle
Support may provide. Each product family within Oracle Fusion Applications has
its own instance of Diagnostic Dashboard. Provided that an appropriate job role is
assigned, navigate to Diagnostic Dashboard from any Oracle Fusion application or
from Oracle Enterprise Manager Cloud Control (Cloud Control).
(Writer note: paragraph above also referred to the dashboard letting the customer
"work with categorization tags to keep the diagnostic tests organized," but this text
Chapter 16
Review and Configure Diagnostic Logging Settings and Diagnostic Testing Features
16-17

is currently hidden as it implies custom tag capability, which is not planned to be
supported in v1).
16.4.3.2.1 Navigate to the Diagnostic Dashboard Application from an Oracle Fusion
Application
To use Diagnostic Dashboard to execute or monitor diagnostic tests or display or
purge test results while using an Oracle Fusion application, navigate to Diagnostic
Dashboard directly from the application.
To display the Diagnostic Dashboard application from an Oracle Fusion application:
1. Log in to the relevant Oracle Fusion application as a user who has access to the
specific Diagnostic Dashboard operations that are needed.
2. From the Settings and Actions menu in the application, choose
Troubleshooting, Run Diagnostic Tests to display Diagnostic Dashboard.
Oracle Fusion applications display the Troubleshooting, Run Diagnostic Tests
command in the Settings and Actions menu only for users who are assigned
to the preconfigured jobs roles that grant access to Diagnostic Dashboard
operations.
16.4.3.2.2 Navigate to the Diagnostic Dashboard Application from Cloud Control
To use the Diagnostic Dashboard application to execute or monitor diagnostic tests or
display or purge test results while using Cloud Control, such as while using Support
Workbench to gather additional information about an existing incident, navigate to
Diagnostic Dashboard directly from Cloud Control.
To display to Diagnostic Dashboard from Cloud Control:
1. In Oracle Enterprise Manager, select the product family or cluster application for
which diagnostic tests are run or diagnostic test results are viewed.
2. From the dynamic dropdown menu, choose Diagnostics, Fusion Applications
Diagnostic Dashboard.
A login screen for Diagnostic Dashboard appears in a new window.
3. Log in using an account for the Oracle Fusion Applications product family to be
tested.
The account used must also be assigned to a job role that provides access to
Diagnostic Dashboard.
16.4.3.2.3 Configure Required Variables for the diagctl Command Line Interface
To operate properly, the
diagctl
command-line interface requires to set certain
environment variables.
Set the required environment variables for each session that plans to use the
diagctl
command-line interface. For more convenience, the commands that define these
variables may be added to the
.profile
or
.bashrc
files of all users who will run
diagctl.
To set environment variables for a user of the
diagctl
command-line interface:
Chapter 16
Review and Configure Diagnostic Logging Settings and Diagnostic Testing Features
16-18

1. Log in to the operating system of the Administration Server of the Common
domain.
2. Use a command such as the following to set the
DIAGJPSCONFIGFILE
environment variable to the location of the
jps-config-jse.xml
file, making these
substitutions:
Replace
APPLICATIONS_CONFIG
with the location of the top-level directory of
Oracle Fusion Applications configuration files.
Replace
primordial_host_name
with the host name of the Administration Server
of the Common domain).
UNIX:
export DIAGJPSCONFIGFILE=
APPLICATIONS_CONFIG
/domains/
primordial_host_name/CommonDomain/config/fmwconfig/jps-config-jse.xml
Command syntax for UNIX environments may vary depending on which shell are
used. Whenever an environment variable is defined, use the command syntax for
the chosen shell.
(REVIEWER: FYI, APPLICATIONS_CONFIG represents a placeholder, in this
step, rather than an environment variable.)
(Writer note: Since the correct syntax for setting UNIX environment variables
depends on the customer's shell, and since OC said Bourne/Bash are what he
typically sees, I'm using B/B syntax and keeping this hidden text for my future
reference.)
• variablename=path (Korn shell syntax)
• export variablename=path (Bourne shell syntax and LINUX bash shell)
• setenv variablename path (C shell syntax)
3. Use a command such as the following to set the
JAVA_HOME
environment variable
to the location of the directory that contains Java files, where
APPLICATIONS_BASE
is the top-level directory for the Oracle Fusion Applications binaries.
UNIX: export JAVA_HOME=APPLICATIONS_BASE/fusionapps/jdk
4. Use a command such as the following to set the
MW_HOME
environment variable to
the location of the directory that contains Oracle Fusion Middleware files.
UNIX: export MW_HOME=APPLICATIONS_BASE/fusionapps
After completing this step, use the
diagctl
command-line interface to run
diagnostic tests.
16.4.4 Health Checking and Diagnostic Tasks
Only after ensuring the completeness of the following configuration, perform health
checking and troubleshooting for Oracle Fusion applications using log files, incidents,
diagnostic tests and so on. See Perform System Maintenance Tasks and Prepare to
Troubleshoot Using Incidents, Logs, QuickTrace, and Diagnostic Tests in the Oracle
Fusion Applications Administrator's Guide.
16.4.5 Configuration Tasks
The following configuration tasks can be performed:
Chapter 16
Review and Configure Diagnostic Logging Settings and Diagnostic Testing Features
16-19

• Enable viewing of logs generated by C and PL/SQL. See Configuring Access
to Logs for Fusion Applications Control in the Oracle Fusion Applications
Administrator's Guide.
• Configure log file rotation. See Configuring Log File Rotation in the Oracle Fusion
Middleware Administrator's Guide.
• Review default logging profile options and adjust values for specific requirements.
See Default System Log Settings and Configure Standard Fusion Applications
Log Settings for Troubleshooting in the Oracle Fusion Applications Administrator's
Guide.
• Review and adjust the QuickTrace settings. See Default System Settings for
Incident Creation in the Oracle Fusion Applications Administrator's Guide.
• Configure user access to diagnostic testing functionality. See Configure Access to
the Diagnostic Dashboard in the Oracle Fusion Applications Administrator's Guide.
• Configure a job role for future user access to troubleshooting options. See Assist
Users in Gathering Data Using Troubleshooting Options in the Oracle Fusion
Applications Administrator's Guide.
• To benefit from the health checking, patching recommendations, and configuration
services offered by My Oracle Support, install and configure Oracle Configuration
Manager. See Install Configuration Manager on My Oracle Support.
• To use the latest troubleshooting features, including a purpose built Oracle Fusion
Applications module, provided by Remote Diagnostic Agent (RDA), install and
configure RDA. See the RDA Documentation on My Oracle Support.
16.5 Configure Oracle HTTP Server with Custom
Certificates
If Simple topology is implemented, SSLterminates at OHS. Provisioning configures
OHS with a default dummy certificate. As the dummy certificate is not trusted by
browsers, certificate warning messages are displayed when accessing any external
URL.
To avoid this, configure OHS to use certificate(s) signed by a trusted certificate
authority (CA). It can be an external certificate authority such as Verisign, or an
internal certificate authority whose root certificate is trusted by the browser.
Generate a certificate signing request and obtain signed certificate(s) and import these
certificate(s) into wallet(s). There are two options for choosing certificate(s) and the
OHS configuration is different based on the chosen option.
16.5.1 Option 1
Obtain a wildcard or Subject Alternative Name (SAN) certificate. A single
wildcard certificate can protect all sub-domains at the same level (for example,
*.mycompany.com can be used for both fin.mycompany.com and prj.mycompany.com).
A SAN certificate can protect various domains mentioned in the Subject Alternative
Name field.
• Import a single certificate (SAN or wildcard) into the wallet. Wallet
location is specified using SSLWallet directive in
${ORACLE_INSTANCE}/config/$
Chapter 16
Configure Oracle HTTP Server with Custom Certificates
16-20

{COMPONENT_TYPE}/${COMPONENT_NAME}/FusionSSL.conf
and by default points to
the directory containing the default wallet.
• To specify the wallet containing the signed certificate, comment the existing
SSLWallet directive and add a new line which points to the directory containing
the wallet you have created, for example: SSLWallet "${ORACLE_INSTANCE}/
config/${COMPONENT_TYPE}/${COMPONENT_NAME}/keystores/myWallet
16.5.2 Option 2
Obtain a separate server certificate for all external URLs. Procure up to 10 certificates,
one for each external URL. This number varies depending on the selected offerings to
provision.
1. Create a separate wallet for each certificate and import the certificates into them,
since a wallet can only hold a single server certificate.
2. Copy
FusionSSL.conf
into separate files, one for each certificate (for example,
FusionSSL_fin.conf
,
FusionSSL_hcm.conf
, and so on ).
3. Edit the individual
FusionSSL_<product>.conf
and edit SSLWallet directive to
point to the directory containing the wallet that is created, for example,
FusionSSL_hcm.conf -> SSLWallet "${ORACLE_INSTANCE}/config/$
{COMPONENT_TYPE}/${COMPONENT_NAME}/keystores/hcm
4. Specify the modified SSL configuration files in external Virtual Hosts defined in the
FusionVirtualHost_<product>.conf
files present in the
${ORACLE_INSTANCE}/
config/${COMPONENT_TYPE}/${COMPONENT_NAME}
directory.
By default, all VirtualHost entries for external URLs point to a single
FusionSSL.conf
file. Edit this line in each file to point to the respective
FusionSSL_<product>.conf
file.
For example, change the fragment as follows:
#External virtual host for hcm
<VirtualHost hcm.mycompany.com:10620>
ServerName https://hcm.mycompany.com:10620
include "${ORACLE_INSTANCE}/config/${COMPONENT_TYPE}/$
{COMPONENT_NAME}/FusionSSL.conf"
to
#External virtual host for hcm
<VirtualHost hcm.mycompany.com:10620>
ServerName https://hcm.mycompany.com:10620
# include "${ORACLE_INSTANCE}/config/${COMPONENT_TYPE}/$
{COMPONENT_NAME}/FusionSSL.conf"
include "${ORACLE_INSTANCE}/config/${COMPONENT_TYPE}/$
{COMPONENT_NAME}/FusionSSL_hcm.conf"
After making all the necessary changes, restart OHS.
For more information about generating wallets, see Managing Keystores, Wallets, and
Certificates in the Oracle Fusion Middleware Administering Oracle Fusion Middleware
guide.
Chapter 16
Configure Oracle HTTP Server with Custom Certificates
16-21

16.6 Set Up Backup for Oracle Fusion Applications
If there is an Enterprise Manager Cloud Control and it is intended to be used for
backing up and restoring Oracle Fusion Applications, set it up before performing
the initial backup. Follow the instructions detailed in Prerequisites for Using Cloud
Control to Back Up or Restore the Environment in the Oracle Fusion Applications
Administrator's Guide.
If Enterprise Manager Cloud Control is not intended to be used, perform backup and
restore using operating system commands or third party tools to back up the Oracle
Fusion Applications and Oracle Identity Management file systems, as well as database
tools to back up the databases.
Ensure to perform a full backup either immediately or when the remaining post-
installation tasks have been completed. See Perform a Backup in the Oracle Fusion
Applications Administrator's Guide for instructions on how to perform a backup using
Enterprise Manager Cloud Control or command line.
16.7 Set up Oracle Enterprise Manager Cloud Control to
Monitor and Manage Oracle Fusion Applications
Oracle Enterprise Manager Cloud Control (Cloud Control) is a system management
software that delivers centralized monitoring, administration, and life cycle
management functionality for the complete Oracle Fusion Applications IT infrastructure
from one single console. For example, monitor all the Oracle WebLogic Server
domains for all the product families from one console.
For information about how to install Cloud Control, see Overview of Enterprise
Manager Cloud Control in the Oracle Enterprise Manager Cloud Control Basic
Installation Guide and Understanding the Basics of Enterprise Manager Cloud Control
Installation in the Oracle Enterprise Manager Cloud Control Advanced Installation and
Configuration Guide .
16.8 Complete Conditional Oracle Identity Management
Post-Installation Tasks
Review and complete the conditional Oracle Identity Management Post-Installation
tasks described in this section.
16.8.1 Post-Provisioning Steps for Oracle Access Manager
Perform the tasks in the following sections:
• Update Existing WebGate Agents (page 16-23)
• Update WebGate Configuration (page 16-23)
The Oracle Identity Management Console URLs are provided in About Oracle Identity
Management Console URLs (page 10-27).
Chapter 16
Set Up Backup for Oracle Fusion Applications
16-22

16.8.1.1 Update Existing WebGate Agents
Update the OAM Security Model of all WebGate profiles, with the exception of
Webgate_IDM and Webgate_IDM_11g, which should already be set
To do this, perform the following steps:
1. Log in to the Oracle Access Manager Console as the Oracle Access Manager
administration user.
2. Click the System Configuration tab.
3. Expand Access Manager Settings - SSO Agents.
4. Click the Agents icon.
5. In the Search window, click Search.
6. Click an Agent, for example: IAMSuiteAgent.
7. Set the Security radio button to OAM Transfer mode in the OAM Configuration
screen of the Oracle Identity Management Provisioning Wizard, as described in
Create an Oracle Identity Management Provisioning Profile (page 10-2).
Click Apply.
8. Restart the managed servers WLS_OAM1 and WLS_OAM2 as described in Start
and Stop Components (page 10-26).
16.8.1.2 Update WebGate Configuration
To update the maximum number of WebGate connections, proceed as follows.
1. In the Oracle Access Manager Console, click the Agents icon.
2. On the displayed search page, click Search to perform an empty search.
3. Click the Agent Webgate_IDM_11g.
4. In the User Defined Parameters box, set
client_request_retry_attempts
to
11
.
5. If the following Logout URLs are not listed, add them:
•
/oamsso/logout.html
•
/console/jsp/common/logout.jsp
•
/em/targetauth/emaslogout.jsp
6. Click Apply.
7. Repeat Steps 5 and 6 for the following agents: OraFusionApp_11AG and
OSN_Agent (if it exists).
16.8.2 Configure Oracle Identity Federation
This section is not applicable for the Single Host topology or when all Oracle Identity
Management products are installed on the same host.
The Oracle Identity Management provisioning tools create, but do not start, Oracle
Identity Federation. This section explains how to enable Oracle Identity Federation
after provisioning has completed.Oracle Identity Federation is an optional component.
If Oracle Identity Federation is not intended to be used, skip this section. This section
Chapter 16
Complete Conditional Oracle Identity Management Post-Installation Tasks
16-23

describes how to extend the Oracle Identity Management domain to include Oracle
Identity Federation in an enterprise deployment.
This section contains the following topics:
• Start Oracle Identity Federation Managed Servers (page 16-24)
• Validate Oracle Identity Federation (page 16-24)
• Configure the Enterprise Manager Agents (page 16-25)
• Enable and Disable Oracle Identity Federation (page 16-25)
16.8.2.1 Start Oracle Identity Federation Managed Servers
Do the following to start the managed servers wls_oif1 and wls_oif2:
1. Run
stopall.sh
in Linux as described in Start and Stop Components
(page 10-26).
2. Edit the
oif_startup.conf
file to automatically start Oracle Identity Federation.
This file is located in the directory:
IDM_CONFIG/scripts
.
#
# OIF is enabled OOTB for Shared IDM
#
# OIF_ENABLED indicates whether or not OIF should be started/stopped
# as part of the startoif.sh/stopoif.sh scripts. Valid values are true or
false
# If false, the OIF will not be started or stopped
OIF_ENABLED=true
# OPMN_EMAGENT_MANAGED_BY_OIF_SCRIPT indicates whether or not OPMN and
# the EMAgent components for the OIM domain should be started, when OIF is
enabled.
# Valid values are true or false. If false, OPMN and the EMAgent components
will not
# be started or stopped when OIF is enabled.
# If OIF is disabled, OPMN and the EMAgent components will not be started or
stopped
OPMN_EMAGENT_MANAGED_BY_OIF_SCRIPT=true
Save the file.
3. Run
startall.sh
in Linux as described in Starting and Stopping Components
(page 10-26).
16.8.2.2 Validate Oracle Identity Federation
Validate the configuration of Oracle Identity Federation on IDMHOST1 and IDMHOST2
by accessing the Service Provider (SP) metadata on each host.
1. On IDMHOST1, access the SP metadata by going to:
http://IDMHOST1.mycompany.com:14100/oamfed/sp/metadata
2. On IDMHOST2, access the SP metadata by going to:
http://IDMHOST2.mycompany.com:14100/oamfed/sp/metadata
If the configuration is correct, access the following URL from a web browser:
https://SSO.mycompany.com/oamfed/sp/metadata
Chapter 16
Complete Conditional Oracle Identity Management Post-Installation Tasks
16-24

Metadata should be shown.
16.8.2.3 Configure the Enterprise Manager Agents
All the Oracle Fusion Middleware components deployed in this enterprise deployment
are managed by using Oracle Enterprise Manager Fusion Middleware Control. To
manage Oracle Identity Federation with this tool, configure the EM agents with the
correct monitoring credentials. Update the credentials for the EM agents associated
with IDMHOST1 and IDMHOST2. Follow these steps to complete this task:
1. Use a web browser to access Oracle Enterprise Manager Fusion Middleware
Control at
http://ADMINVHN.mycompany.com:7001/em
. Log in as the WebLogic
user.
2. From the Domain Home Page, navigate to the Agent-Monitored Targets page
using the menu under Farm, then Agent-Monitored Targets.
a. Click the Configure link for the Target Type Identity Federation Server to go to
the Configure Target Page.
b. On the Configure Target Page, click Change Agent and choose the correct
agent for the host.
When unsure about which agent to update, execute the command:
OAM_ORACLE_INSTANCE/EMAGENT/EMAGENT/bin/emctl status agent
c. Update the WebLogic monitoring user name and the WebLogic
monitoring password. Enter
weblogic_idm
as the WebLogic monitoring user
name and the password for the weblogic user as the WebLogic monitoring
password.
d. Click OK to save changes.
16.8.2.4 Enable and Disable Oracle Identity Federation
In Service Provider (SP) mode, Oracle Access Manager delegates user authentication
to Oracle Identity Federation, which uses the Federation Oracle Single Sign-On
protocol with a remote Identity Provider. Once the Federation Oracle Single Sign-On
flow is performed, Oracle Identity Federation will create a local session and then
propagates the authentication state to Oracle Access Manager, which maintains the
session information.
This section provides the steps to integrate Oracle Identity Federation with Oracle
Identity Manager in authentication mode and SP mode.
MANDATORY: Federation Trust must be established prior to enabling Oracle Identity
Federation.
This section contains the following topics:
• Enable Oracle Identity Federation (page 16-25)
• Disable Oracle Identity Federation (page 16-26)
16.8.2.4.1 Enable Oracle Identity Federation
This section describes how to switch the authentication of the Oracle Access Manager
security domain from local authentication to Federation SSO.
Chapter 16
Complete Conditional Oracle Identity Management Post-Installation Tasks
16-25

Perform the following operations to switch from local authentication to Federation SSO
for Browser Based Schemes:
1. In a browser, go to the OAM Console, at:
http://ADMINVHN.mycompany.com:7001/oamconsole
Log in as the Oracle Access Manager user.
2. Navigate to Policy Configuration, then Shared Components, then
Authentication Schemes, and then FAAuthScheme.
3. Set the Challenge Method to FORM.
4. Set the Authentication Module to
SaaSModule
.
5. Set the Challenge URL to
/pages/oamLogin.jsp
.
6. Set the Context Type to customWar.
7. Set the Context Value to
/fusion_apps
.
8. Set the Challenge Parameters field with the following entries:
•
federationEnabled=true
•
ssoChooserEnabled=false
If dual authentication mode is required, set
ssoChooserEnabled=true
instead
of
ssoChooserEnabled=false
. Dual authentication mode is required when
some users in the Oracle Fusion Applications LDAP directory do not exist
in the Identity Provider's directory. Those users cannot be authenticated with
Federation SSO and must be challenged locally.
•
fedSSOEnabled=true
•
initial_command=NONE
•
TAPPartnerId=OIFDAPPartner
•
TAPChallengeURL=https://SSO.mycompany.com:443/fed/user/spoam11g
9. Click Apply.
16.8.2.4.2 Disable Oracle Identity Federation
This section describes how to switch the authentication of the OAM security domain
from Federation SSO to local authentication.
Perform the following operations to switch from local authentication to Federation SSO
for Browser Based Schemes:
1. In a browser, go to the OAM Console, at:
http://ADMINVHN.mycompany.com:7001/oamconsole
Log in as the Oracle Access Manager user.
2. Navigate to Policy Configuration -> Shared Components -> Authentication
Schemes -> FAAuthScheme.
3. Set the Challenge Method to FORM.
4. Set the Authentication Module to
SaaSModule
.
5. Set the Challenge URL to
/pages/oamLogin.jsp
.
Chapter 16
Complete Conditional Oracle Identity Management Post-Installation Tasks
16-26

6. Set the Context Type to customWar.
7. Set the Context Value to
/fusion_apps
.
8. Set the Challenge Parameters field with the following entries:
•
federationEnabled=false
•
ssoChooserEnabled=false
•
fedSSOEnabled=false
•
initial_command=NONE
•
TAPPartnerId=OIFDAPPartner
•
TAPChallengeURL=https://SSO.mycompany.com:443/fed/user/spoam11g
9. Click Apply.
16.8.3 Configure Identity Integration with Active Directory
This section describes how to add support for Active Directory to the enterprise
deployment.
This section contains the following topics:
• Create Adapters in Oracle Virtual Directory (page 16-27)
• Prepare Active Directory (page 16-30)
• Modify Oracle Identity Manager to Support Active Directory (page 16-34)
• Update the Username Generation Policy for Active Directory (page 16-34)
16.8.3.1 Create Adapters in Oracle Virtual Directory
Oracle Virtual Directory communicates with other directories through adapters.
The procedure is slightly different, depending on the directory to be connected to. The
following sections show how to create and validate adapters for supported directories:
• Remove Existing Adapters (page 16-27)
• Create an Oracle Virtual Directory Adapter for Active Directory (page 16-28)
• Validate the Oracle Virtual Directory Adapters (page 16-29)
16.8.3.1.1 Remove Existing Adapters
The provisioning process created Oracle Virtual Directory adapters to Oracle Internet
Directory. When switching the identity store to Active Directory, remove these
adapters.
1. Log in to Oracle Directory Services Manager (ODSM) at:
http://
admin.mycompany.com/odsm
2. If this has not been done already , create connections to each of the Oracle Virtual
Directory instances.
3. Select one of the Oracle Virtual Directory instances and connect to it.
4. Click the Adapter tab.
5. Click the adapter User ID.
Chapter 16
Complete Conditional Oracle Identity Management Post-Installation Tasks
16-27

6. Click Delete Selected Adapter.
7. Repeat for the adapter CHANGELOG_OID.
8. Repeat Steps 1- 7 for each Oracle Virtual Directory instance.
16.8.3.1.2 Create an Oracle Virtual Directory Adapter for Active Directory
idmConfigTool
can be used to create the Oracle Virtual Directory User and Changelog
adapters for Oracle Internet Directory and Active Directory. Oracle Identity Manager
requires adapters. It is highly recommended, though not mandatory, to use Oracle
Virtual Directory to connect to Oracle Internet Directory.
1. Set the environment variable
ORACLE_HOME
to
IDM_BASE/products/app/iam
.
2. Create a properties file for the Active Directory adapter called
ovd1.props
, with the
following content:
ovd.host:LDAPHOST1.mycompany.com
ovd.port:8899
ovd.binddn:cn=orcladmin
ovd.password:ovdpassword
ovd.oamenabled:true
ovd.ssl:true
ldap1.type:AD
ldap1.host:ADIDSTORE.mycompany.com
ldap1.port:636
ldap1.binddn:cn=adminuser
ldap1.password:adpassword
ldap1.ssl:true
ldap1.base:dc=mycompany,dc=com
ldap1.ovd.base:dc=mycompany,dc=com
usecase.type: single
The following list describes the parameters used in the properties file.
•
ovd.host
is the host name of a server running Oracle Virtual Directory.
•
ovd.port
is the https port used to access Oracle Virtual Directory
(
OVD_ADMIN_PORT
).
•
ovd.binddn
is the user DN used to connect to Oracle Virtual Directory.
•
ovd.password
is the password for the DN used to connect to Oracle Virtual
Directory.
•
ovd.oamenabled
is always
true
in Oracle Fusion Applications deployments.
•
ovd.ssl
is set to
true
, as an https port is used.
•
ldap1.type
is set to OID for the Oracle Internet Directory back end directory
or set to AD for the Active Directory back end directory.
•
ldap1.host
is the host on which back end directory is located. Use the load
balancer name.
•
ldap1.port
is the port used to communicate with the back end directory
(
OID_LDAP_PORT
).
•
ldap1.binddn
is the bind DN of the
oimLDAP
user.
•
ldap1.password
is the password of the
oimLDAP
user
Chapter 16
Complete Conditional Oracle Identity Management Post-Installation Tasks
16-28

•
ldap1.ssl
is set to
true
if the back end's SSL connection is used, and
otherwise set to
false
. This should always be set to
true
when an adapter
is being created for AD.
•
ldap1.base
is the base location in the directory tree.
•
ldap1.ovd.base
is the mapped location in Oracle Virtual Directory.
•
usecase.type
is set to
Single
when using a single directory type.
3. Configure the adapter by using the
idmConfigTool
command, which is located at:
IDM_BASE/products/app/iam/idmtools/bin
When the
idmConfigTool
is run, it creates or appends to the file
idmDomainConfig.param
. This file is generated in the same directory that the
idmConfigTool
is run from. To ensure that each time the tool is run, the same
file is appended to, always run the
idmConfigTool
from the directory:
IDM_BASE/products/app/iam/idmtools/bin
The syntax of the command is:
Linux:idmConfigTool.sh -configOVD input_file=configfile [log_file=logfile]
For example: idmConfigTool.sh -configOVD input_file=ovd1.props
The command requires no input. The output looks like this:
The tool has completed its operation. Details have been logged to logfile
Perform the following tasks on IDMHOST1:
Run this command for each Oracle Virtual Directory instance in the topology, with the
appropriate value for
ovd.host
in the property file.
16.8.3.1.3 Validate the Oracle Virtual Directory Adapters
Perform the following tasks by using ODSM:
1. Access ODSM through the load balancer at:
http://ADMIN.mycompany.com/odsm
2. Connect to Oracle Virtual Directory.
3. Go the Data Browser tab.
4. Expand Client View to see each of the user adapter root DNs listed.
5. Expand the user adapter root DN, if there are objects already in the back end
LDAP server, see those objects here. ODSM does not support changelog query,
so the
cn=changelog
subtree cannot be expanded.
6. Perform the following tasks by using the command-line:
a. Validate the user adapters by typing:
ldapsearch -h directory_host -p ldap_port -D "cn=orcladmin" -q -b
<user_search_base> -s sub "objectclass=inetorgperson" dn
For example:
ldapsearch -h LDAPHOST1.mycompany.com -p 6501 -D "cn=orcladmin" -q -b
"cn=Users,dc=mycompany,dc=com" -s sub "objectclass=inetorgperson" dn
Supply the password when prompted.
See the user entries that already exist in the back end LDAP server.
Chapter 16
Complete Conditional Oracle Identity Management Post-Installation Tasks
16-29

b. Validate changelog adapters by typing:
ldapsearch -h directory_host -p ldap_port -D "cn=orcladmin" -q -b
"cn=changelog" -s one "changenumber>=0"
For example:
ldapsearch -h LDAPHOST1 -p 6501 -D "cn=orcladmin" -q -b "cn=changelog"
-s one "changenumber>=0"
The command returns logs of data, such as creation of all the users. It returns
without error if the changelog adapters are valid.
c. Validate lastchangenumber query by typing:
ldapsearch -h directory_host -p ldap_port -D "cn=orcladmin" -q -b
"cn=changelog" -s base 'objectclass=*' lastchangenumber
For example:
ldapsearch -h LDAPHOST1 -p 6501 -D "cn=orcladmin" -q -b "cn=changelog"
-s base 'objectclass=*' lastchangenumber
The command returns the latest change number generated in the back end
LDAP server.
16.8.3.2 Prepare Active Directory
Prepare Active Directory as described in the following sections:
• Configure Active Directory for Use with Oracle Access Manager and Oracle
Identity Manager (page 16-30)
• Create Users and Groups (page 16-31)
• Create Access Control Lists in Non-Oracle Internet Directory Directories
(page 16-33)
16.8.3.2.1 Configure Active Directory for Use with Oracle Access Manager and Oracle
Identity Manager
This section describes how to configure Active Directory. Extend the schema in Active
Directory as follows.
WARNING: The order in which the steps are performed is critical!
1. Locate the following files:
IDM_BASE
/products/dir/idm/oam/server/oim-intg/ ldif/ad/schema/
ADUserSchema.ldif
IDM_BASE
/products/dir/idm/oam/server/oim-intg/ldif/ad/schema/
AD_oam_pwd_schema_add.ldif
2. In both these files, replace the
domain-dn
with the appropriate
domain-dn
value
3. Use
ldapadd
from the command line to load the two LDIF files, as follows.
ldapadd -h activedirectoryhostname -p activedirectoryportnumber -D
AD_administrator -q -c -f file
Chapter 16
Complete Conditional Oracle Identity Management Post-Installation Tasks
16-30

where
AD_administrator
is a user which has schema extension privileges to the
directory
For example:
ldapadd -h "ACTIVEDIRECTORYHOST.mycompany.com" -p 389 -D adminuser –q -c -f
ADUserSchema.ldif
ldapadd -h "ACTIVEDIRECTORYHOST.mycompany.com" -p 389 -D adminuser -q -c -f
AD_oam_pwd_schema_add.ldif
After the
-D
, either a DN or
can be specified.
4. Then go to:
IDM_BASE
/products/app/oracle_common/modules/oracle.ovd_11.1.1/
oimtemplates
Run the following command to extend Active Directory schema:
-AD "dc=mydomain,dc=com" -OAM true
16.8.3.2.2 Create Users and Groups
Create users and groups as described in the following sections.
16.8.3.2.2.1 Create Users and Groups by Using the idmConfigTool
Configure the Identity Store by using the command
idmConfigTool
, which is located
at:
IDM_BASE/products/app/iam/idmtools/bin
When the
idmConfigTool
is run, it creates or appends to the file
idmDomainConfig.param
. This file is generated in the same directory in which the
idmConfigTool
is run. To ensure that the same file is appended to every time the tool
is run, always run the
idmConfigTool
from the directory:
IDM_BASE/products/app/iam/idmtools/bin
The syntax of the command on Linux is:
idmConfigTool.sh -prepareIDStore mode=all input_file=configfile
For example:
idmConfigTool.sh -prepareIDStore mode=all input_file=idstore.props
When the command runs, it prompts to enter the password of the account to be
connected to and passwords for the accounts that are being created.
The password must conform to the following rules:
This invocation of
idmConfigTool
creates the group
orclFAOAMUserWritePrivilegeGroup
.
16.8.3.2.2.2 Create the Configuration File
Create a property file,
idstore.props
, to use when preparing the Identity Store. The
file has the following structure:
Chapter 16
Complete Conditional Oracle Identity Management Post-Installation Tasks
16-31

# Common
IDSTORE_HOST: LDAPHOST1.mycompany.com
IDSTORE_PORT: 389
IDSTORE_BINDDN: cn=orcladmin
IDSTORE_GROUPSEARCHBASE: cn=Groups,dc=mycompany,dc=com
IDSTORE_SEARCHBASE: dc=mycompany,dc=com
IDSTORE_USERNAMEATTRIBUTE: cn
IDSTORE_LOGINATTRIBUTE: uid
IDSTORE_USERSEARCHBASE: cn=Users, dc=mycompany,dc=com
POLICYSTORE_SHARES_IDSTORE: true
# OAM
IDSTORE_OAMADMINUSER:oamadmin
IDSTORE_OAMSOFTWAREUSER:oamLDAP
OAM11G_IDSTORE_ROLE_SECURITY_ADMIN:OAMAdministrators
# OAM and OIM
IDSTORE_SYSTEMIDBASE: cn=systemids,dc=mycompany,dc=com
# OIM
IDSTORE_OIMADMINGROUP: OIMAdministrators
IDSTORE_OIMADMINUSER: oimLDAP
# Required due to bug
IDSTORE_OAAMADMINUSER : oaamadmin
# Fusion Applications
IDSTORE_READONLYUSER: IDROUser
IDSTORE_READWRITEUSER: IDRWUser
IDSTORE_SUPERUSER: weblogic_fa
# Weblogic
IDSTORE_WLSADMINUSER : weblogic_idm
Where:
•
IDSTORE_BINDDN
is an administrative user in the Identity Store Directory
•
IDSTORE_GROUPSEARCHBASE
is the location in the directory where Groups are
Stored.
•
IDSTORE_HOST
and
IDSTORE_PORT
are, respectively, the host and port of the Identity
Store directory. Specify the back end directory here, rather than Oracle Virtual
Directory, Active Directory:
LDAPHOST1
and
389
.
•
IDSTORE_LOGINATTRIBUTE
is the LDAP attribute which contains the users Login
name.
•
IDSTORE_OAMADMINUSER
is the name of the user to be created as the Oracle
Access Manager Administrator.
•
IDSTORE_OAMSOFTWAREUSER
is a user that gets created in LDAP that is used when
Oracle Access Manager is running to connect to the LDAP server.
•
IDSTORE_OIMADMINGROUP
Is the name of the group to be created to hold the Oracle
Identity Manager administrative users.
•
IDSTORE_OIMADMINUSER
is the user that Oracle Identity Manager uses to connect to
the Identity store.
•
IDSTORE_READONLYUSER
is the name of a user to be created, which has Read Only
permissions on the Identity Store.
•
IDSTORE_READWRITEUSER
is the name of a user to be created, which has Read/
Write permissions on the Identity Store.
•
IDSTORE_SUPERUSER
is the name of the administration user to be used to log in to
the WebLogic Administration Console in the Oracle Fusion Applications domain.
Chapter 16
Complete Conditional Oracle Identity Management Post-Installation Tasks
16-32

•
IDSTORE_SEARCHBASE
is the location in the directory where Users and Groups are
stored.
•
IDSTORE_SYSTEMIDBASE
is the location of a container in the directory where users
can be placed when they are not wanted in the main user container. This happens
rarely but one example is the Oracle Identity Manager reconciliation user which is
also used for the bind DN user in Oracle Virtual Directory adapters.
•
IDSTORE_USERSEARCHBASE
is the location in the directory where Users are Stored.
•
OAM11G_IDSTORE_ROLE_SECURITY_ADMIN
is the name of the group which is used to
allow access to the OAM console.
•
POLICYSTORE_SHARES_IDSTORE
is set to
true
for IDM 11g.
•
IDSTORE_OAAMADMINUSER
is required because of a bug in
idmConfigTool
.
16.8.3.2.3 Create Access Control Lists in Non-Oracle Internet Directory Directories
In the preceding sections, the Identity Store was seeded with users and artifacts
for the Oracle components. If the Identity Store is hosted in a non-Oracle Internet
Directory directory, such as Microsoft Active Directory, set up the access control lists
(ACLs) to provide appropriate privileges to the entities created. This section lists the
artifacts created and the privileges required for the artifacts.
• Users and groups. ACLs to the users and groups container are provided in Oracle
Internet Directory. Set them manually for other directories. The Oracle Identity
Manager/Oracle Access Manager integration and Oracle Fusion Applications
require the following artifacts to be created in the Identity store.
– Group with read privileges to the users container
(
orclFAUserReadPrivilegeGroup
). Configure the local directory ACLs so that
this group has privileges to read all the attributes of the users in the Identity
Store.
– Group with read/write privileges to the users container
(
orclFAUserWritePrivilegeGroup
)
– Group with read privileges to the groups container
(
orclFAGroupReadPrivilegeGroup
)
– Group with read privileges to the groups container
(
orclFAGroupWritePrivilegeGroup
)
– Group with write privileges to a partial set of attributes
(
orclFAUserWritePrefsPrivilegeGroup
)
• The user specified by the
IDSTORE_READONLYUSER
parameter. When
running the
preconfigIDstore
command, this user is assigned to the
groups
orclFAUserReadPrivilegeGroup
,
orclFAWritePrefsPrivilegeGroup
, and
orclFAGroupReadPrivilegeGroup
. The user also needs compare privileges to the
userpassword
attribute of the user entry.
• The user specified by the
IDSTORE_READWRITEUSER
parameter. It is assigned to the
groups
orclFAUserWritePrivilegeGroup
and
orclFAGroupWritePrivilegeGroup
.
• System IDs. The System ID container is created for storing all the system
identifiers. If there is another container in which the users are to be created, that is
specified as part of the admin.
• Oracle Access Manager Admin User. This user is added to the OAM Administrator
group, which provides permission for the administration of the Oracle Access
Chapter 16
Complete Conditional Oracle Identity Management Post-Installation Tasks
16-33

Manager Console. No LDAP schema level privileges are required, since this is just
an application user.
• Oracle Access Manager Software User. This user is added to the groups where
the user gets read privileges to the container. This is also provided with schema
admin privileges.
• Oracle Identity Manager user
oimLDAP
under System ID container. Password
policies are set accordingly in the container. The passwords for the users in the
System ID container must be set up so that they do not expire.
• Oracle Identity Manager administration group. The Oracle Identity Manager user is
added as its member. The Oracle Identity Manager admin group is given complete
read/write privileges to all the user and group entities in the directory.
• WebLogic Administrator. This is the administrator of the IDM domain for Oracle
Virtual Directory
• WebLogic Administrator Group. The WebLogic administrator is added as a
member. This is the administrator group of the IDM domain for Oracle Virtual
Directory.
• Reserve container. Permissions are provided to the Oracle Identity Manager
admin group to perform read/write operations.
16.8.3.3 Modify Oracle Identity Manager to Support Active Directory
When first installed, Oracle Identity Manager has a set of default system properties for
its operation.
If the Identity Store is in Active Directory,
change the System property
XL.DefaultUserNamePolicyImpl
to
oracle.iam.identity.usermgmt.impl.plugins.FirstNameLastNamePolicyForAD
or
oracle.iam.identity.usermgmt.impl.plugins.LastNameFirstNamePolicyForAD
.
See Managing System Properties in the Oracle Fusion Middleware Administrator's
Guide for Oracle Identity Manager.
16.8.3.4 Update the Username Generation Policy for Active Directory
If the back-end directory is Active Directory, update Oracle Identity Manager so that
it only allows user names with a maximum of 20 characters. This is a limitation of
Active Directory. Update the username generation policy from
DefaultComboPolicy
to
FirstnameLastnamepolicyforAD
as follows.
1. Log in to the OIM Console at the URL listed in About Oracle Identity Management
Console URLs (page 10-27).
2. Click Advanced on the top of the right pane.
3. Click Search System properties.
4. On the navigation bar in the left pane, search on Username Generation.
5. Click Default Policy for Username Generation.
6. In the Value field, update the entry from
oracle.iam.identity.usermgmt.impl.plugins.DefaultComboPolicy
to
oracle.iam.identity.usermgmt.impl.plugins.FirstNameLastNamePolicyForAD
.
7. Click Save.
Chapter 16
Complete Conditional Oracle Identity Management Post-Installation Tasks
16-34
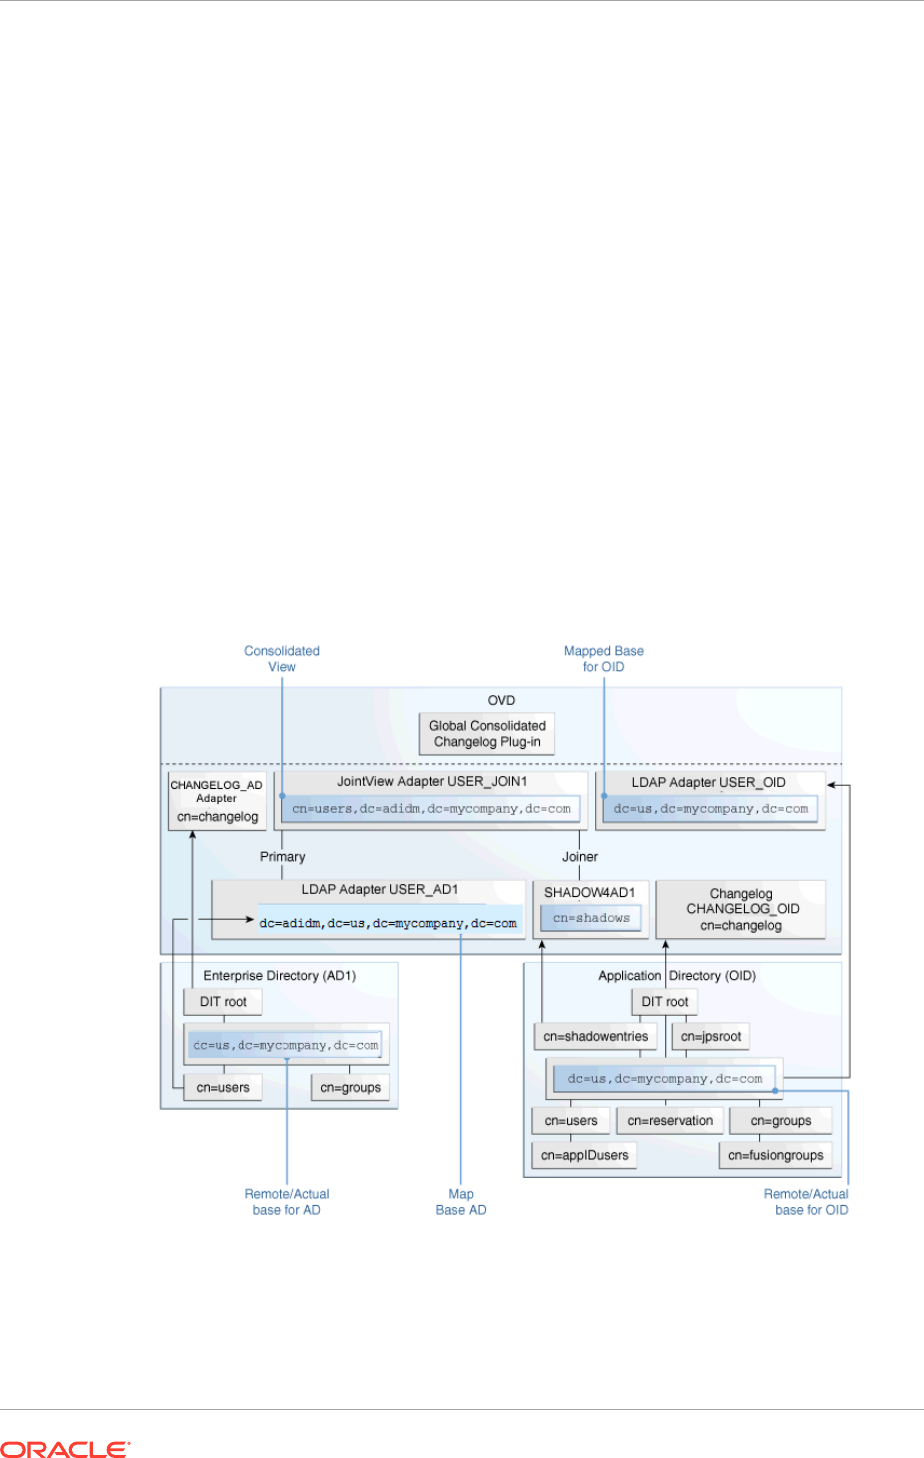
16.8.4 Set up LDAP Split Profile and Enable Active Directory Users in
Oracle Fusion Applications
A split profile, or split directory configuration, is one where identity data is stored
in multiple directories, possibly in different locations. A split profile is used to store
custom attributes required for Oracle Fusion Applications deployment. Use this kind
of deployment when to avoid modifying the existing Identity Store by extending the
schema.
Oracle Virtual Directory unifies Active Directory and Oracle Internet Directory to
provide a single consolidated abstract view. This is a very generic implementation
scenario but is very important when setting up Oracle Identity Management for Oracle
Fusion Applications to use the existing Enterprise Repository for the user base but do
not want to modify the existing Enterprise Repository Schema.
For example: To provision users out of the existing Active Directory without replicating
the user base to some other repository, use split profile with Active Directory and
Oracle Internet Directory. In this scenario, Oracle Virtual Directory provides the
consolidated view.
Figure 16-1 LDAP Split Profile Configuration
Figure 16-1 (page 16-35) illustrates the scenario of split profile configuration where
the existing Enterprise Repository is not extended and represents the view from the
Oracle Virtual Directory level (adapter plug-in view/unified view).
Chapter 16
Complete Conditional Oracle Identity Management Post-Installation Tasks
16-35

In the image, although the actual base for both Oracle Internet Directory and Active
Directory repositories are the same
dc=mycompany,dc=com
, the Oracle Virtual Directory
Adapters are configured to map uniquely and to consolidate to a unified view of
dc=adidm,dc=mycompany,dc=com
.
The following sections describe how to set up split profile to enable Active Directory
Users.
• Create Adapters in Oracle Virtual Directory for consolidating Active Directory and
Oracle Internet Directory (page 16-36)
• Configure the Storable Attributes (page 16-43)
• Configure Oracle Access Manager and Oracle Identity Manager for Split Profile
(page 16-43)
16.8.4.1 Create Adapters in Oracle Virtual Directory for consolidating Active
Directory and Oracle Internet Directory
This section details the steps required to create Adapters in Oracle Virtual Directory for
consolidating the two directory servers Active Directory and Oracle Internet Directory:
• Setup Oracle Internet Directory as a Shadow Directory (page 16-36)
• Create a shadow joiner adapter (page 16-38)
• Verify Oracle Internet Directory User Adapter and Changelog Adapter (page 16-39)
• Create Active Directory User Adapter (page 16-39)
• Create Active Directory Changelog adapter (page 16-40)
• Create Join adapter (page 16-41)
• Create Global plugin for virtualmemberof functionality (page 16-42)
• Create Global Plugin for Changelog (page 16-42)
16.8.4.1.1 Set Up Oracle Internet Directory as a Shadow Directory
As Active Directory is not being extended, Oracle Internet Directory is used as
a shadow directory. Use Oracle Virtual Directory to merge the entities from the
directories by creating a container in Oracle Internet Directory to store Fusion
Applications specific attributes.
1. Create a shadowentries container in Oracle Internet Directory.
Create a
ShadowADContainer.ldif
file with the following details and run it against
Oracle Internet Directory using the
ldapadd
command.
Contents of ShadowADContainer.ldif:
dn: cn=shadowentries
cn: shadowentries
objectclass: top
objectclass: orclContainer
Command:
ldapadd -h idmhost1.mycompany.com -p 3060 -D "cn=orcladmin" -q -c -v
-f /tmp/ShadowADContainer.ldif
Chapter 16
Complete Conditional Oracle Identity Management Post-Installation Tasks
16-36

Ensure that the following environment variables are set before using ldapadd:
• ORACLE_HOME (set to
IDM_BASE/products/dir/oid
)
• PATH - The following directory locations should be in the PATH:
ORACLE_HOME/bin
ORACLE_HOME/ldap/bin
ORACLE_HOME/ldap/admin
Output:
add cn:
shadowentries
add objectclass:
top
orclContainer
adding new entry cn=shadowentries
modify complete
2. Verify if the container is successfully created by accessing ODSM using the URL:
<sso-address>/odsm
.
If Oracle Internet Directory/Oracle Virtual Directory servers are not listed in the
ODSM client, configure them before proceeding to the next step. See Creating
ODSM Connections to Oracle Virtual Directory (page 17-18).
3. Grant access to the shadowentries container by creating a
Grant.ldif
file as
follows:
Contents of
Grant.ldif
:
dn: cn=shadowentries
changetype: modify
add: orclaci
orclaci: access to entry by
group="cn=RealmAdministrators,cn=groups,cn=OracleContext,dc=mycompany,dc=com"
(browse,add,delete)
orclaci: access to attr=(*) by
group="cn=RealmAdministrators,cn=groups,cn=OracleContext,dc=mycompany,dc=com"
(read,write,search,compare)
orclaci: access to entry by
group="cn=OIMAdministrators,cn=Groups,dc=mycompany,dc=com"
(browse,add,delete)orclaci: access to attr=(*) by
group="cn=OIMAdministrators,cn=Groups,dc=mycompany,dc=com"
(search,read,compare,write)
-
changetype: modify
add: orclentrylevelaci
orclentrylevelaci: access to entry by * (browse,noadd,nodelete)
orclentrylevelaci: access to attr=(*) by * (read,search,nowrite,nocompare)
Command:
ldapadd -h idmhost1.mycompany.com -p 3060 -D "cn=orcladmin" -q -c -v
-f /tmp/Grant.ldif
Output:
add orclaci: access to entry by
group="cn=RealmAdministrators,cn=groups,cn=OracleContext,dc=mycompany,dc=com"
(browse,add,delete) access to attr=(*) by
group="cn=RealmAdministrators,cn=groups,cn=OracleContext,dc=mycompany,dc=com"
Chapter 16
Complete Conditional Oracle Identity Management Post-Installation Tasks
16-37

(read,write,search,compare) access to entry by
group="cn=OIMAdministrators,cn=Groups,dc=mycompany,dc=com"
(browse,add,delete) access to attr=(*) by
group="cn=OIMAdministrators,cn=Groups,dc=mycompany,dc=com"
(search,read,compare,write)add orclentrylevelaci: access to entry by
* (browse,noadd,nodelete) access to attr=(*) by *
(read,search,nowrite,nocompare)modifying entry cn=shadowentriesmodify
complete
4. Verify the access permissions in Oracle Internet Directory with ODSM using
the URL:
<sso-address>/odsm
. To verify the settings select the container
cn=shadowentries
in the Data Browser and open the Subtree Access tab. The
table Content Access Control should display the entries that were created.
16.8.4.1.2 Create a Shadow Joiner Adapter
WARNING: All the ODSM steps should be performed by connecting to Oracle Virtual
Directory.
To create a shadow joiner adapter, select the Adapter tab, and then click the Create
adapter icon in the left pane.
1. In the New Adapter Wizard window, select the Type tab:
a. In the Adapter drop-down list, select
LDAP
.
b. In the Adapter Name field, specify
SHADOW4AD1
.
c. In the Adapter Template drop-down list, select template
User_OID
.
d. Click Next.
2. In the New LDAP Adapter Wizard window:
Connection tab:
a. Click Add Host and specify the Host and Port values. It is recommended to
use the same value used for the USER_OID adapter.
b. In the Server Proxy Bind DN field, specify the required value. It is
recommended to use the same value used for the USER_OID adapter.
c. In the Proxy Password field, specify the password.
d. Click Next.
Connection Test tab:
a. Verify if the connection is successful and click Next.
Namespace tab:
a. In the Remote Base field, specify
cn=shadowentries
.
b. In the Mapped Namespace field, specify
cn=shadows
.
c. Click Next.
Summary tab:
a. Verify the summary details and click Next.
3. Verify the created adapter on the left pane, and select it.
4. Review the details of the General tab, and then click the Routing tab.
Chapter 16
Complete Conditional Oracle Identity Management Post-Installation Tasks
16-38

5. On the Routing tab, from the Visibility drop-down list, select
Internal
and click
Apply.
6. On the
Plugins
tab, select User management and click Edit (select User
Management and click the pencil icon).
• oamEnabled should be changed from 'false' to 'true'.
• oimLanguages must be added and set to = 'en'.
7. Click Apply.
16.8.4.1.3 Verify Oracle Internet Directory User Adapter and Changelog Adapter
1. Select USER_OID and verify default settings on the General tab.
2. If any changes are required, select the Plug-ins tab and edit User Management
(select User Management and click the pencil icon).
3. Select CHANGELOG_OID adapter and verify default settings on the General tab.
4. Select the Plug-ins tab and edit the changelog plugin.
5. In addition to default values, add the following:
•
targetDNFilter=cn=shadowentries
•
virtualDITAdapterName=USER_JOIN1;SHADOW4AD1
•
virtualDITAdapterName=USER_OID
(if this value is already present, do not
make any changes)
6. Click OK and Apply.
16.8.4.1.4 Create Active Directory User Adapter
In the Directory Manager, on the Adapter tab, click New Adapter.
1. In the New Adapter Wizard window, on the Type tab:
a. In the Adapter Type drop-down list, select
LDAP
.
b. In the Adapter Name field, specify
USER_AD
.
c. In the Adapter Template drop-down list, select
User_ActiveDirectory
.
2. Click Next.
3. In the New LDAP Adapter Wizard window:
Connection tab:
a. In the DNS Settings area, for the Use DNS for Auto Discovery option, select
the No radio button.
b. Click Add Host and specify the Host and Port values. Ensure that the Is Read
Only checkbox is selected to ensure no write attempts against the Active
Directory.
c. Do not select the Use SSL/TLS checkbox.
d. The SSL Authentication Mode will be read-only and set to No Authentication.
e. In the Server Proxy Bind DN field, specify the required value.
f. In the Proxy Password field, specify the password.
Chapter 16
Complete Conditional Oracle Identity Management Post-Installation Tasks
16-39

g. Click Next.
Connection Test tab:
a. Verify if the connection is successful and click Next.
Namespace tab:
a. In the Remote Base field, specify
dc=us,dc=mycompany,dc=com
.
b. In the Mapped Namespace field, specify
dc=adidm,dc=us,dc=mycompany,dc=com
.
c. Click Next.
Summary tab:
a. Verify the summary details and click Finish.
4. Verify and review the details on the General tab.
5. On the Routing tab, from the Visibility drop-down list, select Internal, and click
Apply.
6. On the Plug-ins tab, edit User Management and set the following parameter
values:
a.
oamEnabled=true
b. Add
filterObjectClass =
oblixOrgPerson,oblixPersonPwdPolicy,OIMPersonPwdPolicy
7. Click OK and Apply.
16.8.4.1.5 Create Active Directory Changelog adapter
In the Directory Manager, on the Adapter tab, click New Adapter.
1. In the New Adapter Wizard window, on the Type tab:
a. In the Adapter Type drop-down list, select
LDAP
.
b. In the Adapter Name field, specify
CHANGELOG_AD
.
c. In the Adapter Template drop-down list, select
Changelog_ActiveDirectory
.
2. Click Next.
3. In the New LDAP Adapter Wizard window:
Connection tab:
a. In the DNS Settings area, for the Use DNS for Auto Discovery option, select
the No radio button.
b. Click Add Host and specify the Host and Port values. Ensure that the Is Read
Only checkbox is selected to ensure no write attempts against the Active
Directory.
c. Do not select the Use SSL/TLS checkbox.
d. The SSL Authentication Mode will be read-only and set to No Authentication.
e. In the Server Proxy Bind DN field, specify the required value. It is
recommended to use the same value used for the USER_AD adapter.
f. In the Proxy Password field, specify the password.
Chapter 16
Complete Conditional Oracle Identity Management Post-Installation Tasks
16-40

g. Click Next.
Connection Test tab:
a. Verify if the connection is successful and click Next.
Namespace tab:
a. In the Remote Base field, do not specify any value.
b. In the Mapped Namespace field, specify
cn=changelog
.
c. Click Next.
Summary tab:
a. Verify the summary details and click Finish.
4. Verify and review the details on the General tab.
5. On the Plug-ins tab, edit User Management and set the following parameter
values:
a.
mapUserState=true
b.
oamEnabled=true
c.
targetDNFilter=dc=mycompany,dc=com
d.
virtualDITAdapterName=USER_JOIN1;USER_AD
e.
sizeLimit=1000
6. Click OK and Apply.
16.8.4.1.6 Create Join Adapter
In the Directory Manager, on the Adapter tab, click New Adapter.
1. In the New Adapter Wizard window, on the Type tab:
a. In the Adapter Type drop-down list, select
Join
.
b. In the Adapter Name field, specify
USER_JOIN1
.
c. In the Adapter Template drop-down list, select
Default
.
2. Click Next.
3. In the New Join Adapter Wizard window:
Settings tab:
a. In the Adapter Suffix/Namespace field, specify
cn=users,dc=adidm,dc=mycompany,dc=com
.
b. In the Primary Adapter drop-down list, select
USER_AD
.
c. In the Bind Adapters field, specify
USER_AD
.
d. Click Next.
Summary tab:
a. Verify the summary details and click Finish.
4. Verify and review the details on the General tab. Select the
USER_JOIN1
adapter
and add join rule. In the Join Rule window:
Chapter 16
Complete Conditional Oracle Identity Management Post-Installation Tasks
16-41

a. In the Joined Adapter drop-down list, select
SHADOW4AD1
.
b. In the Type drop-down list, select
ShadowJoiner
.
c. In the Condition field, specify
cn
.
d. Click OK.
5. Click Apply and verify the details.
Before proceeding, review all adapter details on the Home tab.
16.8.4.1.7 Create Global Plugin for virtualmemberof Functionality
1. In ODSM connected to Oracle Virtual Directory, select the Advanced tab, then
select global plugins and click Create.
2. In the Plug-in window, specify values as follows:
a. In the Name field, specify
global_virtmember1
.
b. In the Class field, click Select and select
VirtualMemberOfPlugin
from the
list.
c. In the Parameters field, add the following values:
i.
Name = searchBase, Value = cn=groups,dc=mycompany,dc=com
ii.
Name = adapterName, Value = USER_OID
iii.
Name = explicitrequestonly, Value = false
d. In the Namespace field, add
dc=mycompany,dc=com
.
e. Click Apply. An Internal Server Error may be displayed due to time out.
f. Click OK.
16.8.4.1.8 Create Global Plugin for Changelog
1. In ODSM connected to Oracle Virtual Directory, select the Advanced tab, then
select global plugins and click Create.
2. In the Plug-in window, specify values as follows:
a. In the Name field, specify
GlobalChangeLogPlugin
.
b. In the Class field, click Select and select
com.octetstring.vde.chain.plugins.changelog.ConsolidatedChglogPlugi
n
.
c. Click Apply. An Internal Server Error is displayed due to timeout.
d. Click OK. Reconnect to Oracle Virtual Directory and then browse the adbase
tree.
e. Verify changelog functionality using the following command:
ldapsearch -h idmhost1.mycompany.com -p 6501 -D "cn=orcladmin" -q
-b "cn=changelog" -s base "objectclass=*" lastchangenumber
The command should return the following output:
cn=ChangeLog
lastChangeNumber=CHANGELOG_AD:1234;CHANGELOG_OID:17890
Chapter 16
Complete Conditional Oracle Identity Management Post-Installation Tasks
16-42

16.8.4.2 Configure the Storable Attributes
Configure the storable attributes to ensure that the Oracle Virtual Directory can
correctly route attributes against Active Directory and Oracle Internet Directory and
does not store attributes in Active Directory.
1. In ODSM connected to Oracle Virtual Directory, select the Adapter tab, then select
SHADOW4AD and click the Routing tab.
2. In the Storable Attributes field, click Add and paste the following attribute values.
orclMTUid
orclTimeZone
orclDisplayNameLanguagePreference
orcldateFormat
orclFontSize
orclnumberFormat
orclPwdExpirationDate
orclGenerationQualifier
middleName
c
orclHireDate
orclImpersonationGrantee
orclAdminPrivilege
orclIsEnabled
orclFAPartyID
orclembeddedHelp
orclFATerritory
orclAccessibilityMode
orclImpersonationGranter
orclPwdChangeRequired
orclColorContrast
orclActiveEndDate
orclFAUserID
orclMTTenantUName
orcltimeFormat
orclcurrency
orclFAPersonID
employeeNumber
orclActiveStartDate
orclMTTenantGUID
orclFALanguage
manager
3. Select USER_AD and click the Routing tab.
4. In the Unstorable Attributes field, click Add and paste the attribute values
specified in Step 2.
5. Click Apply.
16.8.4.3 Configure Oracle Access Manager and Oracle Identity Manager for
Split Profile
This section details the steps required to configure Oracle Access Manager and
Oracle Identity Manager for Split Profile.
• Configure Oracle Identity Management Domain with new settings (page 16-44)
Chapter 16
Complete Conditional Oracle Identity Management Post-Installation Tasks
16-43

• Verify and Configure OAM to use third-party users as OAM Administrators
(page 16-44)
• Verify Oracle Identity Manager (page 16-45)
• Update Container Rules in MDS for Split Profile (page 16-45)
• Update Username Generation Policy to Accommodate Active Directory (page 16-45)
• Change User and Group Search Base for all Oracle Fusion Applications Domains
(page 16-46)
• Add Users from Active Directory into Oracle Identity Manager (page 16-46)
• Grant Privileges to Active Directory User (page 16-46)
16.8.4.3.1 Configure Oracle Identity Management Domain with new settings
1. Log in to the Oracle WebLogic Server console as
weblogic_idm
and go to
Security Realms, and then click myrealm, Providers.
2. Click OVDAuthenticator, then select the Provider Specific tab, and then click
Lock & Edit.
3. Click Save and then click Activate Changes.
4. Restart Oracle Identity Management, log in to the Oracle WebLogic Server
console, and go to Security Realms, myrealm.
5. On the Users tab and Groups tab, verify that the users from Active Directory are
also displayed in addition to Oracle Internet Directory.
16.8.4.3.2 Verify and Configure OAM to use third-party users as OAM Administrators
1. Log in to the OAM console, and go to system configuration, common
configuration, datasources, user identity stores, OIMIDStore.
2. On the OIMIDStore tab, in the Users and Groups area, delete "
cn=users
" and
"
cn=groups
" from the User Search Base and Group Search Base fields.
3. Click Apply.
4. In the Access System Administrators area, click the green + to add an OAM
Administrator.
5. In the Add System Administrator Roles window, search for and select an Active
Directory user.
6. Click Add Selected.
7. Click Apply.
8. On the Oracle Identity Management server, do an ldapsearch for the same user to
retrieve DN.
9. Log into ODSM with Oracle Internet Directory, and browse to
cn=OAMadministrators under dc=com,dc=mycompany,dc=groups. Click the
green + and add the DN.
10. Click Apply.
11. Log in to the OAM console again with the Active Directory user credentials.
Chapter 16
Complete Conditional Oracle Identity Management Post-Installation Tasks
16-44

16.8.4.3.3 Verify Oracle Identity Manager
1. Log in to the Oracle Identity Manager as xelsysadm (example
https://
sso.mycompany.com/oim
).
2. Click Advanced, Configuration, Resource Management, Manage IT Resource.
Ensure that pop-ups are allowed.
3. In the Manage IT Resource window, from the IT Resource Type drop-down list,
select
Directory Server
.
4. Click Search.
5. Ensure that the Search Base and User Reservation Container fields contain the
existing Oracle Identity Manager values.
16.8.4.3.4 Update Container Rules in MDS for Split Profile
1. Navigate to the Oracle Identity Manager home's
bin
folder.
2. In the
weblogic.properties
file, set the following three values:
wls_servername=wls_oim1
application_name=OIMMetadata
metadata_from_loc=/tmp/oimtemp
3. Create the following directory structure: /
tmp/oimtemp/file/
and create a file
called
LDAPContainerRules.xml
with following content:
<?xml version='1.0' encoding='UTF-8'?>
<container-rules>
<user>
<rule>
<expression>Default</expression>
<container>cn=Users,dc=mycompany,dc=com</container>
<description>UserContainer</description>
</rule>
</user>
<role>
<rule>
<expression>Default</expression>
<container>cn=Groups,dc=mycompany,dc=com</container>
<description>RoleContainer</description>
</rule>
</role>
</container-rules>
4. Run the
weblogicImportMetadata.sh
command to import content from the xml
file.
16.8.4.3.5 Update Username Generation Policy to Accommodate Active Directory
1. Log in to Oracle Identity Manager, typically
https://sso.mycompany.com/oim
as
xelsysadm and go to Advanced, Search System Properties, Advanced Search.
2. Search for "
Username Generation
" and then click on Default policy for
username generation.
Chapter 16
Complete Conditional Oracle Identity Management Post-Installation Tasks
16-45

3. In the Value field, update the value from
oracle.iam.identity.usermgmt.impl.plugins.DefaultComboPolicy
to
oracle.iam.identity.usermgmt.impl.plugins.FirstNameLastNamePolicyForAD
.
4. Click Save.
16.8.4.3.6 Change User and Group Search Base for all Oracle Fusion Applications
Domains
1. Ensure all Oracle Fusion Applications components are shut down on the Oracle
Fusion Applications node.
2. Do a backup of the Fusion domains structure.
3. Change
user-base-dn
and
group-base-dn
in xml files for all domains using the
following commands:
The
sed
command does the actual change, the preceding commands are used for
verification.
cd $APPLICATIONS_CONFIG/domains/<hostname>
grep -i "user-base-dn" */config/config.xml
grep -i "group-base-dn" */config/config.xml
ls -l */config/config.xml
sed -i 's/<wls:group-base-dn>cn=Groups,dc=mycompany/<wls:group-base-
dn>dc=mycompany/g' */config/config.xml
sed -i 's/<wls:user-base-dn>cn=Users,dc=mycompany/<wls:user-base-
dn>dc=mycompany/g' */config/config.xml
4. Restart all Oracle Fusion Applications components.
16.8.4.3.7 Add Users from Active Directory into Oracle Identity Manager
1. Log in to Oracle Identity Manager, typically
https://sso.mycompany.com/oim
, and
go to Advanced, Search Scheduled Jobs, Advanced Search.
2. Search for "
LDAP user create
" and select LDAP User Create and Update Full
Reconciliation to run the job.
3. Click Refresh and verify that the job status changes from running to stopped, and
execution status is success.
4. Repeat Step 1 to Step 3 for LDAP Role Create and Update Full Reconciliation
job.
16.8.4.3.8 Grant Privileges to Active Directory User
1. In Oracle Identity Manager, click Administration, Advanced Search: Users, and
search for an Active Directory user.
2. In the displayed search result, select the user and click the Roles tab to review the
current roles.
3. Click Assign and select a new role.
4. Verify if the user has the new role assigned. Log in to the Oracle Fusion
Applications home page and verify the dashboard.
Chapter 16
Complete Conditional Oracle Identity Management Post-Installation Tasks
16-46

16.8.5 Set Up Oracle Identity Management Node Manager for SSL
Follow the instructions detailed in this section ONLY for EDG topology and only if the
Configure Second application instances option is selected on the Node Topology
Configuration Page (page 10-5).
This section contains the following topics:
• Overview of the Node Manager (page 16-47)
• Configure Node Manager to Use SSL (page 16-48)
• Update Domain to Access Node Manager Using SSL (page 16-48)
• Update Start and Stop Scripts to Use SSL (page 16-48)
• Enable Host Name Verification Certificates for Node Manager (page 16-49)
• Update boot.properties Files (page 16-54)
• Start Node Manager (page 16-54)
16.8.5.1 Overview of the Node Manager
Node Manager enables to start and stop the Administration Server and the Managed
Servers.
Process
The topologies and hosts are shown in Table 16-1 (page 16-47).
Table 16-1 Hosts in Each Topology
Topology Hosts
OAM11g/OIM11g IDMHOST1
IDMHOST2
OIF11g IDMHOST1
IDMHOST2
Note that the procedures in this section must be performed multiple times for each
VIP-and-IP pair using the information provided in the component-specific sections.
Recommendations
Oracle provides two main recommendations for Node Manager configuration in
enterprise deployment topologies:
• Oracle recommends placing the Node Manager log file in a location different
from the default one (which is inside the Middleware Home where Node Manager
resides).
• Oracle also recommends using host name verification for the communication
between Node Manager and the servers in the domain. This requires the use
of certificates for the different addresses used in the domain. This section explains
the steps for configuring certificates in the hosts for host name verification. See
Enable Host Name Verification Certificates for Node Manager (page 16-49).
Chapter 16
Complete Conditional Oracle Identity Management Post-Installation Tasks
16-47

The passwords used in this guide are used only as examples. Use secure passwords
in a production environment. For example, use passwords that consist of random
sequences of both uppercase and lowercase characters as well as numbers.
16.8.5.2 Configure Node Manager to Use SSL
By default, provisioning does not configure Node Manager in SSL mode. Configure
each node manager in the topology to use SSL.
For each node manager that has its configuration in
IDM_CONFIG/nodemanager/
hostname
, perform the following steps:
1. Edit the file
nodemanager.properties
.
2. Change the line
SecureListener=false
to
SecureListener=true
.
3. Save the file.
4. Restart Node Manager by killing the
nodemanager
process, and restart by running
the following command:
startNodeManagerWrapper.sh
Repeat these steps for each node manager.
16.8.5.3 Update Domain to Access Node Manager Using SSL
1. Log in to the WebLogic Administration console as the user
weblogic_idm
.
Console URLs are provided in About Oracle Identity Management Console URLs
(page 10-27).
2. Select IDMDomain, Environment, Machines from the Domain Structure menu.
3. Click on Lock and Edit.
4. Click on one of the machines, for example idmhost1.mycompany.com.
5. Click on the Node Manager tab.
6. Change Type from Plain to SSL.
7. Click Save.
8. Repeat Steps 4-7 for each machine.
9. Click Activate Changes.
16.8.5.4 Update Start and Stop Scripts to Use SSL
Update the following files, which are generated by the provisioning tool. Each of these
files is located in the directory
IDM_CONFIG/scripts/basescripts
:
•
stop_nodemanager_template.py
•
stop_adminserver_template.py
•
start_adminserver_template.py
Do the following for each of the files:
1. Locate the line in the file that starts with
nmConnect
.
2. Change the last parameter from
plain
to
SSL
.
Chapter 16
Complete Conditional Oracle Identity Management Post-Installation Tasks
16-48

For example, in
start_adminserver_template.py
, change the line:
nmConnect('admin', nmpwd, 'localhost', '5556', 'IDMDomain' , '/u01/oracle/
config/domains/IDMDomain' , 'Plain')
to
nmConnect('admin', nmpwd, 'localhost', '5556', 'IDMDomain' , '/u01/oracle/
config/domains/IDMDomain' , 'SSL')
3. Save the file.
16.8.5.5 Enable Host Name Verification Certificates for Node Manager
This section describes how to set up host name verification certificates for
communication between Node Manager and the Administration Server. It consists of
the following steps:
• Generate Self-Signed Certificates Using the utils.CertGen Utility (page 16-49)
• Create an Identity Keystore Using the utils.ImportPrivateKey Utility (page 16-50)
• Create a Trust Keystore Using the Keytool Utility (page 16-51)
• Configure Node Manager to Use the Custom Keystores (page 16-52)
• Configure Managed Oracle WebLogic Servers to Use the Custom Keystores
(page 16-52)
• Change the Host Name Verification Setting for the Managed Servers (page 16-53)
16.8.5.5.1 Generate Self-Signed Certificates Using the utils.CertGen Utility
The certificates added in this section (as an example) address a configuration where
Node Manager listens on a physical host name (HOST.mycompany.com) and a
WebLogic Managed Server listens on a virtual host name (VIP.mycompany.com).
Whenever a server is using a virtual host name, it is implied that the server can
be migrated from one node to another. Consequently, the directory where keystores
and trust keystores are maintained ideally must reside on a shared storage that is
accessible from the failover. If additional host names are used in the same or different
nodes, the steps in this example must be extended to:
1. Add the required host names to the certificate stores (if they are different from
HOST.mycompany.com and VIP.mycompany.com).
2. Change the identity and trust store location information for Node Manager (if
the additional host names are used by Node Manager) or for the servers (if the
additional host names are used by Managed Servers).
Follow these steps to create self-signed certificates on HOST. These certificates
should be created using the network name or alias. The following examples configure
certificates for HOST.mycompany.com and VIP.mycompany.com; that is, it is assumed
that both a physical host name (HOST) and a virtual host name (VIP) are used
in HOST. It is also assumed that HOST.mycompany.com is the address used by
Node Manager and VIP.mycompany.com is the address used by a Managed Server
or the Administration Server. This is the common situation for nodes hosting an
Administration Server and a Fusion Middleware component, or for nodes where two
Managed Servers coexist with one server listening on the physical host name and
one server using a virtual host name (which is the case for servers that use migration
servers).
Chapter 16
Complete Conditional Oracle Identity Management Post-Installation Tasks
16-49

1. Set up the environment by running the IDM_BASE
/products/app/
wl_server10.3/server/bin/setWLSEnv.sh
script. In the Bourne shell, run the
following commands:
cd IDM_BASE/
products/app/wl_server10.3/server/bin
. ./setWLSEnv.sh
Verify that the
CLASSPATH
environment variable is set:
echo $CLASSPATH
2. Create a user-defined directory for the certificates. For example, create a directory
called 'keystores' under the IDM_CONFIG/domains/IDMDomain directory. Note
that certificates can be shared across WebLogic domains.
cd IDM_CONFIG/domains/IDMDomain
mkdir keystores
MANDATORY: The directory where keystores and trust keystores are maintained
must be on shared storage that is accessible from all nodes so that when the
servers fail over (manually or with server migration), the appropriate certificates
can be accessed from the failover node. Oracle recommends using central or
shared stores for the certificates used for different purposes (like SSL set up for
HTTP invocations, for example).
3. Change directory to the directory that was just created:
cd keystores
4. Using the utils.CerGen tool, create certificates for each Physical and Virtual Host
in the topology. For example:
java utils.CertGen Key_Passphrase IDMHOST1.mycompany.com_cert
IDMHOST1.mycompany.com_key domestic IDMHOST1.mycompany.com
Other examples include:
IDMHOST2
,
ADMINVHN
,
SOAHOST1VHN
,
SOAHOST2VHN
,
OIMHOST1VHN
, and
OIMHOST2VHN
.
16.8.5.5.2 Create an Identity Keystore Using the utils.ImportPrivateKey Utility
Follow these steps to create an identity keystore on IDMHOST1:
1. Create a new identity keystore called
appIdentityKeyStore
using the
utils.ImportPrivateKey
utility. Create this keystore under the same directory as
the certificates (that is, IDM_CONFIG/domains/IDMDomain/keystores).
The Identity Store is created (if none exists) when a certificate is imported and
the corresponding key into the Identity Store using the
utils.ImportPrivateKey
utility.
2. The default password for the standard Java keystore is
changeit
. Oracle
recommends always changing the default password. Use the
keytool
utility to
do this. The syntax is:
keytool -storepasswd -new New_Password -keystore Trust_Keystore -storepass
Original_Password
For example:
keytool -storepasswd -new Key_Passphrase -keystore
appTrustKeyStoreIDMHOST1.jks -storepass changeit
Chapter 16
Complete Conditional Oracle Identity Management Post-Installation Tasks
16-50

3. The CA certificate CertGenCA.der is used to sign all certificates generated by
the utils.CertGen tool. It is located in the
WL_HOME/server/lib
directory. This CA
certificate must be imported into the
appTrustKeyStore
using the
keytool
utility.
The syntax is:
keytool -import -v -noprompt -trustcacerts -alias Alias_Name
-file CA_File_Location -keystore Keystore_Location -storepass
Keystore_Password
For example:
keytool -import -v -noprompt -trustcacerts -alias clientCACert -file WL_HOME/
server/lib/CertGenCA.der -keystore appTrustKeyStoreIDMHOST1.jks -storepass
Key_Passphrase
16.8.5.5.3 Create a Trust Keystore Using the Keytool Utility
Follow these steps to create the trust keystore on each host, for example IDMHOST1
and IDMHOST2:
1. Copy the standard Java keystore to create the new trust keystore since it
already contains most of the root CA certificates needed. Oracle does not
recommend modifying the standard Java trust keystore directly. Copy the standard
Java keystore CA certificates located under the IDM_BASE
/products/app/
wl_server10.3/server/lib
directory to the same directory as the certificates. For
example:
cp IDM_BASE/products/app/wl_server10.3/server/lib/cacerts IDM_CONFIG/domains/
IDMDomain/keystores/appTrustKeyStoreIDMHOST1.jks
2. The default password for the standard Java keystore is
changeit
. Oracle
recommends always changing the default password. Use the
keytool
utility to
do this. The syntax is:
keytool -storepasswd -new New_Password -keystore Trust_Keystore -storepass
Original_Password
For example:
keytool -storepasswd -new Key_Passphrase -keystore
appTrustKeyStoreIDMHOST1.jks -storepass changeit
3. The CA certificate CertGenCA.der is used to sign all certificates generated
by the utils.CertGen tool. It is located in the IDM_BASE
/products/app/
wl_server10.3/server/lib
directory. This CA certificate must be imported into
the
appTrustKeyStore
using the
keytool
utility. The syntax is:
keytool -import -v -noprompt -trustcacerts -alias Alias_Name
-file CA_File_Location -keystore Keystore_Location -storepass
Keystore_Password
For example:
keytool -import -v -noprompt -trustcacerts -alias clientCACert -file
IDM_BASE
/products/app/wl_server10.3/server/lib/CertGenCA.der -keystore
appTrustKeyStoreIDMHOST1.jks -storepass Key_Passphrase
Chapter 16
Complete Conditional Oracle Identity Management Post-Installation Tasks
16-51

16.8.5.5.4 Configure Node Manager to Use the Custom Keystores
To configure Node Manager to use the custom keystores, add the following lines to
the end of the
nodemanager.properties
file located in the
IDM_CONFIG/nodemanager/
hostname
directory, where
hostname
is the name of the host where nodemanager runs:
KeyStores=CustomIdentityAndCustomTrust
CustomIdentityKeyStoreFileName=Identity_Keystore
CustomIdentityKeyStorePassPhrase=Identity_Keystore_Password
CustomIdentityAlias=Identity_Keystore_Alias
CustomIdentityPrivateKeyPassPhrase=Private_Key_Used_When_Creating_Certificate
For example:
KeyStores=CustomIdentityAndCustomTrust
CustomIdentityKeyStoreFileName=IDM_CONFIG/domains/IDMDomain/keystores/
appIdentityKeyStore.jks
CustomIdentityKeyStorePassPhrase=Key_Passphrase
CustomIdentityAlias=appIdentityIDMHOST1
CustomIdentityPrivateKeyPassPhrase=Key_Passphrase
The passphrase entries in the
nodemanager.properties
file get encrypted when Node
Manager is started, as described in Start and Stop Components (page 10-26). For
security reasons, minimize the time the entries in the
nodemanager.properties
file are
left unencrypted. After editing the file, start Node Manager as soon as possible so that
the entries get encrypted.
16.8.5.5.5 Configure Managed Oracle WebLogic Servers to Use the Custom Keystores
Follow these steps to configure the identity and trust keystores for WLS_SERVER:
1. Log in to Oracle WebLogic Server Administration Console at:
http://
ADMIN.mycompany.com/console
2. Click Lock and Edit.
3. Expand the Environment node in the Domain Structure window.
4. Click Servers. The Summary of Servers page is displayed.
5. Click the name of the server for which the identity and trust keystores
(WLS_SERVER) are configured. The settings page for the selected server is
displayed.
6. Select Configuration, then Keystores.
7. In the Keystores field, select the Custom Identity and Custom Trust method
for storing and managing private keys/digital certificate pairs and trusted CA
certificates.
8. In the Identity section, define attributes for the identity keystore:
• Custom Identity Keystore: The fully qualified path to the identity keystore:
IDM_CONFIG/domains/IDMDomain/keystores/appIdentityKeyStore.jks
• Custom Identity Keystore Type: Leave blank; it defaults to JKS.
• Custom Identity Keystore Passphrase: The password (
Keystore_Password
)
provided in Create a Trust Keystore Using the Keytool Utility (page 16-51).
This attribute is optional or required depending on the type of keystore. All
Chapter 16
Complete Conditional Oracle Identity Management Post-Installation Tasks
16-52

keystores require the passphrase to write to the keystore. However, some
keystores do not require the passphrase to read from the keystore. WebLogic
Server only reads from the keystore, so whether this property is defined or not
depends on the requirements of the keystore.
9. In the Trust section, define properties for the trust keystore:
• Custom Trust Keystore: The fully qualified path to the trust keystore:
IDM_CONFIG/domains/IDMDomain/keystores/appTrustKeyStoreIDMHOST1.jks
• Custom Trust Keystore Type: Leave blank; it defaults to JKS.
• Custom Trust Keystore Passphrase: The password provided as
New_Password in Create a Trust Keystore Using the Keytool Utility
(page 16-51). This attribute is optional or required depending on the type
of keystore. All keystores require the passphrase to write to the keystore.
However, some keystores do not require the passphrase to read from the
keystore. WebLogic Server only reads from the keystore, so whether this
property is defined or not depends on the requirements of the keystore.
10. Click Save.
11. Click Activate Changes in the Administration Console's Change Center to make
the changes take effect.
12. Select Configuration, then SSL.
13. Click Lock and Edit.
14. In the Private Key Alias field, enter the alias used for the host name the Managed
Server listens on, for example:
• For
wls_ods1
, use
appIdentityIDMHOST1
.
• For
wls_ods2
use
appIdentityIDMHOST2
.
• For
ADMINSERVER
use
appIdentityADMINVHN
.
In the Private Key Passphrase and the Confirm Private Key Passphrase fields,
enter the password for the keystore created in Create an Identity Keystore Using
the utils.ImportPrivateKey Utility (page 16-50).
15. Click Save.
16. Click Activate Changes in the Administration Console's Change Center to make
the changes take effect.
17. Restart the server for which the changes have been applied, as described in Start
and Stop Components (page 10-26).
16.8.5.5.6 Change the Host Name Verification Setting for the Managed Servers
Once the previous steps have been performed, set host name verification for the
affected Managed Servers to
Bea Hostname Verifier
. To do this, perform the
following steps:
1. Log in to Oracle WebLogic Server Administration Console. Console URLs are
provided in About Oracle Identity Management Console URLs (page 10-27).
2. Select Lock and Edit from the change center.
3. Expand the Environment node in the Domain Structure window.
4. Click Servers. The Summary of Servers page is displayed.
Chapter 16
Complete Conditional Oracle Identity Management Post-Installation Tasks
16-53

5. Select the Managed Server in the Names column of the table. The settings page
for the server is displayed.
6. Open the SSL tab.
7. Expand the Advanced section of the page.
8. Set host name verification to
Bea Hostname Verifier
.
9. Click Save.
10. Click Activate Changes.
16.8.5.6 Update boot.properties Files
Each managed server has a
boot.properties
file which is created as part of the
process described in previous sections. In order to start managed servers using the
provisioning start script, update each of these files and comment out following line:
TrustKeyStore=DemoTrust
After finishing updating the file, the line should look like this:
#TrustKeyStore=DemoTrust
The files that must be updated are:
IDM_CONFIG/domains/IDMDomain/servers/AdminServer/security/boot.properties
and each Managed Server
boot.properties
file. These have path names of the form:
IDM_CONFIG/domains/IDMDomain/servers/servername/security/boot.properties
and
IDM_CONFIG/domains/IDMDomain/servers/AdminServer/data/nodemanager/
boot.properties
16.8.5.7 Start Node Manager
• Run the following commands to start Node Manager.
cd IDM_CONFIG/nodemanager/hostname
./startNodeManagerWrapper.sh
Verify that Node Manager is using the appropriate stores and alias from the Node
Manager output. The following should be seen when Node Manager starts.:
<Loading identity key store:
FileName=IDM_CONFIG/domains/IDMDomain/keystores/appIdentityKeyStore.jks,
Type=jks, PassPhraseUsed=true>
Host name verification works if a test configuration change is applied to the servers
and it succeeds without Node Manager reporting any SSL errors.
Chapter 16
Complete Conditional Oracle Identity Management Post-Installation Tasks
16-54

16.9 Install and Configure Oracle Business Intelligence
Applications
Oracle Business Intelligence Applications consists of pre-built metadata, dashboards,
analyses, and ETL tools that provide insight into the organization's historical data. The
Oracle Business Intelligence Applications software binaries are installed during Oracle
Fusion Applications installation and provisioning in the Oracle Home for Business
Intelligence. Set up the Oracle Business Intelligence Applications components before
using them. See Installing and Setting Up Oracle BI Applications in the Oracle
Business Intelligence Applications Installation Guide.
16.10 Configure Oracle Transactional Business Intelligence
After installing Oracle Fusion Transactional Business Intelligence, configure it to obtain
real-time analysis of the organization's day-to-day operational data. For information on
setting up accounting segment, modeling Essbase cubes, and setting up Descriptive
Flexfields see the Oracle Fusion Transactional Business Intelligence Administrator's
Guide.
16.11 Set Up Report Delivery Servers
Oracle Business Intelligence Publisher is the report generation and delivery engine for
Oracle Fusion Applications. Oracle BI Publisher receives report requests from Oracle
Fusion Applications in the following ways:
• Through Oracle Enterprise Scheduler
• Through the Reports and Analytics pane
• From an application page
Requests submitted through Oracle Enterprise Scheduler are processed by the Oracle
BI Publisher scheduler. Requests submitted through the Reports and Analytics pane
can be either real-time online requests or scheduled requests. Requests submitted
through an application may invoke Oracle Enterprise Scheduler or may return report
request results directly back to the application page.
After installing Oracle Fusion Applications, Oracle BI Publisher is configured to
accept requests from Oracle Fusion Applications. However, before delivering report
documents to their destinations, define the delivery servers in Oracle BI Publisher. Use
the Oracle BI Publisher Administration page to define the delivery servers.
After setup, configure the number of report processor and delivery threads to
best handle the processing and delivery requirements. In addition, configure report
properties for the system or at the report level to tune performance of the reports.
To diagnose report processing issues, BI Publisher provides a set of scheduler
diagnostics.
16.11.1 Navigate to the Oracle BI Publisher Administration Page
Use the Oracle BI Publisher Administration page to:
• Configure delivery servers
Chapter 16
Install and Configure Oracle Business Intelligence Applications
16-55
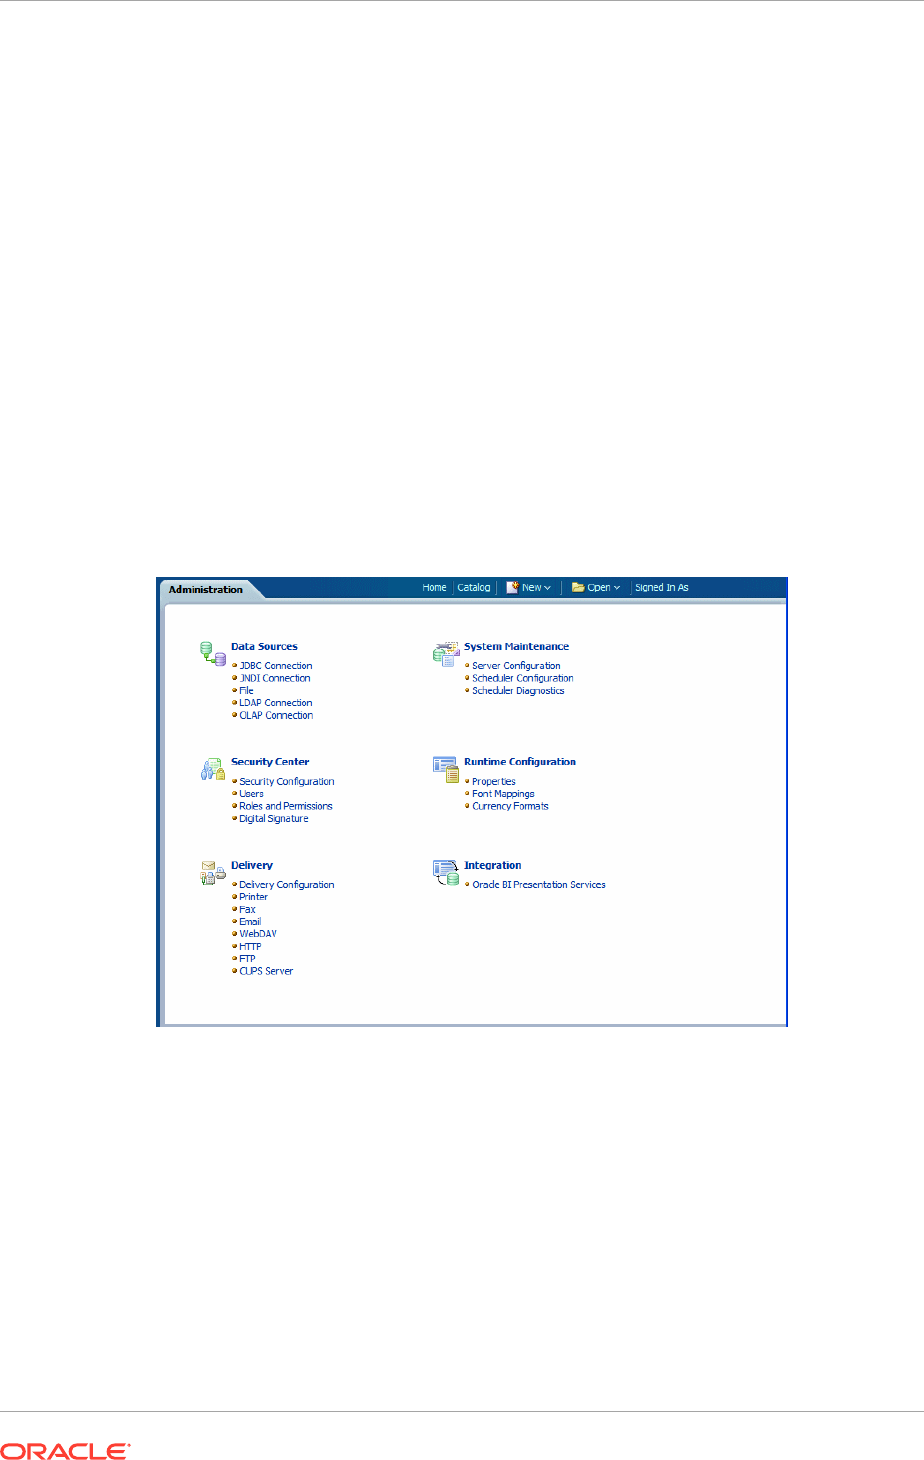
• Manage report and delivery processors
• View scheduler diagnostics
• Set system properties and report runtime configuration properties
The
BIAdministrator
role is necessary to access the BI Publisher Administration
page.
To navigate to the Oracle BI Publisher Administration page:
• From the Oracle Fusion Applications Navigator, under Tools, click Reports
and Analytics. In the Reports and Analytics pane, click Catalog to display
the Oracle Business Intelligence presentation catalog page. From here, click
Administration and then click Manage BI Publisher.
• Alternatively, log in to Oracle Business Intelligence directly (example:
http://
example.com:port/analytics
). Click Administration and then click Manage BI
Publisher.
Figure 16-2 (page 16-56) shows the BI Publisher Administration page:
Figure 16-2 BI Publisher Administration Page
16.11.2 Configure Report Delivery Servers
To configure delivery servers:
1. From the BI Publisher Administration page, click Delivery Configuration.
2. Enter values in the Delivery Configuration Options tab to set general properties
for email deliveries and notifications. Figure 16-3 (page 16-57) shows the Delivery
Configuration Options tab:
Chapter 16
Set Up Report Delivery Servers
16-56
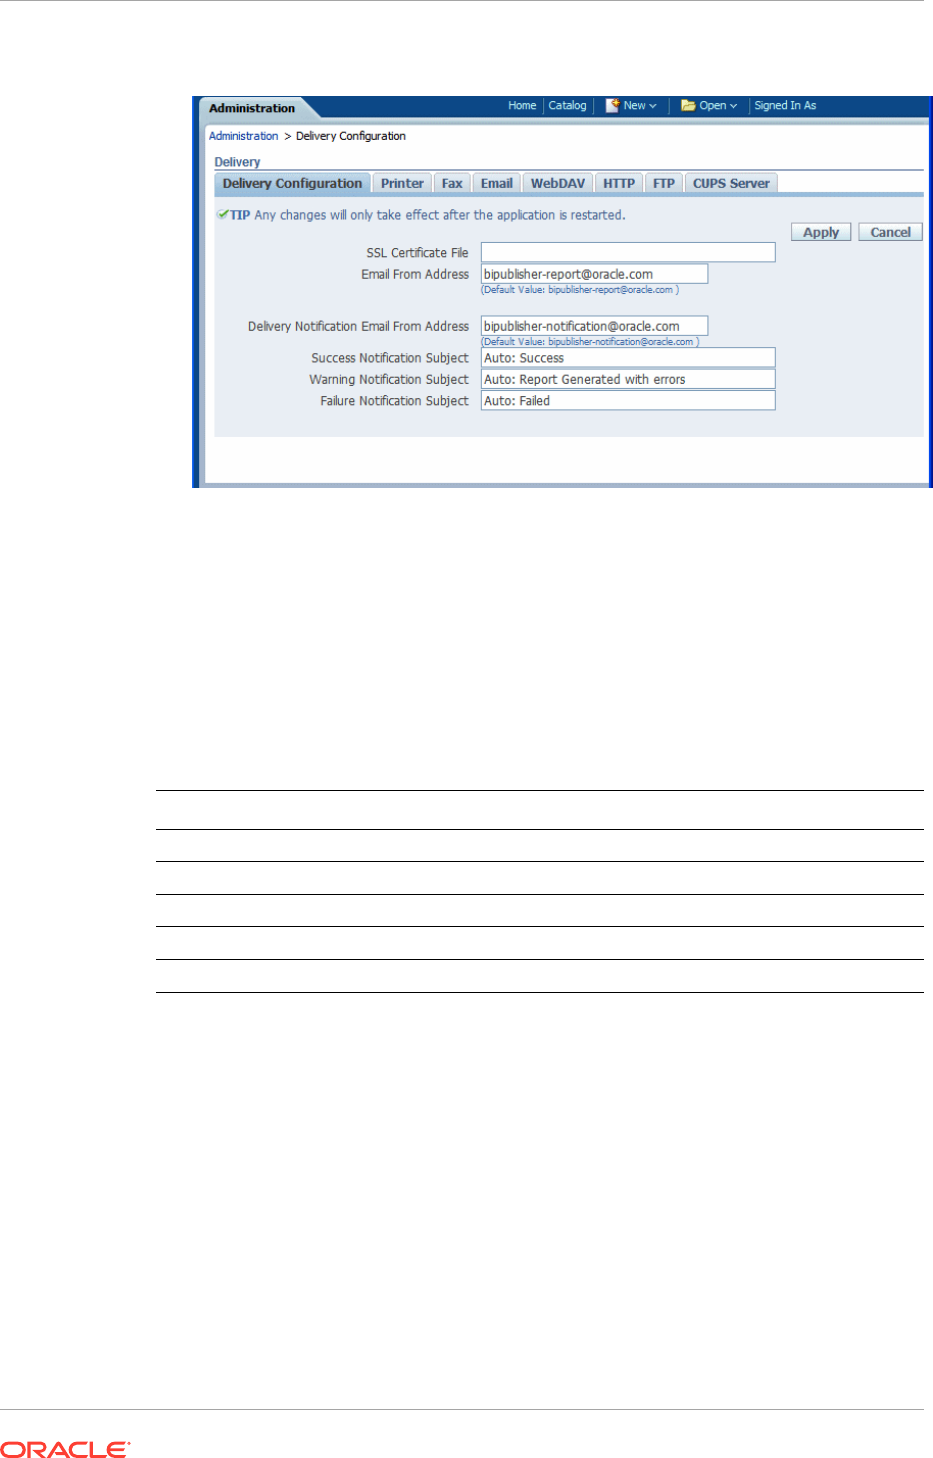
Figure 16-3 Delivery Configuration Options Tab
For more information about this tab see Configuring Delivery Options in the
Oracle Fusion Middleware Administrator's Guide for Oracle Business Intelligence
Publisher (Oracle Fusion Applications Edition).
3. To configure a delivery server, click the appropriate tab.
The following table lists the report delivery channels supported by Oracle BI Publisher.
See Setting Up Delivery Destinations in the Oracle Fusion Middleware Administrator's
Guide for Oracle Business Intelligence Publisher (Oracle Fusion Applications Edition)
for configuration information.
Delivery Type Section
Printer and Fax Adding a Printer or Fax Server
E-mail Adding an E-mail Server
WebDAV Adding a WebDAV Server
HTTP Adding an HTTP Server
FTP Adding an FTP Server
Note that printing is supported through Internet Printing Protocol (IPP). If Oracle BI
Publisher is operating in a UNIX environment, set up the Common UNIX Printing
Service (CUPS) and then define the CUPS server to Oracle BI Publisher. For
information on setting up CUPS and Windows IPP, see Setting Up a Printer in
the Oracle Fusion Middleware Administrator's Guide for Oracle Business Intelligence
Publisher (Oracle Fusion Applications Edition).
16.12 Configure Oracle Data Integrator Studio
Configuring Oracle Data Integrator Studio for external authentication is necessary to
prevent any unauthorized access. The access credentials are stored in a configuration
file. To make the external configuration work, the jps configuration file (jps-config.xml)
must be configured and placed in the prescribed directory where the application is
installed.
Chapter 16
Configure Oracle Data Integrator Studio
16-57

Prerequisites
• Select the Developer Installation options on the Select Installation Type page:
– ODI Studio (with local agent)
– ODI SDK
• Skip Repository Configuration on the Repository Configuration page
MANDATORY: Oracle Data Integrator Studio must be installed in a separate
Oracle home other than Oracle Fusion Middleware Oracle homes and Oracle
Fusion Applications Oracle home.
For more information about installing Oracle Data Integrator, see Preparing to
Install and Configure Oracle Data Integrator in the Fusion Middleware Installing and
Configuring Oracle Data Integrator.
16.13 Set Up the Oracle Business Intelligence
Administration Tool
Oracle Business Intelligence Administration Tool is a part of the Oracle Business
Intelligence Client Tools and is packaged along with the Oracle Business Intelligence
Applications. It enables to manage the metadata repository and is required for certain
steps in the Oracle Business Intelligence Applications setup process. For more
information about setting up the Oracle Business Intelligence Administration Tool, see
Installing and Setting Up Oracle BI Applications in the Oracle Business Intelligence
Applications Installation Guide
16.14 Perform Optional Language Installations
This section describes how to install a language other than US English, using
Language Pack Installer. See Select Languages (page 3-11) for a list of available
languages.
A language pack for a given language and release contains artifacts at the specific
release level that are translated to the specific language. Translated artifacts include
Oracle Fusion Applications seed data that is uploaded into Oracle Fusion Applications
database, SOA resource bundles, JEE resource bundles, LDAP data, Diagnostics Test
Framework, and BI Presentation Catalog data. Install language packs with Language
Pack Installer.
This section includes the following topics:
• Pre-Installation Steps - Before Down Time (page 16-58)
• Pre-Installation Steps - During Down Time (page 16-60)
• Install a Language (page 16-61)
• Complete the Post-Installation Tasks (page 16-70)
• Troubleshoot Language Pack Installer Sessions (page 16-72)
16.14.1 Pre-Installation Steps - Before Down Time
This section describes the preparation steps for installing a language pack, all of which
can be performed before the scheduled down time.
Chapter 16
Set Up the Oracle Business Intelligence Administration Tool
16-58

16.14.1.1 Before Beginning
Follow the steps in this section before beginning the language pack installation.
1. Ensure there is access to the Oracle Fusion Applications NLS release notes from
the current release.
2. Ensure that the steps in Download Language Pack Software (page 5-27) have
been followed.
16.14.1.2 Confirm the Oracle Fusion Applications Installation is Complete
Ensure that all tasks described in Complete Mandatory Common Post-Installation
Tasks (page 15-1) have been followed.
If a language pack is being installed on an upgraded environment, ensure to complete
that all tasks described in Run Post-Upgrade Tasks in the Oracle Fusion Applications
Upgrade Guide.
In either case, perform also the steps in Post-Installation in the Technical Known
Issues, Oracle Fusion Applications Release 12 document.
16.14.1.3 Maintain Versions of Customized BI Publisher Reports
If a language pack is installed immediately after the Oracle Fusion Applications
installation, skip this step.
If a language pack is installed at a later stage, ensure to have the versions of any
customized BI Publisher reports. If a language pack includes an update to a catalog
object that was delivered with an Oracle Fusion application, the update overwrites any
customizations applied to the original report.
16.14.1.4 Run Health Checker for Pre-Down Time Checks
Run Health Checker directly from
APPLICATIONS_BASE
and from the primordial host.
Run these checks any number of times prior to the down time. For information about
the checks that Health Checker runs, see Language Pack Readiness Health Checks in
the Oracle Fusion Applications Upgrade Guide.
Perform the following steps to run Health Checker:
1. Set the
APPLICATIONS_BASE
environment variable to point to the directory
that contains Oracle Fusion Applications. For example, if Oracle Fusion
Applications is installed in
/server01/APPLICATIONS_BASE/fusionapps
, then set
the
APPLICATIONS_BASE
environment variable to
/server01/APPLICATIONS_BASE
.
Examples follow:
UNIX:
setenv APPLICATIONS_BASE /server01/APPTOP/
2. Run Health Checker. Note that this is one command.
UNIX:
$APPLICATIONS_BASE/fusionapps/applications/lcm/hc/bin/hcplug.sh -manifest
$APPLICATIONS_BASE/fusionapps/applications/lcm/hc/config/
LanguagePackReadinessHealthChecks.xml
[-DlogLevel=log_level]
Chapter 16
Perform Optional Language Installations
16-59

If any health checks fail, refer to the Health Checker log files and reports to find
the corrective actions to resolve the issue. The suggested corrective actions must be
run manually to fix the issue before proceeding with the upgrade. Then rerun Health
Checker to ensure all checks are successful. Optionally, use the -checkpoint true
option when Health Checker is restarted, so that only the failed plug-ins or the plug-ins
that did not run are executed.
Review the Health Checker log file or the HTML summary report to see if any errors
occurred that require corrective action. The log file and the HTML summary are
located in
APPLICATIONS_CONFIG/lcm/logs/release_version/healthchecker
.
16.14.2 Pre-Installation Steps - During Down Time
This section describes the mandatory preparation steps for installing a language pack,
all of which must be performed during the system down time. Language Pack Installer
does not require any servers to be shut down. However, no users should be online, so
it is still considered to be down time.
16.14.2.1 Run Health Checker for General System Health Checks
Run Health Checker directly from
APPLICATIONS_BASE
and from the primordial host.
For information about the checks that Health Checker runs, see General System
Health Checks in the Oracle Fusion Applications Upgrade Guide.
Perform the following steps to run Health Checker:
1. Set the
APPLICATIONS_BASE
environment variable to point to the directory
that contains Oracle Fusion Applications. For example, if Oracle Fusion
Applications is installed in
/server01/APPLICATIONS_BASE/fusionapps
, then set
the
APPLICATIONS_BASE
environment variable to
/server01/APPLICATIONS_BASE
.
Examples follow:
UNIX:
setenv APPLICATIONS_BASE /server01/APPTOP/
2. Run Health Checker. Note that this is one command.
UNIX:
$APPLICATIONS_BASE/fusionapps/applications/lcm/hc/bin/hcplug.sh -manifest
$APPLICATIONS_BASE/fusionapps/applications/lcm/hc/config/
GeneralSystemHealthChecks.xml
[-DlogLevel=log_level]
If any health checks fail, refer to the Health Checker log files and reports to find
the corrective actions to resolve the issue. The suggested corrective actions must be
run manually to fix the issue before proceeding with the upgrade. Then rerun Health
Checker to ensure all checks are successful. Optionally, use the -checkpoint true
option when Health Checker is restarted, so that only the failed plug-ins or the plug-ins
that did not run are executed.
Review the Health Checker log file or the HTML summary report to see if any errors
occurred that require corrective action. The log file and the HTML summary are
located in
APPLICATIONS_CONFIG/lcm/logs/release_version/healthchecker
.
Chapter 16
Perform Optional Language Installations
16-60

16.14.2.2 Back Up Oracle Fusion Applications
Back up the entire Oracle Fusion Applications environment by following the steps in
Back Up and Recover Oracle Fusion Applications in the Oracle Fusion Applications
Administrator's Guide. You should also back up your central inventory.
16.14.2.3 Apply Mandatory Prerequisite Patches
Apply any patches listed in Post-Installation in the Oracle Fusion Applications release
notes that might have been downloaded in Download Language Pack Software
(page 5-27).
16.14.3 Install a Language
Language Pack Installer does not require any servers to be shut down. However, no
users should be online, so it is still considered to be down time. Oracle recommends
that language packs be installed from a machine that is co-located in the same
subnetwork as the database server to maximize performance. Language Pack Installer
must be run on the primordial host.
Ensure that the steps in Pre-Installation Steps - Before Down Time (page 16-58) and
Pre-Installation Steps - During Down Time (page 16-60) are successfully completed
before starting Language Pack Installer.
The policy store can maintain attributes in only one language. To override the base
English strings in the policy store, set the
-DupdateJAZNPolicyStore
option to true
when the Language Pack is installed. The Description and Displayname are the two
attributes which are translatable and are loaded in JAZN files in the Language Pack.
Language Pack Installer supports silent mode and GUI mode. In silent mode,
Language Pack Installer reports the progress of the installation as console output.
In GUI mode, navigate through screens that display the progress of the installation,
including log file locations and status messages.
• Run Language Pack Installer in Silent Mode (page 16-61)
• Run Language Pack Installer in GUI Mode (page 16-64)
16.14.3.1 Run Language Pack Installer in Silent Mode
Perform the following steps to start Language Pack Installer in silent mode from
the command line, using specific options to further define the necessary actions.
Language Pack Installer must be run from the primordial host.
1. Create a response file named
silent.rsp
to be used in silent mode. This file
can be located in any directory that is accessible while launching Language Pack
Installer. An example follows:
ORACLE_HOME=/u01/APPLICATIONS_BASE/fusionapps/applications
CRM_SELECTED_JAZN_MIGRATION_TYPE=PATCH_POLICY
FSCM_SELECTED_JAZN_MIGRATION_TYPE=PATCH_POLICY
HCM_SELECTED_JAZN_MIGRATION_TYPE=PATCH_POLICY
OBI_SELECTED_JAZN_MIGRATION_TYPE=PATCH_POLICY
UCM_SELECTED_JAZN_MIGRATION_TYPE=PATCH_POLICY
BPM_SELECTED_JAZN_MIGRATION_TYPE=PATCH_POLICY
Chapter 16
Perform Optional Language Installations
16-61

SOA_SELECTED_JAZN_MIGRATION_TYPE=PATCH_POLICY
B2B_SELECTED_JAZN_MIGRATION_TYPE=PATCH_POLICY
The
stripe_SELECTED_JAZN_MIGRATION_TYPE
properties allow to choose which
deployment method Language Pack Installer uses for policy store changes to each
stripe. The following choices are available:
•
PATCH_POLICY
: Apply safe changes only. This is the recommended deployment
method. Choose this method if there are no conflicts.
•
MIGRATE_POLICY_OVERRIDE
: Apply all changes and overwrite customizations.
•
MIGRATE_POLICY_NO_OVERRIDE
: Append additive changes.
•
MIGRATE_POLICY_APM:
Manually resolve conflicts and upload changes using
Authorization Policy Manager (APM).
If
PATCH_POLICY
or
MIGRATE_POLICY_NO_OVERRIDE
are chosen, then the results of
the analysis must be reviewed to manually upload any changes not applied by
Language Pack Installer, based on the selected choice, after the installation is
complete. If
MIGRATE_POLICY_OVERRIDE
was chosen, then the customizations that
are overwritten after the installation is complete may need to be reapplied.
If
MIGRATE_POLICY_APM
is chosen, the installation must be paused while bringing up
the APM application and uploading the changes.
Note the location of the following files:
• Baseline file:
FA_ORACLE_HOME/admin/JAZN/stripe/baseline
• Patch file for fscm, crm, and hcm stripes:
FA_ORACLE_HOME/stripe/deploy/
system-jazn-data.xml
• Patch file for the obi, ucm, bpm, b2b, and soa stripes:
FA_ORACLE_HOME/com/acr/security/jazn/bip_jazn-data.xml
2. Set the
JAVA_HOME
environment variable as follows:
UNIX: setenv JAVA_HOME APPLICATIONS_BASE/fusionapps/jdk
3. Confirm the registration of the network location of
FA_ORACLE_HOME
.
$REPOSITORY_LOCATION/installers/fusionapps/Disk1/runInstaller -addLangs -
jreLoc APPLICATIONS_BASE/fusionapps/jdk/
-invPtrLoc APPLICATIONS_BASE/fusionapps/applications/oraInst.loc -silent -
response location_of_response_file -updatesDir installer_patch_directory
4. Run the following command to start Language Pack Installer in silent mode:
If Language Pack Installer encounters errors in silent mode during installation,
it terminates the session. The issue that caused the failure and then restart
Language Pack Installer must be resolved using the same command used
previously. Language Pack Installer then restarts from the first failed task.
See General Troubleshooting During the Configuration Phase in Silent Mode
(page 16-75).
UNIX:
REPOSITORY_LOCATION
/installers/fusionapps/Disk1/runInstaller -
addLangs -jreLoc
APPLICATIONS_BASE
/fusionapps/jdk [-invPtrLoc FA_ORACLE_HOME/oraInst.loc] -
silent
-response location_of_silent.rsp_file
-noCheckForUpdates OR -updatesDir installer_patch_directory
[-DpatchStageLocation=directory_location_of_patch_stage
[-Dworkers=number_of_workers][-DlogLevel=level]
Chapter 16
Perform Optional Language Installations
16-62

[-DserverStartTimeout=timeout_period_for_server_in_seconds]
[-DpatchDownloadLocation=patch_directory][-debug]
The following table shows valid options that can be used when running Language
Pack Installer in silent mode.
Table 16-2 Language Pack Installer Command Options in Silent Mode
Option Name Description Mandatory
-addLangs
Runs Language Pack Installer to install one
language.
Yes.
-jreLoc
Path where the Java Runtime Environment
is installed. This option does not support
relative paths, so specify the absolute path.
Yes.
-invPtrLoc
(UNIX platforms
only)
The location of an overriding inventory
pointer file. If the Oracle Fusion
Applications Oracle home directory
(
FA_ORACLE_HOME
) is registered in
inventory with a
/net
path, then
provide the location of
oraInst.loc
including
/net
in the path.
Recommended, use to
override the default
location of the inventory
pointer file, located
in
/etc/oraInst.loc
.
-silent
Run Language Pack Installer in silent
mode.
Yes.
-response
The location of the response file,
silent.rsp
.
Yes.
-
noCheckForUpd
ates
Skips the application of the installer update
patch, if there is no installer update patch
available for this release.
No, this option cannot be
used if the
-updatesDir
option is used. Either
-
noCheckForUpdates
or
-
updatesDir
must be
used.
-updatesDir
The location of the installer update patch.
When a valid installer patch is found, the
installer automatically restarts itself after
applying the patch.
No, this option cannot
be used if the
-noCheckForUpdates
option is used. Either
-
noCheckForUpdates
or
-
updatesDir
must be
used.
-
DpatchStageLo
cation
Location of patch stage. This is the
directory where Middleware patches from
a downloaded location, as well as
the repository, are consolidated before
applying.
No, the default directory is
APPLICATIONS_BASE/..
/patch_stage
.. For
example, if
APPLICATIONS_BASE
is
/u01/
APPLICATIONS_BASE
, the
patch stage directory
is
/u01/patch_stage
.
-
DupdateJAZNPo
licyStore=tru
e
Updates the policy store with translated
attributes so field descriptions, display
names, and other attributes display their
translated values.
No, use only when base
English is not used in the
policy store.
Chapter 16
Perform Optional Language Installations
16-63

Table 16-2 (Cont.) Language Pack Installer Command Options in Silent
Mode
Option Name Description Mandatory
-Dworkers
The number of workers to use for
uploading database content. If a value is
provided for the number of workers that is
outside the calculated range, a value that
is within the optimal range is requested. If
this option is not used, a calculated optimal
value is used.
No, overrides the default
number of workers
calculated by Language
Pack Installer.
-
DserverStartT
imeout
Configures the timeout value for server in
seconds.
No, overrides the default
value for server timeout.
-
DpatchDownloa
dLocation
The directory path where mandatory
prerequisite patches were downloaded to
be applied by Language Pack Installer.
See Download Language Pack Software
(page 5-27).
No, the default is
11.1.11.x.0_post_rep
o_patches
.
-DlogLevel
Records messages in the log file at the
level specified. Enter a value to override
the default log level of
INFO
.
No, default value is
INFO
.
-debug
Retrieve debug information from Language
Pack Installer.
No.
5. Proceed to Complete the Post-Installation Tasks (page 16-70)..
16.14.3.2 Run Language Pack Installer in GUI Mode
Perform the following steps to run Language Pack Installer in GUI mode from
the command line, using specific options to further define the necessary actions.
Language Pack Installer must be run from the primordial host.
If Language Pack Installer encounters errors, refer to Troubleshoot Language Pack
Installer Sessions (page 16-72) before clicking any buttons in the Language Pack
Installer user interface.
1. Set the
JAVA_HOME
environment variable as follows:
UNIX: setenv JAVA_HOME APPLICATIONS_BASE/fusionapps/jdk
2. Confirm registration of the network location of
FA_ORACLE_HOME
.
If the Oracle Fusion Applications Oracle home directory (
FA_ORACLE_HOME
), which
is
APPLICATIONS_BASE/fusionapps/applications
, is registered in the central
inventory with a
/net
path, then provide the
oraInst.loc
location including
/net
when starting Language Pack Installer. An example follows:
UNIX only:
$REPOSITORY_LOCATION
/installers/fusionapps/Disk1/runInstaller -jreLoc
APPLICATIONS_BASE/fusionapps/jdk/
-invPtrLoc /net/APPLICATIONS_BASE/fusionapps/applications/oraInst.loc
If not triggered with a
/net
path, Language Pack Installer copies the
-invPtrLoc
file to
FA_ORACLE_HOME
. This results in a copy of the file to itself, which then
becomes an empty or zero byte file. As a result, the copy phase fails when
oracle_common
patches are applied.
Chapter 16
Perform Optional Language Installations
16-64

3. Run the following command to start Language Pack Installer in GUI mode.
UNIX:
$REPOSITORY_LOCATION
/installers/fusionapps/Disk1/runInstaller -
addLangs -jreLoc APPLICATIONS_BASE
/fusionapps/jdk
[-invPtrLoc FA_ORACLE_HOME/oraInst.loc]
-noCheckForUpdates OR -updatesDir installer_patch_directory
[-DpatchStageLocation=directory_location_of_patch_stage
[-Dworkers=number_of_workers][-DlogLevel=level]
[-DserverStartTimeout=timeout_period_for_server_in_seconds]
[-DpatchDownloadLocation=patch_directory][-debug]
[-DupdateJAZNPolicyStore=true]
The following table shows valid options that can be used when running Language
Pack Installer.
Table 16-3 Language Pack Installer Command Line Options
Option Name Description Mandatory
-addLangs
Runs Language Pack Installer to install one
language.
Yes.
-jreLoc
Path where the Java Runtime Environment
is installed. This option does not support
relative paths, so specify the absolute path.
Yes.
-
noCheckForUpd
ates
Skips the application of the installer update
patch, if there is no installer update patch
available for this release.
No, this option cannot be
used if the
-updatesDir
option is used. Either
-
noCheckForUpdates
or
-
updatesDir
must be
used.
-updatesDir
The location of the installer update patch.
When a valid installer patch is found, the
installer automatically restarts itself after
applying the patch.
No, this option cannot
be used if the
-noCheckForUpdates
option is used. Either
-
noCheckForUpdates
or
-
updatesDir
must be
used.
-
DpatchStageLo
cation
Location of patch stage. This is the
directory where Middleware patches from
a downloaded location, as well as the
repository, are consolidated before applying.
No, the default directory
is
APPLICATIONS_BASE/.
./patch_stage
. For
example, if
APPLICATIONS_BASE
is
/u01/
APPLICATIONS_BASE
,
the patch stage directory
is
/u01/patch_stage
.
-invPtrLoc
(UNIX platforms
only)
The location of an overriding inventory
pointer file. If the Oracle Fusion Applications
Oracle home directory (
FA_ORACLE_HOME
),
is registered in inventory with a
/net
path,
then provide the location of
oraInst.loc
including
/net
in the path.
Recommended, use to
override the default
location of the inventory
pointer file, located
in
/etc/oraInst.loc
.
Chapter 16
Perform Optional Language Installations
16-65

Table 16-3 (Cont.) Language Pack Installer Command Line Options
Option Name Description Mandatory
-Dworkers
The number of workers to use for uploading
database content. If a value is provided for
the number of workers that is outside the
calculated range, a value that is within the
optimal range is requested. If this option is
not used, a calculated optimal value is used.
No, overrides the default
number of workers
calculated by Language
Pack Installer.
-
DserverStartT
imeout
Configures the timeout value for server in
seconds.
No, overrides the default
value for server timeout.
-
DpatchDownloa
dLocation
The directory path where mandatory
prerequisite patches were downloaded to
be applied by Language Pack Installer.
See Download Language Pack Software
(page 5-27).
No, the default is
11.1.11.x.0_post_re
po_patches
.
-DlogLevel
Records messages in the log file at the
specified level. Enter a value to override the
default log level of
INFO
.
No, the default value is
INFO
.
-
DupdateJAZNPo
licyStore=tru
e
Updates the policy store with translated
attributes so field descriptions, display
names, and other attributes display their
translated values.
No, use only when base
English is not used in the
policy store.
-debug
Retrieve debug information from Language
Pack Installer.
No.
The following table illustrates the tasks that Language Pack Installer runs. For
information about log files and troubleshooting Language Pack Installer errors, see
Troubleshoot Language Pack Installer Sessions (page 16-72).
Table 16-4 Language Pack Installer Screen Sequence
Screen Description and Action Required
Welcome Appears when Language Pack Installer is started. This screen
does not appear if Language Pack Installer is started after a
failure. The standard Welcome screen is read-only. It contains a
navigation pane on the left-hand side that summarizes the tasks
the installer takes. Each item in the pane represents an installer
screen, which contains prompts for the necessary information.
Click Next to continue.
Install Software
Updates
Appears when Language Pack Installer is started. This screen
does not appear if the
-noCheckForUpdates
option is supplied,
or after the installer restarts itself automatically after applying an
installer patch. The screen displays two options:
• Skip applying the installer update
• Search Local Directory for Updates
Select Search Local Directory for Updates. Specify the correct
Installer update patch location or click Browse to locate the file.
Then click Search for Updates to display the patch number and
the type of patch.
Click Next to continue.
Chapter 16
Perform Optional Language Installations
16-66

Table 16-4 (Cont.) Language Pack Installer Screen Sequence
Screen Description and Action Required
Installation Location Specify the location of the existing Oracle Fusion Applications
home (
FA_ORACLE_HOME
) where the language is installed.
Click Next to continue.
Installation Summary Summarizes the selections made during this installation session. It
includes the Oracle home, required and available disk space, and
the language to be installed. Review the information displayed to
ensure that the installation details are correct.
To make changes before installing, click Back to return to previous
screens in the interview.
Click Install to start installing this language.
Installation Progress Displays a progress indicator that shows the percentage of the
installation phase that is complete and indicates the location of the
installation log file. The installation phase consists of copying files
from the language pack to the appropriate Oracle homes.
When the installation progress indicator shows 100 percent, click
Next to continue.
Chapter 16
Perform Optional Language Installations
16-67

Table 16-4 (Cont.) Language Pack Installer Screen Sequence
Screen Description and Action Required
Policy Store Analysis
(Note that this screen
displays only when
the
-
DupdateJAZNPolicy
Store
option is set to
true
when Language
Pack Installer is
started)
Analysis is available for the following policy store stripes: hcm,
crm, fscm, soa, ucm, bpm, b2b,and obi. Select the stripes to be
analyzed and then click Run Analysis to identify any conflicts
or deletions. Only the stripes that are included in the language
pack are enabled for analysis and the analysis could run for
several minutes. After the analysis runs, review the results of the
analysis to determine which deployment method Language Pack
Installer should use for policy store changes to each stripe. Oracle
recommends to select Apply safe changes only. This is the
safest method unless the consequences of the other three options
have beemn read and totally understood. If it is decided to resolve
the conflicts or deletions before the actual JAZN upload from
Language Pack Installer, the Policy Store Analysis step should be
run again to get the most accurate analysis report. The choices for
deployment method are:
• Apply safe changes only (choose this method if there are no
conflicts).
• Apply all changes and overwrite customizations (not available
for soa, ucm, b2b, and bpm stripes).
• Append additive changes.
• Manually resolve conflicts and upload changes using
Authorization Policy Manager.
If Apply safe changes only is selected or Append additive
changes, then the results of the analysis must be reviewed to
manually upload any changes not applied by Language Pack
Installer with the selected choice, after the installation is complete.
If Apply all changes and overwrite customizations is chosen,
then the customizations that are overwritten after the installation
is complete may need to be reapplied. If one of these options is
chosen, click Next after making the selection.
If Manually resolve conflicts and upload changes using
Authorization Policy Manager (APM) is selected, the installation
must be paused while bringing up the APM application and
uploading the changes. Note the location of the following files:
• Baseline file:
FA_ORACLE_HOME/admin/JAZN/stripe/
baseline
• Patch file for fscm, crm, and hcm stripes:
FA_ORACLE_HOME/
stripe/deploy/system-jazn-data.xml
• Patch file for the ucm:
FA_ORACLE_HOME/com/acr/
security/jazn/ucm_jazn-data.xml
• Patch file for the soa:
FA_ORACLE_HOME/com/acr/
security/jazn/soa_jazn-data.xml
• Patch file for the bpm:
FA_ORACLE_HOME/com/acr/
security/jazn/bpm_jazn-data.xml
•
Patch file for the obi:
FA_ORACLE_HOME/com/acr/
security/jazn/bip_jazn-data.xml
When completing this task in APM, shut down the APM
application, return to Language Pack Installer, and click Next.
Configuration
Progress
Displays a progress indicator that shows the percentage of the
configuration phase that is complete. It displays each configuration
assistant in the message pane as it is performed.
No additional user action is required in the Configuration Progress
screen unless a failure occurs.
Chapter 16
Perform Optional Language Installations
16-68

Table 16-4 (Cont.) Language Pack Installer Screen Sequence
Screen Description and Action Required
Installation Complete Summarizes the installation just completed. To save this
configuration to a response file, click Save.
To complete a successful installation, click Finish. The Finish
button is activated only if all mandatory configuration assistants
completed successfully. To rerun this session after resolving failed
configuration assistants, click Cancel.
For information about the user interface, see Installer User Interface (page 16-69).
4. Proceed to Complete the Post-Installation Tasks (page 16-70)..
Example 16-1 Language Pack Installation with no policy store translation
UNIX: $REPOSITORY_LOCATION/installers/fusionapps/Disk1/runInstaller -addLangs
-jreLoc APPLICATIONS_BASE/fusionapps/jdk
-invPtrLoc FA_ORACLE_HOME/oraInst.loc
-noCheckForUpdates OR -updatesDir installer_patch_directory
Example 16-2 Language Pack Installation with policy store translation
UNIX: $REPOSITORY_LOCATION/installers/fusionapps/Disk1/runInstaller -addLangs
-jreLoc APPLICATIONS_BASE/fusionapps/jdk
-invPtrLoc FA_ORACLE_HOME/oraInst.loc -DupdateJAZNPolicyStore=true
-noCheckForUpdates OR -updatesDir installer_patch_directory
Example 16-3 Language Pack installation when FA_ORACLE_HOME is
registered with a /net path
UNIX: $REPOSITORY_LOCATION/installers/fusionapps/Disk1/runInstaller -addLangs
-jreLoc APPLICATIONS_BASE/fusionapps/jdk
-invPtrLoc /net/APPLICATIONS_BASE/fusionapps/applications/oraInst.loc
-noCheckForUpdates OR -updatesDir installer_patch_directory
16.14.3.2.1 Installer User Interface
Language Pack Installer provides a graphical user interface which allows to control
the behavior of the installer by the use of buttons, in cases where it encounters
a failure. Note that the behavior of these buttons may vary, depending on whether
it is a configuration assistant, or a step within a configuration assistant, that fails.
The behavior also depends on whether a configuration assistant is mandatory. All
mandatory configuration assistants must complete successfully before proceeding to
the next configuration assistant. For information about which configuration assistants
are mandatory, see Language Pack Installer Configuration Assistants (page 16-73).
Exit out of the installer in the event of a failure and restart from the point of failure.
If a non-mandatory configuration assistant fails, and the next configuration assistant
continues, restart the installer after it finishes the last configuration assistant. When
restarting, the installer retries all failed configuration assistants and steps.
An explanation of the usage of each button follows. Note that the buttons are available
only in GUI mode, not in silent mode.
• Abort Button
The Abort button allows to skip a failed configuration assistant or step within
a configuration assistant, and records the failure so it can be rerun when the
Chapter 16
Perform Optional Language Installations
16-69

installation is restarted. For mandatory configuration assistants, after aborting the
configuration assistant, the installer does not proceed and only the Cancel button
is enabled. Resolve the cause of the failure and start the installer from this failure
point. For non-mandatory configuration assistants, the installer proceeds to the
next configuration assistant after aborting the configuration assistant. This button
is enabled only after a failure.
• Cancel Button
The Cancel button allows to stop an installer session after the failure of a
mandatory action. This button is enabled only after a failure.
• Close Button
The Windows Close button allows to stop an installer session after a failure. This
is enabled only after a failure.
• Continue Button
The Continue button allows to skip a failed non-mandatory step within any
configuration assistant. The installer records the failure and then proceeds with the
next step within the configuration assistant. When this installer session is rerun,
the failed steps within the configuration assistant are attempted again.
Note that this button is enabled only for non-mandatory steps within a
configuration assistant.
• Next Button
The Next button allows to proceed to the next screen. This button is enabled only
when all configuration assistants complete successfully in the current screen.
• Retry Button
The Retry button allows to attempt to rerun a failed configuration assistant, or a
step within a configuration assistant. Use Retry when the cause of the failure is
identified the issue can be resolved during the current Language Pack Installer
session.
16.14.4 Complete the Post-Installation Tasks
Perform the following required manual steps after Language Pack Installer completes
successfully:
• Confirm Database Artifact Deployments Were Successful (page 16-70)
• Review Log Files for Errors or Exceptions (page 16-71)
• Run Health Checker for Post Installation Checks (page 16-71)
• Bounce All Servers and Verify the Status of Deployed Applications (page 16-71)
• Reload Custom Templates for BI Publisher Reports (page 16-72)
• Perform Steps in NLS Release Notes (page 16-72)
16.14.4.1 Confirm Database Artifact Deployments Were Successful
Confirm that all database artifact deployments were successful by reviewing the
Diagnostics report and log files. See Diagnostics Report in the Oracle Fusion
Applications Patching Guide.
Chapter 16
Perform Optional Language Installations
16-70

16.14.4.2 Review Log Files for Errors or Exceptions
Confirm there are no unresolved errors or exceptions in the log files. For
information about resolving errors, see Troubleshoot Language Pack Installer
Sessions (page 16-72).
16.14.4.3 Run Health Checker for Post Installation Checks
Run Health Checker to perform post installation checks directly from
APPLICATIONS_BASE
and from the primordial host by performing the following steps.
For information about the checks that Health Checker runs, see Post-Upgrade Tasks
Performed by Health Checker in the Oracle Fusion Applications Upgrade Guide.
1. Set the
APPLICATIONS_BASE
environment variable to point to the directory
that contains Oracle Fusion Applications. For example, if Oracle Fusion
Applications is installed in
/server01/APPLICATIONS_BASE/fusionapps
, then set
the
APPLICATIONS_BASE
environment variable to
/server01/APPLICATIONS_BASE
.
Examples follow:
UNIX:
setenv APPLICATIONS_BASE /server01/APPTOP/
2. Run Health Checker.
UNIX:
$APPLICATIONS_BASE/fusionapps/applications/lcm/hc/bin/hcplug.sh -manifest
$APPLICATIONS_BASE/fusionapps/applications/lcm/hc/config/
PostLanguagePackHealthChecks.xml
[-DlogLevel=log_level]
If any health checks fail, refer to the Health Checker log files and reports to find
the corrective actions to resolve the issue. The suggested corrective actions must be
run manually to fix the issue before proceeding with the upgrade. Then rerun Health
Checker to ensure all checks are successful. Optionally, use the -checkpoint true
option when Health Checker is restarted, so that only the failed plug-ins or the plug-ins
that did not run are executed.
Review the Health Checker log file or the HTML summary report to see if any errors
occurred that require corrective action. The log file and the HTML summary are
located in
APPLICATIONS_CONFIG/lcm/logs/release_version/healthchecker.
If the JAZN Conflicts check fails, refer to Resolve JAZN Conflicts Found by Health
Checker (page 16-79).
16.14.4.4 Bounce All Servers and Verify the Status of Deployed Applications
1. Bounce all servers using the
fastarstop
script bounce option. See Understand
the fastartstop Utility and its Syntax in the Oracle Fusion Applications
Administrator's Guide.
If more than one language in an environment are being installed, servers need to
be bounced only once at the end of installing all languages in that environment, to
minimize time spent bouncing servers.
2. Verify that all deployed applications are up and running. Check this from Fusion
Applications Control, or by reviewing the server side log files. See Access Fusion
Applications Control in the Oracle Fusion Applications Administrator's Guide.
Chapter 16
Perform Optional Language Installations
16-71

16.14.4.5 Reload Custom Templates for BI Publisher Reports
Follow this step if you have customized BI Publisher reports.
Reload custom templates for BI Publisher reports on Oracle-delivered BI Publisher
reports.
16.14.4.6 Perform Steps in NLS Release Notes
Perform any steps listed in Post-Installation Tasks in the Oracle Fusion Applications
NLS release notes.
16.14.5 Troubleshoot Language Pack Installer Sessions
This section the following topics related to troubleshooting Language Pack Installer
sessions.
• Log Directories for Language Pack Installer Tasks (page 16-72)
• Troubleshoot Failures During the Installation Phase (page 16-73)
• Language Pack Installer Configuration Assistants (page 16-73)
• General Troubleshooting During the Configuration Phase in Silent Mode
(page 16-75)
• General Troubleshooting During the Configuration Phase in GUI Mode (page 16-75)
• Recovering From a Language Pack Installer Session That Was Shut Down
(page 16-78)
• Troubleshoot Applying Middleware Patches (page 16-78)
• Troubleshoot Loading Database Components (page 16-78)
• Troubleshoot Deployment of Applications Policies (page 16-79)
• Troubleshoot Deployment of BI Publisher Artifacts (page 16-79)
• Resolve JAZN Conflicts Found by Health Checker (page 16-79)
• Installer Requirement Checks Fail (page 16-79)
• Language Pack Installer Fails Due To Thread Calls (page 16-79)
16.14.5.1 Log Directories for Language Pack Installer Tasks
The following table provides a list of log directories for Language Pack Installer tasks.
Table 16-5 Log Directories for Language Pack Installer Activities
Log directory name Description
INVENTORY_LOC/logs
Installation phase logs
APPLICATIONS_CONFIG/lcm/logs/11.1.11.x.0/
LanguagePack/language
Top level directory for Language
Pack Installer logs
Chapter 16
Perform Optional Language Installations
16-72

Table 16-5 (Cont.) Log Directories for Language Pack Installer Activities
Log directory name Description
APPLICATIONS_CONFIG/lcm/logs/11.1.11.x.0/
LanguagePack/language/configlogs
Top level log directory for
configuration assistants. A log
file exists for each configuration
assistant.
APPLICATIONS_CONFIG/lcm/logs/11.1.11.x.0/
LanguagePack/language/PatchManager_DBPatch
Log directory for the
Loading Database Components
configuration assistant
APPLICATIONS_CONFIG/lcm/logs/11.1.11.x.0/
LanguagePack/language/
PatchManager_ActivateLanguage
Log directory for the Activate
Language configuration assistant
APPLICATIONS_CONFIG/lcm/logs/11.1.11.x.0/
LanguagePack/language/soalogs
Log files from SOA Composite
activities
Note that SOA server logs are
located under respective domains.
For example, the SOA server
logs for Common Domain are
under
APPLICATIONS_CONFIG/
domains
/
hostname
/
CommonDomain/servers/
soa_server1/logs.
See
SOA Composite Log
Files in the Oracle Fusion
Applications Upgrade Guide.
16.14.5.2 Troubleshoot Failures During the Installation Phase
For information regarding troubleshooting failures during the language pack installation
phase, see Troubleshoot Other Potential Issues During the Upgrade in the Oracle
Fusion Applications Upgrade Guide.
16.14.5.3 Language Pack Installer Configuration Assistants
During the installation phase, Language Pack Installer copies all files from the
language pack to the appropriate locations, such as Oracle Fusion Middleware
home and Oracle Fusion Applications Oracle home. After the file copy is completed,
Language Pack Installer calls configuration assistants to perform the remaining tasks
required to update and deploy the artifacts included in the language pack. Language
Pack Installer supports parallel processing of certain configuration assistants to
improve performance. Parallel configuration assistants are organized by groups and
all configuration assistants in a group start running at the same time. The installer
proceeds to the next configuration assistant outside of the group, only after all parallel
tasks in a group complete successfully.
All mandatory configuration assistants must complete successfully before proceeding
to the next configuration assistant. See General Troubleshooting During the
Configuration Phase in Silent Mode (page 16-75) and General Troubleshooting During
the Configuration Phase in GUI Mode (page 16-75).
The following table provides a list of possible configuration assistants, including steps
within the configuration assistants. The Retry Behavior and Troubleshooting column
Chapter 16
Perform Optional Language Installations
16-73

describes what Language Pack Installer does after a configuration assistant fails and
the Retry button is selected or Language Pack Installer is restarted in silent mode. If
available, links are provided to relevant troubleshooting sections.
Table 16-6 Configuration Assistants Run by Language Pack Installer
Name Mandatory Description Retry Behavior and
Troubleshooting
Activate Language Yes Activates the language in the
database.
Runs Activate
Language again.
Preverification Yes Performs the following validation
checks:
• Policy Store
• Check for Number of DB
Workers
• Database Content Upload
• Taxonomy URL
• Flexfields
• LDAP Data (LDIF)
• SOA Resource Bundle
Runs failed steps.
Synchronize
Multilingual Tables
Yes Runs the Maintain Multilingual
Tables utility to maintain the tables
related to the newly activated
language. See Maintaining Multi-
lingual Tables in the Oracle Fusion
Applications Patching Guide.
Restart from failure.
Apply Middleware
Language Patches
Yes • Applies Language Repository
Patches
• Applies Language
Downloaded Patches, as
described in Download
Language Pack Software
(page 5-27).
Applies the failed
patches. See
Troubleshoot Applying
Middleware Patches
in the Oracle Fusion
Applications Upgrade
Guide.
Load Database
Components
Yes Uploads the database content
packaged in the language pack to
the database.
Runs failed
database commands.
See Troubleshoot
Loading Database
Components in
the Oracle Fusion
Applications Upgrade
Guide.
Update Language
Release Information
Yes Updates the language release
information in the
AD_LANGUAGES
table.
Starts from the
beginning of the task.
Chapter 16
Perform Optional Language Installations
16-74

Table 16-6 (Cont.) Configuration Assistants Run by Language Pack Installer
Name Mandatory Description Retry Behavior and
Troubleshooting
Deploy Applications
Policies (jazn-
data.xml)
Yes Performs the deployment of the
updated applications policies,
based on the selections during the
Policy Store Analysis task.
This task runs only in
case of choosing to override
the base English strings in
the policy store by using
the
-DupdateJAZNPolicyStore
option set to
true
when the
language pack is installed.
Deploys the
failed stripes.
See Troubleshooting
Deployment of
Applications Policies
in the Oracle Fusion
Applications Upgrade
Guide.
Deploy BI Publisher
Artifacts
Yes Using Catalog Manager, deploys
BI Publisher artifacts.:
Starts from the
beginning of the task.
See Troubleshooting
Deployment of BI
Publisher Artifacts
(page 16-79).
Deploy Flexfields No Deploys flexfields to the domain
that hosts the
FndSetup
application.
Starts from the
beginning of the task.
Deploy LDAP Data
(LDIF)
Yes Uploads LDIF XLIFF translations
to the identity store
Retries failed XLIFF
files.
Deploy SOA
Resource Bundles
Yes Deploys SOA Resource Bundles
to the corresponding SOA servers.
Deploys failed SOA
resource bundles.
Activate SOA
Language
Yes Runs the SOA Human Workflow
configuration script to activate the
language of the language pack.
Starts from the
beginning of the task.
16.14.5.4 General Troubleshooting During the Configuration Phase in Silent
Mode
The installer can be restarted to rerun all failed configuration tasks as well as
those tasks that were not started from the previous session. When a mandatory
configuration task or step fails in silent mode, the installer exits. After resolving the
issue that caused the failure, restart the installer using the same command used to
start it. When the installer restarts, it restarts from the first failed task.
If any non-mandatory tasks fail in silent mode, the installer continues with the next
configuration task and does not exit. Review the logs to find any non-mandatory tasks
that failed and then rerun the installer until all tasks complete successfully.
If the installer is run in GUI mode, start it from the
REPOSITORY_LOCATION/installers/
fusionapps/Disk1
directory.
16.14.5.5 General Troubleshooting During the Configuration Phase in GUI
Mode
This section describes the following troubleshooting scenarios:
Chapter 16
Perform Optional Language Installations
16-75

• Restart a Failed Installer Session (page 16-76)
• Troubleshoot Failures While Parallel Tasks Are Running (page 16-76)
• The Next Button Is Not Enabled During Configuration Assistants (page 16-77)
• The OPSS Security Store Goes Down While the Installer is Running (page 16-77)
• Failure During Opening of Wallet Based Credential Store (page 16-77)
• Error While Loading Database Components in GUI Mode (page 16-78)
16.14.5.5.1 Restart a Failed Installer Session
The installer can be restarted to rerun all failed configuration assistants as well as
those configuration assistants that were not started from the previous session. When
a configuration assistant or step fails, the Configuration Progress screen displays the
location of the log file and the exception that caused the failure. View the content of the
log files that appear at the bottom of the screen to obtain detailed information to assist
in diagnosing the cause of the failure.
If one or more failures occur during the configuration phase, after the final
configuration assistant is complete, the following message displays:
Configuration is completed with errors, exit the installer by clicking the 'Cancel'
button and retry the failed configurations.
Perform the following steps to rerun the installer and retry the failed configuration
assistants:
1. Click Cancel to exit the installer.
2. Resolve the issues that caused the failure.
3. Start the installer using the same command syntax used for the previous
incomplete installation.
4. A pop up dialog displays, asking to continue or not the previous incomplete
installation. Select Yes to continue running the previous session. If No is selected,
the installer starts from the beginning and it fails, indicating that a release cannot
be installed again in the same environment. Restore then from the backup and
restart the installer.
5. The Configuration Progress screen displays only the failed and remaining
configuration assistants, and then runs these configuration assistants.
6. Assuming all configuration assistants complete successfully, click Next to go to
the Installation Complete screen and then click Finish to end the session. If a
configuration assistant fails again and to attempt to run the session again, click
Cancel to save the session. If all configuration assistants completed successfully,
click Finish to end the session.
16.14.5.5.2 Troubleshoot Failures While Parallel Tasks Are Running
If one or more tasks in a group fail, select the failed tasks in any combination, and
the Abort, Retry, and Continue buttons are enabled as appropriate for the selected
tasks. For example, if two tasks in a group fail, and the first task allows to select
Continue, but the other task does not, then the Continue button is not enabled if both
tasks are selected.
Process one or more failed tasks at a time. For example, if three tasks fail, retry
one of them, and abort the second task while it is running. Then, retry the third task.
Chapter 16
Perform Optional Language Installations
16-76

When the first and third tasks finish processing, the next step depends on whether
the second task is mandatory. If it is a mandatory task, the installer stops, and if
it is non-mandatory the installer continues with the next task after the group. It is
also possible to pick two out of three or all three tasks and select Retry, Abort, or
Continue, based on which buttons are enabled.
Note that all tasks in a group must either fail or complete successfully before the
Cancel button is enabled.
16.14.5.5.3 The Next Button Is Not Enabled During Configuration Assistants
Problem
On the Configuration Progress page of the installer, the Next button is enabled only
when all configuration assistants are successful.
If all the configuration assistants are complete, and the Next button is not enabled,
then a configuration failure has been encountered and continued to the next
configuration assistant.
Solution
In this case, retry the failed configuration assistants by following these steps:
1. On the Configuration Progress page of the installer, click Cancel.
2. Restart the installer. All failed configuration assistants or steps rerun upon restart.
See Restart a Failed Installer Session (page 16-76).
As long as a configuration assistant is not successful, the Next button remains
disabled. It may be necessary to repeat the cancel and retry procedure until all
configuration assistants are successful.
16.14.5.5.4 The OPSS Security Store Goes Down While the Installer is Running
Problem
The OPSS Security Store goes down while the installer is running.
Solution
Configuration tasks that are related to the OPSS Security Store fail if the store goes
down. Perform the following steps to recover:
1. Abort the failed configuration task.
2. Select Cancel to end the installer session.
3. Start the OPSS Security Store. See Start Oracle Internet Directory in the Oracle
Fusion Applications Upgrade Guide.
4. Start a new installer session. The installer resumes with the remaining tasks
because Cancel is selected, which saves the session.
16.14.5.5.5 Failure During Opening of Wallet Based Credential Store
Problem
The following error occurs during the configuration phase.
Chapter 16
Perform Optional Language Installations
16-77

Reason:oracle.security.jps.service.credstore.CredStoreException: JPS-01050:
Opening of wallet based credential store failed.
Reason java.io.IO Exception: PKI-02002: Unable to open the wallet. Check
password.
Solution
After resolving the cause of the failure, cancel the installation and then restart the
installer.
16.14.5.5.6 Error While Loading Database Components in GUI Mode
Problem
Language Pack Installer reports that one or more database workers failed during the
Loading Database Components configuration assistant.
Solution
Use AD Controller to manage the failed workers. After resolving the issue that caused
the workers to fail and restarting the failed worker, click OK in the dialog box and
Language Pack Installer continues processing. See Troubleshoot Patching Sessions
for Database Content in the Oracle Fusion Applications Patching Guide.
16.14.5.6 Recover From a Language Pack Installer Session That Was Shut
Down
Problem
A Language Pack Installer session was shut down during the upgrade.
Solution
If tasks spawned by Language Pack Installer are killed in the middle of any process,
the system may not be in a recoverable state and the state should be carefully
reviewed by Oracle Support before proceeding.To recover from this situation, restore
the backup of
APPLICATIONS_BASE
and start from the beginning of the language pack
installation.
16.14.5.7 Troubleshoot Applying Middleware Patches
For information about troubleshooting a failure that occurs during the Applying
Middleware Patches configuration assistant, see Troubleshoot Applying Middleware
Patches in the Oracle Fusion Applications Upgrade Guide.
16.14.5.8 Troubleshoot Loading Database Components
For information about troubleshooting a failure that occurs during the Loading
Database Components configuration assistant, see Troubleshoot Loading Database
Components in the Oracle Fusion Applications Upgrade Guide.
Chapter 16
Perform Optional Language Installations
16-78

16.14.5.9 Troubleshoot Deployment of Applications Policies
For information about troubleshooting failures during the Deployment of Applications
Policies configuration assistant, see Troubleshooting Deployment of Applications
Policies in the Oracle Fusion Applications Upgrade Guide.
16.14.5.10 Troubleshoot Deployment of BI Publisher Artifacts
Problem
The following error occurs if the BI Presentation servers are running during the
deployment of BI Publisher artifacts:
java.lang.RuntimeException: Webcat patch file creation failed!
Solution
If the language pack contains BI Publisher artifacts, the BI Presentation servers must
not be running. To resolve this issue, shut down the BI Presentation servers to release
locks on the Oracle BI Presentation Catalog. See fastartstop Syntax in the Oracle
Fusion Applications Administrator's Guide.
16.14.5.11 Resolve JAZN Conflicts Found by Health Checker
This step is performed by Health Checker only if the
-DupdateJAZNPolicyStore
option
is set to true.
Health Checker checks the JAZN Analysis reports for potential conflicts and deletions
that are not patched automatically by Language Pack Installer.
16.14.5.12 Installer Requirement Checks Fail
Problem
The installer fails with the following type of errors:
Starting Oracle Universal Installer...
Checking if CPU speed is above 300 MHz.
Checking Temp space: must be greater than 4096 MB. Actual 9177 MB Passed
Checking swap space: 3915 MB available, 4000 MB required. Failed <<<<
Some requirement checks failed. You must fulfill these requirements before
continuing with the installation,
Solution
Manually increase the requirement check that failed, in this example, the swap space.
Then restart Language Pack Installer.
16.14.5.13 Language Pack Installer Fails Due To Thread Calls
Problem
Language Installer fails due to thread calls and reports errors similar to the following
example:
Chapter 16
Perform Optional Language Installations
16-79

"Thread-11" id=29 idx=0x98 tid=25751 prio=5 alive, native_blocked
at java/io/UnixFileSystem.getBooleanAttributes0(Ljava/io/File;)I(Native
Method)
at java/io/UnixFileSystem.getBooleanAttributes(UnixFileSystem.java:228)
at java/io/File.exists(File.java:733)
Solution
Restart Language Pack Installer.
16.15 Set Up Segregation of Duties
When a role assignment is requested through Oracle Identity Management, it needs
to check with the Application Access Controls Governor to see if there are any
segregation of duties (SOD) violations. If Application Access Controls Governor
reports any SOD violations, depending on the violation or access issues, Oracle
Identity Manager needs to send the request for an approval to specific roles,
automatically approve the request, or reject the request.
16.15.1 Set Up SOD
To set up SOD, complete the following procedures.
1. Ensure that the following configuration requirements are met:
• Set up an Application Access Controls Governor server
• Set up the Oracle Fusion connector
• Define a data source
• Update the Application Access Controls Governor server details in Identity
Manager
Perform all the setup tasks only from the Identity Manager domain.
2. To manually switch from Oracle Identity Management to Lightweight Directory
Access Protocol (LDAP) as the source of user roles for Service-Oriented
Architecture (SOA) server deployed with Identity Manager, perform the following
configuration steps.
This step is applicable only to the environments set up with Oracle
Identity Management and Oracle Access Management integration, and LDAP
synchronization of users and roles enabled in Oracle Identity Manager.
a. Log in to the Enterprise Manager Console as a Weblogic_Administrator user.
b. Access the Weblogic Domain in which Identity Manager is configured.
c. Open the Security - Realms page.
d. On the Providers tab of the Security - Realms page, open OIDAuthenticator.
e. In the provider specific parameters for
OIDAuthenticator
, update the Oracle
Virtual Directory port with the Oracle Internet Directory port by changing the
value of the port from Oracle Virtual Directory port to Oracle Internet Directory
port.
f. On the Providers tab of the security realm settings page, create a new
authentication provider with the name OIMSignatureAuthenticationProvider
and the type OIMSignatureAuthenticationProvider.
Chapter 16
Set Up Segregation of Duties
16-80

g. Configure
OIMSignatureAuthenticationProvider
with the following
parameters:
DBDriver: oracle.jdbc.OracleDrive
DBUrl: jdbc:oracle:thin:@<db_hostname>:<db_port>:<db_sid>
.
For example, jdbc:oracle:thin:@localhost:5521:iam4
.
PKIKeystore Provider: sun.security.rsa.SunRsaSign
Symmetric Key Keystore Provider: com.sun.crypto.provider.SunJCE
DBUser: the Identity Manager database schema user name
DBPassword: the Identity Manager database schema user password
These parameters as same as in
OIMAuthenticationProvider
.
h. Delete the existing
OIMSignatureAuthenticator
.
i. Reorder authentication providers into the following sequence:
OAMIDAsserter
OIMSignatureAuthenticationProvider
OIMAuthenticationProvider
OIDAuthenticator
DefaultAuthenticator
DefaultIdentityAsserter
IDMDomainAgent
j. Disable the Weblogic user profile in Identity Manager.
This user profile must be disabled to avoid the authentication errors at
Identity Manager Authenticator level, as Identity Manager Authenticator is
now placed ahead of the Default Authenticator in authentication provider
ordering. However, the user profile cannot be disabled from Identity Manager
Administration page. Instead, run the following SQL scripts on the OIM
database.
update usr set usr_status='Disabled' where usr_login='WEBLOGIC';
update usr set usr_disabled=1 where usr_login='WEBLOGIC';
k. Create the Weblogic user profile in LDAP and add it to the Administrators
role. If the Administrators role does not exist in LDAP, create it first and then
add the Weblogic user profile to it.
A user can be created in LDAP by creating an LDAP Data Interchange Format
(LDIF) file and using the ldapadd command.
l. In the jps-config.xml file, locate the element group
<jpsContext
name="default">
.
m. Under
<jpsContext name="default">
, locate the identity store element
<serviceInstanceRef ref="idstore.oim"/>
, replace its value with
idstore.ldap
and save the file.
n. Restart all servers in the domain, including the Administration Server.
Chapter 16
Set Up Segregation of Duties
16-81

3. Administer role memberships using the Delegated Administration tasks in Oracle
Identity Manager. To apply SOD checks on these administrative actions, configure
the following Identity Manager system properties.
• Set
XL.RM_REQUEST_ENABLED
to
TRUE
• Set
XL.RM_ROLE_ASSIGN_TEMPLATE
to
ASSIGN ROLES WITH CALLBACK POLICY
16.15.2 Turn Off SOD Checks
To turn off the SOD checks, do the following.
1. Log in as an Administrator to the Enterprise Manager application for Oracle
Identity Manager server.
2. Navigate to the system MBean browser for the Identity Manager server.
3. Locate
OAACGConfig MBean
option.
4. Set the property
SODEnabled
to
False
and save.
5. Log in to the Identity Manager's advanced console and set the system property
XL.RM_REQUEST_ENABLED
to
False
.
6. Restart the Identity Manager server.
To turn on the SOD checks, set the properties
SODEnabled
and
XL.RM_REQUEST_ENABLED
to
True
.
16.15.3 Modify the Segregation of Duties Routing Policies for
Approving Role Provisioning: Procedures
When an access control necessitates an approval, the predefined routing rules
determine the approver for a role provisioning request. These rules are defined in the
OAACGRoleAssignSODCheck
composite because of Approval Management Extensions
(AMX) functionality such as Supervisory List.
The following rules are used to route the request to the suitable role.
• If the requested role assignment is of Chief Financial Officer, SOD remediation
task is assigned to the IT Security Manager role.
• If SOD violation occurs because of a policy where the SOD control perspective
is Business Process - Information Technology Management and the control
priority is 1, SOD remediation task is assigned to the Application Administrator
role.
• If SOD violation occurs for any other reason (Catch All rule), SOD remediation
task is assigned to the Controller role.
To modify these routing rules, do it in two ways:
• Using Oracle SOA Composer
• Using JDeveloper
16.15.4 Modify Rules Using Oracle SOA Composer
Use the Oracle SOA Composer associated with the SOA server used by Oracle
Identity Management, and change the
RemediationRules
ruleset associated with
Chapter 16
Set Up Segregation of Duties
16-82

OAACGRoleAssignSODCheck
composite. For instance, to shift the task assignment in
the Catch All rule from the Controller role to a different role.
1. Log in to the Oracle SOA Composer.
2. Click Open - Open Task.
3. Select OAACGRoleAssignSODCheck and click Open.
4. On the ApprovalTaskRules.rules tab, click Edit.
5. Expand Catch All and in the THEN statement, replace
GL_CONTROLLER_JOB
with
the new role.
6. Save the changes.
16.15.5 Modify Rules Using JDeveloper
Modifications can be made directly to the configuration file available within
OAACGRoleAssignSODCheck.zip
.
To perform this task, administrative privileges or the role of an Administrator are
necessary.
1. Go to IDM_BASE/products/app/oim
/server/workflows/composites/
and extract
the contents of OAACGRoleAssignSODCheck.zip to a directory.
2. Open the application in JDeveloper. See the routing rules in the ruleset
RemeditationRules
of the
ApprovalTaskRules.rules
file, where the following
SOD related information is available for configuring the rules as part of the task
payload element
oaacgResponse
.
• hasIssues: Acceptable values are:
– TRUE: Authorization issues exist but can be remedied
– FALSE: No authorization issues
– REJECT: Authorization issues exist but cannot be remedied; request has
to be rejected
• dimensions: List of dimensions and tags that are defined on the controls
related to the authorization issues
• requestedRoles: List of roles that are requested as part of this request
• existingRoles: List of existing role memberships for the user
• authIssues: List of Oracle Governance, Risk and Compliance Controls Incident
IDs and the following additional details. This information is subsequently
required to notify the approval decision.
– ctrlPriority: Priority of the Oracle Applications Access Control Governor
control that resulted in the authorization issue
– ctrlName: Name of the SOD policy
– userName: User profile to which the authorization issue belongs
– roleName: Role associated with the authorization issue
– sodStatus: Approval status of the request indicating whether the request
is approved by Governance, Risk and Compliance Controls, or approved
with conditions, or rejected
Chapter 16
Set Up Segregation of Duties
16-83

– issuePath: Information about the entity on which the SOD policy is defined
After the rule modifications, update the following values in the
OAACGRoleAssignSODCheck_cfgplan.xml
configuration plan file.
Value Description
@oimT3URL
The OIM server t3 URL
@oimServerHost
The OIM server host name
@oimServerPort
The OIM server port number
Thereafter, deploy the modified composite with this updated configuration plan file.
16.15.6 Troubleshoot Segregation of Duties for Role Provisioning:
Procedures
The following scenarios may require troubleshooting measures to ensure successful
completion of segregation of duties (SOD) checks and approval of role provisioning
requests.
16.15.7 Failure of Role Assignment Request
The role assignment request fails and the request gets the Request Failed status. To
troubleshoot this, do the following:
1. Log in to the Oracle Identity Management domain in Enterprise Manager.
2. On the home page, under (Service Oriented Architecture), click
OAACGRoleAssignSODCheck composite.
3. Under Recent Instances, click the latest instance and look for any error message
or description of failure of request.
4. Check if the Application Access Controls Governor server information provided in
Oracle Identity Manager is correct.
5. On the left pane, click IDM domain and from the context menu select System
Mbean Browser.
6. Under Application Defined Mbeans, navigate to
oracle.iam
and select the OIM
server and Application OIM.
7. Expand XML Config - Config - XMLConfig.OAACGConfig and select
OAACGCOnfig.
8. Ensure that the attribute values used in Host, Port, DataSourceName, Service
URL, and UserName are correct. To modify any incorrect information, on the
Operations tab, click
updateOAACGConfigInformation
method, and provide the
following parameters.
Parameter
Description
host Application Access Controls Governor host name or IP
address
port Application Access Control Governor port
Chapter 16
Set Up Segregation of Duties
16-84

Parameter Description
username Admin username
password Admin password
serviceURL Application Access Control Governor service URL
Note
Ensure that there is a forward slash at the end of the URL.
The URL must be in the format /grcc/services/GrccService/.
DatasourceName Data source name of the Oracle Fusion connector that is
configured in Application Access Control Governor
9. After saving the modifications, restart the Oracle Identity Management server.
16.15.8 Task Details Missing
If the task details of the assigned task are not found, perform the following checks to
troubleshoot.
1. Ensure that the taskflow is deployed on the SOA server.
a. Log in to the Weblogic console.
b. On the left side, under the menu, click Deployments.
c. Ensure that TaskDetails application is deployed to SOA server and its state is
Active.
2. Ensure that the predefined Admin user in Oracle Identity Management (OIM) is
available in the Oracle Credential Store Framework (CSF), do the following:
a. Log in to Oracle Identity Management domain in Enterprise Manager.
b. On the left pane, click Identity Management domain and from the context
menu, select Security - Credentials.
c. Expand OIM and check for the key entry
sysadmin
.
d. Select the entry and click Edit to view the details.
e. Ensure that the user name is set to
xelsysadm
.
If these steps do not help, refer to the generic troubleshooting tips associated with
Oracle Identity Manager.
For generic information about troubleshooting OIM, see Troubleshoot Oracle Identity
Management in the Oracle Fusion Applications Administrator's Guide.
16.15.9 Configure Oracle Data Integrator Studio for External
Authentication: Explained
Configuring Oracle Data Integrator Studio for external authentication is necessary to
prevent any unauthorized access. The access credentials are stored in a configuration
file. To make the external configuration work, the jps configuration file (jps-config.xml)
must be configured and placed in the prescribed directory where the application is
installed.
Chapter 16
Set Up Segregation of Duties
16-85

16.15.10 Prerequisites
To configure Oracle Data Integrator Studio, ensure that the following selections were
made in the Oracle Data Integrator installation wizard:
• Developer Installation options on the Select Installation Type page:
– ODI Studio (with local agent)
– ODI SDK
• Skip Repository Configuration on the Repository Configuration page
Oracle Data Integrator Studio must be installed in a separate Oracle home other
than Oracle Fusion Middleware Oracle homes and Oracle Fusion Applications Oracle
home.
16.15.11 Configuration for ESS
In the
<APPLICATIONS_BASE/fusionapps/odi>/oracledi/client/odi/bin
directory,
access the file
odi.conf
and update the parameter
AddVMOption -
Doracle.odi.studio.ess=true
. This enables ESS configuration properties to be
visible in Topology.
16.16 Configure Presence Servers
For an on-premise installation of Oracle Fusion Applications, Microsoft Office
Communication Server (OCS) 2007 or Microsoft Live Communication Server (LCS)
can be optionally used as the presence server. The setup involves creating external
application connections, and instant messaging and presence connections, to OCS or
LCS for each Oracle Fusion application.
Prerequisites for OCS or LCS need also to be set up.
This table lists the Java EE applications that can be configured with OCS or LCS.
Product Family or Product Java EE Application Name
Oracle Fusion Application
Customer Relationship
Management
• ContractManagementApp
• CrmCommonApp
• CrmPerformanceApp
• CustomerApp
• MarketingApp
• OrderCaptureApp
• SalesApp
Oracle Fusion Applications
Human Capital Management
• HcmBenefitsApp
• HcmCompensationApp
• HcmCoreApp
• HcmCoreSetupApp
• HcmPayrollApp
• HcmTalentApp
Oracle Fusion Applications
Projects
ProjectFinancialsApp
Chapter 16
Configure Presence Servers
16-86

Product Family or Product Java EE Application Name
Oracle Fusion Application
Toolkit
HomePageApp
For each application, execute the following commands against the appropriate
domain:
•
createExtAppConnection
•
addExtAppField
•
createIMPConnection
Replace placeholder values enclosed within brackets (< >) with real values, for the
appName, url, poolName, userDomain, and server fields.
• For the appName field, enter the Java EE application name, for example
HcmBenefitsApp.
• The userDomain field is required only for the OCS connection and refers to the
user domain associated with the OCS installation.
• For the server field, enter the managed server name on which the Java EE
application is deployed. This field is optional if there is only one managed server
for the application.
16.16.1 createExtAppConnection
Execute this command:
createExtAppConnection(appName='<JavaEEApp>', name='IMP_EXT_APP',
displayName='Presence Server Login Credentials')
The appName field is environment specific and requires to enter a value.
16.16.2 addExtAppField
Execute this command:
addExtAppField(appName='<JavaEEApp>', name='IMP_EXT_APP',
fieldName='Account', fieldValue='', displayToUser=1)
The appName field is environment specific and requires to enter a value.
16.16.3 createIMPConnection
If Oracle Fusion Applications is deployed in a high availability configuration, there
may be multiple managed servers targeted for each Java EE application. The
createIMPConnection command must be run for each application on each server, and
specify the server in the server field.
If the LCS adapter is used, then execute this command:
createIMPConnection(appName='<JavaEEApp>', name='presence',
adapter='LCS', url='<http://host:port/contextPath>', appId='IMP_EXT_APP',
poolName='<poolNameHere>', timeout=60, default=1,
server='<managedServerName>')
Chapter 16
Configure Presence Servers
16-87

If the OCS adapter is used, then execute this command:
createIMPConnection(appName='<JavaEEApp>', name='presence',
adapter='OCS2007', url='<http://host:port/contextPath>',
appId='IMP_EXT_APP', userDomain='<example.com>',
poolName='<poolNameHere>', timeout=60, default=1,
server='<managedServerName>')
These fields are environment specific and require to enter a value:
• appName
• adapter (OCS2007 or LCS)
• url
• poolName
• default (1 or 0)
The connection is not used unless this field is set to 1. If 0 is used, then essentially
disable the connection.
• server
16.17 Configure Audit Trails for Oracle Fusion Middleware
The Oracle Fusion Middleware Audit Framework is a new service in Oracle Fusion
Middleware 11g, designed to provide a centralized audit framework for the middleware
family of products. The framework provides audit service for platform components
such as Oracle Platform Security Services (OPSS) and Oracle Web Services. It also
provides a framework for JavaEE applications, starting with Oracle's own JavaEE
components. JavaEE applications will be able to create application-specific audit
events. For non-JavaEE Oracle components in the middleware, such as C or JavaSE
components, the audit framework also provides an end-to-end structure similar to
that for JavaEE applications. For Oracle Fusion Applications, several Oracle Fusion
Middleware products such as Oracle Data Integrator (ODI), Business Intelligence
Publisher (BIP), Oracle Platform Security Services (OPSS), Oracle Web Service
Management (OWSM), Oracle Business Intelligence Enterprise Edition (OBIEE), and
Meta Data Services (MDS) leverage audit trails capability.
Figure 16-4 (page 16-89) is a high-level architectural diagram of the Oracle Fusion
Middleware Audit Framework.
Chapter 16
Configure Audit Trails for Oracle Fusion Middleware
16-88
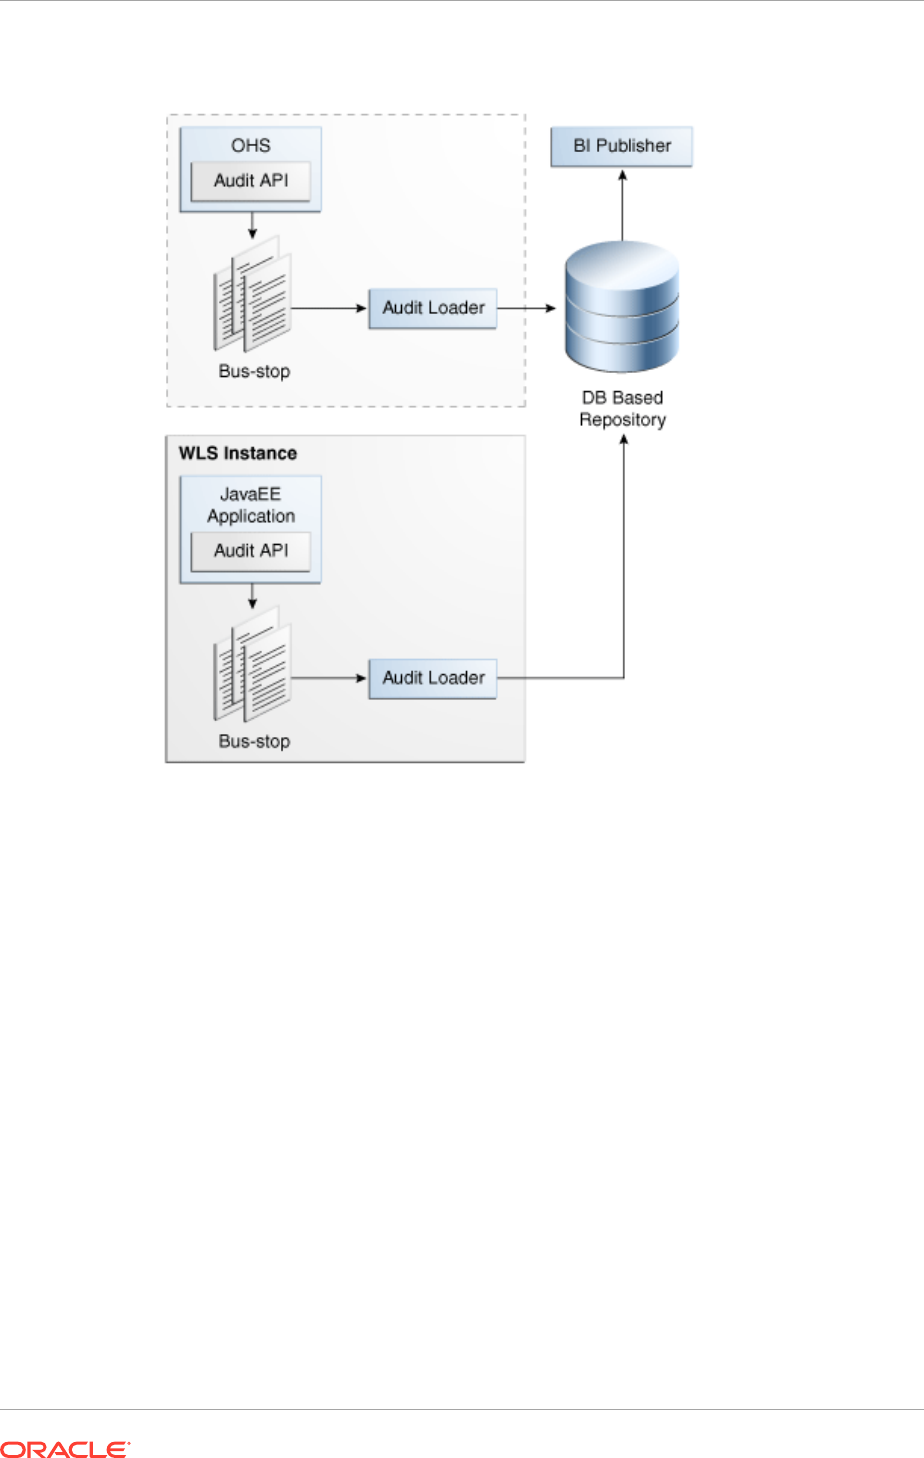
Figure 16-4 Audit Event Flow
The Oracle Fusion Middleware Audit Framework consists of the following key
components:
• Audit APIs: These are APIs provided by the audit framework for any audit-aware
components integrating with the Oracle Fusion Middleware Audit Framework.
During run time, applications may call these APIs, where appropriate, to audit the
necessary information about a particular event happening in the application code.
The interface allows applications to specify event details such as user name and
other attributes needed to provide the context of the event being audited.
• Audit Events and Configuration: The Oracle Fusion Middleware Audit
Framework provides a set of generic events for convenient mapping to application
audit events. Some of these include common events such as authentication. The
framework also allows applications to define application-specific events.
These event definitions and configurations are implemented as part of the audit
service in Oracle Platform Security Services. Configurations can be updated
through Enterprise Manager (UI) and WebLogic Scripting Tool (WLST) command-
line tool.
• Audit Bus-stop: Bus-stops are local files containing audit data before they are
pushed to the audit repository. In the event where no database repository is
configured, these bus-stop files can be used as a file-based audit repository. The
bus-stop files are simple text files that can be queried easily to look up specific
Chapter 16
Configure Audit Trails for Oracle Fusion Middleware
16-89

audit events. When a DB-based repository is in place, the bus-stop acts as an
intermediary between the component and the audit repository. The local files are
periodically uploaded to the audit repository based on a configurable time interval.
• Audit Loader: As the name implies, the audit loader loads the files from the audit
bus-stop into the audit repository. In the case of platform and JavaEE application
audit, the audit loader is started as part of the JavaEE container start-up. In the
case of system components, the audit loader is a periodically spawned process.
• Audit Repository: The audit repository contains a predefined Oracle Fusion
Middleware Audit Framework schema, created by Repository Creation Utility
(RCU). When configured, all the audit loaders are aware of the repository and
upload data to it periodically. The audit data in the audit repository is expected to
be cumulative and will grow over time. Ideally, this should not be an operational
database used by any other applications; rather, it should be a standalone
RDBMS used for audit purposes only. In a highly available configuration, Oracle
recommends to use an Oracle Real Application Clusters (RAC) database as the
audit data store.
• Oracle Business Intelligence Publisher: The data in the audit repository is
exposed through predefined reports in Oracle Business Intelligence Publisher. The
reports allow users to drill down the audit data based on various criteria. For
example:
– User name
– Time range
– Application type
– Execution context identifier (ECID)
The enterprise deployment topology does not include Oracle Fusion Middleware Audit
Framework configuration. The ability to generate audit data to the bus-stop files and
the configuration of the audit loader will be available after the products are installed.
The main consideration is the audit database repository where the audit data is stored.
Because of the volume and the historical nature of the audit data, it is strongly
recommended that customers use a separate database from the operational store
or stores being used for other middleware components.
16.18 Install Print Servers
Print servers must be installed for external applications as part the implementation
activity in Oracle Fusion Applications.
This task is not applicable to Oracle Cloud implementations.
16.18.1 External Applications
Several external applications require specialized print servers. See the related product
documentation for installing print servers for these applications.
• Oracle Business Intelligence Financial Reporting Studio and Financial Reporting
Print Server.
• Primavera P6 Enterprise Project Portfolio Management.
Chapter 16
Install Print Servers
16-90

16.19 Configure Oracle HTTP Server for Privileged Port
(UNIX Only with No Load Balancer)
A secondary Oracle HTTP server needs to be added to the Oracle Fusion Applications
environment to effectively handle the load and improve the application performance.
Before proceeding with the installation of the secondary HTTP server, ensure that the
following prerequisites are met.
• Availability of a free slot to install the secondary HTTP server.
Usually, the secondary HTTP server is installed on the same slot as the primary
HTTP server. In such cases, the webgate used by the primary HTTP server can
be used by the secondary HTTP server. However, if the secondary HTTP server is
not installed on the same slot as the primary HTTP server, the webgate used by
the primary HTTP server is not accessible by the secondary HTTP server. In that
case, a separate webgate needs to be installed for the secondary HTTP server.
• Set up a directory structure similar to the directory structure of the primary HTTP
server. The directory structure of the primary HTTP server is as follows.
First OHS mw home: /slot/ems5905/appmgr/APPLICATIONS_BASE/webtier_mwhome
First OHS OH: webtier
First OHS instance dir: /slot/ems5905/appmgr/APPLICATIONS_BASE/instance/
CommonDomain_webtier/
First OHS component name: ohs1
First OHS bin dir: /slot/ems5905/appmgr/APPLICATIONS_BASE/instance/
CommonDomain_webtier/bin
First OHS config dir: /slot/ems5905/appmgr/APPLICATIONS_BASE/instance/
CommonDomain_webtier/config/OHS/ohs1/moduleconf
On the same lines, a directory structure can be defined for the secondary HTTP
server as shown here:
Second OHS mw home: /slot/ems5905/appmgr/APPLICATIONS_BASE/webtier_mwhome2
Second OHS OH: webtier2
Second OHS instance dir: /slot/ems5905/appmgr/APPLICATIONS_BASE/instance/
CommonDomain_webtier2
Second OHS component name: ohs2
16.20 Use Default Oracle Database Vault Schemas
This is an optional step. If Oracle Database Vault is intended to be used, use
only the default Oracle Database Vault Owner (DVOWNER) and Oracle Database
Vault Account (DVACCTMGR) schemas. Custom schemas are not allowed for using
Oracle Database Vault. This ensures future smooth migration to Oracle Software As A
Service.
16.21 Next Steps
For more information about scale out and server migration for Oracle Fusion
Applications, go to Complete Conditional Common High Availability Post-Installation
Tasks for Oracle Identity Management (page 17-1). Otherwise, go to the section that
corresponds to the product offering that is installed.
Chapter 16
Configure Oracle HTTP Server for Privileged Port (UNIX Only with No Load Balancer)
16-91

17
Complete Conditional Common High
Availability Post-Installation Tasks for
Oracle Identity Management
This section describes the conditional common high availability post-installation tasks
for Oracle Identity Management that must be reviewed and completed as required.
This section contains the following topics:
• Introduction to Completing Conditional Common High Availability Post-Installation
Tasks for Oracle Identity Management (page 17-1)
• Scale Identity Management (page 17-1)
• Set Up Server Migration for Identity Management (page 17-44)
• Set Up Fail Over for the Administration Server (page 17-51)
• What to Do Next (page 17-55)
17.1 Introduction to Completing Conditional Common
High Availability Post-Installation Tasks for Oracle Identity
Management
After having successfully completed the conditional common post-installation tasks
review and perform the following conditional common high availability tasks.
Some components in the Oracle Fusion Applications environment are dependent on
one another. Therefore, it is important to start and stop components in the proper
order. In the course of normal IT operations, common operations include shutting
down computers and starting them back up. Therefore, it is crucial to start and stop
Oracle Fusion Applications in a sequential manner. See Start and Stop an Oracle
Fusion Applications Environment in the Oracle Fusion Applications Administrator's
Guide.
17.2 Scale Identity Management
The Identity Management topology is highly scalable. It can be scaled up and/or
scaled out. This section explains how to do so.
To scale up the topology, add a new component instance to a node already running
one or more component instances.
To scale out the topology, add new component instances to new nodes.
17-1

17.2.1 Scale Up the Topology
The Oracle Identity Management topology described in the guide has three tiers: the
Directory Tier, Application Tier and Web Tier. The components in all the three tiers can
be scaled up by adding a new server instance to a node that already has one or more
server instances running. The procedures described in this section show how to create
a new managed server or directory instance.
17.2.2 Scale Out the Topology
Scale out a topology by adding new components to new nodes. The components in all
three tiers of the Oracle Identity Management topology described in this section can be
scaled out by adding a new component instance to a new node.
17.2.3 Scale Out the Database
The process of scaling out the Oracle Identity Management database involves
installing new database instances, which is not described in this guide. The following
steps assume that Real Application Clusters (RAC) is used and that the additional
database instances have already been configured. For more information about RAC,
see Install Oracle Database (page 7-4).
Oracle Identity Management components interface with the database using WebLogic
Datasources. In systems that use Oracle RAC, Data sources are configured as Multi
Datasources in Identity Management. A multi datasource is made up of several
child datasources, one for each RAC database Instance. The Identity Management
Applications interface with the RAC database by accessing the parent multi data
source. If a new database instance is added, then create new datasources for each of
the existing multi datasources and then add the new data source into the pre-existing
multi data source. Because different applications use different datasources, add the
database to each data source that is using the database.
To do this perform the following steps:
1. Log In to the WebLogic console using the URL:
http://admin.mycompany.com/
console
2. Select Services, then Messaging, then Data Sources from the Domain Structure
window.
3. Click on a Data Source which has an ID of the type Multi
4. Click on the Targets tab and make a note of what targets the multi data source is
assigned to.
5. Click on the Configuration tab and the Data Sources subtab. The chosen box
shows what Data sources are currently part of the multi datasource.
6. Select Services, then Messaging, then Data Sources from the Domain Structure
window.
7. This time click on one of the data sources that are currently part of the multi
datasource.
8. Make a note of the following attributes. (The example shown is the data source
EDNDDatasource-rc0, which is part of the multi data source EDNDatasource.)
General Tab
Chapter 17
Scale Identity Management
17-2

JNDI Name: for example,
jdbc/EDNDatasource-rc0
Connection Pool Tab:
• URL: for example:
jdbc:oracle:thin:@(DESCRIPTION=(ADDRESS_LIST=(ADDRESS=(PROTOCOL=TCP
)(HOST=idmdb-scan.mycompany.com)(PORT=1521)))
(CONNECT_DATA=(SERVICE_NAME=soa_edg.mycpmpany.com)
(INSTANCE_NAME=idmdb1)))
• Driver Class: for example:
oracle.jdbc.xa.client.OracleXADataSource
• Properties: for example:
user=FA_SOAINFRA
oracle.net.CONNECT_TIMEOUT=10000
• System Properties: for example:
v$session.program=JDBCProgramName
• Password: This is the database password used when the Oracle Identity
Management RCU is ran
9. Return to the Overview screen
10. Click Lock and Edit.
11. Click New, then Generic Datasource
12. Select Services, then Messaging, then Data Sources from the Domain Structure
window.
13. Provide the following:
• Name: Choose a name for the datasource for example:
EDNDDatasource-rc3
• JNDI Name: Enter a jndi name, for example: jdbc/EDNDatasource-rc3
• Database Type:
oracle
14. Click Next.
• Database Driver: This can be determined from the Driver class, that is,
xa
or
non xa
. For example: Oracle's Driver (thin XA) for RAC Service-Instance
connections; Versions 10 and later
15. Click Next.
16. On the Transaction Options page, click next.
17. On the Connection Properties page enter:
• Service name: Database service name for example:
soaedg.mycompany.com
• Database Name: Enter the name of the database for example:
IDMDB
• Host Name: If this is for an 11.2 database enter the database scan address.
Otherwise enter the VIP of the host being added.
• Port: Enter the listener port, for example:
1521
• Database User Name: enter the value from Properties, for example:
FA_SOAINFRA
• Enter the password assigned when the Oracle Fusion Middleware Repository
Creation Utility (Oracle Fusion Middleware RCU) was run and confirm it.
Click Next.
Chapter 17
Scale Identity Management
17-3

18. On the Test Configuration page, test the connection.
Click Next
19. On the Targets page, assign the same targets as noted for the mutli datasource.
20. Click Finish.
21. Now that the datasource has been defined, it can be added to the existing multi
datasource.
Select Services, then Messaging, then Data Sources from the Domain Structure
window.
22. Click on the multi datasource, for example: EDNDDatasource
23. Click on the Targets tab and add the newly created data source.
24. Click Finish
25. Click Activate Changes
26. Repeat for each data source that uses the database.
17.2.4 Scale the Directory Tier
The Directory tier consists of two LDAP hosts, each running Oracle Internet Directory
and Oracle Virtual Directory.
This section contains the following topics:
• Scale Oracle Internet Directory (page 17-4)
• Scale Oracle Virtual Directory (page 17-12)
17.2.4.1 Scale Oracle Internet Directory
The Directory Tier has two Oracle Internet Directory nodes,
LDAP_PROVISIONED_HOST
and
LDAP_SCALED_OUT_HOST
, each running an Oracle Internet Directory instance.
When scaling up, use the existing Oracle Identity Management binaries on either node
for creating the new Oracle Internet Directory instance.
To add a new Oracle Internet Directory instance to either Oracle Internet Directory
node, or to scale out Oracle Internet Directory instances, perform the steps in the
following subsections:
• Assemble Information for Scaling Oracle Internet Directory (page 17-4)
• Configure an Additional Oracle Internet Directory Instance (page 17-5)
• Register Oracle Internet Directory with the WebLogic Server Domain (IDMDomain)
(page 17-8)
• Configure Oracle Internet Directory to Accept Server Authentication Mode SSL
Connections (page 17-9)
• Reconfigure the Load Balancer (page 17-12).
17.2.4.1.1 Assemble Information for Scaling Oracle Internet Directory
Assemble the following information before scaling Oracle Internet Directory.
Chapter 17
Scale Identity Management
17-4

Description Variable Documented Value Customer Value
Host Name
LDAP_SCALED_OUT_HOS
T
.
mycompany.com
OID Port
OID_LDAP_PORT
This value is available in
the Oracle Fusion Applications
Installation Workbook, Network
- Ports tab, Identity
Management Port Numbers
table, OID row.
OID SSL Port
OID_LDAP_SSL_
PORT
This value is available in
the Oracle Fusion Applications
Installation Workbook, Network
- Ports tab, Identity
Management Port Numbers
table, OID SSL row.
Oracle Instance
Location
OID_ORACLE_IN
STANCE
Oracle Instance/
component Name
oidn oid3
OID Admin
Password
Password to protect
the SSL wallet/
keystore
COMMON_IDM_PA
SSWORD
Password for the CA
wallet
COMMON_IDM_PA
SSWORD
WebLogic Admin
Host
ADMINVHN.mycompa
ny.com
WebLogic Admin
Port
WLS_ADMIN_POR
T
7001
WebLogic Admin
User
weblogic_idm
WebLogic Admin
Password
17.2.4.1.2 Configure an Additional Oracle Internet Directory Instance
The schema database must be running before performing this task. Follow these steps
to install Oracle Internet Directory on the host:
1. Before starting the configuration, determine the ports to be used for the new
directory instance. For Scale out, these can be the same as the other existing
instances. For Scale Up these ports must be unique to the new server instance.
Ensure that selected ports are not in use by any service on the computer by
issuing these commands for the operating system that is being used.
For example, on Linux, enter:
netstat -an | grep "3060"
netstat -an | grep "3131"
Chapter 17
Scale Identity Management
17-5

If a port is not in use, no output is returned from the command. If the ports are in
use (that is, if the command returns output identifying either port), they must be
free.
Remove the entries for the ports in the
/etc/services
file and restart the services,
as described in Start and Stop Components (page 10-26), or restart the computer.
2. Create a file containing the ports used by Oracle Internet Directory. On Disk1 of
the installation media, locate the file
stage/Response/staticports.ini
. Copy it to
a file called
oid_ports.ini
. Delete all entries in
oid_ports.ini
except for
Non-SSL
Port for Oracle Internet Directory
and
SSL Port for Oracle Internet
Directory
. Change the values of those ports to the ports to be used, for example:
3060
and
3131
.
If the port names in the file are slightly different from those listed in this step, use
the names in the file.
3. Start the Oracle Identity Management 11g Configuration Wizard by running
OID_ORACLE_HOME/bin/config.sh
.
4. On the Welcome screen, click Next.
5. On the Select Domain screen, select Configure without a Domain.
Click Next.
6. On the Specify Installation Location screen, specify the following values:
Oracle Instance Location:
OID_ORACLE_INSTANCE
Oracle Instance Name:
oidn
, where
n
is a sequential number for the instance. For
example, if there are two instances already configured,
n
is
3
, so enter
oid3
.
Click Next.
7. On the Specify Email for Security Updates screen, specify these values:
• Email Address: Provide the email address for the My Oracle Support account.
• Oracle Support Password: Provide the password for the My Oracle Support
account.
• Check the check box next to the I wish to receive security updates via My
Oracle Support field.
Click Next.
8. On the Configure Components screen, select Oracle Internet Directory, deselect
all the other components, and click Next.
9. On the Configure Ports screen, use the
oid_ports.ini
file created in Step 2 to
specify the ports to be used. This enables to bypass automatic port configuration.
a. Select Specify Ports using a Configuration File.
b. In the file name field specify
oid_ports.ini
.
c. Click Save, then click Next.
10. On the Specify Schema Database screen, select Use Existing Schema and
specify the following values:
• Connect String: This value is available in the Oracle Fusion Applications
Installation Workbook, Database tab, IDM Database table, IDM DB Instances
row.
Chapter 17
Scale Identity Management
17-6

– The Oracle RAC database connect string information must be provided in
the format:
host1:port1:instance1 ^host2:port2:instance2@servicename
– During this installation, it is not required that all the Oracle RAC instances
to be up. If one Oracle RAC instance is up, the installation can proceed.
– Complete and accurate information must be provided. Specifically, the
correct host, port, and instance name for each Oracle RAC instance must
be provided, and the service name provided must be configured for all the
specified Oracle RAC instances.
Any incorrect information entered in the Oracle RAC database connect
string must be corrected manually after the installation.
• User Name:
ODS
• Password:
password
. This is the password of the ODS schema in the
database as specified when Oracle Identity Management RCU was run.
Click Next.
11. The ODS Schema in use message appears. The ODS schema chosen is already
being used by the existing Oracle Internet Directory instance. Therefore, the
new Oracle Internet Directory instance being configured would reuse the same
schema.
Choose Yes to continue.
A popup window with this message appears:
"Please ensure that the system time on this Identity Management Node
is in sync with the time on other Identity management Nodes that are
part of the Oracle Application Server Cluster (Identity Management)
configuration. Failure to ensure this may result in unwanted instance
failovers, inconsistent operational attributes in directory entries
and potential inconsistent behavior of password state policies."
Ensure that the system time is synchronized among all the
I
DM_PROVISIONED_HOST
s and
IDM_SCALED_OUT_HOST
s. See Synchronize Oracle
Internet Directory Nodes (page 5-6).
Click OK to continue.
12. On the Specify OID Admin Password screen, specify the Oracle Internet Directory
administration password.
If a message saying that OID is not running is displayed, verify that the orcladmin
account has not become locked and try again. Do not continue until this message
is no longer displayed.
Click Next.
13. On the Installation Summary screen, review the selections to ensure that they are
correct. If they are not, click Back to modify selections on previous screens. When
they are correct, click Configure.
14. On the Configuration screen, multiple configuration assistants are launched in
succession. This process can be lengthy. Wait for the configuration process to
finish.
15. On the Installation Complete screen, click Finish to confirm the choice to exit.
Chapter 17
Scale Identity Management
17-7

16. To validate the installation of the Oracle Internet Directory instance on the new
LDAP host, issue these commands:
ldapbind -h LDAPHOST.mycompany.com -p 3060 -D "cn=orcladmin" -q
ldapbind -h LDAPHOST.mycompany.com -p 3131-D "cn=orcladmin" -q -U 1
where
LDAPHOST
is the host where the new instance is running.
Ensure that the following environment variables are set before using
ldapbind
:
•
ORACLE_HOME
•
ORACLE_INSTANCE
•
PATH
- The following directory locations should be in the
PATH
:
IDM_ORACLE_HOME/bin
IDM_ORACLE_HOME/ldap/bin
IDM_ORACLE_HOME/ldap/admin
17.2.4.1.3 Register Oracle Internet Directory with the WebLogic Server Domain
(IDMDomain)
All the Oracle Fusion Middleware components deployed in this enterprise deployment
are managed by using Oracle Enterprise Manager Fusion Middleware Control. To
manage the Oracle Internet Directory component with this tool, register the component
and the Oracle Fusion Middleware instance that contains it with an Oracle WebLogic
Server domain. A component can be registered either at install time or post-install.
A previously un-registered component can be registered with a WebLogic domain by
using the
opmnctl
registerinstance
command.
To register the Oracle Internet Directory instances installed on the host where the new
server instance is running, follow these steps for each instance:
1. On the new host:
Set
ORACLE_HOME
to
IDM_ORACLE_HOME
.
Set
ORACLE_INSTANCE
to
OID_ORACLE_INSTANCE
, where
OID_ORACLE_INSTANCE
is
the location of the newly created instance.
2. Execute the
opmnctl
registerinstance
command:
OID_ORACLE_INSTANCE/bin/opmnctl registerinstance -adminHost WLSHostName -
adminPort WLSPort -adminUsername adminUserName
For example:
OID_ORACLE_INSTANCE/bin/opmnctl registerinstance -adminHost
ADMINVHN.mycompany.com -adminPort 7001 -adminUsername weblogic
The command requires login to WebLogic Administration Server
(
ADMINVHN.mycompany.com
)
Username:
weblogic
Password:
*******
For additional details on registering Oracle Internet Directory components with a
WebLogic Server domain, see Registering an Oracle Instance or Component with
Chapter 17
Scale Identity Management
17-8

the WebLogic Server in the Oracle Fusion Middleware Administrator's Guide for
Oracle Internet Directory.
3. On the host where the new instance is running, update the Enterprise Manager
Repository URL using the
emctl
utility with the
switchOMS
flag. This will enable the
local emagent to communicate with the WebLogic Administration Server using the
virtual IP address. The
emctl
utility is located under the
OID_ORACLE_INSTANCE/
EMAGENT/EMAGENT/bin
directory.
Syntax:
./emctl switchOMS ReposURL
For Example:
./emctl switchOMS http://ADMINVHN:7001/em/upload
Output:
./emctl switchOMS http://ADMINVHN.mycompany.com:7001/em/upload
Oracle Enterprise Manager 10g Release 5 Grid Control 10.2.0.5.0.
Copyright (c) 1996, 2009 Oracle Corporation. All rights reserved.
SwitchOMS succeeded.
4. Force the agent to reload its configuration by issuing the command:
./emctl reload
5. Check that the agent is using the correct Upload URL using the command:
./emctl status agent
6. Validate that the agents on the host where the new server is running are
configured properly to monitor their respective targets. Follow these steps to
complete this task:
• Use a web browser to access Oracle Enterprise Manager Fusion Middleware
Control at:
http://ADMINVHN.mycompany.com:7001/em
Log in as the
weblogic_idm
user.
• From the Domain Home Page navigate to the Agent-Monitored Targets page
using the menu under Farm, Agent-Monitored Targets.
• Update the WebLogic monitoring user name and the WebLogic monitoring
password.
– Enter
weblogic_idm
as the WebLogic monitoring user name and the
password for the
weblogic_idm
user as the WebLogic monitoring
password.
– Click OK to save changes.
17.2.4.1.4 Configure Oracle Internet Directory to Accept Server Authentication Mode SSL
Connections
If SSL Authentication Mode is used, the following must be performed to ensure that
the Oracle Internet Directory instances are capable of accepting requests using this
mode. Each Oracle Internet Directory instance must be configured independently.
Chapter 17
Scale Identity Management
17-9

To enable Oracle Internet Directory to communicate using SSL Server Authentication
Mode, perform the following steps on the host where the new server is running:
When this operation is performed, only the Oracle Internet Directory instance used
should be running.
1. Set the
ORACLE_HOME
,
ORACLE_INSTANCE
and
JAVA_HOME
variables. For example:
• Set
ORACLE_HOME
to
IDM_ORACLE_HOME
.
• Set
ORACLE_INSTANCE
to
OID_ORACLE_INSTANCE
.
• Set
JAVA_HOME
to
DIR_MW_HOME/jdk
• Set the
PATH
variable to include
JAVA_HOME
.
2. To enable SSL Server Authentication use the tool SSLServerConfig which is
located in:
ORACLE_COMMON_HOME/bin
For example
$ORACLE_COMMON_HOME/bin/SSLServerConfig.sh -component oid
3. When prompted, enter the following information:
• LDAP Hostname: Central LDAP host, for example:
POLICYSTORE.mycompany.com
• LDAP port:
LDAP_POLICY_LBR_PORT
, for example:
389
• Admin user DN:
cn=orcladmin
• Password:
orcladmin_password
• sslDomain for the CA:
IDMDomain
Oracle recommends that the SSLDomain
name be the same as the Weblogic domain name to make reference easier.
• Password to protect the SSL wallet/keystore:
COMMON_IDM_PASSWORD
• Enter confirmed password for the SSL wallet/keystore:
COMMON_IDM_PASSWORD
• Password for the CA wallet:
certificate_password
. This is the primary
password used when provisioning was run.
• Country Name 2 letter code: Two letter country code, such as
US
• State or Province Name: State or province, for example:
California
• Locality Name: Enter the name of the city, for example:
RedwoodCity
• Organization Name: Company name, for example:
mycompany
• Organizational Unit Name: Leave at the default
• Common Name: Name of this host, for example:
LDAP_SCALED_OUT_HOST.mycompany.com
• OID component name: Name of the Oracle Instance, for example:
oid1
. To
determine the OID component name, execute the command:
OID_ORACLE_INSTANCE/bin/opmnctl status
• WebLogic admin host: Host running the WebLogic Administration Server, for
example:.
ADMINVHN.mycompany.com
• WebLogic admin port:
WLS_ADMIN_PORT
, for example:
7001
Chapter 17
Scale Identity Management
17-10

• WebLogic admin user: Name of the WebLogic administration user, for
example:
weblogic
• WebLogic password:
password
.
• AS instance name: Name of the new instance entered in Step 6 of Configure
an Additional Oracle Internet Directory Instance (page 17-5), for example:
oid3
.
• SSL wallet name for OID component [oid_wallet1]: Accept the default
• Do you want to restart your OID component:
Yes
• Do you want to test your SSL setup?
Yes
• SSL Port of the OID Server:
OID_LDAP_SSL_PORT
, for example:
3131
Sample output:
Server SSL Automation Script: Release 11.1.1.4.0 - Production
Copyright (c) 2010 Oracle. All rights reserved.
Downloading the CA wallet from the central LDAP location...
>>>Enter the LDAP Hostname [SLC00DRA.mycompany.com]: POLICYSTORE.mycompany.com
>>>Enter the LDAP port [3060]: 3060
>>>Enter an admin user DN [cn=orcladmin]
>>>Enter password for cn=orcladmin:
>>>Enter the sslDomain for the CA [idm]: IDMDomain
>>>Enter a password to protect your SSL wallet/keystore:
>>>Enter confirmed password for your SSL wallet/keystore:
>>>Enter password for the CA wallet:
>>>Searching the LDAP for the CA usercertificate ...
Importing the CA certifcate into trust stores...
>>>Searching the LDAP for the CA userpkcs12 ...
Invoking OID SSL Server Configuration Script...
Enter attribute values for your certificate DN
>>>Country Name 2 letter code [US]:
>>>State or Province Name [California]:
>>>Locality Name(eg, city) []:Redwood
>>>Organization Name (eg, company) [mycompany]:
>>>Organizational Unit Name (eg, section) [oid-20110524015634]:
>>>Common Name (eg, hostName.domainName.com) [SLC00XXX.mycompany.com]:
The subject DN is
cn=SLC00DRA.mycompany.com,ou=oid-20110524015634,l=Redwood,st=California,c=US
Creating an Oracle SSL Wallet for oid instance...
/u01/oracle/products/access/idm/../oracle_common/bin
>>>Enter your OID component name: [oid1]
>>>Enter the weblogic admin server host [SLC00XXX.mycompany.com] ADMINVHN
>>>Enter the weblogic admin port: [7001]
>>>Enter the weblogic admin user: [weblogic]
>>>Enter weblogic password:
>>>Enter your AS instance name:[asinst_1] oid1
>>>Enter an SSL wallet name for OID component [oid_wallet1]
Checking the existence of oid_wallet1 in the OID server...
Configuring the newly generated Oracle Wallet with your OID component...
Do you want to restart your OID component?[y/n]y
Do you want to test your SSL set up?[y/n]y
>>>Please enter your OID ssl port:[3131] 3131
Please enter the OID hostname:[SLC00DRA.mycompany.com]
LDAP_SCALED_OUT_HOST.mycompany.com
Chapter 17
Scale Identity Management
17-11

>>>Invoking IDM_ORACLE_HOM/bin/ldapbind -h LDAP_SCALED_OUT_HOST.mycompany.com -p
3131-U 2 -D cn=orcladmin ...
Bind successful
Your oid1 SSL server has been set up successfully
Confirm that the script has been successful. Repeat all the steps in Configuring
Oracle Internet Directory to Accept Server Authentication Mode SSL Connections
(page 17-9). for each Oracle Internet Directory instance.
17.2.4.1.5 Reconfigure the Load Balancer
If the Oracle Internet Directory instances are accessed through a load balancer, add
the new Oracle Internet Directory instance to the existing server pool defined on the
load balancer for distributing requests across the Oracle Internet Directory instances.
17.2.4.2 Scale Oracle Virtual Directory
The Directory Tier has two nodes,
LDAP_PROVISIONED_HOST
and
LDAP_SCALED_OUT_HOST
, each running an Oracle Virtual Directory instance.
When scaling up, use existing Oracle Identity Management binaries on either node for
creating the new Oracle Virtual Directory instance.
To add a new Oracle Virtual Directory instance to either Oracle Virtual Directory node,
or to scale out Oracle Virtual Directory instances, perform the steps in the following
subsections:
• Assemble Information for Scaling Oracle Virtual Directory (page 17-12)
• Configure an Additional Oracle Virtual Directory (page 17-13)
• Register Oracle Virtual Directory with the Oracle WebLogic Server Domain
(IDMDomain) (page 17-15)
• Configure Oracle Virtual Directory for SSL (page 17-17)
• Create ODSM Connections to Oracle Virtual Directory (page 17-18)
• Create Adapters in Oracle Virtual Directory (page 17-18)
• Reconfigure the Load Balancer (page 17-21)
17.2.4.2.1 Assemble Information for Scaling Oracle Virtual Directory
Assemble the following information before scaling Oracle Virtual Directory.
Description Variable Documented Value Customer Value
Host Name NA
LDAP_SCALED_OUT_HOST.my
company.com
NA
OVD Listen Port
OVD_PORT
NA This value is available in the Oracle
Fusion Applications Installation Workbook,
Network - Ports tab, Identity Management
Port Numbers table, OVD.
OVD SSL Port
OVD_SSL_PORT
NA This value is available in the Oracle
Fusion Applications Installation Workbook,
Network - Ports tab, Identity Management
Port Numbers table, OVD SSL.
Chapter 17
Scale Identity Management
17-12

Description Variable Documented Value Customer Value
Oracle Virtual Directory
Proxy Port
OVD_ADMIN_POR
T
NA This value is available in the Oracle
Fusion Applications Installation Workbook
Network - Ports tab, Identity Management
Port Numbers table, OVD Admin.
Oracle Instance Location
OVD_ORACLE_IN
STANCE
/u02/local/oracle/
config/instances/oidn
NA
OVD Existing Instance/
Component Name
ovdn ovd1
NA
Newly Created Instance/
Component Name
ovdn ovd3
NA
OVD Administrator
Password
NA NA NA
WebLogic Admin Host
WLSHostName ADMINVHN.mycompany.com
NA
WebLogic Admin Port
WLS_PORT
7001 NA
WebLogic Admin User
adminUserName
weblogic_idm NA
WebLogicAdmin
Password
NA NA NA
Back end Identity Store
host
OID_LBR_HOST OIDIDSTORE.mycompany.co
m
NA
Back end Identity Store
port
OID_LDAP_PORT
NA This value is available in the
Oracle Fusion Applications Installation
Workbook Network - Ports tab ->Identity
Management Port Numbers -> OID.
Identity Store LDAP
admin password
NA NA NA
Password to protect your
SSL wallet/keystore
COMMON_IDM_PA
SSWORD
NA NA
Password for the CA
wallet (created when
you ran the Oracle
Identity Management
Provisioning Wizard)
COMMON_IDM_PA
SSWORD
NA NA
17.2.4.2.2 Configure an Additional Oracle Virtual Directory
Follow these steps to configure the new Oracle Virtual Directory instance:
1. Ensure that ports used (
OVD_PORT
and
OVD_SSL_PORT
) are not in use by any service
on the computer by issuing these commands for the operating system that is used.
On Linux:
netstat -an | grep "6501"
netstat -an | grep "7501"
If a port is not in use, no output is returned from the command. If the ports are in
use (that is, if the command returns output identifying either port), the port must be
free.
On Linux:
Chapter 17
Scale Identity Management
17-13

Remove the entries for ports used by Oracle Virtual Directory in the
/etc/
services
file and restart the services, as described in Start and Stop Components
(page 10-26), or restart the computer.
2. Create a file containing the ports used by Oracle Virtual Directory. On Disk1 of the
installation media, locate the file stage
/Response/staticports.ini
. Copy it to a
file called
ovd_ports.ini
. Delete all entries in ovd_ports.ini except for Non-SSL
Port for Oracle Virtual Directory and SSL Port for Oracle Virtual Directory. Change
the values of those ports to the ports to be used, example: 3060 and 3131.
If the port names in the file are slightly different from those listed in this step, use
the names in the file.
3. Start the Oracle Identity Management 11g Configuration Wizard by running
OID_ORACLE_HOME/bin/config.sh
.
4. On the Welcome screen, click Next.
5. On the Select Domain screen, select Configure without a Domain.
Click Next.
6. On the Specify Installation Location screen, specify the following values:
Oracle Instance Location:
OVD_ORACLE_INSTANCE
Oracle Instance Name:
ovdn
, where
n
is a sequential number for the instance.
For example, if there are two instances already configured,
n
will be
3
, so enter
ovd3
.
Click Next.
7. On the Specify Email for Security Updates screen, specify these values:
• Email Address: Provide the email address for the My Oracle Support
account.
• Oracle Support Password: Provide the password for the My Oracle Support
account.
• Check the checkbox next to the I wish to receive security updates via My
Oracle Support field.
Click Next.
8. On the Configure Components screen, select Oracle Virtual Directory, deselect all
the other components, and click Next.
9. On the Configure Ports screen, use the ovd_ports.ini file created in Step 2 to
specify the ports to be used. This enables to bypass automatic port configuration.
a. Select Specify Ports using a Configuration File.
b. In the file name field specify
ovd_ports.ini
.
c. Click Save, then click Next.
10. On the Specify Virtual Directory screen: In the Client Listeners section, enter:
• LDAP v3 Name Space:
REALM_DN
, for example:
dc=mycompany,dc=com
In the OVD Administrator section, enter:
• Administrator User Name:
cn=orcladmin
• Password:
administrator_password
• Confirm Password:
administrator_password
Chapter 17
Scale Identity Management
17-14

Select Configure the Administrative Server in secure mode.
Click Next.
11. On the Installation Summary screen, review the selections to ensure that they are
correct. If they are not, click Back to modify selections on previous screens. When
they are correct, click Configure.
12. On the Configuration screen, multiple configuration assistants are launched in
succession. This process can be lengthy. Wait for the configuration process to
finish.
Click Next.
13. On the Installation Complete screen, click Finish to confirm the choice to exit.
14. To validate the installation of the Oracle Virtual Directory instance on the host,
issue these commands:
ldapbind -h LDAPHOST.mycompany.com -p 6501 -D "cn=orcladmin" -q
ldapbind -h LDAPHOST.mycompany.com -p 7501 -D "cn=orcladmin" -q -U 1
where
LDAPHOST
is the host where the new instance is running.
Ensure that the following environment variables are set before using
ldapbind
:
• Set
ORACLE_HOME
to
OID_ORACLE_HOME
.
• Set
ORACLE_INSTANCE
to
OVD_ORACLE_INSTANCE
.
•
PATH
- The following directory locations should be in the
PATH
:
OID_ORACLE_HOME/bin
OID_ORACLE_HOME/ldap/bin
OID_ORACLE_HOME/ldap/admin
17.2.4.2.3 Register Oracle Virtual Directory with the Oracle WebLogic Server Domain
(IDMDomain)
All the Oracle Fusion Middleware components deployed in this enterprise deployment
are managed by using Oracle Enterprise Manager Fusion Middleware Control. To
manage the Oracle Virtual Directory component with this tool, register the component
and the Oracle Fusion Middleware instance that contains it with an Oracle WebLogic
Server domain. A component can be registered either at install time or post-install.
A previously un-registered component can be registered with a WebLogic domain by
using the
opmnctl
registerinstance
command.
To register the Oracle Virtual Directory instances, follow these steps on the host where
the new instance is running:
1. Set the
ORACLE_HOME
to
OID_ORACLE_HOME
.
2. Set
ORACLE_INSTANCE
to
OVD_ORACLE_INSTANCE1
, where
OVD_ORACLE_INSTANCE1
is
the location of the newly-created instance.
3. Execute the
opmnctl
registerinstance
command:
OVD_ORACLE_INSTANCE/bin/opmnctl registerinstance -adminHost WLSHostName -
adminPort WLSPort -adminUsername adminUserName
For example:
Chapter 17
Scale Identity Management
17-15

OVD_ORACLE_INSTANCE/bin/opmnctl registerinstance \
-adminHost ADMINVHN.mycompany.com -adminPort 7001 -adminUsername weblogic
The command requires login to WebLogic Administration Server.
Username:
weblogic
Password:
password
For additional details on registering Oracle Virtual Directory components with a
WebLogic Server domain, see Registering an Oracle Instance Using OPMNCTL in
the Oracle Fusion Middleware Administrator's Guide for Oracle Virtual Directory.
4. In order to manage Oracle Virtual Directory by using Oracle Enterprise Manager
Fusion Middleware Control, the Enterprise Manager Repository URL must be
updated to point to the virtual IP address associated with the WebLogic
Administration Server. Do this using the
emctl
utility with the
switchOMS
flag. This
will enable the local emagent to communicate with the WebLogic Administration
Server using the virtual IP address. The
emctl
utility is located under the
OVD_ORACLE_INSTANCE/EMAGENT/EMAGENT/bin
directory.
Syntax:
./emctl switchOMS ReposURL
For Example:
./emctl switchOMS http://ADMINVHN:7001/em/upload
Output:
./emctl switchOMS http://ADMINVHN.mycompany.com:7001/em/upload
Oracle Enterprise Manager 10g Release 5 Grid Control 10.2.0.5.0.
Copyright (c) 1996, 2009 Oracle Corporation. All rights reserved.
SwitchOMS succeeded.
5. Force the agent to reload its configuration by issuing the command:
./emctl reload
6. Check that the agent is using the correct Upload URL using the command:
./emctl status agent
7. Validate if the agents on the host where the new instance is running are configured
properly to monitor their respective targets. Follow these steps to complete this
task:
a. Use a web browser to access Oracle Enterprise Manager Fusion
Middleware Control at
http://ADMINVHN.mycompany.com:7001/em
. Log in as
the
weblogic_idm
user.
b. From the Domain Home Page navigate to the Agent-Monitored Targets page
using the menu under Farm, thenAgent-Monitored Targets
c. Update the WebLogic monitoring user name and the WebLogic monitoring
password.
• Enter
weblogic_idm
as the WebLogic monitoring user name and the
password for the weblogic user as the WebLogic monitoring password.
• Click OK to save changes.
Chapter 17
Scale Identity Management
17-16

17.2.4.2.3.1 Configure Oracle Virtual Directory for SSL
Before configuring Oracle Virtual Directory for SSL, set the
ORACLE_HOME
,
ORACLE_INSTANCE
and
JAVA_HOME
variables. For example, on the new
LDAPHOST
, set
ORACLE_HOME
to
OID_ORACLE_HOME
, set
ORACLE_INSTANCE
to
OVD_ORACLE_INSTANCE
, set
JAVA_HOME
to
JAVA_HOME
, and add
JAVA_HOME
to the
PATH
variable.
Start the SSL Configuration Tool by issuing the command
SSLServerConfig
command
which is located in the directory
ORACLE_COMMON_HOME/bin
directory.
For example:
ORACLE_COMMON_HOME/bin/SSLServerConfig.sh -component ovd
When prompted, enter the following information:
• LDAP Hostname: Central LDAP host, for example:
POLICYSTORE.mycompany.com
It is recommended to use the Policy Store directory, not the Identity Store.
• LDAP port: LDAP port, for example:
3060
(
OID_LDAP_PORT
)
• Admin user DN:
cn=orcladmin
• Password:
administrator_password
• sslDomain for the CA:
IDMDomain
• Password to protect the SSL wallet/keystore:
password_for_local_keystore
• Enter confirmed password for the SSL wallet/keystore:
password_for_local_keystore
• Password for the CA wallet: certificate_password. This is the primary password
crated when provisioning. Fixed was run as in OID Section
• Country Name 2 letter code: Two letter country code, such as
US
• State or Province Name: State or province, for example:
California
• Locality Name: Enter the name of the city, for example:
RedwoodCity
• Organization Name: Company name, for example:
mycompany
• Organizational Unit Name: Leave at the default
• Common Name: Name of this host, for example:
LDAP_SCALED_OUT_HOST.mycompany.com
• OVD Instance Name: for example,
ovd1
. To determine the OVD component name,
execute the command:
OVD_ORACLE_INSTANCE/bin/opmnctl status
• Oracle instance name: Name of the newly created Oracle instance, for example:
ovd3Fixed as in OID Section
• WebLogic admin host: Host running the WebLogic Administration Server, for
example:.
ADMINVHN.mycompany.com
• WebLogic admin port: WebLogic Administration Server port, for example:
7001
(
WLS_ADMIN_PORT
)
• WebLogic admin user: Name of the WebLogic administration user, for example:
weblogic
Chapter 17
Scale Identity Management
17-17

• WebLogic password:
password
.
• SSL wallet name for OVD component [
ovdks1.jks
]: Accept the default
When asked to restart the Oracle Virtual Directory component, enter
Yes
.
When asked to test the OVD SSL connection, enter
Yes
. Ensure that the test is a
success.
17.2.4.2.4 Create ODSM Connections to Oracle Virtual Directory
Before managing Oracle Virtual Directory, create connections from ODSM to each of
the Oracle Virtual Directory instances. To do this, proceed as follows:
1. Access ODSM through the load balancer at:
http://ADMIN.mycompany.com/odsm
2. Follow these steps to create connections to Oracle Virtual Directory:
To create connections to Oracle Virtual Directory, follow these steps. Create
connections to each Oracle Virtual Directory node separately. Using the Oracle
Virtual Directory load balancer virtual host from ODSM is not supported:
a. Create a direct connection to Oracle Virtual Directory on the new host
providing the following information in ODSM:
Host
:
LDAPHOST
.
mycompany.com
Port
:
8899
(The Oracle Virtual Directory proxy port,
OVD_ADMIN_PORT
)
Enable the SSL option.
User
:
cn=orcladmin
Password
: password_to_connect_to_OVD
b. Create a direct connection to Oracle Virtual Directory on the host where the
new instance is running, providing the following information in ODSM:
Host
:
LDAPHOST.mycompany.com
Port
:
8899
(The Oracle Virtual Directory proxy port)
Enable the SSL option.
User
:
cn=orcladmin
Password
: password_to_connect_to_OVD
17.2.4.2.5 Create Adapters in Oracle Virtual Directory
Oracle Virtual Directory communicates with other directories through adapters.
The procedure is slightly different, depending on the directory connected to. The
following sections show how to create and validate adapters for supported directories:
Creating Oracle Virtual Directory Adapters for Oracle Internet Directory and
Active Directory
idmConfigTool
can be used to create the Oracle Virtual Directory User and Changelog
adapters for Oracle Internet Directory and Active Directory. Oracle Identity Manager
requires adapters. It is highly recommended, though not mandatory, to use Oracle
Virtual Directory to connect to Oracle Internet Directory.
To do this, perform the following tasks on
IDM_PROVISIONED_HOST
:
Chapter 17
Scale Identity Management
17-18

1. Set the environment variable
ORACLE_HOME
to
IAM_ORACLE_HOME
.
2. Create a properties file for the adapter that is configured called
ovd1.props
. The
contents of this file depends on whether the Oracle Internet Directory adapter or
the Active Directory Adapter are being configured.
• Oracle Internet Directory adapter properties file:
ovd.host:LDAPHOST.mycompany.com
ovd.port:8899
ovd.binddn:cn=orcladmin
ovd.password:ovdpassword
ovd.oamenabled:true
ovd.ssl:true
ldap1.type:OID
ldap1.host:OIDIDSTORE.mycompany.com
ldap1.port:3060
ldap1.binddn:cn=oimLDAP,cn=systemids,dc=mycompany,dc=com
ldap1.password:oidpassword
ldap1.ssl:false
ldap1.base:dc=mycompany,dc=com
ldap1.ovd.base:dc=mycompany,dc=com
usecase.type: single
• Active Directory adapter properties file:
ovd.host:LDAPHOST.mycompany.com
ovd.port:8899
ovd.binddn:cn=orcladmin
ovd.password:ovdpassword
ovd.oamenabled:true
ovd.ssl:true
ldap1.type:AD
ldap1.host:ADIDSTORE.mycompany.com
ldap1.port:636
ldap1.binddn:cn=adminuser
ldap1.password:adpassword
ldap1.ssl:true
ldap1.base:dc=mycompany,dc=com
ldap1.ovd.base:dc=mycompany,dc=com
usecase.type: single
The following list describes the parameters used in the properties file.
•
ovd.host
is the host name of a server running Oracle Virtual Directory.
•
ovd.port
is the https port used to access Oracle Virtual Directory
(
OVD_ADMIN_PORT
).
•
ovd.binddn
is the user DN used to connect to Oracle Virtual Directory.
•
ovd.password
is the password for the DN used to connect to Oracle Virtual
Directory.
•
ovd.oamenabled
is always
true
in Oracle Fusion Applications deployments.
•
ovd.ssl
is set to
true
, as an https port is being run.
•
ldap1.type
is set to OID for the Oracle Internet Directory back end directory
or set to AD for the Active Directory back end directory.
•
ldap1.host
is the host on which back end directory is located. Use the load
balancer name.
Chapter 17
Scale Identity Management
17-19

•
ldap1.port
is the port used to communicate with the back end directory
(
OID_LDAP_PORT
or
OID_LDAP_SSL_PORT
.
•
ldap1.binddn
is the bind DN of the
oimLDAP
user.
•
ldap1.password
is the password of the
oimLDAP
user
•
ldap1.ssl
is set to
true
if the back end's SSL connection is used, and
otherwise set to
false
. This should always be set to
true
when an adapter
is being created for AD.
•
ldap1.base
is the base location in the directory tree.
•
ldap1.ovd.base
is the mapped location in Oracle Virtual Directory.
•
usecase.type
is set to
Single
when using a single directory type.
3. Configure the adapter by using the
idmConfigTool
command, which is located at:
IAM_ORACLE_HOME/idmtools/bin
When the
idmConfigTool
is run, it creates or appends to the file
idmDomainConfig.param
. This file is generated in the same directory that the
idmConfigTool
is run from. To ensure that each time the tool is run, the same
file is appended to, always run the
idmConfigTool
from the directory:
IAM_ORACLE_HOME/idmtools/bin
The syntax of the command is:
idmConfigTool.sh -configOVD input_file=configfile [log_file=logfile]
For example:
idmConfigTool.sh -configOVD input_file=ovd1.props
The command requires no input. The output looks like this:
The tool has completed its operation. Details have been logged to logfile
Run this command for the newly created Oracle Virtual Directory instance in the
topology, with the appropriate value for
ovd.host
in the property file.
Validating the Oracle Virtual Directory Adapters
Perform the following tasks by using ODSM:
1. Access ODSM through the load balancer at:
http://ADMIN.mycompany.com/odsm
2. Connect to Oracle Virtual Directory.
3. Go the Data Browser tab.
4. Expand Client View to see each of the user adapter root DN's listed.
5. Expand the user adapter root DN, if there are objects already in the back end
LDAP server, those objects should be displayed here.
6. ODSM doesn't support changelog query, so the
cn=changelog
subtree cannot be
expanded.
Perform the following tasks by using the command-line:
• Validate the user adapters by typing:
ldapsearch -h directory_host -p ldap_port -D "cn=orcladmin" -q -b
user_search_base -s sub "objectclass=inetorgperson" dn
Chapter 17
Scale Identity Management
17-20

For example:
ldapsearch -h LDAPHOST.mycompany.com -p 6501 -D "cn=orcladmin" -q -b
"cn=Users,dc=mycompany,dc=com" -s sub "objectclass=inetorgperson" dn
Supply the password when prompted.
The user entries that already exist in the back end LDAP server should be
seen.
• Validate changelog adapters by typing:
ldapsearch -h directory_host -p ldap_port -D "cn=orcladmin" -q -b
"cn=changelog" -s one "changenumber>=0"
For example:
ldapsearch -h LDAPHOST -p 6501 -D "cn=orcladmin" -q -b "cn=changelog" -s
one "changenumber>=0"
The command returns logs of data, such as creation of all the users. It returns
without error if the changelog adapters are valid.
• Validate
lastchangenumber
query by typing:
ldapsearch -h directory_host -p ldap_port -D "cn=orcladmin" -q -b
"cn=changelog" -s base 'objectclass=*' lastchangenumber
For example:
ldapsearch -h LDAP_SCALED_OUT_HOST -p 6501 -D "cn=orcladmin" -q -b
"cn=changelog" -s base 'objectclass=*' lastchangenumber
The command returns the latest change number generated in the back end
LDAP server.
17.2.4.2.5.1 Reconfigure the Load Balancer
If the Oracle Virtual Directory instances are accessed through a load balancer, add the
new Oracle Virtual Directory instance to the existing server pool defined on the load
balancer for distributing requests across the Oracle Virtual Directory instances.
17.2.5 Scale the Application Tier
The Application Tier can be scaled out to multiple nodes. The following sections
describe the details for scaling the Application Tier.
17.2.5.1 Mount Middleware Home and Create a New Machine when Scaling
Out
When scaling out a component of the Application Tier, perform these steps first:
1. On the new node, mount the existing Middleware home, which should include the
Oracle Fusion Middleware installation and the domain directory, and ensure that
the new node has access to this directory, just like the rest of the nodes in the
domain.
2. To attach
IAM_HOME
in shared storage to the local Oracle Inventory, execute the
following command:
Chapter 17
Scale Identity Management
17-21

cd IAM_ORACLE_HOME/oui/bin
./attachHome.sh -jreLoc JAVA_HOME
3. To update the Middleware home list, create (or edit, if another WebLogic
installation exists in the node) the
IAM_MW_HOME/bea/beahomelist
file and add
IAM_MW_HOME/oui/bin
to it.
4. Log in to the WebLogic Administration Console at:
http://ADMIN.mycompany.com/
console
5. Create a new machine for the new node to be used, and add the machine to the
domain, as follows.
a. Select Environment, then select Machines from the Navigation menu.
b. Click Lock and Edit.
c. Click New on the Machine Summary screen.
d. Enter the following information:
Name: Name of the machine. This is usually the host name.
Machine OS: Select UNIX.
e. Click Next.
f. On the Node Manager Properties page, enter the following information:
Type: SSL.
Listen Address: Use the host name.
g. Click Finish.
h. Click Activate Changes.
17.2.5.2 Create a New Node Manager when Scaling Out
Node Manager is used to start and stop WebLogic managed servers on the new host.
In order to create a new node manager for the new host perform the following steps:
1. Create a new directory for the new node manager by copying
an existing one. Copy the directory
SHARED_CONFIG_DIR/nodemanager/
IDM_PROVISIONED_HOST
.
mycompany.com
to:
SHARED_CONFIG_DIR/nodemanager/
newidmhost.mycompany.com
For example:
cp -r $
SHARED_CONFIG_DIR
/nodemanager/
IDM_PROVISIONED_HOST
.mycompany.com
$SHARED_CONFIG_DIR/nodemanager/newidmhost.mycompany.com
2. Change to the newly created directory.
cd SHARED_CONFIG_DIR/nodemanager/newidmhost.mycompany.com
3. Edit the
nodemanager.properties
file, changing all the entries for
IDM_PROVISIONED_HOST
to newidmhost. For example:
DomainsFile=/u01/oracle//config/nodemanager/
IDM_PROVISIONED_HOST
.mycompany.com/nodemanager.domain
becomes
DomainsFile=/u01/oracle//config/nodemanager/newidmhost.mycompany.com/
nodemanager.domain
Chapter 17
Scale Identity Management
17-22

4. Edit the
startNodeManagerWrapper.sh
file, changing all the entries for
IDM_PROVISIONED_HOST
to
IDM_SCALED_OUT_HOST
. For example:
NM_HOME=/u01/oracle/config/nodemanager/
IDM_PROVISIONED_HOST
.mycompany.com
becomes
NM_HOME=/u01/oracle/config/nodemanager/
IDM_SCALED_OUT_HOST
.mycompany.com
5. Start the node manager by invoking the command:
./startNodeManagerWrapper.sh
17.2.5.3 Scale ODSM
To scale up ODSM, use the existing installations (WebLogic Server home, Oracle
Fusion Middleware home, and domain directories) for creating a new Managed Server
for the Oracle Directory Services Manager component.
To scale out, use the existing installations in shared storage for creating the
new Managed Servers. It is not necessary to install WebLogic Server or Identity
Management binaries in a new location but it is necessary to run
pack
and
unpack
to move files to
MSERVER
on the new node. This is described in Complete the Oracle
Identity Manager Configuration Steps (page 17-35).
To scale ODSM instances, follow these steps:
1. Assemble the following information for scaling ODSM.
Description Variable Documented Value Customer Value
Host name
IDM_SCALED_OUT_HOS
T
.
mycompany.com
ODSM Port
ODSM_PORT
This value is available
in the Oracle Fusion
Applications Installation
Workbook Network - Ports
tab, Identity Management
Port Numbers table,
IDMDomain ODSM row.
Oracle Instance
Location/Name
ODS_ORACLE_IN
STANCE
LOCAL_CONFIG_DIR/
instances/odsm
Oracle Middleware
Home Location
IAM_MW_HOME /u01/oracle/
products/app
Oracle Home
Directory
idm
WebLogic Admin
host
ADMINVHN.mycompany
.com
WebLogic Admin
Port
WLS_ADMIN_POR
T
7001
WebLogic User
Name
weblogic_idm
WebLogic
Password
COMMON_IDM_PA
SSWORD
Chapter 17
Scale Identity Management
17-23

Description Variable Documented Value Customer Value
WebLogic Server
Directory
IAM_MW_HOME
/
wlserver_10.3
2. Ensure that the system, patch, kernel and other requirements are met. See
Verifying Certification, System Requirements, and Interoperability in the Oracle
Fusion Middleware Installation Guide for Oracle Identity Management in the
Oracle Fusion Middleware documentation library for a specific platform and
version.
3. To provisioning the Instance Home or the Managed Server domain directory on
shared storage, ensure that the appropriate shared storage volumes are mounted
on the new host as described in Mounting Middleware Home and Creating a New
Machine when Scaling Out (page 17-21).
4. For scaling out, use the default port (
ODSM_PORT
). For scaling up, choose a unique
port for this instance. Ensure that port number used is not in use by any service on
the computer by issuing this command for the operating system used. If a port is
not in use, no output is returned from the command.
On Linux:
netstat -an | grep "7005"
If the port is in use (if the command returns output identifying the port), free it.
On Linux:
Remove the entries for port
7005
(
ODSM_PORT
) in the
/etc/services
file if the port
is in use by a service and restart the services, as described in Start and Stop
Components (page 10-26), or restart the computer.
5. Start the Oracle Identity Management 11g Configuration Wizard by running the
config.sh
script located under the
IDM_ORACLE_HOME/bin
directory on the new
host. For example:
IDM_ORACLE_HOME/bin
6. On the Welcome screen, click Next.
7. On the Select Domain screen, select the Expand Cluster option and specify these
values:
• Hostname:
ADMINVHN.mycompany.com
• Port:
7001
(
WLS_ADMIN_PORT
)
• UserName:
weblogic_idm
• User Password:
password for the webLogic user
Click Next.
8. A dialog box with the following message appears:
The selected domain is not a valid Identity Management domain or the
installer
cannot determine if it is a valid domain. If you created the domain using the
Identity Management installer, you can ignore this message and continue. If
you
did not create the domain using the Identity Management installer, refer to
the
Identity Management documentation for information on how to verify the domain
is valid.
Chapter 17
Scale Identity Management
17-24

Click YES to continue.
This is a benign warning that can be safely ignored.
9. A dialog box with the following message appears:
The selected domain is not a valid Identity Management domain or the
installer
cannot determine if it is a valid domain. If you created the domain using the
Identity Management installer, you can ignore this message and continue. If
you
did not create the domain using the Identity Management installer, refer to
the
Identity Management documentation for information on how to verify the domain
is valid.
Click YES to continue.
This is a benign warning that can be safely ignored.
10. On the Email for Security Updates screen, specify these values:
• Email Address: Provide the email address for the My Oracle Support
account.
• Oracle Support Password: Provide the password for the My Oracle Support
account.
• Select the checkbox next to the I wish to receive security updates via My
Oracle Support field.
Click Next.
11. On the Configure Components screen, de-select all the products except ODSM
and then click Next.
12. On the Configure Ports screen, use the
odsm_ports.ini
file created in Step 4 to
specify the ports to be used. This enables to bypass automatic port configuration.
a. Select Specify Ports using a Configuration File.
b. In the file name field specify
odsm_ports.ini
.
c. Click Save, then click Next.
13. On the Installation Summary screen, review the selections to ensure that they are
correct (if they are not, click Back to modify selections on previous screens), and
click Configure.
14. On the Configuration Progress screen, multiple configuration assistants are
launched in succession; this process can be lengthy. Wait until it completes.
15. On the Installation Complete screen, click Finish to confirm the choice to exit.
16. Add the newly added Managed Server host name and port to the list
WebLogicCluster parameter, as described in Add New WebLogic Managed Server
to Oracle HTTP Server Configuration Files (page 17-40).
17.2.5.4 Scale Oracle Access Manager 11g
To scale up, use the existing installations (WebLogic Server home, Oracle Fusion
Middleware home, and domain directories) for creating a new Managed Server for the
Oracle Access Manager component.
Chapter 17
Scale Identity Management
17-25

Use the existing binaries in shared storage for creating the new Managed Servers.
It is not necessary to install WebLogic Server or Identity Management binaries in a
new location but it is necessary to run pack and unpack to bootstrap the domain
configuration in the new node.
If shared storage is used, allow the new host access to that shared storage area.
Scale Oracle Access Manager by performing the steps in the following subsections:
17.2.5.4.1 Assemble Information for Scaling Oracle Access Manager
Assemble the following information before scaling Oracle Access Manager.
Description Variable Documented Value Customer Value
Host Name
IDMHOSTn
NA NA
Existing OAM server NA
WLS_OAM1
NA
New OAM server
name
WLS_OAMn WLS_OAM3
NA
Server Listen
Address
NA NA NA
Server Listen Port
OAM_PORT
NA This value is available in
the Oracle Fusion Applications
Installation Workbook, Network -
Ports tab, Identity Management
Port Numbers table, IDMDomain
OAM row.
WebLogic Admin
Host
NA ADMINVHN.mycompa
ny.com
NA
WebLogic Admin
Port
WLS_ADMIN_
PORT
7001 NA
WebLogic Admin
User
NA weblogic_idm NA
WebLogic Admin
Password
NA NA NA
17.2.5.4.2 Prepare New Node for Scaling Out
The following steps are necessary only in case of scaling out.
1. Ensure that shared storage is mounted on the new node, as described in Mount
Middleware Home and Create a New Machine when Scaling Out (page 17-21).
2. To update the Middleware home list, create (or edit, if another WebLogic
installation exists in the node) the
IAM_MW_HOME/bea/beahomelist
file and add
IAM_MW_HOME
to it.
17.2.5.4.3 Configure the New Oracle Access Manager Server
1. Log in to the Oracle WebLogic Administration Console at:
http://
ADMIN.mycompany.com/console
Chapter 17
Scale Identity Management
17-26

2. From the Domain Structure window of the Oracle WebLogic Server Administration
Console, expand the Environment node and then Servers. The Summary of
Servers page appears.
3. Click Lock & Edit from the Change Center menu.
4. Select an existing server on the host to be extended, for example:
WLS_OAM1
.
5. Click Clone.
6. Enter the following information:
• Server Name: A new name for the server, for example:
WLS_OAM3
.
• Server Listen Address: The name of the host on which the Managed Server
runs.
• Server Listen Port: The port the new Managed Server uses. This port must
be unique within the host.
In case of scaling out, use the default port,
14100
(
OAM_PORT
). In case of
scaling up, choose a unique port.
7. Click OK.
8. Click the newly created server WLS_OAM3
9. Set Machine to be the machine created in Mount Middleware Home and Create a
New Machine when Scaling Out (page 17-21).
10. Click Save.
11. Disable host name verification for the new Managed Server. Before starting and
verifying the
WLS_OAM3
Managed Server, disable host name verification. Re-enable
it after having configured server certificates for the communication between the
Oracle WebLogic Administration Server and the Node Manager in
IDMHOSTn
.
If the source server from which the new one was cloned had already disabled
host name verification, these steps are not required, as the host name verification
settings were propagated to the cloned server. To disable host name verification:
a. In Oracle Enterprise Manager Fusion Middleware Control, select Oracle
WebLogic Server Administration Console.
b. Expand the Environment node in the Domain Structure window.
c. Click Servers. The Summary of Servers page appears.
d. Select WLS_OAM3 in the Names column of the table. The Settings page for
server appears.
e. Click the SSL tab.
f. Click Advanced.
g. Set Hostname Verification to
None
.
h. Click Save.
12. Click Activate Changes from the Change Center menu.
13. Run
pack
and
unpack
as described in Running Pack/Unpack (page 17-40).
Chapter 17
Scale Identity Management
17-27

17.2.5.4.4 Register the Managed Server with Oracle Access Manager
Register the new Managed Server with Oracle Access Manager. Configure the new
Managed Server now as an Oracle Access Manager server. Do this from the Oracle
OAM console. Proceed as follows:
1. Log in to the OAM console at
http://ADMIN.mycompany.com/oamconsole
as the
Oracle Oracle Access Manager administration user.
2. Click the System Configuration tab.
3. Click Server Instances.
4. Select Create from the Actions menu.
5. Enter the following information:
• Server Name:
WLS_OAM3
• Host: Host that the server runs on
• Port: Listen port that was assigned when the Managed Server was created
• OAM Proxy Port: Port for the Oracle Access Manager proxy to run on. This is
unique for the host
• Proxy Server ID:
AccessServerConfigProxy
• Mode: Set to same mode as existing Oracle Access Manager servers.
6. Click Coherence tab.
Set Local Port to a unique value on the host.
7. Click Apply.
8. Restart the WebLogic Administration Server as described in Start and Stop
Components (page 10-26).
17.2.5.4.5 Update WebGate Profiles
Add the newly created Oracle Access Manager server to all WebGate Profiles that
might be using it, such as
Webgate_IDM
,
Webgate_IDM_11g
, and
IAMSuiteAgent
For example, to add the Oracle Access Manager server to
Webgate_IDM
, access the
OAM console at:
http://ADMIN.mycompany.com/oamconsole
Then proceed as follows:
1. Log in as the Oracle Access Manager Admin User.
2. Click the System Configuration tab.
3. Expand Access Manager Settings, SSO Agents, OAM Agents.
4. Click the open folder icon, then click Search.
The WebGate agent Webgate_IDM should be shown.
5. Click the agent Webgate_IDM.
6. Select Edit from the Actions menu.
7. Click
+
in the Primary Server list (or the Secondary Server list if this is a
secondary server).
Chapter 17
Scale Identity Management
17-28

8. Select the newly created managed server from the Server list.
9. Set Maximum Number of Connections to
20
for all of the OAM Servers listed
in the primary servers list (10 x WLS_OAM1 connections + 10 x WLS_OAM2
connections).
10. Click Apply.
Repeat Steps 5 to 10 for Webgate_IDM_11g, IAMSuiteAgent, and all other
WebGates that might be in use.
Start now the new Managed Server, as described in Start and Stop Components
(page 10-26).
17.2.5.4.6 Update the Web Tier
Add the newly added Managed Server host name and port to the list WebLogicCluster
parameter, as described in Add New WebLogic Managed Server to Oracle HTTP
Server Configuration Files (page 17-40).
Save the file and restart the Oracle HTTP server, as described in Start and Stop
Components (page 10-26).
17.2.5.5 Scale Oracle Identity Manager
A node that runs a Managed Server configured with Oracle SOA Suite and Oracle
Identity Manager components already exists. The node contains a Middleware home,
a SOA Oracle home, an Oracle Identity Manager Oracle home, and a domain directory
for existing Managed Servers. Use the existing installations in shared storage for
creating a new WLS_SOA and WLS_OIM managed server. There is no need to install
the Oracle Identity and Access Management or Oracle SOA Suite binaries in a new
location
When scaling up, add WLS_SOA and WLS_OIM managed servers to existing nodes.
In either case, run pack and unpack.
When scaling out the topology, add new Managed Servers configured with OIM and
SOA to new nodes. First check that the new node can access the existing home
directories for WebLogic Server, OIM, and SOA. It is not necessary to run pack and
unpack to bootstrap the domain configuration in the new node.
Follow the steps in the following subsections to scale the topology:
• Assemble Information for Scaling Oracle Identity Manager (page 17-30)
• Clone an Existing Oracle Identity Manager Server when Scaling Up Oracle Identity
Manager or SOA (page 17-30)
• Mount Middleware Home and Create a New Machine when Scaling Out
(page 17-31)
• Configure New JMS Servers (page 17-31)
• Perform Pack/Unpack When Scaling Out (page 17-32)
• Configure Oracle Coherence for Deploying Composites (page 17-32)
• Complete the Oracle Identity Manager Configuration Steps (page 17-35)
Chapter 17
Scale Identity Management
17-29

17.2.5.5.1 Assemble Information for Scaling Oracle Identity Manager
Assemble the following information before scaling Oracle Identity Manager.
Description Variable Documented Value Customer Value
Host name
IDMHOSTn IDM_PROVISIONED_HOS
T
SOA virtual server
name
SOAHOSTxVHN
OIM virtual server
name
OIMHOSTxVHN
SOA managed server
to clone
WLS_SOAn WLS_SOA_PROVISIONED
_HOST
OIM managed server
to clone
WLS_OIMn WLS_OIM_PROVISIONED
_HOST
SOA managed server
name
WLS_SOAn WLS_SOA_SCALED_OUT_
HOST2
OIM managed server
name
WLS_OIMn WLS_OIM_SCALED_OUT_
HOST
Numeric extension for
new JMS servers
n
3
WebLogic Admin
Host
ADMINVHN.mycompa
ny.com
WebLogic Admin Port
WLS_ADMIN_P
ORT
7001
WebLogic Admin
User
weblogic_idm
WebLogic Admin
Password
17.2.5.5.2 Clone an Existing Oracle Identity Manager Server when Scaling Up Oracle
Identity Manager or SOA
Follow this procedure twice, once to clone
WLS_SOA_PROVISIONED_HOST
and once again
to clone
WLS_OIM_PROVISIONED_HOST
.
1. Log in to the Administration Console at:
http://ADMIN.mycompany.com/console
2. Clone the
WLS_OIM_PROVISIONED_HOST
or the
WLS_SOA_PROVISIONED_HOST
into a
new Managed Server. The source Managed Server to clone should be one that
already exists on the node where the new Managed Server is run.
To clone a Managed Server:
a. Select Environment, Servers from the Administration Console.
b. From the Change Center menu, click Lock and Edit.
c. Select the Managed Server to clone (for example,
WLS_OIM_PROVISIONED_HOST
or
WLS_SOA_PROVISIONED_HOST
).
d. Select Clone.
Chapter 17
Scale Identity Management
17-30

Name the new Managed Server
WLS_OIM_PROVISONED_HOST
n or
WLS_SOA_PROVISIONED_HOST
n, where n is a number to identify the new Managed
Server.
The rest of the steps assume that a new server is being added to
IDM_PROVISIONED_HOST
, which is already running
WLS_SOA_PROVISIONED_HOST
and
WLS_OIM_PROVISIONED_HOST
.
3. For the listen address, assign the host name or IP address to use for this new
Managed Server. To use server migration as recommended for this server, this
should be the VIP (also called a floating IP) to enable it to move to another node.
The VIP should be different from the one used by the Managed Server that is
already running.
17.2.5.5.3 Mount Middleware Home and Create a New Machine when Scaling Out
Mount the Middleware home, as described in Mount Middleware Home and Create a
New Machine when Scaling Out (page 17-21).
17.2.5.5.4 Configure New JMS Servers
Create JMS Servers for SOA, Oracle Identity Manager, UMS, and BPM on the new
Managed Server. Do this as follows:
1. Log in to the WebLogic Administration Server and navigate to Services,
Messaging, JMS Servers.
2. Click New.
3. Enter a value for Name, such as
BPMJMSServer_auto_3
.
4. Click Create New Store.
5. Select
FileStore
from the list
6. Click Next.
7. Enter a value for Name, such as
BPMJMSFileStore_auto_3
8. Enter the following values:
Target: The new server that is being created.
Directory:
ASERVER_HOME/jms/BPMJMSFileStore_auto_3
9. Click OK.
10. When returned to the JMS Server screen, select the newly created file store from
the list.
11. Click Next.
12. On the next screen set the Target to the server that is being created.
13. Click Finish.
Create the following JMS Queues depending on the managed server that is being
created:
Server
JMS Server Name File Store Name Directory Target
WLS_SO
An
BPMJMSServer_aut
o_n
BPMJMSFileStore_
auto_n
ASERVER_HOME/jms/
BPMJMSFileStore_auto_n
WLS_S
OAn
Chapter 17
Scale Identity Management
17-31

Server JMS Server Name File Store Name Directory Target
WLS_SO
An
SOAJMSServer_aut
o_n
SOAJMSFileStore_
auto_n
ASERVER_HOME/jms/
SOAJMSFileStore_auto_n
WLS_S
OAn
WLS_SO
An
UMSJMSServer_aut
o_n
UMSJMSFileStore_
auto_n
ASERVER_HOME/jms/
UMSJMSFileStore_auto_n
WLS_S
OAn
wls_OIMn OIMJMSServer_auto
_n
OIMJMSFileStore_
auto_n
ASERVER_HOME/jms/
OIMJMSFileStore_auto_n
wls_OIM
n
wls_SOA
n
PS6SOAJMSServer
_auto_n
PS6SOAJMSFileSt
ore_auto_n
ASERVER_HOME/jms/
PS6SOAJMSFileStore_aut
o_n
wls_SO
An
Add the newly created JMS Queues to the existing JMS Modules by performing the
following steps:
1. Log in to the WebLogic Administration Console.
2. Navigate to Services, Messaging, JMS Modules.
3. Click a JMSModule, such as SOAJMSModule
4. Click the Sub Deployments tab.
5. Click the listed sub deployment.
This subdeployment module name is a random name in the form of
JMSServerNameXXXXXX resulting from the Configuration Wizard JMS
configuration.
6. Assign the newly created JMS server, for example SOAJMSServer_auton.
7. Click Save.
8. Perform this for each of the JMS modules listed in the following table:
JMS Module JMS Server
BPMJMSModule BPMJMSServer_auto_n
JRFWSAsyncJmsModule JRFWSAsyncJmServer_auto_n
OIMJMSModule OIMJMSServer_auto_n
SOAJMSModule SOAJMSServer_auto_n
UMSJMSSystemResource UMSJMSServe_auto_n
9. Click Activate Configuration from the Change Center menu.
17.2.5.5.5 Perform Pack/Unpack When Scaling Out
This section is necessary only when scaling out.
Run
pack
and
unpack
as described in Run Pack/Unpack (page 17-40).
17.2.5.5.6 Configure Oracle Coherence for Deploying Composites
Although deploying composites uses multicast communication by default, Oracle
recommends using unicast communication in SOA enterprise deployments. Use
unicast if multicast communication is disabled for security reasons.
Chapter 17
Scale Identity Management
17-32

Unicast communication does not enable nodes to discover other cluster members in
this way. Consequently, specify the nodes that belong to the cluster. It is not necessary
to specify all of the nodes of a cluster, however. Specify only enough nodes so that
a new node added to the cluster can discover one of the existing nodes. As a result,
when a new node has joined the cluster, it is able to discover all of the other nodes in
the cluster. Additionally, in configurations such as SOA enterprise deployments where
multiple IPs are available in the same system, configure Oracle Coherence to use a
specific host name to create the Oracle Coherence cluster.
An incorrect configuration of the Oracle Coherence framework used for deployment
may prevent the SOA system from starting. The deployment framework must be
properly customized for the network environment on which the SOA system runs.
Oracle recommends the configuration described in this section.
17.2.5.5.6.1 Enable Communication for Deployment Using Unicast Communication
Specify the nodes using the
tangosol.coherence.wkan
system property, where
n
is a number between 1 and 9. Specify up to 9 nodes. Start the numbering at
1. This numbering must be sequential and must not contain gaps. In addition,
specify the host name used by Oracle Coherence to create a cluster through the
tangosol.coherence.localhost
system property. This local host name should be the
virtual host name used by the SOA server as the listener addresses, for example:
SOAHOST3VHN. Set this property by adding the
-Dtangosol.coherence.localhost
parameters to the Arguments field of the Oracle WebLogic Server Administration
Console's Server Start tab. The new server need also to be added to the existing
entries.
Tip:
To guarantee high availability during deployments of SOA composites,
specify enough nodes so that at least one of them is running at any given
time.
SOA_SCALED_OUT_HOST2VHN
is the virtual host name that maps to the virtual IP where
WLS_SOA_SCALED_OUT_HOST2
is listening.
17.2.5.5.6.2 Specify the Host Name Used by Oracle Coherence
Use the Administration Console to specify a host name used by Oracle Coherence.
To add the host name used by Oracle Coherence:
1. Log into the Oracle WebLogic Server Administration Console.
2. In the Domain Structure window, expand the Environment node.
3. Click Servers. The Summary of Servers page appears.
4. Click the name of the server (
WLS_SOA_PROVISIONED_HOST
or
WLS_SOA_SCALED_OUT_HOST
, which are represented as hyperlinks) in Name column
of the table. The settings page for the selected server appears.
5. Click Lock & Edit.
6. Click the Server Start tab.
Chapter 17
Scale Identity Management
17-33

7. Enter the following for
WLS_SOA_PROVISIONED_HOST
,
WLS_SOA_SCALED_OUT_HOST1
,
and
WLS_SOA_SCALED_OUT_HOST2
into the Arguments field.
For
WLS_SOA_PROVISIONED_HOST
, enter the following:
-Dtangosol.coherence.wka1=SOAHOST1VHN
-Dtangosol.coherence.wka2=SOAHOST2VHN
-Dtangosol.coherence.wka3=SOAHOST3VHN
-Dtangosol.coherence.localhost=SOAHOST1VHN
For
WLS_SOA_SCALED_OUT_HOST1
, enter the following:
-Dtangosol.coherence.wka1=SOAHOST1VHN
-Dtangosol.coherence.wka2=SOAHOST2VHN
-Dtangosol.coherence.wka3=SOAHOST3VHN
-Dtangosol.coherence.localhost=SOAHOST2VHN
For
WLS_SOA_SCALED_OUT_HOST2
, enter the following:
-Dtangosol.coherence.wka1=SOAHOST1VHN
-Dtangosol.coherence.wka2=SOAHOST2VHN
-Dtangosol.coherence.wka3=SOAHOST3VHN
-Dtangosol.coherence.localhost=SOAHOST3VHN
There should be no breaks in lines between the different
-D
parameters. Do not
copy or paste the text to the Administration Console's arguments text field. It may
result in HTML tags being inserted in the Java arguments. The text should not
contain other text characters than those included the example above.
The Coherence cluster used for deployment uses port 8088 by default. This
port can be changed by specifying a different port (for example, 8089) with
the -Dtangosol.coherence.wkan.port and -Dtangosol.coherence.localport startup
parameters. For example:
WLS_SOA_PROVISIONED_HOST
(enter the following into the Arguments field on a
single line, without a carriage return):
-Dtangosol.coherence.wka1=SOAHOST1VHN
-Dtangosol.coherence.wka2=SOAHOST2VHN
-Dtangosol.coherence.wka3=SOAHOST3VHN
-Dtangosol.coherence.localhost=SOAHOST1VHN
-Dtangosol.coherence.localport=8089
-Dtangosol.coherence.wka1.port=8089
-Dtangosol.coherence.wka2.port=8089
-Dtangosol.coherence.wka3.port=8089
WLS_SOA_SCALED_OUT_HOST1
(enter the following into the Arguments field on a
single line, without a carriage return):
-Dtangosol.coherence.wka1=SOAHOST1VHN
-Dtangosol.coherence.wka2=SOAHOST2VHN
-Dtangosol.coherence.wka3=SOAHOST3VHN
-Dtangosol.coherence.localhost=SOAHOST2VHN
-Dtangosol.coherence.localport=8089
-Dtangosol.coherence.wka1.port=8089
-Dtangosol.coherence.wka2.port=8089
-Dtangosol.coherence.wka3.port=8089
WLS_SOA_SCALED_OUT_HOST2
(enter the following into the Arguments field on a
single line, without a carriage return):
Chapter 17
Scale Identity Management
17-34

-Dtangosol.coherence.wka1=SOAHOST1VHN
-Dtangosol.coherence.wka2=SOAHOST2VHN
-Dtangosol.coherence.wka3=SOAHOST3VHN
-Dtangosol.coherence.localhost=SOAHOST3VHN
-Dtangosol.coherence.localport=8089
-Dtangosol.coherence.wka1.port=8089
-Dtangosol.coherence.wka2.port=8089
-Dtangosol.coherence.wka3.port=8089
For more information about Coherence Clusters, see Introduction to Coherence
in the Oracle Fusion Middleware Developing Applications with Oracle Coherence
guide.
8. Click Save and Activate Changes.
Ensure that these variables are passed to the managed server correctly. They should
be reflected in the server's output log. Failure of the Oracle Coherence framework can
prevent the soa-infra application from starting.
The multicast and unicast addresses are different from the ones used by the
WebLogic Server cluster for cluster communication. SOA guarantees that composites
are deployed to members of a single WebLogic Server cluster even though the
communication protocol for the two entities (the WebLogic Server cluster and the
groups to which composites are deployed) are different.
17.2.5.5.7 Complete the Oracle Identity Manager Configuration Steps
1. Configure TX persistent store for the new server. This should be a location visible
from other nodes as indicated in the recommendations about shared storage.
From the WebLogic Administration Console, select the Server_name, Services
tab. Under Default Store, in Directory, enter the path to the folder used to store
the data files from the default persistent store.
2. Disable host name verification for the new Managed Server. Before starting and
verifying the
WLS_SOAn
Managed Server, disable host name verification. It can be
re-enabled after configuring server certificates for the communication between the
Oracle WebLogic Administration Server and the Node Manager in
IDMHOSTn
. If the
source server from which the new one has been cloned had already disabled host
name verification, these steps are not required (the host name verification settings
is propagated to the cloned server).
To disable host name verification:
a. In the Oracle Enterprise Manager Console, select Oracle WebLogic Server
Administration Console.
b. Expand the Environment node in the Domain Structure window.
c. Click Servers. The Summary of Servers page appears.
d. Select WLS_SOA
n
in the Names column of the table. The Settings page for
the server appears.
e. Click the SSL tab.
f. Click Advanced.
g. Set Hostname Verification to
None
.
h. Click Save.
Chapter 17
Scale Identity Management
17-35

3. Repeat Steps 6a through 6h to disable host name verification for the
WLS_OIMn
Managed Servers. In Step d, select WLS_OIM
n
in the Names column of the table.
4. Click Activate Changes from the Change Center menu.
5. Restart the WebLogic Administration Server as described in Start and Stop
Components (page 10-26).
6. Start and test the new Managed Server from the Administration Console.
a. Shut down the existing Managed Servers in the cluster.
b. Ensure that the newly created Managed Server,
WLS_SOA
n, is up.
c. Access the application on the newly created Managed Server (
http://
vip:port/soa-infra
). The application should be functional.
7. Configure the newly created managed server for server migration. Follow the
steps in Configure Server Migration Targets (page 17-49) to configure server
migration.
Since this new node is using an existing shared storage installation, the
node is already using a Node Manager and an environment configured for
server migration that includes netmask, interface,
wlsifconfig
script superuser
privileges. The floating IP addresses for the new Managed Servers are already
present in the new node.
8. Test server migration for this new server. Follow these steps from the node where
the new server was added:
a. Stop the
WLS_SOA
n Managed Server.
To do this, run:
kill -9 pid
on the process ID (PID) of the Managed Server. Identify the PID of the node
using
ps -ef | grep WLS_SOAn
b. Watch the Node Manager Console. A message indicating that the floating IP
address for
WLS_SOA_PROVISIONED_HOST
has been disabled is displayed.
c. Wait for the Node Manager to try a second restart of WLS_SOA
n
. Node
Manager waits for a fence period of 30 seconds before trying this restart.
d. Once Node Manager restarts the server, stop it again. Now Node Manager
should log a message indicating that the server will not be restarted again
locally.
e. Repeat Steps a-d for WLS_OIMn.
17.2.5.6 Scale Oracle Identity Federation
The Oracle Identity Federation instances can be scaled out by adding a new node with
a Managed Server to the existing cluster.
The existing installations (WebLogic Server home, Oracle Fusion Middleware home,
and domain directories) can be used for creating a new Managed Server for Oracle
Identity Federation.
The Oracle Identity Federation instances can be scaled out by adding a new node with
a Managed Server to the existing cluster.
Chapter 17
Scale Identity Management
17-36

Perform the steps in the following sections to scale Oracle Identity Federation.
• Assemble Information for Scaling Oracle Identity Federation (page 17-37)
• Configure Oracle Identity Federation (page 17-37)
• Perform Pack/Unpack when Scaling Out (page 17-39)
• Complete Oracle Identity Federation Server Configuration (page 17-39)
• Add New Managed Server to OHS Configuration (page 17-39)
17.2.5.6.1 Assemble Information for Scaling Oracle Identity Federation
Assemble the following information before scaling Oracle Identity Federation.
Description Variable Documented Value Customer Value
Host name
IDM_SCALED_OUT_HOST
.
myco
mpany.com
OIF Port
OIF_PORT
7499 This value is available in the Oracle
Fusion Applications Installation Workbook,
Network - Ports tab, Identity Management
Port Numbers table, IDMDomain OIF row.
Instance name
oifn oif3
WebLogic Admin Host
ADMINVHN.mycompany.com
WebLogic Admin Port
WLS_ADMIN_PO
RT
7001
WebLogic Admin User weblogic_idm
WebLogic Admin
Password
17.2.5.6.2 Configure Oracle Identity Federation
1. Ensure that the system, patch, kernel and other requirements are met. See
Verifying Certification, System Requirements, and Interoperability in the in the
Oracle Fusion Middleware Installation Guide for Oracle Identity Management in
the Oracle Fusion Middleware documentation library for the platform and version
being used.
2. Create a file containing the ports used by Oracle Internet Directory. On Disk1 of
the installation media, locate the file
stage/Response/staticports.ini
. Copy it to
a file called
oif_ports.ini
. Delete all entries in
oif_ports.ini
except for
Oracle
Identity Federation Server Port
. Change the value of that port to the port
used for this instance.
If scaling out, use the default port, 7499 (
OIF_PORT
). If scaling up, choose a unique
port for this instance.
If the port name in the file is slightly different from those listed in this step, use the
name in the file.
3. Ensure that the appropriate shared storage volumes are mounted on the new
IDMHOST,
as described in Mount Middleware Home and Create a New Machine
when Scaling Out (page 17-21).
Chapter 17
Scale Identity Management
17-37

4. Ensure that the to be used is not in use by any service on the computer by issuing
these commands for the operating system used, specifying the port to be used. If
a port is not in use, no output is returned from the command.
UNIX:
netstat -an | grep "7499"
If the port is in use (if the command returns output identifying the port), it must be
free.
UNIX:
Remove the entries for port
7499
in the
/etc/services
file.
5. Start the Oracle Identity Management 11g Configuration Wizard located under the
IDM_ORACLE_HOME/bin
directory as follows:
Issue this command:
./config.sh
6. On the Welcome screen, click Next.
7. On the Select Domain screen, select the Expand Cluster option and specify these
values:
• HostName:
ADMINVHN.mycompany.com
• Port:
7001
• UserName:
weblogic_idm
• User Password:
weblogic_user_password
Click Next.
8. A dialog box with the following message appears:
The selected domain is not a valid Identity Management domain or the
installer cannot determine if it is a valid domain. If you created the
domain using the Identity Management installer, you can ignore this message
and continue. If you did not create the domain using the Identity Management
installer, refer to the Identity Management documentation for information on
how to verify the domain is valid.
This is a benign warning that can be ignored.
Click Yes to continue.
9. On the Specify Installation Location screen, specify the following values:
• Oracle Middleware Home Location:
OIF_MW_HOME
(This value is prefilled and
cannot be updated.)
• Oracle Home Directory:
idm
(This value is prefilled and cannot be updated.)
• WebLogic Server Directory:
OIF_MW_HOME/wlserver_10.3
• Oracle Instance Location:
OIF_ORACLE_INSTANCE
• Instance Name:
oifn
, where
n
is a sequential number, for example
oif3
.
Click Next.
10. On the Specify Security Updates screen (if shown), specify the values shown in
this example:
Chapter 17
Scale Identity Management
17-38

• Email Address: Provide the email address for the My Oracle Support
account.
• Oracle Support Password: Provide the password for the My Oracle Support
account.
• Select I wish to receive security updates via My Oracle Support.
Click Next.
11. On the Configure Components screen, de-select all the components except Oracle
Identity Federation components. Select only Oracle Identity Federation from the
Oracle Identity Federation components. Do not select Oracle HTTP Server.
Click Next.
12. On the Configure Ports screen, use the
oif_ports.ini
file created in Step 2 to
specify the ports to be used. This enables to bypass automatic port configuration.
a. Select Specify Ports using a Configuration File.
b. In the file name field specify
oif_ports.ini
.
c. Click Save, then click Next.
13. On the Installation Summary screen, review the selections to ensure that they
are correct. If they are not correct, click Back to modify selections on previous
screens. Then click Configure.
14. On the Configuration Progress screen, view the progress of the configuration.
15. On the Installation Complete screen, click Finish to confirm the choice to exit.
17.2.5.6.3 Perform Pack/Unpack when Scaling Out
This section is necessary only when scaling out.
From
IDM_PROVISIONED_HOST
, copy the applications directory under the
ASERVER_HOME/config/fmwconfig/servers/wls_oif1
directory to the
ASERVER_HOME/
config/fmwconfig/servers/wls_oifn
directory, where
wls_oifn
is the new server
being added, for example:
cp -rp ASERVER_HOME/config/fmwconfig/servers/wls_oif1/applications
user@I
DM_PROVISIONED_HOST
:ASERVER_HOME/config/fmwconfig/servers/wls_oif3
Then run
pack
and
unpack
as described in Run Pack/Unpack (page 17-40).
17.2.5.6.4 Complete Oracle Identity Federation Server Configuration
Perform the steps in Validate Oracle Identity Federation (page 16-24) and Configure
the Enterprise Manager Agents (page 16-25) to completed the configuration of your
new server.
17.2.5.6.5 Add New Managed Server to OHS Configuration
Add the newly added Managed Server host name and port to the list WebLogicCluster
parameter, as described in Add New WebLogic Managed Server to Oracle HTTP
Server Configuration Files (page 17-40).
Chapter 17
Scale Identity Management
17-39

17.2.5.7 Run Pack/Unpack
Whenever a domain is extended to include a new managed server, extract the domain
configuration needs from the
ASERVER_HOME
location to the
MSERVER_HOME
location. This
applies for scaling up or out. To do this perform the following steps.
1. Pack the domain on
IDM_PROVISIONED_HOST
to create a template pack using the
command:
pack.sh -domain=ASERVER_HOME -template =/templates/managedServer.jar -
template_name="template_name" -managed=true
The
pack.sh
script is located in
ORACLE_COMMON_HOME/common/bin
.
2. Unpack the domain on the new host for scale out, or on the existing host for scale
up, using the command:
unpack.sh -domain=MSERVER_HOME -template=/templates/managedServer.jar -
app_dir=MSERVER_HOME/applications
The
unpack.sh
script is located in
ORACLE_COMMON_HOME/common/bin
.
3. In case of scaling out, start Node Manager and update the property file.
a. Start and stop Node Manager as described in Start and Stop Components
(page 10-26).
b. Run the script
setNMProps.sh
, which is located in
ORACLE_COMMON_HOME/
common/bin
, to update the node manager properties file, for example:
cd ORACLE_COMMON_HOME/common/bin
./setNMProps.sh
c. Start Node Manager once again as described in Start and Stop Components
(page 10-26).
17.2.5.8 Add New WebLogic Managed Server to Oracle HTTP Server
Configuration Files
Scaling an Application Tier component typically requires to create a new WebLogic
managed server. If a new managed server is added to the topology, after adding the
managed server, update the Oracle HTTP Server configuration files (on all nodes) and
add the new server to the existing WebLogic cluster directives.
In the Web tier, there are several configuration files under
WEB_ORACLE_INSTANCE/
config/OHS/componentname/moduleconf
, including
admin_vh.conf
,
sso_vh.conf
and
idminternal_vh.conf
. Each contain a number of entries in location blocks. If a block
references two server instances and add a third one is added, update that block with
the new server.
For example if a new Oracle Access Manager server is added, update
sso_vh.conf
to
include the new managed server. Add the new server to the
WebLogicCluster
directive
in the file, for example, change:
<Location /oam>
SetHandler weblogic-handler
WebLogicCluster
IDM_PROVISIONED_HOST.mycompany.com:14100,IDM_SCALED_OUT_HOST.mycompany.com:14100
</Location>
Chapter 17
Scale Identity Management
17-40

<Location /fusion_apps>
SetHandler weblogic-handler
WebLogicCluster
IDM_PROVISIONED_HOST.mycompany.com:14100,IDM_SCALED_OUT_HOST.mycompany.com:14100
</Location>
to:
<Location /oam>
SetHandler weblogic-handler
WebLogicCluster
IDM_PROVISIONED_HOST.mycompany.com:14100,IDM_SCALED_OUT_HOST.mycompany.com:14100,
IDM_PROVISIONED_HOST.mycompany.com:14101
</Location>
<Location /fusion_apps>
SetHandler weblogic-handler
WebLogicCluster
IDM_PROVISIONED_HOST.mycompany.com:14100,IDM_SCALED_OUT_HOST.mycompany.com:14100,
IDM_SCALED_OUT_HOST.mycompany.com:14100
</Location>
Similarly, if y a new ODSM server is added, update ODSM entries in the file
admin_vh.conf
.
Once the configuration file has been updated, restart the Oracle HTTP server(s) as
described in Start and Stop Components (page 10-26). Oracle recommends to do this
sequentially to prevent loss of service.
17.2.6 Scale the Web Tier
The Web Tier already has a node running an instance of the Oracle HTTP Server. The
existing Oracle HTTP Server binaries can be used for creating the new Oracle HTTP
Server instance.
To scale the Oracle HTTP Server, perform the steps in the following subsections:
• Assemble Information for Scaling the Web Tier (page 17-41)
• Mount Middleware Home and Copy Oracle HTTP Server Files when Scaling Out
(page 17-42)
• Run the Configuration Wizard to Configure the HTTP Server (page 17-42)
• Register Oracle HTTP Server with WebLogic Server (page 17-43)
• Reconfigure the Load Balancer (page 17-44)
17.2.6.1 Assemble Information for Scaling the Web Tier
Assemble the following information before scaling the Web Tier.
Description
Variable Documented Value Customer Value
Host name WEBHOST1.mycomp
any.com
NA
OHS port
OHS_PORT
7777 NA
Instance Name
webn web1
or
web2
NA
Chapter 17
Scale Identity Management
17-41

Description Variable Documented Value Customer Value
Component Name
webn web1
or
web2
NA
WebLogic Admin
Host
NA ADMINVHN.mycompa
ny.com
NA
WebLogic Admin
Port
WLS_ADMIN_
PORT
7001 NA
WebLogic Admin
User
weblogic_idm NA
WebLogic Admin
Password
NA NA NA
17.2.6.2 Mount Middleware Home and Copy Oracle HTTP Server Files when
Scaling Out
1. On the new node, mount the existing Middleware home.
2. Copy all files created in
ORACLE_INSTANCE/config/OHS/component/moduleconf
from the existing Web Tier configuration to the new one.
17.2.6.3 Run the Configuration Wizard to Configure the HTTP Server
Perform these steps to configure the Oracle Web Tier:
1. Create a file containing the ports used by Oracle HTTP Server. On Disk1 of the
installation media, locate the file
stage/Response/staticports.ini
. Copy it to a
file called
ohs_ports.ini
. Delete all entries in
ohs_ports.ini
except for
OHS PORT
and
OPMN Local Port
. Change the value of
OPMN Local Port
to
6700
. In case
of scaling out, use the default value,
7777
, for
OHS PORT
. In case of scaling up,
choose a unique value for that instance on the machine.
If the port names in the file are slightly different from
OHS PORT
and
OPMN Local
Port
, use the names in the file.
2. Change the directory to the location of the Oracle Fusion Middleware
Configuration Wizard:
cd WEB_ORACLE_HOME/bin
3. Start the Configuration Wizard:
./config.sh
Enter the following information into the configuration wizard:
1. On the Welcome screen, click Next.
2. On the Configure Component screen, select: Oracle HTTP Server.
Ensure that Associate Selected Components with WebLogic Domain is selected.
Ensure Oracle Web Cache is NOT selected.
Click Next.
3. On the Specify WebLogic Domain Screen, enter
• Domain Host Name:
ADMINVHN.mycompany.com
Chapter 17
Scale Identity Management
17-42

• Domain Port No:
7001
, where
7001
is
WLS_ADMIN_PORT
.
• User Name: Weblogic Administrator User (For example:
weblogic
)
• Password: Password for the Weblogic Administrator User account
Click Next.
4. On the Specify Component Details screen, specify the following values:
Enter the following values for WEBHOSTn, where n is the number of the new host,
for example,
3
:
• Instance Home Location: WEB_ORACLE_INSTANCE (
/u02/local/
oracle/config/instances/ohsn
, for example,
/u02/local/oracle/config/
instances/ohs1
)
• Instance Name:
webn
• OHS Component Name:
webn
Click Next.
5. On the Configure Ports screen, use the
ohs_ports.ini
file created in Step 1to
specify the ports to be used. This enables to bypass automatic port configuration.
a. Select Specify Ports using a Configuration File.
b. In the file name field specify
ohs_ports.ini
.
c. Click Save, then click Next.
6. On the Specify Security Updates screen, specify these values:
• Email Address: The email address for the My Oracle Support account.
• Oracle Support Password: The password for the My Oracle Support
account.
Select: I wish to receive security updates via My Oracle Support.
Click Next.
7. On the Installation Summary screen, review the selections to ensure that they are
correct. If they are not, click Back to modify selections on previous screens.
Click Configure.
On the Configuration screen, the wizard launches multiple configuration
assistants. This process can be lengthy. When it completes, click Next.
On the Installation Complete screen, click Finish to confirm the choice to exit.
17.2.6.4 Register Oracle HTTP Server with WebLogic Server
• For Oracle Enterprise Manager Fusion Middleware Control to be able to manage
and monitor the new Oracle HTTP server, register the Oracle HTTP server with
IDMDomain. To do this, register Oracle HTTP Server with WebLogic Server by
running the following command on the host where the new server is running:
cd WEB_ORACLE_INSTANCE/bin
./opmnctl registerinstance -adminHost ADMINVHN.mycompany.com \
-adminPort 7001 -adminUsername weblogic
Chapter 17
Scale Identity Management
17-43

17.2.6.5 Reconfigure the Load Balancer
Add the new Oracle HTTP Server instance to the existing server pool defined on the
load balancer for distributing requests across the HTTP instances.
17.2.7 Post-Scaling Steps for All Components
Provisioning creates a set of scripts to start and stop managed servers defined in the
domain. When a new managed server is created in the domain needed to update
the domain configuration so that these start and stop scripts can also start the newly
created managed server.
1. To update the domain configuration, edit the file
serverInstancesCustom.txt
,
which is located in the directory:
SHARED_CONFIG_DIR/scripts
2. To start a node manager on a new machine, add an entry which looks like this:
newmachine.mycompany.com NM nodemanager_pathname nodemanager_port
For example:
IDM_SCALED_OUT_HOST.mycompany.com NM /u01/oracle/config/nodemanager/
IDM_SCALED_OUT_HOST.mycompany.com 5556
3. To start a managed server called
WLS_OIM_SCALED_OUT_HOST
add an entry which
looks like this:
newmachine.mycompany.com OIM ManagedServerName
For example:
IDM_SCALED_OUT_HOST OIM WLS_OIM_SCALED_OUT_HOST
4. Save the file.
17.3 Set Up Server Migration for Identity Management
Configuring server migration allows SOA-managed and OIM-managed servers to be
migrated from one host to another, so that if a node hosting one of the servers fails,
the service can continue on another node. This section describes how to configure
server migration for an Identity Management enterprise deployment.
17.3.1 Overview of Server Migration for an Enterprise Deployment
Perform the steps in the following sections to configure server migration for the
following Managed Servers:
•
WLS_OIM_PROVISIONED_HOST
•
WLS_SOA_PROVISIONED_HOST
•
WLS_OIM_SCALED_OUT_HOST
•
WLS_SOA_SCALED_OUT_HOST
The
WLS_OIM_PROVISIONED_HOST
and
WLS_SOA_PROVISIONED_HOST
Managed Server are
configured to restart on
IDM_SCALED_OUT_HOST
should a failure occur.
The
WLS_OIM_SCALED_OUT_HOST
and
WLS_SOA_SCALED_OUT_HOST
Managed Servers are
configured to restart on
IDM_PROVISIONED_HOST
should a failure occur.
Chapter 17
Set Up Server Migration for Identity Management
17-44

The
WLS_OIM_PROVISIONED_HOST
,
WLS_SOA_PROVISIONED_HOST
,
WLS_OIM_SCALED_OUT_HOST
and
WLS_SOA_SCALED_OUT_HOST
servers listen on specific
floating IPs that are failed over by WebLogic Server Migration.
17.3.2 Set Up a User and Tablespace for the Server Migration Leasing
Table
In this section, a user and tablespace are setup for the server migration leasing table:
If other servers in the same domain have already been configured with server
migration, the same tablespace and data sources can be used. In that case, the data
sources and multi data source for database leasing do not need to be re-created, but
they must be retargeted to the clusters being configured with server migration.
1. Create a tablespace called
leasing
. For example, log on to SQL*Plus as the
sysdba user and run the following command:
create tablespace leasing
logging datafile 'DB_HOME/oradata/orcl/leasing.dbf'
size 32m autoextend on next 32m maxsize 2048m extent management local;
2. Create a user named
leasing
and assign to it the
leasing
tablespace:
create user leasing identified by password;
grant create table to leasing;
grant create session to leasing;
alter user leasing default tablespace leasing;
alter user leasing quota unlimited on LEASING;
3. Create the
leasing
table using the
leasing.ddl
script:
a. Copy the
leasing.ddl
file located in either of the following directories to the
database node:
WL_HOME/server/db/oracle/817
WL_HOME/server/db/oracle/920
b. Connect to the database as the
leasing
user.
c. Run the
leasing.ddl
script in SQL*Plus:
@Copy_Location/leasing.ddl;
17.3.3 Create a Multi Data Source Using the Oracle WebLogic
Administration Console
The second step is to create a multi data source for the leasing table from the Oracle
WebLogic Server Administration Console. Console URLs are provided in About Oracle
Identity Management Console URLs (page 10-27). Create a data source to each of the
Oracle RAC database instances during the process of setting up the multi data source,
both for these data sources and the global leasing multi data source. When a data
source is created:
• Ensure that this is a non-XA data source.
• The names of the multi data sources are in the format of
MultiDS-rac0
,
MultiDS-
rac1
, and so on.
• Use Oracle's Driver (Thin) Version 9.0.1, 9.2.0, 10, 11.
Chapter 17
Set Up Server Migration for Identity Management
17-45

• Data sources do not require support for global transactions. Therefore, do not use
any type of distributed transaction emulation/participation algorithm for the data
source (do not choose the Supports Global Transactions option, or the Logging
Last Resource, Emulate Two-Phase Commit, or One-Phase Commit options of
the Supports Global Transactions option), and specify a service name for the
database.
• Target these data sources to the oim_cluster and the soa_cluster.
• Ensure the data source's connection pool initial capacity is set to 0 (zero). To do
this, select Services, JDBC, and then Datasources. In the Datasources screen,
click the Datasource Name, then click the Connection Pool tab, and enter 0
(zero) in the Initial Capacity field.
Creating a Multi Data Source
Perform these steps to create a multi data source:
1. From Domain Structure window in the Oracle WebLogic Server Administration
Console, expand the Services node. The Summary of JDBC Data Source page
appears.
2. Click Data Sources. The Summary of JDBC Multi Data Source page is displayed.
3. Click Lock and Edit.
4. Click New Multi Data Source. The Create a New JDBC Multi Data Source page is
displayed.
5. Enter
leasing
as the name.
6. Enter
jdbc/leasing
as the JNDI name.
7. Select Failover as algorithm (default).
8. Click Next.
9. Select oim_cluster and soa_cluster as the targets.
10. Click Next.
11. Select non-XA driver (the default).
12. Click Next.
13. Click Create New Data Source.
14. Enter
leasing-rac0
as the name. Enter
jdbc/leasing-rac0
as the JNDI name.
Enter
oracle
as the database type. For the driver type, select Oracle Driver (Thin)
for Oracle RAC Service-Instance connections, Versions:10 and later.
When creating the multi data sources for the leasing table, enter names in the
format of
MultiDS-rac0
,
MultiDS
-
rac1
, and so on.
15. Click Next.
16. On JDBC Data Source Properties, select Database Driver: Oracle's Driver
(Thin) for RAC Service-Instance connections.
17. Deselect Supports Global Transactions.
18. Click Next.
19. Enter the service name, database name, host port, and password for the leasing
schema.
20. Click Next.
Chapter 17
Set Up Server Migration for Identity Management
17-46

21. Click Test Configuration and verify that the connection works.
22. Click Next.
23. Target the data source to oim_cluster and SOA cluster.
24. Click Finish.
25. Select the data source that was just created, for example
leasing-rac0
, and add it
to the right screen.
26. Click Create a New Data Source for the second instance of the Oracle RAC
database, target it to the oim_cluster and soa_cluster, repeating the steps for the
second instance of the Oracle RAC database.
27. Add the second data source to the multi data source.
28. Click Activate Changes.
17.3.4 Edit Node Manager's Properties File
In this section, Node Manager's properties file are edited. This must be done for the
Node Managers on the nodes where the servers are running,
IDM_PROVISIONED_HOST
and
IDM_SCALED_OUT_HOST
.
The
nodemanager.properties
file is located in the directory
SHARED_CONFIG_DIR/nodemanager/hostname
where
hostname
is the name of the host where the node manager is running.
Add the following properties to enable server migration to work properly:
•
Interface:
Interface=eth0
This property specifies the interface name for the floating IP (for example, eth0).
Do not specify the sub-interface, such as
eth0:1
or
eth0:2
. This interface is to
be used without
:0
or
:1
. Node Manager's scripts traverse the different :X-enabled
IPs to determine which to add or remove. For example, the valid values in Linux
environments are
eth0
,
eth1
,
eth2
,
eth3
,
eth
n, depending on the number of
interfaces configured.
•
NetMask:
NetMask=255.255.255.0
This property specifies the net mask for the interface for the floating IP. The net
mask should the same as the net mask on the interface.
•
UseMACBroadcast:
UseMACBroadcast=true
This property specifies whether to use a node's MAC address when sending ARP
packets, that is, whether to use the -
b
flag in the
arping
command.
Verify in Node Manager's output (shell where Node Manager is started) that these
properties are being used, or problems may arise during migration. A similar message
should be displayed in Node Manager's output:
Chapter 17
Set Up Server Migration for Identity Management
17-47

StateCheckInterval=500
eth0=*,NetMask=255.255.255.0
UseMACBroadcast=true
•
LogToStderr
must be set to true (in
node.propertes
), in order to see the
properties in the output.
• The following steps are not required if the server properties (start properties) have
been properly set and Node Manager can start the servers remotely.
1. If not done already, set the
StartScriptEnabled
property in the
nodemanager.properties
file to true. This is required to enable Node Manager
to start the managed servers.
2. Start Node Manager on
IDM_PROVISIONED_HOST
and
IDM_SCALED_OUT_HOST
by running the
startNodeManagerWrapper.sh
script, which is located in the
SHARED_CONFIG_DIR/nodemanager/hostname
directory.
When running Node Manager from a shared storage installation, multiple nodes
are started using the same
nodemanager.properties
file. However, each node may
require different NetMask or
Interface
properties. In this case, specify individual
parameters on a per-node basis using environment variables. For example, to use a
different interface (
eth3
) in HOSTn, use the
Interface
environment variable by setting
JAVA_OPTIONS
to:
-DInterface=eth3
.
Then start Node Manager.
17.3.5 Set Environment and Superuser Privileges for the wlsifconfig.sh
Script
On Linux, set environment and superuser privileges for the
wlsifconfig.sh
script:
Ensure that the PATH environment variable includes the files listed in Table 17-1
(page 17-48).
Table 17-1 Files Required for the PATH Environment Variable
File Located in this directory
wlsifconfig.sh MSERVER_HOME/bin/server_migration
wlscontrol.sh WL_HOME/common/bin
nodemanager.domains SHARED_CONFIG_DIR/nodemanager/HostName
For security reasons,
sudo
should be restricted to the subset of commands required
to run the
wlsifconfig.sh
script. For example, perform the following steps to set the
environment and superuser privileges for the
wlsifconfig.sh
script.
Ask the system administrator for the appropriate
sudo
and system rights to perform
this step.
Grant
sudo
privilege to the WebLogic user
oracle
with no password restriction, and
grant execute privilege on the
/sbin/ifconfig
and
/sbin/arping binaries
.
Make sure the script is executable by the WebLogic user ('oracle'). The following is an
example of an entry inside
/etc/sudoers
granting sudo execution privilege for
oracle
and also over
ifconfig
and
arping
.
Chapter 17
Set Up Server Migration for Identity Management
17-48

To grant sudo privilege to the WebLogic user ('oracle') with no password restriction,
and grant execute privilege on the
/sbin/ifconfig
and
/sbin/arping
binaries:
Defaults:oracle !requiretty
oracle ALL=NOPASSWD: /sbin/ifconfig,/sbin/arping
17.3.6 Configure Server Migration Targets
In this section, server migration targets are configured. Configuring Cluster Migration
sets the
DataSourceForAutomaticMigration
property to true.
To configure migration in a cluster:
1. Log in to the Oracle WebLogic Server Administration Console at:
http://
ADMIN.mycompany.com/console
.
2. In the Domain Structure window, expand Environment and select Clusters. The
Summary of Clusters page is displayed.
3. Click the cluster needed to configure migration (oim_cluster) in the Name column
of the table.
4. Click the Migration tab.
5. Click Lock and Edit.
6. In the Candidate Machines for Migratetable Servers field, select the machine
to which to allow migration and click the right arrow. In this case, select
IDM_PROVISIONED_HOST
and
IDM_SCALED_OUT_HOST
.
7. Select the data source to be used for automatic migration. In this case, select the
leasing data source.
8. Click Save.
9. In the Domain Structure window of the Oracle WebLogic Server Administration
Console, expand Environment and select Servers.
10. Select the server needed to configure migration.
11. Click the Migration tab.
12. Select Automatic Server Migration Enabled and click Save.
13. Click Activate Changes.
14. Repeat steps 2 to 13 for the SOA cluster.
15. Restart WebLogic Administration Server, Node Managers, and the servers for
which server migration has been configured, as described in Start and Stop
Components (page 10-26).
If migration is only going to be allowed to specific machines, do not specify candidates
for the cluster, but rather specify candidates only on a server per server basis.
17.3.7 Test the Server Migration
In this section, the server migration is tested. Perform these steps to verify that server
migration is working properly:
Chapter 17
Set Up Server Migration for Identity Management
17-49

To test from
IDM_PROVISIONED_HOST
:
1. Stop the
WLS_OIM_PROVISIONED_HOST
Managed Server. To do this, run this
command:
kill -9 pid
where pid specifies the process ID of the Managed Server. The pid can be
identified in the node by running this command:
ps -ef | grep WLS_OIM_PROVISIONED_HOST
2. Watch the Node Manager console. A message indicating that
WLS_
OIM_PROVISIONED_HOST
's floating IP has been disabled should be displayed.
3. Wait for Node Manager to try a second restart of
WLS_OIM_PROVISIONED_HOST
. It
waits for a fence period of 30 seconds before trying this restart.
4. Once Node Manager restarts the server, stop it again. Node Manager should now
log a message indicating that the server will not be restarted again locally.
To test from
IDM_SCALED_OUT_HOST
:
1. Watch the local Node Manager console. After 30 seconds since the last
try to restart
WLS_OIM_PROVISIONED_HOST
on
IDM_PROVISIONED_HOST
, Node
Manager on
IDM_SCALED_OUT_HOST
should prompt that the floating IP for
WLS_OIM_PROVISIONED_HOST
is being brought up and that the server is being
restarted in this node.
2. Access the OIM Console using the Virtual Host Name, for example: OIMVH1.
Console URLs are provided in About Oracle Identity Management Console URLs
(page 10-27).
Follow the previous steps to test server migration for the
WLS_OIM_SCALED_OUT_HOST
,
WLS_SOA_PROVISIONED_HOST
, and
WLS_SOA_SCALED_OUT_HOST
Managed Servers.
Table 17-2 (page 17-50) shows the Managed Servers and the hosts they migrate to in
case of a failure.
Table 17-2 Managed Server Migration
Managed Server Migrated From Migrated To
WLS_OIM_PROVISIONED_HOS
T
IDM_PROVISIONED_HOST IDM_SCALED_OUT_HOST
WLS_OIM_SCALED_OUT_HOST IDM_SCALED_OUT_HOST IDM_PROVISIONED_HOST
WLS_SOA_PROVISIONED_HOS
T
IDM_PROVISIONED_HOST IDM_SCALED_OUT_HOST
WLS_SOA_SCALED_OUT_HOST IDM_SCALED_OUT_HOST IDM_PROVISIONED_HOST
Verification From the Administration Console
Migration can also be verified in the Administration Console:
1. Log in to the Administration Console. Console URLs are provided in About Oracle
Identity Management Console URLs (page 10-27).
2. Click IDMDomain on the left console.
Chapter 17
Set Up Server Migration for Identity Management
17-50

3. Click the Monitoring tab and then the Migration sub tab.
The Migration Status table provides information on the status of the migration.
After a server is migrated, to fail it back to its original node/machine, stop the Managed
Server from the Oracle WebLogic Administration Console and then start it again. The
appropriate Node Manager starts the Managed Server on the machine to which it was
originally assigned.
17.3.8 Back Up the Server Migration Configuration
Back up the database and the WebLogic domain, as described in Perform Backups
During Installation and Configuration (page 10-28).
17.4 Set Up Fail Over for the Administration Server
This section discusses how to fail over the Administration Server to IDMHOST2 and
how to fail it back to IDMHOST1.
This section contains the following topics:
• Fail Over the Administration Server to IDMHOST2 (page 17-51)
• Start the Administration Server on IDMHOST2 (page 17-53)
• Validate Access to IDMHOST2 Through Oracle HTTP Server (page 17-53)
• Fail the Administration Server Back to IDMHOST1 (page 17-54)
17.4.1 Fail Over the Administration Server to IDMHOST2
If a node fails, the Administration Server can be failed over to another node. This
section describes how to fail over the Administration Server from IDMHOST1 to
IDMHOST2.
Assumptions:
• The Administration Server is configured to listen on
ADMINVHN.mycompany.com
, and
not on
ANY
address.
• The Administration Server is failed over from IDMHOST1 to IDMHOST2, and the
two nodes have these IP addresses:
– IDMHOST1:
100.200.140.165
– IDMHOST2:
100.200.140.205
– ADMINVIP:
100.200.140.206
This is the Virtual IP address where the Administration Server is running,
assigned to interface:index (for example, eth1:2), available in IDMHOST1 and
IDMHOST2.
• The domain directory where the Administration Server is running in IDMHOST1 is
on a shared storage and is mounted also from IDMHOST2.
NM in IDMHOST2 does not control the domain at this point, since
unpack
/
nmEnroll
has not been run yet on IDMHOST2. But for the purpose of AdminServer
failover and control of the AdminServer itself, Node Manager is fully functional
Chapter 17
Set Up Fail Over for the Administration Server
17-51

• Oracle WebLogic Server and Oracle Fusion Middleware Components have been
installed inIDMHOST2 as described in previous sections. That is, the same
path for
IDM_ORACLE_HOME
and
MW_HOME
that exists in IDMHOST1 is available in
IDMHOST2.
The following procedure shows how to fail over the Administration Server to a different
node, IDMHOST2.
Step 1 and Step 2 are applicable ONLY for Linux.
1. Stop the Administration Server as described in Start and Stop Components
(page 10-26).
2. Migrate the IP address to the second node.
a. Run the following command as root on IDMHOST1 (where x:y is the current
interface used by
ADMINVHN.mycompany.com
):
Linux:
/sbin/ifconfig x:y down
For example:
/sbin/ifconfig eth0:1 down
Solaris:
/sbin/ifconfig x:y down
For example:
/sbin/ifconfig eth0:1 down
b. Run the following command on IDMHOST2:
Linux:
/sbin/ifconfig interface:index IP_Address netmask netmask
For example:
/sbin/ifconfig eth0:1 100.200.140.206 netmask 255.255.255.0
Solaris:
/sbin/ifconfig interface:index IP_Address netmask netmask
For example:
/sbin/ifconfig eth0:1 100.200.140.206 netmask 255.255.255.0
Ensure that the netmask and interface to be used match the available network
configuration in IDMHOST2.
3. Update routing tables by using the following commands, for example:
Linux:
/sbin/arping -q -U -c 3 -I eth0 100.200.140.206
Solaris:
/usr/sbin/ping <ipaddress>
Chapter 17
Set Up Fail Over for the Administration Server
17-52

17.4.2 Start the Administration Server on IDMHOST2
Perform the following steps to start Node Manager on IDMHOST2.
1. On IDMHOST2, mount the Administration Server domain directory if it is not
already mounted. For example:
mount /u01/oracle
2. Start Node Manager by using the following commands:
cd WL_HOME/server/bin
./startNodeManager.sh
3. Stop the Node Manager by killing the Node Manager process.
Starting and stopping Node Manager at this point is only necessary the first time
Node Manager is run. Starting and stopping it creates a property file from a
predefined template. The next step adds properties to that property file.
4. Run the setNMProps.sh script to set the
StartScriptEnabled
property to
true
before starting Node Manager:
cd ORACLE_COMMON_HOME/common/bin
./setNMProps.sh
Use the
StartScriptEnabled
property to avoid class loading failures and other
problems.
5. Start the Node Manager as described in Starting and Stopping Components
(page 10-26).
6. Start the Administration Server on IDMHOST2.
cd ORACLE_COMMON_HOME/common/bin
./wlst.sh
Once in the WLST shell, execute the following commands:
nmConnect('admin','Admin_Password', 'IDMHOST2','5556', 'IDMDomain','/u1/
oracle/config/domains/IDMDomain')
nmStart('AdminServer')
7. Test the access to the Administration Server on IDMHOST2 as follows:
a. Ensure the access to the Oracle WebLogic Server Administration Console at:
http://ADMINVHN.mycompany.com:7001/console.
b. Check that it is possible to access and verify the status of components in the
Oracle Enterprise Manager at:
http://ADMINVHN.mycompany.com:7001/em
.
17.4.3 Validate Access to IDMHOST2 Through Oracle HTTP Server
Perform the same steps as in Validate the Administration Server (page 10-24). This
is to check that the Administration Server can be accessed when it is running on
IDMHOST2.
Chapter 17
Set Up Fail Over for the Administration Server
17-53

17.4.4 Fail the Administration Server Back to IDMHOST1
This step checks that the Administration Server can be failed back, that is, it can be
stopped on IDMHOST2 and run on IDMHOST1. To do this, migrate ADMINVHN back
to IDMHOST1 node as described in the following steps.
1. Ensure that the Administration Server is not running. If it is, stop it from
the WebLogic console, or by running the command
stopWeblogic.sh
from
ASERVER_HOME/bin
.
2. On IDMHOST2, unmount the Administration server domain directory. For example:
umount /u01/oracle
3. On IDMHOST1, mount the Administration server domain directory. For example:
mount /u01/oracle
4. Disable the
ADMINVHN.mycompany.com
virtual IP address on IDMHOST2 and run
the following command as
root
on IDMHOST2:
/sbin/ifconfig x:y down
where
x:y
is the current interface used by
ADMINVHN.mycompany.com
.
5. Run the following command on IDMHOST1:
/sbin/ifconfig interface:index 100.200.140.206 netmask 255.255.255.0
Ensure that the netmask and interface to be used match the available network
configuration in IDMHOST1
6. Update routing tables by using arping. Run the following command from
IDMHOST1.
/sbin/arping -q -U -c 3 -I interface 100.200.140.206
7. If Node Manager is not already started on IDMHOST1, start it, as described in
Start and Stop Components (page 10-26).
8. Start the Administration Server again on IDMHOST1.
cd ORACLE_COMMON_HOME/common/bin
./wlst.sh
Once in the WLST shell, execute
nmConnect(admin,'Admin_Pasword, IDMHOST1,'5556',
'IDMDomain','/u01/oracle/config/domains/IDMDomain'
nmStart('AdminServer')
9. Test the access to the Oracle WebLogic Server Administration Console at:
http://ADMINVHN.mycompany.com:7001/console
where
7001
is
WLS_ADMIN_PORT
10. Check it is possible to access and verify the status of components in the Oracle
Enterprise Manager at:
http://ADMINVHN.mycompany.com:7001/em
Chapter 17
Set Up Fail Over for the Administration Server
17-54

17.5 Next Steps
For more information regarding scale out and server migration for Oracle Fusion
Applications, go to Complete Conditional Common High Availability Post-Installation
Tasks for Oracle Fusion Applications (page 18-1). Otherwise, go to the section that
corresponds to the product offering that is installed.
Chapter 17
Next Steps
17-55

18
Complete Conditional Common High
Availability Post-Installation Tasks for
Oracle Fusion Applications
This section describes the conditional common high availability post-installation tasks
for Oracle Fusion Applications that must be reviewed and completed as required.
This section contains the following topics:
• Introduction to Completing Conditional Common High Availability Post-Installation
Tasks for Oracle Fusion Applications (page 18-1)
• Scale Oracle Fusion Applications (page 18-1)
• Set Up Server Migration for Oracle Fusion Applications (page 18-91)
• What to Do Next (page 18-98)
18.1 Introduction to Completing Conditional Common
High Availability Post-Installation Tasks for Oracle Fusion
Applications
After successfully completing the conditional common post-installation tasks review
and perform the following conditional common high availability tasks.
Some components in the Oracle Fusion Applications environment are dependent on
one another. Therefore, it is important to start and stop components in the proper
order. In the course of normal IT operations, common operations include shutting
down computers and starting them back up. Therefore, it is crucial to start and stop
Oracle Fusion Applications in a sequential manner. See Start and Stop an Oracle
Fusion Applications Environment in the Oracle Fusion Applications Administrator's
Guide.
18.2 Scale Oracle Fusion Applications
The Oracle Fusion Applications topology is highly scalable, and can be scaled up
or out. When scaling up the topology, add a new Managed Server to provisioning
hosts that are already running one or more Managed Servers. When scaling out the
topology, add one or more instances of Managed Servers to new hosts.
18.2.1 Scale Out Oracle HTTP Server
The first Oracle HTTP Server (
WEBHOST1
) was configured during the provisioning
process. This section describes how to scale out Oracle HTTP Server to additional
hosts.
18-1

18.2.1.1 Prerequisites for Performing the Scale Out
Before scaling out Oracle HTTP Server to additional hosts, ensure the following is
done:
1. Reboot
WEBHOST2
to start the scaleout where
WEBHOST2
is a clean machine.
MANDATORY:
WEBHOST2
and
WEBHOST1
should be running the same version of
the operating system certified for Oracle Fusion Applications as other provisioning
hosts.
2. On
WEBHOST2
, create the directory
REPOSITORY_LOCATION/installers
with the
same user that installed Oracle HTTP Server on
WEBHOST1
.
3. Copy or
ftp
the entire content of the following directories from
installers
and
jdk
to
WEBHOST2
. Depending on network access available to
WEBHOST2
, it is
possible to copy or
ftp
from
REPOSITORY_LOCATION
or
WEBHOST1
:
•
REPOSITORY_LOCATION/installers/webgate
•
REPOSITORY_LOCATION/installers/webtier
•
REPOSITORY_LOCATION/jdk
18.2.1.2 Install the Oracle Web Tier
To install Oracle Web Tier, do the following:
1. Run the following command to install Oracle Web Tier on
WEBHOST2
:
UNIX:
REPOSITORY_LOCATION
/installers/webtier/Disk1/runInstaller
The Oracle Fusion Middleware 11g Oracle Web Tier Utilities Configuration
Welcome screen opens.
2. (UNIX only) Specify the same values for inventory directory and operating system
group as those set for
WEBHOST1
. (These values can be found in the
/etc/
oraInst.loc
file specified for
WEBHOST1
.)
Click OK.
3. (UNIX only) Follow the instructions in the Inventory Location Confirmation Dialog
box to execute the
createCentralInventory.sh
script as root user, and then click
OK to dismiss the dialog box.
4. Select the appropriate options, and then click Next to start the installation.
The Select Installation Type screen opens.
5. Select Install Software - Do Not Configure and click Next.
The Prerequisite Checks screen opens.
After all prerequisite checks have successfully completed, click Next. The Specify
Installation Location screen opens. (If any prerequisite check fails, first resolve the
issue, and then click Retry to run the prerequisite checks again.)
Select the path to Oracle Middleware Home and enter a name for the home
directory. For example, (UNIX)
/u01/oracle/products/webtier_mwhome/
. Click
Next.
Chapter 18
Scale Oracle Fusion Applications
18-2

6. In the Specify Security Updates screen, do the following:
• Enter an email address
• Indicate to receive security updates from My Oracle Support
• Enter the My Oracle Support password
Click Next. The Installation Summary screen opens.
7. Click Install. The Installation Progress screen opens.
Click Next when the installation has finished. The Installation Complete screen
opens.
Click Finish.
8. Review the directory structure that has been created:
cd
APPLICATIONS_BASE
/webtier_mwhome
18.2.1.3 Install Oracle Web Tier Patches
If any directory under
REPOSITORY_LOCATION/installers/webtier/prepatch
and/or
REPOSITORY_LOCATION/installers/webtier/patch
exists, perform the steps in this
section. If no directory exists, perform only Steps 1 (page 18-3) and 3 (page 18-3) on
both
WEBHOST1
and
WEBHOST2
(skip Step 2).
To install Web Tier patches, do the following:
1. Set or change the environment variable
$ORACLE_HOME
to
APPLICATIONS_BASE/
webtier_mwhome/webtier/
, as shown in the following examples:
UNIX:
export
ORACLE_HOME
=
APPLICATIONS_BASE
/webtier_mwhome/webtier
2. To install the patches:
a. If a subfolder exists in the
prepatch
folder of the Web Tier installer, change
directory to the
prepatch
folder and run the following command:
ORACLE_HOME
/OPatch/opatch napply
b. Change directory to the
patch
folder and run the command again.
3. Make sure the same patches are installed on both
WEBHOST1
and
WEBHOST2
by
running the following command on both
WEBHOST1
and
WEBHOST2
, comparing the
output to ensure the patches are the same:
APPLICATIONS_BASE
/webtier_mwhome/webtier/OPatch/opatch lsinventory
18.2.1.4 Configure Oracle Web Tier
To configure Oracle Web Tier, do the following:
1. Begin configuring the Oracle Web Tier components:
UNIX:
cd
APPLICATIONS_BASE
/webtier_mwhome/webtier/bin
run ./config.sh
Chapter 18
Scale Oracle Fusion Applications
18-3

The Oracle Fusion Middleware 11g Oracle Web Tier Utilities Configuration
Welcome screen opens.
Click Next. The Configure Components screen opens.
2. Select Oracle HTTP Server and Associate Selected Components with
WebLogic Domain.
3. Click Next. The Specify WebLogic Domain screen opens.
4. Enter the following:
• Common domain host name; for example,
PROVISIONED_HOST
• Common domain port number; for example,
COMMONDOMAIN ADMIN PORT
• Common domain Administration Server user name
• Common domain Administration Server password
Associate Oracle HTTP Server with the CommonDomain that Provisioning
installed.
5. Click Next. The Specify Component Details screen opens.
6. Do the following:
• Select the instance home location; for example,
APPLICATIONS_CONFIG/
CommonDomain_webtier1
• Enter the instance name; for example,
CommonDomain_webtier1
• Enter the Oracle HTTP Server component name; for example
ohs2
7. Click Next. The Configure Ports screen opens.
Copy the
staticports.ini
file from
repository/installers/webtier/Disk1/
stage/Response
to
ORACLE_BASE/staticports.ini
.
8. Select Specify Ports using Configuration file and click View/Edit.
In the text field that displays enter
OHS port = 10601
(or whichever OHS Port was
used on
PROVISIONED_HOST
during Provisioning).
Click Save and then click Next.
The Specify Security Updates screen opens.
9. Do the following:
• Enter an email address
• Indicate to receive security updates from My Oracle Support
• Enter the My Oracle Support password
10. Click Next. The Installation Summary screen opens.
11. Click Configure to install the configuration. The Configuration Progress screen
opens.
12. Click Next.
When the installation completes, the Installation Complete screen opens.
13. Click Finish.
14. Copy or
ftp
the
FusionVirtualHost
files from
WEBHOST1
to
WEBHOST2
:
Chapter 18
Scale Oracle Fusion Applications
18-4

WEBHOST1
>
APPLICATIONS_CONFIG
/CommonDomain_webtier/config/OHS/ohs1/
moduleconf
to
WEBHOST2
>
APPLICATIONS_CONFIG
/CommonDomain_webtier1/config/OHS/ohs2/
moduleconf/
15. Copy or
ftp
the
FusionSSL.conf
file from
WEBHOST1
to
WEBHOST2
:
WEBHOST1
>
ORACLE_BASE
/config/CommonDomain_webtier/config/OHS/ohs1
to
WEBHOST2
>
ORACLE_BASE
/config/CommonDomain_webtier1/config/OHS/ohs2
16. After the copy is complete, replace all occurrences of
WEBHOST1
with
WEBHOST2
in
all of the files with names ending in
.conf
that were copied to
WEBHOST2
.
17. Start the Oracle HTTP Server instance:
UNIX:
WEBHOST2
> cd
APPLICATIONS_CONFIG
/CommonDomain_webtier1/bin
WEBHOST2
> ./opmnctl startall
If an error message is displayed saying that the
FusionSSL.conf
file is missing,
copy the file from
APPLICATIONS_CONFIG/CommonDomain_webtier/config/OHS/
ohs1
on
WEBHOST1
to the
APPLICATIONS_CONFIG/CommonDomain_webtier1/
config/OHS/ohs2
folder on
WEBHOST2
.
18.2.1.5 Install WebGate
To install WebGate on
WEBHOST2
, do the following:
1. From
REPOSITORY_LOCATION/installers/webgate/Disk1
, start the WebGate
installation:
UNIX:
./runInstaller -jreLoc
REPOSITORY_LOCATION
/jdk
2. When the Welcome screen opens, click Next. The Prerequisite Checks screen
opens.
3. When the checking process completes, click Next. The Installation Location
screen opens.
4. Enter an Oracle Middleware Home location Oracle Home Directory,
APPLICATIONS_BASE/webtier_mwhome,
and click Next. The GCC Library Details
screen opens.
5. Enter an Oracle Middleware Home location Oracle Home Directory,
APPLICATIONS_BASE/webtier_mwhome
, and click Next. The Installation Summary
screen opens.
6. Click Save to save the response file. Click Install to start the installation. Following
an interim screen, the Installation Progress screen opens.
During installation, a progress screen opens.
7. When the installation finishes, click Next. The Installation Complete screen opens.
Chapter 18
Scale Oracle Fusion Applications
18-5

8. Click Save to save the installation details. Click Finish to complete the WebGate
installation.
18.2.1.6 Install WebGate Patches
If any directory under
REPOSITORY_LOCATION/installers/webgate/prepatch
and/or
REPOSITORY_LOCATION/installers/webgate/patch
exists, perform the steps in this
section. If no directory exists, perform only Steps 1 (page 18-3) and 3 (page 18-3) on
both
WEBHOST1
and
WEBHOST2
(skip Step 2).
To install WebGate patches, do the following:
1. Set or change the environment variable
$ORACLE_HOME
to
APPLICATIONS_BASE/
webtier_mwhome/webgate/
, as shown in the following examples:
UNIX:
export
ORACLE_HOME
=
APPLICATIONS_BASE
/webtier_mwhome/webgate
2. To install the patches:
a. If a subfolder exists in the
prepatch
folder of the WebGate installer, change
directory to the
prepatch
folder and run the following command:
ORACLE_HOME
/OPatch/opatch napply
b. Change directory to the
patch
folder and run the command again.
3. Make sure the same patches are installed on both
WEBHOST1
and
WEBHOST2
by
running the following command on both hosts:
APPLICATIONS_BASE
/webtier_mwhome/webgate/OPatch/opatch lsinventory
18.2.1.7 Configure WebGate
After installing WebGate, do the following:
1. (UNIX) Append environment variable
LD_LIBRARY_PATH
with the Web Tier library
path
APPLICATIONS_BASE/webtier_mwhome/webtier/lib
.
UNIX:
WEBHOST2
> export LD_LIBRARY_PATH=
APPLICATIONS_BASE
/webtier_mwhome/
webtier/lib:$LD_LIBRARY_PATH
2. Run the commands that follow.
UNIX:
# Usage: deployWebGateInstance.sh -w <WebGate_instancedir> -oh
WebGate_Oracle_Home
$ cd
APPLICATIONS_BASE
/webtier_mwhome/webgate/webgate/ohs/tools/
deployWebGate
$ ./deployWebGateInstance.sh -w
APPLICATIONS_CONFIG
/CommonDomain_webtier1/
config/OHS/ohs2 -oh
APPLICATIONS_BASE
/webtier_mwhome/webgate
$ cd
APPLICATIONS_BASE
/webtier_mwhome/webgate/webgate/ohs/tools/setup/
InstallTools
Chapter 18
Scale Oracle Fusion Applications
18-6

$ ./EditHttpConf -w
APPLICATIONS_CONFIG
/CommonDomain_webtier1/config/OHS/
ohs2 -oh
APPLICATIONS_BASE
/webtier_mwhome/webgate -o webgate.conf
3. Do the following on
WEBHOST1
:
a. From
APPLICATIONS_CONFIG/CommonDomain_webtier/config/OHS/ohs1/
webgate/config
, copy the following to
APPLICATIONS_CONFIG/
CommonDomain_webtier1/config/OHS/ohs2/webgate/config
on
WEBHOST2
:
"ObAccessClient.xml","cwallet.sso","password.xml"
b. From
APPLICATIONS_CONFIG/CommonDomain_webtier/config/OHS/ohs1/
webgate/config/simple
, copy the following to
APPLICATIONS_CONFIG/
CommonDomain_webtier1/config/OHS/ohs2/webgate/config/simple
on
WEBHOST2
:
"aaa_key.pem","aaa_cert.pem"
4. Restart Oracle HTTP Server:
UNIX:
WEBHOST2
> cd
APPLICATIONS_CONFIG
/CommonDomain_webtier1/bin
WEBHOST2
> ./opmnctl stopall
WEBHOST2
> ./opmnctl startall
Oracle HTTP Server scaleout is now complete, and
WEBHOST1
and
WEBHOST2
should
behave identically.
18.2.1.8 Validate Oracle HTTP Server on WEBHOST2
To validate after the installation is complete:
1. Check that it is possible to access the Oracle HTTP Server home page on
WEBHOST1
and
WEBHOST2
using the following URLs:
•
http://webhost1.mycompany.com:10601
•
http://webhost2.mycompany.com:10601
2. Stop
WEBHOST1
:
UNIX:
WEBHOST1
> cd
APPLICATIONS_CONFIG
/CommonDomain_webtier/bin
WEBHOST1
> ./opmnctl stopall
3. Access the following URLs to ensure that the WebLogic Administration console
of applicable Oracle Fusion Applications domain is visible, and that Oracle HTTP
Server on
WEBHOST2
is configured correctly:
The host and port of these URLs come from the internal virtual hosts and ports
listed in the Virtual Hosts Configuration screen of the Oracle Fusion Applications
Provision Wizard. The URLs can be also found in the provisioning summary
file. (For more information, see the Installation Complete row in Table 13-1
(page 13-6)). Having all of the domains depends on the provisioning offerings
selected.
•
http://crminternal.mycompany.com/console
•
http://fininternal.mycompany.com/console
•
http://hcminternal.mycompany.com/console
Chapter 18
Scale Oracle Fusion Applications
18-7

•
http://scminternal.mycompany.com/console
•
http://commoninternal.mycompany.com/console
•
http://biinternal.mycompany.com/console
•
http://icinternal.mycompany.com/console
•
http://prjinternal.mycompany.com/console
•
http://prcinternal.mycompany.com/console
4. Access the following URLs to ensure that the WebLogic Administration console
of applicable Oracle Fusion Applications domain is visible, and that Oracle HTTP
Server on
WEBHOST2
is configured correctly:
The host and port of these URLs come from the external virtual hosts and ports
listed in the Virtual Hosts Configuration screen of the Oracle Fusion Applications
Provision Wizard. Having all of the domains depends on the provisioning offerings
selected.
•
https://crmexternal.mycompany.com/sales/faces/mooOpportunityHome
•
https://crmexternal.mycompany.com/crmPerformance/faces/
TerritoriesMain
•
https://crmexternal.mycompany.com/contractManagement/faces/
ContractsDashboard
•
https://crmexternal.mycompany.com/customer/faces/
CustomerCtrWorkarea
•
https://finexternal.mycompany.com/ledger/faces/LedgerWorkArea
•
https://finexternal.mycompany.com/payables/faces/PaymentLandingPage
•
https://prcexternal.mycompany.com/procurement/faces/
PrcPoPurchasingWorkarea
•
https://prjexternal.mycompany.com/projectsFinancials/faces/
PRJProjectWorkarea
•
https://commonexternal.mycompany.com/homePage/faces/
AtkHomePageWelcome
•
https://biexternal.mycompany.com/analytics
•
https://icexternal.mycompany.com/incentiveCompensation/faces/
IcCnCompPlanWorkarea
5. Run the following commands:
UNIX:
WEBHOST1
> cd
APPLICATIONS_CONFIG
/CommonDomain_webtier/bin
WEBHOST1
> ./opmnctl startall
18.2.2 Scale Out Node Manager
This section describes how to setup and configure Node Manager to a new host to be
used as a scaled-out host.
Chapter 18
Scale Oracle Fusion Applications
18-8

18.2.2.1 Prerequisites for Setting Up Node Manager
Before setting up Node Manager, ensure the following:
• Start with a clean machine (denoted as SCALED_OUT_HOST), if it is the first time
it is being set up.
• The UNIX
/etc/hosts
file has proper entries. To verify this from the clean machine,
ping the hosts listed in
/etc/hosts
files with the fully qualified name of the hosts.
• The user created on
SCALED_OUT_HOST
to perform the scale out should be the
same as the user on
PROVISIONED_HOST
.
• The directory structure
APPLICATIONS_BASE
is mounted on
SCALED_OUT_HOST
and it
is the same shared file system as used by
PROVISIONED_HOST
.
The Local domains directory on the
PROVISIONED_HOST
should not be mounted on
SCALED_OUT_HOST
.
• The directory structure
APPLICATIONS_CONFIG
/
nodemanager
on
SCALED_OUT_HOST
has been created.
• Provisioning the initial Oracle Fusion Applications environment on
PROVISIONED_HOST
has already completed and verified.
18.2.2.2 Set Up Node Manager for SCALED_OUT_HOST
Do the following:
1. Run the following command:
UNIX:
SCALED_OUT_HOST
> cd
APPLICATIONS_CONFIG
/nodemanager
2. In the
nodemanager
directory, copy the content of the node-specific directory to
SCALED_OUT_HOST
. In this case,
PROVISIONED_HOST
is the node-specific directory.
UNIX:
SCALED_OUT_HOST
> cp -r
PROVISIONED_HOST
SCALED_OUT_HOST
3. Change directory to
SCALED_OUT_HOST
. The following files should be seen:
nm_data.properties nodemanager.log startNodeManagerWrapper.sh
nodemanager.domains nodemanager.properties
Manually delete any lock files that may be present. For example,
nodemanager.log.lck
.
4. In the
nodemanager.domains
file, edit all the domain paths that are local
to
SCALED_OUT_HOST
. For example,
Domain=/u02/local/oracle/config/domains/
SCALED_OUT_HOST/domain_name
.
In this section, replace
domain_name
with the domain-specific syntax. For example,
CRMDomain
,
FINDomain
,
HCMDomain
, and so on.
Because the Oracle Business Intelligence domain is a bit different,
an example path would be
BIDomain=/u02/local/oracle/config/domains/
PROVISIONED_HOST
/
BIDomain
.
Chapter 18
Scale Oracle Fusion Applications
18-9

5. (UNIX only) In the
startNodeManagerWrapper.sh
file, change
NM_HOME
to
APPLICATIONS_CONFIG/nodemanager/SCALED_OUT_HOST
.
6. In the
nodemanager.properties
file:
• Add or modify the following lines:
KeyStores=CustomIdentityAndCustomTrust
CustomIdentityKeyStoreFileName=APPLICATIONS_CONFIG/keystores/
SCALED_OUT_HOST
_fusion_identity.jks
CustomIdentityPrivateKeyPassPhrase=keypassword
CustomIdentityAlias=
SCALED_OUT_HOST
_fusion
keypassword is the password given in the provisioning response file for the
Oracle Fusion Applications Administration user.
Since the passwords in the response and plan files are encrypted, take note of
or save the Node Manager password entered when creating the provisioning
response file.
• Ensure that the path to the local machine
/u02/local/oracle/nodemanager/
exists, and that the
LogFile
value is pointing to
/u02/local/oracle/
nodemanager/SCALED_OUT_HOST.log
.
• Ensure that the path for
DomainsFile
and
NodeManagerHome
are correct for
SCALED_OUT_HOST
.
18.2.2.3 Create the Identity Keystore on SCALED_OUT_HOST
Provisioning has created the identity keystore
PROVISIONED_HOST_fusion_identity.jks
for
PROVISIONED_HOST
. Subsequently, the
identity keystore
SCALED_OUT_HOST_fusion_identity.jks
must be created for
SCALED_OUT_HOST
.
Do the following to create the keystore:
1. Change directory to
APPLICATIONS_CONFIG/keystores
.
Ensure the
PROVISIONED_HOST_fusion_identity.jks
and
fusion_trust.jks
files
are present.
2. Back up
fusion_trust.jks
to
fusion_trust.jks.org
.
3. Run the following command to set the CLASSPATH:
UNIX:
SCALED_OUT_HOST
> source
APPLICATIONS_BASE
/fusionapps/wlserver_10.3/server/
bin/setWLSEnv.sh
Ensure that the CLASSPATH has been set:
SCALED_OUT_HOST
> which keytool
Ensure that the CLASSPATH has been set:
SCALED_OUT_HOST
> where keytool
The output should point to the
APPLICATIONS_BASE/fusionapps/jdk/jre/bin/
keytool
.
Chapter 18
Scale Oracle Fusion Applications
18-10

4. Run the following command to create the keypair for
SCALED_OUT_HOST_fusion_identity.jks
.
SCALED_OUT_HOST
> keytool -genkeypair -keyalg RSA
-alias
SCALED_OUT_HOST
_fusion -keypass
keypassword
-keystore
SCALED_OUT_HOST
_fusion_identity.jks
-storepass
keystorepassword
-validity 180 -dname 'CN=
SCALED_OUT_HOST
, OU=defaultOrganizationUnit,
O=defaultOrganization, C=US'
where
•
keystorepassword
is the password given in the
APPLICATIONS_BASE/
provisioning/plan/provisioning.plan
file
•
keypassword
is the password given in the
APPLICATIONS_BASE/provisioning/
plan/provisioning.plan
file
It is recommended to keep the commands in a file and then execute it.
Since the passwords in the response and plan files are encrypted, take note
of or save the Node Manager password entered when creating the provisioning
response file.
5. Run the following command to export the certificates:
UNIX:
SCALED_OUT_HOST
> keytool -exportcert -alias
SCALED_OUT_HOST
_fusion
-keystore
SCALED_OUT_HOST
_fusion_identity.jks
-storepass
keystorepassword
-rfc -file /tmp/appIdentityKeyStore.jks
If the alias
SCALED_OUT_HOST_fusion
exists, run this command to delete it:
keytool -delete -alias
SCALED_OUT_HOST
_fusion
-keystore fusion_trust.jks -storepass
keystorepassword
The following command will display the certificates in the trust keystore:
keytool -list -keystore fusion_trust.jks -storepass
keystorepassword
6. Run the following command to import the certificates:
UNIX:
SCALED_OUT_HOST
> keytool -importcert -noprompt -alias
SCALED_OUT_HOST
_fusion -file /tmp/appIdentityKeyStore.jks
-keystore fusion_trust.jks -storepass keystorepassword
7. Verify that the file
SCALED_OUT_HOST_fusion_identity.jks
has been created in
the directory
APPLICATIONS_CONFIG/keystores
directory.
8. Start Node Manager on
SCALED_OUT_HOST
.
UNIX:
APPLICATIONS_CONFIG
/nodemanager/
SCALED_OUT_HOST
/
startNodeManagerWrapper.sh &
The
&
in the command runs the script in the background.
9. Verify that Node Manager is up and running.
UNIX:
Chapter 18
Scale Oracle Fusion Applications
18-11

netstat -a | grep 5556
18.2.3 Perform Scale-Out Tasks Common to All Domains
There are the scale-out tasks that are common to all Oracle Fusion Applications
Managed Servers in all domains (Common, Oracle Fusion CRM, Oracle Fusion
Financials, Oracle Fusion Human Capital Management, Oracle Fusion Incentive
Compensation, Oracle Fusion Project Portfolio Management, Oracle Fusion
Procurement, and Oracle Fusion Supply Chain Management) except Oracle Business
Intelligence. These tasks are the following:
• Starting
SCALED_OUT_HOST
Node Manager in SSL mode
• Adding a new machine in the Oracle WebLogic Server console
• Packing and unpacking the Managed Server domain home
• Cloning Managed Servers and assigning them to
SCALED_OUT_HOST
• Configuring Oracle HTTP Server
• Configuring server migration for the Managed Servers
• Validating the system
For specific information about scaling the Oracle Business Intelligence domain, see
Scale Out the Oracle Business Intelligence Domain (page 18-35).
18.2.3.1 Start SCALED_OUT_HOST Node Manager in SSL Mode
To start Node Manager in the Secure Sockets Layer (SSL) mode, follow the
instructions in Scale Out Node Manager (page 18-8).
18.2.3.2 Add a New Machine In the Oracle WebLogic Server Console
To add a new machine:
1. Stop the domain's Administration Server.
UNIX:
PROVISIONED_HOST
>
APPLICATIONS_CONFIG
/domains/
PROVISIONED_HOST
/
domain_name
/bin/stopWebLogic.sh
2. Set the following environment variable on
SCALED_OUT_HOST
.
UNIX:
export WLST_PROPERTIES="-Dweblogic.security.SSL.trustedCAKeyStore=
APPLICATIONS_CONFIG
/keystores/fusion_trust.jks"
3. Start the domain's Administration Server.
UNIX:
SCALED_OUT_HOST
>
APPLICATIONS_BASE
/fusionapps/wlserver_10.3/common/bin/
wlst.sh
SCALED_OUT_HOST
> nmConnect(username='
username
', password='
password
',
domainName='
domain_name
', host='
PROVISIONED_HOST
',port='5556',
nmType='ssl', domainDir='
APPLICATIONS_CONFIG
/domains/
PROVISIONED_HOST
/
domain_name
')
Chapter 18
Scale Oracle Fusion Applications
18-12

SCALED_OUT_HOST
> nmStart('AdminServer')
SCALED_OUT_HOST
> exit ()
The username and password used in the
nmConnect
are the Node Manager
credentials (user name and password) specified when creating the provisioning
response file.
4. Log in to the Administration Server:
http://domaininternal.mycompany.com/
console
.
5. Navigate to Domain_Name, Environment, Machines.
LocalMachine is located in the right-hand pane.
6. In the left-hand pane, click Lock & Edit.
7. In the right-hand pane, first click New to add the remote machine, and then specify
the following:
• Name - enter
SCALED_OUT_HOST
• Machine operating system - in UNIX: Unix
8. Click Next.
9. In the window that opens, set the following attributes:
• Type - SSL
• Listen Address - <
SCALED_OUT_HOST
>
The "localhost" default value here is wrong.
• Listen port - 5556
10. Click Finish and activate the changes.
18.2.3.3 Pack and Unpack the Managed Server Domain Home to
SCALED_OUT_HOST
Since the
PROVISIONED_HOST
domain directory file system is also available from
SCALED_OUT_HOST
, both the
pack
and
unpack
commands can be executed from
SCALED_OUT_HOST
.
To pack and unpack the Managed Server domain home:
1. Change directory to
APPLICATIONS_BASE/fusionapps/oracle_common/common/
bin
.
2. Run the
pack
command:
UNIX:
SCALED_OUT_HOST
> ./pack.sh -managed=true -domain=
APPLICATIONS_CONFIG
/
domains/
PROVISIONED_HOST
/
domain_name
-template=
APPLICATIONS_BASE/
user_templates/
domain_name
_managed.jar -template_name="
domain_name
_Managed_Server_Domain"
3. Ensure that
APPLICATIONS_LOCAL_CONFIG
/domains/SCALED_OUT_HOST
/
domain_name
is empty, and then run the
unpack
command:
UNIX:
Chapter 18
Scale Oracle Fusion Applications
18-13

SCALED_OUT_HOST
> ./unpack.sh -domain=
APPLICATIONS_LOCAL_CONFIG
/domains/
SCALED_OUT_HOST
/
domain_name
-template=
APPLICATIONS_BASE_
/user_templates/
domain_name
_managed.jar
In these commands,
APPLICATIONS_LOCAL_CONFIG
is local to
SCALED_OUT_HOST
.
18.2.3.4 Clone Managed Servers and Assign Them to SCALED_OUT_HOST
The following naming conventions are used in the procedure that follows:
• ManagedServerName_1 is the name of the Managed Server to be cloned.
• ClonedManagedServer is the name given to the Managed Server that is being
cloned. For consistency, its name should follow the same naming convention
as ManagedServerName, in this format: ClonedManagedServer_n, where n is a
number starting with 2, and is incremented when multiple instances are cloned.
For example, ClonedManagedServer_3, ClonedManagedServer_4, and so on.
To add a Managed Server and assign it to
SCALED_OUT_HOST
:
1. Log in to the Administration Server:
http://
domain_nameinternal.mycompany.com/console
.
(
domain_name
is the domain containing the Managed Server that is being cloned).
2. Navigate to Domain_Name, Environment, Servers.
3. Switch to Lock & Edit mode.
4. Select the ManagedServerName_1 check box and then click Clone.
5. Specify the following Server Identity attributes:
• Server Name -
ClonedServerName
_2
To ensure consistency in naming, copy the name of the server shown in
Server Identity and paste it into the Server Name field. Then change the
number to "_2".
• Server Listen Address - <
SCALED_OUT_HOST
>
• Server Listen Port - leave "as is"
6. Click OK.
The newly cloned server should now be seen,
ClonedServerName
_2
.
7. Click ClonedServerName_2 and change the following attributes:
• Machine - <
SCALED_OUT_HOST
>
• Cluster Name - accept the default, ClonedServerNameCluster
Ensure that this cluster name is the same as the cluster name of the original
Managed Server.
8. Click Save and then Activate Changes.
9. Navigate to Domain_Name, Environment, Servers.
10. From the Name column, click the ClonedServerName_2 scaled-out server link.
11. Click Lock & Edit, and then select the Configuration tab.
12. Select the Keystores tab, and ensure that the keystores value is Custom Identity
and Custom Trust.
Chapter 18
Scale Oracle Fusion Applications
18-14

13. Do the following:
a. Change the Custom Identity Keystore path to point to the
APPLICATIONS_CONFIG/keystores/SCALED_OUT_HOST_fusion_identity.jks
file.
b. Leave the Custom Identity Keystore type blank.
c. Change the Custom Identity Keystore Passphrase entry. This should be
the same as the keystorepassword, which is the password given in the
APPLICATIONS_BASE/provisioning/plan/provisioning.plan
file.
d. Re-enter the Confirm Custom Identity Keystore Passphrase.
e. Ensure that the Confirm Custom Trust Keystore path is pointing to the
APPLICATIONS_CONFIG/keystores/fusion_trust.jks
file.
f. Leave the Custom Trust Keystore type blank.
g. Change the Custom Trust Keystore Passphrase entry. This should be
the same as the keystorepassword, which is the password given in the
APPLICATIONS_BASE/provisioning/plan/provisioning.plan
file.
h. Re-enter the Custom Trust Keystore Passphrase.
i. Click Save.
14. Select the SSL tab.
a. Make sure that Identity and Trust Locations is set to Keystores.
b. Change the Private Key Alias to
SCALED_OUT_HOST_fusion
.
c. Change the Private Key Passphrase to the keypassword, which
is the password given in the
APPLICATIONS_BASE/provisioning/plan/
provisioning.plan
file.
d. Re-enter the keypassword from Step 13.c (page 18-15) for the Confirm Private
Key Passphrase.
e. Click Save.
15. Select the Server Start tab.
Change the Arguments to reflect the name of the cloned Managed Server and
make sure the server group is the correct cluster name. For example, the following
should be seen:
-DJDBCProgramName=DS/
domain_name
/
ClonedServerName
_2
-Dserver.group=
ClonedServerName
Cluster
Click Save.
16. Select the Logging tab, and then select the HTTP tab.
17. Do the following:
a. Change the Log file name to
logs/access.log.%yyyyMMdd%
.
b. Change the rotation type to By Time.
c. Leave the Limit number of retained files option unchecked.
d. Leave the Rotate log file on startup option unchecked.
e. Click Save.
f. Expand Advanced.
Chapter 18
Scale Oracle Fusion Applications
18-15

g. Change the format to Extended.
h. Change the extended logging format fields to the following:
date time time-taken cs-method cs-uri
sc-status sc(X-ORACLE-DMS-ECID)
cs(ECID-Context) cs(Proxy-Remote-User)
cs(Proxy-Client-IP)
i. Click Save.
18. Click Activate Changes.
19. Repeat Steps 2 (page 18-14) to 18 (page 18-16) for all the Managed Servers on
this domain.
20. Run the newly created Managed Servers:
a. Log in to the Administration Server:
http://
domain_nameinternal.mycompany.com/console
.
b. Navigate to Domain_Name,Environment, Servers, Control.
c. Select the newly created Managed Servers and click Start.
d. Navigate to Domain_Name, Environment, Servers and check the State to
verify that the newly created Managed Servers are running.
18.2.3.5 Configure Oracle HTTP Server
To configure Oracle HTTP Server:
1. Do the following:
• On
WEBHOST1
, change directory to
APPLICATIONS_CONFIG/
CommonDomain_webtier/config/OHS/ohs1/moduleconf
• On
WEBHOST2
, change directory to
APPLICATIONS_CONFIG/
CommonDomain_webtier1/config/OHS/ohs2/moduleconf
2. Copy
FusionVirtualHost_domain.conf
to
FusionVirtualHost_domain.conf.org
.
where
domain
is replaced with the syntax of the specific product domain.
The following table shows how the
FusionVirtualHost
configuration file names
map to each domain.
Table 18-1 FusionVirtualHost Configuration File-to-Domain Mapping
Domain File Name
Oracle Fusion Common
FusionVirtualHost_fs.conf
Oracle Business Intelligence
FusionVirtualHost_bi.conf
Oracle Fusion Customer Relationship
Management
FusionVirtualHost_crm.conf
Oracle Fusion Financials
FusionVirtualHost_fin.conf
Oracle Fusion Human Capital
Management
FusionVirtualHost_hcm.conf
Oracle Fusion Incentive Compensation
FusionVirtualHost_ic.conf
Chapter 18
Scale Oracle Fusion Applications
18-16

Table 18-1 (Cont.) FusionVirtualHost Configuration File-to-Domain Mapping
Domain File Name
Oracle Fusion Procurement
FusionVirtualHost_prc.conf
FusionVirtualHost_prc.supplierporta
l.conf
Oracle Fusion Project Portfolio
Management
FusionVirtualHost_prj.conf
Oracle Fusion Supply Chain Management
FusionVirtualHost_scm.conf
3. Edit the
FusionVirtualHost_domain.conf
file, adding the scaled-out host and
port to all the WebLogic Application Clusters. Add this to both the Internal and
External part of the
FusionVirtualHost_domain.conf
file. The example shows
sample code for ManagedServer.
• Do not add these values for Oracle Enterprise Manager, Oracle WebLogic
Server Administration Console, or Oracle Authorization Policy Manager.
• If the Managed Servers are running on VIPs, replace
PROVISIONED_HOST
and
SCALED_OUT_HOST
with the VIP addresses shown in the example code.
4. Repeat Step 3 (page 18-17) for all applications.
5. Do the following to restart Oracle HTTP Server:
On
WEBHOST1
:
• Change directory to
APPLICATIONS_CONFIG/CommonDomain_webtier/bin
• Enter the following:
UNIX:
WEBHOST1
> ./opmnctl stopall
WEBHOST1
> ./opmnctl startall
On
WEBHOST2
:
• Change directory to
APPLICATIONS_CONFIG/CommonDomain_webtier1/bin
• Enter the following:
UNIX:
WEBHOST2
> ./opmnctl stopall
WEBHOST2
> ./opmnctl startall
Example 18-1 Sample "ManagedServer" Code
<Location /managedServer>
SetHandler weblogic-handler
WebLogicCluster <
PROVISIONED_HOST
:port>,<
SCALED_OUT_HOST
:port>
</Location>
18.2.3.6 Configure Server Migration for the Managed Servers
Server migration is required for proper failover of Oracle Fusion Applications
components in the event of failure in any of the
PROVISIONED_HOST
and
SCALED_OUT_HOST
nodes. See Set Up Server Migration for Oracle Fusion Applications
(page 18-91).
Chapter 18
Scale Oracle Fusion Applications
18-17

18.2.3.7 Validate the System
Verify URLs to ensure that the appropriate routing and failover are working.
To verify the URLs:
1. Log in to the domain's Oracle WebLogic Server Administration Console and stop
all the Managed Servers on
PROVISIONED_HOST
while the Managed Servers on
SCALED_OUT_HOST
are running.
2. Before cloning a Managed Server, do the following:
a. Log in to Oracle Fusion Applications with the correct user ID.
b. Select the appropriate menu to access the application provisioned to that
managed server.
c. Copy the URL by keeping the portion/segment of
https://host[:port]/
ApplicationName/faces/NameOfWebPage
.
The following URLs are examples of Managed Servers in various domains:
•
https://crmexternal.mycompany.com/contractManagement/faces/
ContractsDashboard
•
https://finexternal.mycompany.com/ledger/faces/JournalEntryPage
•
https://finexternal.mycompany.com/payables/faces/InvoiceWorkbench
•
https://finexternal.mycompany.com/receivables/faces/
ReceiptsWorkArea
•
https://finexternal.mycompany.com/receivables/faces/
TransactionsWorkArea
•
https://commonexternal.mycompany.com/helpPortal/faces/
AtkHelpPortalMain
•
https://commonexternal.mycompany.com/homePage/faces/
AtkHomePageWelcome
•
https://hcmexternal.mycompany.com/hcmCore/faces/
AddPersonUiShellMainPage
•
https://hcmexternal.mycompany.com/hcmCore/faces/PersonSearch
•
https://scmexternal.mycompany.com/productManagement/faces/
ItemDashboard
•
https://scmexternal.mycompany.com/costManagement/faces/
ItemCostProfileWorkarea
•
https://icexternal.mycompany.com/incentiveCompensation/faces/
IcCnCompPlanWorkarea
•
https://prjexternal.mycompany.com/projectsFinancials/faces/
PRJProjectWorkarea
•
https://prjexternal.mycompany.com/projectsFinancials/faces/
PrjCostWorkArea
3. Verify that routing and failover are functioning properly. (Ensure the log in prompt
is visible.)
Chapter 18
Scale Oracle Fusion Applications
18-18

4. Log in to the domain's Oracle WebLogic Server Administration Console and stop
all the Managed Servers on
SCALED_OUT_HOST
.
5. Start the Managed Servers on
PROVISIONED_HOST
.
6. Repeat Step 2 (page 18-18). (Ensure the log in prompt is visible.)
7. Start all the Managed Servers on
SCALED_OUT_HOST
and verify that they are
running on
PROVISIONED_HOST
and
SCALED_OUT_HOST
.
18.2.4 Perform Scale-Out Tasks Specific to the Oracle Fusion
Customer Relationship Management Domain
In addition to the scale-out tasks found in Perform Scale-Out Tasks Common to All
Domains (page 18-12), perform the following task to scale out the Oracle Fusion CRM
Data Quality feature.
18.2.4.1 Configure Data Quality for Scale Out
Data Quality is an Informatica tool that provides the following:
• A matching function, which allows to search, match, and identify duplicate
customer records based on key customer attributes such as name, address, date
of birth, Social Security Number, or tax ID number. It also includes data quality
connector, a generalized interface that can make real-time and batch requests to
an external data-cleansing engine.
• An address-cleansing feature, which corrects and validates address data based on
postal requirements.
Implementing Data Quality requires four steps:
1. Obtaining postal reference data and license keys.
2. Setting up the Data Quality Engine, also known as Informatica Identity Resolution
(IIR).
3. Configuring Data Quality Connector and IIR in Oracle Fusion Functional Setup
Manager.
4. Creating a second Data Quality server on
CRMHOST2
.
18.2.4.1.1 Obtain Postal Reference Data and License Keys
Before configuring data quality for scale out, obtain postal reference data and license
key files from AddressDoctor. For information about how to obtain these, see the
licensing documentation.
18.2.4.1.2 Set Up the Data Quality Engine
To set up the data quality engine:
1. On
CRMHOST1
, change directory to
APPLICATIONS_BASE/InformaticaIR/bin
.
2. Run the following commands:
CRMHOST1
> source setfusionEnv.sh
CRMHOST1
> ./liup
CRMHOST1
> ./idsup
Chapter 18
Scale Oracle Fusion Applications
18-19

3. Start the following:
./idsconc -a
4. On the launched console, select Rulebase Type=SSA and Alias=rtunitrb and
click OK. Then click Yes to create a new rulebase.
5. In the IIR console, navigate to System , New, Create a system from SDF.
6. Enter the following system information:
• System Name -
FusionDQRealtime
• System Definition File -
APPLICATIONS_BASE/InformaticaIR/ids/
FusionDQRealtime.sdf
• DB Type -
SSA
• Alias -
fusion_s01
7. Click OK, and then click Close to dismiss the Create/System window.
8. Navigate to System menu, Select, System Name: FusionDQRealtime and click
OK.
9. Navigate to System menu, Load IDT to start loading the individual IDT tables,
one by one, until the following IDTs are completed:
load_location
load_organization
load_org_address
load_person
load_per_address
load_per_phone
10. Close the IIR Console started in Step 2 and run the following commands to stop
the IIR server:
CRMHOST1
>
APPLICATIONS_BASE
/InformaticaIR/bin/idsdown
CRMHOST1
>
APPLICATIONS_BASE
/InformaticaIR/bin/lidown
11. Assuming the postal reference data and license key files have been received from
AddressDoctor (requested in Obtaining Postal Reference Data and License Keys
(page 18-19)), run the following commands:
CRMHOST1
> cd
APPLICATIONS_BASE
/InformaticaIR/ssaas/ad5/ad/db
CRMHOST1
> cp
mylocation
/key .
CRMHOST1
> cp
mylocation
/*.MD .
mylocation
is the directory where the license key and the postal reference data
were copied.
*.MD
is the postal data reference file.
key
is a text file that contains the
AddressDoctor license.
AddressDoctor supports 248 countries. Each
*.MD
file is per country or a group of
countries. Each of these files should be copied to the
*.MD
directory.
12. Run the following commands to start the IIR server:
CRMHOST1
>
APPLICATIONS_BASE
/InformaticaIR/bin/liup
CRMHOST1
>
APPLICATIONS_BASE
/InformaticaIR/bin/idsup
13. From the IIR Console, do the following to start the UPD Synchronizer:
a. Run the following command:
Chapter 18
Scale Oracle Fusion Applications
18-20

CRMHOST1
>
APPLICATIONS_BASE
/InformaticaIR/bin/idsconc -a
b. On the launched console, select Rulebase Type=SSA and Alias=rtunitrb,
and click OK to go the RuleBase.
c. In the IIR console, go to System, Select and select FusionDQRealtime.
d. Go to Tools, Synchronizer, Run Synchronizer and click OK to accept all the
defaults shown in the Update Synchronizer popup window.
Ensure that the IDT Name=(all) option is selected.
18.2.4.1.3 Configure the Data Quality Connector and IIR
To configure the data quality connector and IIR:
1. Log in to Oracle Fusion Functional Setup Manager as an
administrator. For example,
http://commoninternal.mycompany.com/homePage/
faces/AtkHomePageWelcome
.
2. Click Navigator, then Setup and Maintenance.
3. Select the All tasks tab.
4. Select Input Name= manage server and then click Search.
The Manage Server Configurations task displays.
5. Click Go to Task to open the Manage Data Quality Server Configurations page,
and then click Search to find all existing configurations.
6. Select Realtime and Batch Basic Server and do the following:
a. Click Edit.
b. Enter the server IP address and port of the IIR search server set up as the IIR
matching server.
For the server IP address, enter the
CRMHOST1
IP address. Enter the default
port number,
1666
. Since the port number can be different than the default port
number, run the following command to confirm that the correct one is used:
grep SSA_SEPORT=
APPLICATIONS_BASE
/InformaticaIR/env/isss
c. Select Enable Matching.
d. Click Save and Close.
7. From the Manage Data Quality Server Configurations page, select Realtime
Cleanse Server and do the following:
a. Click Edit.
b. Enter the server IP address and port of the IIR search server set up as the IIR
matching server.
For the server IP address, enter the
CRMHOST1
IP address. Enter the default
port number,
1666
. Since the port number can be different than the default port
number, run the following command to confirm that the correct one is used:
grep SSA_SEPORT=
APPLICATIONS_BASE
/InformaticaIR/env/isss
c. Select Enable Cleansing.
d. Click Save and Close.
Chapter 18
Scale Oracle Fusion Applications
18-21

8. From the Manage Data Quality Server Configurations page, select Batch Cleanse
Server and repeat Steps 7.a (page 18-21) through 7.d (page 18-21) from Step 7
(page 18-21).
9. Search for the task Manage Data Synchronization and click Go to Task.
10. From Actions dropdown list, select Refresh Identity Table Information to refresh
the IDT repository information.
11. Select Enable for Sync for each IDT and click Save.
12. Click Schedule Synchronization Process and then Advanced.
13. Select Using a schedule.
14. Select Hourly/Minute from the Frequency dropdown list. (This frequency should
be determined by the business requirement.)
15. Enter every 5 minutes for this example. (This every 5 minutes sample should be
determined by the business requirement.)
16. Select a "next few days" end date from the calender. (This few days sample
should be determined by the business requirement.)
17. Click Submit to schedule the Sync ESS job.
18. Do the following to validate that Data Quality is up and running:
a. Ensure that the Customer Center application is running.
b. In Customer Center, create a unique organization and then try to create that
same organization again.
If Data Quality is working correctly, a popup window will display telling that this
organization cannot be created because it already exists.
18.2.4.1.4 Create a Second Data Quality Server on CRMHOST2
To create a second data quality server:
1. Run the following command:
CRMHOST2
> cd
REPOSITORY_LOCATION
/installers/iir/fusion_iir
2. Edit the
install.props
file to include the following values:
##############################################
# USE ABSOLUTE PATHS FOR ALL
##############################################
# These environment variables are required to be set for
# IIR to be able to use the ORACLE DB CLIENT
##############################################
ORACLE_HOME=
APPLICATIONS_BASE
/dbclient
TNS_ADMIN=
APPLICATIONS_CONFIG
/ess/tnsadmin
LD_LIBRARY_PATH=
APPLICATIONS_BASE
/dbclient/lib
##############################################
# These properties are required to be set for
# IIR to be installed in the right directory
##############################################
FUSION_STAGE_DIR=
REPOSITORY_LOCATION
/installers/iir
IIR_STAGE_DIR=
REPOSITORY_LOCATION
/installers/iir
IIR_VERSION=IIR_901sp1_linux_amd64
IIR_TOP=
APPLICATIONS_BASE
/IIR2
##############################################
Chapter 18
Scale Oracle Fusion Applications
18-22

# These properties are required to be set for IIR to be
# able to connect to the Oracle DB to install Schema Objects
##############################################
IIR_DB_HOSTNAME=FUSIONDBHOST1-VIP
IIR_DB_PORT=1521
IIR_DB_SID=FADB1
IIR_DB_USER=fusion_dq
IIR_DB_PASSWD=PASSWORD
#################################################
# ALL THESE PROPERTIES ARE NEEDED BY THE INSTALLER
# DO NOT MODIFY THESE UNLESS NECESSARY
#################################################
IIR_INSTALL_LOG_LOC=
REPOSITORY_LOCATION
/installers/iir/fusion_iir
IIR_INSTALL_TYPE=all
IIR_INCLUDE_DOC=yes
##############################################
# Default is one Server Instance
##############################################
IIR_INSTANCE_1_PORT=1601
##############################################
# Not Implemented yet
##############################################
IIR_INSTANCE_2_PORT=
##############################################
# This option is needed for Search to be accessible through a Browser
##############################################
IIR_HTTP=Y
##############################################
# This is for Installing the IIR Control and Sync Objects ( needed only for
the #first time)
##############################################
INSTALL_IIR_OBJECTS=N
##############################################
# This is needed for OEM Key
##############################################
SSALI_MZXPQRS=STANISLAUS
3. Run the following command:
./runInstaller.sh install.props > test_console
The installation is now complete.
4. Configure the data quality connector and IIR:
a. Log in to Oracle Fusion Functional Setup Manager as an administrator.
For example,
http://commoninternal.mycompany.com/homePage/faces/
AtkHomePageWelcome
.
b. Click Navigator, then Setup and Maintenance.
c. Select the All tasks tab.
d. Select Input Name= manage server and then click Search.
The Manage Server Configurations task displays.
e. Click Go to Task to open the Manage Data Quality Server Configurations
page, and then click Search to find all existing configurations.
f. Select Realtime and Batch Basic Server and do the following:
i. Click Edit.
Chapter 18
Scale Oracle Fusion Applications
18-23

ii. Enter the server IP address and port of the IIR search server set up as the
IIR matching server.
For the server IP address, enter the
CRMHOST1
IP address. Enter the
default port number,
1666
. Since the port number can be different than
the default port number, run the following command to confirm that the
correct one is used:
grep SSA_SEPORT=
APPLICATIONS_BASE
/InformaticaIR/env/isss
iii. Select Enable Matching.
iv. Click Save and Close.
g. Update the SecondaryServer1Address and SecondaryServer1Port values
respectively for the host name and port of the Secondary Server
CRMHOST2
.
These parameters can be found in the Server Parameter Values section.
h. Select Enable High Availability for each server configuration.
i. Click Save and Close.
5. Restart IIR on
CRMHOST1
and
CRMHOST2
.
On
CRMHOST1
:
CRMHOST1
> cd
APPLICATIONS_BASE
/InformaticaIR/bin
CRMHOST1
> source setfusionEnv.sh
CRMHOST1
> . ../env/isss
CRMHOST1
> ./idsdown
CRMHOST1
> ./idsup
On
CRMHOST2
:
CRMHOST2
> cd
APPLICATIONS_BASE
/IIR2/InformaticaIR/bin
CRMHOST2
> source setfusionEnv.sh
CRMHOST2
> . ../env/isss
CRMHOST2
> ./idsdown
CRMHOST2
> ./idsup
The following is sample output of the
idsdown
command:
bash-3.2$ ./idsdown
Mon Jun 24 11:48:48 2013 idsdown: shutting down idscssv on localhost:1669
Mon Jun 24 11:48:48 2013 idsdown: shutting down idscosv on localhost:1667
Mon Jun 24 11:48:48 2013 idsdown: shutting down idssesv on localhost:1666
Mon Jun 24 11:48:48 2013 idsdown: shutting down idsxmsv on localhost:1670
Mon Jun 24 11:48:48 2013 idsdown: shutting down idshtsv on localhost:1671
Mon Jun 24 11:48:48 2013 idsdown: shutting down idsrbsv on localhost:1668
6. Restart the Oracle Fusion Applications instances (which require DQ) so that the
DQ Connector can do load balancing and failover.
18.2.5 Perform Scale-Out Tasks Specific to the Common Domain
In addition to the scale-out tasks found in Perform Scale-Out Tasks Common to All
Domains (page 18-12), do also the following for the Oracle Fusion Common domain:
• Perform one additional step when cloning Managed Servers
• Remove Oracle Coherence start-up properties from the
wlcs_server1
server
• Configure shared content folders for the
UCM_server1
server
Chapter 18
Scale Oracle Fusion Applications
18-24

• Add a
sip
data-tier channel to the
wlcs_sipstate2
server
• Unpack the
UCM_server2
server
• Configure the Oracle WebCenter product suite
• Scale out Oracle WebCenter Content inbound refinery server
• Add the
UCM_server1
and
UCM_server2
servers to the connection pool
18.2.5.1 Clone Managed Servers and Assign Them to SCALED_OUT_HOST
To add a Managed Server to the Common domain, do the following:
1. Follow the steps in Clone Managed Servers and Assign Them to
SCALED_OUT_HOST (page 18-14).
2. Ensure that the
UCM_server2
Managed Server is functioning properly. Access and
log in to the following:
•
http://SCALED_OUT_HOST:7012/cs
•
http://SCALED_OUT_HOST:7012/ibr
18.2.5.2 Remove Oracle Coherence Start-up Properties from the wlcs_server1
Server
Remove Oracle Coherence startup properties from the
wlcs_server1
Managed
Server's Startup tab before scaling out the
wlcs_server2
Manager Server.
Although the provisioning process adds Oracle Coherence startup properties to the
wlcs_server1
Managed Server, Oracle Coherence is not configured and is not
currently used in Oracle Fusion Applications on-premise deployments.
To remove the startup properties:
1. Log in to the Oracle WebLogic Server Administration Console (
http://
commoninternal.mycompany.com/console
).
2. In the Domain Structure window, expand the Environment node.
3. Click Servers.
The Summary of Servers page appears.
4. Select wlcs_server1 (represented as a hyperlink) from the column of the table.
The Settings page appears.
5. Click Lock & Edit.
6. Click the Server Start tab.
7. Remove the following Oracle Coherence properties from the Arguments field:
-DUCS.coherence.localhost=
PROVISIONED_HOST
-DUCS.coherence.localport=7061
-DUCS.coherence.wka1.port=7061
-DUCS.coherence.wka1=
PROVISIONED_HOST
8. Click Save and Activate Changes.
9. Navigate to CommonDomain, Environment, Servers and select the Control tab.
Chapter 18
Scale Oracle Fusion Applications
18-25

10. Select the
wlcs_server1
Managed Server in the table, click Shutdown, and then
select the Force Shutdown Now option from dropdown list.
11. Start the
wlcs_server1
Managed Server.
18.2.5.3 Configure Shared Content Folders for the UCM_server1 Server
To configure shared content folders for the
UCM_server1
server, do the following:
1. Create a
COMMONUCMLBRVH
Transmission Control Protocol (TCP) VIP with port
6300 on the load-balancing router (LBR) with
PROVISIONED_HOST
:7034
and
SCALED_OUT_HOST:7034
as its members.
Because Oracle WebCenter Content failover works only with TCP connections,
ensure to use TCP, and not Hypertext Transfer Protocol (HTTP), in the LBR setup.
2. Shut down the
UCM_server1
Managed Server:
a. Log in to the Oracle WebLogic Server Administration Console (
http://
commoninternal.mycompany.com/console
).
b. In the Domain Structure window, first navigate to Environment, then Servers,
and then click Control.
c. Select UCM_server1.
d. Click Shutdown and then Force Shutdown Now.
3. In the
/u02/local/oracle/config/domains/PROVISIONED_HOST/
CommonDomain/ucm/cs/bin/intradoc.cfg
file on
PROVISIONED_HOST
, create the
variables
IntradocDir
,
vaultDir
, and
weblayoutDir
if they do not already
exist, and point them to the shared location:
ORACLE_BASE/config/domains/
PROVISIONED_HOST/CommonDomain/ucm/cs
.
4. Copy the
PROVISIONED_HOST
/u02/local/oracle/config/domains/
PROVISIONED_HOST/CommonDomain/ucm/cs
directory from the local
to the shared location,
ORACLE_BASE/config/domains/PROVISIONED_HOST/
CommonDomain/ucm/cs
.
5. In the
config
file on
PROVISIONED_HOST
(
ORACLE_BASE/config/domains/
PROVISIONED_HOST/CommonDomain/ucm/cs/config/config.cfg
), edit two existing
properties with the following:
SocketHostNameSecurityFilter=localhost|localhost.localdomain|
localhost6|localhost6.localdomain6|
WEBHOST1
|
PROVISIONED_HOST
|
WEBHOST2
|
SCALED_OUT_HOST
|
COMMONUCMLBRVH
and
IdcCommandServerHost=127.0.0.1
6. Start the
UCM_server1
Managed Server.
7. Ensure that the
UCM_server1
Managed Server is functioning properly. It should be
possible to access and log in to the following:
•
http://PROVISIONED_HOST:7012/cs
•
http://PROVISIONED_HOST:7012/ibr
Chapter 18
Scale Oracle Fusion Applications
18-26

18.2.5.4 Add a sip Data-Tier Channel to the wlcs_sipstate2 Server
Unless a
sip
data-tier channel is added, the
wlcs_sipstate2
server start-up fails with
the following error:
There are no sip nor diameter channels targeted to server "wlcs_sipstate2"
Therefore, do the following for the
wlcs_sipstate2
scaled-out server only:
1. Change directory to:
APPLICATIONS_CONFIG
/domains/
PROVISIONED_HOST
/CommonDomain/config/custom
2. After the following line in the
datatier.xml
file:
<server-name>wlcs_sipstate1</server-name>
add
<server-name>wlcs_sipstate2</server-name>
18.2.5.5 Unpack the UCM_server2 Server
To provision the
UCM_server2
server cluster with a shared configuration,
copy the
APPLICATIONS_CONFIG/domains/PROVISIONED_HOST/CommonDomain/ucm
folder
structure, including files, to
/u02/local/oracle/config/domains/SCALED_OUT_HOST/
CommonDomain
for the
UCM_Server2
local configuration.
18.2.5.6 Configure Oracle WebCenter
This section describes the additional steps to complete the Oracle WebCenter product
suite scale out.
This section tells how to do the following:
• Configure the Oracle WebCenter Portal
wc_spaces
and
wc_spaces
2 servers
• Configure persistence stores for JMS servers
• Configure a default persistence store for transaction recovery
• Set the listen address for the
IPM_server1
and
IPM_server2
servers
• Add
IPM_server1
and
IPM_server2
VIP addresses to the list of allowed hosts
• Add the
UCM_server1
and
UCM_server2
servers to the connection pool
18.2.5.6.1 Configure the Oracle WebCenter Portal wc_spaces and wc_spaces2 Servers
After scaling out the Oracle WebCenter Portal Managed Server, do the following:
1. Log in to:
http://commoninternal.mycompany.com/em
.
2. Navigate to Farm_CommonDomain, WebCenter, Portal, Spaces, WebCenter
Portal ( 11.1.*) (WC_Spaces), WebCenter Portal (top left of right pane),
Settings, Service configuration.
Click Content Repository.
3. Highlight FusionAppsContentRepository and click Edit.
Chapter 18
Scale Oracle Fusion Applications
18-27

4. Select Socket and enter
COMMONUCMLBRVH
as the host and the LBR port for the
server.
5. If updating the first instance of
wc_spaces
did not automatically update the second
instance, repeat Step 2 (page 18-27) through Step 4 (page 18-28) for
wc_spaces2
.
6. Restart the Oracle WebCenter Portal
wc_spaces
and
wc_spaces2
Managed
Servers.
Verifying the Location of FusionAppsContentRepository
When configuring Oracle WebCenter Content Server, the
FusionAppsContentRepository
content repository should move from the file system
to the Fusion database. To verify the move of the repository to the database, upload
the
/etc/hosts
file on
PROVISIONED_HOST
to WebCenter Content Server by running
the following commands, in order:
UNIX:
export RIDC_JAR=<
APPLICATIONS_BASE
>/fusionapps/ecm/ucm/Distribution/FAProv/
oracle.ucm.fa_client_11.1.1.jar
export UCMSCRIPT_JAR=/u01/oracle/products/fusionapps/ecm/ucm/Distribution/
FAProv/ucmscript.jar
$ java -cp $UCMSCRIPT_JAR:$RIDC_JAR oracle.ucm.client.UploadTool
--url=idc://
PROVISIONED_HOST
:7034 --username=
admin_username
--uploadFile=/etc/hosts --dSecurityGroup=public --dDocTitle=hosts
--Tool.AccountRequired=false
--quiet
• In the
java -cp
command, the Intradoc protocol is being used in the URL option
--url=idc://
, and not
http
.
• Get the IntradocServerPort number
7034
used in the URL above from the
config
file:
UNIX:
/u02/local/oracle/config/domains/
PROVISIONED_HOST
/CommonDomain/ucm/cs/
config/config.cfg
• After the UNIX
/etc/hosts
file successfully uploads to the Fusion database,
something similar to the following displays:
Upload successful.
[dID=1 | dDocName=UCMFA000001]
Use the
dID
number in the next SQL command.
UNIX:
$ sqlplus FUSION_OCSERVER11G/
fusionDB_password
SQL> select dID, dRenditionID, dFileSize, DLastModified
from FileStorage where dID=1;
SQL>
The following is sample output from the SQL command:
Chapter 18
Scale Oracle Fusion Applications
18-28

DID DRENDITIONID DFILESIZE DLASTMODIFIED
1 primaryFile 702 21-MAY-13 12.16.03.524000 PM
1 webViewableFile 702 21-MAY-13 12.16.03.687000 PM
18.2.5.6.2 Configure Persistence Stores for JMS Servers
Set the location for all persistence stores targeted to the
IPM_server1
and
IPM_server2
Managed Servers to a directory that is visible from both
PROVISIONED_HOST
and
SCALED_OUT_HOST
.
To configure the persistence stores:
1. Log in to the Oracle WebLogic Server Administration Console (
http://
commoninternal.mycompany.com/console
).
2. Click Lock & Edit.
3. In the Domain Structure window, expand the Services node and then click the
Persistence Stores node.
The Summary of Persistent Stores page displays.
4. Click New, and then select the Create File Store option from dropdown list.
5. Enter the following directory information:
• Name: For example,
IPMJMSFileStore1
• Target:
IPM_server1
• Directory:
APPLICATIONS_CONFIG/domains/PROVISIONED_HOST/CommonDomain
6. Click OK.
7. Repeat Steps 3 (page 18-29) through 6 (page 18-29) to create the following
persistence stores:
•
ViewerJMSFileStore1
, targeting to
IPM_server1
•
ViewerJMSFileStore2
, targeting to
IPM_server2
•
IPMJMSFileStore2
, targeting to
IPM_server2
8. Click Activate Changes.
9. Click Lock & Edit.
10. In the Domain Structure window, expand the Services node, then click the
Messaging, then JMS Servers node.
The Summary of JMS Servers page displays.
11. Click the name of the server, IpmJmsServer1.
12. From the Configuration, General tab, select IPMJMSFileStore1 from the
Persistence Store dropdown list.
13. Click Save.
14. Repeat Steps 10 (page 18-29) through 13 (page 18-29) for the JMS server
ViewerJmsServer1 using
ViewerJMSFileStore1
.
15. Click Activate Changes.
16. Click Lock & Edit.
17. In the Domain Structure window, expand the Services node and then click the
Messaging, JMS Servers node.
Chapter 18
Scale Oracle Fusion Applications
18-29

The Summary of JMS Servers page displays.
18. Click New.
19. Enter a name (for example,
IpmJmsServer2
), then select IPMJMSFileStore2 from
the Persistence Store dropdown list.
20. Click Next.
21. Select IPM_server2 as the target.
22. Click Finish.
23. Repeat Steps 17 (page 18-29) through 22 (page 18-30) to create the new JMS
server ViewerJmsServer2 using
ViewerJMSFileStore2
targeting the
IPM_server2
Managed Server.
24. Click Activate Changes.
25. Restart the
IPM_server1
and
IPM_server2
Managed Servers.
18.2.5.6.3 Configure a Default Persistence Store for Transaction Recovery
Each server has a transaction log which stores information about committed
transactions that are coordinated by the server that may not have been completed.
Oracle WebLogic Server uses this transaction log for recovery from system crashes
or network failures. To leverage the migration capability of the Transaction Recovery
Service for the servers within a cluster, store the transaction log in a location
accessible to a server and its backup servers.
Preferably, this location should be a dual-ported SCSI disk or on a Storage Area
Network (SAN).
To set the location for the default persistence store:
1. Log in to the Oracle WebLogic Server Administration Console (
http://
commoninternal.mycompany.com/console
).
2. In the Change Center, click Lock & Edit.
3. In the Domain Structure window, expand the Environment node and then click the
Servers node.
The Summary of Servers page displays.
4. Click the name of the server (represented as a hyperlink) in the IPM_server1
table. The settings page for the selected server opens with the Configuration tab
active.
5. Open the Services tab.
6. In the Default Store section of the page, enter the path to the folder where the
default persistent stores will store its data files. For example, create a directory
PROVISIONED_HOST
>
APPLICATIONS_CONFIG
/domains/
PROVISIONED_HOST
/CommonDomain/tlogs
7. Click Save.
8. Repeat Steps 1 (page 18-30) through 7 (page 18-30) for the
IPM_server2
Managed Server.
9. Click Activate Changes.
Chapter 18
Scale Oracle Fusion Applications
18-30

10. Restart the Managed Servers to activate the changes (ensure that Node Manager
is up and running):
a. Log in to the Oracle WebLogic Server Administration Console (
http://
commoninternal.mycompany.com/console
).
b. In the Summary of Servers screen, select the Control tab.
c. Select IPM_server1 and IPM_server2 in the table and then click Shutdown.
d. After the servers have shut down, select IPM_server1 and IPM_server2 in the
table and click Start.
• To enable migration of the Transaction Recovery service, specify a location on a
persistent storage solution that is available to other servers in the cluster. Both
IPM_server1
and
IPM_server2
must be able to access this directory.
• Ensure the following the path exists on the machine:
(Linux)
/usr/share/X11/fonts/TTF
(Solaris)
/usr/X11/lib/X11/fonts/TrueType
18.2.5.6.4 Set the Listen Address for IPM_server1 and IPM_server2
Ensure that virtual IPs have been enabled on
PROVISIONED_HOST
and
SCALED_OUT_HOST
before setting the
IPM_server1
and
IPM_server2
listen addresses.
To set the listen address for the Managed Servers:
1. Log in to the Administration Console (
http://commoninternal.mycompany.com/
console
).
2. In the Change Center, click Lock & Edit.
3. Expand the Environment node in the Domain Structure window.
4. Click Servers.
The Summary of Servers page displays.
5. Select IPM_server1 in the table.
The Settings page for
IPM_server1
Managed Server displays.
6. Set the listen address to COMMONIPMVH1 and click Save.
7. Navigate to the Summary of Servers page and select IPM_server2 in the table.
The Settings page for the
IPM_server2
Managed Server displays.
8. Set the listen address to COMMONIPMVH2 and click Save.
Both
COMMONIPMVH1
and
COMMONIPMVH2
are pingable.
9. Click Activate Changes.
The changes will not take effect until the
IPM_server1
and
IPM_server2
Managed
Servers are restarted. To restart the Managed Servers, do the following:
a. Ensure that Node Manager is up and running.
b. On the Summary of Servers page, select the Control tab.
c. Navigate to the Summary of Servers page, select IPM_server1
andIPM_server2 in the table, and then click Shutdown.
Chapter 18
Scale Oracle Fusion Applications
18-31

d. After the servers have shut down, select IPM_server1 and IPM_server2 in the
table and click Start.
18.2.5.6.5 Add IPM_server1 and IPM_server2 VIP Addresses to the List of Allowed Hosts
Perform these steps to add the
IPM_server1
and
IPM_server2
virtual-host names to
the
SocketHostNameSecurityFilter
parameter list:
1. Edit the
config
file
PROVISIONED_HOST
:
APPLICATIONS_LOCAL_CONFIG/domains/
PROVISIONED_HOST/CommonDomain/ucm/cs/config/config.cfg
, with the following:
SocketHostNameSecurityFilter=localhost|localhost.localdomain|localhost6|
localhost6.localdomain6|
WEBHOST1
|
PROVISIONED_HOST
|
WEBHOST2
|
SCALED_OUT_HOST
|
COMMONUCMLBRVH
|
COMMONIPMVH1
|
COMMONIPMVH2
2. Restart the
UCM_server1
and
UCM_server2
Oracle WebCenter Content
Management Servers for the changes to take effect.
18.2.5.7 Scale Out Oracle WebCenter Content Inbound Refinery Server
Follow the steps below to scale out the Oracle WebCenter Content Inbound Refinery
(IBR) server. Note that IBR is provisioned only if the provisioning offering(s) selected
needs it. Subsequently, the environment may not need IBR.
If
APPLICATIONS_LOCAL_CONFIG/domains/PROVISIONED_HOST/CommonDomain/ucm/ibr
is present on
PROVISIONED_HOST
, then IBR is provisioned in the environment.
1. Edit the
APPLICAITONS_LOCAL_CONFIG/domains/PROVISIONED_HOST/
CommonDomain/ucm/ibr/config/config.cfg
file on
PROVISIONED_HOST
with the
following:
•
IDC_Name=PROVISIONED_HOST7012
•
InstanceMenuLabel=PROVISIONED_HOST7012
•
SocketHostNameSecurityFilter=localhost|localhost.localdomain|
localhost6|localhost6.localdomain6|PROVISIONED_HOST|SCALED_OUT_HOST
•
HttpServerAddress=PROVISIONED_HOST:7012
(
PROVISIONED_HOST
's server
address instead of load balancer, as it is a singleton node.)
2. Add the following to the
config.cfg
file on both
PROVISIONED_HOST
and
SCALED_OUT_HOST
:
EnableReserveDirectoryCheck=false
3. Restart the
ucm_server1
server.
4. Navigate to
http://SCALED_OUT_HOST:7012/ibr
(
SCALED_OUT_HOST
's
ibr
) and log
in when prompted.
The post-installation configuration page displays, as it is not a clustered node.
5. On the post-installation configuration page:
a. Set the server socket port to 7035.
b. Ensure the port has a unique server instance name and unique local paths on
SCALED_OUT_HOST
.
c. Set the Incoming Socket Connection Address Security Filter:
Chapter 18
Scale Oracle Fusion Applications
18-32

SocketHostNameSecurityFilter=localhost|localhost.localdomain|
localhost6|localhost6.localdomain6|PROVISIONED_HOST|SCALED_OUT_HOST
d. Click Submit.
e. Restart the
ucm_server2
server.
6. Navigate to
http://PROVISIONED_HOST
:
7012/cs
and select Administration >
providers.
ibrprovider is already defined in this list.
7. Add a new outgoing provider:
a. Click Add.
b. Set the values to match the values of ibrprovider.
MANDATORY: The value for the new outgoing ibrprovider must differ from the
value of the default ibrprovider.
c. Assign the following unique values: to Provider Name, Provider Description,
Server Host Name, Server Port, Instance Name, and Relative Web Root.
– Provider Name:
ibr_provider2
– Provider Description: ibrprovider for second server
– Server Host Name:
SCALED_OUT_HOST
– Server Port:
7035
– Instance Name:
SCALED_OUT_HOST_HOST7012
– Relative Web Root:
/cs
8. Navigate to Inbound Refinery on the second node:
http://
SCALED_OUT_HOST:7012/ibr.
9. (UNIX only) Select Conversion Settings and update the primary web rendition.
10. Navigate to Third-Party Applications Settings, General OutsideIn Filter
Options, Options and set the following path to the fonts:
/usr/share/X11/fonts/
TTF
.
Solaris:
Navigate to Third-Party Applications Settings, General OutsideIn Filter
Options, Options and set the following path to the fonts:
/usr/X11/lib/X11/
fonts/TrueType
.
The font location can be specific to the operating system.
11. Restart the
UCM_server1
and
UCM_server2
Managed Servers.
18.2.5.8 Add UCM_server1 and UCM_server2 to the Connection Pool
To add
UCM_server1
and
UCM_server2
to the connection pool, do the following:
1. Log in to the Oracle WebCenter Content: Imaging application at:
https://
commonexternal.mycompany.com/imaging
.
2. In the left-hand pane, expand Manage Connections.
3. Click the Fusion Applications UCM Connection link.
Chapter 18
Scale Oracle Fusion Applications
18-33

4. In the right-hand Fusion Applications UCM Connection: Connection Summary
pane, click Modify.
5. In the Basic Information screen, click Next.
6. In the Connection Settings screen, add two servers to the Content Server pool:
•
PROVISIONED_HOST
:
7034
•
SCALED_OUT_HOST
:
7034
7. Click Next.
8. In the Connection Security screen, leave all four default selections for the
FUN_FINANCIAL_APPLICATION_ADMINISTRATOR_JOB WebLogic user, and
then click Next.
9. In the Review Settings screen, review the connection details and click Submit.
18.2.6 Configure Oracle Coherence for the odi_server Managed
Server
Oracle Data Integrator Managed Servers are present in four domains:
• Oracle Fusion CRM
• Oracle Fusion HCM
• Oracle Fusion Human Capital Management
• Oracle Fusion Incentive Compensation
Oracle recommends using unicast communication in
odi_server
enterprise
deployments, unless use of multicast is a must. Consider using multicast
communication for large Oracle Data Integrator clusters with approximately 20 or more
Oracle Data Integrator Managed Servers
WARNINIG: An incorrect configuration of the Oracle Coherence framework that is
used for deployment may prevent the
odi_server
Managed Server from starting.
Oracle recommends the configuration described in this section.
Unicast communication does not enable nodes to discover other cluster members
automatically when a new Oracle Data Integrator server is added to a cluster.
Consequently, specify the nodes that belong to the cluster. It is not necessary to
specify all of the nodes of a cluster, however. Specify only enough nodes so that a
new node added to the cluster can discover one of the existing nodes. Consequently,
when a new node has joined the cluster, it is able to discover all of the other nodes
in the cluster. Additionally, in configurations such as Oracle Data Integrator enterprise
deployments, where multiple IPs are available in the same box, configure Oracle
Coherence to use a specific host name to create the Oracle Coherence cluster.
Tip:
To guarantee high availability during deployments of
odi_server
Managed
Servers, specify enough nodes so that at least one of them is running at any
given time.
Chapter 18
Scale Oracle Fusion Applications
18-34

Specify the nodes using the
-Doracle.odi.coherence.wka n
system property,
where
n
is the number for each Oracle HTTP Server. The numbering starts at
1. This numbering must be sequential and must not contain gaps. In addition,
specify the host name used by Oracle Coherence to create a cluster through the
tangosol.coherence.localhost
system property. Set this property by adding the
-Dtangosol.coherence.localhost
parameters to the Arguments field of the Oracle
WebLogic Server Administration Console's Server Start tab.
To add the virtual-host names to Oracle Coherence:
1. Log in to the Oracle WebLogic Server Administration Console (
http://
domain_nameinternal.mycompany.com/console
).
2. In the Domain Structure window, expand the Environment node.
3. Click Servers.
The Summary of Servers page appears.
4. Select odi_server1 (represented as a hyperlink) from the column of the table.
The Settings page appears.
5. Click Lock & Edit.
6. Click the Server Start tab.
7. Change the existing properties if necessary, and enter new properties into the
Arguments field:
-Dtangosol.coherence.localport=9066
-Dtangosol.coherence.localhost=
PROVISIONED_HOST
-Doracle.odi.coherence.wka1=
PROVISIONED_HOST
-Doracle.odi.coherence.wka1.port=9066
-Doracle.odi.coherence.wka2=
SCALED_OUT_HOST
-Doracle.odi.coherence.wka2.port=9066
-DJDBCProgramName=DS/
domain_name
Domain/odi_server1
-Dserver.group=ODICluster
WARNING: There should be no breaks in lines between the different
-D
parameters. Do not copy or paste the code from above to the Administration
Console's Arguments text field. This may result in HTML tags being inserted in
the Java arguments. The code should not contain other characters than those
included in the example above.
8. Click Save and Activate Changes.
9. Navigate to Domain_Name, Environment, Servers and select the Control tab.
10. Select the
odi_server1
Managed Server in the table, click Shutdown, and then
select the Force Shutdown Now option from dropdown list.
11. Start the
odi_server1
Managed Server.
18.2.7 Scale Out the Oracle Business Intelligence Domain
This section describes how to scale the Oracle Business Intelligence domain.
18.2.7.1 Overview of the Oracle Business Intelligence Domain
Oracle Fusion Applications offerings use following Oracle Business Intelligence
components from the Oracle Business Intelligence domain:
Chapter 18
Scale Oracle Fusion Applications
18-35

• Oracle Business Intelligence Analytics
• Essbase
• Oracle Real-Time Decisions
• Oracle Business Intelligence Publisher
• Oracle Business Intelligence Publisher (Oracle BI Publisher)
• Oracle Transaction Business Intelligence
Oracle Essbase
Oracle Fusion General Ledger combines the traditional general ledger functionality
with Oracle Essbase functionality, which is embedded seamlessly within Oracle Fusion
General Ledger. At the time users create their chart of accounts, the balances cube
is created automatically. Later, in case of a change such as a cost center is added
or a date effective hierarchy is modified, the General Ledger automatically creates or
modifies the corresponding balances cube hierarchy. As transactions or journals are
posted, the General Ledger automatically updates the multidimensional cube. Unlike a
data warehouse, no batch programs need to be run to populate the balances cube; it
is all happening in real time when a journal is posted.
Oracle Business Intelligence Publisher
Oracle BI Publisher provides the ability to create and format high quality reports across
Oracle Fusion Financials applications. It applies templates, which users design in
familiar desktop tools, to standard extracts and reports. For example, it is used widely
used in Oracle Fusion Payments for formatting of the check payments and electronic
payment files.
Oracle Transaction Business Intelligence
Oracle Transaction Business Intelligence is widely used in Oracle Fusion Financials as
a reporting tool. Using Oracle Transaction Business Intelligence, users can perform
adhoc queries directly from transaction tables using drag-and-drop functionality
to build custom reports in real time from the various Oracle Fusion Financials
applications. It helps immensely in reducing the need to build and maintain customized
reports.
Oracle Business Intelligence Analytics
Oracle Business Intelligence Analytics provides day-to -day key performance
indicators (KPIs) of any item in Oracle Fusion Financials. Intelligence and analytics
are embedded within the context of business transactions to help users complete the
transitions. For example, before users post a journal, the system tells them the impact
the journal has on the account balances. This eliminates the need to navigate to a
separate page to run a query or run a report. End users are not distracted from the
task at hand, reporting and process demand is reduced, and smarter decisions are
made in the context of the transaction.
18.2.7.2 Prerequisites for Scaling the Oracle Business Intelligence Domain
Before beginning, ensure the following:
• Node Manager has been started in the Secure Sockets Layer (SSL) mode by
following the instructions in Scaling Out Node Manager (page 18-8).
Chapter 18
Scale Oracle Fusion Applications
18-36

• The Administration Console's Follow Configuration Changes feature has been
disabled (to eliminate redirections):
1. Log into the Administration Console (
http://biinternal.mycompany.com/
console
) and go to Preferences, Shared Preferences.
2. Deselect Follow Configuration Changes and click Save.
18.2.7.3 Start the Default Node Manager
To start the default Node Manager:
1. Stop any Node Manager running on
BIHOST2
using one of the following methods:
• Use Ctrl+C in the shell where it was started.
• Use the standard process-identification and kill commands in the operating
system appropriate to the specific product offering and the Oracle Fusion
Applications enterprise deployment.
2. Change directory to
APPLICATIONS_BASE/fusionapps/wlserver_10.3/common/
nodemanager
and edit the
nodemanager.properties
file with the following:
SecureListener=false
3. Change directory to
APPLICATIONS_BASE/fusionapps/oracle_common/common/bin
and run the following script:
UNIX:
./setNMProps.sh
4. Change directory to
APPLICATIONS_BASE/fusionapps/wlserver_10.3/server/bin
and run the following script:
UNIX:
./startNodeManager.sh
Node Manager starts on
BIHOST2
.
Steps 2 (page 18-37) through 4 (page 18-37) enable Node Manager on
BIHOST2
and
the Administrator Console to communicate on Plain Socket.
18.2.7.4 Prerequisites for Scaling Oracle Business Intelligence on BIHOST2
Prerequisites include the following:
• Configuring a JMS file persistence store on
BIHOST1
• Setting the listen address for the
bi_server1
server
• Updating the
FusionVirtualHost_bi.conf
configuration file
18.2.7.4.1 Configure a JMS File Persistence Store in BIHOST1
Configure the location for the Java Message Service (JMS) file persistence store to a
directory visible from both nodes. Change the persistent store to use this shared base
directory.
1. Log in to the Administration Console (
http://biinternal.mycompany.com/
console
).
Chapter 18
Scale Oracle Fusion Applications
18-37

2. In the Domain Structure window, expand the Services node.
3. In the Change Center, click Lock & Edit.
4. Click the Persistent Stores node.
The Summary of Persistent Stores page displays.
5. Click JRFWSAsyncFileStore and enter a directory that is located in the shared
storage. This shared storage is accessible from both
BIHOST1
and
BIHOST2
:
APPLICATIONS_CONFIG
/domains/
BIHOST1
/BIDomain/JRFWSAsyncFileStore
6. Click Save.
7. Click Activate Changes.
The changes will not take effect until the Managed Server is restarted.
8. Do the following:
a. Ensure that Node Manager is up and running.
b. On the Summary of Servers page, select the Control tab.
c. Select bi_server1 in the table and then click Shutdown.
d. After the server has shut down, select bi_server1 in the table and then click
Start.
9. Run the following commands on
BIHOST1
to restart the Oracle Business
Intelligence system components:
UNIX:
$ cd
APPLICATIONS_CONFIG
/BIInstance/bin
$ ./opmnctl stopall
$ ./opmnctl startall
18.2.7.4.2 Set the Listen Address for the bi_server1 Managed Server
Make sure that the steps described in Enable Virtual IPs on PROVISIONED_HOST
and SCALED_OUT_HOST (page 18-74) have been performed before setting the
bi_server1
listen address.
To set the listen address for the Managed Server:
1. Log in to the Administration Console (
http://biinternal.mycompany.com/
console
).
2. In the Change Center, click Lock & Edit.
3. Expand the Environment node in the Domain Structure window.
4. Click Servers. The Summary of Servers page is displayed.
5. Select bi_server1 in the table. The Settings page for
bi_server1
is displayed.
6. Set the Listen Address to
BIVH1
.
Both
BIVH1
and
BIVH2
are pingable.
7. Click Save.
8. Click Activate Changes.
9. The changes do not take effect until the
bi_server1
Managed Server is restarted
(ensure that Node Manager is up and running):
Chapter 18
Scale Oracle Fusion Applications
18-38

a. On the Summary of Servers page, select the Control tab.
b. Select bi_server1 in the table and then click Shutdown.
c. After the server has shut down, select bi_server1 in the table and then click
Start.
10. Restart the Oracle Business Intelligence system components on
BIHOST1
:
UNIX:
$ cd
APPLICATIONS_CONFIG
/BIInstance/bin
$ ./opmnctl stopall
$ ./opmnctl startall
18.2.7.4.3 Update the FusionVirtualHost_bi.conf Configuration File
To enable Oracle HTTP Server to route to
bi_cluster
, which contains the
bi_servern
Managed Servers, set the WebLogicCluster parameter to the list of nodes in the
cluster:
1. Update the WebLogicCluster parameter in the
FusionVirtualHost_bi.conf
file to contain a cluster list of virtual
host
:
port
entries. (On
WEBHOST1
:
APPLICATIONS_CONFIG/CommonDomain_webtier/
config/OHS/ohs1/moduleconf/FusionVirtualHost_bi.conf
. On
WEBHOST2
:
APPLICATIONS_CONFIG/CommonDomain_webtier1/config/OHS/ohs2/
moduleconf/FusionVirtualHost_bi.conf
.)
MANDATORY: Update the
FusionVirtualHost_bi.conf
file in two locations:
• Under the internal virtual host for Oracle Business Intelligence
• Under the external virtual host for Oracle Business Intelligence
For example, for the internal virtual host:
<LocationMatch ^/analytics/>
SetHandler weblogic-handler
WebLogicCluster
BIVH1
:10217,
BIVH2
:10217
</LocationMatch>
For the external virtual host:
<LocationMatch ^/analytics/>
SetHandler weblogic-handler
WebLogicCluster
BIVH1
:10217,
BIVH2
:10217
WLProxySSL ON
WLProxySSLPassThrough ON
RewriteEngine ON
RewriteOptions inherit
</LocationMatch>
2. Restart Oracle HTTP Server on both
WEBHOST1
and
WEBHOST2
:
WEBHOST1
>
APPLICATIONS_CONFIG
/CommonDomain_webtier/bin/opmnctl
restartproc
ias-component=ohs1
WEBHOST2
>
APPLICATIONS_CONFIG
/CommonDomain_webtier1/bin/opmnctl
restartproc
ias-component=ohs2
The servers specified in the WebLogicCluster parameters are only important at
startup time for the plug-in. The list must provide at least one running cluster
Chapter 18
Scale Oracle Fusion Applications
18-39

member for the plug-in to discover other members in the cluster. The listed cluster
member must be running when Oracle HTTP Server is started. Oracle WebLogic
Server and the plug-in work together to update the server list automatically with
new, failed, and recovered cluster members.
Sample scenarios include:
• Example 1: If there is a two-node cluster and then a third member is added, it
is not necessary to update the configuration to add the third member. The third
member is discovered dynamically at run time.
• Example 2: There is a three-node cluster, but only two nodes are listed in
the configuration. However, if both listed nodes are down when Oracle HTTP
Server is started, then the plug-in would fail to route to the cluster. Ensure that
at least one of the listed nodes is running when Oracle HTTP Server is started.
If all the members of the cluster are listed, then guarantee it is possible to
route to the cluster, assuming at least one member is running when Oracle
HTTP Server is started. For more information on configuring the Oracle
WebLogic Serverplug-in, see Oracle Fusion Middleware Using Web Server
1.1 Plug-Ins with Oracle WebLogic Server.
18.2.7.5 Scale Oracle Business Intelligence Components
This section describes how to scale out the Oracle Business Intelligence system
using the Configuration Assistant. It is assumed that an Oracle Business Intelligence
ORACLE_BASE (binaries) has already been installed and is available from
BIHOST1
and
BIHOST2
, and that a domain with an Administration Server has been created.
This is the domain that will be extended in this section to support Oracle Business
Intelligence components.
OPTIONAL: Oracle strongly recommends to read the Oracle Fusion Middleware
release notes for any additional installation and deployment considerations before
starting the setup process.
This section tells how to do the following:
• Scale out Oracle Business Intelligence on
BIHOST2
• Start Node Manager in SSL mode
• Scale out the system components
• Configure secondary instances of singleton system components
• Configure the
bi_server2
Managed Server
• Perform additional configuration for Oracle Business Intelligence high availability
• Configure a default persistence store for transaction recovery
• Start and validate Oracle Business Intelligence on
BIHOST2
• Validate access through Oracle HTTP Server
• Configure Node Manager for the Managed Servers
• Configure server migration for the Managed Servers
18.2.7.5.1 Scale Out the Oracle Business Intelligence System on BIHOST2
To scale out the Oracle Business Intelligence system:
Chapter 18
Scale Oracle Fusion Applications
18-40

1. Ensure that the
bi_server1
server is running.
2. In the
ORACLE_BASE/products/fusionapps/registry.xml
file, change
<component name="WebLogic Server" version="10.3.6.0"
InstallDir="
ORACLE_BASE
/products/fusionapps/wlserver_10.3">
to
<component name="WebLogic Server" version="Temporary"
InstallDir="
ORACLE_BASE
/products/fusionapps/wlserver_10.3">
3. Change directory to the location of the Oracle Business Intelligence Configuration
Assistant, and then start it:
UNIX:
BIHOST2
>
APPLICATIONS_BASE
/fusionapps/bi/bin
BIHOST2
> ./config.sh
4. In the Welcome screen, click Next.
5. In the Prerequisite Checks screen, verify that all checks complete successfully,
and then click Next.
6. In the Create, Scale Out or Extend BI System screen, select Scale Out BI System
and enter the following:
• Host Name:
BIHOST1
• Port:
10201
• User name:
WLS_Administrator
• User Password:
WLS_Administrator_password
Click Next.
7. In the Scale Out BI System Details screen, enter the following:
• Middleware Home:
APPLICATIONS_BASE/fusionapps
(dimmed)
• Oracle Home:
APPLICATIONS_BASE/fusionapps/bi
(dimmed)
• WebLogic Server Home:
APPLICATIONS_BASE/fusionapps/wlserver_10.3
(dimmed)
• Domain Home:
APPLICATIONS_CONFIG/domains/BIHOST1/BIDomain
• Applications Home:
APPLICATIONS_CONFIG/applications/BIDomain
• Instance Home: Defaults to
APPLICATIONS_CONFIG/BIInstance1
• Instance Name:
BIInstance1
(dimmed)
Click Next.
8. In the Configure Ports screen, select "Specify Ports using Configuration File."
Use the
bi_staticports.ini
file from the
APPLICATIONS_BASE/ports
directory.
Click Next.
9. In the Specify Security Updates screen, choose to receive security updates from
Oracle support or not. To receive updates, enter an e-mail address.
Click Next.
10. In the Summary screen, click Configure.
Chapter 18
Scale Oracle Fusion Applications
18-41

11. In the Configuration Progress screen, verify that all the Configuration Tools have
completed successfully and click Next.
12. In the Complete screen, click Finish.
18.2.7.5.2 Start Node Manager in SSL Mode
To start Node Manager in SSL mode:
1. Stop the default Node Manager running on
BIHOST2
using one of the following
methods:
• Use CTRL+C in the shell where it was started
• Use the standard process-identification and kill commands in the operating
system appropriate to the product and the Oracle Fusion Applications
enterprise deployment.
2. Start Node Manager in SSL mode on
BIHOST2
:
UNIX:
BIHOST2
> cd
APPLICATIONS_CONFIG
/nodemanager/
BIHOST2
BIHOST2
> ./startNodeManagerWrapper.sh &
3. Update the Node Manager for the
BIHOST2
machine using the Oracle WebLogic
Server Console by doing the following:
a. Log in to the Administration Server:
http://biinternal.mycompany.com/
console
.
b. Navigate to BIDomain, Environment, Machines.
c. In the left-hand pane, click Lock & Edit.
d. In the right-hand pane, click
BIHOST2
.
e. In the window that opens, click the Node Manager tab and set the following
attributes:
– Type - SSL
– Listen Address - <
BIHOST2
>
– Listen Port - 5556
4. Click Save and then Activate Changes.
The changes will not take effect until the
bi_server2
Managed Server is restarted.
5. Do the following:
a. Stop the Administration Server:
UNIX:
BIHOST1
>
APPLICATIONS_CONFIG
/domains/
BIHOST1
/BIDomain/bin/
stopWebLogic.sh
b. Connect to the Administration Server through
nmConnect
and start the
Administration Server using
nmstart
.
– Set the following environment variable:
UNIX:
Chapter 18
Scale Oracle Fusion Applications
18-42

export WLST_PROPERTIES="-Dweblogic.security.SSL.trustedCAKeyStore=
APPLICATIONS_CONFIG
/keystores/fusion_trust.jks"
– Start the Administration Server:
UNIX:
BIHOST1
> cd
APPLICATIONS_BASE
/fusionapps/
wlserver_10.3/common/bin
BIHOST1
> ./wlst.sh
– In the WLST shell, execute the following command:
wls:/offline> nmConnect (username='Admin_User',password='Admin_
Password',host='
BIHOST1
',port='5556', nmType='ssl', domainDir=
'
APPLICATIONS_CONFIG
/domains/
BIHOST1
/BIDomain')
wls:/nm/
domain_name
> nmStart ('AdminServer')
wls:/nm/
domain_name
> exit ()
The username and password used in
nmConnect
are the Node Manager
credentials (user name and password) specified when creating the
provisioning response file.
c. Restart the
bi_server2
Managed Server:
– On the Summary of Servers page, select the Control tab.
– Select bi_server2 in the table and then click Shutdown.
– After the server has shut down, select bi_server2 in the table and then click
Start.
18.2.7.5.3 Scale the System Components
To scale out the system components, do the following in Oracle Enterprise Manager
Fusion Middleware Control:
1. Log in to Fusion Middleware Control (
http://biinternal.mycompany.com/em
).
2. Expand the Business Intelligence node in the Farm_BIDomain window.
3. Click coreapplication.
4. Click Capacity Management, then click Scalability.
5. Click Lock and Edit Configuration.
6. For the
BIHOST2
BIInstance1 Oracle instance, increment the Oracle Business
Intelligence components by 1:
• BI Servers
• Presentation Servers
• JavaHosts
7. Change the Port Range From and Port Range To to be the same as the
BIHOST1
BIInstance Oracle instance.
8. Click Apply.
9. Click Activate Changes.
Chapter 18
Scale Oracle Fusion Applications
18-43

Restart is not needed at this point, because a restart is performed after completing the
steps in Configure Secondary Instances of Singleton Components (page 18-44).
18.2.7.5.4 Configure Secondary Instances of Singleton Components
Oracle Business Intelligence Scheduler and Oracle Business Intelligence Cluster
Controller are singleton components that operate in active/passive mode. Configure
a secondary instance of these components so that they are distributed for high
availability.
To configure secondary instances, do the following in Fusion Middleware Control:
1. Log in to Fusion Middleware Control (
http://biinternal.mycompany.com/em
).
2. Expand the Business Intelligence node in the Farm_BIDomain window.
3. Click coreapplication.
4. Click Availability, then click Failover.
5. Click Lock and Edit Configuration to activate the Primary/Secondary
Configuration section of the Availability tab.
6. Specify the Secondary Host/Instance for BI Scheduler and BI Cluster Controller.
7. Click Apply.
8. Click Activate Changes.
9. Click Restart to apply recent changes.
10. From Manage System, click Restart.
11. Click Yes when prompted to confirm to restart all Business Intelligence
components.
Under Potential Single Points of Failure, no problem should be reported for BI
Scheduler and BI Cluster Controller.
18.2.7.5.5 Configure the bi_server2 Managed Server
This section explains what to do to configure the
bi_server2
Managed Server.
Setting the Listen Address for the bi_server2 Managed Server
Make sure that the steps described in Enable Virtual IPs on PROVISIONED_HOST
and SCALED_OUT_HOST (page 18-74) have been performed before setting the
bi_server2
listen address.
To set the listen address for the Managed Server:
1. Log in to the Oracle WebLogic Server Administration Console (
http://
biinternal.mycompany.com/console
).
2. In the Change Center, click Lock & Edit.
3. Expand the Environment node in the Domain Structure window.
4. Click Servers. The Summary of Servers page is displayed.
5. Select bi_server2 in the table. The settings page for
bi_server2
is displayed.
6. Set the Listen Address to
BIVH2
.
7. Click Save.
Chapter 18
Scale Oracle Fusion Applications
18-44

8. Click Activate Changes.
The changes will not take effect until the Managed Server is restarted.
9. Do the following:
a. Ensure that Node Manager is up and running.
b. On the Summary of Servers page, select the Control tab.
c. Select bi_server2 in the table and then click Shutdown.
d. After the server has shut down, select bi_server2 in the table and then click
Start.
Configuring Custom Identity and Custom Trust for the bi_server2 Managed Server
To configure custom identity and custom trust:
1. Log in to the Oracle WebLogic Server Administration Console (
http://
biinternal.mycompany.com/console
).
2. In the Change Center, click Lock & Edit.
3. Expand the Environment node in the Domain Structure window.
4. Click Servers.
The Summary of Servers page displays.
5. Select bi_server2 in the table. The Settings page for
bi_server2
displays.
6. Click Keystores, and then do the following:
a. Click Change next to Demo Identity and Demo Trust.
b. Select Custom Identity and Custom Trust from the Keystores dropdown list
and click Save.
c. Under Identity, do the following:
– Change the Custom Identity Keystore entry to point to the
APPLICATIONS_CONFIG/keystores/BIHOST2_fusion_identity.jks
file.
– Enter and confirm the Custom Identity Keystore Passphrase.
d. Under Trust, do the following:
– Change the Custom Identity Keystore entry to point to the
APPLICATIONS_CONFIG/keystores/fusion_trust.jks
file.
– Enter and confirm the Custom Trust Keystore Passphrase.
– Click Save.
7. Click SSL, and then do the following:
a. Ensure that Identity and Trust Locations is set to Keystores.
b. Under Identity, do the following:
– Change the Private Key Alias to
BIHOST2_fusion
.
– Enter and confirm the Private Key Passphrase to the keypassword.
– Click Save.
8. Click Activate Changes.
Chapter 18
Scale Oracle Fusion Applications
18-45

9. (UNIX) Set the following property in
APPLICATIONS_BASE/fusionapps/
wlserver_10.3/common/bin/wlst.sh
:
WLST_PROPERTIES=" -Dweblogic.wlstHome='${WLST_HOME}'
-Dweblogic.security.SSL.trustedCAKeyStore=
APPLICATIONS_CONFIG
/keystores/
fusion_trust.jks ${WLST_PROPERTIES}"
Disabling Host Name Verification for the bi_server2 Managed Server
This step is required if the appropriate certificates have not been set up to authenticate
the different nodes with the Administration Server. If the server certificates have
not been configured, errors are displayed during the management of the different
WebLogic servers. To avoid these errors, disable host name verification while setting
up and validating the topology, and enable it again after the topology configuration is
complete.
To disable host name verification:
1. Log in to Oracle WebLogic Server Administration Console (
http://
biinternal.mycompany.com/console
).
2. Click Lock & Edit.
3. Expand the Environment node in the Domain Structure window.
4. Click Servers. The Summary of Servers page is displayed.
5. Select bi_server2 in the table. The settings page for the server is displayed.
6. Click the SSL tab.
7. Expand the Advanced section of the page.
8. Set Host Name Verification to None.
9. Click Save.
10. Click Activate Changes.
11. The change will not take effect until the
bi_server2
Managed Server is restarted
(make sure that Node Manager is up and running):
a. In the Summary of Servers screen, select the Control tab.
b. Select bi_server2 in the table and then click Shutdown.
c. Select bi_server2 in the table and then click Start.
12. Restart the Oracle Business Intelligence system components on
BIHOST2
:
UNIX:
$ cd
APPLICATIONS_CONFIG
/BIInstance1/bin
$ ./opmnctl stopall
$ ./opmnctl startall
Adding bi_server2 System Properties to the Server Start Tab
After scaling out the
bi_server2
Managed Server, add a new system property to the
Server Start tab of this Managed Server.
1. Log in to the Oracle WebLogic Server Administration Console (
http://
biinternal.mycompany.com/console
).
2. Click Lock & Edit.
Chapter 18
Scale Oracle Fusion Applications
18-46

3. Expand the Environment node in the Domain Structure window.
4. Click Servers.
The Summary of Servers page displays.
5. Select bi_server2 in the table.
The settings page for the server displays.
6. Click Server Start.
7. Add the following property to the arguments:
-DJDBCProgramName=DS/BIDomain/bi_server2
8. Click Save and then Activate Changes.
9. Restart the
bi_server2
Managed Server (ensure sure that Node Manager is up
and running):
a. In the Summary of Servers screen, select the Control tab.
b. Select bi_server2 in the table and then click Shutdown.
c. Select bi_server2 in the table and then click Start.
10. Restart the BI System Components on
BIHOST2
:
UNIX:
$ cd
APPLICATIONS_CONFIG
/BIInstance1/bin
$ ./opmnctl stopall
$ ./opmnctl startall
18.2.7.5.6 Perform Additional Configuration for Oracle Business Intelligence High
Availability
This section describes additional high availability configuration tasks for Oracle BI
Enterprise Edition, Oracle Real-Time Decisions, Oracle BI Publisher, and Oracle
Financial Reports.
Additional Configuration Tasks for Oracle BI Scheduler
If server-side scripts are used with Oracle BI Scheduler, it is recommended to
configure a shared directory for the scripts so that they can be shared by all Oracle BI
Scheduler components in a cluster.
Perform these steps only if server-side scripts are used.
To share Oracle BI Scheduler scripts:
1. Create an
APPLICATIONS_CONFIG/BIShared/OracleBISchedulerComponent/
coreapplication_obisch1
directory.
2. From
BIHOST1
, copy the default Oracle BI Scheduler
scripts (for example,
APPLICATIONS_CONFIG/BIInstance/bifoundation/
OracleBISchedulerComponent/coreapplication_obisch1/scripts/common
)
and custom Oracle BI Scheduler scripts
(for example,
APPLICATIONS_CONFIG
/BIInstance/bifoundation/
OracleBISchedulerComponent/coreapplication_obisch1/scripts/scheduler
) to
the following location:
Chapter 18
Scale Oracle Fusion Applications
18-47

APPLICATIONS_CONFIG/BIShared/OracleBISchedulerComponent/
coreapplication_obisch1
3. Update the SchedulerScriptPath and DefaultScriptPath elements of the Oracle BI
Scheduler
instanceconfig.xml
file, as follows:
• SchedulerScriptPath: Refers to the path where Oracle BI Scheduler-created
job scripts are stored. Change this to the path of the shared BI Scheduler
scripts location.
• DefaultScriptPath: Specifies the path where user-created job scripts (not
agents) are stored. Change this to the path of the shared BI Scheduler scripts
location.
The
instanceconfig.xml
files for Oracle BI Scheduler are in the following
locations:
On BIHOST1::
APPLICATIONS_CONFIG/BIInstance/config/
OracleBISchedulerComponent/coreapplication_obisch1
On BIHOST2:
APPLICATIONS_CONFIG /BIInstance1/config/
OracleBISchedulerComponent/coreapplication_obisch1
Update these files for each Oracle BI Scheduler component in the deployment.
4. Restart the Oracle BI Scheduler component.
On BIHOST1:
UNIX:
$ cd
APPLICATIONS_CONFIG
/BIInstance/bin
$ ./opmnctl stopproc
ias-component=coreapplication_obisch1
$ ./opmnctl startproc
ias-component=coreapplication_obisch1
On BIHOST2:
UNIX:
$ cd
APPLICATIONS_CONFIG
/BIInstance1/bin
$ ./opmnctl stopproc
ias-component=coreapplication_obisch1
$ ./opmnctl startproc
ias-component=coreapplication_obisch1
Additional Configuration Tasks for Oracle Real-Time Decisions
This sections contains information about the following:
• Configuring Oracle Real-Time Decisions clustering
• Adding Oracle RTD system properties to the server start tab
Configuring Oracle Real-Time Decisions Clustering Properties
Perform these steps in Fusion Middleware Control to set up cluster-specific
configuration properties for Oracle Real-Time Decisions (Oracle RTD). It is only
necessary to perform the steps on one of the nodes in the deployment. It is
not necessary to set cluster-specific configuration properties for Oracle RTD for
subsequent nodes.
1. Log in to Fusion Middleware Control (
http://biinternal.mycompany.com/em
).
Chapter 18
Scale Oracle Fusion Applications
18-48

2. Expand the Application Deployments node in the Farm_BIDomain window.
3. Expand Oracle RTD(11.1.1)(bi_cluster).
4. Click any node under it. For example, Oracle RTD(11.1.1)(bi_server1).
5. In the right pane, click Application Deployment, and then select System MBean
Browser.
6. In the System MBean Browser pane, expand Application Defined MBeans.
7. For any one of the servers under Oracle RTD, navigate to the MBean and set the
attribute, as shown in the following table. Other servers automatically get updated
with the value that is set.
Table 18-2 Oracle RTD MBean Attributes and Values for Clustering
MBean Attribute Value
SDClusterPropertyManager -
> Misc
DecisionServiceAddres
s
http://
biinternal.mycompany.com
8. Click Apply.
Adding Oracle RTD System Properties to the Server Start Tab
After scaling out Oracle RTD, use the Administration Console to add three system
properties to the Server Start tab of each Managed Server.
1. Log in to the Oracle WebLogic Server Administration Console (
http://
biinternal.mycompany.com/console
).
2. Click Lock & Edit.
3. Expand the Environment node in the Domain Structure window.
4. Click Servers.
The Summary of Servers page displays.
5. Select bi_server<1,2> in the table.
The settings page for the server displays.
6. Click Server Start.
7. Add the following property to the arguments:
-Drtd.clusterRegistryJobIntervalMs=12000
-Drtd.clusterDepartureThresholdMs=50000
-Drtd.clusterDepartureThreshold2Ms=50000
8. Click Save and then Activate Changes.
9. Restart the
bi_server<1,2>
Managed Server (ensure sure that Node Manager is
up and running):
a. In the Summary of Servers screen, select the Control tab.
b. Select bi_server<1,2> in the table and then click Shutdown.
c. Select bi_server<1,2> in the table and then click Start.
10. Restart the BI System Components on
BIHOST1
and
BIHOST2
:
UNIX:
Chapter 18
Scale Oracle Fusion Applications
18-49

$ cd
APPLICATIONS_CONFIG
/BIInstancen/bin
$ ./opmnctl stopall
$ ./opmnctl startall
Performing this task enables an instance of Oracle RTD to be migrated successfully
from one host to another in the event of a failure of a Managed Server.
Even after these changes, if the server migration finishes in less than 50 seconds, the
Oracle RTD batch framework is in an inconsistent state.
If the enterprise has deployed any RTD Inline Services that host Batch Job
implementations, and if after a server migration the batch console command, "batch-
names", or its brief name, "bn", shows no registered batch jobs, then the Oracle RTD
Batch Manager service must be stopped and restarted. To do this, perform these
steps:
1. In Fusion Middleware Control, expand the WebLogic Domain node in the left
pane. Then, right-click BIDomain and select System MBean Browser.
2. Locate SDPropertyManager, Misc MBean under Application Defined MBeans,
OracleRTD, Server:bi_server n.
Be sure to select the Misc MBean that corresponds to the local node where the
change is being made. For example, in case of connecting to
APPHOST1
, then make
sure to update the attribute associated with
bi_server1
.
3. Set the BatchManagerEnabled attribute to false and click Apply.
4. Set the BatchManagerEnabled attribute back to true and click Apply. Performing
this task causes the Batch Manager to stop and be restarted.
When it restarts, it runs on either the same server as before, or on a different
server.
5. After restarting Batch Manager, note that the corresponding MBean does not
always immediately get refreshed on the server where Batch Manager comes
back up, so this is not a concern. Instead, verify that Batch Manager is now
operational by using the Batch Console tool:
a. Locate the zip file for the Oracle RTD client tools in the following location:
APPLICATIONS_BASE
/fusionapps/bi/clients/rtd/rtd_client_11.1.1.zip
b. Because most Oracle RTD client tools do not run on UNIX, unzip this file in
a location on a Windows machine (referred to here as RTD_HOME). Then,
locate the batch console jar file in:
RTD_HOME/client/Batch/batch-console.jar
c. Change to this directory and execute the jar, passing to it the URL and port of
either the Managed Server, or of the cluster proxy:
java -jar batch-console.jar -url http://SERVER:PORT
d. When prompted, enter the user name and password of a user who is a
member of the Administrator role, BI_Adminstrator role, or some other role
authorized to administer Oracle RTD batch jobs.
e. When prompted for a command, enter
bn
:
Checking server connection...
command: bn
CrossSellSelectOffers
command:quit
Chapter 18
Scale Oracle Fusion Applications
18-50

If Batch Manager has successfully restarted, then the
bn
command lists
the names of all batch implementations hosted by all deployed RTD Inline
Services.
The commonly deployed example, CrossSell, hosts a batch implementation
named CrossSellSelectOffers, shown in the preceding example.
Additional Configuration Tasks for Oracle BI Publisher
Perform the steps in this section on each machine where Oracle BI Publisher is
configured.
Configuring Integration with Oracle BI Presentation Services
To configure Oracle BI Publisher integration with Oracle BI Presentation Services:
1. Log in to Oracle BI Publisher (
http://biinternal.mycompany.com/xmlpserver
)
with Administrator credentials and select the Administration tab.
2. Under Integration, select Oracle BI Presentation Services.
3. Verify and update the following:
• Server Protocol: http
• Server: biinternal.mycompany.com
• Port: 80
• URL Suffix: analytics-ws/saw.dll
4. Click Apply.
5. Under System Maintenance, select Server Configuration.
In the Catalog section, change the BI Publisher Repository value to the shared
location for the Configuration Folder. For example:
APPLICATIONS_CONFIG
/BIShared/BIPublisher/repository
6. Click Apply.
7. Restart the Oracle BI Publisher application:
a. Log in to the Administration Console (
http://biinternal.mycompany.com/
console
).
b. Click Deployments in the Domain Structure window.
c. Select bipublisher(11.1.1).
d. Click Stop, and then select When Work Completes or Force Stop Now.
e. After the application has stopped, click Start and then Start Servicing All
requests.
Setting the Oracle BI Enterprise Edition Data Source
The Oracle BI EE Data Source must point to the clustered Oracle BI Servers through
the Cluster Controllers. Perform this task in Oracle BI Publisher.
To set the Oracle BI EE data source in Oracle BI Publisher:
1. Log in to Oracle BI Publisher (
http://biinternal.mycompany.com/xmlpserver
)
with Administrator credentials and select the Administration tab.
2. Under Data Sources, select JDBC Connection.
Chapter 18
Scale Oracle Fusion Applications
18-51

3. Update the Oracle BI EE data source setting by changing the Connection String
parameter to the following:
jdbc:oraclebi://primary_cluster_controller_host:primary_cluster_controller_
port/
PrimaryCCS=primary_cluster_controller_host;PrimaryCCSPort=primary_cluster_
controller_port;SecondaryCCS=secondary_cluster_controller_host;
SecondaryCCSPort=secondary_cluster_controller_port;
For example:
jdbc:oraclebi://
BIHOST1
:10212/PrimaryCCS=
BIHOST1
;PrimaryCCSPort=10212;
SecondaryCCS=
BIHOST2
;SecondaryCCSPort=10212;
Since the Cluster Controller Port may be different between
BIHOST1
and
BIHOST2
,
use the following procedure to check the port being used:
a. Log in to the Oracle Enterprise Manager Console:
http://
biinternal.mycompany.com/em
.
b. Expand Farm_Domain, Business Intelligence, coreapplication.
c. Navigate to Availability.
d. Check the port number used by the Cluster Controller on
BIHOST1
and
BIHOST2
.
4. Do one of the following:
• Select Use System User.
• Deselect Use System User and specify BIImpersonateUser credentials.
See Credentials for Connecting to the Oracle BI Presentation Catalog in Oracle
Fusion Middleware Developer's Guide for Oracle Business Intelligence Enterprise
Edition.
5. Click Test Connection. A "Connection established successfully" message should
be received.
6. Click Apply.
Configuring Java Message Service for Oracle BI Publisher
Configure the location for the persistence store to the Oracle Fusion Applications
database.
On BIHOST2:
1. Log in to the Oracle WebLogic Server Administration Console (
http://
biinternal.mycompany.com/console
).
2. In the Domain Structure window, expand the Services node and then click the
Persistence Stores node. The Summary of Persistence Stores page is displayed.
3. Click Lock & Edit.
4. Click New, and then Create JDBCStore.
5. Enter a name (for example,
BipJDBCStore-bi_server2
) and target (for
example,
bi_server2
). Select bip_datasource as the data source, and enter
Bip_bi_server2_
as the prefix name.
6. Click OK and then Activate Changes.
Chapter 18
Scale Oracle Fusion Applications
18-52

7. In the Domain Structure window, expand the Services node and then click the
Messaging, JMS Servers node. The Summary of JMS Servers page is displayed.
8. Click Lock & Edit.
9. Click New.
10. Enter a name (for example,
BipJmsServer-bi_server2
) and in the Persistence
Store drop-down list, select BipJDBCStore-bi_server2 and click Next.
11. Select bi_server2 as the target.
12. Click Finish and Activate Changes.
13. In the Domain Structure window, expand the Services node and then click the
Messaging, JMS Modules node. The JMS Modules page is displayed.
14. In the Change Center, click Lock & Edit.
15. Click BipJmsResource and then click the Subdeployments tab.
16. Select BipJmsSubDeployment under Subdeployments.
17. Add the new Oracle BI Publisher JMS Server (BipJmsServer-bi_server2) as an
additional target for the subdeployment.
18. Click Save and then Activate Changes.
To validate, do the following:
1. Log in to each Oracle BI Publisher URL.
2. Navigate to Administration, System Maintenance, Scheduler Diagnostics.
All statuses should be in a Passed state and both instances should be visible.
Additional Configuration Tasks for Oracle Business Intelligence for Microsoft
Office
The information in this section tells how to do the following:
• Configure Oracle Business Intelligence for Microsoft Office properties
• Validate Oracle Business Intelligence for Microsoft Office
Configuring Oracle Business Intelligence for Microsoft Office Properties
To perform additional configuration tasks for Oracle Business Intelligence for Microsoft
Office:
1. Validate the Oracle BI Enterprise Edition Office Server setup by accessing
http://
biinternal.mycompany.com/bioffice/about.jsp
.
The About Oracle BI EE Office Server page displays.
2. Go to the Oracle BI Enterprise Edition Office Server directory. For example:
APPLICATIONS_CONFIG/domains/BIHOST1/BIDomain/servers/bi_server1/tmp/
_WL_user/bioffice_11.1.1/cvsibb/war/WEB-INF
To locate the Oracle BI Enterprise Edition Office Server directory, check the
LogDir parameter on the About Oracle BI EE Office Server page. The Oracle
BI Enterprise Edition Office Server directory is the parent directory of the log
directory.
Determine the exact location for BIHOSTn by using the following URL:
http://
BIVHn:10217/bioffice/about.jsp
.
Chapter 18
Scale Oracle Fusion Applications
18-53

3. On both
BIHOST1
and
BIHOST2
, open bioffice.xml for editing and modify the BI
Office properties shown in the following table.
Table 18-3 BI Office Properties in bioffice.xml
Property Name Valid Value Description
SawBaseURL http://
biinternal.mycompany.com/
analytics/saw.dll
or
http://
biinternal.mycompany.com/
analytics-ws/saw.dll
Load Balancer Virtual Server Name
URL for Oracle BI Presentation
Services.
Important: If SSO is enabled, then
enter the URL for the protected
analytics servlet deployed when
configuring BI Office to integrate
with the SSO-enabled Oracle BI
Server. The URL that is specified
for this property is used for Web
services requests between the BI
Office Server and Presentation
Services.
SawUseSSO 0 = No (Default)
1 = Yes
Set this property to
1
if
the Oracle Business Intelligence
implementation is enabled for SSO.
SawWebURLforSS
O
http://
biinternal.mycompany.com/
analytics/saw.dll
When SSO is enabled, use this
property to enter the public URL
that allows external users to access
Oracle Business Intelligence using
SSO from the Oracle BI Add-in for
Microsoft Office.
4. Restart the BI Office application:
a. Log in to the Administration Console (
http://biinternal.mycompany.com/
console
).
b. Click Deployments in the Domain Structure window.
c. Select bioffice(11.1.1).
d. Click Stop.
e. After the application has stopped, click Start.
5. Validate that the SawBaseURL parameter has been updated on the About Oracle
BI EE Office Server page.
Validating Oracle Business Intelligence for Microsoft Office
To validate configuration for Oracle Business Intelligence for Microsoft Office:
1. Log in to Oracle BI Presentation Services at:
http://biinternal.mycompany.com/analytics
2. In the lower left pane, under the Get Started heading, select Download BI
Desktop Tools and then select Oracle BI for MS Office.
3. Install Oracle BI for Microsoft by running the Oracle BI Office InstallShield Wizard.
4. Open Microsoft Excel or Microsoft PowerPoint.
5. From the Oracle BI menu, select Preferences.
Chapter 18
Scale Oracle Fusion Applications
18-54
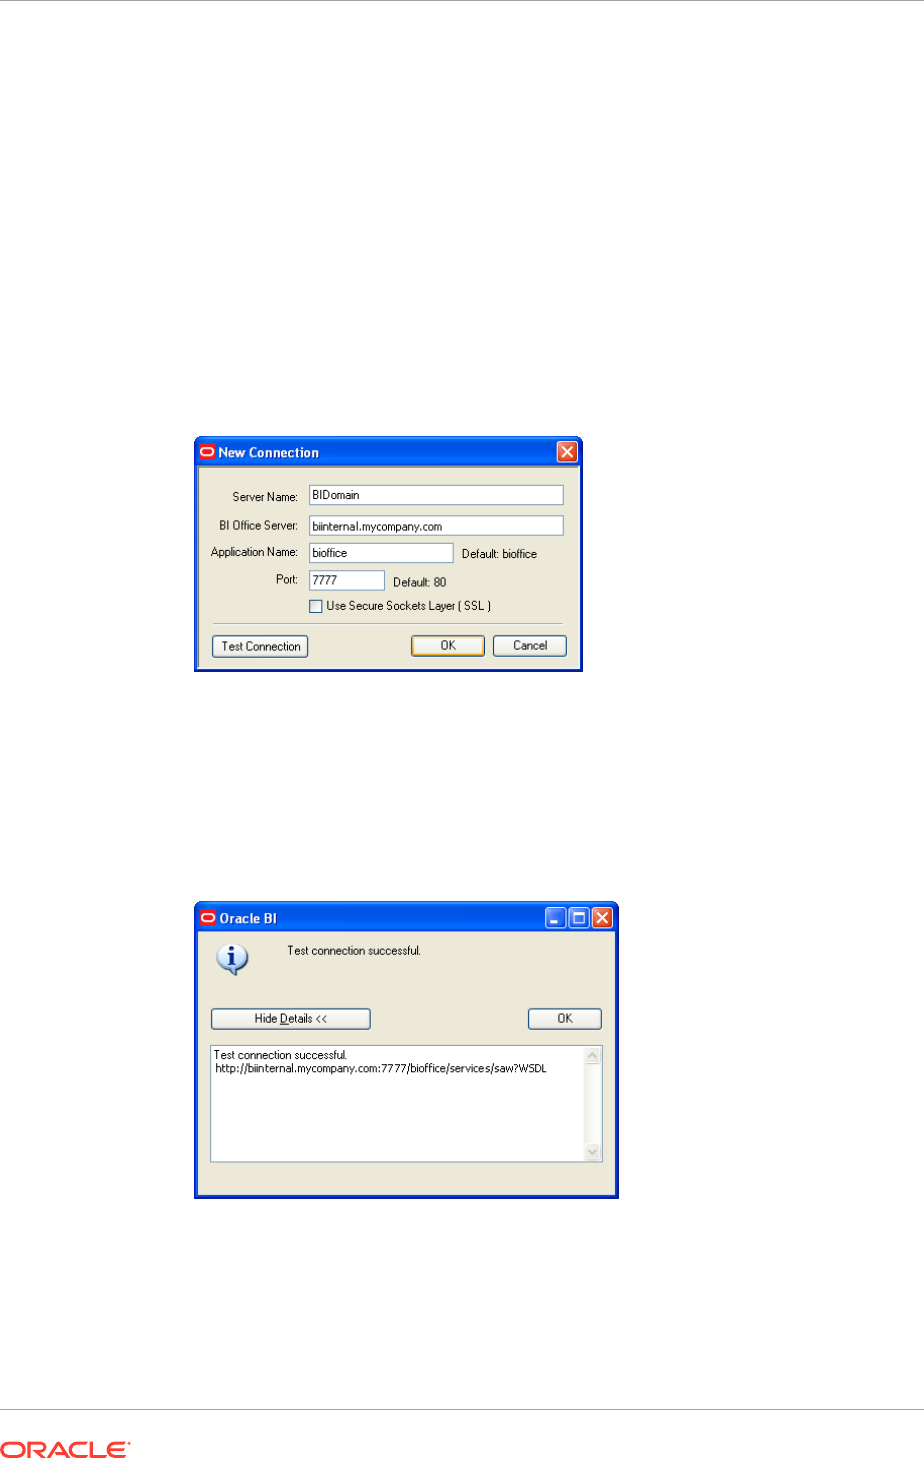
6. In the Connections tab, select New.
7. Enter values for the following fields:
• Server Name: Provide a name for the connection.
• BI Office Server: Provide the URL for the Oracle BI Office Server.
• Application Name: Enter the Application Name defined for the Oracle BI
Office Server when the Oracle BI Office Server application was deployed to
Oracle WebLogic Server. The default name is bioffice.
• Port: Enter the Oracle BI Office Server port number.
The following figure shows the New Connection dialog.
Figure 18-1 New Connection Dialog for Oracle BI Office
8. Click Test Connection to test the connection between the add-in and the Oracle
BI Office Server.
Successful connections receive a "Test connection successful" message, as
shown in the following figure.
Figure 18-2 Test Connection Successful Message
9. Log in as an Administrator (for example,
weblogic
) and validate that it is possible
to access the Oracle BI Task Pane, as shown in the following figure.
Chapter 18
Scale Oracle Fusion Applications
18-55
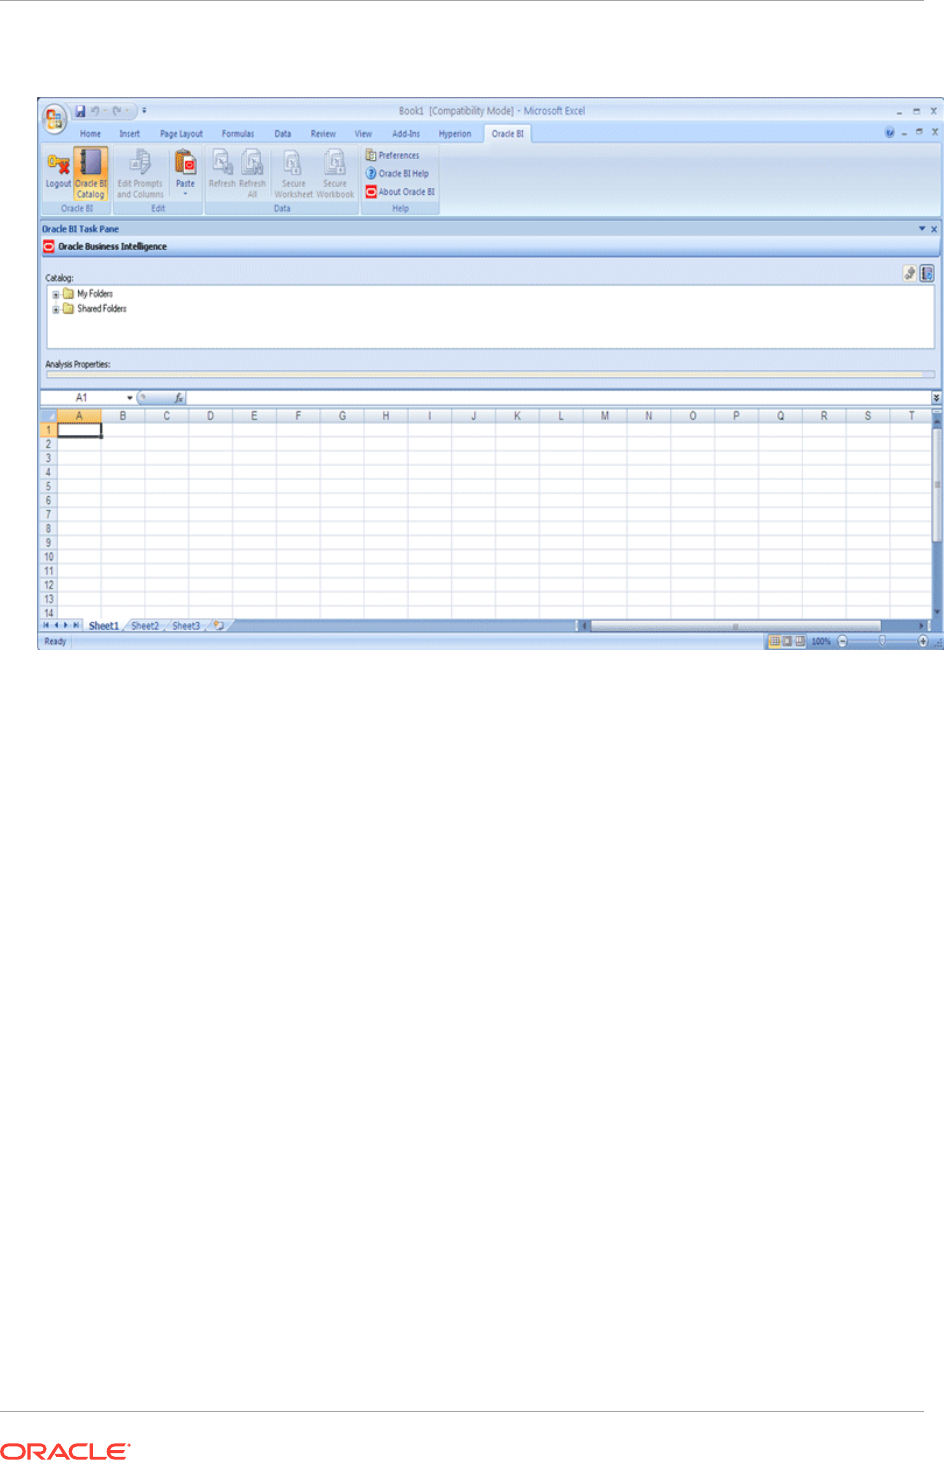
Figure 18-3 Oracle BI Task Pane in Microsoft Excel
Additional Configuration Tasks for Oracle Financial Reporting
There are additional configuration tasks to perform for Oracle Financial Reporting. Do
the following on
BIHOST1
and
BIHOST2
:
1. Update the
VARIABLE_VALUE_LIMIT
from 4096 to 3072000 in the
NQSConfig.INI
file. For example,
VARIABLE_VALUE_LIMIT = 3072000;
On
BIHOST1
, this file is located in
APPLICATIONS_CONFIG/BIInstance/config/
OracleBIServerComponent/coreapplication_obis1
.
On
BIHOST2
, this file is located in
APPLICATIONS_CONFIG/BIInstance1/config/
OracleBIServerComponent/coreapplication_obis1
.
2. Run the following commands to restart the Oracle Business Intelligence system
components on
BIHOST1
and
BIHOST2
:
UNIX:
$ cd
APPLICATIONS_CONFIG
/BIInstancen/bin
$ ./opmnctl stopall
$ ./opmnctl startall
18.2.7.5.7 Configure a Default Persistence Store for Transaction Recovery
Each server has a transaction log that stores information about committed transactions
that are coordinated by the server that may not have been completed. The Oracle
WebLogic Server uses this transaction log for recovery from system crashes or
network failures. To leverage the migration capability of the Transaction Recovery
Chapter 18
Scale Oracle Fusion Applications
18-56

Service for the servers within a cluster, store the transaction logs in the Oracle Fusion
Applications database.
To set the location for the default persistence store:
1. Log in to the Oracle WebLogic Server Administration Console (
http://
biinternal.mycompany.com/console
).
2. In the Change Center, click Lock & Edit.
3. In the Domain Structure window, expand the Environment node and then click the
Servers node. The Summary of Servers page is displayed.
4. Click bi_server2 in the table. The Settings page for the selected server is
displayed, and defaults to the Configuration tab.
5. Navigate to Configuration > Services.
6. In the Transaction Log Store section of the page, do the following:
• For the type, select JDBC from the dropdown list. list.
• For the data store, select bip_datasource from dropdown list.
• For the prefix name, enter
TLOG_bi_server2_
.
7. Click Save.
8. Click Activate Changes.
9. Restart
bi_server2
to activate the changes:
a. Log in to the Oracle WebLogic Server Administration Console (
http://
biinternal.mycompany.com/console
).
b. In the Summary of Servers screen, select the Control tab.
c. Select bi_server2 in the table and then click Shutdown.
d. Start the
bi_server2
server.
e. Restart the Oracle Business Intelligence system components on
BIHOST2
:
UNIX:
$ cd
APPLICATIONS_CONFIG
/BIInstance1/bin
$ ./opmnctl stopall
$ ./opmnctl startall
18.2.7.5.8 Start and Validate Oracle Business Intelligence on BIHOST2
This information in this section tells how to do the following:
• Start the
bi_server2
Managed Server
• Start the Oracle Business Intelligence system components
• Validate Oracle Business Intelligence URLs
Starting the bi_server2 Managed Server
To start the
bi_server2
Managed Server:
1. Start the
bi_server2
Managed Server using the Oracle WebLogic Server
Administration Console, as follows:
Chapter 18
Scale Oracle Fusion Applications
18-57

a. Log in to the Oracle WebLogic Server Administration Console (
http://
biinternal.mycompany.com/console
).
b. Expand the Environment node in the Domain Structure window.
c. Select Servers. The Summary of Servers page is displayed.
d. Click the Control tab.
e. Select bi_server2 and then click Start.
2. Verify that the server status is reported as Running in the Administration Console.
If the server is shown as Starting or Resuming, wait for the server status to change
to Started. If another status is reported (such as Admin or Failed), check the
server output log files for errors.
Starting the Oracle Business Intelligence System Components
Control Oracle Business Intelligence system components using
opmnctl
commands.
To start the Oracle Business Intelligence system components using the
opmnctl
command-line tool:
1. Go to the directory that contains the Oracle Process Manager and Notification
Server command-line tool, located in
APPLICATIONS_CONFIG/BIInstance1/bin
.
2. Run the
opmnctl
command to start the Oracle Business Intelligence system
components
• (UNIX)
./opmnctl startall
: Starts Oracle Process Manager and Notification
Server and all Oracle Business Intelligence system components
• (UNIX)
./opmnctl start
: Starts Oracle Process Manager and Notification
Server only
• (UNIX)
./opmnctl startproc ias-component=component_name
: Starts a
particular system component. For example, where
coreapplication_obips1
is the Presentation Services component:
UNIX:
./opmnctl startproc ias-component=coreapplication_obips1
3. Check the status of the Oracle Business Intelligence system components:
UNIX:
./opmnctl status
UNIX:
opmnctl status
Validating Oracle Business Intelligence URLs
Access the following URLs:
• Access
http://BIVH2:10217/analytics
to verify the status of
bi_server2
.
• Access
http://BIVH2:10217/wsm-pm
to verify the status of Web Services
Manager. Click Validate Policy Manager. A list of policies and assertion
templates available in the data is displayed.
WARNING: The configuration is incorrect if no policies or assertion templates
appear.
Chapter 18
Scale Oracle Fusion Applications
18-58

• Access
http://BIVH2:10217/xmlpserver
to verify the status of the Oracle BI
Publisher application.
• Access
http://BIVH2:10217/ui
to verify the status of the Oracle Real-Time
Decisions application.
• Access
http://BIVH2:10217/mapviewer
to verify the status of the map view
functionality in Oracle BI EE.
• Access
http://BIVH2:10217/hr
to verify Financial Reporting.
• Access
http://BIVH2:10217/calcmgr/index.htm
to verify Calculation Manager.
• Access
http://BIVH2:10217/aps/Test
to verify APS.
• Access
http://BIVH2:10217/workspace
to verify workspace.
18.2.7.5.9 Validate Access Through Oracle HTTP Server
Verify URLs to ensure that the appropriate routing and failover is working from Oracle
HTTP Server to bi_cluster. Perform these steps to verify the URLs:
1. While
bi_server2
is running, stop
bi_server1
using the Oracle WebLogic Server
Administration Console.
2. Access the following URLs to verify that routing and failover is functioning
properly:
•
http://WEBHOST1:10621/analytics
•
http://WEBHOST1:10621/xmlpserver
•
http://WEBHOST1:10621/ui
(access only available on Microsoft Internet
Explorer 7 or 8)
•
http://WEBHOST1:10621/hr
•
http://WEBHOST1:10621/calcmgr/index.htm
•
http://WEBHOST1:10621/aps/Test
•
http://WEBHOST1:10621/workspace
3. Start
bi_server1
from the Oracle WebLogic Server Administration Console.
4. Stop
bi_server2
from the Oracle WebLogic ServerAdministration Console.
5. Access the following URLs to verify that routing and failover is functioning
properly:
•
http://WEBHOST1:10621/analytics
•
http://WEBHOST1:10621/xmlpserver
•
http://WEBHOST1:10621/ui
(access only available on Microsoft Internet
Explorer 7 or 8)
•
http://WEBHOST1:10621/hr
•
http://WEBHOST1:10621/calcmgr/index.htm
•
http://WEBHOST1:10621/aps/Test
•
http://WEBHOST1:10621/workspace
6. Start
bi_server2
from the Oracle WebLogic ServerAdministration Console.
Chapter 18
Scale Oracle Fusion Applications
18-59

18.2.7.5.10 Configure Node Manager for the Managed Servers
Oracle recommends using host name verification for the communication between
Node Manager and the servers in the domain. This requires the use of certificates
for the different addresses communicating with the Administration Server and other
servers. See Scale Out Node Manager (page 18-8). for further details. The procedures
in that section must be performed twice using the information provided in the following
table.
Table 18-4 Details for Host Name Verification for Node Manager and Servers
Run Host Name (Host) Server Name (WLS_SERVER)
Run1:
BIHOST1 bi_server1
Run2:
BIHOST2 bi_server2
If Node Manager is configured for the Managed Servers earlier, it is not necessary to
configure it again.
18.2.7.5.11 Configure Server Migration for the Managed Servers
Server migration is required for proper failover of the Oracle BI Publisher components
in the event of failure in any of the
BIHOST1
and
BIHOST2
nodes. See Set Up Server
Migration for Oracle Fusion Applications (page 18-91).
18.2.7.6 Configure and Validate Oracle Essbase Clustering
This section describes how to configure and validate secondary instances of Oracle
Essbase Agent so that they are distributed for high availability.
Using Essbase in a Multi-Node Real Application Cluster (RAC) Oracle Fusion
Applications Database Environment:
Currently in an Oracle Fusion Applications environment provisioned with multi-node
RAC database instances, Essbase is configured to connect only to the primary Oracle
Real Application Clusters (RAC) node through Open Database Connectivity (ODBC).
The connection does not fail over to other RAC nodes when the primary node is
down. This means that the primary RAC node must be running when Oracle Fusion
Applications uses Essbase to provide online analytical processing capabilities.
When Oracle Fusion Applications functionality fails due to Essbase, check if the
primary RAC node is up and running. If the primary RAC node is down, restarting it
resolves the failure. There is currently no workaround to make the connection failover
to other RAC nodes.
Perform the following steps in Fusion Middleware Control to scale out the secondary
Oracle Essbase Agent:
1. Log in to Fusion Middleware Control (
http://biinternal.mycompany.com/em
).
2. Expand the Business Intelligence node in the Farm_BIDomain window.
3. Click coreapplication.
4. Click Availability, then click Failover.
Chapter 18
Scale Oracle Fusion Applications
18-60

5. Click Lock and Edit Configuration to activate the Primary/Secondary
Configuration section of the Availability tab.
6. Specify the Secondary Host/Instance for Essbase Agent.
7. Ensure the Shared Folder Path is set to
APPLICATIONS_CONFIG/BIShared/
Essbase/essbaseserver1
and click Apply.
8. Click Activate Changes.
9. Under Manage System, click Restart.
10. Click Yes in the confirmation dialog.
Under Potential Single Points of Failure, no problems should be reported for
Essbase Agent.
Do the following to validate Essbase clustering:
1. Check the APS (Hyperion Provider Services) test URL:
http://biinternal.mycompany.com/aps/Essbase?Clustername=Essbase_FA_Cluster
The message "Hyperion Provider Services: Hello!" should display.
2. Run the following command on
BIHOST1
:
UNIX:
APPLICATIONS_CONFIG
/BIInstance/bin/opmnctl stopproc
ias-component=essbaseserver1
3. Ensure that Essbase starts on
BIHOST2
:
UNIX:
APPLICATIONS_CONFIG
/BIInstance1/bin/opmnctl status
The status should be
init
then
Alive
.
4. Check the APS test URL again:
http://biinternal.mycompany.com/aps/Essbase?Clustername=Essbase_FA_Cluster
18.2.7.7 Validate the System
Verify URLs to ensure that the appropriate routing and failover is working from Oracle
HTTP Server to
bi_cluster
. Perform these steps to verify the URLs:
1. While
bi_server2
is running, stop
bi_server1
using the Oracle WebLogic Server
Administration Console.
2. Access the following URLs to verify that routing and failover is functioning
properly:
•
http://WEBHOST1:10621/analytics
•
http://WEBHOST1:10621/xmlpserver
•
http://WEBHOST1:10621/ui
(access only available on Microsoft Internet
Explorer 7 or 8)
•
http://WEBHOST1:10621/hr
•
http://WEBHOST1:10621/workspace
•
http://WEBHOST1:10621/calcmgr/index.htm
Chapter 18
Scale Oracle Fusion Applications
18-61

•
http://WEBHOST1:10621/aps/Test
3. Start
bi_server1
from the Oracle WebLogic Server Administration Console.
4. Stop
bi_server2
from the Oracle WebLogic Server Administration Console.
5. Access the following URLs to verify that routing and failover is functioning
properly:
•
http://WEBHOST1:10621/analytics
•
http://WEBHOST1:10621/xmlpserver
•
http://WEBHOST1:10621/ui
(access only available on Microsoft Internet
Explorer 7 or 8)
•
http://WEBHOST1:10621/hr
•
http://WEBHOST1:10621/workspace
•
http://WEBHOST1:10621/calcmgr/index.htm
•
http://WEBHOST1:10621/aps/Test
6. Start
bi_server2
from the Oracle WebLogic Server Administration Console.
18.2.8 Scale Up: Add Managed Servers to Existing Hosts
Scale out and or scale up an Oracle Fusion Applications environment. When scaling
out, add a new instance of a Managed Server to a new host (called
SCALED_OUT_HOST
in previous sections) that does not already have the Managed Server running in it.
When scaling up, add a new instance of a Managed Server in an existing host (either
a
PROVISIONED_HOST
or
SCALED_OUT_HOST
) that already has one or more instances of
the Managed Server running in it.
This section describes how to scale up an environment by adding a new instance
of a Managed Server to an existing host, called
SCALED_UP_HOST
. Note that a
SCALED_UP_HOST
is one of the
PROVISIONED_HOST
or
SCALED_UP_HOST
that are already
part of the Oracle Fusion Applications environment. For clarity in this section, we use
SCALED_UP_MGD_SERVER
to denote the Managed Server to be scaled up.
This section explains how to do the following:
• Scale up the topology (add Managed Servers to an existing node) for Oracle ADF
server
• Scale out the topology (add Managed Servers to a new node) for Oracle SOA
Suite server
• Scale up the topology (add Managed Servers to an existing node) for Oracle SOA
Suite server
• Scale up the topology (add Managed Servers to an existing node) for Oracle
Business Intelligence
18.2.8.1 Scale Up Oracle Fusion Applications Managed Servers to an Existing
Host
Before performing the tasks in this section, ensure that the Managed Server
(
SCALED_UP_MGD_SERVER
) to be scaled up and its domain (referred to as
domain
) is
running.
Chapter 18
Scale Oracle Fusion Applications
18-62

18.2.8.1.1 Clone Managed Servers and Assign Them to SCALED_UP_HOST
To add a Managed Server (
SCALED_UP_MGD_SERVER
) and assign it to
SCALED_UP_HOST
:
1. Log in to the Administration Server:
http://
domain_nameinternal.mycompany.com/console
.
2. Navigate to Domain_Name ,Environment, Servers.
3. Switch to Lock & Edit mode.
4. Select the SCALED_UP_MGD_SERVER checkbox and then click Clone.
5. Specify the following Server Identity attributes:
• Server Name -
SCALED_UP_MGD_SERVER_n
To ensure consistency in naming, copy the name of the server shown in
Server Identity and paste it into the Server Name field. Increase the number
of instances of
SCALED_UP_MGD_SERVER
by one and use that number to replace
"
n
" at the end of the server name. Oracle recommends following the managed
server naming convention
NamedManagedServer_n
.
• Server Listen Address - <
SCALED_UP_HOST
> (This is the existing host where the
new instance of
SCALED_UP_MGD_SERVER
is added.)
• Server Listen Port - Give an unused port on the machine
SCALED_UP_HOST
6. Click OK.
7. Navigate back to Domain_Name, Environment, Servers. See the newly cloned
server,
SCALED_UP_MGD_SERVER_n
.
8. From SCALED_UP_MGD_SERVER_
n
, click Advanced and then select the
WebLogic Plug-In Enabled checkbox.
9. Click Save and then click Activate Changes.
10. Run the newly created Managed Server:
a. Navigate to Domain_Name, Environment.
b. From the Navigation pane on the Oracle WebLogic Server console, select
Activate Changes.
c. Navigate to Domain_Name, Environment, Servers, Control.
d. Check the newly created Managed Server and click Start.
e. Navigate to Domain_Name, Environment, Servers and check the State to
verify that the newly created Managed Server is running.
11. Log in to the Administration Server once again (
http://
domain_nameinternal.mycompany.com/console
) and verify that all the Managed
Servers, including the new instance of the scaled-up Managed Server, are
running.
12. Do the following:
a. Switch to Lock & Edit mode.
b. Select the SCALED_UP_MGD_SERVER checkbox.
c. Select the Server Start tab.
Chapter 18
Scale Oracle Fusion Applications
18-63

d. Change the Arguments to reflect the name of the cloned Managed Server
and make sure the server group is the correct cluster name. For example, the
following should be seen:
-DJDBCProgramName\=DS/
domain_name
/
SCALED_UP_MGD_SERVER_n
-Dserver.group\=SCALED_UP_MGD_SERVERCluster
The naming convention of a
SCALED_UP_MGT_SERVER_CLUSTER
is the name of
the managed server appended with "Cluster" after dropping "Server_n". For
example, if
SCALED_UP_MGD_SERVER_n
is HomePageServer_4, its cluster (that
is, server group) is HomePageCluster.
e. Click Save.
13. Select the Logging tab, and then select the HTTP tab.
14. Do the following:
a. Change the Log file name to
logs/access.log.%yyyyMMdd%
.
b. Change the rotation type to By Time.
c. Leave the Limit number of retained files option unchecked.
d. Leave the Rotate log file on startup option unchecked.
e. Click Save.
f. Expand Advanced.
g. Change the format to Extended.
h. Change the extended logging format fields to the following:
date time time-taken cs-method cs-uri
sc-status sc(X-ORACLE-DMS-ECID)
cs(ECID-Context) cs(Proxy-Remote-User)
cs(Proxy-Client-IP)
i. Click Save.
15. Click Activate Changes.
16. Restart the
SCALED_UP_MGD_SERVER_n
for the changes to take affect.
18.2.8.1.2 Validate the System
Verify URLs to ensure that the appropriate routing and failover are working.
To verify the URLs:
1. Log in to the domain's Oracle WebLogic Server Administration Console
and stop all the instances of
SCALED_UP_MGD_SERVER
currently running in
SCALED_UP_HOST
,
PROVISIONED_HOST
, and
SCALED_OUT_HOST
, where applicable.
(Also stop
SCALED_UP_MGD_SERVER_n
that are just added.)
2. Do the following:
a. Edit the
FusionVirtualHost_domain.conf
file where
domain
takes the value
of
fs
(Common domain),
crm
,
fin
,
hcm
,
ic
,
scm
, and so on, depending on the
domain used.
Chapter 18
Scale Oracle Fusion Applications
18-64

If the
SCALED_UP_HOST
's host and port do not already exist in the
SCALED_UP_MGT_SERVER
entry, complete Steps b and c. Otherwise, skip to Step
3.
b. Locate the name (in lower case) of the scaled-up Managed Server in
the file. Add the value
SCALED_UP_HOST:port
to the WebLogicCluster
property. Note that there are two parts, internal and external, in the
FusionVirtualHost_domain.conf
file on
WEBHOST
. The
SCALED_UP_HOST:port
must be added to both the internal and external parts. If scaling out web tier to
WEBHOST2
and others, do the same on these hosts as well.
The following is an example of scaling up the
HomePage
Managed Server, and
what the
SCALED_UP_HOST:port
looks like in the
<Location> xml
element in
the
FusionVirtualHost_fs.conf
file
<Location /homepage>
SetHandler weblogic-handler
WebLogicCluster <
PROVISIONED_HOST
:port>,<
SCALED_UP_HOST
:port>,
<
SCALED_OUT_HOST
:port>
WLProxySSL ON
WLProxySSLPassThrough ON
RewriteEngine On
RewriteOptions inherit
</Location>
c. Restart Oracle HTTP Server on both
WEBHOST1
and all other web-tier hosts,
where applicable.
3. Log in to the domain's Oracle WebLogic Server Administration Console and start
the
SCALED_UP_MGD_SERVER_n
Managed Server. Begin with
n
=1.
4. Access the URL of the application deployed to the
SCALED_UP_MGD_SERVER
from a
different machine to verify that routing and failover are functioning properly.
Close all browser windows then open a new one to ensure that the Oracle Fusion
Applications login window displays correctly. The URL for the
HomePage
Managed
Server for example, is:
https://domainexternal.mycompany.com/homePage/faces/AtkHomePageWelcome
5. Log in to the domain's Oracle WebLogic Server Administration Console and stop
the
SCALED_UP_MGD_SERVER_n
Managed Server started in Step 3.
6. Repeat Steps 3 through 5 for the other instances of the
SCALED_UP_MGD_SERVER
.
7. After completing validation, start all instances of
SCALED_UP_MGD_SERVER
.
18.2.8.2 Scale Up Oracle SOA Suite Server to an Existing Host
Before performing the procedures in this section, ensure that CommonDomain and its
Managed Servers are running.
18.2.8.2.1 Clone Managed Servers and Assigning Them to SCALED_UP_HOST
To add a Managed Server and assign it to
SCALED_UP_HOST
:
1. Log in to the Administration Server:
http://
domain_nameinternal.mycompany.com/console
.
2. Navigate to Domain_Name, Environment, Servers.
3. Switch to Lock & Edit mode.
Chapter 18
Scale Oracle Fusion Applications
18-65

4. Select the Managed_Servers checkbox (for example, soa_server1) and then
click Clone.
5. Specify the following Server Identity attributes:
• Server Name -
soa_servern
To ensure consistency in naming, copy the name of the server shown in
Server Identity and paste it into the Server Name field. Increase the total
number of instances of
soa_server
in this domain by one and use that number
to replace
n
at the end of the server name. Oracle recommends following the
Oracle SOA Suite server naming convention
soa_servern
.
• Server Listen Address - <
SCALED_UP_HOST
>
• Server Listen Port - Give an unused port on the machine
SCALED_UP_HOST
6. Click OK.
7. Navigate back to Domain_Name. See the newly cloned SOA server,
soa_servern
.
8. Do the following:
a. Click soa_servern.
b. From the General tab, select Advanced and then select the WebLogic Plug-
In Enabled checkbox.
9. Click Save and then Activate Changes.
10. Run the newly created Managed Servers:
a. Navigate to Domain_Name.
b. From the Navigation pane on the Oracle WebLogic Server console, select
Activate Changes.
c. Navigate to Domain_Name.
d. Check the newly created Managed Servers and click Start.
e. Navigate to Domain_Name and check the State to verify that the newly
created Managed Servers are running.
11. Log in to the Administration Server once again (
http://
domain_nameinternal.mycompany.com/console
) and verify that all the Managed
Servers, including scaled-up servers, are running.
12. Do the following:
a. Switch to Lock & Edit mode.
b. Select the Managed_Server checkbox (for example, soa_servern).
c. Select the Server Start tab.
d. Change the Arguments to reflect the name of the cloned Managed Server
and make sure the server group is the correct cluster name. For example, the
following should be seen:
-DJDBCProgramName\=DS/CommonDomain/soa_server
n
-Dserver.group\=SOACluster
e. Click Save.
13. Select the Logging tab, and then select the HTTP tab.
Chapter 18
Scale Oracle Fusion Applications
18-66

14. Do the following:
a. Change the Log file name to
logs/access.log.%yyyyMMdd%
.
b. Change the rotation type to By Time.
c. Leave the Limit number of retained files option unchecked.
d. Leave the Rotate log file on startup option unchecked.
e. Click Save.
f. Expand Advanced.
g. Change the format to Extended.
h. Change the extended logging format fields to the following:
date time time-taken cs-method cs-uri
sc-status sc(X-ORACLE-DMS-ECID)
cs(ECID-Context) cs(Proxy-Remote-User)
cs(Proxy-Client-IP)
i. Click Save.
15. Click Activate Changes.
16. Restart the Managed Server for the changes to take affect.
18.2.8.2.2 Validate the System
Verify URLs to ensure that the appropriate routing and failover is working from Oracle
HTTP Server to the domain's SOACluster.
To verify the URLs:
1. Log in to the domain's Oracle WebLogic Server Administration Console and
stop all the instances of
soa_server
currently running in
SCALED_UP_HOST
,
PROVISIONED_HOST
, and
SCALED_OUT_HOST
, where applicable. (Also stop
soa_servern
that are just added.)
2. Do the following:
a. Edit the
FusionVirtualHost_domain.conf
file where
domain
takes the value
of
fs
(Common domain),
crm
,
fin
,
hcm
,
ic
,
scm
, and so on, depending on the
domain used.
If the
SCALED_UP_HOST
's host and port do not already exist in the
/soa/
composer
entry, complete Steps b and c. Otherwise, skip to Step 3.
b. Locate
/soa/composer
in the file. Add the value
SCALED_UP_HOST:port
to
the WebLogicCluster property. Note that there are two parts, internal
and external, in the
FusionVirtualHost_domain.conf
file on
WEBHOST
. The
SCALED_UP_HOST:port
must be added to both the internal and external parts.
If scaling out web tier to
WEBHOST2
and others, do the same on these hosts as
well.
The following is an example of scaling up the
HomePage
Managed Server, and
what the
SCALED_UP_HOST:port
looks like in the
<Location> xml
element in
the
FusionVirtualHost_fs.conf
file
<Location /homepage>
SetHandler weblogic-handler
WebLogicCluster <
DOMAINHOSTSOAVH1
:port>, <
DOMAINHOSTSOAVH2
:port>
WLProxySSL ON
Chapter 18
Scale Oracle Fusion Applications
18-67

WLProxySSLPassThrough ON
RewriteEngine On
RewriteOptions inherit
</Location>
c. Restart Oracle HTTP Server on both
WEBHOST1
and all other web-tier hosts,
where applicable.
3. Log in to the domain's Oracle WebLogic Server Administration Console and start
the
soa_servern
Managed Server. Begin with
n
=1.
4. Access the URL
http://domain_nameinternal.mycompany.com/soa-infra
to
verify that routing and failover are functioning properly.
Close all browser windows then open a new one to ensure that the Oracle Fusion
Applications login window displays correctly.
5. Log in to the domain's Oracle WebLogic Server Administration Console and stop
the
soa_servern
Managed Server started in Step 3.
6. Repeat Steps 3 through 5 for the other instances of the
soa_servern
.
7. After completing validation, start all instances of
soa_servern
.
18.2.8.3 Scale Up Oracle Business Intelligence to an Existing Host
The procedure in this section allows to increase the number of instances of
system components, such as Oracle Business Intelligence server, Oracle Business
Intelligence Presentation Services server, and Oracle Business Intelligence Java host,
on
SCALED_UP_HOST
. (Note that it is not necessary to run multiple Oracle Business
Intelligence servers on
SCALED_UP_HOST
.)
Before performing the procedure, ensure that BIDomain and its Managed Server and
system components are running in an existing host (referred to as
SCALED_UP_HOST
),
where it is either a
PROVISIONED_HOST
or
SCALED_OUT_HOST
.
18.2.8.3.1 Scale-Up Procedure for Oracle Business Intelligence
To scale up Oracle Business Intelligence on
SCALED_UP_HOST
:
1. Log in to Fusion Middleware Control:
http://biinternal.mycompany.com/em
.
2. Expand the Business Intelligence node in the Farm_BIDomain window.
3. Click coreapplication.
4. Click Capacity Management, then click Scalability.
5. Click Lock & Edit and then change the number of BI Servers, Presentation
Servers, or Java Hosts using the arrow keys.
To avoid port conflicts for the system components being scaled within the given
Oracle WebLogic Server instance, enter a different range of available ports in the
Port Range From and Port Range To fields. For example, change Port Range
From to
10221
and Port Range To to
10300
.
6. Click Apply, then click Activate Changes.
7. Click Restart to apply recent changes.
8. Click Restart under Manage System.
9. Click Yes in the confirmation dialog.
Chapter 18
Scale Oracle Fusion Applications
18-68

18.2.9 Procedures for Scaling Out Oracle SOA Suite Server
This section describes the additional scale-out steps required for the
soa_server1
and
soa_server2
servers on
PROVISIONED_HOST
and
SCALED_OUT_HOST
.
The Oracle SOA Suite server uses the Java Message Service (JMS) server. JMS
requires a shared file system for its file store and transactional log. Each Oracle SOA
Suite Managed Server in a cluster uses a separate file on the shared folder. During
a node failure, the Oracle SOA Suite server must be moved to a targeted node to
run the same server using the exact JMS file store and transaction log. To enable this
server migration, each Oracle SOA Suite server must be configured with its own virtual
IP, which can be floated on any server where the Oracle SOA Suite server is migrated.
For Java Database Connectivity (JDBC), each Oracle SOA Suite Managed Server in a
cluster uses a dedicated table per server on a database using the shared data source
connection. During a node failure, the Oracle SOA Suite server must be moved to a
targeted node to run the same server using the exact JDBC store and transaction log.
Perform the procedures in this section for the Oracle SOA Suite servers in all domains
except the BIDomain, which has no Oracle SOA Suite servers.
For Oracle Fusion Applications, the Oracle SOA Suite virtual IPs
PROVISIONED_HOST
and
SCALED_OUT_HOST
are called
DOMAINHOSTSOAVH1
and
DOMAINHOSTSOAVH2
.
where
DOMAIN
is replaced with the domain-specific syntax. For example,
CRMSOAVH1
,
CRMSOAVH2
,
FINSOAVH1
,
HCMSOAVH1
,
ICSOAVH1
,
PROJSOAVH1
, and so on.
18.2.9.1 Scale Out the Oracle SOA Suite Server
When scaling out the Oracle SOA Suite server, add new Managed Servers configured
to new nodes.
18.2.9.1.1 Prerequisites for Scaling Out the Topology for Oracle SOA Suite Server
Before beginning, ensure the following:
•
SCALED_OUT_HOST
Node Manager has been started in the Secure Sockets Layer
(SSL) mode
• Start with a clean machine if it is the first time it is being used for a scale out
• The UNIX
/etc/hosts
file has proper entries. To verify this from the clean
machine, ping the hosts listed in
/etc/hosts
files with the fully qualified name
of the hosts.
• The user created on
SCALED_OUT_HOST
should the same as the user on
PROVISIONED_HOST
• The directory structure
APPLICATIONS_BASE
is mounted on
SCALED_OUT_HOST
, and
is the same shared file system as used by
PROVISIONED_HOST
• The directory structure
APPLICATIONS_CONFIG
on
SCALED_OUT_HOST
has been
created
• The initial deployment on
PROVISIONED_HOST
has already been done and verified
by provisioning
Chapter 18
Scale Oracle Fusion Applications
18-69

18.2.9.1.2 Add a New Machine in the Oracle WebLogic Server Console
To add a new machine:
1. Stop the domain's Administration Server:
UNIX:
PROVISIONED_HOST
>
APPLICATIONS_CONFIG
/domains/
PROVISIONED_HOST
/
CommonDomain/bin/stopWebLogic.sh
2. Set the following variable on
SCALED_OUT_HOST
.
UNIX:
WLST_PROPERTIES="-Dweblogic.security.SSL.trustedCAKeyStore=
APPLICATIONS_BASE
/fusionapps/wlserver_10.3/server/lib/fusion_trust.jks"
3. Start the domain's Administration Server on
SCALED_OUT_HOST
.
UNIX:
SCALED_OUT_HOST
>
APPLICATIONS_BASE
/fusionapps/wlserver_10.3/common/bin/
wlst.sh
SCALED_OUT_HOST
> nmConnect(username='
username
', password='
password
',
domainName='
domain_name
Domain', host='
PROVISIONED_HOST
',port='5556',
nmType='ssl', domainDir='
APPLICATIONS_CONFIG
/domains/
PROVISIONED_HOST
/'
domain_name
Domain')
SCALED_OUT_HOST
> nmStart('AdminServer')
The username and password used in the
nmConnect
are the Node Manager
credentials (username and password) specified when creating the provisioning
response file.
4. Log in to the Administration Server:
http://
domain_nameinternal.mycompany.com/console
.
5. Navigate to Domain_Name, Environment, Machines.
LocalMachine is located in the right-hand pane.
6. In the left-hand pane, click Lock & Edit.
7. In the right-hand pane, first click New to add the remote machine, and then specify
the following:
• Name - enter
SCALED_OUT_HOST
• Machine operating system - in UNIX: Unix
8. Click Next.
9. In the window that opens, set the following attributes:
• Type - SSL
• Listen Address - <
SCALED_OUT_HOST
>
WARNING: The "localhost" default value here is wrong.
• Listen port - 5556
10. Click Finish and activate the changes.
Chapter 18
Scale Oracle Fusion Applications
18-70

18.2.9.1.3 Pack and Unpack the Managed Server Domain Home
Since the
PROVISIONED_HOST
domain directory file system is also available from
SCALED_OUT_HOST
, both the
pack
and
unpack
commands can be executed from the
SCALED_OUT_HOST
.
To pack and unpack the Managed Server domain home:
1. Change directory to
APPLICATIONS_BASE/fusionapps/oracle_common/common/
bin
.
2. Run the
pack
command
UNIX:
SCALED_OUT_HOST
> ./pack.sh -managed=true -domain=
APPLICATIONS_CONFIG
/
domains/
SCALED_OUT_HOST
/
domain_name
Domain -template=
APPLICATIONS_BASE/
user_templates/
domain_name
Domain_managed.jar -template_name="
domain_name
_Managed_Server_
Domain"
3. Run the
unpack
command.
UNIX:
SCALED_OUT_HOST
> ./unpack.sh -domain=
APPLICATIONS_CONFIG
/domains/
SCALED_OUT_HOST
/
domain_name
Domain -template=
APPLICATIONS_BASE
/
user_templates/
Managed_Server_Domain.jar
Here,
APPLICATIONS_BASE
is shared. If local applications config is enabled,
replace
APPLICATIONS_CONFIG
with
APPLICATIONS_LOCAL_CONFIG
, which is local to
SCALED_OUT_HOST
.
18.2.9.1.4 Clone Managed Servers and Assign Them to SCALED_OUT_HOST
To add a Managed Server and assign it to
SCALED_OUT_HOST
:
1. Log in to the Administration Server:
http://
domain_nameinternal.mycompany.com/console
.
2. Navigate to Domain_Name, Environment, Servers.
3. Switch to Lock & Edit mode.
4. Select the Managed_Server checkbox (for example, soa_server1) and then click
Clone.
5. Specify the following Server Identity attributes:
• Server Name -
soa_server3
To ensure consistency in naming, copy the name of the server shown in
Server Identity and paste it into the Server Name field. Then change the
number to "3".
• Server Listen Address - <
SCALED_OUT_HOST
>
• Server Listen Port - leave "as is"
6. Click OK.
Chapter 18
Scale Oracle Fusion Applications
18-71

7. Navigate back to Domain_Name, Environment, Servers. See the newly cloned
server,
soa_server3
.
8. Click soa_server3 and change the following attributes:
• Machine - <
SCALED_OUT_HOST
>
• Cluster Name - accept the default, SOACluster
Ensure that this cluster name is the same as the cluster name of the original
Managed Server.
9. From soa_server3, click Advanced and then select the WebLogic Plug-In
Enabled checkbox.
10. Click Save.
11. Select the Keystores tab, and then ensure that the keystores value is Custom
Identity and Custom Trust.
12. Do the following:
a. Change the Custom Identity Keystore path to
point to the
APPLICATIONS_BASE/fusionapps/wlserver_10.3/server/lib/
SCALED_OUT_HOST_fusion_identity.jks
file.
b. Leave the Custom Identity Keystore type blank.
c. Change the Custom Identity Keystore Passphrase entry. This should be the
same as the keystorepassword field described in the first bullet in Step 4 in
Create the Identity Keystore on SCALED_OUT_HOST (page 18-10).
d. Re-enter the Confirm Custom Identity Keystore Passphrase.
e. Ensure that the Confirm Custom Trust Keystore path is
pointing to the
APPLICATIONS_BASE/fusionapps/wlserver_10.3/server/lib/
fusion_trust.jks
file.
f. Leave the Custom Trust Keystore type blank.
g. Change the Custom Trust Keystore Passphrase entry. This should be the
same as the keystorepassword field described in the first bullet in Step 4 in
Creating the Identity Keystore on SCALED_OUT_HOST (page 18-10).
h. Re-enter the Custom Trust Keystore Passphrase.
i. Click Save.
13. Select the SSL tab.
a. Make sure that Identity and Trust Locations is set to Keystores.
b. Change the Private Key Alias to
SCALED_OUT_HOST_fusion
.
c. Change the Private Key Passphrase to the keypassword, as described
in the second bullet in Step 4 in Creating the Identity Keystore on
SCALED_OUT_HOST (page 18-10).
d. Re-enter the keypassword from Step c for the Confirm Private Key
Passphrase.
e. Click Save.
14. Select the Server Start tab.
Chapter 18
Scale Oracle Fusion Applications
18-72

Change the Arguments to reflect the name of the cloned Managed Server and
make sure the server group is the correct cluster name. For example, the following
should be seen:
-DJDBCProgramName\=DS/
domain_name
Domain/soa_server3
-Dserver.group\=SOACluster
Click Save.
15. Select the Logging tab, and then select the HTTP tab.
16. Do the following:
a. Change the Log file name to
logs/access.log.%yyyyMMdd%
.
b. Change the rotation type to By Time.
c. Leave the Limit number of retained files option unchecked.
d. Leave the Rotate log file on startup option unchecked.
e. Click Save.
f. Expand Advanced.
g. Change the format to Extended.
h. Change the extended logging format fields to the following:
date time time-taken cs-method cs-uri
sc-status sc(X-ORACLE-DMS-ECID)
cs(ECID-Context) cs(Proxy-Remote-User)
cs(Proxy-Client-IP)
i. Click Save.
17. Click Activate Changes.
18. Run the newly created Managed Server:
a. Navigate to Domain_Name, Environment.
b. From the Navigation pane on the Oracle WebLogic Server console, select
Activate Changes.
c. Navigate to Domain_Name, Environment, Servers, Control.
d. Check the newly created Managed Server and click Start.
e. Navigate to Domain_Name, Environment, Servers, and check the State to
verify that the newly created Managed Servers are running.
18.2.9.1.5 Validate the System
Verify URLs to ensure that the appropriate routing and failover is working from Oracle
HTTP Server to the domain's SOACluster.
To verify the URLs:
1. Log in to the domain's Oracle WebLogic Server Administration Console and
stop the
soa_server1
Managed Server on
PROVISIONED_HOST
while the Managed
Servers on
SCALED_OUT_HOST
are running.
2. Do the following:
Chapter 18
Scale Oracle Fusion Applications
18-73

a. Edit the
FusionVirtualHost
file, adding the scaled-out
soa_server3
Managed
Server's host and port.
b. Add the code shown in the following example to both the Internal and External
part of the
FusionVirtualHost
file on
WEBHOST1
and
WEBHOST2
.
<Location /soa/composer>
SetHandler weblogic-handler
WebLogicCluster <
DOMAINHOSTSOAVH1
:port>,<
DOMAINHOSTSOAVH2
:port>,
WLProxySSL ON
WLProxySSLPassThrough ON
RewriteEngine On
RewriteOptions inherit
</Location>
c. Restart Oracle HTTP Server on both
WEBHOST1
and
WEBHOST2
.
3. Access
http://domain_nameinternal.mycompany.com/soa-infra
to verify that
routing and failover are functioning properly. (Ensure the log in prompt is visible.)
4. Log in to the domain's Oracle WebLogic Server Administration Console and stop
the
soa_server3
Managed Server on
SCALED_OUT_HOST
.
5. Start the
soa_server1
Managed Server on
PROVISIONED_HOST
.
6. Repeat Step 3. (Ensure the log in prompt is visible.)
7. Start the
soa_server3
Managed Server on
SCALED_OUT_HOST
and verify that
soa_server1
and
soa_server3
are running.
18.2.9.2 Enable Virtual IPs on PROVISIONED_HOST and
SCALED_OUT_HOST
In this example,
ethX
is the ethernet interface (
eth0
or
eth1
) and
Y
is the index (0, 1, 2,
and so on). In addition, the
DOMAINHOSTSOAVH1
and
DOMAINHOSTSOAVH2
VIPs are used.
To enable the virtual IP on Linux:
1. On
PROVISIONED_HOST
:
a. (UNIX) Run the
ifconfig
command as root:
/sbin/ifconfig
interface:index
IPAddress
netmask
netmask
For example:
/sbin/ifconfig ethX:Y 100.200.140.206 netmask 255.255.255.0
b. (UNIX only) Enable the network to register the new location of the virtual IP:
/sbin/arping -q -U -c 3 -I
interface
IPAddress
For example:
/sbin/arping -q -U -c 3 -I ethX 100.200.140.206
c. Validate that the address is available by pinging it from another node. For
example:
UNIX:
/bin/ping 100.200.140.206
2. Repeat Steps 1.a (page 18-74) through 1.c (page 18-74) on
SCALED_OUT_HOST
.
Chapter 18
Scale Oracle Fusion Applications
18-74

18.2.9.3 Set the Listen Address for soa_servern
Ensure to have performed the steps described in Enable Virtual IPs on
PROVISIONED_HOST and SCALED_OUT_HOST (page 18-74), and the scale-
out steps described in Add a New Machine In the Oracle WebLogic Server
Console (page 18-12), Pack and Unpack the Managed Server Domain Home to
SCALED_OUT_HOST (page 18-13), and Clone Managed Servers and Assign Them
to SCALED_OUT_HOST (page 18-14) before setting the
soa_servern
listen address.
To set the listen address for the Managed Server:
1. Log in to the Administration Console.
2. In the Change Center, click Lock & Edit.
3. Expand the Environment node in the Domain Structure window.
4. Click Servers. The Summary of Servers page is displayed.
5. Select soa_servern in the table. The Setting page for
soa_servern
is displayed.
6. Set the Listen Address to
DOMAINHOSTSOAVH1
.
7. Click Save.
8. Click Activate Changes.
9. The changes do not take effect until the
soa_servern
Managed Server is restarted
(ensure that Node Manager is up and running):
a. On the Summary of Servers page, select the Control tab.
b. Select soa_servern in the table and then click Shutdown.
c. After the server has shut down, select soa_servern in the table and then click
Start.
18.2.9.4 Update the FusionVirtualHost Configuration File
To enable Oracle HTTP Server to route to
soa_cluster
, which contains the
soa_servern
Managed Servers, set the WebLogicCluster parameter to the list of
nodes in the cluster.
The
FusionVirtualHost
configuration file uses specific file-naming conventions. For
information about these conventions, see Table 18-1 (page 18-16) in Configure Oracle
HTTP Server (page 18-16).
To set the parameter:
1. Update the WebLogicCluster parameter in the
FusionVirtualHost
configuration file to contain a cluster list of virtual
host
:
port
entries. (On
WEBHOST1
:
APPLICATIONS_CONFIG/CommonDomain_webtier/
config/OHS/ohs1/moduleconf/FusionVirtualHost_domain.conf
. On
WEBHOST2
:
APPLICATIONS_CONFIG/CommonDomain_webtier1/config/OHS/ohs2/
moduleconf/FusionVirtualHost_domain.conf
.) For example:
<Location /soa-infra>
SetHandler weblogic-handler
WebLogicCluster
DOMAINHOSTSOAVH1
:7416,
DOMAINHOSTSOAVH2
:7416
</Location>
Chapter 18
Scale Oracle Fusion Applications
18-75

2. Restart Oracle HTTP Server on both
WEBHOST1
and
WEBHOST2
:
WEBHOST1
>
APPLICATIONS_CONFIG
/CommonDomain_webtier/bin/opmnctl
restartproc
ias-component=ohs1
WEBHOST2
>
APPLICATIONS_CONFIG
/CommonDomain_webtier1/bin/opmnctl
restartproc
ias-component=ohs2
The servers specified in the WebLogicCluster parameters are only important at startup
time for the plug-in. The list must provide at least one running cluster member for the
plug-in to discover other members in the cluster. The listed cluster member must be
running when Oracle HTTP Server is started. Oracle WebLogic Server and the plug-in
work together to update the server list automatically with new, failed, and recovered
cluster members.
Sample scenarios include the following:
• Example 1: If there is a two-node cluster and add a third member is added, it
is not necessary to update the configuration to add the third member. The third
member will be discovered dynamically at runtime.
• Example 2: There is a three-node cluster, but only two nodes are listed in the
configuration. However, if both listed nodes are down when Oracle HTTP Server is
started, then the plug-in would fail to route to the cluster. Ensure that at least one
of the listed nodes is running when Oracle HTTP Server is started.
If all the members of the cluster are listed, then guarantee it is possible to route to
the cluster, assuming at least one member is running when Oracle HTTP Server is
started. For more information on configuring the Oracle WebLogic Server plug-in, see
Overview of Oracle WebLogic Server Proxy Plug-In in the Oracle Fusion Middleware
Using Oracle WebLogic Server Proxy Plug-Ins 12.2.1.2 guide.
18.2.9.5 Switch Oracle User Messaging Service to Use Oracle Advanced
Queuing
After
PROVISIONED_HOST
has been provisioned, Oracle User Messaging Service is fully
configured with
UMSAQJMSForeignServer
in the
UMSAQJMSSystemResource
JMS Module,
and the Oracle Advanced Queuing (AQ-JMS) Foreign Server is deployed over the
Oracle SOA Suite Cluster.
No additional JMS configuration is required for the scaled-out server host.
Although
UMSJMSServer_auto_1
is configured with the
UMSJMSFileStore_auto_1
file
persistence deployed over the
soa_server1
Managed Server, they are not being used
by Oracle Fusion Applications.
18.2.9.6 Configure JMS Servers with JDBC Store Persistence
After
PROVISIONED_HOST
has been provisioned, the Java Message Service (JMS)
servers are set up and configured and Java Database Connectivity (JDBC) stores
are created and fully configured for
PROVISIONED_HOST
. Create and configure now the
JMS servers and JDBC stores for
SCALED_OUT_HOST_HOST
.
Do the following to create and configure the JMS servers and JDBC stores for
SCALED_OUT_HOST
:
Chapter 18
Scale Oracle Fusion Applications
18-76

1. Log in to the Oracle WebLogic Server Administration Console.
2. Click Lock & Edit.
3. In the Domain Structure window, expand the Services node and then click the
Persistence Stores node.
The Summary of Persistence Stores page appears.
4. Click New, and then Create JDBC Store.
5. In the file store fields, enter the following:
• Name: for example,
SOAJMSJDBCStore_2
• Target:
soa_server2
• Data Source:
SOALocalTxDataSource
• Prefix Name:
DOMAIN_FUSION_SOAINFRA.SOAJMS_2_
. (Do not forget to include
the ending "_".)
6. Click OK.
7. Repeat Steps 3 (page 18-77) through 6 (page 18-77) for the remaining the three
remaining JDBC stores, using the same target and data-source field values:
•
AGJMSJDBCStore_2
•
BPMJMSJDBCStore_2
•
PS6SOAJMSJDBCStore_2
8. Click Activate Changes.
9. Click Lock & Edit.
10. In the Domain Structure window, expand the Services node and then click the
Messaging, JMS Servers node.
The Summary of Summary of JMS Servers page appears.
11. Click New.
12. Enter a name (for example,
SOAJMSServer_2
), then select
SSOAJMSJDBCStore_2 in the Persistence Store dropdown list.
13. Click Next.
14. Select soa_server2 as the target.
15. Click Finish.
16. Repeat Steps 10 (page 18-77) through 15 (page 18-77) for the remaining JMS
servers:
•
AGJMSServer_2
•
BPMJMSServer_2
•
PS6SOAJMSServer_2
17. Click Activate Changes.
18. Click Lock & Edit.
19. In the Domain Structure window, expand the Services node and then click the
Messaging > JMS Modules node.
The JMS Modules page appears.
Chapter 18
Scale Oracle Fusion Applications
18-77

20. Click SOAJMSModule and then click the Subdeployments tab.
21. Click SOAJMSServerxxxxx under Subdeployments.
22. Add the new
SOAJMSServer_2
server as an additional target for the
subdeployment.
23. Click Save.
24. Repeat Steps 19 (page 18-77) through 23 (page 18-78) for the
BPMJMSModule
JMS
module.
WARNING: Do not make any changes to these JMS modules:
•
ADSJMSAQModule
•
JRFWSAsyncJmsModuleAQ
•
AGJMSModule
•
PS6SOAJMSModule
25. Click Activate Changes.
18.2.9.7 Configure Oracle Coherence for Deploying Composites
Although deploying composites uses multicast communication by default, Oracle
recommends using unicast communication instead in SOA enterprise deployments.
Use unicast to disable multicast communication for security reasons.
An incorrect configuration of the Oracle Coherence framework that is used for
deployment may prevent the SOA system from starting. The deployment framework
must be properly customized for the network environment on which the SOA system
runs. Oracle recommends the configuration described in this section.
Multicast communication enables Oracle Fusion Middleware SOA to discover all of the
members of a cluster to which it deploys composites dynamically. However, unicast
communication does not enable nodes to discover other cluster members in this way.
Consequently, specify the nodes that belong to the cluster. It is not necessary to
specify all of the nodes of a cluster, however. It is only necessary to specify enough
nodes so that a new node added to the cluster can discover one of the existing nodes.
Consequently, when a new node has joined the cluster, it is able to discover all of
the other nodes in the cluster. Additionally, in configurations such as SOA enterprise
deployments, where multiple IPs are available in the same box, configure Oracle
Coherence to use a specific host name to create the Oracle Coherence cluster.
Tip:
To guarantee high availability during deployments of SOA composites,
specify enough nodes so that at least one of them is running at any given
time.
Specify the nodes using the
tangosol.coherence.wka n
system property, where
n
is
the number for each Oracle HTTP Server. The numbering starts at 1. This numbering
must be sequential and must not contain gaps. In addition, specify the host name used
by Oracle Coherence to create a cluster through the
tangosol.coherence.localhost
system property. This local host name should be the virtual host name used by the
SOA server as the listener addresses (
DOMAINHOSTSOAVH1
and
DOMAINHOSTSOAVH2
).
Chapter 18
Scale Oracle Fusion Applications
18-78

Set this property by adding the
-Dtangosol.coherence.localhost
parameters to the
Arguments field of the Oracle WebLogic Server Administration Console's Server Start
tab.
DOMAINHOSTSOAVH1
is the virtual host name that maps to the virtual IP where
soa_server1
is listening (in
PROVISIONED_HOST
).
DOMAINHOSTSOAVH2
is the virtual host
name that maps to the virtual IP where
soa_server2
is listening (in
SCALED_OUT_HOST
).
To add the host name used by Oracle Coherence:
1. Log in to the Oracle WebLogic Server Administration Console.
2. In the Domain Structure window, expand the Environment node.
3. Click Servers.
The Summary of Servers page appears.
4. Select soa_server1 (represented as a hyperlink) from the column of the table.
The Settings page appears.
5. Click Lock & Edit.
6. Click the Server Start tab.
7. Append the following for
soa_server1
and
soa_server2
to the Arguments field.
For
soa_server1
:
-Dtangosol.coherence.wka1=
DOMAINHOSTSOAVH1
-Dtangosol.coherence.wka2=
DOMAINHOSTSOAVH2
-Dtangosol.coherence.localhost=
DOMAINHOSTSOAVH1
-Dtangosol.coherence.localport=8089
-Dtangosol.coherence.wka1.port=8089
-Dtangosol.coherence.wka2.port=8089
For
soa_server2
:
-Dtangosol.coherence.wka1=
DOMAINHOSTSOAVH2
-Dtangosol.coherence.wka2=
DOMAINHOSTSOAVH1
-Dtangosol.coherence.localhost=
DOMAINHOSTSOAVH2
-Dtangosol.coherence.localport=8089
-Dtangosol.coherence.wka1.port=8089
-Dtangosol.coherence.wka2.port=8089
WARNING: There should be no breaks in lines between the different
-D
parameters. Do not copy or paste the code from above to the Administration
Console's Arguments text field. This may result in HTML tags being inserted in
the Java arguments. The code should not contain other characters than those
included in the example above.
8. Click Save and Activate Changes.
Ensure that these variables are passed to the Managed Server correctly. (They should
be reflected in the server's output log.) Failure of the Oracle Coherence framework can
prevent the soa-infra application from starting.
By default, the Oracle Coherence cluster uses port 8088 for deployment. This port can
be changed by specifying the
-Dtangosol.coherence.wkaX.port
startup parameter.
To avoid a port number conflict when configuring coherence parameters in different
domains, ensure that port 8089 increments by 1, or choose the next free port in this
sequence.
Chapter 18
Scale Oracle Fusion Applications
18-79

The multicast and unicast addresses are different from the ones used by the Oracle
WebLogic Server cluster for cluster communication. Oracle SOA Suite guarantees that
composites are deployed to members of a single Oracle WebLogic Server cluster even
though the communication protocol for the two entities (the Oracle WebLogic Server
cluster and the groups to which composites are deployed) are different.
18.2.9.8 Configure a JDBC Transaction Log Store for Transaction Recovery
Each server has a transaction log that stores information about committed transactions
that are coordinated by the server that may not have been completed. Oracle
WebLogic Server uses this transaction log for recovery from system crashes or
network failures. To leverage the migration capability of the Transaction Recovery
Service for the servers within a cluster, store the transaction log in a location
accessible to a server and its backup servers.
To set the location for the transaction log store:
1. Log in to the Oracle WebLogic Server Administration Console (
http://
domain_nameinternal.mycompany.com/console
).
2. In the Change Center, click Lock & Edit.
3. In the Domain Structure window, expand the Environment node and then click the
Servers node.
The Summary of Servers page appears.
4. Click the server name soa_server2 (represented as a hyperlink) in the table. The
Settings page for the selected server appears, and defaults to the Configuration
tab.
5. In the Configuration tab, click the Services tab.
6. In the Transaction Log Store section of the page, do the following:
a. For the type, change the dropdown list selection from Default Store to JDBC.
b. For the data store, select SOALocalTxDataSource from dropdown list.
c. For prefix name, enter
DOMAIN_FUSION_SOAINFRA.TLOG_soa_server2_
. (Do not
forget to include the ending "_".)
The prefix name is specific for each domain.
• Oracle Fusion Customer Relationship Management domain:
CRM_FUSION_SOAINFRA.TLOG_soa_server2_
• Oracle Fusion Financials domain:
FIN_FUSION_SOAINFRA.TLOG_soa_server2_
• Oracle Fusion Common domain:
SETUP_FUSION_SOAINFRA.TLOG_soa_server2_
• Oracle Fusion Incentive Compensation domain:
OIC_FUSION_SOAINFRA.TLOG_soa_server2_
• Oracle Fusion Human Capital Management domain:
HCM_FUSION_SOAINFRA.TLOG_soa_server2_
• Oracle Fusion Supply Chain Management domain:
SCM_FUSION_SOAINFRA.TLOG_soa_server2_
Chapter 18
Scale Oracle Fusion Applications
18-80

• Oracle Fusion Project Portfolio Management domain:
PRJ_FUSION_SOAINFRA.TLOG_soa_server2_
• Oracle Fusion Procurement domain:
PRC_FUSION_SOAINFRA.TLOG_soa_server2_
When the JDBC transaction log store configuration is complete, and after
bouncing the
soa_server2
server, do the following:
• Append the table name in the prefix name with
WLStore
. For example,
TLOG_soa_server2_WLStore
.
• Verify that the new table,
TLOG_soa_server2_WLStore
, has been created in
DOMAIN_FUSION_SOAINFRA
.
7. Click Save and then click Activate Changes.
8. Restart the Managed Server to activate the changes (ensure that Node Manager
is up and running):
a. Log in to the Oracle WebLogic Server Administration Console (
http://
domain_nameinternal.mycompany.com/console
).
b. In the Summary of Servers screen, select the Control tab.
c. Select soa_server2 in the table and then click Shutdown.
d. Start the
soa_server2
server.
18.2.9.9 Disable Host Name Verification for the soa_servern Managed Servers
This step is required if the appropriate certificates are not set up to authenticate the
different nodes with the Administration Server. By default, Host Name Verification
should be set to None. If it is not, follow the steps below.
If the server certificates have not been configured, errors are displayed during the
management of the different Oracle WebLogic Servers. To avoid these errors, disable
host name verification while setting up and validating the topology, and enable it again
after the enterprise deployment topology configuration is complete.
To disable Host Name Verification:
1. Log in to Oracle WebLogic Server Administration Console. For example,
http://
domain_nameinternal.mycompany.com/console
.
2. Click Lock & Edit.
3. Expand the Environment node in the Domain Structure window.
4. Click Servers.
The Summary of Servers page appears.
5. Select soa_servern (represented as a hyperlink) in the table.
The Settings page appears.
6. Select the SSL tab.
7. Expand the Advanced section of the page.
8. Set Hostname Verification to None.
9. Click Save.
Chapter 18
Scale Oracle Fusion Applications
18-81

10. Repeat Steps 1 (page 18-81) through 9 (page 18-81) for the other instance of the
soa_servern
Managed Server.
11. Save and activate the changes.
18.2.9.10 Restart Node Manager on PROVISIONED_HOST
To restart Node Manager on
PROVISIONED_HOST
:
1. (UNIX only) Stop Node Manager by stopping the process associated with it:
a. If it is running in the foreground in a shell, simply use CTRL+C.
b. If it is running in the background in the shell, find the associated process and
use the
kill
command to stop it. For example:
PROVISIONED_HOST
> ps -ef | grep NodeManager
orcl 9139 9120 0 Mar03 pts/6 00:00:00/bin/sh ./startNodeManager.sh
c. Run the following command:
PROVISIONED_HOST
> kill -9 9139
2. Start Node Manager.
UNIX:
PROVISIONED_HOST
>
APPLICATIONS_CONFIG
/nodemanager/
PROVISIONED_HOST
/
startNodeManagerWrapper.sh
18.2.9.11 Start and Validate soa_server1 on PROVISIONED_HOST
To start the
soa_server1
Managed Server on
PROVISIONED_HOST
:
1. Access the Administration Console. For example,
http://
domain_nameinternal.mycompany.com/console
.
2. Click Servers.
3. Open the Control tab.
4. Select soa_server1.
5. Click Start.
To validate the
soa_server1
Managed Server on
PROVISIONED_HOST
:
1. Verify that the server status is reported as Running in the Administration Console.
If the server is shown as Starting or Resuming, wait for the server status to change
to Started. If another status is reported (such as Admin or Failed), check the
server output log files for errors.
2. Access
http://DOMAINHOSTSOAVH1:7416/soa-infra
and
http://
domain_nameinternal.mycompany.com/soa-infra
to verify status of
soa_server1
.
Although the
soa_server1
server may be up, some applications may be in a failed
state. Therefore, Oracle recommends verifying the above URLs and watching for
errors pertaining each individual application in the server's output file.
18.2.9.12 Restart Node Manager on SCALED_OUT_HOST
To restart Node Manager on
SCALED_OUT_HOST
, follow the steps in Restart Node
Manager on PROVISIONED_HOST (page 18-82).
Chapter 18
Scale Oracle Fusion Applications
18-82

18.2.9.13 Start and Validate soa_servern on SCALED_OUT_HOST
To start the
soa_servern
Managed Server on
SCALED_OUT_HOST
and ensure that it is
configured correctly:
1. From the Administration Console, start the
soa_servern
Managed Server.
2. Verify that the server status is reported as Running in the Administration Console.
If the server is shown as Starting or Resuming, wait for the server status to change
to Started. If another status is reported (such as Admin or Failed), check the
server output log files for errors.
3. Access
http://DOMAINHOSTSOAVH2:7416/soa-infra
and
http://
domain_nameinternal.mycompany.com/soa-infra
.
Although
soa_server2
server may be up, some applications may be in a failed
state. Therefore, Oracle recommends verifying the above URLs and watching for
errors pertaining each individual application in the server's output file.
18.2.10 Configure Administration Server High Availability
This section describes how to configure and validate the Oracle WebLogic Server
Administration Server for high availability.
The Administration Server is a singleton application, so it cannot be deployed in an
active-active configuration. By default, the Administration Server is only available on
the first installed node. If this node becomes unavailable, then the Administration
Console and Fusion Middleware Control also become unavailable. To avoid this
scenario, the Administration Server and the applications deployed to it must be
enabled for failover. The enterprise deployment architecture in this guide calls for the
deploying the Administration Server on a disk shared between the primary node and
the secondary node.
The following domains are deployed as part of the Oracle Fusion Applications
enterprise deployment implementation:
The list of domains may differ depending on the product offerings that are provisioned
in the environment.
• Oracle Fusion Customer Relationship Management Domain
• Oracle Fusion Common Domain
• Oracle Fusion Financials Domain
• Oracle Fusion Human Capital Management Domain
• Oracle Fusion Supply Chain Management Domain
• Oracle Fusion Incentive Compensation Domain
• Oracle Fusion Project Portfolio Management Domain
• Oracle Fusion Procurement Domain
• Oracle Business Intelligence Domain
The process described in this section initially deploys each domain-specific
Administration Server in shared storage (
APPLICATIONS_BASE
) mounted on
PROVISIONED_HOST
, and Managed Servers in the local disk (
APPLICATIONS_CONFIG
).
Chapter 18
Scale Oracle Fusion Applications
18-83

This section tells how to do the following:
• Enable an administrative virtual host on
PROVISIONED_HOST
• Add a new machine in the Oracle WebLogic Server Console
• Enable the Administration Server to listen on the virtual IP address
18.2.10.1 Enable an Administrative Virtual Host on PROVISIONED_HOST
DOMAINADMINVH
is used as a generic name in this section.
where
DOMAIN
is replaced with the domain-specific syntax. For example,
CRMADMINVH
,
FINADMINVH
,
HCMADMINCH
, and so on.
The Administration Server must be configured to listen on a virtual IP Address
to enable it to seamlessly failover from one host to another. In a failure, the
Administration Server, along with the virtual IP Address, can be migrated from one
host to another.
However, before the Administration Server can be configured to listen on a virtual IP
Address, one of the network interface cards on the host running the Administration
Server must be configured to listen on this virtual IP Address. The steps to enable a
virtual IP Address are completely dependent on the operating system.
To enable a virtual IP Address on
PROVISIONED_HOST
:
In a UNIX environment, the command must be run as the root user.
1. UNIX: On
PROVISIONED_HOST
, run the
ifconfig
command to get the value of the
netmask. In a UNIX environment, run this command as the root user. For example
Linux:
[root@
PROVISIONED_HOST
~] # /sbin/ifconfig
eth0 Link encap:Ethernet HWaddr 00:11:43:D7:5B:06
inet addr:139.185.140.51 Bcast:139.185.140.255 Mask:255.255.255.0
inet6 addr: fe80::211:43ff:fed7:5b06/64 Scope:Link
UP BROADCAST RUNNING MULTICAST MTU:1500 Metric:1
RX packets:10626133 errors:0 dropped:0 overruns:0 frame:0
TX packets:10951629 errors:0 dropped:0 overruns:0 carrier:0
collisions:0 txqueuelen:1000
RX bytes:4036851474 (3.7 GiB) TX bytes:2770209798 (2.5 GiB)
Base address:0xecc0 Memory:dfae0000-dfb00000
Solaris: On
PROVISIONED_HOST
, check
/etc/netmasks
to get the
netmask
value:
cat /etc/netmasks
2. (UNIX) On
PROVISIONED_HOST
, bind the virtual IP Address to the network interface
card using
ifconfig
. In a UNIX environment, run this command as the root user.
Use a
netmask
value that was obtained in Step 1.
(Linux) The syntax and usage for the
ifconfig
command is as follows:
/sbin/ifconfig networkCardInterface Virtual_IP_Address netmask netMask
For example:
/sbin/ifconfig eth0:1 100.200.140.206 netmask 255.255.255.0
Chapter 18
Scale Oracle Fusion Applications
18-84

(Solaris) The syntax and usage for the
ifconfig
command is as follows:
/sbin/ifconfig networkCardInterface Virtual_IP_Address netmask netMask
For example:
/sbin/ifconfig lo0 100.200.140.206 netmask 255.255.255.
3. (Linux only) Update the routing table using
arping
. In a UNIX environment, run
this command as the root user.
/sbin/arping -q -U -c 3 -I networkCardInterface Virtual_IP_Address
For example:
/sbin/arping -q -U -c 3 -I eth0 100.200.140.206
4. Validate that the address is available by pinging it from another node. For
example:
Linux:
/bin/ping 100.200.140.206
Solaris:
/usr/sbin/ping 100.200.140.206
18.2.10.2 Add a New Machine in the Oracle WebLogic Server Console
Create a new machine and assign the Administration Server to the new machine using
the Administration Console:
1. Log in to the Administration Console.
2. In the Change Center, click Lock & Edit.
3. In the Environment section of the Home page, click Machines.
4. On the Summary of Machines page, select the machine that is associated with
the Administration Server from under the Machines table and click Clone. For
example:
PROVISIONED_HOST.MYCOMPANY.COM
.
5. On the Clone a Machine page, enter the name of the machine under the Machine
Identity section and click OK. For example, enter
ADMINHOST
as the machine name.
6. On the Summary of Machines page, click the newly created machine link.
7. On the Settings page for the
ADMINHOST
machine, click Servers.
8. Click Add under the Servers table.
9. On the Add a Server to Machine page, select Select an existing server, and
associate it with this machine.
10. Choose the AdminServer from the dropdown list.
11. Click Finish to associate the Administration Server with the machine.
12. On the Settings page for the
ADMINHOST
machine, click Node Manager.
13. Set the listen address to
DOMAINADMINVH
.
Ensure that the steps described in Enable an Administrative Virtual Host on
PROVISIONED_HOST (page 18-84) have been performed before setting the
Node Manager listen address.
Chapter 18
Scale Oracle Fusion Applications
18-85

14. Click Save.
15. In the Change Center, click Activate Changes.
18.2.10.3 Enable an Administration Server to Listen on the Virtual IP Address
Ensure to have performed the steps described in Enable an Administrative Virtual Host
on PROVISIONED_HOST (page 18-84) before setting the Administration Server listen
address.
To set the Administration Server listen address:
1. Log in to the Administration Console.
2. In the Change Center, click Lock & Edit.
3. Expand the Environment node in the Domain Structure window.
4. Click Servers. The Summary of Servers page is displayed.
5. Select AdminServer(admin) in the table. The Settings page for
AdminServer(admin) is displayed.
6. Set the listen address to
DOMAINADMINVH
(domain-specific administrative virtual
host).
7. Click Save.
8. Click Activate Changes.
9. The changes will not take effect until the Administration Server is restarted. Follow
these steps to restart the Administration Server:
a. In the Summary of Servers page, select the Control tab.
b. Select AdminServer(admin) in the table and then click Shutdown.
10. Set the following environment variable.
UNIX:
WLST_PROPERTIES="-Dweblogic.security.SSL.trustedCAKeyStore=
APPLICATIONS_CONFIG
/keystores/fusion_trust.jks"
11. Start the Administration Server again from the command line using the
nmconnect
user name and password.
UNIX:
PROVISIONED_HOST
>
APPLICATIONS_BASE
/fusionapps/wlserver_10.3/common/bin/
wlst.sh
PROVISIONED_HOST
> nmConnect(username='
username
', password='
password
',
domainName='
domain_name
', host='
DOMAINADMINVH
',port='5556', nmType='ssl',
domainDir='
APPLICATIONS_CONFIG
/domains/
PROVISIONED_HOST
/
domain_name
')
PROVISIONED_HOST
> nmStart('AdminServer')
PROVISIONED_HOST
> exit ()
18.2.10.4 Configure Oracle HTTP Server
To configure Oracle HTTP Server:
1. On
WEBHOST1
:
Chapter 18
Scale Oracle Fusion Applications
18-86

a. (UNIX) Change directory to
APPLICATIONS_CONFIG/CommonDomain_webtier/
config/OHS/ohs1/moduleconf
.
b. Edit the domain-specific virtual host
config
file. For example:
UNIX:
cp FusionVirtualHost_
domain
.conf FusionVirtualHost_
domain
.conf.org
The
FusionVirtualHost
configuration file uses specific file-naming conventions.
For information about these conventions, see Table 18-1 (page 18-16) in
Configuring Oracle HTTP Server (page 18-16).
2. Edit the
FusionVirtualHost
configuration file, adding the Administrative virtual
host and port. Example 18-2 (page 18-87) shows sample code.
Replace
DOMAINADMINVH
and port with domain-specific Administrative virtual host
and port number.
3. Restart Oracle HTTP Server:
UNIX:
Change directory to
APPLICATIONS_CONFIG/CommonDomain_webtier/bin
and enter
the following:
WEBHOST1
> ./opmnctl stopall
WEBHOST1
> ./opmnctl startall
4. Repeat Steps 1 (page 18-86) through 3 (page 18-87) on
WEBHOST2
.
Example 18-2 Add AdministrativeVirtual Host and Port
## Context roots for application em
<Location /em>
SetHandler weblogic-handler
WebLogicCluster
DOMAINADMINVH
:
port
</Location>
## Context roots for application console
<Location /console >
SetHandler weblogic-handler
WebLogicCluster
DOMAINADMINVH
:
port
</Location>
18.2.10.5 Validate the Administration Server
Perform these steps to ensure that the Administration Server and Oracle Enterprise
Manager Fusion Middleware Control are properly configured:
1. Ensure to have access the domain-specific Oracle WebLogic Server
Administration Console and Oracle Enterprise Manager Fusion Middleware
Control. For example:
http://domain_nameinternal.mycompany.com/console
http://domain_nameinternal.mycompany.com/em
2. After completing the steps in Configuring Administration Server High Availability
(page 18-83) for other domains, repeat Step 1 (page 18-87) for other domains by
replacing the domain-specific URL.
3. Do the following:
Chapter 18
Scale Oracle Fusion Applications
18-87

a. Log into Oracle Fusion Functional Setup Manager as a super user. The user
should have the Oracle WebLogic Server Administrator role, for example,
"FAadmin". Functional Setup Manager is located here:
https://commonexternal.mycompany.com/setup/faces/TaskListManagerTop
b. Select Register Domains in the left-hand task pane.
c. On the Register Domains page, select the domain to be updated and click
Edit.
d. Do the following:
– Replace
ADMIN_HOST
(the default value) with
DOMAINADMINVH
wherever it
appears.
– Update the value of Node Manager Protocol to
ssl
.
– Ensure the value of Node Manager Port is
5556
.
e. Click Save and Close.
f. Repeat Step 3.a (page 18-88) through Step 3.e (page 18-88) for all domains
except IDMDomain.
4. Replace the value of
TAXONOMY_URL
in the
fusion_env.properties
,
fusion_prov.properties
, and
atgpf_env.properties
files located in
APPLICATIONS_CONFIG/fapatch
with
DOMAINADMINVH
if the Administration Server's
listen address is updated with the virtual IP (VIP) for CommonDomain.
5. The changes do not take effect until the Administration Server is restarted. Follow
these steps to restart the Administration Server:
a. In the Summary of Servers page, select the Control tab.
b. Select AdminServer(admin) in the table and then click Shutdown.
6. Set the following environment variable:
UNIX:
WLST_PROPERTIES="-Dweblogic.security.SSL.trustedCAKeyStore=
APPLICATIONS_CONFIG
/keystores/fusion_trust.jks"
7. Start the Administration Server again from the command line using the
nmconnect
user name and password.
UNIX:
PROVISIONED_HOST
>
APPLICATIONS_BASE
/fusionapps/wlserver_10.3/common/bin/
wlst.sh
PROVISIONED_HOST
> nmConnect(username='username', password='password',
domainName='
domain_name
', host='
DOMAINADMINVH
',port='5556', nmType='ssl',
domainDir='
APPLICATIONS_CONFIG
/domains/
PROVISIONED_HOST
/
domain_name
')
PROVISIONED_HOST
> nmStart('AdminServer')
PROVISIONED_HOST
> exit ()
8. Restart the Managed Servers:
a. Log in to the Oracle WebLogic Server Administration Console (
http://
domain_nameinternal.mycompany.com/console
).
b. Navigate to Domain_Name > Environment > Servers > Control.
Chapter 18
Scale Oracle Fusion Applications
18-88

c. Select all the Managed Servers and click Stop.
d. After all the servers have shut down, select all the servers in the table and
then click Start.
18.2.10.6 Manual Fail Over the Administration Server to SCALED_OUT_HOST
In case a node fails, fail over the Administration Server to another node. This
section describes how to fail over the Administration Server from
PROVISIONED_HOST
to
SCALED_OUT_HOST
.
18.2.10.6.1 Prerequisites for the Manual Failover
Ensure the following:
• The Administration Server is configured to listen on a domain-specific
administrative virtual host, and not on any address
• When failover happens, the Administration Server is failed over from
PROVISIONED_HOST
to
SCALED_OUT_HOST
and the two nodes have the following IPs:
–
PROVISIONED_HOST
: 100.200.140.165
–
SCALED_OUT_HOST
: 100.200.140.205
–
DOMAINADMINVH
: 100.200.140.206. This is the VIP where the domain-
specific Administration Server is running, assigned to
ethX:Y
, available in
PROVISIONED_HOST
and
SCALED_OUT_HOST
.
– The domain directory where the Administration Server is running
on
PROVISIONED_HOST
is on shared storage and is mounted from
SCALED_OUT_HOST
18.2.10.6.2 Performing the Failover
The following procedure explains how to fail over the Administration Server to a
different node (
SCALED_OUT_HOST
) with the Administration Server still using the same
Oracle WebLogic Server machine. (This machine is a logical machine, not a physical
one.)
To fail over the Administration Server:
1. Stop the Administration Server.
2. Migrate the IP to the second node:
a. Run the following command as root on
PROVISIONED_HOST
to (where
X:Y
is the
current interface used by
DOMAINADMINVH
):
PROVISIONED_HOST
> /sbin/ifconfig ethX:Y down
b. Run the following command as root on
SCALED_OUT_HOST
:
SCALED_OUT_HOST
> /sbin/ifconfig
interface:index
IP_Address
netmask
netmask
For example:
/sbin/ifconfig eth0:1 100.200.140.206 netmask 255.255.255.0
Chapter 18
Scale Oracle Fusion Applications
18-89

Ensure that the netmask and interface to be used to match the available
network configuration in
SCALED_OUT_HOST
.
3. Update the routing tables with arping. For example, run the following command as
root:
SCALED_OUT_HOST
> /sbin/arping -q -U -c 3 -I eth0 100.200.140.206
4. Validate that the address is available by pinging it from another node. For
example:
/bin/ping 100.200.140.206
5. Start the Administration Server on
SCALED_OUT_HOST
using the procedure in Enable
an Administration Server to Listen on the Virtual IP Address (page 18-86).
6. Test access to the Administration Server on
SCALED_OUT_HOST
:
a. Ensure that it is possible to access the domain-specific Oracle WebLogic
Server Administration Console and Oracle Enterprise Manager Fusion
Middleware Control. For example, for the Oracle Fusion Customer
Relationship Management domain, use these URLs:
•
http://crminternal.mycompany.com/console
•
http://crminternal.mycompany.com/em
b. Repeat Step 6.a (page 18-90) for other domain by replacing the domain-
specific URL.
The Administration Server does not use Node Manager for failing over. After a
manual failover, the machine name that appears in the Current Machine field in
the Administration Console for the server is
PROVISIONED_HOST
, and not the failover
machine,
SCALED_OUT_HOST
. Since Node Manager does not monitor the Administration
Server, the machine name that appears in the Current Machine field, is not relevant
and can be ignored.
18.2.10.7 Fail the Administration Server Back to PROVISIONED_HOST
Ensure that the Oracle WebLogic Server Administration Server can be failed back, that
is, stop it on
SCALED_OUT_HOST
and run it on
PROVISIONED_HOST
. To do this, migrate
DOMAINADMINVH
back to
PROVISIONED_HOST
node.
To migrate
DOMAINADMINVH
:
1. Stop the Administration Server on
SCALED_OUT_HOST
.
2. Run the following command as root from
SCALED_OUT_HOST
to shut down the
network stack virtual interface:
SCALED_OUT_HOST
> /sbin/ifconfig ethX:Y down
3. Run the following command as root from
PROVISIONED_HOST
to restart the virtual
interface:
PROVISIONED_HOST
> /sbin/ifconfig ethX:Y 100.200.140.206 netmask
255.255.255.0
Ensure that the netmask and interface to be used match the available network
configuration in
PROVISIONED_HOST
.
4. Run the following command from
PROVISIONED_HOST
to update the routing tables
through arping:
Chapter 18
Scale Oracle Fusion Applications
18-90

PROVISIONED_HOST
> /sbin/arping -q -U -c 3 -I eth0 100.200.140.206
5. Validate that the address is available by pinging it from another node. For
example:
/bin/ping 100.200.140.206
6. Start the Administration Server again on
PROVISIONED_HOST
using the procedure in
Enable an Administration Server to Listen on the Virtual IP Address (page 18-86).
7. Test access to the Administration Server on
PROVISIONED_HOST
:
a. Ensure that it is possible to access the domain-specific Oracle WebLogic
Server Administration Console and Oracle Enterprise Manager Fusion
Middleware Control. For example, for the Oracle Fusion Customer
Relationship Management domain, use these URLs:
•
http://crminternal.mycompany.com/console
•
http://crminternal.mycompany.com/em
b. Repeat Step 7.a (page 18-91) for other domain by replacing the domain-
specific URL.
18.3 Set Up Server Migration for Oracle Fusion Applications
This section describes how to configure server migration according to Oracle Fusion
Applications recommendations.
18.3.1 Prerequisites for Setting Up Server Migration
Before migrating Oracle Fusion Applications domains, ensure to have done the
following for all Managed Servers needing to be migrated:
• Enabled the Virtual IPs on
PROVISIONED_HOST
and
SCALED_OUT_HOST
. (See Enable
Virtual IPs on PROVISIONED_HOST and SCALED_OUT_HOST (page 18-74).)
• Set the listen address for the
soa_servern
Managed Servers. (See Set the Listen
Address for soa_servern (page 18-75).)
18.3.2 Migrate Oracle Fusion Applications
The procedures in this section apply to these domains and applications:
• Oracle SOA Suite in the Oracle Fusion Customer Relationship Management
domain
• Oracle SOA Suite in the Oracle Fusion Financials domain
• Oracle SOA Suite and Oracle WebCenter Content: Imaging in the Oracle Fusion
Common domain
• Oracle Fusion Common domain
• Oracle SOA Suite in the Oracle Business Intelligence domain
• Oracle SOA Suite in the Oracle Fusion Human Capital Management domain
• Oracle SOA Suite in the Oracle Fusion Supply Chain Management domain
• Oracle SOA Suite in the Oracle Fusion Project Portfolio Management domain
Chapter 18
Set Up Server Migration for Oracle Fusion Applications
18-91

• Oracle SOA Suite in the Oracle Fusion Procurement domain
• Oracle SOA Suite in the Oracle Incentive Compensation domain
The list of domains may differ depending on the product offerings that are provisioned
in the environment.
18.3.3 About Server Migration Configuration
The procedures described in this section must be performed for various components
of the topology (for example, web tier, application tier, database tier). Variables are
used in this section to distinguish between component-specific items:
• WLS_SERVER1 and WLS_SERVER2 refer to the managed Oracle WebLogic
Servers for the enterprise deployment component
• PROVISIONED_HOST and SCALED_OUT_HOST refer to the host machines for
the enterprise deployment component
• CLUSTER refers to the cluster associated with the enterprise deployment
component
The values to be used to these variables are provided in the component-specific
sections in this guide.
In this enterprise topology, configure server migration for the
WLS_SERVER1
and
WLS_SERVER2
Managed Servers. The
WLS_SERVER1
Managed Server is configured
to restart on
SCALED_OUT_HOST
should a failure occur. The
WLS_SERVER2
Managed
Server is configured to restart on
PROVISIONED_HOST
should a failure occur. For this
configuration, the
WLS_SERVER1
and
WLS_SERVER2
servers listen on specific floating
IP addresses that are failed over by Oracle WebLogic Server migration. Configuring
server migration for the Oracle WebLogic Servers consists of the following steps:
• Step 1: Set up a user and tablespace for the server migration leasing table
• Step 2: Create a multi-data source using the Oracle WebLogic Server
Administration Console
• Step 3: Edit Node Manager's properties file
• Step 4: Set environment and superuser privileges for the
wlsifconfig
script
• Step 5: Configure server migration targets
• Step 6: Test the server migration
18.3.4 Set Up a User and Tablespace for the Server Migration Leasing
Table
The first step is to set up a user and tablespace for the server migration leasing table.
If other servers in the same domain have already been configured with server
migration, the same tablespace and data sources can be used. In that case, the data
sources and multi-data source for database leasing do not need to be re-created, but
they have to be retargeted to the cluster being configured with server migration.
To set up a user and tablespace:
1. Create a tablespace called 'leasing'. For example, log on to SQL*Plus as the
sysdba user and run the following command:
Chapter 18
Set Up Server Migration for Oracle Fusion Applications
18-92

SQL> create tablespace leasing logging datafile
'DB_HOME/oradata/orcl/leasing.dbf'
size 32m autoextend on next 32m maxsize 2048m extent management local;
2. Create a user named
leasing
and assign to it the leasing tablespace:
SQL> create user leasing identified by
password
;
SQL> grant create table to leasing;
SQL> grant create session to leasing;
SQL> alter user leasing default tablespace leasing;
SQL> alter user leasing quota unlimited on LEASING;
3. Create the leasing table using the
leasing.ddl
script:
a. Copy the
leasing.ddl
file located in either the
APPLICATIONS_BASE/fusionapps/wlserver_10.3/server/db/oracle/817
or
the
APPLICATIONS_BASE/fusionapps/wlserver_10.3/server/db/oracle/920
directory to the database node.
b. Connect to the database as the leasing user.
c. Run the
leasing.ddl
script in SQL*Plus:
SQL> @Copy_Location/leasing.ddl;
18.3.5 Create a Multi-Data Source Using the Oracle WebLogic Server
Administration Console
The second step is to create a multi-data source for the leasing table from the Oracle
WebLogic Server Administration Console. Create a data source to each of the Oracle
RAC database instances during the process of setting up the multi-data source, both
for these data sources and the global leasing multi-data source.
Please note the following considerations when creating a data source:
• Make sure that this is a non-XA data source
• The names of the multi-data sources are in the format of <MultiDS>-rac0,
<MultiDS>-rac1, and so on
• Use Oracle's Driver (Thin) Version 9.0.1, 9.2.0, 10, 11
• Use Supports Global Transactions, One-Phase Commit, and specify a service
name for the database
• Target these data sources to the cluster assigned to the enterprise deployment
component
Creating a Multi-Data Source
To create a multi-data source:
1. In the Domain Structure window in the Oracle WebLogic Server Administration
Console, click the Data Sources link.
2. Click Lock & Edit.
3. Select Multi Data Source from the New dropdown list.
The Create a New JDBC Multi Data Source page is displayed.
4. Enter
leasing
as the name.
Chapter 18
Set Up Server Migration for Oracle Fusion Applications
18-93

5. Enter
jdbc/leasing
as the JNDI name.
6. Select Failover as algorithm (default).
7. Click Next.
8. Select the cluster that must be migrated. In this case, SOA cluster.
9. Click Next.
10. Select non-XA driver (the default).
11. Click Next.
12. Click Create a New Data Source.
13. Enter
leasing-rac0
as the name. Enter
jdbc/leasing-rac0
as the JNDI name.
Enter
oracle
as the database type. For the driver type, select Oracle Driver (Thin)
for Oracle RAC Service-Instance connections, Versions 10 and later.
When creating the multi-data sources for the leasing table, enter names in the
format of <MultiDS>-rac0, <MultiDS>-rac1, and so on.
14. Click Next.
15. Deselect Supports Global Transactions.
16. Click Next.
17. Enter the following for the leasing schema:
• Service Name: The service name of the database.
• Database Name: The Instance Name for the first instance of the Oracle RAC
database.
• Host Name: The name of the node that is running the database. For the
Oracle RAC database, specify the first instance's VIP name or the node name
as the host name.
• Port: The port number for the database (1521).
• Database User Name: Enter
leasing
.
• Password: The leasing password.
18. Click Next.
19. Click Test Configuration and verify that the connection works.
20. Click Next.
21. Target the data source to the cluster assigned to the enterprise deployment
component (CLUSTER).
22. Click Finish.
23. Click Create a New Data Source for the second instance of the Oracle RAC
database, target it to the cluster assigned to the enterprise deployment component
(CLUSTER), repeating the steps for the second instance of the Oracle RAC
database.
24. Add
leasing-rac0
and
leasing-rac1
to the multi-data source.
25. Make sure the initial connection pool capacity of the data sources is set to 0
(zero). In the Datasources screen do the following:
a. Select Services, then select Datasources.
Chapter 18
Set Up Server Migration for Oracle Fusion Applications
18-94

b. Click Datasource Name, then click the Connection Pool tab.
c. Enter
0
(zero) in the Initial Capacity field.
26. Click Save, then click Activate Changes.
18.3.6 Edit Node Manager's Properties File
The third step is to edit Node Manager's properties file, which is located at:
APPLICATIONS_CONFIG
/nodemanager/
PROVISIONED_HOST
APPLICATIONS_CONFIG
/nodemanager/
SCALED_OUT_HOST
This must be done for the node managers in both nodes where server migration is
being configured. For example:
Interface=eth0
NetMask=255.255.255.0
UseMACBroadcast=true
• Interface: This property specifies the interface name for the floating IP (for
example,
eth0
).
Do not specify the sub-interface, such as
eth0:1
or
eth0:2
. This interface is to
be used without
:0
or
:1
. Node Manager's scripts traverse the different :X-enabled
IPs to determine which to add or remove. For example, the valid values in Linux
environments are
eth0
,
eth1
,
eth2
,
eth3
,
ethn
, depending on the number of
interfaces configured.
• NetMask: This property specifies the net mask for the interface for the floating IP.
The net mask should the same as the net mask on the interface; 255.255.255.0 is
used as an example in this document.
• UseMACBroadcast: This property specifies whether to use a node's MAC
address when sending ARP packets, that is, whether to use the -
b
flag in the
arping
command.
Verify in Node Manager's output (shell where Node Manager is started) that these
properties are being used, or problems may arise during migration. Something like this
should be seen in Node Manager's output:
...
StateCheckInterval=500
Interface=eth0
NetMask=255.255.255.0
...
The steps below are not required if the server properties (start properties) have been
properly set and Node Manager can start the servers remotely.
1. Set the following property in the
nodemanager.properties
file:
• StartScriptEnabled: Set this property to 'true'. This is required for Node
Manager to start the Managed Servers using start scripts.
2. (UNIX only) On
PROVISIONED_HOST
and
SCALED_OUT_HOST
, restart Node Manager:
Run the
startNodeManagerWrapper.sh
script, which is located
in the
APPLICATIONS_CONFIG/nodemanager/PROVISIONED_HOST
and
APPLICATIONS_CONFIG/nodemanager/SCALED_OUT_HOST_HOST
directories.
Chapter 18
Set Up Server Migration for Oracle Fusion Applications
18-95

18.3.7 Set Environment and Superuser Privileges for the wlsifconfig.sh
Script (for UNIX Only)
The fourth step, for UNIX only, is to set environment and superuser privileges for the
wlsifconfig.sh
script.
1. Ensure that the PATH is set with the environment variables in the terminal from
where Node Manager is started, and that it includes these files:
Table 18-5 Files Required for the PATH Environment Variable
File Located in these directories
wlsifconfig.sh
APPLICATIONS_CONFIG/domains/PROVISIONED_HOST/
ManagedServerName_Domain/bin/server_migration
APPLICATIONS_CONFIG/domains/
SCALED_OUT_HOSTHOST/
ManagedServerName_Domain/bin/server_migration
wlscontrol.sh
APPLICATIONS_BASE/fusionapps/wlserver_10.3/
common/bin
nodemanager.domains
APPLICATIONS_CONFIG/nodemanager/
PROVISIONED_HOST
APPLICATIONS_CONFIG/nodemanager/SCALED_OUT_HOST
2. Grant
sudo
configuration for the
wlsifconfig.sh
script.
• Configure
sudo
to work without a password prompt.
• For security reasons,
sudo
should be restricted to the subset of commands
required to run the
wlsifconfig.sh
script. For example, perform these steps
to set the environment and superuser privileges for the
wlsifconfig.sh
script:
a. Grant
sudo
privilege to the Oracle WebLogic Server user (
oracle
) with no
password restriction, and grant execute privilege on the
/sbin/ifconfig
and
/sbin/arping
binaries.
b. Make sure the script is executable by the Oracle WebLogic Server user
(
oracle
). The following is an example of an entry inside
/etc/sudoers
granting sudo execution privilege for
oracle
and also over
ifconfig
and
arping
:
oracle ALL=NOPASSWD: /sbin/ifconfig,/sbin/arping
Ask the system administrator for the
sudo
and system rights as appropriate to this
step.
18.3.8 Configure Server Migration Targets
The fifth step is to configure server migration targets. Assign first all the available
nodes for the cluster's members and then specify candidate machines (in order of
preference) for each server that is configured with server migration.
Enterprise deployment recommends using cluster-based migration. Perform the
following steps, including a step to enable automatic server migration (Step 10
(page 18-97)), to configure cluster-based migration for all Managed Servers in a cluster:
Chapter 18
Set Up Server Migration for Oracle Fusion Applications
18-96

1. Log in to the Oracle WebLogic Server Administration Console. For example,
http://domain_nameinternal.mycompany.com
.
2. In the Domain Structure window, expand Environment and select Clusters. The
Summary of Clusters page is displayed.
3. Click the cluster used to configure migration (CLUSTER) in the Name column of
the table.
4. Click the Migration tab.
5. Click Lock & Edit.
6. In the Available field, select the machine to which to allow migration and click the
right arrow. In this case, select
PROVISIONED_HOST
and
SCALED_OUT_HOST
.
When there are three (3) hosts, select all three.
7. Select the data source to be used for automatic migration. In this case, select the
leasing data source.
8. Click Save.
9. Click Activate Changes.
10. Enable automatic server migration for all Managed Servers in the cluster (Perform
this task for all of the Managed Servers).
Although cluster-based migration is used for the Managed Servers, perform this
step (from the Migration tab) to enable automatic server migration for all the
Managed Servers in the selected cluster.
a. In the Domain Structure window of the Oracle WebLogic Server Administration
Console, expand Environment and select Servers.
Tip:
Click Customize this table in the Summary of Servers page and
move Current Machine from the Available window to the Chosen
window to view the machine on which the server is running.
This is different from the configuration if the server gets migrated
automatically.
b. Select the server used to configure cluster-based migration.
c. Click the Migration tab, and then click Lock & Edit.
d. Select Automatic Server Migration Enabled. This enables Node Manager to
start a failed server on the target node automatically.
e. Click Save.
f. Click Activate Changes.
g. Restart the administration server, node managers, and the servers for which
server migration has been configured.
18.3.9 Test the Server Migration
The sixth and final step is to test the server migration. Perform these steps to verify
that server migration is working properly:
Chapter 18
Set Up Server Migration for Oracle Fusion Applications
18-97

From PROVISIONED_HOST:
1. Stop the
WLS_SERVER1
Managed Server.
UNIX:
PROVISIONED_HOST
> kill -9 pid
In the command,
process_id
specifies the process ID of the Managed Server. To
identify the
pid
in the node:
UNIX:
PROVISIONED_HOST
> ps -ef | grep WLS_SERVER1 | grep
domain_name
_SOACluster
2. Watch the Node Manager console. A message indicating that
WLS_SERVER1
's
floating IP has been disabled should be displayed.
3. Wait for Node Manager to try a second restart of
WLS_SERVER1
. It waits for a fence
period of 10 seconds before trying this restart.
4. After Node Manager restarts the server, stop it few times. Node Manager should
now log a message indicating that the server will not be restarted again locally.
From SCALED_OUT_HOST:
1. Watch the local Node Manager console. Ten (10) seconds after the last try to
restart
WLS_SERVER1
on
PROVISIONED_HOST
, Node Manager on
SCALED_OUT_HOST
should prompt that the floating IP for
WLS_SERVER1
is being brought up and that the
server is being restarted in this node.
2. As an example, for Oracle SOA Suite Managed Servers, access the soa-infra
console in the same IP.
Verification from the Administration Console
Migration can also be verified in the Administration Console:
1. Log in to the Administration Console.
2. Click Domain on the left console.
3. Click the Monitoring tab and then the Migration subtab.
The Migration Status table provides information on the status of the migration.
To complete server migration in a cluster, perform the same steps on the second, third,
and so on, managed servers.
18.4 Next Steps
If the Oracle Fusion Customer Relationship Management product offering has been
installed, continue to Complete Oracle Fusion Customer Relationship Management
Post-Installation Tasks (page 19-1). Otherwise, go to the section that corresponds to
the product offering that is installed.
Chapter 18
Next Steps
18-98

19
Complete Oracle Fusion Customer
Relationship Management Post-Installation
Tasks
This section describes the Oracle Fusion Customer Relationship Management (Oracle
Fusion CRM) post-installation tasks that must be reviewed and completed before
starting working with an Oracle Fusion CRM implementation.
This section contains the following topics:
• Install and Configure the Bounce Handling Daemon (page 19-1)
• Set Up SMS Marketing (page 19-2)
• Set Up Implicit Personalization Behavior (page 19-3)
• What To Do Next (page 19-5)
19.1 Install and Configure the Bounce Handling Daemon
The E-Mail Marketing Server is a combination of components designed to support high
volume, personalized e-mail messages, and to track e-mail bounces and click-through
responses. The bounce handling daemon (BHD) tracks e-mail messages that cannot
be delivered, parses the returned e-mail messages, and records the cause of the
e-mail bounce.
The bounce handling daemon installation program is available on the Oracle Fusion
Middleware companion disk. Prior to installing the program, ensure the Marketing
application has been provisioned, noting the Oracle SOA Suite Server host and port,
and determined the designated server to place the daemon. The designated server
must have port 25 available.
It is recommended to place the bounce handling daemon in the DMZ. Optionally,
place the bounce handling daemon behind an inbound mail transfer agent (MTA). The
approach chosen depends on the configuration of the network, DMZ, existing inbound
mail transfer agent, and firewall.
Complete the following steps to install and configure the bounce handling daemon:
1. Using the companion disk, locate and run the installation program:
fusionbhd/
Disk1/runInstaller
. Provide information when prompted, such as the JDK
location, designated BHD server installation directory, and the http or https
protocol, host and port for the Marketing SOA URL.
2. Navigate to the
WLS_HOME/config/fwmconfig
directory and copy the files and
directory listed below to the
$HOME/bhd/fusionapps/crm/ewm/bhd/bin
directory.
• jps-config-jse.xml
• default-keystore.jks
• bootstrap directory (including the cwallet.sso)
19-1

3. Update the root user permissions to allow read, write, and execute access to the
jps-config-jse.xml and default-keystore.jks files and the bootstrap directory.
4. Update the root user permissions to allow read, write, and execute access to the
BHD server installation directory, it's subdirectories and files. The top level BHD
server installation directory is specified during the install process.
5. Grant read access to the fusionapps/crm/ewm/bhd/logs directory to nonroot users
to provide availability to application log files.
6. Log in as a root user in UNIX.
7. Navigate to the
fusionapps/crm/ewm/bhd
directory.
8. Enter the
$ ./bin/bhd-onpremise-ctl.sh start
command. This commands
starts the BHD service for port 25.
For more information on provisioning, see Provision a New Oracle Fusion Applications
Environment (page 13-1).
19.2 Set Up SMS Marketing
To use the SMS marketing campaign capability within Oracle Fusion Customer
Relationship Management, enable it after installing Oracle Fusion Applications.
Customers interested in SMS marketing campaigns need to complete SMPP Driver
configuration in the SOA suite component Oracle User Messaging Service.
An instance of the SMPP driver is already installed as part of the Oracle Fusion
Applications installation and is a part of the Oracle User Messaging Service, but it
does not point to any User Messaging Server. To configure the SMPP driver, an
account with an SMPP driver gateway vendor Is needed.
IMPORTANT
Before proceeding with the enabling process, ensure to have access rights to
update and deploy applications on the WebLogic Administration Console and Oracle
Enterprise Manager associated with the Customer Relationship Management domain.
1. Log in to the WebLogic Administration Console associated with the Customer
Relationship domain.
Under Deployments, see the application usermessagingdriver-smpp in the
Installed state.
2. Expand usermessagingdriver-smpp and navigate to Targets tab. The Current
Targets column shows (None specified), indicating that no target is configured.
3. On the console, switch to the Lock & Edit mode, update the target to all servers in
the CRM_SOACluster, and save the changes.
4. While remaining in the Lock & Edit mode for the console, navigate to
Deployments, select the checkbox next to usermessagingdriver-smpp, and click
Update. The Update Application Assistant wizard appears.
5. For the Deployment Plan Path field, click Change Path and select
the Fusion Applications specific deployment plan: APPTOP
/instance/
applications/ums/crm/usermessagingdriver-smpp_FusionPlan.xml
.
6. On the next screen of the Update Application Assistant wizard, select Release
Configuration to commit the changes made until this point. The state of the
application usermessagingdriver-smpp changes to Active.
Chapter 19
Set Up SMS Marketing
19-2

7. Log out of WebLogic Administration Console.
8. Log in to the Oracle Enterprise Manager associated with the Customer
Relationship Management domain.
9. Expand CRMDomain - User Messaging Service, right-click the application
usermessagingdriver-smpp and select SMPP Driver Properties from the
context menu.
10. Configure the driver and apply the changes.
11. Restart the usermessagingdriver-smpp application to bring into effect the driver
configuration changes.
Use now the SMS Marketing capability of Oracle Fusion Customer Relationship
Management.
19.3 Set Up Implicit Personalization Behavior
This topic covers the post-deployment activities required for Oracle Fusion CRM
applications that support implicit personalization behavior.
Performing these activities fixes the inconsistent implicit personalization behavior
between sessions in the following Oracle Fusion CRM applications:
• Oracle Fusion CRM Common
• Oracle Fusion Territory Management
• Oracle Fusion Customer Center
• Oracle Fusion Marketing
• Oracle Fusion Order Capture Common Components
• Oracle Fusion Sales
19.3.1 Post-Deployment Activities
Make the following changes to the
adf-config.xml
file as a post-deployment activity.
These steps are applicable only for the Oracle Fusion CRM applications where implicit
personalization behavior is supported.
1. Shut down the domain where the application is deployed.
2. Search for
adf-config.xml
file. For example, for Sales application, this
file is typically located at
Sales <deploy directory>/SalesApp/V2.0/app/
SalesApp/adf/META-INF/adf-config.xml
3. Back up
adf-config.xml
file.
4. Open
adf-config.xml
file in a text editor and comment out all occurrences of the
tag
<adf-faces-config>
under the root node
<adf-config>. . .</adf-config>
.
For example:
<!-- adf-faces-config xmlns="http://xmlns.example.com/adf/faces/
config">. . . </adf-faces-config -->
5. Add the following after the commented section.
<adf-faces-config xmlns="http://xmlns.example.com/adf/faces/config">
Chapter 19
Set Up Implicit Personalization Behavior
19-3

<persistent-change-manager>
<persistent-
change-manager-class>oracle.adf.view.rich.change.MDSDocumentChangeManager</
persistent-change-manager-class>
</persistent-change-manager>
<taglib-config>
<taglib uri="http://xmlns.example.com/adf/
pageeditor">
<tag name="layoutCustomizable">
<!-- Added to pass JAudit-->
<attribute name="layout">
<persist-changes>true</
persist-changes>
</attribute>
</tag>
</taglib>
<taglib uri="http://xmlns.example.com/adf/faces/
customizable">
<tag name="showDetailFrame">
<persist-operations>all</persist-operations>
<!-- Added to pass JAudit-->
<attribute name="disclosed">
<persist-changes>true</persist-
changes>
</attribute>
<attribute name="height">
<persist-changes>true</persist-
changes>
</attribute>
</tag>
<!-- Added to pass JAudit-->
<tag name="portlet">
<attribute name="disclosed">
<persist-changes>true</persist-
changes>
</attribute>
<attribute name="height">
<persist-changes>true</persist-
changes>
</attribute>
</tag>
</taglib>
<taglib uri="http://xmlns.example.com/adf/faces/rich">
<tag name="column">
<persist-operations>all</persist-operations>
<attribute name="displayIndex">
<persist-changes>true</persist-
changes>
</attribute>
<attribute name="visible">
<persist-changes>true</persist-
changes>
</attribute>
<attribute name="width">
Chapter 19
Set Up Implicit Personalization Behavior
19-4

<persist-changes>true</persist-
changes>
</attribute>
</tag>
</taglib>
</taglib-config>
</adf-faces-config>
6. Specifically for Customer Center application, and as an additional step, locate
these lines under the
<mds:cust-config>
section:
<mds:match path="/oracle/apps/">
<mds:customization-class
name="oracle.apps.fnd.applcore.customization.ProductFamilyCC"/>
<mds:customization-class
name="oracle.apps.fnd.applcore.customization.SiteCC"/>
</mds:match>
When lines are commented, they appear as:
<!--mds:match path="/oracle/apps/">
<mds:customization-class
name="oracle.apps.fnd.applcore.customization.ProductFamilyCC"/>
<mds:customization-class
name="oracle.apps.fnd.applcore.customization.SiteCC"/>
</mds:match>
7. Save and close the file.
8. Start up the domain that hosts the Oracle Fusion CRM application.
19.4 Next Steps
If the Oracle Fusion Financials product offering has been installed, go to Complete
Oracle Fusion Financials Post-Installation Tasks (page 20-1). Otherwise, go to the
section that corresponds to the product offering that is installed.
Chapter 19
Next Steps
19-5

20
Complete Oracle Fusion Financials Post-
Installation Tasks
This section describes the Oracle Fusion Financials post-installation tasks that must
be reviewed and completed before starting working with an Oracle Fusion Applications
Oracle Fusion Financials implementation.
This section contains the following topics:
• Set Up the Financial Reporting Center (page 20-1)
• Set Up Oracle Document Capture and Oracle Forms Recognition (page 20-6)
• Oracle Fusion Advanced Collections Dunning (page 20-18)
• Enable Encryption of Sensitive Payment Information (page 20-19)
• Configure a Communication Channel to a Payment System (page 20-19)
• Configure Oracle B2B Inbound Flow to Receive Supplier Invoices in XML
(page 20-20)
• Set Up Oracle B2B to Send Receivables Transactions in XML (page 20-24)
• What To Do Next (page 20-26)
20.1 Set Up the Financial Reporting Center
The Oracle Fusion Financial Reporting Center provides functionality for reporting on
Oracle Fusion General Ledger balances. It provides secure, self-service access to
reports that use real time account information.
Design traditional financial report formats such as balance sheets, profit and loss
statements, and cash flow reports. Design also nontraditional formats for financial or
analytic data that include text and graphics.
The following figure shows the main components in the Financial Reporting Center:
Financial Reporting, Account Monitor, Account Inspector, Smart View, Financial
Reporting Workspace, and Financial Reporting Studio. These components use the
Oracle Fusion General Ledger preaggregated balances as the staring data.
20-1
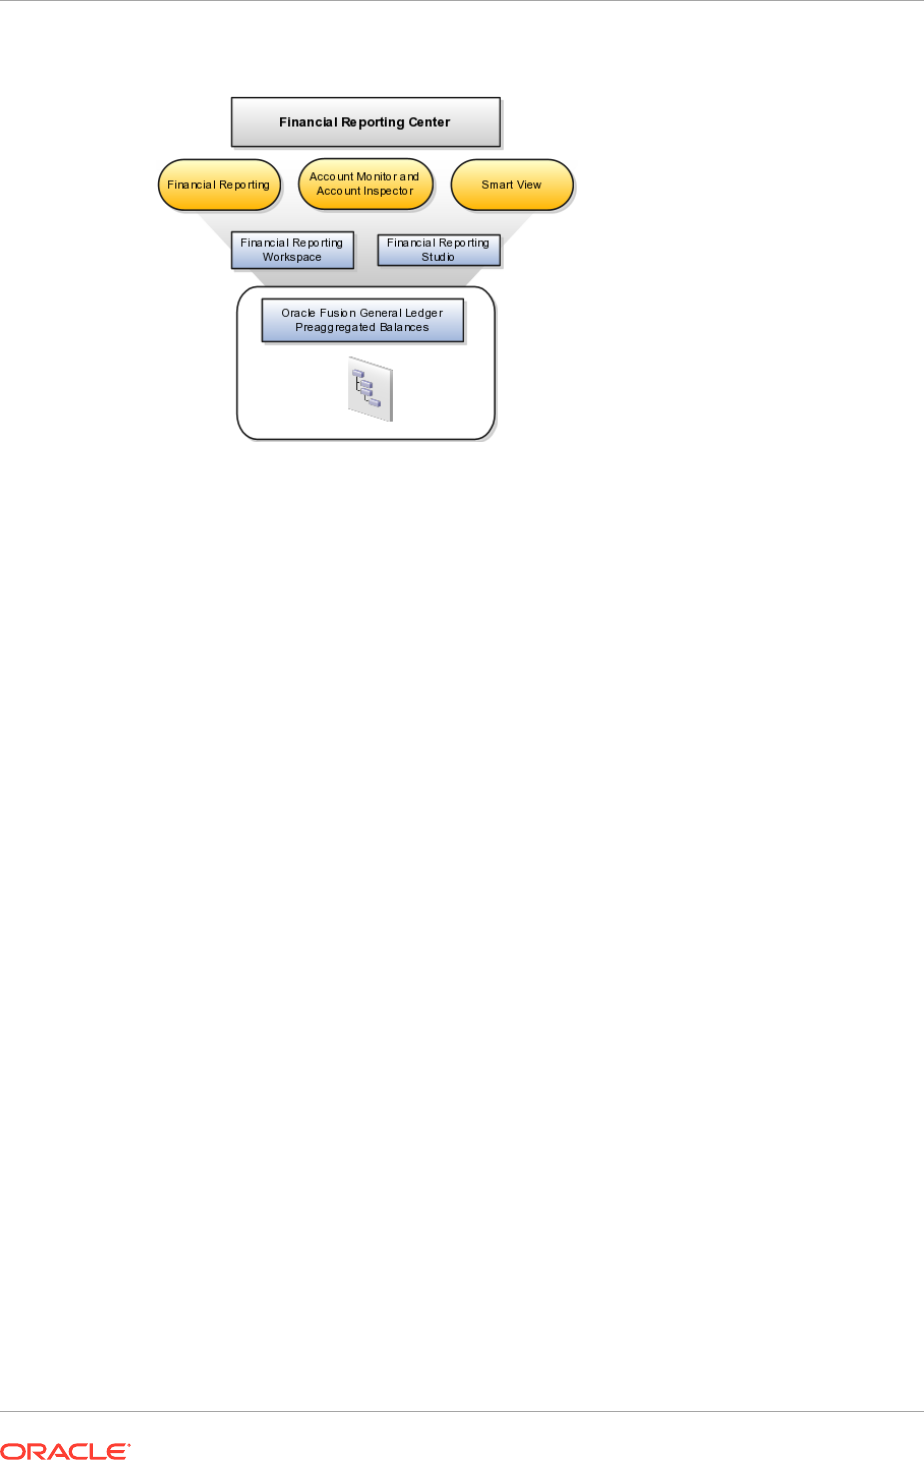
Figure 20-1 Financial Reporting Center
20.1.1 Components
Financial Reporting Center is comprised of numerous components:
• Financial Reporting: Financial users and analysts access live reports and books
or published snapshot reports and books from previously scheduled batches in a
variety of formats. Other functionality includes:
– Refreshing report data using runtime points of view or parameters
– Drill through capability from parents to other parents
– Drill down to detail balances, journal lines, and subledger transactions.
• Oracle Hyperion Smart View: Financial analysts view, import, manipulate,
distribute, and share data from the Oracle Fusion General Ledger balances in
Microsoft Excel.
• Account Monitor and Account Inspector: Financial analysts monitor and track
key account balances in real time at every level of the dimensions and hierarchies.
These tools provide multidimensional account analysis and drill down capability.
• Workspace: Reporting administrators create, open, save, and delete folders and
store report objects, reports, and snapshot reports.
• Oracle Hyperion Financial Reporting Studio: Report authors use an object-
oriented graphical report layout with report objects, such as text boxes, grids,
images, and charts, to design reports.
20.1.2 Set Up the Financial Reporting Center: Critical Choices
Oracle Fusion Financial Reporting Center is a powerful tool for accessing, designing,
and presenting financial reports and analytic data. The critical choices required to
configure and install the components in Financial Reporting Center consist of:
• Configuring Financial Reporting Center
• Installing and configuring Financial Reporting Studio, performed by the end users.
• Installing Smart View, performed by the end user.
Chapter 20
Set Up the Financial Reporting Center
20-2

• Configuring Workspace Database Connection, performed by the administrator.
• Configuring Oracle Fusion Transactional BI Dimensions
20.1.3 Configure Financial Reporting Center
Access the reports through the folder structure in the Financial Reporting Center and
Workspace installed with Oracle Fusion Financial Applications. The Oracle Fusion
Business Intelligence (BI) administrator defines the folder structure in Workspace
considering the company's security requirements for folders and reports, as well as
report distribution requirements for financial reporting batches. Security can be set on
folders and reports from Workspace. The BI administrator grants access to view the
folders and reports .
20.1.4 Install and Configure Financial Reporting Studio
Oracle Hyperion Financial Reporting Studio is client-based software. If Oracle Fusion
Applications is accessed from Oracle Cloud, connect to the Financial Reporting Studio
through a Windows Remote Desktop Connection.
Otherwise, report authors download the installation files for Financial Reporting
Studio from Workspace by clicking Navigator, then Financial Reporting Center,
and then Open Workspace for Financial Reporting. Once Workspace is launched,
click Tools, then Install, and then Financial Reporting Studio. After performing
the prerequisites and completing the installation, launch the Financial Reporting
Studio. Provide the user ID, password, and the Server URL. Derive the Server URL
information by following the steps:
1. Open Navigator, then Financial Reporting Center, and then Open Workspace
for Financial Reporting.
2. Edit the Workspace URL by removing
workspace/index.jsp
.
Following are two examples of Server URLs:
• If the Workspace URL is
https://example.com/workspace/index.jsp
, the
Server URL is
https://example.com
.
• If the Workspace URL is
https://example.com:10622/workspace/index.jsp
,
the Server URL is
https://example.com:10622
.
3. Copy the modified URL to the Server URL field.
For end users installing the Oracle Fusion Financials Reporting Studio, the installer
launches a separate console window that continues to run for a brief time after the
installation completes the setup tasks. The process is normal, expected, and applies to
Oracle Hyperion Reporting Studio installations in both the Oracle Fusion Applications
and Enterprise Performance Manager modes.
Wait for the console window to close, which happens automatically before clicking
Finish on the Financial Reporting Studio Installation dialog box. When clicking Finish
before the console window closes, the Financial Reporting Studio installation may not
fully complete.
MANDATORY: Save a new report before attempting to preview it with Web Preview.
Prerequisites needed for installing the Financial Reporting Studio are:
• Financial Reporting Studio Client Certifications
Chapter 20
Set Up the Financial Reporting Center
20-3

• Microsoft Office installed on the end-users computers
See Installing Multiple Versions of Financial Reporting Studio on a Client Machine
in the Oracle Enterprise Performance Management System Installation and
Configuration Guide, and Installing Financial Reporting Studio in the Oracle Hyperion
Enterprise Performance Management System EPM System Standard Deployment
Guide.
20.1.5 Install Smart View
Smart View is a Microsoft Excel add-in that must be loaded to each client. To
download the installation files from Workspace click Navigator, then Financial
Reporting Center, and then Open Workspace for Financial Reporting. Once the
Workspace is launched, click Tools, then Install, and then Smart View.
Smart View can be installed only on a Windows operating system because it is an
add-in to Microsoft Office products.
Once Smart View is installed, it must be configured to connect to Oracle Fusion
Applications. This is done using the Smart View Shared Connections URL. Derive the
Shared Connections URL by following the steps below:
1. Open Workspace for Financial Reporting from the Financial Reporting Center task
panel.
2. Edit the Workspace URL, for example, if the Workspace URL is
https://example.com/workspace/index.jsp
. Remove
index.jsp
and add
SmartViewProviders
at the end of the URL.
This is another example for a Cloud based environment: If the Workspace URL
is
https://example.com:10622/workspace/index.jsp
, the Shared Connections
URL is
https://example.com:10622/workspace/SmartViewProviders
.
3. Copy the URL.
4. Launch Excel.
5. Navigate to the Smart View menu, then Options, and then Advanced.
6. Paste the URL in the Shared Connections URL field.
7. Click OK.
For more information on configuring Smart View client for users, see Installing Smart
View in the Oracle Hyperion Smart View for Office User's Guide for Oracle Hyperion
Smart View.
To connect Oracle Fusion General Ledger Balances cubes in Smart View:
Perform these steps only once for a new server and database.
1. Open Smart View from Start menu, then Programs, then Microsoft Office, and
then Microsoft Excel 2007.
2. Go to the Smart View menu, then Open in the Start on the ribbon, then click
the Smart View Panel that appears in the drop down box under the ribbon. This
launches a task pane.
3. Click Shared Connections on the task pane.
4. Log in with the user name and password.
Chapter 20
Set Up the Financial Reporting Center
20-4

5. Select Essbase from the Select Server to proceed dropdown list of shared
connections.
If the Essbase Server is not there, then it has to be added. Use the following
steps:
• Click the Add Essbase Server link on the bottom of the spreadsheet.
• Specify the Essbase Server login and password.
• Expand the Essbase sever and locate the cube under it.
6. Click Expand to expand the list of cubes.
7. Expand the cube (name of the chart of accounts).
8. Click db. A list of functions appears on the bottom of the panel.
9. Click Ad hoc analysis.
To set how the name and alias of the Essbase database appears:
1. Click Options on the ribbon, then select the Member Options, and then select
Member Name Display.
2. Set one of the following options:
• Distinct Member Name: Only shows the full Essbase distinct path.
• Member Name and Alias: Shows both the member name and the alias.
• Member Name Only: Shows only the member name.
The Smart Slice feature is not supported in Oracle Fusion General Ledger. For all
other documentation, see Installing Smart View in the Oracle Hyperion Smart View
for Office User's Guide for Oracle Hyperion Smart View.
20.1.6 Configure Workspace Database Connections
Administrators need to create database connections from Workspace so users can
access the cubes from Workspace and Financial Reporting Studio.
Ledger setup has to be completed before the database connection can be created.
Oracle Fusion General Ledger balances cubes are created as part of ledger setup.
There is a separate cube for each combination of chart of accounts and accounting
calendar. A database connection is needed for each cube.
To define a database connection, do the following:
1. From the Navigator, select Financial Reporting Center.
2. From the Financial Reporting Center task panel, select Open Workspace for
Financial Reporting.
3. From within Workspace select the Navigator menu, then Applications, then BI
Catalog.
4. From the Tools menu, select Database Connection Manager.
5. Click New.
6. Enter a user-friendly database connection.
7. Enter Essbase as the Type, the server, user name, and password.
Chapter 20
Set Up the Financial Reporting Center
20-5

8. Select Application (cube) and Database from the list of values. Expand the
Application name to see the related Database, for example, db.
9. Click OK twice to save the selections.
10. Click Close in the Database Connection Manager window to save the connection.
For more information about configuring Essbase database connections in Workspace,
see Understanding Essbase in the Oracle Essbase Database Administrator's Guide for
Oracle Essbase.
The database connection is available in both Workspace and Financial Reporting
Studio. Optionally, it can be set up in Financial Reporting Studio when putting grids on
a report. This should only be done by an administrator.
20.1.7 Configure Oracle Fusion Transactional BI Dimensions
Within Oracle Fusion Transactional Business Intelligence (BI), Accounting Segment
Dimensions such as Balancing segment or Cost Center segment are based on
the Chart of Accounts configuration. These segments can be configured to be tree-
enabled, which means that hierarchies are defined on the segment values for rollup
purposes. In such scenarios, filter by a specific hierarchy when performing ad-hoc
queries against tree-based accounting segments. Incorrect results may occur if tree
filters are not applied. To apply tree filters, create a filter condition on Tree Filter
attributes in Accounting Segment Dimensions.
For information on setting up General Ledger accounting segments, see the Oracle
Cloud Administering Transactional Analyses.
20.2 Set Up Oracle Document Capture and Oracle Forms
Recognition
Oracle Fusion Financials uses Oracle Document Capture to import payables invoice
and expense receipt images from various sources including scanners, e-mail, and FTP
sites. Oracle Fusion Payables also leverages Oracle Forms Recognition for intelligent
data recognition for invoice entry.
This task is not applicable to Oracle Cloud implementations.
To implement Oracle Fusion Expenses and use automated receipt image processing,
then set up Document Capture and configure it for expenses. If Oracle Fusion
Automated Invoice Processing has been licensed, then set up Forms Recognition in
addition to Document Capture, and configure both for payables.
To set up Document Capture and Forms Recognition, perform these steps in the
specified order:
1. Configure Document Capture and Forms Recognition network shares.
2. Install and configure Document Capture and Forms Recognition on Windows
desktop.
For details regarding users and privileges for the setup, refer to the installation guides
of Oracle Document Capture and Oracle Forms Recognition.
Chapter 20
Set Up Oracle Document Capture and Oracle Forms Recognition
20-6

20.2.1 Configure the Oracle Webcenter: Imaging and Process
Management Input Directory Network Share
Oracle Document Capture and Oracle Forms Recognition save images to the Oracle
Webcenter: Imaging (Imaging) input directory for further processing. Since Document
Capture and Forms Recognition are Windows-based products, configure the input
directory as a network shared directory so that Document Capture and Forms
Recognition can save images to this location.
This task is not applicable to Oracle Cloud implementations.
To install network sharing for Oracle Document Capture and Oracle Forms
Recognition:
1. Verify the Imaging input directory path.
2. Configure the network share for the Imaging input directory.
3. Verify Imaging Input Agent.
4. Configure the Windows mapped network drive for the input directory.
20.2.1.1 Verify the Oracle Webcenter: Imaging Input Directory Path
To verify the input directory path:
1. Log in to the Enterprise Manager on the Common Domain, as an Administrator.
2. Navigate to the Domain level.
3. Select System MBean Browser.
4. Open the
oracle.imaging.config.bean
.
5. Look for the InputDirectories value.
• This is the Imaging input directory where Imaging and Process Management
checks for incoming scanned invoices.
• The path points to a directory on the server running Imaging.
6. Open a terminal window for the server running Imaging and check the path
specified for the Input Directory.
The path should be a symbolic link pointing to a folder on a storage server. Both
the Imaging server and the Windows server must have read/write access to the
same folder on the storage server.
20.2.1.2 Configure the Network Share for the Oracle Webcenter: Imaging Input
Directory
Enable the Imaging input directory to be accessed by Document Capture or Forms
Recognition running on Windows:
• The storage server share should have Common Internet File System (CIFS)
enabled for Windows compatible share names.
• The path to the Windows share name should be in Universal Naming Convention
(UNC) format.
Chapter 20
Set Up Oracle Document Capture and Oracle Forms Recognition
20-7

If licensed Oracle Fusion Automated Invoice Processing has been licensed, individual
Oracle Document Capture workstations used for scanning invoices do not need
access to the input directory.
The storage host must grant read/write access to the Imaging Input Agent running on
the Common Domain host and at least one Windows user with login access to the
server running Oracle Document Capture and Oracle Forms Recognition.
20.2.1.3 Verify Oracle Webcenter: Imaging Input Agent
To verify if the Imaging Input Agent is operating correctly:
1. Log in to the Oracle Enterprise Manger for the Common Domain.
2. Navigate to the Imaging Server.
3. Restart the server.
After the server restarts, check the input directory path referenced earlier. A file
named
InputAgent.lock
should be shown. If this file is not shown, verify that
the image server is running and check the image server logs for errors. If there
are errors, check whether the Input Agent has the necessary permissions in the
storage directory. The Input agent needs read/write file access to this directory.
Additionally, verify that the Windows network drive is correctly mapped with
permitted read/write access. Do this by creating a folder or file from the Linux box
where the Imaging server is running. Oracle Forms Recognition is not compatible
with NFS mounted shares on Windows. Use create CIFS shares for Windows
instead. The Windows user should be able to view it on the Windows network
drive and should be able to open and modify it.
20.2.1.4 Configure the Windows Mapped Network Drive for the Input Directory
Log in to the Windows desktop with a user ID that has explicit access to the input
directory file share.
Map the drive on the Windows servers running Oracle Forms Recognition and Oracle
Document Capture servers. The drive is not mapped on individual user machines
running Oracle Document Capture client for Invoicing.
1. Open Windows Explorer.
2. Right-click the folder icon that corresponds to the computer name.
3. Select Map Network Drive.
4. Select a drive letter, for example Y.
5. Specify the path for the shared directory on the storage host, using the UNC
format:
\\<host name>\<name>.
6. Click OK and verify that the network share now appears in Windows Explorer
as the specified drive letter. If Windows Explorer is unable to create the mapped
drive, the issue may be that the Common Internet File System (CIFS) is not
enabled on the storage host.
7. Verify that Windows users have read/write access to the input directory and all its
file contents.
Chapter 20
Set Up Oracle Document Capture and Oracle Forms Recognition
20-8

8. Verify that the Input Agent directory includes the
InputAgent.lock
file (the input
directory may be a sub-directory of the share). If the
InputAgent.lock
file is not
seen, the following are possible explanations:
• The Imaging Server is not running and needs to be started.
• The Imaging Server is running but the Input Agent does not have the
appropriate access to the network share directory and cannot generate the
InputAgent.lock
file.
• The Imaging Server configuration for Input Agent Directory does not point
to the same network share as the mapped network drive, or it points to a
sub-directory other than the one being verified.
To verify that the Windows network drive is correctly mapped with permitted read/write
access, create a folder or file from the Linux box where the Imaging server is running
and check if the Windows user is able to view the folder or file on the Windows
network drive and is able to open and modify it.
20.2.2 Configure the Oracle Forms Recognition Project Network Share
The Oracle Forms Recognition project directory contains directories and files shared
by Oracle Document Capture, Oracle Forms Recognition Designer, Oracle Forms
Recognition Verifier, and Oracle Forms Recognition Runtime Service. In a typical
installation scenario, these applications are not installed on the same computer.
However, the project directory must be stored in a shared directory accessible to each
application, regardless of where it is installed.
This task is not applicable to Oracle Cloud implementations.
To configure the Oracle Forms Recognition project network share, do the following:
1. Configure the share for the Oracle Forms Recognition AP Project Folder.
2. Configure the Windows mapped network drive for the AP Project Folder.
20.2.2.1 Configure the Network Share for the Oracle Forms Recognition AP
Project Folder
Ensure that the Oracle Forms Recognition project directory is accessible to the Oracle
Document Capture or Oracle Forms Recognition applications running on Windows.
• The storage server share should be configured with Common Internet File System
(CIFS) enabled for Windows compatible share names.
• The Windows share name must be in universal naming convention (UNC) format.
• The network share is meant for exclusive use by the Oracle Document Capture or
Oracle Forms Recognition applications running on Windows.
Configure the storage host to share the Oracle Forms Recognition Project directory
with the Oracle Document Capture and Oracle Forms Recognition users.
20.2.2.2 Configure the Windows Mapped Network Drive for the AP Project
Folder
Log on to the Windows desktop with a user ID that has explicit access to the Oracle
Forms Recognition project file share.
Chapter 20
Set Up Oracle Document Capture and Oracle Forms Recognition
20-9

This mapping is done on the following:
• Windows servers running Oracle Forms Recognition and Oracle Document
Capture servers for Expenses
• Servers running Oracle Forms Recognition Designer and Verifier
• Invoice scanning workstations running Oracle Document Capture
Perform the following steps to configure the Windows mapped network drive:
1. In Windows Explorer, identify the folder for the PC icon that displays the same
name as that of the actual PC.
2. Right-click the folder icon that corresponds to the computer name.
3. Right-click the folder and select Map Network Drive.
4. Select a drive letter, for example X.
5. Specify the path for the shared directory on the storage host, using the UNC
format: \\<host name>\<share name>.
6. Click OK and verify that the network share now appears in Windows Explorer
as the specified drive letter. If Windows Explorer is unable to create the mapped
drive, the issue may be that CIFS is not enabled on the storage host.
20.2.3 Install and Configure Oracle Document Capture and Oracle
Forms Recognition on Windows
To configure Oracle Document Capture and Oracle Forms Recognition to run on
Windows, perform the following tasks in the given order:
These tasks are not applicable to Oracle Cloud implementations.
1. Install prerequisites.
2. Run the setup utility.
3. Install Oracle Document Capture.
4. Configure Oracle Document Capture.
5. Configure Oracle Document Capture Import Server for Importing Images from
E-Mail.
6. Install Oracle Forms Recognition for Payables.
7. Configure Oracle Forms Recognition for Payables.
8. Configure shared drive access for Oracle Forms Recognition Runtime Service
Manager.
Ensure that the required network shares have been configured before performing
these steps. Steps 4 to 7 (Configure Oracle Document Capture to Configure Oracle
Forms Recognition for Payables) are required only if Oracle Fusion Automated Invoice
Processing has been licensed.
20.2.3.1 Prerequisites
Before proceeding with the installation and configuration of Oracle Document Capture
and Oracle Forms Recognition, do the following:
Chapter 20
Set Up Oracle Document Capture and Oracle Forms Recognition
20-10

1. Ensure that the empty Document Capture schema is created in the Oracle
database with at least three user profiles: a read-only user profile for reporting,
a read/write user profile for schema administration, and a read/write user profile
for the Document Capture runtime connection. Document Capture tracks batches
and stores audit information in the schema tables. The Document Capture
runtime connection configuration includes read/write user profile credentials so
that Document Capture can write data to the schema tables without requesting a
separate login.
2. Install and Configure Oracle database support for Open Database Connectivity
(ODBC) and OLEDB. See Oracle Database Software Downloads on Oracle
Technology Network.
3. Ensure that Java Runtime Environment (JRE) 1.6 or higher is installed. See Java
Downloads on Oracle Technology Network.
4. To configure expenses, create the folder C
:\ODC Projects\EXM\Import
. Share
this folder with read-write permissions enabled for incoming expense documents.
5. Download the Capture-FormsRec_FA.zip file from the Oracle Fusion Applications
repository. The zip file is located at
<repository_root>/installers/Capture-
FormsRec.
20.2.3.2 Run the Setup Utility
This program streamlines the installation and configuration of Oracle Document
Capture and Oracle Forms Recognition.
1. Extract the contents of the Capture-FormsRec_FA.zip (downloaded earlier from
the Oracle Fusion Applications repository) to a temporary folder and double-
click Setup.exe to run the utility. The Oracle WebCenter Capture and Forms
Recognition for Fusion Financials Setup window appears.
2. In the I/PM Input Agent Folder field, enter a UNC path of the folder from which IPM
uploads the documents. For example,
\\<server_name>\<share_name>
.
3. In the Oracle Forms Recognition AP Project Folder field, provide the root directory
for the AP project. For example,
<Drive Letter>:\OFR
. If the specified directory
does not exist at the mentioned location, the installer creates a directory with the
same name.
Install and configure Oracle Document Capture and Oracle Forms Recognition. The
relevant instructions are provided in the subsequent sections.
20.2.3.3 Install Oracle Document Capture
Repeat the installation procedure on every machine that runs Oracle Document
Capture.
If an error occurs while installing Oracle Document Capture, verify if the computer's
print spooler service is running (Start , then Settings, then Control Panel, then
Administrative Tools, and then Services). Scroll down until Print Spooler is seen.
If the status shows that it has not started, right-click the Print Spooler service and
select Start. Now retry installing Oracle Document Capture.
1. On the Oracle WebCenter Capture and Forms Recognition for Fusion Financials
Setup window, in the Oracle Document Capture region, click Install. The Oracle
Document Capture installer appears.
Chapter 20
Set Up Oracle Document Capture and Oracle Forms Recognition
20-11

2. Proceed through the installation steps to complete the installation. Once the
installation is complete, the Setup utility initiates an additional process to install
a patch.
3. Proceed through the options to complete the patch installation. After it is complete,
the Configure button in the Oracle Document Capture region is enabled.
20.2.3.4 Configure Oracle Document Capture
To configure Oracle Document Capture:
1. On the Oracle WebCenter Capture and Forms Recognition for Fusion Financials
Setup window, in the Oracle Document Capture region, click Configure. The
Oracle Document Capture Configuration Utility dialog box appears.
2. In the Batch Folder field, browse and select the folder where Oracle Document
Capture batch files are stored.
3. In the Commit Folder field, browse and select the folder where Oracle Document
Capture commits the captured files.
If Oracle Forms Recognition is used, leave this blank for now. After installing
Oracle Forms Recognition, come back and set the folder path to
<Drive
Letter>:\OFR_Project\AP\Global\Import
. If Oracle Forms Recognition is not
being installed, set this to the Image Processing Management Input Directory.
4. Click OK. The Capture Batch Setup dialog box appears.
The Capture Batch Setup dialog box appears only when configuring Oracle
Document Capture for the first time.
5. On the Capture Batch Setup dialog box, do the following:
a. In the Enter Path to Network Batch Folder field, specify the same folder
path that is provided in the Batch Folder field on the Oracle Document Capture
Configuration Utility dialog box.
b. In the Enter Path to Network Commit Folder field, specify the same folder
path that is provided in the Commit Folder field on the Oracle Document
Capture Configuration Utility dialog box.
c. In the Capture Database Setup area, select the Other Database Platform
option and click Configure. The Configure Database Connection dialog box
appears.
d. Click Configure DB Connection. The Data Link Properties dialog box
appears.
- On the Provider tab, select Oracle Provider for OLE DB and click Next.
- On the Connection tab, do the following:
i. In the Data Source field, enter the name of the Oracle database.
ii. Select the Use a specific user name and password option and provide
the User name and Password that have read and write access to the
Capture schema.
iii. Select the Allow saving password option.
iv. Click Test Connection to check for connectivity issue if any, and resolve it
before proceeding with the configuration.
- Click OK. The Data Link Properties dialog box closes.
Chapter 20
Set Up Oracle Document Capture and Oracle Forms Recognition
20-12

e. On the Configure Database Connection dialog box, click OK. The Configure
Database Connection dialog box closes.
f. On the Capture Batch Setup dialog box, click Initialize DB to populate the
Capture schema in the Oracle database.
• Initializing the database is required when configuring Oracle Document
Capture for the first time.
• If a standalone instance of Oracle Document Capture is being
configured for testing, use the default Capture database (capture.mdb)
that is installed with the product. On most systems, this database
is located in the Oracle Document Capture installation directory.
On Windows 2008 R2, the Capture database is installed in the
system
ALLUSERPROFILES\Oracle Document Capture
folder. By default,
ALLUSERSPROFILES
is
C:\ProgramData
.
To use the default capture.mdb, create a data source based on Microsoft
Jet OLE DB 4.0. The local Capture database is only used for testing.
For production environments, create the Capture schema in the Oracle
database.
A warning message appears indicating loss of existing data in the Capture
schema proceeding with the initialization.
- Click Yes. The Security Model dialog box appears.
- Select the option that is appropriate to the system environment and click OK.
The Microsoft Windows Open dialog box appears.
- Navigate to the Oracle Document Capture installation directory, search for
the
Capture_ORACLE.sql
file, select it, and click Open. Oracle Document
Capture runs the script of the Capture schema and creates the required tables
in the Oracle database.
g. On the Capture Batch Setup dialog box, click OK. The Capture Batch Setup
dialog box closes.
6. On the Oracle Document Capture Configuration Utility dialog box, click OK.
If prompted for user credentials, enter the user name and password that have been
used during the configuration process.
20.2.3.4.1 Configure Additional Routing Attributes for Manual Scanning
To configure additional routing attributes for manual scanning:
1. If the Automated Invoice Processing components are being installed for the first
time, the latest cabinet files already exist. Thus, skip the unzip and import steps
and proceed to Step 2. Otherwise, if Automated Invoice Processing is already
used, perform the following steps to import the latest cabinet files:
a. Unzip the
Capture-FormsRec_FA.zip
package.
b. Import the
ApInvoiceOdcCabinet.zip
and
ApInvoiceOfrCabinet.zip
files
using the Document Capture Import Export utility.
2. Open Oracle Document Capture and select Indexing - Manage Index Profiles.
3. Select the Fields tab for index profiles Fusion Payable Invoices With OFR and
Fusion Payable Invoices Without OFR and verify that they contain the following
index fields: Routing_Attribute_1 through Routing_Attribute_5, and URN.
Chapter 20
Set Up Oracle Document Capture and Oracle Forms Recognition
20-13

4. Select System - Manage Macros.
5. Select the Scan for ISIS category.
6. Select the OFR-Scan-ISIS-Macro macro.
7. Click Setup.
8. (Optional) Review and modify the Prompt User upon closing Review option in the
Index Documents area to meet the requirements.
9. Select the Do not Commit Batch option in the Commit Options area.
10. Click OK.
11. (Optional) If all five attributes are not planned to be used, or a longer length are
planned to be used for each of the remaining attributes, change the maximum
length of the index field attributes:
a. Select Admin - File Cabinets.
b. Select either Payables Invoice with OFR or Payables Invoices without
OFR, depending on which file cabinet are used.
c. Select the routing attribute to edit.
d. Click Edit.
e. Update the Max Length field.
• Do not modify the index field names, otherwise the predefined attribute
configuration does not work as expected.
• The sum of the maximum lengths is limited to the number of characters
allowed by Oracle Forms Recognition (233), minus the number of
characters in the file path where the image files are imported, minus the
TIF file extension including the period (4), minus the characters reserved
for internal use (40), minus one separator character per attribute.
For example, if the image files are imported into the
C:\OFR\Import\
directory and if all five attributes are used, do not exceed 170 characters
(233-14-4-40-5).
• The number of characters for an attribute value cannot exceed the Max
Length for that attribute. If the attribute value character count exceeds the
specified maximum length, an error is displayed on the Oracle Document
Capture's scan and commit.
f. Click OK.
20.2.3.5 Configure Oracle Document Capture Import Server for Importing
Images from E-Mail
To set up the Oracle Document Capture Import Server to import invoice images that
are received through e-mail and to capture additional attributes for routing based on
information in the e-mail subject, perform the following steps.
To configure additional routing attributes, do the following:
1. If the Automated Invoice Processing components are being installed for the first
time, you already have the latest cabinet files, skip the unzip and import steps
and proceed to Step 2. Otherwise, if Automated Invoice Processing is being used
already, perform the following steps to import the latest cabinet files:
Chapter 20
Set Up Oracle Document Capture and Oracle Forms Recognition
20-14

a. Unzip the Capture-FormsRec_FA.zip package.
b. Import the ApInvoiceOdcCabinet.zip and ApInvoiceOfrCabinet.zip files
using the Document Capture Import Export utility.
2. (Optional) Perform Step 11 in Configure Additional Routing Attributes for Manual
Scanning (page 20-13) to change the maximum lengths of the index attribute
fields.
To configure the Email Provider batch job, do the following:
1. Open the Oracle Document Capture Import Server.
2. Select Setup - Batch Jobs.
3. Expand the Email Provider folder.
4. Select the AP Email Provider batch job.
5. If Oracle Forms Recognition is not being used, perform the following steps,
otherwise proceed to Step 6.
a. Select the General tab.
b. In the File Cabinet field, select Payables Invoice without OFR.
c. In the Server Macro field, select <NONE>.
d. Select the Processing tab.
e. Uncheck the Commit Batches option.
6. Select the Image Output tab. The default resolution is set to 300 x 300.
Do not modify this setting.
7. Select the Email Provider Settings tab.
8. Select the Email Accounts subtab.
a. In the Email Protocol field, select the e-mail protocol that is being used.
b. In the Email Server Name field, specify the DNS name that the e-mail server
uses.
c. In the Email Addresses to Process field, enter the e-mail addresses that are
designated to process scanned invoices.
9. Select the Email Filters subtab.
a. Configure the settings in the Process Emails containing specified text area.
Specify the e-mail text that the Oracle Document Capture Import Server must
find to process an e-mail. If the designated e-mail account is responsible only
for receiving scanned invoices, this section can be left blank.
b. Configure the settings in the Attachment Processing area to process the
invoice image attachments.
10. Select the Post-Processing subtab.
a. In the Upon Successful Import area, select the action to take when the
import process succeeds.
The default setting is to delete the message from the e-mail account.
b. In the Upon Failed Import area, select the action to take when the import
process fails.
Chapter 20
Set Up Oracle Document Capture and Oracle Forms Recognition
20-15

The default setting is Don't Delete Message, which leaves the failed imported
invoices in the e-mail account.
11. Click Close.
To schedule the Email Provider batch job, do the following:
1. Select Server - Schedule.
2. Click Schedule New Event.
3. In the Event field, select Email Provider - AP Email Provider.
4. In the Event Properties area, specify the intended frequency.
The recommended frequency setting is Every 1 Minute.
5. Select Server - Activate to run the job.
20.2.3.6 Install Oracle Forms Recognition for Payables
Install Oracle Forms Recognition for Payables on two different servers, one server
each for:
• The Runtime Service: The instance of Oracle Forms Recognition for the Runtime
Service must be installed on a secure server accessible only to administrators.
The Runtime Service normally runs without any user intervention. However,
administrators need to access the Runtime Service to perform setup and
configuration tasks.
• The Designer and Verifier: The instance of Oracle Forms Recognition for the
Designer and Verifier needs to be installed on a server that is accessible to the
users of the applications.
To install Oracle Forms Recognition, perform the following steps:
1. On the Oracle WebCenter Capture and Forms Recognition for Fusion Financials
Setup window, in the Oracle Forms Recognition region, click Install. The Oracle
Forms Recognition installer appears.
While installing it on each server, ensure to select the Complete install option.
2. Proceed through the installation steps to complete the installation. Once the
installation is complete, the Setup utility initiates an additional process to install
a patch, if any.
3. Proceed through the options to complete the patch installation. After it is complete,
the Configure button in the Oracle Forms Recognition region is enabled.
20.2.3.7 Configure Oracle Forms Recognition for Payables
To configure Oracle Forms Recognition for Payables, perform the following steps:
1. On the Oracle WebCenter Capture and Forms Recognition for Fusion Financials
Setup window, in the Oracle Forms Recognition region, click Configure. The
Oracle Forms Recognition Runtime Server Creation dialog box appears.
The Oracle Forms Recognition Runtime Server Creation dialog box appears if
Oracle Forms Recognition has been installed for the first time. If Oracle Forms
Recognition is already available and was earlier configured, the Oracle Forms
Recognition Runtime Server Creation dialog box is skipped and the Oracle Forms
Chapter 20
Set Up Oracle Document Capture and Oracle Forms Recognition
20-16

Recognition Configuration Utility dialog box appears. The instructions here are
provided assuming that Oracle Forms Recognition is installed for the first time.
2. On the Oracle Forms Recognition Runtime Server Creation dialog box, select one
of the options to create the Runtime Service:
• All (Import, OCR, Classification, Extraction, Export and Clean-up) to create
and configure a single instance of the Runtime Service that performs all
Oracle Forms Recognition workflow operations. This is the default option and
is normally reserved for use by demonstration systems.
• Custom to customize the creation of the Runtime Service based on several
parameters as described here:
• For production environments, Oracle recommends to create separate Runtime
Service instances for each function using the Custom options described in the
following table. To increase system capacity, add additional instances of OCR,
Classification and Extraction Runtime Service.
• To create separate instances for each function, create all of them at this point.
This dialog box is available only during first time installation. It is not possible
to access it later to add Runtime Service instances. To add instances later,
create each of them manually.
Sub-option Functional Description
Import Selecting this checkbox creates an import enabled instance of the
Runtime Service.
OCR, Classification
and Extraction
Selecting this checkbox creates an OCR, Classification and
Extraction enabled instance of the Runtime Service.
Number of Instances Specify the number of OCR, Classification and Extraction enabled
instances to be created. The default value is 1.
An OCR, Classification and Extraction enabled instance is CPU
intensive and therefore, to balance higher invoice loads, create
additional instances. However, it is recommended that the number
of such instances must not exceed the number of cores on the
server. Add additional instances using the SET file created by
the Setup utility. The SET file name is FusionAP - OCE.set,
which is located in the Bin folder of the Forms Recognition
install folder, for example
C:\Program Files\Oracle\Forms
Recognition\Bin
.
Export and Clean-up Selecting this checkbox creates an Export and Clean-up enabled
instance of the Runtime Service.
3. Click OK. The Oracle Forms Recognition Runtime Server Creation dialog box
closes and the Oracle Forms Recognition Configuration Utility dialog box appears.
4. In the AP Solution INI File field, ensure that the path is set to the automatically
installed INI file.
5. In Database Connections, ensure that at least one connection is selected. In
absence of a Database Connection, click Create to create a database connection.
Ensure that the selected database connection has read-only access to the Fusion
schema.
6. From the ODBC System DSN (32-bit) list, select one of the predefined ODBC
System DSN value. If the list is blank, create an ODBC System DSN using the
ellipsis button next to the field. Ensure that the ODBC connection has read-only
access to the Fusion schema.
Chapter 20
Set Up Oracle Document Capture and Oracle Forms Recognition
20-17

7. Enter the User ID and Password associated with the selected ODBC System DSN.
8. Click Test Connections to ensure that the selected database connection is active
and working.
9. In the PO Format field, enter the format of the purchase order.
Use # as a wildcard character to represent a single number and @ as a wildcard
character to represent a single alphabet.
10. In the Ignore Characters field, specify the characters such as comma, hyphen,
period that may appear as part of the purchase order but need to be ignored. The
ignore characters are always associated with a PO format.
11. Click Add. The PO format is added to the Defined Formats list, while
simultaneously storing the associated characters to be ignored when that PO
format is in use.
For more information on PO Formats see the AP Solution Guide located at
<Drive
Letter>:\OFR_Projects\AP.
20.2.3.8 Configure Shared Drive Access for Oracle Forms Recognition Runtime
Service Manager
The Oracle Forms Recognition runtime service manager processes invoice images
and exports them to a shared network drive. By design, Windows services are not
allowed to access mapped network drives. Therefore, to access a network share, a
Windows service must be running as an authenticated Windows user and it must
access the share by specifying a UNC style path (
\\server_name\share_name
).
Subsequently, assign a Windows user profile to the Oracle Forms Recognition
Runtime Service Manager. The specified user profile must have read/write access
to the shared network drive.
1. On the server that hosts the Runtime Service, navigate to Start, then Control
Panel, and then Administrative Tools.
2. Select Services.
3. Right-click Oracle Forms Recognition Runtime Service Manager and select
Properties.
4. Select the Log On tab.
5. Select the This account radio button, and enter the user name and password of
the user granted read/write access to the shared network folder.
6. Click Apply and then click OK.
20.3 Oracle Fusion Advanced Collections Dunning
Oracle Fusion Advanced Collections Dunning feature utilizes Oracle Business
Intelligence Publisher to distribute dunning letters to customers via E-mail, fax or print.
To use this feature, configure Oracle Business Intelligence Publisher to connect to the
deploying company's internal E-mail, or the print or fax servers.
20.3.1 Add the E-Mail Server
To add an E-Mail server:
Chapter 20
Oracle Fusion Advanced Collections Dunning
20-18

1. From the Admin page select E-mail. This displays the list of servers that have
been added. Select Add Server.
2. Enter the Server Name, Host, and Port for the E-mail server.
3. Select a Secure Connection method to use for connections with the E-mail server.
The options are: None or SSL. Use Secure Socket Layer. TLS (Transport Layer
Security). Use TLS when the server supports the protocol; SSL is accepted in the
response. TLS Required. If the server does not support TLS, then the connection
is not made.
4. Optionally enter the following fields if appropriate: General fields; Port Security
fields User name and Password.
20.4 Enable Encryption of Sensitive Payment Information
Financial transactions contain sensitive information which must be protected by a
secure, encrypted mode. To protect the credit card and external bank account
information, enable encryption. Encryption encodes sensitive data so that it cannot
be read or copied. To enable encryption, create a wallet file. A wallet file is a digital file
that stores the primary encryption key, which the application uses to encrypt sensitive
data.
To secure the credit card or bank account data, navigate to the Setup and
Maintenance work area, search for the Manage System Security Options task and
perform the following steps:
1. Open the Manage System Security Options page
2. Click Apply Quick Defaults
3. Select all the check boxes:
• Automatically create wallet file and encryption key
• Encrypt credit card data
• Encrypt bank account data
4. Click Apply
20.5 Configure a Communication Channel to a Payment
System
To transmit payment information to or receive payment information from a payment
system, configure the channel used to communicate with the payment system. The
concepts related to configuring a communication channel to a payment system are:
• Proxy Server (page 20-19)
• Secure Sockets Layer Protocol (page 20-20)
• Unsecure Protocols (page 20-20)
20.5.1 Proxy Server
Payments must communicate through a proxy server to its payment system. Use
the standard Java networking proxy system properties that are in the configuration
Chapter 20
Enable Encryption of Sensitive Payment Information
20-19

files when Oracle Fusion Applications were initially set up. Alternatively, specify proxy
settings for a transmission protocol on the Create Transmission Configuration page by
entering a value for the Proxy Host parameter.
20.5.2 Secure Sockets Layer Protocol
When Payments communicates with a payment system, the information exchanged
may be sensitive, such as credit card numbers. If the communication isn’t secure, it
poses a security risk. The security risk increases when communication tot he payment
system is across a public network such as the Internet.
To set up a payment system servlet with a secured sockets layer, enable HTTPS on
the middle-tier server where the servlet resides. If funds-capture-process profiles are
not defined for the payment system, change the Transmission Servlet Base
URL parameter on the Edit Payment Systems page to start with HTTPS. If funds
capture process profiles are defined, change the value for the Destination URL
parameter on the Edit Transmission Configuration page to start with HTTPS.
For secure communication with the payment system, ensure that the most current
certification authority (CA) certificates are in the Fusion secure sockets trust store
file. If Payments rejects the payment system’s secure sockets certificate, it might be
necessary to insert the certificates manually.
The following table shows security actions which are applicable to Cloud and on-
premise:
Table 20-1 Security Actions Applicable to Cloud and On-Premise
Action Cloud On-Premise
Set up a payment system
servlet with a secure sockets
layer (SSL)
Not applicable Enable SSL on the servlet’s
application server
Insert certification authority
certificates
File a service request with the
help desk
Enter a value in the
Value field for the Wallet
Location parameter on the
Create or Edit Transmission
Configuration page
20.5.3 Unsecure Protocols
The preferred file-based transmission protocol is Secure File Transfer Protocol
(SFTP). File Transfer Protocol (FTP) is unsecured and should only be used to meet
legacy third-party requirements. FTP must be used over a secure link such as a virtual
private network (VPN) or a leased line with data link level encryption enabled.
20.6 Configure Oracle B2B Inbound Flow to Receive
Supplier Invoices in XML
Oracle B2B Server is an Oracle SOA Suite component that manages interactions
between deploying companies and trading partners such as suppliers. Oracle Fusion
Payables supports an inbound Oracle B2B flow using Oracle B2B Server for receiving
invoices from suppliers in XML format.
Chapter 20
Configure Oracle B2B Inbound Flow to Receive Supplier Invoices in XML
20-20

This task is not applicable to Oracle Cloud implementations.This task is not applicable
to Oracle Cloud implementations.
Trading partners can use this B2B feature to communicate electronically by sending
documents in XML format. The B2B XML invoices use the same XML standard
171_Process_Invoice_002 (version 7.2.1) developed by the Open Applications Group
(OAG). For more information on B2B XML Invoices, see B2B XML Invoices: How They
Are Processed in the Oracle Fusion Applications Procurement, Payables, Payments,
and Cash Guide.
Customers or deploying companies who want to receive and process invoices in XML
format (complying to OAG standards) that are provided by the suppliers, need to
perform the following post-installation configurations.
• Host Company Configuration
• Supplier Configuration
These configurations are required only if customers or deploying companies want to
use the B2B XML invoice feature.
20.6.1 Configure the Host Company
Perform the following steps to complete Host Company configuration.
1. Set up the Oracle B2B Server.
2. Set up Oracle Supplier Network for the Host Company
This step is required only if customers use Oracle Supplier Network as the
communication channel.
3. To set up the Oracle B2B Server, do the following:
a. Create a supplier trading partner.
The Oracle B2B Server is preloaded with the supported OAG document
schemas and sample trading partners such as MyCompany which is the host
company trading partner, and ApSampleTradingPartner which is the supplier
trading partner. However, it is possible to create the supplier trading partners
as instructed here.
- Log in to the Oracle B2B Server.
- On the left, click Add on the Partner toolbar. The Partner Name dialog box
appears.
- Enter the name of the trading partner and click OK. A confirmation message
appears. The new supplier trading partner is listed in the Partner region.
- On the Documents tab, click Add to add a document definition for the
supplier trading partner. The Select Document Definition dialog box appears.
- Select OAG - 7.2.1 - PROCESS_INVOICE_002 - OAG_DEF and click Add.
The document definition is added to the supplier and is displayed under
Documents.
- For the document definition, clear the checkbox under Receiver.
- In the Partner region, select the new supplier trading partner, and on the
Agreement toolbar, click Add to add a new agreement between the host
company and the new supplier trading partner.
Chapter 20
Configure Oracle B2B Inbound Flow to Receive Supplier Invoices in XML
20-21

- Enter the name of the agreement.
- On the process train, click the Select Document Definition train stop. The
Select Document Definition dialog box appears.
- Select the PROCESS_INVOICE_002 document definition mapped to the
supplier trading partner and click OK.
- Under Agreement Parameters, ensure that the Functional Ack checkbox is
clear, and click Save.
- To validate the agreement, click Validate.
- Click Deploy. An information message appears, indicating successful
deployment of the agreement.
b. Set up a listening channel.
Oracle B2B Server supports multiple protocols for sending/receiving
messages between trading partners. Choose a protocol that is best suited
for your company. Refer to the Oracle B2B Server documentation or online
help to learn about each protocol and which parameters need to be set up.
Listening channel can be set up at the global level (applicable to all trading
partners) or at the trading partner level.
Do one of the following:
- Click Administration to set up a global listening channel and click the
Listening Channel tab.
- Click Partners to set up a trading partner listening channel and click the
Channels tab.
- Do not set up a listening channel if Oracle Supplier Network is used by the
suppliers to send the B2B invoice payload.
When Oracle Supplier Network is used, the only required setup to
communicate with the supplier trading partner is to add a Generic Identifier
on the B2B Server, using the Trading Partner Alias of the supplier as the
value of the identifier. The Trading Partner Alias of suppliers is defined on
the Trading Partners tab of the host company trading partner in the Oracle
Supplier Network. The Generic Identifier entry is added to the Identifiers table
on the Profile tab of the trading partner page.
Save the changes to complete the set up.
4. Set up Oracle Supplier Network for the Host Company if the supplier uses Oracle
Supplier Network to send the B2B invoice payload. To complete the setup, perform
the following:
a. Log in to the Oracle Supplier Network using the registered account.
b. Access Messaging - Communication Parameters and select HTTPS URL
Connection as the Delivery Method.
c. Click Modify to update the delivery method parameter values.
d. Enter the URL of the B2B HTTP receiver. Consult the system administrator if
the value is unknown.
e. Enter the User ID and password for Oracle Supplier Network.
Different values for the Test and Production environments can be specified.
f. Access Messaging - Transaction Management.
Chapter 20
Configure Oracle B2B Inbound Flow to Receive Supplier Invoices in XML
20-22

g. Add the OAG PROCESS_INVOICE_002 document from the list of available
documents if it is not already added.
h. From the Action drop down list, select Receive.
i. From each Delivery Method drop down list (OSN Test Delivery Method and
OSN Production Delivery Method), select HTTPS URL Connection and click
Submit.
j. On the Trading Partners tab, in the Add Trading Partners region, click Add
to add supplier trading partners. It is possible to add all the supplier trading
partners who send invoice payloads to the host company.
5. Set up the B2B Site Code.
For each supplier site that is enabled for B2B communication, the host
company assigns a B2B Site Code to the site and communicates it to the
supplier. Supplier has to provide this B2B Site Code in the invoice payload in
the <PARTNER><PARTNRIDX> element, with <PARTNER><PARTNRTYPE> =
Supplier within the <INVHEADER> element. To assign a B2B Site Code to a
supplier site, navigate to the Manage Suppliers UI in the Fusion application.
Search for the supplier and then open the supplier site. Enter a value into the
B2B Supplier Site Code. Click Save. This code needs to be communicated to the
suppliers manually so that they can include it in their invoice payloads.
To assign a B2B Site Code to a supplier site, do the following:
a. In Oracle Fusion Applications, access Suppliers - Manage Suppliers.
b. Search for the specific supplier and open the relevant supplier site.
c. On the Edit Site tab, in the B2B Trading Partner Information region, enter
the site code (the site code set by the host company in Oracle B2B Server) in
the B2B Supplier Site Code field.
d. Click Save.
Communicate the same site code to the suppliers.
20.6.2 Configure the Supplier
The following configuration steps must be performed by suppliers if they are using
Oracle Supplier Network to send the invoice payload.
1. Log in to the Oracle Supplier Network using the registered account.
2. Navigate to Messaging - Communication Parameters and select HTTPS URL
Connection as the Delivery Method.
3. Click Modify to update the delivery method parameter values.
4. Enter the URL of the B2B HTTP receiver.
5. Enter the User ID and password for Oracle Supplier Network.
Different values for the Test and Production environments can be specified.
6. Navigate to Messaging - Transaction Management.
7. Add the OAG PROCESS_INVOICE_002 document from the list of available
documents if it is not already added.
8. From the Action drop down list, select Send.
Chapter 20
Configure Oracle B2B Inbound Flow to Receive Supplier Invoices in XML
20-23

9. From each Delivery Method drop down list (OSN Test Delivery Method and OSN
Production Delivery Method), select HTTPS URL Connection and click Submit.
10. On the Trading Partners tab, in the Add Trading Partners region, click Add to
add host company trading partner.
20.7 Set Up Oracle B2B to Send Receivables Transactions
in XML
Oracle B2B Server is an Oracle SOA Suite component that manages interactions
between deploying companies and trading partners. Oracle Fusion Receivables
supports an outbound Oracle B2B flow using Oracle B2B Server to send transactions
to customer trading partners in XML format.
The setup of the Oracle B2B flow for Receivables makes use of these existing
elements:
• XML Schema document guideline
• OAG-7.2.1-PROCESS_INVOICE_002-OAG_DEF document definition
• Host trading partner MyCompany
To set up Oracle B2B to send Receivables transactions in XML:
• Configure the host and remote trading partners
• Configure agreements between the host and remote trading partners
20.7.1 Configure Trading Partners
Configure the enterprise as the host trading partner, and all of the customers that
receive XML documents as remote trading partners.
To configure trading partners:
1. Log in to the Oracle B2B Server.
2. Navigate to the Administration page.
3. Click the Document tab.
4. Load the OAG-7.2.1-PROCESS_INVOICE_002-OAG_DEF document definition
file.
5. Click the Types tab.
6. Add a new Internal Identifier with the name B2B Trading Partner Code.
This name matches the field name on the customer account profile.
7. Navigate to the Partners page.
8. In the Partner regional area, select the default host partner MyCompany.
9. If necessary, update the default host partner name to reflect the enterprise.
10. Click the Documents tab.
11. Verify that the OAG-7.2.1-PROCESS_INVOICE_002-OAG_DEF document
definition is assigned to the host trading partner.
12. Ensure that the Sender option is enabled.
Chapter 20
Set Up Oracle B2B to Send Receivables Transactions in XML
20-24

13. In the Partner regional area, click the Add icon.
14. Enter the name of a remote trading partner.
15. Select the Internal Identifier Type B2B Trading Partner Code previously created
and enter the Value for the identifier.
This is the value that entered in the B2B Trading Partner Code field on the
customer account profile of this remote trading partner.
16. Click the Documents tab.
17. Click the Add icon to associate the OAG-7.2.1-PROCESS_INVOICE_002-
OAG_DEF document definition with the remote trading partner.
18. Enable the Receiver option.
19. Click the Channel tab.
20. Define a channel for the remote trading partner.
The channel determines how the XML transaction is delivered to the remote
trading partner from B2B: directly; via the Oracle Supplier Network (OSN), or via a
third party.
If Oracle Supplier Network (OSN) is used to communicate, select the Generic
Identifier and enter the IP Address of the OSN machine.
21. Repeat steps 13 to 20 for each remote trading partner.
20.7.2 Configure Agreements
A trading partner agreement defines the terms that enable two trading partners, the
sender and the receiver, to exchange business documents. The agreement identifies
the trading partners, trading partner identifiers, document definitions and channels.
An agreement consists of two trading partners, the host trading partner and one
remote trading partner, and represents one type of business transaction between
these partners. For example, if the host trading partner MyCompany and the remote
trading partner ABC Solutions regularly exchange both purchase orders and invoices,
then two separate agreements are needed for each document definition.
To configure agreements between the host and remote trading partners:
1. Log in to the Oracle B2B Server.
2. Navigate to the Partners page.
3. In the Agreement regional area, click the Add icon to open a new agreement for
the host trading partner MyCompany.
4. Enter the agreement ID and Name.
5. Enter the agreement parameters.
6. Select the Document Definition OAG-7.2.1-PROCESS_INVOICE_002-OAG_DEF
for this agreement.
7. Select the remote trading partner to include in this agreement.
8. Select the channel for the remote trading partner.
9. Add identifiers for the remote trading partner.
10. Click Save to save the agreement.
Chapter 20
Set Up Oracle B2B to Send Receivables Transactions in XML
20-25

11. Click Validate to validate the agreement.
12. Click Deploy to deploy the agreement.
Deployment is the process of activating an agreement from the design-time
repository to the run-time repository.
13. Repeat steps 3 to 12 for each agreement between the host trading partner and
this remote trading partner.
20.8 Next Steps
If the Fusion Accounting Hub product offering has been installed, go to Complete
Oracle Fusion Applications Accounting Hub Post-Installation Tasks (page 21-1).
Otherwise, go to the section that corresponds to the product offering that is installed.
Chapter 20
Next Steps
20-26

21
Complete Oracle Fusion Applications
Accounting Hub Post-Installation Tasks
This section describes the Oracle Fusion Applications Accounting Hub post-installation
tasks that should be reviewed and completed before starting working with an Oracle
Fusion Applications Fusion Accounting Hub implementation.
This section contains the following topics:
• Set Up the Financial Reporting Center (page 21-1)
• Integrate with Other Products (page 21-1)
• What To Do Next (page 21-3)
21.1 Set Up the Financial Reporting Center
To setup the Financial Reporting Center, follow the steps detailed in Set Up the
Financial Reporting Center (page 20-1).
21.2 Integrate with Other Products
Oracle Fusion Applications provides a coexistence strategy that allows to continue
to use the Oracle E-Business Suite or Oracle PeopleSoft General Ledgers and
subledgers while using Oracle Fusion Applications Accounting Hub for financial
reporting.
21.2.1 Integrate with Oracle E-Business Suite and Oracle PeopleSoft:
Overview
Coexistence includes the ability to transfer balances from the Oracle E-Business Suite
General Ledger and journal entries from Oracle PeopleSoft General Ledger to the
Oracle Fusion Applications Accounting Hub.
For more information on completing the post-installation setup for coexistence with
Oracle E-Business Suite General Ledger see:
• Details in Configuring Oracle Golden Gate to Integrate the E-Business Suite
Ledger with Fusion Accounting Hub on My Oracle Support.
• Define Applications Coexistence Configuration for E-Business Suite in the Oracle
Fusion Accounting Hub Implementation Guide
• Integrating with Oracle Fusion Applications in the Oracle General Ledger
Implementation Guide Release 12.2: This guide contains information about
loading and transferring data from Oracle E-Business Suite to the Oracle Fusion
Applications Accounting Hub.
For more information on completing the post-installation setup for coexistence with
Oracle PeopleSoft General Ledger, see:
21-1

• Define Applications Coexistence Configuration for PeopleSoft in the Oracle Fusion
Accounting Hub Implementation Guide
• Integrating PeopleSoft General Ledger with Oracle Fusion Accounting Hub
inPeopleSoft General Ledger 9.1 Documentation Update
The Oracle Data Integrator (ODI) component (extract file for manual import) is
currently available via My Oracle Support only in note id: 1365971.1.
21.2.1.1 Register Applications Coexistence Instances
Register applications coexistence instances to indicate in Oracle Fusion General
Ledger which Oracle E-Business Suite and Oracle PeopleSoft instances are integrated
with the Oracle Fusion Applications Accounting Hub. A user interface enables to
perform this registration. For each E-Business Suite or PeopleSoft instance, provide a
unique system identifier. This identifier must also be registered in the corresponding
Oracle E-Business Suite or Oracle PeopleSoft instance.
Specify a unique journal source per instance. For Oracle E-Business Suite, limit which
instance and balancing segments may post to a particular Oracle Fusion General
Ledger.
For Oracle E-Business Suite, determine the Function ID to move data from Oracle
Fusion General Ledger to Oracle E-Business Suite General Ledger. Include the
Function ID at the end of the drill down URL that is provided during the registration of
the Oracle E-Business Suite instance.
To find the Oracle E-Business Suite Function ID:
1. Login as a System Administrator and navigate to the Function page.
2. Query for the function name: GL_FUSION_EBS_DRILL.
3. From the Help menu, click Diagnostics, and then click Examine.
4. Select the FUNCTION_ID field. The value box shows the value of the Function ID.
For Oracle E-Business Suite: The URL format for the non-dynamic portion
needs to be in the following format:
http://<domain>:<port>/OAA_HTML/RF.jsp?
function_id=<function_id>
.
In the above URL format, the
domain
,
port
, and
function_id
are for the Oracle
E-Business Suite Instance.
For Oracle PeopleSoft: The URL format for the non-dynamic portion needs to be in the
following format:
http://server/servlet_name/SiteName/PortalName/NodeName/c/
PROCESS_JOURNALS.FUS_DRILLBACK_JRNL.GBL
In the above URL format:
•
http://server/
: Scheme (http or https) and the web server name.
•
servlet_name/
: Name of the physical servlet that the web server invokes to
handle the request.
•
SiteName/
: Site name specified during Oracle PeopleSoft Pure Internet
Architecture setup.
•
PortalName/
: Name of the portal to use for this request.
•
NodeName/
: Name of the node that contains the content for this request.
Chapter 21
Integrate with Other Products
21-2

21.2.2 How to Integrate with Data Relationship Management:
Overview
Oracle Fusion Applications provides integration between Oracle Fusion Applications
Accounting Hub and Oracle Hyperion Data Relationship Management. The integration
is included with Oracle Fusion Applications Accounting Hub, Oracle Hyperion
Data Relationship Management to store corporate charts of accounts values and
hierarchies, and then update this information to both Oracle Fusion Applications
Accounting Hub and the Oracle E-Business Suite General Ledger.
21.2.3 How to Integrate with Hyperion Planning: Overview
For Oracle Cloud implementations, integrate with on-premise Oracle Hyperion
Planning for advanced budgeting by loading actual balances from Oracle Fusion
Applications Accounting Hub to Oracle Hyperion Planning to use the actual data in the
budgeting process. Load also budget data from Oracle Hyperion Planning to Oracle
Fusion Applications Accounting Hub through the Budget Interface to perform budget
variance reporting within Oracle Fusion Applications Accounting Hub.
For other implementations, Oracle Fusion Applications provides integration between
Oracle Fusion Applications Accounting Hub and Oracle Hyperion Planning through
Oracle Financial Data Quality Management ERP Integrator adapter.
21.3 Next Steps
If the Oracle Fusion Human Capital Management product offering has been installed,
go to Complete Oracle Fusion Human Capital Management Post-Installation Tasks
(page 22-1). Otherwise, go to the section that corresponds to the product offering that
is installed.
Chapter 21
Next Steps
21-3

22
Complete Oracle Fusion Human Capital
Management Post-Installation Tasks
This section describes the Oracle Fusion Human Capital Management (Oracle Fusion
HCM) post-installation tasks that should be reviewed and completed before starting
working with an Oracle Fusion HCM implementation.
This section contains the following topics:
• Set Up Oracle Fusion Human Capital Management Coexistence (page 22-1)
• Recommended Memory Requirement for Oracle Fusion Human Capital
Management Workforce Reputation Management Product (page 22-8)
• Create and Update an ISAM Vertex Database (page 22-9)
• What To Do Next (page 22-10)
22.1 Set Up Oracle Fusion Human Capital Management
Coexistence
Oracle Fusion HCM Coexistence functionality enables the integration of the
existing Oracle Human Resource applications with a hosted Oracle Fusion HCM
implementation. As a result of the integration, use Oracle Fusion Workforce
Compensation and Talent Management functionality alongside the existing setup.
Using Oracle Fusion HCM Coexistence, extract, transform, and transport files from
PeopleSoft Enterprise or Oracle E-Business Suite and intelligently synchronize
selected business object data between the source application and Oracle Fusion HCM
applications. Refer to HCM Coexistence: Explained.
Setting up an implementation of Oracle Fusion HCM for Coexistence with an existing
application involves the following procedures.
1. Ensuring that tokens are correctly replaced during Oracle Enterprise Scheduler
Service deployment.
2. Setting up an FTP Server.
3. Setting up FTP Accounts.
4. Setting up SOA FTP Adapter.
5. Setting up Oracle Data Integrator.
6. Configuring the Oracle Web Services Manager for Interaction with the Source
Application Web Services.
7. Setting up the HCM Configuration for Coexistence Parameters.
These procedures set up the connections in the Oracle Fusion environment to work
with the source application. Therefore, set up the connections in the source application
as well. The instructions for configuring the source application are in the following
documents, which are available on My Oracle Support (MOS):
22-1

• Integrating PeopleSoft HRMS 8.9 with Fusion Talent Management and Fusion
Workforce Compensation (Document ID 1480967.1)
• Integrating PeopleSoft HRMS 9.0 with Fusion Talent Management and Fusion
Workforce Compensation (Document ID 1480995.1)
• Integrating PeopleSoft HRMS 9.1 with Fusion Talent Management and Fusion
Workforce Compensation (Document ID 1480996.1)
• HCM Coexistence - Integrating EBS HCM 11i and Fusion Talent Management and
Workforce Compensation (Document ID 1460869.1)
• HCM Coexistence - Integrating EBS HCM R12.1 and Fusion Talent Management
and Workforce Compensation (Document ID 1460868.1)
22.1.1 Prerequisites
Use Oracle Fusion Applications Provisioning to provision a new Oracle Fusion
Applications environment.
In addition to the components installed using Oracle Fusion Applications Provisioning,
Oracle Fusion HCM Coexistence requires the following products to be installed.
• Adobe Reader
• Oracle Application Development Framework Desktop Integration (ADFDi)
• Microsoft Office 2007
22.1.2 Ensure Correct Token Replacement During Oracle Enterprise
Scheduler Service Deployment
Ensure that Oracle Fusion HCM invokes the following services defined in the Oracle
Enterprise Scheduler Service
connections.xml
file for
HcmEssApp
:
•
BulkLoadOdiInvoke
- ODI Agent
•
OdiAgentURLForHCM
- ODI Agent via ODI-ESS bridge
• All entries with the prefix BulkLoad* - HCM product services
Ensure that the service URLs of the entries above are replaced correctly during
deployment. Ensure that the Protocol, Host and Port tokens are assigned valid values
for the application domain.
22.1.3 Set Up an FTP Server
Oracle Fusion Applications Provisioning creates an FTP server and installs Oracle
WebCenter. Ensure that the server is configured on port 20 and 21 and start the
server.
22.1.4 Set Up FTP Accounts
Create two user accounts with read and write access, a generic user account to
configure the FTP adapter and a user specific account for Oracle Fusion Applications.
For example, create user accounts with directory structure and permissions as shown
in the following table.
Chapter 22
Set Up Oracle Fusion Human Capital Management Coexistence
22-2

User/
Usag
e
User
Name
(OS
User)
Password User Home
Directory
Permissions Comments
BPEL/
SOA
<bpel
_user
name>
<bpel_pa
ssword>
/fusion Read and write for
current directory and
child levels only
User account used
with Oracle Fusion
SOA FTP Adapter
configuration.
Custo
mer 1
<cust
omer1
_user
name>
<custome
r1-pswd>
/fusion/
E_<ENTERPRISE_I
D>
Read and write for
current directory and
child levels only
The
<ENTERPRISE_ID>
corresponds to
the Oracle Fusion
Applications ID of
Customer 1. The
user account is used
by the PeopleSoft
Enterprise application
interaction with the
Oracle Fusion SOA/
BPEL process.
22.1.5 Set Up SOA FTP Adapter
Set up the following parameters of the SOA FTP adapter.
• Set the FTP server
hostname
in the FTP adapter connections properties file
weblogic-ra.xml
• Set the FTP server operating system user name and password
To set the FTP server
hostname
and set the FTP server operating system user name
and password in the FTP adapter connections property file, do the following:
1. Access
FtpAdapter.rar
which is available in the Oracle_SOA1 directory structure
on Oracle Weblogic Server (WLS) HcmDomain server file system.
2. Extract and save the
META-INF/weblogic-ra.xml
file to a temporary location.
3. Update the
META-INF/weblogic-ra.xml
file with appropriate values for the
following connection properties:
•
<wls:jndi-name>eis/Ftp/FtpAdapter</wls:jndi-name>
•
<wls:name>host</wls:name>
<wls:value>ftpServerHostName</wls:value>
•
<wls:name>username</wls:name>
<wls:value>ftpUserName</wls:value>
•
<wls:name>password</wls:name>
<wls:value>ftpUserPswd</wls:value>
4. Create an additional copy of
FtpAdapter.rar
.
5. Update
FtpAdapter.rar
with the updated
META-INF/weblogic-ra.xml
file. Run
the following command:
Chapter 22
Set Up Oracle Fusion Human Capital Management Coexistence
22-3

zip -ur /<path>/Oracle_SOA1/soa/connectors/FtpAdapter.rar META-INF/weblogic-
ra.xml
6. Bounce the WLS HcmDomain.
22.1.6 Set Up Oracle Data Integrator
This section describes the prerequisites and steps required for setting up Oracle Data
Integrator.
22.1.6.1 Prerequisites
Before setting up Oracle Data Integrator, ensure to complete the following:
• Oracle Data Integrator code is loaded using XML Import into a copy of the central
template repository (id:500) using the FUSION_ODI schema.
• Topology entries are coming from the central template repository.
• Work repository (jdbc) is configured automatically to match the installation.
• Topology Java DataBase Connectivity (JDBC) entries for the database are
configured automatically to match the installation.
• Installation uses the default FUSION and FUSION_ODI_STAGE schemas.
• Schemas FUSION and FUSION_ODI_STAGE are installed in the same database.
• The Oracle Data Integrator repository is in the same database as FUSION
(schema: FUSION_ODI).
• Default context Development is used.
• Oracle Data Integrator console is available for configuration of the topology.
22.1.6.2 Set Up Oracle Data Integrator for Oracle Fusion Human Capital
Management Coexistence
To set up Oracle Data Integrator for Oracle Fusion HCM Coexistence, complete the
following procedures.
1. Create Oracle Data Integrator directories.
2. Validate Oracle Data Integrator topology settings.
3. Verify the configuration of the work repository.
4. Verify database connections.
5. Configure file technology connections.
22.1.7 Create Oracle Data Integrator Directories
Create manually and specify the directories and files to which Oracle Data Integrator
has read and write access.
• For each enterprise, create an enterprise folder in the work directory.
• For the operating system user of the Oracle Data Integrator agent, create or
specify directories for the items listed in the following table for Oracle Data
Integrator use. The users must have full read and write access to the directories.
Chapter 22
Set Up Oracle Fusion Human Capital Management Coexistence
22-4

Oracle Data
Integrator Directory
Name
Item Description Example Values
FILE_ROOT_HCM Oracle Data Integrator base work directory /home/
ODI_ROOT_DIRECT
ORY
FILE_OUTPUT_HCM Oracle Data Integrator export work directory /home/
ODI_ROOT_DIRECT
ORY/export
N/A
Enterprise directory name, where
<eid>
is the
numeric enterprise id
/home/
ODI_ROOT_DIRECT
ORY/E_<eid>
While creating the directory, ensure that the owner of the directory and the operating
user of the Oracle Data Integrator agent are the same. The directory should be
accessible from the Oracle WebLogic Server domain that runs the Oracle Data
Integrator agent and the SOA process.
22.1.8 Validate the Topology Settings
After the directories have been created, use either Oracle Data Integrator Studio
or Oracle Data Integrator Repository Explorer to validate the Oracle Data Integrator
topology settings.
Configure or validate the following:
• Work repository connection
• Oracle technology (database) connections
• File technology connections
Use JDBC connection and credentials to validate and ensure that the connections
refer to the correct database.
22.1.9 Verify the Configuration of the Work Repository
Use Oracle Data Integrator Studio to verify the work directories and repository
configuration.
1. Navigate to Topology, then Repositories, and then Work Repositories.
2. Double-click FUSIONAPPS_WREP.
3. Verify that the work repository (jdbc URL) points to the Oracle Fusion Applications
database.
22.1.10 Verify Database Connections
Verify that the JDBC data server URLs point to the Oracle Fusion Applications
database.
1. Navigate to Topology, then Physical Architecture, and then Oracle.
2. Double-click the ORACLE_FUSION data server.
Chapter 22
Set Up Oracle Fusion Human Capital Management Coexistence
22-5

3. On the Definitions page, verify that the Connection User is
FUSION_ODI_STAGE.
4. Enter the password.
5. In the Instance/db link (Data Server) field, enter the instance for the Oracle
Fusion Applications database.
Use the following format if the instance name is not registered with the
Transparent Network Substrate (TNS) service:
<host>:<port>/<instance_name>
.
If the instance name is registered with the TNS service, specify only the instance
name.
6. Click JDBC.
7. Ensure that the URL in the JDBC URL field points to the Oracle Fusion
Applications database.
8. Expand and open the child schema: ORACLE_FUSION.FUSION.
9. Ensure that the Default box is selected.
10. Verify that FUSION is entered as the value in the Schema field.
11. Verify that FUSION_ODI_STAGE is entered as the value in the Work Schema
field.
Perform the same steps for the ORACLE_WORK_HCM data server. However, ensure
that the value of both the schema and the work schema is FUSION_ODI_STAGE.
22.1.11 Configure File Technology Connections
The ODI work directories previously defined now need to be configured in the topology
so that ODI can make use of them.
Using ODI Studio, configure files in topology.
1. Navigate to Topology, then Physical Architecture - File.
2. Double-click FILE_ROOT_HCM.
3. Verify that the value of JDBC Driver is com.sunopsis.jdbc.driver.file.FileDriver.
4. Verify that the value of JDBC URL is jdbc:snps:dbfile.
5. Expand and open the child physical schema.
6. For Directory (Schema), provide the directory path defined for
FILE_ROOT_HCM.
7. Provide the same value for Directory (Work Schema).
8. Ensure that the Default box is selected.
Use the same steps to configure FILE_OUTPUT_HCM using the directory path for
FILE_OUTPUT_HCM instead of FILE_ROOT_HCM.
22.1.12 Enable SQL*Loader for Oracle Data Integrator
Oracle Fusion HCM Coexistence Oracle Data Integrator uses SQL*Loader to import
file data. Use the SQL*Loader in Oracle Data Integrator from the Oracle Weblogic
Server environment to perform the following steps.
Chapter 22
Set Up Oracle Fusion Human Capital Management Coexistence
22-6

1. Determine the directory where the Oracle client software is installed for the
deployment. The default name is
DBCLIENT
and it is placed in the parent directory
of MW_HOME. Refer to this directory as
DBCLIENT ORACLE_HOME
.
2. Verify the existence of
DBCLIENT ORACLE_HOME/bin/sqlldr
.
3. Change the directory to ODI ORACLE_HOME
/bin
.
4. Create a script named
sqlldr
that contains the following:
#!/bin/sh
ORACLE_HOME=<DBCLIENT ORACLE_HOME>
export ORACLE_HOME
$ORACLE_HOME/bin/sqlldr $*
#
5. Make the script executable using the following command.
chmod +x sqlldr
22.1.13 Configure the Oracle Web Services Manager for Interaction
with the Source Application Web Services
Configure the Oracle Web Services Manager certificate key with the user credentials
for a Simple Object Access Protocol (SOAP) interaction with the source application
Web services.
The user credentials correspond to the source application user with entitlement to
invoke the source application Web service.
1. Log in to the Enterprise Manager Console as a Weblogic_Administrator user.
2. Access HcmDomain under the Weblogic Domain.
3. Open Security - Credentials.
4. Access and expand the key map oracle.wsm.security.
5. Click Credential Key to search for the key
FUSION_APPS_HCM_HR2HR_APPLOGIN-
KEY
.
6. Click Edit to update the credentials.
7. Set the user name and password of the source application user.
22.1.14 Set up the HCM Configuration for Coexistence Parameters
After the FTP and Oracle Data Integrator directory paths have been created, set up
the related parameters in Oracle Fusion HCM.
1. Log in to Oracle Fusion Applications.
MANDATORY: The Oracle Fusion Applications user must have the appropriate
roles to set up and configure Oracle Fusion applications. At least, ensure
that the user is assigned the View All data role for the HCM Application
Administrator job role. For details on setting up implementation users, see Define
Implementation Users in the Oracle Fusion Applications Coexistence for HCM
Implementation Guide.
2. Go to Navigator - Tools - Setup and Maintenance and perform the following
tasks:
Chapter 22
Set Up Oracle Fusion Human Capital Management Coexistence
22-7

a. Find and initiate the Manage HCM Configuration for Coexistence task to
bring up the Manage HCM Configuration for Coexistence parameters page.
b. Set up the following parameters.
Parameter Description
On Demand FTP
Root Directory
Mounted root directory of the server
ODI Context The logical name for the group containing logical-to-physical
mappings for connections in Oracle Data Integrator. The default
value in Oracle Data Integrator is DEVELOPMENT.
This value is case sensitive. Therefore, ensure that it is
completely uppercase.
ODI User The Oracle Data Integrator user name
ODI Password The password associated with the Oracle Data Integrator user
name
ODI Work
Repository
The repository that contains the Oracle Data Integrator related
code definitions. The default value in Oracle Data Integrator is
FUSIONAPPS_WREP
.
ODI Root Directory The local directory where Oracle Data Integrator processes files
and creates work and log files. It is the directory path defined
for
FILE_ROOT_HCM
, when creating the Oracle Data Integrator
directories.
It is possible now to implement Oracle Fusion Talent and Oracle Fusion Workforce
Compensation using the Coexistence for HCM offering, available from the Setup and
Maintenance work area of Oracle Fusion Applications.
22.2 Recommended Memory Requirement for Oracle
Fusion Human Capital Management Workforce Reputation
Management Product
This section is only applicable to use the Oracle Fusion HCM Workforce Reputation
Management product packaged with the Workforce Deployment, or Workforce
Development product offerings. To provision an environment with these two product
offerings, see Select Product Offerings (page 12-2).
The physical machine hosting Oracle Fusion HCM Workforce Reputation Management
(WorkforceReputationServer_1) Managed Server must have a minimum of 24 GB of
memory. Allocate 8 GB of memory to the Oracle Fusion HCM Workforce Reputation
Management (WorkforceReputationServer_1) Managed Server. The Oracle Fusion
HCM Workforce Reputation Management externalization process may use up to 16
GB of memory.
To specify memory allocation for the Oracle Fusion HCM Workforce Reputation
Management (WorkforceReputationServer_1) Managed Server:
1. Edit the
fusionapps_start_params.properties
file located under
APPLICATIONS_CONFIG/domains/<host>/HCMDomain/config
, by replacing the line:
fusion.HCMDomain.WorkforceReputationCluster.default.minmaxmemory.main=
-Xms512m -Xmx2048
Chapter 22
Recommended Memory Requirement for Oracle Fusion Human Capital Management Workforce Reputation Management
Product
22-8

with
fusion.HCMDomain.WorkforceReputationCluster.default.minmaxmemory.main=
-Xms4096m -Xmx8192m
2. Save the
fusionapps_start_params.properties
file.
3. Restart Oracle Fusion HCM Workforce Reputation Management
(WorkforceReputationServer_1) managed server either from the WebLogic
console or Enterprise Management for the Oracle Fusion HCM domain.
See Perform Basic Administrative Tasks in the Oracle Fusion Applications
Administrator's Guide.
22.3 Create and Update an ISAM Vertex Database
To successfully run the US or Canadian Payroll, create an Indexed Sequential Access
Method (ISAM) database using the data file provided by Vertex. Once the ISAM
database is created, process the data file each month to maintain accurate payroll
results. Vertex makes the data file available on a monthly basis.
22.3.1 Create and Update an ISAM Database for Microsoft Windows
To create the ISAM database for Applications running on Windows, follow these
instructions.
1. In the
environment.properties
file, ensure that the $VERTEX_TOP variable is
set for the appropriate environment.
2. Copy the utility and library files under $VERTEX_TOP
/utils
and $VERTEX_TOP
/lib
and place them in a Windows local directory, such as
C:\Vertex_Util-Lib
.
3. Copy the latest Vertex data file (
qfpt.dat
) to the local directory used to create the
ISAM database, such as
C:\Vertex_Data
.
4. From the local directory containing the utilities and library files (in this case
C:\Vertex_Util-Lib
), run
cbmaint
.
5. On the installer screen, select Create Database and Payroll Tax Database.
6. Provide the local directory path used to create the ISAM database (in this case,
C:\Vertex_Data
). The ISAM database files get created in this directory.
7. From the local directory containing the utilities and library files (in this case
C:\Vertex_Util-Lib
), run
vprtmupd
to populate the ISAM database files.
8. On the Installer screen, select Update Payroll Tax Database.
9. Provide the local directory path where the Vertex data file
qfpt.dat
is available (in
this case
C:\Vertex_Data
).
10. Provide the directory path where ISAM database was created (in this case
C:\Vertex_Data
). The ISAM database files residing in this directory get updated.
The update process takes some time.
11. Backup the database file and the related files under $VERTEX_TOP
/data
, if any,
in case there is a need to revert to the earlier ISAM database.
12. Copy the ISAM database files and all related files from the local directory (in this
case
C:\Vertex_Data
), and place then under $VERTEX_TOP
/data
.
Chapter 22
Create and Update an ISAM Vertex Database
22-9

13. Provide users with complete permissions to all files under $VERTEX_TOP
/data
.
The ISAM database is available for use by the US Payroll application and the
Canadian Payroll application.
22.3.2 Create and Update an ISAM Database for UNIX
To create the ISAM database for application running on UNIX, follow these
instructions.
1. Set the environment variable
LD_LIBRARY_PATH
as the value of $VERTEX_TOP
/
lib
.
2. Backup the database file and the related files under
$VERTEX_TOP/data
, if any, in
case there is a need to revert to the earlier ISAM database.
3. Copy the latest Vertex data file (
qfpt.dat
) to
$VERTEX_TOP/data
.
4. From $VERTEX_TOP
/utils
, run
cbmaint
.
5. On the installer screen, select Create Database and Payroll Tax Database.
6. Provide the directory path used to create the ISAM database (in this
case $VERTEX_TOP
/data
). The ISAM database files get created in this directory.
7. From the $VERTEX_TOP
/utils
, run
vptmupd
to populate the ISAM database
files.
8. On the Installer screen, select Update Payroll Tax Database.
9. Provide the directory path where the Vertex Data file
qfpt.dat
is available (in this
case $VERTEX_TOP
/data
).
10. Provide the directory path where ISAM database was created (in this
case $VERTEX_TOP
/data
). The ISAM database files residing in this directory
get updated. The update process takes some time.
11. Provide users with complete permissions ot all files under $VERTEX_TOP
/data
.
The ISAM databse is available for use by the US Payroll application and the Canadian
Payroll application.
22.4 Next Steps
If the Oracle Fusion Incentive Compensation product offering has been installed, go to
Complete Oracle Fusion Incentive Compensation Post-Installation Tasks (page 23-1).
Otherwise, go to the section that corresponds to the product offering that is installed.
Chapter 22
Next Steps
22-10

23
Complete Oracle Fusion Incentive
Compensation Post-Installation Tasks
This section describes the Oracle Fusion Incentive Compensation post-installation
tasks that should be reviewed and completed before starting working with an Oracle
Fusion Incentive Compensation implementation.
This section contains the following topics:
• Integrate Oracle Fusion Incentive Compensation with Geo Map Server (page 23-1)
• What to Do Next (page 23-2)
23.1 Integrate Oracle Fusion Incentive Compensation with
Geo Map Server
Oracle Fusion Incentive Compensation uses the functionality provided by the Geo Map
server. Depending on the network connectivity where the application is installed and
the available support for integration, it might be necessary to modify the MapViewer
and GeoMapViewer connections.
Connect to the Geo Map server provided by Oracle.
If the firewall on the network blocks HTTP connections, the map server cannot be
accessed.
To use a preferred map server or any other map server that is available on premise
or on another network, modify certain Oracle Application Development Framework
(Oracle ADF) connection properties for MapViewer and GeoMapViewer.
1. Log in to Oracle Enterprise Manager Fusion Applications Control.
2. In the left pane, navigate to Oracle Fusion Incentive Compensation, then
Fusion Applications, then IncentiveCompensationApp and click the server to
modify the ADF connection properties.
3. At the top of the page, from the Fusion J2EE Application context menu, select
ADF, then select Configure ADF Connections.
4. On the ADF Connections Configuration page, go to the URL Connections
section.
5. Select the MapViewerURL connection name and click Edit.
6. In the URL field, replace the default URL with the URL or location information of
the preferred map server and click OK.
7. Repeat the steps to modify the URL for the GeoMapViewer connection name.
23-1

23.2 Next Steps
If an Oracle Fusion Project Portfolio Management product offering has been installed,
go to Complete Oracle Fusion Project Portfolio Management Post-Installation Tasks
(page 24-1). Otherwise, go to the section that corresponds to the product offering that
is installed.
Chapter 23
Next Steps
23-2

24
Complete Oracle Fusion Project Portfolio
Management Post-Installation Tasks
This section describes the Oracle Fusion Project Portfolio Management post-
installation tasks that should be reviewed and completed before starting working with
an Oracle Fusion Project Portfolio Management implementation.
This section contains the following topics:
• View Summarized Revenue and Invoice Amounts After Data Migration (page 24-1)
• What to Do Next (page 24-1)
24.1 View Summarized Revenue and Invoice Amounts After
Data Migration
Run the Update Project Contract Performance Data process to display summarized
revenue and invoice amounts after migrating revenue and invoice data from existing
applications to Project Financial Management applications.
24.2 Next Steps
If the Oracle Fusion Supply Chain Management product offering is installed, go
to Complete Oracle Fusion Supply Chain Management Post-Installation Tasks
(page 25-1). Otherwise go to What To Do Next (page 26-1) to complete the
required functional and implementation tasks before starting using the Oracle Fusion
Applications setup.
24-1

25
Complete Oracle Fusion Supply Chain
Management Post-Installation Tasks
This section describes the Oracle Fusion Supply Chain Management post-installation
tasks that should be reviewed and completed before starting working with an Oracle
Fusion Supply Chain Management implementation.
This section contains the following topics:
• Install Oracle Enterprise Data Quality for Product Data Oracle DataLens Server
(page 25-1)
• What to Do Next (page 25-2)
25.1 Install Oracle Enterprise Data Quality for Product Data
Oracle DataLens Server
Oracle Enterprise Data Quality for Product Data is built on industry-leading DataLens
Technology to standardize, match, enrich, classify, and correct product data from
different sources and systems. For Oracle Fusion Product Hub to use Oracle
Enterprise Data Quality for Product Data features, establish a connection between
them.
For more information on installing and using Oracle Enterprise Data Quality for
Product Data Oracle DataLens Server, see Preparing for Installation in the Oracle
Enterprise Data Quality for Product Data Oracle DataLens Server Installation Guide.
For more information on implementation, see Getting Started in the Oracle Enterprise
Data Quality for Product Data R12 PIM Connector Installation Guide.
25.1.1 Establish a Connection
After installation, use the Oracle Enterprise Manager to establish or modify the
connection with the Oracle DataLens Server.
1. Log in to an Oracle Fusion Middleware farm using Oracle Enterprise Manager
Fusion Applications Control.
2. Expand the Fusion Applications node under Oracle Fusion Supply Chain
Management.
3. Right-click the application for which a connection will be established, for example,
ProductManagementApp.
4. Select ADF, then Configure ADF Connections from the menu.
5. On the ADF Connections Configuration page, set the connection type as
URL
and
the connection name as
DSAServerURL
.
6. Click Create Connection. The added connection appears under URL
Connections.
25-1

7. Under URL Connections, select Edit
DSAServerURL
and provide the URL for
Oracle DataLens Server.
For example, the SOA Common Properties Server URL with
/datalens
appended
to the URL such as
http://<host name>:port/datalens
.
8. Click OK.
9. Click Apply.
10. Set connections for ProductManagementCommonApp and ScmEssApp
applications using Step 3 to Step 10.
11. For the changes to take effect, restart the Product Management, SCM Common,
and ESS servers from the Weblogic Admin Console.
25.2 Next Steps
Go to What To Do Next (page 26-1) which describes the next steps to be completed.
Chapter 25
Next Steps
25-2

26
Next Steps
This section describes implementation and functional tasks that must be completed
before starting using an Oracle Fusion Applications setup.
This section contains the following topics:
• Manage User Passwords for Login Access to Applications Components
(page 26-1)
• Complete Common User Setup Tasks (page 26-1)
• Enable Product Offering Functionality (page 26-1)
• Troubleshoot Tips for Runtime Issues (page 26-1)
• (Optional) Install Oracle Enterprise Manager Cloud Control (page 26-3)
26.1 Manage User Passwords for Login Access to
Applications Components
For complete information about setting up and managing passwords for the new
environment, see Secure Oracle Fusion Applications and Provision of Identities in the
Oracle Fusion Applications Administrator's Guide.
26.2 Complete Common User Setup Tasks
For complete information about completing common user setup tasks needed to
create an implementation project, optionally create initial implementation users, and
set up the basic enterprise structure needed for implementing any and all Oracle
Fusion Applications offerings see the Getting Started with Oracle Fusion Applications:
Common Implementation posted on My Oracle Support (Doc ID 1387777.1).
26.3 Enable Product Offering Functionality
Before starting using any of the product offerings already installed, complete some
common implementation tasks and enable the functionality of the offerings in the
environment.
A large library of product-related documentation is available for use after provisioning.
See Overview in the Oracle Fusion Functional Setup Manager User's Guide. See also
the product-specific Oracle Fusion Applications implementation guides.
26.4 Troubleshoot Tips for Runtime Issues
Follow the instructions detailed in this section for resolving known runtime issues.
26-1

26.4.1 OutOfMemory Error Due to PermGen Space (Solaris)
Problem: An OutOfMemoryError due to PermGen space is reported on the
SCMCommon WebLogic Managed Server in the Oracle Fusion Supply Chain
Management domain for the Solaris x64 or Solaris Sparc platform.
Solution for Solaris x64
Perform the following steps to resolve this issue on the Solaris x64 platform.
1. Check the cluster name for the managed server where the PermGen exception is
reported. The cluster name can be found from the Administration Server console
for the Oracle Fusion Supply Chain Management domain.
2. Edit the $DOMAIN_HOME
/config/fusionapps_start_params.properties
file by
performing the following steps.
a. Identify the key/value pair which is
fusion.SCMCommonCluster.SunOS-
i386.memoryargs
in
fusionapps_start_params.properties
.
b. Duplicate the entire line containing the key/value pair of
fusion.SCMCommonCluster.SunOS-i386.memoryargs
and add this as a new
line in
fusionapps_start_params.properties
.
c. Comment the original line by adding a '#' at the beginning of the line.
d. For the line added in Step b, change the default value in
fusion.SCMCommonCluster.SunOS-i386.memoryargs
by replacing 512m with
756m. This is what it should look like:
fusion.SCMCommonCluster.SunOS-i386.memoryargs=-XX:PermSize=256m
-XX:MaxPermSize=756m -XX:+UseParallelGC -
XX:+HeapDumpOnOutOfMemoryError -XX:HeapDumpPath=@HEAP_DUMP_PATH@
-XX:+ParallelGCVerbose -XX:ReservedCodeCacheSize=128m -
XX:+UseParallelOldGC -XX:ParallelGCThreads=4
e. Bounce the Managed Server.
An example for
SCMCommonServer_1
for Solaris x64 follows.
1.
SCMCommonCluster
is the cluster name for
SCMCommonServer_1
.
2. Add the following entry:
fusion.SCMCommonCluster.SunOS-i386.memoryargs=-XX:PermSize=256m
-XX:MaxPermSize756m -XX:+UseParallelGC
-XX:+HeapDumpOnOutOfMemoryError
-XX:HeapDumpPath=path_for_heap_dump -XX:+ParallelGCVerbose
-XX:ReservedCodeCacheSize=128m -XX:+UseParallelOldGC
-XX:ParallelGCThreads=4
In this example, the entry for
fusion.default.SunOS-i386.memoryargs
is already
correct.
Solution for Solaris Sparc
Perform the following steps to resolve this issue on the Solaris Sparc platform.
Chapter 26
Troubleshoot Tips for Runtime Issues
26-2

1. Check the cluster name for the managed server where the
PermGen
exception is
reported. The cluster name can be found from the Administration Server console
for the Oracle Fusion Supply Chain Management domain.
2. Edit the $DOMAIN_HOME
/config/fusionapps_start_params.properties
file by
performimg the following steps.
a. Identify the key/value pair which is
fusion.SCMCommonCluster.SunOS-
sparc.memoryargs
in
fusionapps_start_params.properties
.
b. Duplicate the entire line containing the key/value pair of
fusion.SCMCommonCluster.SunOS-sparc.memoryargs
and add this as a new
line in
fusionapps_start_params.properties
.
c. Comment the original line by adding a '#' at the beginning of the line.
d. For the line added in Step b, change the default value in
fusion.SCMCommonCluster.SunOS-sparc.memoryargs
by replacing 512m with
756m. This is what it should look like:
fusion.SCMCommonCluster.SunOS-sparc.memoryargs=-XX:PermSize=256m
-XX:MaxPermSize=756m -XX:+UseParallelGC -
XX:+HeapDumpOnOutOfMemoryError -XX:HeapDumpPath=@HEAP_DUMP_PATH@
-XX:+ParallelGCVerbose -XX:ReservedCodeCacheSize=128m -
XX:+UseParallelOldGC -XX:ParallelGCThreads=4
e. Bounce the Managed Server.
An example for
SCMCommonServer_1
for Solaris Sparc follows.
1.
SCMCommonCluster
is the cluster name for
SCMCommonServer_1
.
2. Add the following entry:
fusion.SCMCommonCluster.SunOS-sparc.memoryargs=-XX:PermSize=256m
-XX:MaxPermSize756m -XX:+UseParallelGC
-XX:+HeapDumpOnOutOfMemoryError
-XX:HeapDumpPath=path_for_heap_dump -XX:+ParallelGCVerbose
-XX:ReservedCodeCacheSize=128m -XX:+UseParallelOldGC
-XX:ParallelGCThreads=4
In this example, the entry for
fusion.default.SunOS-sparc.memoryargs
is already
correct.
26.5 (Optional) Install Oracle Enterprise Manager Cloud
Control
Oracle Enterprise Manager Cloud Control (Cloud Control) is a system management
software that delivers centralized monitoring, administration, and life cycle
management functionality for the complete Oracle Fusion Applications IT infrastructure
from one single console. For example, monitor all the Oracle WebLogic Server
domains for all the product families from one console.
See Installing Oracle Enterprise Manager Cloud Control in the Oracle Enterprise
Manager Cloud Control Basic Installation Guide and Getting Started in the Oracle
Chapter 26
(Optional) Install Oracle Enterprise Manager Cloud Control
26-3

Enterprise Manager Cloud Control Advanced Installation and Configuration Guide for
information about Cloud Control installation.
Chapter 26
(Optional) Install Oracle Enterprise Manager Cloud Control
26-4

27
Extend an Oracle Fusion Applications
Environment Using Incremental
Provisioning During Upgrade
This section describes the process of extending an Oracle Fusion Applications
environment using incremental provisioning when upgrading from a prior release as
part of the upgrade process. For more information about upgrading from a prior
release of Oracle Fusion Applications, see Introduction to Oracle Fusion Applications
Upgrade in the Oracle Fusion Applications Upgrade Guide.
Incremental provisioning gives the ability to extend an Oracle Fusion Applications
environment during the upgrade, by adding product offerings that are not already
present. Add product offerings that are available for selection in the Provisioning
Wizard, including those introduced in a later release.
To use incremental provisioning, an existing Oracle Fusion Applications environment
created from a prior release is necessary. This environment is used for upgrading to
the current release.
Use incremental provisioning if the Oracle Fusion Applications environment is a
bare metal environment. This means that the environment was created by using the
Provisioning Wizard from a prior release where the product offerings were selected
and the Oracle Fusion Applications provisioning process described in the guide for that
release was followed.
For example: To upgrade from Release 11 to 12, the Provisioning Wizard must
have been used to select the product offerings and the Oracle Fusion Applications
provisioning process, described in this guide, must have been followed to create the
environment for Release 11.
Use incremental provisioning if the Oracle Fusion Applications environment is created
from Oracle Fusion Applications Oracle VM templates of a prior release and to add
product offerings during upgrading to this release. The available selection of product
offerings are the ones newly introduced up to this release (excluding any that already
existing in the OVM environment).
For more information about the list of product offerings included in each of the Oracle
Fusion Applications Oracle VM templates, see Introduction to Oracle VM Installation
in the the Oracle Fusion Applications Installing and Managing in an Oracle VM
Environment Guide.
Incremental provisioning cannot be performed for an Oracle Fusion Applications
environment created in a current release. This means that an Oracle Fusion
Applications environment cannot be provisioned for Release 12, and then decide to
perform incremental provisioning to add product offerings that were not selected using
the provisioning repository from the same release.
During the upgrade from a prior release to Release 12, if the environment meets
one of the conditions described in Conditions for manually performing the incremental
provisioning task during the incremental provisioning pause point to add the FOS
27-1

offering (page 27-2), then perform the incremental provisioning task manually during
the incremental provisioning pause point to add the FOS offering. If none of the
conditions are true, then skip the incremental provisioning task. For more information
about incremental provisioning pause point, see Pause Point 6 - Perform Incremental
Provisioning in the Oracle Fusion Applications Upgrade Guide.
Conditions for manually performing the incremental provisioning task during the
incremental provisioning pause point to add the FOS offering:
• Bare Metal environments: The Provisioning Wizard has been run to select product
offerings and provision the environment on several hosts. The environment
contains any one of these product offerings: Product Management, Order
Orchestration, or Material Management and Logistics from Supply Chain
Management, or Procurement from Financials.
• Oracle VM environments: An environment has been created from one of the
Oracle Fusion Applications Oracle VM templates not managed by Oracle Cloud
and the Oracle VM template used is GSI (available since 11 g Release 7
(11.1.7) or FSCMH (Financial, Supply Chain Management and Human Capital
Management, available prior to 11 g Release 6 (11.1.6). If an HCM or CRM
template is used, see Verify Environment Before Proceeding to Downtime in the
Oracle Fusion Applications Upgrade Guide.
Bare Metal: An environment that does not include any software. In the context of
Oracle Fusion Applications, this means a supported version of operating system must
be installed in order for the computer system to be functional prior to provisioning
Oracle Fusion Applications.
Oracle VM: An environment running on virtual servers. In the context of Oracle Fusion
Applications, the supported virtualization technology is Oracle VM Manager. Installing
an Oracle Fusion Applications Oracle VM template creates multiple Oracle VM servers
running a version of Linux operating system that comes with the Oracle VM template
on the virtual servers.
As described in Oracle WebLogic Server Domains (page 2-39), incremental
provisioning is capable of creating a single Managed Server instance within a
cluster. It does not provide scale out capability such as creating multiple Managed
Server instance within a cluster. After incremental provisioning is complete, scale out
Oracle Fusion Middleware components, such as Oracle HTTP Server and Oracle
SOA Suite, and product domains, such as Oracle Fusion Customer Relationship
Management domain, Oracle Fusion Common domain, Oracle Fusion Human Capital
Management domain, and so on. For more information about scaling out capabilities,
see Complete Conditional Common High Availability Post-Installation Tasks for Oracle
Identity Management (page 17-1) and Complete Conditional Common High Availability
Post-Installation Tasks for Oracle Fusion Applications (page 18-1).
This section includes the following topics:
• Introduction to Extending an Oracle Fusion Applications Environment Using
Incremental Provisioning During Upgrade (page 27-3)
• Create an Extended Provisioning Response File (page 27-3)
• Perform Incremental Provisioning (page 27-10)
• Troubleshoot Incremental Provisioning (page 27-11)
• What To Do Next (page 27-13)
Chapter 27
27-2

27.1 Introduction to Extending an Oracle Fusion
Applications Environment Using Incremental Provisioning
During Upgrade
Oracle Fusion Applications Provisioning orchestrates the physical installation and
configuration of the product offerings selected and deploys those offerings and their
dependent middleware components to a predetermined Oracle WebLogic Server
Domain. To perform the installation tasks, Provisioning requires the provisioning
repository of installers, the provisioning framework, and a response file.
When incremental provisioning is used to extend an existing Oracle Fusion
Applications environment running a prior release, provisioning also requires the
provisioning repository of installers, the provisioning framework, and a response file.
During the upgrade process, Upgrade Orchestrator installs the provisioning framework
by the time upgrade reaches a pause point if the
PERFORM_INCREMENTAL_PROVISIONING
property is set to true in the
pod.properties
file. At this time, proceed with creating an
extended provisioning response file to be used by incremental provisioning.
The incremental provisioning process consists of the following two tasks:
• Creating an Extended Provisioning Response File
An extended provisioning response file contains the same provisioning response
when the Oracle Fusion Applications environment is initially provisioned, and any
additional information provisioning needs to extend the Oracle Fusion Applications
product offerings selected to be added. Instead of entering the same information
again, incremental provisioning introspects the existing Oracle Fusion Applications
environment and creates the extended provisioning response file. See Create an
Extended Provisioning Response File (page 27-3).
• Performing Incremental Provisioning
See Perform Incremental Provisioning (page 27-10).
27.2 Create an Extended Provisioning Response File
To create an extended provisioning response file, start the Provisioning Wizard and
select the Create a Response File for Extending an Existing Fusion Application
Environment option.
Complete the wizard interview screens and save the response file in a location that is
accessible to the various installers. Record the location, as it must be supplied when
performing incremental provisioning. Note that the extended provisioning response
file should be created on the Primordial host, which is the host that contains the
Administration Server of the Common domain.
When a response file is created, chose a provisioning configuration and incremental
provisioning then takes through a series of interview screens to specify the
configuration details for the product offerings and their dependent middleware
components. Save the response file and specify its location when it is ready to be
used to provision a new environment.
Chapter 27
Introduction to Extending an Oracle Fusion Applications Environment Using Incremental Provisioning During Upgrade
27-3

Currently updating an extended response file is not supported. To make changes to
the extended provisioning response file, re-create an extended provisioning response
file.
MANDATORY: Select only the Create a Response File for Extending an Existing
Fusion Application Environment option during upgrade and follow the Upgrade
Orchestration flow.
27.2.1 Before Starting the Provisioning Wizard
Confirm the following before starting incremental provisioning.
• Ensure that the existing Oracle Fusion Applications environment to be extended is
active and running correctly.
• Ensure to complete the required upgrade tasks, including backing up the Oracle
Fusion Applications environment as part of the upgrade process and are ready
to extend the environment. For more information about backing up during
the upgrade process, see Back Up Fusion Applications in the Oracle Fusion
Applications Upgrade Guide.
• To add new provisioning host(s) to the environment, ensure the host(s) is/are
prepared as described in Prepare for an Installation (page 5-1).
27.2.2 Start the Provisioning Wizard
The Provisioning Wizard supports the following command line options:
Table 27-1 Provisioning Wizard Command Line Options
Command Line Option Description Default Value
-invPtrLoc [inventory
pointer file name]
Location of the
oraInst.loc
file.
/etc/
oraInst.loc
-
ignoreSysPrereqs
[true|false]
Disables validation for database, schema
and hosts. Most validation errors will be
ignored.
Note:
-ignoreSysPrereqs true
is the
same as
-ignoreSysPrereqs
with no
value specified.
false
-help
Displays help text.
Usage:
provisioningWizard.sh -invPtrLoc <inventory pointer location file>
-ignoreSysPrereqs {true|false}
-help
To start the Provisioning Wizard, do the following on the primordial host:
1. Set the
JAVA_HOME
environment variable to point to the JDK location in the
provisioning repository, for example:
UNIX:
Chapter 27
Create an Extended Provisioning Response File
27-4

export
JAVA_HOME
=
repository_location
/
jdk
export
PATH
=$
JAVA_HOME/bin:$PATH
This environment variable is not required while creating a response file. However,
it is required for provisioning an environment. See Start the Wizard and Prepare to
Install (page 13-5).
2. Verify that the
LIBPATH
value is null.
3. On UNIX systems, set the DISPLAY environment variable to an active and
authorized display.
4. Run the following command on the primordial host. See Types of Hosts in a
Multiple-Host Environment (page 1-14).
UNIX:
cd framework_location/provisioning/bin
./provisioningWizard.sh
Solaris:
cd framework_location/provisioning/bin
bash provisioningWizard.sh
Example 27-1
provisioningWizard.sh -invPtrLoc /oracle/oraInst.loc
-ignoreSysPrereqs
27.2.3 Wizard Screens and Instructions
Table 27-2 (page 27-5) shows the steps necessary to create a response file using the
Provisioning Wizard. For help with any of the screens, click Help.
If the correct values required are not entered, the error and warning messages are
displayed at the bottom of the screen.
Table 27-2 Creating an Extended Provisioning Response File
Screen Description and Action Required
Welcome No action is required on this read-only screen.
Click Next to continue.
Installation Options Presents the list of valid installation actions that can be
performed using the wizard. Select Create a Response
File for Extending an Existing Fusion Application
Environment.
Click Next to continue.
Introspect an Existing Fusion
Applications Environment
Introspects an existing Oracle Fusion Applications
environment which can be extended. Ensure that all
Admin servers are running before proceeding with the
introspection.
•
Existing Applications Base: Specify the location for
the existing
APPLICATIONS_BASE
.
Click Next to continue.
Chapter 27
Create an Extended Provisioning Response File
27-5

Table 27-2 (Cont.) Creating an Extended Provisioning Response File
Screen Description and Action Required
Additional Configurations This screen displays the product offerings selected when the
environment was originally provisioned. Select the required
checkbox to start the previously provisioned offerings.
Note: If a new offering is available for selection on this
screen. DO NOT select the new offering on this screen
because only the offerings that are already provisioned in
the environment that is being extended must be selected.
Click Next to continue.
Provisioning Configurations
This screen only displays the offerings that have not been
selected when the environment was provisioned. To see the
details of the provisioned environment, use the Click here
to view the configurations that are already provisioned
and started link available on the screen.
To extend the existing Oracle Fusion Applications
environment, select one or more offerings, either within
a configuration, or from the list of standalone product
offerings.
Select individual product offerings within a configuration,
without selecting all available offerings. When individual
product offerings are specified, provisioning starts the
Managed Servers only for the offerings that have been
selected. However, because interdependent details have
been specified for the entire configuration, additional
functionality can be turned on later. The additional
functionality are turned on by using the Oracle Fusion
Applications Functional Setup Manager to start the other
Managed Servers.
Click Details in the message pane to see a breakdown of
servers for each offering.
After clicking Next, selections cannot be changed on this
screen. To make changes, click Cancel, open a new wizard
session, and create a new response file for extending the
existing Oracle Fusion Applications environment.
Click Next to continue.
Chapter 27
Create an Extended Provisioning Response File
27-6

Table 27-2 (Cont.) Creating an Extended Provisioning Response File
Screen Description and Action Required
Response File Description Enter information to describe this response file. This
description is not associated in any way with the executable
response file, or the summary file, that has been saved at
the end of the response file creation process.
•
Response File Name: Specify a name to identify this
response file.
•
Response File Version: Assign a version number
to this response file. The version is intended for
documentation only.
•
Created By: Defaults to the operating system user
who invoked the wizard. Set when the response file is
initially created and cannot be modified for the current
response file.
•
Created Date: Defaults to the date that the response
file was initially created and saved. Set when the
response file was initially created and cannot be
modified for the current response file.
•
Response File Description: Provide a description of
this response file.
Click Next to continue.
Installation Location This screen displays the credentials for the Node Manager
and the location of the various directories required for
installation and configuration actions.
Click Next to continue.
System Port Allocation
Read-only screen displaying the Applications Base Port
and Other Ports: Node Manager.
Click Next to continue.
Database Configuration Read-only screen displaying the database parameters
established when the Oracle Database was installed.
Click Next to continue.
Schema Passwords The database that is installed contains preloaded schemas
required for runtime execution. This read-only screen
displays the schema password details.
Click Next to continue.
ODI Password Configuration Read-only screen displaying the ODI supervisor password.
The ODI Supervisor Password is the Supervisor Password
that is entered on the Custom Variables page during
execution of Oracle Fusion Applications RCU, under the
Primary and Work Repository component.
Click Next to continue.
Domain Topology Configuration Read-only screen displaying the domain topology
configuration option chosen while provisioning the
environment.
The types of possible topologies are:
•
Basic Topology: One host for all domains
•
Medium Topology: One host per domain
•
Advanced Topology: One host per application and
middleware component
Click Next to continue.
Chapter 27
Create an Extended Provisioning Response File
27-7

Table 27-2 (Cont.) Creating an Extended Provisioning Response File
Screen Description and Action Required
Common Domain If applicable, specify values for the new selected domain
and its middleware dependencies. All hosts must use the
same operating system and share a common mount point
for network storage. The host specified for the Admin Server
is the default for all servers. The values for the previously
selected configuration cannot be changed.
•
Host Name: Specify the host where the Managed
Servers for this domain is installed and configured.
Note that this host cannot be the same Oracle Identity
Management host.
•
Port: Port for internal communications only. The wizard
assigns values based on values on the System Port
Allocation screen. Port values can be edited. However,
these values must be unique within the domain and fall
within the range previously specified. For example, in a
range of 7401 to 7800, a value of 8444 generates an
error.
•
UCM Intradoc Server Port: Port where the Universal
Content Management Server listens.
•
InBound Refinery Server Port: Used for calling top-
level services.
Click Next to continue.
Product Family Domains Specify values for this domain and its middleware
dependencies. All hosts must use the same operating
system and share a common mount point for network
storage. The host specified for the Admin Server is the
default for all servers. The default host can be changed.
•
Host Name: Specify the host where the Managed
Servers for this domain is installed and configured..
Note that this host cannot be the same Oracle Identity
Management host.
•
Port: Port for internal communications only. The wizard
assigns values based on values on the System Port
Allocation screen. Port values can be edited. However,
these values must be unique within the domain and fall
within the range previously specified. For example, in a
range of 7401 to 7800, a value of 8444 generates an
error.
Click Next to continue.
Web Tier Configuration Read-only screen displaying the values selected during the
provisioning of the environment.
Click Next to continue.
Chapter 27
Create an Extended Provisioning Response File
27-8

Table 27-2 (Cont.) Creating an Extended Provisioning Response File
Screen Description and Action Required
Virtual Hosts Configuration If applicable, specify values for the new domain that
is selected. The values for the previously selected
configuration cannot be changed. Specify the configuration
parameters for the domains to be installed on the virtual
hosts that is selected on the Web Tier Configuration
screen.
Note: If the environment has a Load Balancer enabled, the
fields on this page are editable and populated with default
values that may not be valid for the environment. Review
and overwrite the default values with the values applicable
to the environment. Review the settings from the original
provisioning summary file and enter those values.
Click Next to continue.
Load Balancer Configuration Read-only screen displaying the Load Balancer
configuration details. Load balancing enables the distribution
of a workload evenly across two or more hosts, network
links, CPUs, hard drives, or other resources.
Click Next to continue.
Web Proxy Configuration Read-only screen displaying the Web Proxy configuration
details.
Click Next to continue.
IDM Properties File Read-only screen displaying the IDM Properties file details.
Click Next to continue.
Identity Management
Configuration
Read-only screen displaying the Oracle Identity
Management configuration details.
Click Next to continue.
Access and Policy Management
Configuration
Read-only screen displaying the Access and Policy
Management configuration details to integrate the Oracle
Fusion Applications environment with Oracle Identity
Management.
Click Next to continue.
Chapter 27
Create an Extended Provisioning Response File
27-9

Table 27-2 (Cont.) Creating an Extended Provisioning Response File
Screen Description and Action Required
Summary Verify that the installation represented on this screen is
correct. Click Back to return to the interview screens that
require changes. Complete the following information:
•
Provisioning Response File Name: Specify a unique
file name for this response file. This is the executable
file that is supplied to the wizard when prompted for
other options.
•
Provisioning Summary: Specify a unique name for
the summary details file. This file cannot be used to
execute the response file.
•
Directory: Enter the directory path where this response
file and the summary file are saved. Choose a location
that is visible to all servers accessing shared storage.
Make sure the location is not read-only.
Record the name of the response file and its location.
Supply it to the system administrator to use when
performing system maintenance tasks.
Click Finish to save the response file and the summary.
The response file is complete and can be used as the
basis for extending the exiting Oracle Fusion Applications
environment.
If the Oracle Fusion Applications environment is being
upgraded, follow the steps in Update Status to Success
(Incremental Provisioning) in the Oracle Fusion Applications
Upgrade Guide to proceed with the upgrade.
27.3 Perform Incremental Provisioning
After the extended provisioning response file is created, perform incremental
provisioning to extend the existing Oracle Fusion Applications environment. The
incremental provisioning process is the same as provisioning a new Oracle Fusion
Applications Environment as described in Provision a New Oracle Fusion Applications
Environment (page 13-1), except that the provisioning phases are based on the
extended provisioning response file.
In the extended provisioning response file previously created, the configuration details
necessary to run a physical installation of Oracle Fusion Applications product offerings
were specified. For full-scale environments, typically the offerings must be provisioned
on multiple hosts, and the installation must be run from a shared drive that is
accessible to all hosts.
Incremental provisioning goes through the same provisioning process to create a new
Oracle Fusion Applications environment. The installation provisioning process is run in
phases, in an assigned order. Complete each phase, in order, on each host, before
moving to the next phase. All phases must be completed successfully on all the hosts
in the environment to create a fully operational applications environment.
When the preverify phase is successful on the primordial host and the webtier host
is placed in the DMZ, place a copy of the response file, the generated provisioning
plan (
APPLICATIONS_BASE/provisioning/plan/provisioning.plan
), and a copy
Chapter 27
Perform Incremental Provisioning
27-10

of the introspect response file (
introspect.rsp
, located in
APPLICATIONS_BASE/
provisioning/introspect/introspect.rsp
in the webtier host in the DMZ.
After incremental provisioning completes successfully, follow the steps in Update
Status to Success (Incremental Provisioning) in the Oracle Fusion Applications
Upgrade Guide to proceed with the upgrade.
27.4 Troubleshoot Incremental Provisioning
If an issue is encountered while performing incremental provisioning, follow the
same guidelines and steps described in Troubleshoot an Oracle Fusion Applications
Environment (page 14-1) to resolve the issues.
The following section describes troubleshooting for specific issues that might be
encountered with incremental provisioning.
• If the environment does not already have any one of the Oracle Sales, Oracle
Marketing, or Oracle Financials offerings, and to add at least one of them
through incremental provisioning, then confirm that the true-type fonts are installed
at
/usr/share/X11/fonts/TTF
. If the true-type fonts are missing, install them
before proceeding to the next step.
27.4.1 Troubleshoot Response File Creation Errors
Problem
The creation of the extended provisioning response file fails with the following
password validation error for Node Manager confirm password, BI RPD confirm
password and OAM webgate confirm password:
Confirm Password: The password must contain only alphanumeric and
punctuation characters. Trailing or leading whitespace characters are
not allowed.
Solution
Manually update the
introspect.rsp
file to reflect correct confirm passwords:
1. Run the wizard and proceed until the introspection page
2. Click next to complete introspection
3. Close the wizard at the Additional Configurations screen
4. Update the $PROVTMP/introspect.rsp (Default /tmp/introspect.rsp) file for these
properties. Copy the value of *PWD and paste to *PWDCONFIRM:
INSTALL_NODEMNGR_PWD=<copy_this_value>
INSTALL_NODEMNGR_PWDCONFIRM=<paste_the_value_from
INSTALL_NODEMNGR_PWD>
INSTALL_BIRPD_PWD=<copy_this_value>
INSTALL_BIRPD_PWDCONFIRM=<paste_the_value_from INSTALL_BIRPD_PWD>
OAM_WEBGATE_PWD=<copy_this_value>
OAM_WEBGATE_PWDCONFIRM=<paste_the_value_from OAM_WEBGATE_PWD>
Chapter 27
Troubleshoot Incremental Provisioning
27-11

Note:
For Linux, the default location for the
introspect.rsp
file is
/tmp/
introspect.rsp
. For Solaris, the default location for the
introspect.rsp
file is
/var/tmp
.
5. Set the env variable:
export SKIP_INTROSPECTION=true
6. Rerun the wizard and go through all the pages to create the response file.
27.4.2 Troubleshoot Preverify Phase Errors
The following section describes the steps to troubleshoot preverify phase errors.
• If the webtier host is located in DMZ, then invoke the preverify phase on the
webtier host with the
-ignoreSyspreqs
argument.
27.4.3 Troubleshoot Install Phase Errors
The following section describes the steps to troubleshoot install phase errors.
27.4.3.1 Install Phase Errors Caused by Configuration Changes Done by Other
Privileged Users
Do not make configuration changes to the Oracle Fusion Applications environments
using super user (root) or other privileged users. Such changes alter file permissions,
causing issues that are hard to troubleshoot and result in severe errors as shown in
the following example.
Example
The install phase of performing incremental provisioning fails with the following error
message in the provisioning log file:
[2014-10-09T10:33:01.762+00:00] [runProvisioning-install] [NOTIFICATION]
[FAPROV-01214] [runProvisioning-install] [tid: 10]
[ecid: 0000KZoTsKmDĝ95RfL6id1KDaGu000001,0] [arg: /u02/instance] [arg: /u01/
APPLTOP/instance/provisioning/restart/backup_install/instance.tar]
Compressing /u02/instance to backup /u01/APPLTOP/instance/provisioning/restart/
backup_install/instance.tar
[2014-10-09T10:33:02.771+00:00] [runProvisioning-install] [WARNING] []
[runProvisioning-install] [tid: 12]
[ecid: 0000KZoU18nDĝ95RfL6id1KDaGu000004,0]
[exec] /bin/tar: /CommonDomain_webtier_local/config/OHS/ohs1/webgate/config/
oblog_config_wg.xml.09222014:
Cannot open: Permission denied
[2014-10-09T10:33:16.858+00:00] [runProvisioning-install] [WARNING] []
[runProvisioning-install] [tid: 12]
[ecid: 0000KZoU18nDĝ95RfL6id1KDaGu000004,0] [exec] /bin/tar: Error exit
delayed from previous errors
[2014-10-09T10:33:16.868+00:00] [runProvisioning-install] [NOTIFICATION] []
Chapter 27
Troubleshoot Incremental Provisioning
27-12

[runProvisioning-install] [tid: 10]
[ecid: 0000KZoTsKmDĝ95RfL6id1KDaGu000001,0] [delete] Deleting: /u01/APPLTOP/
instance/provisioning/restart/backup_install/instance.tar
[2014-10-09T10:33:16.906+00:00] [runProvisioning-install] [NOTIFICATION]
[FAPROV-01214] [runProvisioning-install]
[tid: 10] [ecid: 0000KZoTsKmDĝ95RfL6id1KDaGu000001,0] [arg: /u02/instance]
[arg: /u01/APPLTOP/instance/provisioning/restart/backup_install/instance.tar]
Compressing /u02/instance to backup /u01/APPLTOP/instance/provisioning/restart/
backup_install/instance.tar
[2014-10-09T10:33:17.028+00:00] [runProvisioning-install] [WARNING] []
[runProvisioning-install] [tid: 13]
[ecid: 0000KZoU4b^Dĝ95RfL6id1KDaGu000005,0]
[exec] /bin/tar: ./CommonDomain_webtier_local/config/OHS/ohs1/webgate/config/
oblog_config_wg.xml.09222014:
Cannot open: Permission denied
[2014-10-09T10:33:18.422+00:00] [runProvisioning-install] [WARNING] []
[runProvisioning-install] [tid: 13]
[ecid: 0000KZoU4b^Dĝ95RfL6id1KDaGu000005,0] [exec] /bin/tar: Error exit
delayed from previous errors
These errors are caused by the OHS configuration being changed by a user other
than the user that provisioned the Oracle Fusion Applications environment prior to
performing incremental provisioning. In this case the file,
APPLICATIONS_CONFIG/OHS/
ohs1/webgate/config/oblog_config_wg.xml.09222014,
was altered and is now
owned by the root user.
Resolution
Perform the following steps to resolve this issue.
1. Change the ownership of the file in question, to the user who created the Oracle
Fusion Applications environment.
2. Follow the steps in Recovery After Failure (page 14-4).
3. Rerun the install phase of incremental provisioning.
27.5 Next Steps
After successfully extending the Oracle Fusion Applications environment, resume the
Upgrade Orchestrator process to complete the upgrade. For more information about
the upgrade process, see Update Status to Success (Incremental Provisioning) in the
Oracle Fusion Applications Upgrade Guide to proceed with the upgrade.
DO NOT start using the environment unless the upgrade process is successfully
completed.
To scale out the Oracle Fusion Applications environment to make it high availability,
follow the required steps after completing the upgrade. For more information about
scaling out, see Complete Conditional Common High Availability Post-Installation
Tasks for Oracle Fusion Applications (page 18-1).
Chapter 27
Next Steps
27-13

28
Uninstall an Oracle Fusion Applications
Environment
This section describes the actions necessary to remove an existing Oracle Fusion
Applications environment from a system. It includes step-by-step instructions and
provides important information about the ramifications of taking this action.
This section includes the following topics:
• Introduction to Uninstall an Oracle Fusion Applications Environment (page 28-1)
• Prerequisites to Uninstall an Oracle Fusion Applications Environment (page 28-2)
• Uninstall Oracle Fusion Applications Using the Provisioning Wizard (page 28-2)
• Uninstall Oracle Fusion Applications From the Command Line (page 28-5)
• Clean Up After Uninstalling Oracle Fusion Applications (page 28-5)
• Uninstall Oracle Identity Management (page 28-6)
• Delete the Database (page 28-6)
• Uninstall the Oracle Identity Management Provisioning Framework (page 28-6)
• Uninstall the Oracle Fusion Applications Provisioning Framework (page 28-7)
28.1 Introduction to Uninstall an Oracle Fusion Applications
Environment
During the uninstallation process, components that were installed using the
Provisioning Wizard are removed. The Oracle Fusion Applications database and
the Oracle Identity Management components are not removed. To remove the
Oracle Fusion Applications database, see Delete the Database (page 28-6). The
Oracle Identity Management environment, including the Oracle Identity Management
databases is not removed.
Note the following characteristics of the uninstallation process:
• Run the
deinstall
process on all hosts. Use the Provisioning Wizard
deinstall
option for the Primordial host, and the command line option for the Primary
host and Secondary host. Products installed from the command line must be
uninstalled from the command line.
• Start the Provisioning Wizard on the same host (primordial) where it was started at
the time of installation. Monitor the process on all hosts using the primordial host
interface.
• All binaries, regardless of patch level, are removed.
It is not possible to partially uninstall an environment by selecting specific components
to uninstall.
28-1

28.2 Prerequisites to Uninstall an Oracle Fusion
Applications Environment
Always use the provisioning
deinstall
option (the Provisioning Wizard option
or the command line) rather than simply deleting the
APPLICATIONS_BASE
,
APPLICATIONS_CONFIG
, and the
oraInventory
directories manually. This is especially
important for the web tier. Two of its instances share the same
oraInventory
location.
Before beginning the uninstallation process, complete these tasks:
1. Stop any processes that are running in the environment.
2. Shut down all Managed Servers, the Administration Server, and the Node
Manager on all hosts. See Stop the Entire Environment in Order in the Oracle
Fusion Applications Administrator's Guide.
3. Stop Oracle HTTP Server with this command:
APPLICATIONS_CONFIG/
CommonDomain_webtier/bin/opmnctl shutdown
.
4. Stop the Oracle Business Intelligence components that are controlled
by Oracle Process Manager and Notification Server with this command:
APPLICATIONS_CONFIG/BIInstance/bin/opmnctl shutdown
.
5. Shut down Global Order Promising (GOP) (if provisioned):
UNIX:
APPLICATIONS_CONFIG/gop_1/bin/opmnctl shutdown
.
6. Stop the Java EE components using Oracle Enterprise Manager Fusion
Middleware Control. See Starting and Stopping Java EE Applications Using WLST
in the Oracle Fusion Middleware Administering Oracle Fusion Middleware.
See Start and Stop Components in the Oracle Fusion Applications Administrator's
Guide.
28.3 Uninstall Oracle Fusion Applications Using the
Provisioning Wizard
To perform an uninstallation using the Provisioning Wizard, start the wizard from the
primordial host and complete the uninstallation interview screens.
28.3.1 Start the Provisioning Wizard
To start the Provisioning Wizard, do the following from the primordial host:
1. Set the
JAVA_HOME
environment variable to point to the JDK location in the
provisioning repository, for example:
UNIX:
export
JAVA_HOME
=
REPOSITORY_LOCATION
/
jdk
export
PATH
=$
JAVA_HOME/bin:$PATH
2. Verify that the LIBPATH value is null.
3. Run the following command on the primordial host:
Chapter 28
Prerequisites to Uninstall an Oracle Fusion Applications Environment
28-2

UNIX:
cd FAPROV_HOME/provisioning/bin
./provisioningWizard.sh
Solaris: use
bash provisioningWizard.sh
instead of
./provisioningWizard.sh
.
28.3.2 Wizard Interview Screens and Instructions
Table 28-1 (page 28-3) shows the steps necessary to uninstall an Oracle Fusion
Applications environment with the Provisioning Wizard. For help with any of the
interview screens, click Help.
If the correct values required are not entered, error and warning messages are
displayed at the bottom of the screen.
Table 28-1 Deinstalling an Oracle Fusion Applications Applications
Environment
Screen Description and Action Required
Welcome No action is required on this read-only screen.
Click Next to continue.
Chapter 28
Uninstall Oracle Fusion Applications Using the Provisioning Wizard
28-3

Table 28-1 (Cont.) Deinstalling an Oracle Fusion Applications Applications
Environment
Screen Description and Action Required
Specify Central Inventory
Location
This screen displays only if one or more of the following conditions
are not met:
•
The
-invPtrLoc
option is used to specify the central inventory
location. Thus, default value for the platform is not used.
Note that the default value for Linux platforms is
/etc/
oraInst.loc
. For Solaris, the default value is
/var/opt/
oracle/oraInst.loc
.
• The Central Inventory Pointer File is readable.
• The Central Inventory Pointer File contains a value for
inventory_loc
.
•
The
inventory_loc
directory is writable.
•
The
inventory_loc
directory has at least 150K of space.
•
inventory_loc
is not an existing file.
Specify the location of the Central Inventory Directory that meets
the previous criteria. The
inventory_loc
directory can be created
by the
createCentralInventory.sh
script and does not have to
exist at the time its location is specified.
For non-Windows platforms, in the Operating System Group ID
field, select or enter the group whose members are granted access
to the inventory directory. All members of this group can install
products on this host. Click OK to continue.
The Inventory Location Confirmation dialog prompts to run the
inventory_directory
/
createCentralInventory.sh
script as
root, to confirm that all conditions are met and to create the default
inventory location file, such as
/etc/oraInst.loc
. After this script
runs successfully, return to the interview and click OK to proceed
with the installation.
To continue the installation without root access, select Continue
installation with local inventory. Click OK to proceed with the
installation.
For more information about inventory location files, see Oracle
Universal Installer Inventory in the Oracle Universal Installer User's
Guide.
Click Next to continue.
Installation Options
Presents a list of valid installation actions that can be performed
using the Provisioning Wizard. Select Deinstall an Applications
Environment.
Enter the directory path in the Response File field to the response
file associated with the environment that needs to be deinstalled. Or
click Browse to navigate to the response file location.
Click Next to continue.
Summary Displays the application and middleware components to be
uninstalled. The processes associated with these components must
be shut down manually. See Prerequisites to Uninstall an Oracle
Fusion Applications Environment (page 28-2).
Click Deinstall to begin uninstalling the applications and middleware
components.
Chapter 28
Uninstall Oracle Fusion Applications Using the Provisioning Wizard
28-4

Table 28-1 (Cont.) Deinstalling an Oracle Fusion Applications Applications
Environment
Screen Description and Action Required
Deinstallation Progress The uninstallation process runs on the primordial host. Uninstall
from the command line on any primary or secondary hosts
provisioned in the environment. See Uninstall Oracle Fusion
Applications From the Command Line (page 28-5).
The following symbols help track the deinstall progress:
•
Block: Processing has not yet started on this host for the
named phase.
•
Clock: Performing the build for a phase.
•
Check mark: The build was completed successfully.
•
x mark: The build has failed for this phase. Correct the errors
before continuing.
•
Restricted symbol: The validation process has stopped due to
a failure within another process.
Click an x or a Restricted symbol to display information about
failures. Click the host-level Log file for details about this phase.
Click a build Log file to see details specific to that build.
If the uninstallation fails, a Retry button is enabled, allowing to
try the uninstall again. See Recovery After Failure (page 14-4) for
information about retry, cleanup, and restore actions.
Click Next to continue.
Deinstallation Complete Review the list of components removed from this environment. Click
Save to create a text file that contains the details.
See Clean Up After Uninstalling Oracle Fusion Applications
(page 28-5) for information about manual tasks necessary to
complete the uninstallation process.
Click Finish to dismiss the screen.
28.4 Uninstall Oracle Fusion Applications From the
Command Line
If a primary or secondary host have been provisioned, run the
deinstall
command
on those hosts from the command line, using the same procedure used during
provisioning. If the primordial host is no longer available, the entire uninstall process
must be run from the command line.
Run the
deinstall
command as
root
(with administration privileges) as follows:
UNIX:
runProvisioning.sh -responseFile
response_file_location
-target
deinstall
If the web tier has been deployed in a DMZ, run the Oracle Universal Installer (OUI)
manually on that host to uninstall. See Introduction to Oracle Universal Installer (OUI)
in the Oracle Universal Installer User’s Guide.
28.5 Clean Up After Uninstalling Oracle Fusion Applications
The remaining cleanup tasks are as follows:
Chapter 28
Uninstall Oracle Fusion Applications From the Command Line
28-5

UNIX:
1. If processes are set up to run as a service, verify the /etc/services file and remove
the corresponding entries from the file.
2. If processes are set up to run as a service, verify the /etc/inetd.conf file and
remove the corresponding process entries from the file.
3. Clean up or remove the
APPLICATIONS_BASE
directory.
4. Clean up or remove the application configuration (
APPLICATIONS_CONFIG
) directory.
If local application configuration is enabled, clean up or remove also the local
application configuration directories.
Deinstalling Oracle Fusion Applications does not remove the
beahomelist
file or the
bea
directory under:
UNIX:
user_home/bea/beahomelist
For information about how this file is used, see Backup Artifacts and Updating Oracle
Inventory in the Oracle Fusion Middleware Administrator's Guide.
28.6 Uninstall Oracle Identity Management
Follow these instructions to clean up an Oracle Identity Management provisioned
environment, before starting another round of provisioning.
Linux or UNIX:
1. On each host, kill all Oracle Identity Management processes. Restarting the host is
recommended.
2. On each host, delete the contents of the directory
IDM_LOCAL_CONFIG
.
3. Delete the contents of the directories
IDM_BASE
and
IDM_CONFIG
on shared
storage.
4. Drop the database schema using Oracle Fusion Middleware Repository Creation
Utility. When dropping the schema, ensure to select the ODS schema, as it is not
selected by default. Oracle Identity Management Provisioning faisl during the next
run if this step is not performed correctly.
5. Rerun provisioning.
28.7 Delete the Database
To delete the database, use Database Configuration Assistant (DBCA) to delete an
instance of the database and then remove the database software. See Deleting a
Database Using DBCA and Removing Oracle Database Software in Oracle Database
2 Day DBA.
28.8 Uninstall the Oracle Identity Management Provisioning
Framework
Follow the instructions described in this section to uninstall the Oracle Identity
Management provisioning framework.
Chapter 28
Uninstall Oracle Identity Management
28-6

1. Stop all services running under IDMLCM_HOME. Since there is no script for
killing processes under IDMLCM_HOME, kill all the processes running under
IDMLCM_HOME manually.
2. Change directory to IDMLCM_HOME
/oui/bin
and execute the following
command:
UNIX:
runInstaller -deinstall -jreLoc <JAVA_HOME>
3. On the Oracle Universal Installer screen, proceed as follow in Table 28-2
(page 28-7):
Table 28-2 Provisioning Framework Deinstallation Screen Flow
Screen Description and Action Required
Welcome No action is required on the read-only screen.
Click Next to continue.
Deinstall Oracle Home Verify that the directory path is correct. Click Save to create
a text file with the details of the configuration that is being
deinstalled.
Click Deinstall to continue. On the Warning screen, click
Yes to remove the software files and the provisioning Oracle
home directory. Click No to remove only the software files,
or Cancel to return to the previous screen.
If No is clicked, remove the files manually. For example,
if the provisioning framework directory is
/d1/Oracle/
Provisioning
, use this syntax:
(UNIX)
cd /d1/oracle/provisioning
rm -rf provisioning
Deinstallation Progress The progress of the deinstallation is monitored. Click Cancel
to stop the process.
Click Next to continue.
Deinstallation Complete Review the summary of the deinstallation and the
components that were deinstalled.
Click Finish to exit.
If the
JAVA_HOME
environment variable is not set, retrieve it from
REPOSITORY_LOCATION/installers/jdk/jdk.zip, unzip it to any location and set the
JAVA_HOME
.
28.9 Uninstall the Oracle Fusion Applications Provisioning
Framework
Uninstalling Oracle Fusion Applications involves removing the Oracle Fusion
Applications Provisioning Oracle home. The deinstaller attempts to remove the Oracle
home from which it was started, and removes only the software in the Oracle home.
Before removing the Oracle Fusion Applications Provisioning Oracle home, ensure
that it is not in use. After removing the software, provisioning a new Oracle Fusion
Applications environment is not longer possible.
Chapter 28
Uninstall the Oracle Fusion Applications Provisioning Framework
28-7

28.9.1 Run the Provisioning Framework Deinstaller
To start the deinstaller, navigate to:
UNIX:
FAPROV_HOME/oui/bin
and use this command:
runInstaller -deinstall -jreLoc REPOSITORY_LOCATION/jdk
The Uninstall menu is a Windows shortcut to the
setup.exe -deinstall
command.
Do not use the
Start -> All Programs -> Oracle - OHnnnn -> Oracle
Installation Products -> Uninstall
menu option on Windows operating systems,
where nnnn is a number. This Uninstall menu is also a shortcut to the
setup.exe
program but does not have the
-deinstall
command line option. Therefore, it is not
deinstall the provisioning framework.
The deinstaller described in this section removes the provisioning framework to
provision the Oracle Fusion Applications environment. It does not uninstall the
Oracle Fusion Applications environment. To uninstall an Oracle Fusion Applications
environment, refer to Uninstall Oracle Fusion Applications Using the Provisioning
Wizard (page 28-2) or Uninstall Oracle Fusion Applications From the Command Line
(page 28-5) before removing the provisioning wizard from the system.
28.9.2 Deinstaller Screens and Instructions
Table 28-3 (page 28-8) contains instructions for uninstalling the provisioning framework.
For help with any of the interview screens, click Help.
Table 28-3 Provisioning Deinstaller Screen Flow
Screen Description and Action Required
Welcome No action is required on this read-only screen.
Click Next to continue.
Deinstall Oracle Home
Verify that the directory path is correct. Click Save to create a
text file with the details of the configuration to be deinstalled.
Click Deinstall to continue.
On the Warning screen, select whether the deinstaller should
remove the Oracle home directory in addition to removing
the software. Click Yes to remove the software files and the
provisioning Oracle home directory. Click No to remove only the
software files, or click Cancel to return to the previous screen.
If No is clicked, remove the framework software files manually.
For example, use this syntax if the directory is
/d1/oracle/
provisioning
:
UNIX:
cd /d1/oracle/provisioning
rm -rf provisioning
Deinstallation Progress
Monitor the progress of the deinstallation. Click Cancel to stop
the process. Click Next to continue.
Deinstallation Complete
Click Finish.
Chapter 28
Uninstall the Oracle Fusion Applications Provisioning Framework
28-8

Glossary
applications base
The top-level directory for the Oracle Fusion Applications binaries. You specify a
name for this directory at the time of provisioning. This directory includes two
mount points:
/net/mount1/appbase
for components that will remain read-only after
provisioning, and
/net/mount2
(
APPLICATIONS_CONFIG
) to contain instances that
are configurable after provisioning. This structure aids performance issues and
accommodates a "lock-down" of binaries after provisioning. It ensures that the
configurable components remain available.
BPEL
Business Process Execution Language; a standard language for defining how to send
XML messages to remote services, manipulate XML data structures, receive XML
messages asynchronously from remote services, manage events and exceptions,
define parallel sequences of execution, and undo parts of processes when exceptions
occur.
cleanup
The installation phase that shuts down processes started during a failed phase and
performs the necessary cleanup actions. If the automated cleanup fails, you must
manually stop all processes except the Node Manager on all hosts including OPMN
and Java EE processes before you can run the restore action. Note, however, that you
must stop all processes if you are running the cleanup action on the Configure phase
CLI
Used for starting the Provisioning Wizard and running installation phases on the
Primary host, Secondary host, and DMZ host (when present).
cluster
A group of Oracle WebLogic Servers that work together to provide scalability and high
availability for applications. A cluster appears as a single Oracle WebLogic Server
instance. The Managed Server instances that constitute a cluster can run on the same
Glossary-1

host or be located on different hosts. Applications are deployed to the cluster, which
implies deployment to every Managed Server within the cluster.
Configure
The installation phase that creates domains, Managed Servers, and clusters.
Configures data sources and performs Node Manager registration of servers on the
primordial host and primary host.
Configure-secondary
The installation phase that performs the configuration actions on a primary or
secondary host (or both), registers Managed Servers with the Node Manager on
secondary hosts, and creates a web tier instance. If there are no primary or secondary
hosts, or if there are only primary hosts, this phase runs, but takes no action.
cube
A block of data that contains three or more dimensions. An Essbase database is a
cube.
DMZ
Acronym for demilitarized zone. An isolated internal network used for servers that
are accessed by external clients on the Internet, such as web servers, to provide a
measure of security for internal networks behind the firewall.
DMZ host
A host that cannot access the shared storage within the firewall. This type of host is
typically used to install the Oracle HTTP Server so that restrictions on communication
with components within the firewall can be enforced.
e-mail bounce
An e-mail that is returned due to a temporary or permanent error condition.
financial reporting book
Comprised of reports and other documents such as text, PDF, PowerPoint, Excel and
Word files. When run, the report data is dynamically retrieved from the database; the
snapshot data remains static.
Glossary
Glossary-2

FTP
Acronym for File Transfer Protocol. A system for transferring computer files, generally
by the Internet.
global area
The region across the top of the user interface. It provides access to features and tools
that are relevant to any page you are on.
home directory
A directory that contains one or more Oracle Fusion Middleware homes or Oracle
Fusion Applications homes. This directory has no functional significance other than as
a grouping of related Oracle product offerings.
idmsetup.properties
A properties file,
idmsetup.properties
, is automatically generated during the
provisioning of an Oracle Identity Management environment. This file includes some
of the configuration values that you must supply to the Provisioning Wizard when
you create a response file. These values must be included in your response file to
integrate Oracle Identity Management components with an Oracle Fusion Applications
environment.
Select the Load IDM Configuration from IDM Properties file option available
on the IDM Properties File screen of the Provisioning Wizard, if you want the
values on the Identity Management Configuration screen and the Access and Policy
Management Configuration screen to default to the values in the IDM properties file.
You must however review these screens to ensure that all values are accurate before
proceeding to the next screen.
The properties file is created in:
SHARED_CONFIG_DIR/fa/idmsetup.properties,
where
SHARED_CONFIG_DIR
is the shared configuration location that you selected in the
Install Location Configuration page of the Oracle Identity Management Provisioning
Wizard.
For more information about the IDM properties file, see Passing Configuration
Properties File to Oracle Fusion Applications (page 10-23).
Install
The installation phase that installs middleware and applications components and
applies database patches shipped with provisioning (for databases created with the
wizard).
Glossary
Glossary-3

Managed Server
A server which hosts components and associated resources that constitute each
product configuration. The domains are predefined to ensure that product offerings
and their dependencies are always stored in a standardized arrangement.
MTA
Acronym for mail transfer agent. A software program that transfers electronic mail
messages from one computer to another.
offering
A comprehensive grouping of business functions, such as Sales or Product
Management, that is delivered as a unit to support one or more business processes.
Oracle Fusion Applications Search
A special type of search based on technology that differs from that of most
other searches in Oracle Fusion Applications. Oracle Fusion Applications Search is
available in the global area and other places.
point of view
User selected dimensions that are not included in the grids at the row, column or page
levels for a particular report. Only these dimensions can be overridden at run time,
unless user also specifically defined Prompt for the dimensions on the grid.
Postconfigure
Installation phase which configures Oracle SOA Suite composite deployment and
Oracle HTTP Server, and populates policies and grants. Configures middleware and
applications that require servers to be online.
Preconfigure
The installation phase that updates the Oracle Application Development Framework
(Oracle ADF) configuration.
Preverify
The installation phase that checks to see that the prerequisites for an installation are
met.
Primary host
The host on which the Administration Server of a domain runs.
Glossary
Glossary-4

Primordial host
The host that contains the Common domain (and specifically the Administration Server
of the Common domain). There is one, and only one, primordial host per shared drive.
product offerings
Groups of features within an installation of Oracle Fusion Applications which represent
the highest-level collection of functionality that you can license and implement.
provisioning configuration
A collection of one or more product offerings.
Provisioning Command-line Interface (CLI)
See CLI.
provisioning repository
A repository which contains all the installers required to provision a new Oracle
Fusion Applications environment. You download the repository from the Oracle Fusion
Applications Product Media Package and extract the files to a location of your choice,
for example
repository_location/installers
. The repository must be located on a
networked drive or a shared hard disk so that it is accessible to all the hosts in your
new environment.
provisioning summary file
A file which contains details that describe the installation. It is automatically created by
provisioning after the installation is complete and includes a link to the Oracle Fusion
Applications home page.
Provisioning Wizard
A question-and-answer interview that guides you through the process of installing
a database, creating or updating a response file, and installing or deinstalling the
components of an Oracle Fusion Applications environment.
response file
A collection of configuration details you specify about installation locations, product
offerings and middleware (technology stack) dependencies. In addition, you enter
connection parameters for the database and identity management components that
you set up as prerequisites. You use the Provisioning Wizard interview to create and
execute the response file.
Glossary
Glossary-5

restore
The installation phase consisting of the necessary restore actions required for a given
provisioning phase. This action deletes and restores the instance directory, and, if
necessary (and available), restarts the Common Domain Administration Server and
Oracle HTTP Server.
Secondary host
Location where the Managed Servers for any application reside when they are not on
the same host as the Administration Server of the same domain. Typically used when
a domain spans two physical servers.
SOA
Abbreviation for service-oriented architecture.
Startup
Installation phase that starts the Administration Server and the Managed Server on the
current host. Performs online configuration, including global unique identifier (GUID)
reconciliation and Financial/IPM configuration.
Validate
Installation phase that validates the deployment configuration and starts the Managed
Server.
WebLogic Server Domain
A logically related group of Oracle WebLogic Server resources that is managed as a
unit. It consists of an Administration Server and one or more Managed Server.
WSDL
Abbreviation for Web Services Description Language. It is an XML format that provides
a model for describing Web services.
Glossary
Glossary-6

Index
A
Active Directory
configuring for Oracle Access Manager and
Oracle Identity Manager, 16-30
adapters
Oracle Virtual Directory, 16-27, 17-18
C
certificate
host name verification, 16-49
self-signed, 16-49
Coherence, see ’Oracle Coherence’, 17-32
configuration
Oracle Coherence, 17-32
configuring
custom keystores for Node Manager, 16-52
custom keystores, 16-52
G
generating self-signed certificates, 16-49
H
high availability, 17-33
host name verification
certificate for Node Manager, 16-49
managed servers, 16-53
HTTP server
registering with WebLogic Server, 17-43
I
identity keystore, 16-50
K
keystores
custom, 16-52
identity, 16-50
trust, 16-51
Keytool utility, 16-51
L
leasing.ddl script, 17-45, 18-93
log file for Node Manager, 16-47
M
managed servers
custom keystores, 16-52
host name verification, 16-53
N
Node Manager, 16-49
custom keystores, 16-52
described, 16-47
host name verification certificate, 16-49
identity keystore, 16-50
log file, 16-47
trust keystore, 16-51
O
Oracle Coherence, 17-32
Oracle Directory Services Manager
creating connections to Oracle Virtual
Directory, 10-23
Oracle Identity Manager
creating a multi data source, 17-45
verifying server migration, 17-49
Oracle Virtual Directory
creating adapters, 16-27, 17-18
creating Oracle Directory Services Manager
connections to, 10-23
R
RCU
creating Identity Management schemas, 7-6
S
scaling up
web tier, 17-41
Index-1

scripts
leasing.ddl, 17-45, 18-93
self-signed certificate, 16-49
server migration
testing, 18-97
Single Sign-On
validating for Oracle Access Manager, 10-25
T
testing of server migration, 18-97
trust keystore, 16-51
U
unicast communication, 17-32
utils.CertGen utility, 16-49
utils.ImportPrivateKey utility, 16-50
V
validating
Oracle Access Manager Single Sign-On,
10-25
validation
server migration, 18-97
W
web tier
scaling up, 17-41
Index
Index-2
