
[1]
Oracle® Fusion Middleware
Installation Guide for Oracle Data Integrator
11g Release 1 (11.1.1.9.0)
E16453-07
April 2015
Oracle Fusion Middleware Installation Guide for Oracle Data Integrator 11g Release 1 (11.1.1.9.0)
E16453-07
Copyright © 2015, Oracle and/or its affiliates. All rights reserved.
Primary Author: Joe Paul
This software and related documentation are provided under a license agreement containing restrictions on
use and disclosure and are protected by intellectual property laws. Except as expressly permitted in your
license agreement or allowed by law, you may not use, copy, reproduce, translate, broadcast, modify, license,
transmit, distribute, exhibit, perform, publish, or display any part, in any form, or by any means. Reverse
engineering, disassembly, or decompilation of this software, unless required by law for interoperability, is
prohibited.
The information contained herein is subject to change without notice and is not warranted to be error-free. If
you find any errors, please report them to us in writing.
If this is software or related documentation that is delivered to the U.S. Government or anyone licensing it
on behalf of the U.S. Government, then the following notice is applicable:
U.S. GOVERNMENT END USERS: Oracle programs, including any operating system, integrated software,
any programs installed on the hardware, and/or documentation, delivered to U.S. Government end users
are "commercial computer software" pursuant to the applicable Federal Acquisition Regulation and
agency-specific supplemental regulations. As such, use, duplication, disclosure, modification, and
adaptation of the programs, including any operating system, integrated software, any programs installed on
the hardware, and/or documentation, shall be subject to license terms and license restrictions applicable to
the programs. No other rights are granted to the U.S. Government.
This software or hardware is developed for general use in a variety of information management
applications. It is not developed or intended for use in any inherently dangerous applications, including
applications that may create a risk of personal injury. If you use this software or hardware in dangerous
applications, then you shall be responsible to take all appropriate fail-safe, backup, redundancy, and other
measures to ensure its safe use. Oracle Corporation and its affiliates disclaim any liability for any damages
caused by use of this software or hardware in dangerous applications.
Oracle and Java are registered trademarks of Oracle and/or its affiliates. Other names may be trademarks of
their respective owners.
Intel and Intel Xeon are trademarks or registered trademarks of Intel Corporation. All SPARC trademarks
are used under license and are trademarks or registered trademarks of SPARC International, Inc. AMD,
Opteron, the AMD logo, and the AMD Opteron logo are trademarks or registered trademarks of Advanced
Micro Devices. UNIX is a registered trademark of The Open Group.
This software or hardware and documentation may provide access to or information about content,
products, and services from third parties. Oracle Corporation and its affiliates are not responsible for and
expressly disclaim all warranties of any kind with respect to third-party content, products, and services
unless otherwise set forth in an applicable agreement between you and Oracle. Oracle Corporation and its
affiliates will not be responsible for any loss, costs, or damages incurred due to your access to or use of
third-party content, products, or services, except as set forth in an applicable agreement between you and
Oracle.
The information contained in this document is for informational sharing purposes only and should be
considered in your capacity as a customer advisory board member or pursuant to your beta trial agreement
only. It is not a commitment to deliver any material, code, or functionality, and should not be relied upon in
making purchasing decisions. The development, release, and timing of any features or functionality
described in this document remains at the sole discretion of Oracle.
This document in any form, software or printed matter, contains proprietary information that is the
exclusive property of Oracle. Your access to and use of this confidential material is subject to the terms and
conditions of your Oracle Master Agreement, Oracle License and Services Agreement, Oracle
PartnerNetwork Agreement, Oracle distribution agreement, or other license agreement which has been
executed by you and Oracle and with which you agree to comply. This document and information contained
herein may not be disclosed, copied, reproduced, or distributed to anyone outside Oracle without prior
written consent of Oracle. This document is not part of your license agreement nor can it be incorporated
into any contractual agreement with Oracle or its subsidiaries or affiliates.

iii
Contents
Preface ................................................................................................................................................................ vii
Audience...................................................................................................................................................... vii
Documentation Accessibility.................................................................................................................... vii
Related Documents ................................................................................................................................... viii
Conventions ................................................................................................................................................. ix
1 Installation Overview for Oracle Data Integrator
1.1 Oracle Data Integrator Applications........................................................................................ 1-1
1.2 ODI Installation Types ............................................................................................................... 1-2
1.3 Installation Roadmap ................................................................................................................. 1-3
1.4 Topology Summary of ODI....................................................................................................... 1-6
1.4.1 Contents of the 11g Installation Directory ....................................................................... 1-7
1.4.2 Scripts and Tools.................................................................................................................. 1-7
2 Installing Oracle Data Integrator
2.1 Verifying Your System and Network Environment .............................................................. 2-1
2.2 Installing a Database and Creating the ODI Database Schemas ......................................... 2-2
2.2.1 Installing and Configuring a Database............................................................................. 2-2
2.2.2 Using RCU to Create the Database Schema..................................................................... 2-2
2.3 Installing an Application Server and Creating the Middleware Home.............................. 2-5
2.4 Installing Oracle Data Integrator.............................................................................................. 2-5
2.4.1 Obtaining the Installer ........................................................................................................ 2-5
2.4.2 Starting the Installer ............................................................................................................ 2-5
2.4.3 Following the Installation Instructions............................................................................. 2-6
2.4.4 Configuring a WebLogic Server Domain for Java EE Installations.............................. 2-8
2.5 Verifying the ODI Installation................................................................................................... 2-8
2.5.1 Reviewing Installation Log Files ....................................................................................... 2-8
2.5.2 Checking the Directory Structure...................................................................................... 2-8
3 Configuring Oracle Data Integrator
3.1 Manual Steps for Configuring ODI Studio, Repositories, and the Standalone Agent ..... 3-1
3.1.1 Adding Additional Drivers and Open Tools to the Standalone Agent and ODI Studio..
3-1
3.1.2 Using ODI Studio to Manually Create and Connect to the Repositories .................... 3-2
3.1.3 Changing the Language Used in ODI Studio.................................................................. 3-2
iv
3.1.4 Manually Configuring and Starting the Standalone Agent .......................................... 3-3
3.1.4.1 Manually Configuring the Standalone Agent.......................................................... 3-3
3.1.4.2 Manually Starting the Standalone Agent.................................................................. 3-5
3.2 Configuring Java EE Components............................................................................................ 3-6
3.2.1 Configuring a WebLogic Domain or WebSphere Cell ................................................... 3-6
3.2.1.1 Starting the Configuration Wizard ............................................................................ 3-7
3.2.1.2 Configuring Your ODI Domain.................................................................................. 3-7
3.2.2 Starting the Servers........................................................................................................... 3-12
3.2.2.1 Starting Node Manager ............................................................................................ 3-12
3.2.2.2 Starting the Administration Server......................................................................... 3-13
3.2.2.3 Starting the Managed Server ................................................................................... 3-14
3.2.3 Adding Credential Store Entries .................................................................................... 3-16
3.2.3.1 Adding Credential Store Entries for the Java EE Agent ...................................... 3-16
3.2.3.2 Adding Credential Store Entries for the Oracle Enterprise Manager................ 3-17
3.2.3.3 Adding Credential Store Entries for IBM WebSphere Server............................. 3-18
3.2.4 Declaring the Java EE Agent in Topology..................................................................... 3-18
3.2.5 Generating Java EE Agent Template ............................................................................. 3-19
3.2.6 Configuring ODI Console Connections......................................................................... 3-19
3.2.7 Configuring Oracle Fusion Middleware Control with ODI Plugin .......................... 3-20
3.3 Integrating ODI with Oracle Access Manager 11g ............................................................. 3-22
4 Deinstalling Oracle Data Integrator
4.1 Performing Pre-Deinstallation Tasks ....................................................................................... 4-1
4.1.1 Stopping Oracle Fusion Middleware................................................................................ 4-1
4.1.2 Stopping a Standalone Agent............................................................................................. 4-1
4.1.3 Removing the Oracle Data Integrator Schemas .............................................................. 4-2
4.2 Deinstalling Oracle Data Integrator ......................................................................................... 4-3
4.2.1 Starting the Deinstaller ....................................................................................................... 4-3
4.2.2 Removing the ODI Home................................................................................................... 4-3
4.2.3 Removing the Oracle Common Home ............................................................................. 4-4
4.2.4 Manually Removing Your Oracle Home Directories ..................................................... 4-4
4.2.5 Removing the Program Groups (Windows Only).......................................................... 4-5
4.3 Uninstalling Your Application Server ..................................................................................... 4-5
4.3.1 Removing Oracle WebLogic Server .................................................................................. 4-5
4.3.2 Removing IBM WebSphere ................................................................................................ 4-5
4.4 Reinstallation ............................................................................................................................... 4-6
A Installation Screens for Oracle Data Integrator
A.1 Flowchart of the Oracle Data Integrator Installation Screens ............................................. A-1
A.2 Descriptions of the Oracle Data Integrator Installation Screens......................................... A-2
A.2.1 Welcome............................................................................................................................... A-3
A.2.2 Install Software Updates.................................................................................................... A-4
A.2.3 Select Installation Type ...................................................................................................... A-5
A.2.4 Prerequisite Checks ............................................................................................................ A-6
A.2.5 Specify Installation Location............................................................................................. A-6
A.2.6 Application Server.............................................................................................................. A-8
A.2.7 Repository Configuration.................................................................................................. A-9
v
A.2.8 Master Repository............................................................................................................. A-10
A.2.9 Supervisor User Details ................................................................................................... A-12
A.2.10 Specify Work Repository Details.................................................................................... A-13
A.2.11 Specify Agent Details ....................................................................................................... A-13
A.2.12 Installation Summary....................................................................................................... A-14
A.2.13 Installation Progress......................................................................................................... A-15
A.2.14 Configuration Progress.................................................................................................... A-16
A.2.15 Installation Completed..................................................................................................... A-17
B Deinstallation Screens for Oracle Data Integrator
B.1 Welcome...................................................................................................................................... B-1
B.2 Deinstall Oracle Home .............................................................................................................. B-2
B.3 Deinstallation Progress ............................................................................................................. B-3
B.4 Deinstallation Complete ........................................................................................................... B-4
C Silent Installation and Deinstallation
C.1 Understanding Silent Installation and Deinstallation .......................................................... C-1
C.2 Using the Oracle Data Integrator Response Files.................................................................. C-1
C.3 Oracle Data Integrator Installation Response File Parameters............................................ C-3
C.4 Oracle Data Integrator Deinstallation Response File Parameters....................................... C-5
D Oracle Data Integrator Companion CD
D.1 Oracle Data Integrator Companion Disk Components........................................................ D-1
D.2 Manual Installation and Configuration Steps........................................................................ D-2
D.2.1 Standalone Agent................................................................................................................ D-2
D.2.2 ODI Studio and XML Reference ....................................................................................... D-3
D.2.3 Demonstration Environment ............................................................................................ D-3
D.3 Installing the Java Standalone Agent on iSeries.................................................................... D-4
E Creating Repositories with Oracle Data Integrator Studio
E.1 Introduction to Oracle Data Integrator Repositories............................................................ E-1
E.2 Creating Repository Storage Spaces........................................................................................ E-2
E.3 Creating the Master Repository............................................................................................... E-4
E.4 Connecting to the Master Repository ..................................................................................... E-6
E.5 Creating a Work Repository..................................................................................................... E-7
E.6 Connecting to a Work Repository ........................................................................................... E-8
F Customizing the ODI Credential Map Name
F.1 What is Stored in Credential Store? ........................................................................................ F-1
F.2 Modifying the Credential Map Name .................................................................................... F-1
F.3 Updating WLST Scripts for Credential Map Creation ......................................................... F-2
G OPMN Configuration for Standalone Agent
G.1 Adding a Standalone Agent to OPMN................................................................................... G-1
vi
G.2 Stopping the Agent.................................................................................................................... G-4
G.3 Starting the Agent and Agent Components........................................................................... G-4
G.4 Determining the Status of Oracle HTTP Server .................................................................... G-5
G.5 Deleting the Agent..................................................................................................................... G-5
G.6 Updating the Agent Setting Information ............................................................................... G-5
H Troubleshooting
H.1 General Troubleshooting Tips ................................................................................................. H-1
H.2 Installation and Configuration Log Files................................................................................ H-2
H.2.1 Installation Log Files .......................................................................................................... H-2
H.2.2 Configuration Log Files ..................................................................................................... H-3
H.3 Keeping Track of Your JRE Location ...................................................................................... H-3
H.4 ODI Client and Repository Compatibility ............................................................................. H-4
H.5 Need More Help?....................................................................................................................... H-4

vii
Preface
This guide provides information and instructions for installing, configuring, and
troubleshooting a new instance of the latest version of Oracle Data Integrator 11g
Release 1 (11.1.1.x.0).
If you are an existing Oracle Data Integrator user, your path to obtain the most recent
version of the software will depend on the version of your existing software. For more
information, refer to the Oracle Fusion Middleware Download, Installation, and
Configuration Readme Files for the steps you need to take to update or upgrade your
existing software.
The following topics are covered in this preface:
■ Audience
■ Documentation Accessibility
■ Related Documents
■ Conventions
Audience
This guide is intended for administrators who are responsible for installing and
configuring components of Oracle Data Integrator. It is assumed that readers are
comfortable running some system administration operations, such as creating users
and groups, adding users to groups, and installing operating system patches on the
computer where your products will be installed. Users in UNIX systems who are
installing need
root
access to run some scripts.
Documentation Accessibility
For information about Oracle's commitment to accessibility, visit the Oracle
Accessibility Program website at
http://www.oracle.com/pls/topic/lookup?ctx=acc&id=docacc
.
Access to Oracle Support
Oracle customers have access to electronic support through My Oracle Support. For
information, visit
http://www.oracle.com/pls/topic/lookup?ctx=acc&id=info
or
visit
http://www.oracle.com/pls/topic/lookup?ctx=acc&id=trs
if you are hearing
impaired.
viii
Related Documents
For important information about Oracle Fusion Middleware products, see the
following manuals:
■ Oracle Fusion Middleware Installation Planning Guide
This book contains useful information you should read before installing any
Oracle Fusion Middleware product.
■ Oracle Fusion Middleware Concepts
This book introduces the common terms and concepts in an Oracle Fusion
Middleware environment.
■ Oracle Fusion Middleware Administrator's Guide
This book contains information for managing your Oracle Fusion Middleware
environment after installation and configuration is complete.
For important information about updating or upgrading your existing Oracle Data
Integrator software to the latest version, see the following manuals:
■ Oracle Fusion Middleware Patching Guide
This book provides information for updating your existing 11g version of Oracle
Data Integrator to the latest available version.
■ Oracle Fusion Middleware Upgrade Guide for Oracle Data Integrator
This book provides information for upgrading your existing 10g version of Oracle
Data Integrator to the latest available version.
For more information about related Oracle Data Integrator products and services, see
the following manuals:
■ Oracle Fusion Middleware Developer's Guide for Oracle Data Integrator
This book provides guidelines for developers interested in using Oracle Data
Integrator for integration projects.
■ Oracle Fusion Middleware Connectivity and Knowledge Modules Guide for Oracle Data
Integrator
This document describes Oracle Data Integrator Knowledge Modules and
technologies and how to use them in integration projects.
■ Oracle Fusion Middleware Knowledge Module Developer's Guide for Oracle Data
Integrator
This book describes how to develop your own Knowledge Modules for Oracle
Data Integrator.
■ Oracle Fusion Middleware Application Adapters Guide for Oracle Data Integrator
This book describes Oracle Data Integrator Application Adapters and how to use
them in ODI integration projects.
■ Oracle Fusion Middleware Installation Guide for Oracle Data Profiling and Oracle Data
Quality for ODI
This guide provides Oracle Data Profiling and Data Quality for Oracle Date
Integrator installation information including pre-installation requirements and
troubleshooting.
■ Oracle Fusion Middleware Upgrade Guide for Oracle Data Profiling and Oracle Data
Quality for ODI

ix
Conventions
The following text conventions are used in this document:
Convention Meaning
boldface Boldface type indicates graphical user interface elements associated
with an action, or terms defined in text or the glossary.
italic Italic type indicates book titles, emphasis, or placeholder variables for
which you supply particular values.
monospace
Monospace type indicates commands within a paragraph, URLs, code
in examples, text that appears on the screen, or text that you enter.
x

1
Installation Overview for Oracle Data Integrator 1-1
1
Installation Overview for Oracle Data Integrator
This chapter provides an overview of the Oracle Data Integrator (ODI) installation
process including a description of the installable components, pre and post-installation
tasks, and process flow.
The chapter includes the following topics:
■ Section 1.1, "Oracle Data Integrator Applications"
■ Section 1.2, "ODI Installation Types"
■ Section 1.3, "Installation Roadmap"
■ Section 1.4, "Topology Summary of ODI"
1.1 Oracle Data Integrator Applications
Oracle Data Integrator includes the following applications:
■ Oracle Data Integrator Repository
The Oracle Data Integrator Repository is composed of a Master Repository and
one or more Work Repositories. Objects developed or configured through the user
interfaces are stored in these repositories.
■ Oracle Data Integrator Studio
Oracle Data Integrator Studio is used for administering the infrastructure (security
and topology), reverse-engineering the metadata, developing projects, scheduling,
operating and monitoring executions.
■ Oracle Data Integrator Standalone Agent
The Standalone Agent is the run-time component of Oracle Data Integrator that
executes the integration flows. It runs in a Java Virtual Machine and can be
deployed where needed to run the flows.
■ Java EE Components
These components can be deployed in an application server. These include:
– Management Pack for Oracle Data Integrator
Note: The ODI Standalone Agent includes command line scripts for
managing scenarios and sessions and encoding passwords. For more
information see Section 1.4.2.

ODI Installation Types
1-2 Oracle Fusion Middleware Installation Guide for Oracle Data Integrator
The Management Pack for Oracle Data Integrator leverages Oracle Enterprise
Manager Cloud Control best-in-class application performance management,
service level management and configuration management capabilities. It
provides a centralized management solution for Oracle Data Integrator
Enterprise Edition.
– Oracle Enterprise Manager Plugin for ODI and the Oracle Enterprise Manager
Fusion Middleware Control
Oracle Enterprise Manager Fusion Middleware Control, with the Oracle
Enterprise Manager plugin for ODI, can be used to monitor ODI resources
(agents, repositories, ODI Console instances) and see their status, activities
and notification. You must have both the Oracle Enterprise Manager Fusion
Middleware Control and the Oracle Enterprise Manager Plugin for ODI
deployed to monitor the ODI infrastructure.
– Public (SDK) Web Services
ODI comes with several run-time web services. These include the "Public Web
Service" and the "Agent Web Service".
* The Public Web Service is used for web service calls that do not involve an
agent (listing contexts). The Public Web Service connects to the repository
to retrieve a list of context and scenarios. This web service is deployed on
a Java EE application server.
* The Agent Web Service offers operations (or interface) for managing
scenarios, loading plans, sessions and other functionality. Note that this
web service is built into the Java EE or Standalone Agent.
– Oracle Data Integrator Console
This component is a web interface for run-time, monitoring and metadata
browsing operations. It also contains an extension integrated into the Fusion
Middleware Control. Oracle Data Integrator components can be monitored as
a domain using this extension.
– Java EE Agent
Java EE Agent is the Java EE version of the run-time component of Oracle
Data Integrator. The Java EE agent provides the same features as the
standalone agent, but can also benefit from the features of an application
server.
1.2 ODI Installation Types
The Oracle Data Integrator installer provides the following installation options; you
can select any combination of these options during the installation:
■ Developer Installation
This installation includes the ODI Studio and the Oracle Data Integrator Software
Development Kit (SDK).
Note that this installation does not include the Standalone Agent or the scripts for
managing sessions or scenarios from the command line. If a Standalone Agent will
be needed, select Standalone Installation in addition to Developer Installation.
■ Standalone Installation
This installation includes an Oracle Data Integrator standalone agent.
■ Java EE Installation

Installation Roadmap
Installation Overview for Oracle Data Integrator 1-3
This installation includes the Java EE agent, Oracle Data Integrator Console, and
Public Web Services.
See Section 2.4, "Installing Oracle Data Integrator" for more information about
installing the different ODI installation types.
1.3 Installation Roadmap
The process of installing and configuring Oracle Data Integrator includes these
high-level tasks:
1. Preparing your system environment for installation
2. Creating schemas for applications
3. Installing an Application Server and Oracle Fusion Middleware
4. Installing Oracle Data Integrator
5. Configuring Oracle Data Integrator
6. Performing Postinstallation Configuration
7. Verifying the Configuration
Figure 1–1 shows these steps in the installation process.

Installation Roadmap
1-4 Oracle Fusion Middleware Installation Guide for Oracle Data Integrator
Figure 1–1 Roadmap for Installing and Configuring Oracle Data Integrator
Table 1–1 describes the high-level tasks for installing and configuring Oracle Data
Integrator. The table also provides information on where to get more details about
each task.

Installation Roadmap
Installation Overview for Oracle Data Integrator 1-5
Table 1–1 Tasks in the Oracle Data Integrator Installation Procedure
Task Description More Information
Complete the
installation planning
requirements
Prior to installation you must
prepare your system
environment for installation.
Review the general
installation requirements for
Oracle Fusion Middleware, as
well as any specific
configuration requirements
for Oracle Data Integrator.
Section 2.1, "Verifying Your System and Network
Environment"
For Oracle Data Integrator-specific information, see the
Oracle Fusion Middleware Developer's Guide for Oracle Data
Integrator.
Create the necessary
schemas using the
Repository Creation
Utility (RCU) or ODI
Studio.
The Oracle Repository
Creation Utility (RCU) allows
you to create and load a
Master Repository and a
Work Repository in a single
database schema.
The Oracle Data Integrator
Studio can also be used to
manually create the
repository after installation.
Section 2.2, "Installing a Database and Creating the ODI
Database Schemas"
Note that RCU supports only the Oracle, Microsoft SQL
Server and DB2 technologies. RCU only supports a
single schema containing both the Master Repository
and one Work Repository. Other technologies and
configurations are supported by manually creating the
repositories using the Oracle Data Integrator Studio after
the installation phase.
For more information, see Appendix E, "Creating
Repositories with Oracle Data Integrator Studio"
Install an application
server and create an
Oracle Fusion
Middleware home if
you will be installing the
ODI Java EE
components.
Installing Oracle WebLogic
Server or the IBM WebSphere
application server is not
required to run ODI. The
application server and
Middleware home directory
are prerequisites for using the
Java EE components.
Oracle WebLogic Server installation instructions are
provided in Section 2.3, "Installing an Application Server
and Creating the Middleware Home"; detailed
information is available in Oracle Fusion Middleware
Installation Guide for Oracle WebLogic Server.
IBM WebSphere installation instructions are provided in
Oracle Fusion Middleware Third-Party Application Server
Guide.
Run Oracle Universal
Installer (OUI) to install
Oracle Data Integrator
11g.
The Oracle Universal Installer
automates many of the ODI
installation and configuration
tasks.
Section 2.4, "Installing Oracle Data Integrator"
Perform any post
installation steps for
ODI Studio, repositories
and standalone agent.
After installing ODI you may
need to manually create
repositories, connect to
repositories or add additional
drivers. Depending on your
installation type, you may
also need to manually
configure the standalone
agent.
Section 3.1, "Manual Steps for Configuring ODI Studio,
Repositories, and the Standalone Agent"
Deploy Java EE
components (if
applicable).
If you installed Java EE
components you will need to
declare the Java EE agent in
Topology. You may also need
to create a WebLogic domain
or generate and deploy Java
EE Agent templates.
Section 3.2, "Configuring Java EE Components"
Perform any
post-deployment
configuration tasks for
Java EE agent, Oracle
Data Integrator Console,
and Enterprise Manager
(if applicable).
The Java EE Agent, Oracle
Data Integrator Console and
Enterprise Manager require
manual post-deployment
configuration tasks.
Section 3.2, "Configuring Java EE Components"

Topology Summary of ODI
1-6 Oracle Fusion Middleware Installation Guide for Oracle Data Integrator
1.4 Topology Summary of ODI
The installation topology of ODI will vary based on the components you choose to
install and configure. The installation of ODI requires a Middleware home directory:
■ If, for example, you choose to install only the Standalone Agent, which does not
require an application server, then you must manually create the Middleware
home (
MW_HOME
) directory. Your ODI software will be installed inside this
Middleware home.
■ Of you choose to install Java EE components, then you must first install an
application server. If you choose WebLogic Server, then the Middleware home is
automatically created for you. If you use WebSphere as the application server, you
must still create a separate Middleware home directory which will contain the
your ODI installation.
Installing WebLogic Server also creates the WebLogic Server home (
WL_HOME
)
directory and Oracle Common home (
oracle_common
) directory, which contains
the binary and library files required for Fusion Middleware Control and Java
Required Files (JRF).
When you install Oracle Data Integrator, an ODI Oracle home directory for the suite
(
ODI_HOME
) is created under the Middleware home directory. The ODI Oracle home
directory contains the binary and library files for Oracle Data Integrator.
When you configure your Java EE components and create an Oracle WebLogic Server
domain, a Domain home directory (
DOMAIN_HOME
) is created; this directory can reside
anywhere on your system.
Figure 1–2 shows a typical ODI installation topology, with Java EE components
configured in a domain and WebLogic Server as the application server. Note that the
domain contains two Managed Servers:
odi_server1
is the default Managed Server
created during domain configuration for ODI, and
bam_server1
is the default
Managed Server created during domain configuration for Oracle BAM. It is common
to have both of these in the same domain, as so it is illustrated here to show that other
products can be configured in the same domain as ODI.
Figure 1–2 Topology of an Oracle Data Integrator Installation with Oracle WebLogic
Server

Topology Summary of ODI
Installation Overview for Oracle Data Integrator 1-7
1.4.1 Contents of the 11g Installation Directory
Table 1–2 provides a few of the important Oracle Data Integrator 11g installation
directories and sub-directories. Note that the installation folders you see will vary
depending on the components you have installed.
1.4.2 Scripts and Tools
Table 1–3 lists the scripts and tools provided in the
ODI_HOME
/oracledi/agent/bin
directory. To launch a script from a command line, enter the name of the script to
launch. Type
script_name -help
from the command line for the on-line help.
The extension for these scripts is .bat for Windows operating systems scripts and .sh
for UNIX scripts.
Note: See Appendix D.1, "Oracle Data Integrator Companion Disk
Components" for the locations of additional program files and
directories.
Table 1–2 OID 11g Installation Directory Contents
Directory Description
/bin
This directory contains the Upgrade Assistant.
/cfgtoollogs
This directory contains configuration and installation log files.
/common
This directory contains the following important directories:
■
/bin
(Configuration Wizard,
pack
and
unpack
,
wlst
, and other
scripts for agent creation and credential mapping.)
■
/templates/applications
(Component template files for
WebLogic Server domain creation or extension.)
■
/templates/was
(Component template files for IBM
WebSphere cell creation or extension.)
/odi_misc
This directory contains some core libraries shared by the Oracle
Data Integrator components. Drivers shipped with the product are
in this folder.
/oracledi
This directory contains the following important directories:
■
/agent
(Oracle Data Integrator Standalone Agent.)
■
/agent/bin
(Command line scripts for managing the agent,
scenarios and sessions. The scripts are listed in Section 1.4.2.)
■
/agent/drivers
(drivers for the Oracle Data Integrator
Standalone Agent.)
■
/client
(Oracle Data Integrator Studio)
■
/xml-reference
(Knowledge Modules, Topology and Security
metadata export files.)
/oracledi.common
This directory contains some of the libraries and files shared by
Oracle Data Integrator components.
/oracledi.sdk
This directory contains the ODI Public API. Note that the libraries
of this API are necessary for the run-time agent.
/oui
This directory contains a
/bin
directory, which in turns contains the
ODI deinstaller.
/setup
This directory contains components that can be manually installed.

Topology Summary of ODI
1-8 Oracle Fusion Middleware Installation Guide for Oracle Data Integrator
Table 1–3 Oracle Data Integrator Scripts and Tools
File Description
agent
Starts a standalone agent.
agent_agent_name
Starts the standalone agent
agent_name
. This is the agent that
is automatically configured by the installer if you have
selected this option.
Example: If you created an agent named
agt_007
, a file called
agent_agt_007
is created in this folder.
agentstop
Stops a standalone agent.
encode
Encodes a password.
getsessionstatusremote
Retrieves the status of session via an agent built-in web
service.
This script is only available for UNIX operating systems. You
must have
wget
version 1.12 or higher on your system.
odiparams
This configuration script contains the parameters for starting
the other scripts. The parameters can be manually updated in
the file.
odi_opmn_addagent
Add a standalone agent to OPMN.
odi_opmn_deleteagent
Removes a standalone agent from OPMN.
restartsession
Restarts a session.
startcmd
Starts an Oracle Data Integrator command.
startscen
Starts the execution of a scenario.
startscenremote
Starts a scenario on a remote agent on its web service.
This script is only available for UNIX operating systems. You
must have
wget
version 1.12 or higher on your system.
restartloadplan
Restarts a load plan instance.
startloadplan
Starts a load plan.
stoploadplan
Stops a load plan instance execution.
stopsession
Stops a session execution.

2
Installing Oracle Data Integrator 2-1
2
Installing Oracle Data Integrator
This chapter describes how to install and configure Oracle Data Integrator.
Post-installation configuration parameters are also provided.
The following topics are covered:
■ Section 2.1, "Verifying Your System and Network Environment"
■ Section 2.2, "Installing a Database and Creating the ODI Database Schemas"
■ Section 2.3, "Installing an Application Server and Creating the Middleware Home"
■ Section 2.4, "Installing Oracle Data Integrator"
■ Section 2.5, "Verifying the ODI Installation"
2.1 Verifying Your System and Network Environment
To verify that your system environment meets the minimum requirements for
installation, refer to the following documents, available on Oracle Technology
Network (OTN):
■ Oracle Fusion Middleware System Requirements and Specifications
This document contains information related to hardware and software
requirements, minimum disk space and memory requirements, database schema
requirements, and required system libraries, packages, or patches.
If you are installing on a DHCP server, non-networked computer, or multihomed
computer, there are additional configuration steps that are required. These steps
are also available in the system requirements document in the "Oracle Fusion
Middleware System Configuration Requirements" section.
If you are installing on a Windows operating system and want to install and
configure Java Access Bridge for Section 508 Accessibility, read the "Installing and
Configuring Java Access Bridge" section in this document.
■ Oracle Fusion Middleware Supported System Configurations
This page contains various certification documents for current and previous
product releases. The System Requirements and Supported Platforms for Oracle Fusion
Middleware 11gR1 document contains certification information related to
supported 32-bit and 64-bit operating systems, databases, web servers, LDAP
servers, adapters, IPv6, JDKs, and third-party products.
■ Oracle Fusion Middleware Interoperability and Compatibility Guide
This document covers the compatibility and interoperability issues that may arise
when installing or upgrading Oracle Fusion Middleware 11g products.

Installing a Database and Creating the ODI Database Schemas
2-2 Oracle Fusion Middleware Installation Guide for Oracle Data Integrator
2.2 Installing a Database and Creating the ODI Database Schemas
This section provides a brief overview of using the Repository Creation Utility (RCU).
For more information, for detailed information, see Oracle Fusion Middleware Repository
Creation Utility User's Guide.
The following topics are covered:
■ Installing and Configuring a Database
■ Using RCU to Create the Database Schema
2.2.1 Installing and Configuring a Database
Oracle Data Integrator stores information in a repository that is stored in a database
schema. The Repository Creation Utility (RCU) is able to create the schema and the
repository in the database. RCU supports Oracle, Microsoft SQL Server and IBM DB2
databases and supports the installation of a Master Repository and Work Repositories
into a single schema.
■ The System Requirements and Supported Platforms for Oracle Fusion Middleware 11gR1
document lists the databases that are certified for use with RCU and Oracle Fusion
Middleware. This document is located on the Oracle Fusion Middleware
Supported System Configurations page.
■ Review the requirements for your specific database in the Oracle Fusion
Middleware System Requirements and Specifications document to ensure that
your database is properly configured before you run RCU.
You can also use ODI Studio to manually create repositories instead of using RCU. See
Appendix E, "Creating Repositories with Oracle Data Integrator Studio".
2.2.2 Using RCU to Create the Database Schema
Follow these instructions to create the schemas using RCU:
1. See "Obtaining RCU" in Oracle Fusion Middleware Repository Creation Utility User's
Guide for instructions on how to obtain the latest version of RCU.
2. See "Starting RCU" in Oracle Fusion Middleware Repository Creation Utility User's
Guide for instructions on how to start RCU.
3. Provide the required information on each of the screens as described in
"Repository Creation Utility Screens" in the Oracle Fusion Middleware Repository
Creation Utility User's Guide.
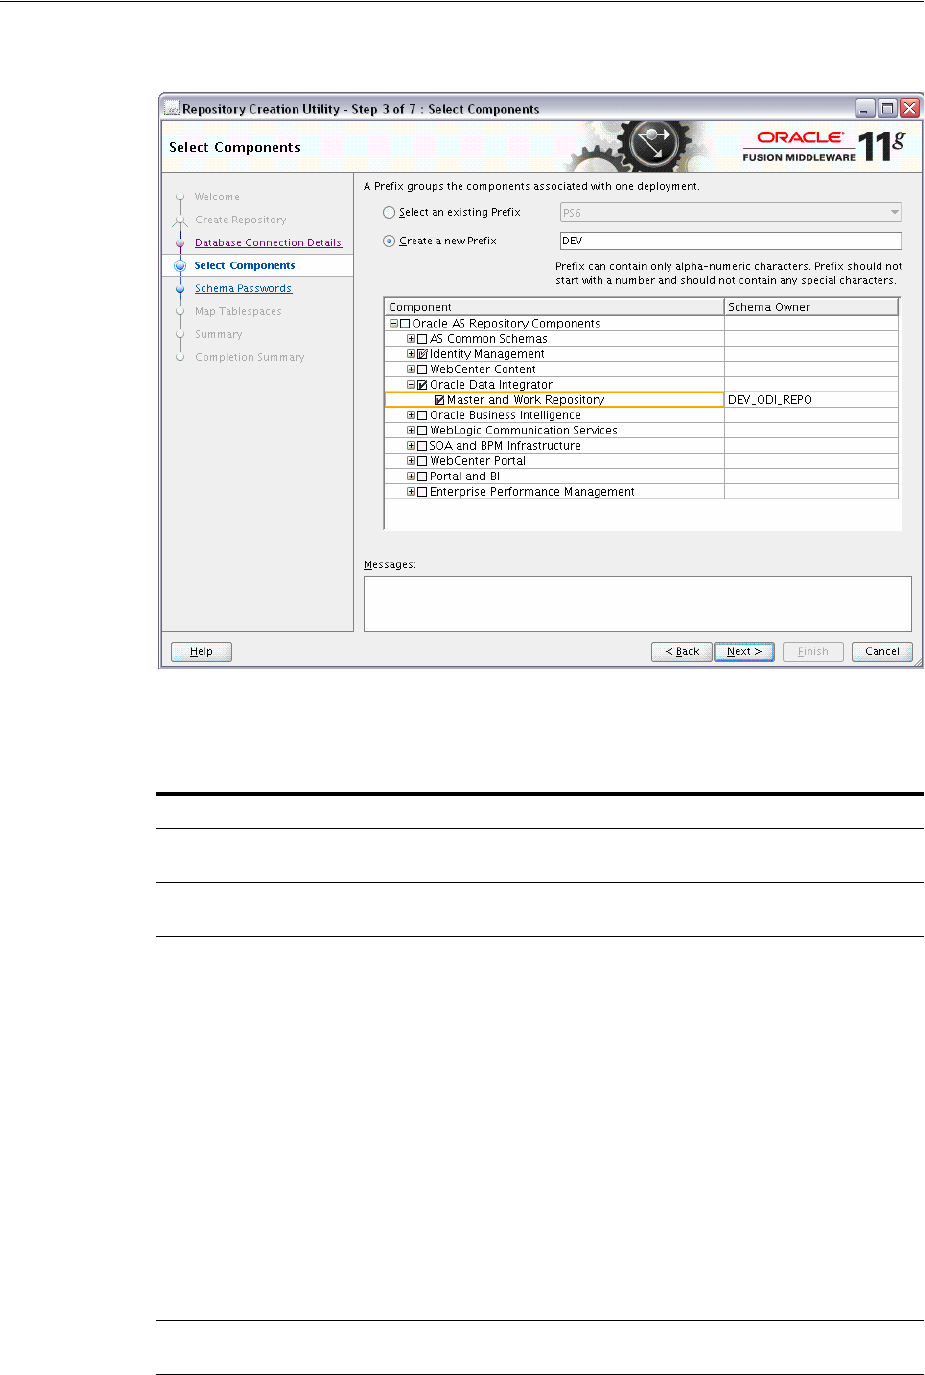
4. On the Select Components screen, select the components whose schemas you
want to install. For Oracle Data Integrator, expand Oracle Data Integrator and
select Master and Work Repository as shown in Figure 2–1. The Select
Components screen is described in detail in the Oracle Fusion Middleware Repository
Creation Utility User's Guide.
Caution: Due to the intensive communication that exists between
ODI components and the repositories, Oracle recommends that you
co-locate the repositories and the other ODI components on the same
LAN, and not on remote sites.
Installing a Database and Creating the ODI Database Schemas
Installing Oracle Data Integrator 2-3
Figure 2–1 Repository Creation Utility Select Components Screen
5. On the Custom Variables screen, provide the following information as described
in Table 2–1 and shown in Figure 2–2:
Table 2–1 RCU Custom Variables Screen Values
Component Variable Description
Master Repository ID A specific ID for the new Master Repository. Master Repository
ID values must be between 0 and 899. Default value is 001.
Supervisor Password Password of the Supervisor user. You must confirm this
password on the following line.
Work Repository Type Specify how the Work Repository will be used:
■ Use Development (D) for creating a development
repository. This type of repository allows management of
design-time objects such as data models and projects
(including interfaces, procedures, etc.) A development
repository also includes the run-time objects (scenarios
and sessions). This type of repository is suitable for
development environments.
D is the default work repository type.
■ Use Execution (E) for creating an execution repository:
This type of repository only includes run-time objects
(scenarios, schedules and sessions). It allows launching
and monitoring of data integration jobs in Operator
Navigator. Such a repository cannot contain any
design-time artifacts. Designer Navigator cannot be used
with it. An execution repository is suitable for production
environments.
Work Repository ID A specific ID for the new Work Repository. Default value is
001.
Installing a Database and Creating the ODI Database Schemas
2-4 Oracle Fusion Middleware Installation Guide for Oracle Data Integrator
Figure 2–2 RCU Custom Variables Screen for ODI
6.
Click Next to continue through the remaining screens as described in "Repository
Creation Utility Screens" in the Oracle Fusion Middleware Repository Creation Utility
User's Guide.
Work Repository Name A unique name for the Work Repository. Default is WORKREP.
Work Repository Password Provide a password for the Work Repository.
Note: This version of Repository Creation Utility (RCU) does not
perform extensive validation on the user entries of Repository ID and
Repository Type.
Master Repository ID values must be between 0 and 899 and Work
Repository ID values must be between 0 and 899. Repository Type
value must be either D (Development) or (E) Execution.
When incorrect values are entered for either of these, RCU fails during
the repository creation process with the following error:
RCU-6135: Error while trying to execute Java action
If you receive this error, go back to the RCU Custom Variables Screen
for ODI and provide the correct values.
Table 2–1 (Cont.) RCU Custom Variables Screen Values
Component Variable Description

Installing Oracle Data Integrator
Installing Oracle Data Integrator 2-5
2.3 Installing an Application Server and Creating the Middleware Home
The Oracle Data Integrator Java EE components require an application server (either
Oracle WebLogic Server or IBM WebSphere) and a Middleware home directory on
your system. Note that you do not need to configure a domain (in the case of Oracle
WebLogic Sever) or a cell (in the case of IBM WebSphere) in order to install Oracle
Data Integrator; you only need to install the application server and create the
Middleware home directory.
Installing Oracle WebLogic Server automatically creates the Middleware home for you.
For more information, see "Middleware Home and WebLogic Home Directories" in
Oracle Fusion Middleware Installation Planning Guide. If you are installing Oracle
WebLogic Server, see the following sections in Oracle Fusion Middleware Installation
Guide for Oracle WebLogic Server:
■ "Product Distribution" for instructions on how to download the latest version.
■ "Running the Installation Program in Graphical Mode" for installation
instructions.
If you are installing IBM WebSphere, you must create the Middleware home directory
structure manually. The Middleware home has no dependency on the location of your
IBM WebSphere installation. If you are installing IBM WebSphere, refer to "Installing
and Configuring Oracle Fusion Middleware on IBM WebSphere" in Oracle Fusion
Middleware Third-Party Application Server Guide for installation information.
2.4 Installing Oracle Data Integrator
This section contains information and instructions for installing Oracle Data
Integrator:
■ Section 2.4.1, "Obtaining the Installer"
■ Section 2.4.2, "Starting the Installer"
■ Section 2.4.3, "Following the Installation Instructions"
2.4.1 Obtaining the Installer
Depending on your specific needs, there are multiple places where you can obtain
Oracle Fusion Middleware software. For details, refer to the Oracle Fusion
Middleware Download, Installation, and Configuration ReadMe Files page, where you
can find the ReadMe file for your specific release.
Select one of the download locations and download "Oracle Data Integrator." This will
be saved to your system as a
.zip
archive file.
After you download the archive file, unpack the archive file into a directory of your
choice on the machine where you will be performing the installation.
2.4.2 Starting the Installer
To start the installer, go to the directory where you unpacked the archive file and
switch to the
Disk1
directory.
Note: If you are installing on a UNIX system for the first time, you
may be asked to run the
ORACLE_HOME/oracleRoot.sh
script as
root
user to create all of the necessary installation directories.

Installing Oracle Data Integrator
2-6 Oracle Fusion Middleware Installation Guide for Oracle Data Integrator
On UNIX operating systems:
cd unpacked_archive_directory/Disk1
./runInstaller -jreLoc JRE_LOCATION
On Windows operating systems:
cd unpacked_archive_directory\Disk1
setup.exe -jreLoc JRE_LOCATION
The installer requires the full path to the location of a Java Runtime Environment (JRE)
on your system, which must be specified using the
-jreLoc
parameter. If you installed
Oracle WebLogic Server (Section 2.3, "Installing an Application Server and Creating
the Middleware Home"), a JRE was installed on your system in the
jdk160_version
directory inside the Middleware home. You can use this location as the
JRE_LOCATION
to start the installer.
If you are using IBM WebSphere as your Application Server, you must provide the full
path to a certified JRE installed on your system. Refer to the System Requirements and
Supported Platforms for Oracle Fusion Middleware 11gR1 document on the Oracle Fusion
Middleware Supported System Configurations page for certified JRE versions.
For information about the log files that are created during installation, refer to
Section H.2, "Installation and Configuration Log Files".
2.4.3 Following the Installation Instructions
Follow the instructions in Table 2–2 to install and configure Oracle Data Integrator.
If you need additional help with any of the installation screens, refer to Appendix A,
"Installation Screens for Oracle Data Integrator" or click Help to access the online help.
Table 2–2 Oracle Data Integrator Installation Flow
Screen When This Screen Appears Description
Welcome Always This screen provides a link to the latest product release
notes. Review this information before you begin the
installation.
Install Software
Updates
Always Select the method you want to use for obtaining software
updates, or select Skip Software Updates if you do not
want to get updates.
If updates are found, the installer will automatically
apply them at this point. Some updates will require the
installer to automatically be restarted; if this happens, the
Install Software Updates screen will not be seen the next
time.
Select Installation Type Always Select the type of installation you want to perform.
For more information about the installation types, see
Section 1.2, "ODI Installation Types".
Prerequisite Checks Always The installer checks for system prerequisites such as
operating system certification, recommended operating
system packages, and physical memory. If there is a
problem, a short error message appears and you will
have an opportunity to correct the issue before
continuing the installation.

Installing Oracle Data Integrator
Installing Oracle Data Integrator 2-7
Specify Installation
Location
Always This screen allows you to specify the absolute path for the
Oracle home location (referred to later in this guide as
ODI_HOME
).
NOTE - The specified Oracle home directory must be an
empty directory or an existing Oracle Data Integrator
home location.
If you selected Java EE Installation on the Select
Installation Type screen, you will also be asked to provide
the location of your Middleware home.
Application Server Only if Java EE Installation
is selected on the Select
Installation Type screen.
Select the application server you want to use for your
Java EE components.
Repository
Configuration
Always This screen allows you to select whether you want to
configure the Oracle Data Integrator Studio and the
Standalone Agent with an existing Master and Work
Repository pair.
NOTE - If you choose to Skip Repository Configuration,
you will have to configure the Oracle Data Integrator
Studio and Standalone Agent manually as described in
Section 3.1, "Manual Steps for Configuring ODI Studio,
Repositories, and the Standalone Agent".
Master Repository Only if Configure with
existing Master and Work
Repositories is selected on
the Repository Configuration
screen.
This screen allows you to specify the connection string to
the database that hosts the Master Repository and the
database user name and password
Supervisor User Details Only if Configure with
existing Master and Work
Repositories is selected on
the Repository Configuration
screen.
This screen allows you to specify the password for the
Supervisor user. This is the same password specified on
the Custom Variables screen when you ran RCU to create
the schemas. See Section 2.2.2, "Using RCU to Create the
Database Schema".
Specify Work
Repository Details
Only if Configure with
existing Master and Work
Repositories is selected on
the Repository Configuration
screen.
This screen allows you to select an existing Work
Repository from the list.
Specify Agent Details Only if Standalone Agent is
selected on the Select
Installation Type screen and
Configure with existing
Master and Work
Repositories is selected on
the Repository Configuration
screen.
Enter the Agent Name and Agent Port number. The name
cannot be the same as another agent already declared in
the topology.
NOTE - Agent Name can be 5 to 30 characters long, must
begin with an alphabetic character, and may contain only
alphanumeric characters and underscores (_).
Installation Summary Always This screen allows you to verify the installation options
you selected.
Click Install to begin the installation.
Table 2–2 (Cont.) Oracle Data Integrator Installation Flow
Screen When This Screen Appears Description

Verifying the ODI Installation
2-8 Oracle Fusion Middleware Installation Guide for Oracle Data Integrator
2.4.4 Configuring a WebLogic Server Domain for Java EE Installations
If you selected Java EE Installation on the Select Installation Type screen, you must do
one of the following before you can use your components:
■ If you are using WebLogic Server as your application server, refer to Section 3.2.1,
"Configuring a WebLogic Domain or WebSphere Cell" to configure a WebLogic
Server domain.
■ If you are using IBM WebSphere as your application server, refer to "Configure
Your Oracle Fusion Middleware Components in a New IBM WebSphere Cell" in
Oracle Fusion Middleware Third-Party Application Server Guide to configure a
WebSphere cell.
2.5 Verifying the ODI Installation
After you complete the installation, you can verify it by successfully completing the
following tasks:
■ Reviewing Installation Log Files
■ Checking the Directory Structure
2.5.1 Reviewing Installation Log Files
Review the contents of the installation log files to make sure that no problems were
encountered. For a description of the log files and where to find them, see Section H.2,
"Installation and Configuration Log Files".
2.5.2 Checking the Directory Structure
The contents of your ODI installation vary based on the options you selected during
the installation. The primary directories are listed in Section 1.4.1, "Contents of the 11g
Installation Directory". Review the directories to ensure that all of the components
were installed correctly.
Installation Progress Always This screen allows you to see the progress of the
installation.
Configuration Progress Only if Developer
Installation or Standalone
Agent are selected on the
Select Installation Type
screen.
This screen allows you to see the progress of any
post-installation configuration tasks you may have
selected.
Installation Completed Always Click Save to save your configuration information to a
file. This information includes port numbers, installation
directories, disk space usage, URLs, and component
names which you may need to access at a later time.
After saving your configuration information, click Finish
to dismiss the installer.
Table 2–2 (Cont.) Oracle Data Integrator Installation Flow
Screen When This Screen Appears Description

3
Configuring Oracle Data Integrator 3-1
3
Configuring Oracle Data Integrator
After the installation is complete, you may need to configure one or more of the
following components before using certain features of Oracle Data Integrator:
■ Section 3.1, "Manual Steps for Configuring ODI Studio, Repositories, and the
Standalone Agent"
■ Section 3.2, "Configuring Java EE Components"
■ Section 3.3, "Integrating ODI with Oracle Access Manager 11g"
3.1 Manual Steps for Configuring ODI Studio, Repositories, and the
Standalone Agent
Depending on the specifics of your environment, the following manual steps may be
required for specific component installations:
■ Section 3.1.1, "Adding Additional Drivers and Open Tools to the Standalone Agent
and ODI Studio"
■ Section 3.1.2, "Using ODI Studio to Manually Create and Connect to the
Repositories"
■ Section 3.1.3, "Changing the Language Used in ODI Studio"
■ Section 3.1.4, "Manually Configuring and Starting the Standalone Agent"
3.1.1 Adding Additional Drivers and Open Tools to the Standalone Agent and ODI
Studio
ODI installation includes a set of DataDirect drivers for the following technologies:
Oracle, Hypersonic SQL, SQL Server, Sybase ASE, and DB2 UDB. If additional drivers
and open tools are needed, they must be added to the Standalone Agent and the ODI
Studio:
■ On UNIX/Linux operating systems, go to the following directory (not created
until after ODI Studio is launched for the first time):
$HOME/.odi/oracledi/userlib
This folder contains the
additional_path.txt
file that allows you to declare
additional files or folders outside of the
/userlib
directory from which the ODI
Studio acquires its libraries and drivers. In the
additional_path.txt
file, add the
following path for the Standalone Agent:
ODI_HOME/oracledi/agent/drivers/

Manual Steps for Configuring ODI Studio, Repositories, and the Standalone Agent
3-2 Oracle Fusion Middleware Installation Guide for Oracle Data Integrator
■ On Windows operating systems, go to the following directory (not created until
after ODI Studio is launched for the first time):
%APPDATA%\odi\oracledi\userlib
%APPDATA%
is the Windows Application Data directory for the user (usually
C:\Documents and Settings\
user
\Application Data
). Add the following path to
the
additional_path.txt
file for the Standalone Agent:
ODI_HOME\oracledi\agent\drivers
3.1.2 Using ODI Studio to Manually Create and Connect to the Repositories
If repository creation was not possible through RCU, due to unsupported technology
or repository topology, use ODI Studio to create and configure repositories.
If the repository connections were not configured during installation, use ODI Studio
to create the connections to the repositories.
For detailed instructions see Appendix E, "Creating Repositories with Oracle Data
Integrator Studio".
3.1.3 Changing the Language Used in ODI Studio
You can change the language that is used by ODI Studio by editing the
odi.conf
file as
described below:
1. Open the
odi.conf
file for editing. The file is located in the following directory:
On UNIX operating systems:
ODI_HOME/oracledi/client/odi/bin
On Windows operating systems:
ODI_HOME\oracledi\client\odi\bin
2. Add the following lines to the
odi.conf
file (Note that this example shows the
modification for US English):
AddVMOption -Duser.language=en
AddVMOption -Duser.region=US
Note: The ODI 11g installation does not include JDBC drivers for the
PostgreSQL database. To use PostgreSQL, you must download
postgresql-8.4-701.jdbc4.jar
from
http://jdbc.postgresql.org/download.html
and then follow the
instructions above.
Note: Make sure you have installed the appropriate system fonts to
support your language change.

Manual Steps for Configuring ODI Studio, Repositories, and the Standalone Agent
Configuring Oracle Data Integrator 3-3
3.1.4 Manually Configuring and Starting the Standalone Agent
During the Standalone Agent installation, the agent is pre-configured to connect to the
existing repository. If the Skip Repository Configuration option was selected on the
Repository Configuration screen, then the agent is installed but not configured.
This section contains instructions for:
■ Section 3.1.4.1, "Manually Configuring the Standalone Agent"
■ Section 3.1.4.2, "Manually Starting the Standalone Agent"
3.1.4.1 Manually Configuring the Standalone Agent
To manually configure the Standalone Agent:
1. Connect to the Master Repository and define a physical agent in the topology for
the standalone agent, with the following information:
■ Name - Name of the physical agent.
■ Host - Name of the host where the standalone agent will be started.
■ Port - Port on this host where the standalone agent will be started. Provide a
port number between 1024 and 65535 that is not currently being used by any
other Oracle home. This port defaults to 20910.
■ Protocol - Incoming listening protocol for the agent. Valid values are
http
or
https
.
■ Web Application Context:
oraclediagent
(This parameter cannot be changed
for a standalone agent.)
2. Configure the agent manually by editing the
odiparams.bat/sh
file to point to the
correct repository. The
odiparams
file is pre-configured if you installed your
standalone agent using Oracle Universal Installer and selected to configure a
repository connection during installation. See Table 3–1 for the list of these
parameters.
Note: If you are changing the language to Japanese, use
AddVMOption -Duser.language=ja_JP.usjis
instead of
AddVMOption -Duser.language=ja_JP.utf8
to avoid issues with truncating text.
See Also: Appendix G, "OPMN Configuration for Standalone
Agent".
See Also: For detailed instruction on declaring an agent in the
topology, refer to "Creating a Physical Agent" in Oracle Fusion
Middleware Developer's Guide for Oracle Data Integrator.

Manual Steps for Configuring ODI Studio, Repositories, and the Standalone Agent
3-4 Oracle Fusion Middleware Installation Guide for Oracle Data Integrator
Table 3–1 lists the parameters if HTTPS is specified as the incoming listening
protocol for the agent. All passwords must be encoded with the following
command:
On UNIX operating systems:
encode.sh password
On Windows operating systems:
encode.bat password
Table 3–1 Repository Connection Information
Parameter Description
ODI_MASTER_DRIVER
JDBC driver used to connect the Master Repository.
ODI_MASTER_URL
JDBC URL used to connect the Master Repository.
ODI_MASTER_USER
Database account used to connect the Master
Repository.
ODI_MASTER_ENCODED_PASS
Database account password. The password must be
encoded with the following command:
On UNIX operating systems:
encode.sh password
On Windows operating systems:
encode.bat password
ODI_SECU_WORK_REP
Name of the Work Repository to connect to. This
Work Repository is the default repository into which
the scenarios are started.
ODI_SUPERVISOR
Name of an ODI Supervisor user. This Supervisor
user is used by the agent to connect the Master
Repository.
The Supervisor user name is case-sensitive.
ODI_SUPERVISOR_ENCODED_PASS
The password of the
ODI_SUPERVISOR
. The password
must be encoded with the following command:
On UNIX operating systems:
encode.sh password
On Windows operating systems:
encode.bat password
ODI_USER
Name of an ODI user used to start scenarios. This
user’s credentials are used when starting a scenario
from a command line.
ODI_ENCODED_PASS
The password of the
ODI_USER
.
ODI_CONNECTION_RETRY_COUNT
The number of retries to establish the connection in
the event that a repository connection fails. If set to
0, no retry will be performed. Default is 10.
NOTE: The
RETRY
parameters allow the agent to
continue sessions if the repository fails and is
temporarily unavailable. This scenario applies
primarily to Oracle RAC configurations.
ODI_CONNECTION_RETRY_DELAY
Time in milliseconds between repository connection
retries. Default is 1000.

Manual Steps for Configuring ODI Studio, Repositories, and the Standalone Agent
Configuring Oracle Data Integrator 3-5
Additionally,
-Djavax.net.ssl.keyStore
,
-Djavax.net.ssl.keyStoreType
,
-Djavax.net.ssl.trustStore
and
-Djavax.net.ssl.trustStoreType
may be
configured by using the
ODI_JAVA_OPTIONS
variable.
The following example shows a modified
odiparams.bat/sh
file:
ODI_MASTER_DRIVER=oracle.jdbc.driver.OracleDriver
ODI_MASTER_URL=jdbc:oracle:thin:@ours:1521:ORA9
ODI_MASTER_USER=ODI_11G
ODI_MASTER_ENCODED_PASS=gxfpqkz074jeaCpL4XSEFzxoj8E0p
ODI_SECU_WORK_REP=WORKREP
ODI_SUPERVISOR=SUPERVISOR
ODI_SUPERVISOR_ENCODED_PASS=fJya.vR5kvNcu9TtV,jVZEt
3.1.4.2 Manually Starting the Standalone Agent
Once the standalone agent has been defined in Topology, it can be started and used to
execute scenarios on predefined schedules or on demand.
To launch a standalone agent:
1. Change directory to the
/agent/bin
directory of the Oracle Data Integrator Agent.
2. Enter the following command to start the agent.
On UNIX operating systems:
./agent.sh
On Windows operating systems:
agent.bat
Table 3–3 lists the different parameters that allow the agent to be configured.
Table 3–2 HTTPS Repository Connection Information
Parameter Description
ODI_KEYSTORE_ENCODED_PASS
The keystore password. This value is mandatory.
ODI_KEY_ENCODED_PASS
The key password. This value is optional.
ODI_TRUSTSTORE_ENCODED_PASS
The truststore password. This value is optional.
See Also: For more information on how to work with a standalone
agent, a Java EE agent and how to handle load balancing, see
"Managing Agents" in the Oracle Fusion Middleware Developer's Guide
for Oracle Data Integrator.
Table 3–3 Agent Configuration Parameters
Parameters Description
-PORT=port
Port on which the agent is listening. Default value is 20910. This
port should exactly match the port specified in the physical
agent definition in the topology.
-NAME=agent_name
This is the name of the physical agent used. This name should
match the name of the physical agent as defined in the topology.
If this parameter is not specified, the agent starts with the
default name OracleDIAgent.

Configuring Java EE Components
3-6 Oracle Fusion Middleware Installation Guide for Oracle Data Integrator
The parameters are prefixed by the hyphen or dash (-) character and the possible
values are preceded by the equals sign (=) character. When entering the command,
consider the operating system specific syntax of the delimiters.
For example, on a UNIX operating system, the following command launches the
standalone agent declared in the repository as
agent_001
on the port
20300
using
HTTP as the listening protocol.
./agent.sh -PORT=20300 -NAME=agent_001 -PROTOCOL=http
On a Windows operating system, it is necessary to "delimit" the command arguments
containing the equals sign (=) character or spaces by using double quotes. For
example:
agent.bat "-PORT=20300" "-NAME=agent_001" "-PROTOCOL=http"
3.2 Configuring Java EE Components
This section provides configuration steps for Java EE Agent, Oracle Data Integrator
Console and Oracle Enterprise Manager.
■ Section 3.2.1, "Configuring a WebLogic Domain or WebSphere Cell"
■ Section 3.2.2, "Starting the Servers"
■ Section 3.2.3, "Adding Credential Store Entries"
■ Section 3.2.4, "Declaring the Java EE Agent in Topology"
■ Section 3.2.5, "Generating Java EE Agent Template"
■ Section 3.2.6, "Configuring ODI Console Connections"
■ Section 3.2.7, "Configuring Oracle Fusion Middleware Control with ODI Plugin"
3.2.1 Configuring a WebLogic Domain or WebSphere Cell
In order to use your Java EE components on IBM WebSphere, you must create and
configure a WebSphere cell. See "Managing Oracle Data Integrator on IBM WebSphere"
and "Configure Your Oracle Fusion Middleware Components in a New IBM
WebSphere Cell" in Oracle Fusion Middleware Third-Party Application Server Guide for
important information and instructions.
In order to use your Java EE components on WebLogic Server, you must create a
WebLogic Server domain and then configure Managed Servers in that domain. The
Oracle Fusion Middleware Configuration Wizard can be used to accomplish these
tasks.
-JMXPORT=jmx_port
JMX agent port number. The agent listens on this port for JMX
request to provide its metrics. Default value is the listening port
+ 1000. For example, if
-PORT=20910
then
-JMXPORT=21910
-PROTOCOL=protocol
Listening protocol for the agent. Specify
http
or
https
. The
default is
http
.
Table 3–3 (Cont.) Agent Configuration Parameters
Parameters Description

Configuring Java EE Components
Configuring Oracle Data Integrator 3-7
Follow the instructions in this section to configure a WebLogic Server domain:
■ Section 3.2.1.1, "Starting the Configuration Wizard"
■ Section 3.2.1.2, "Configuring Your ODI Domain"
3.2.1.1 Starting the Configuration Wizard
The Configuration Wizard is located in the
common/bin
directory in your
ODI_HOME
directory.
Start the Configuration Wizard for WebLogic Server by running the
ODI_
HOME/common/bin/config.sh
(on UNIX operating systems) or
ODI_
HOME\common\bin\config.cmd
(on Windows operating systems).
To create a log file for your configuration session, see the instructions in Section H.2.2,
"Configuration Log Files".
3.2.1.2 Configuring Your ODI Domain
After the Configuration Wizard is started, provide the required information on the
screen as described in Oracle Fusion Middleware Creating Domains Using the
Configuration Wizard.
This section contains important information for some of the screens during the domain
configuration process:
■ Selecting Components on the Select Domain Source Screen
■ Verifying the Listen Port of your ODI Managed Server
Make sure you follow the instructions carefully to successfully configure your domain
for ODI.
Selecting Components on the Select Domain Source Screen
The Select Domain Source screen shown in Figure 3–1 lists all components that are
available for configuration (the products are all from the same Middleware home). In
this example, ODI has been installed in its own Middleware home so only
ODI-specific products are shown.
You may also choose to Extend an Existing Domain with Oracle Data Integrator
components. When you extend an existing domain, only those products which have
not already been configured in the domain will be available.
Select Oracle Data Integrator - JRF Async Web Services - 11.1.1.0 only if you need it.
Selecting the ODI JRF Async Web Services option involves additional JMS
configuration screens which are not required if you are configuring only an ODI
Agent.
Note: If ODI will be used in a clustered or high availability
configuration, see "High Availability for Oracle Data Integrator" in the
Oracle Fusion Middleware High Availability Guide for additional
configuration information.
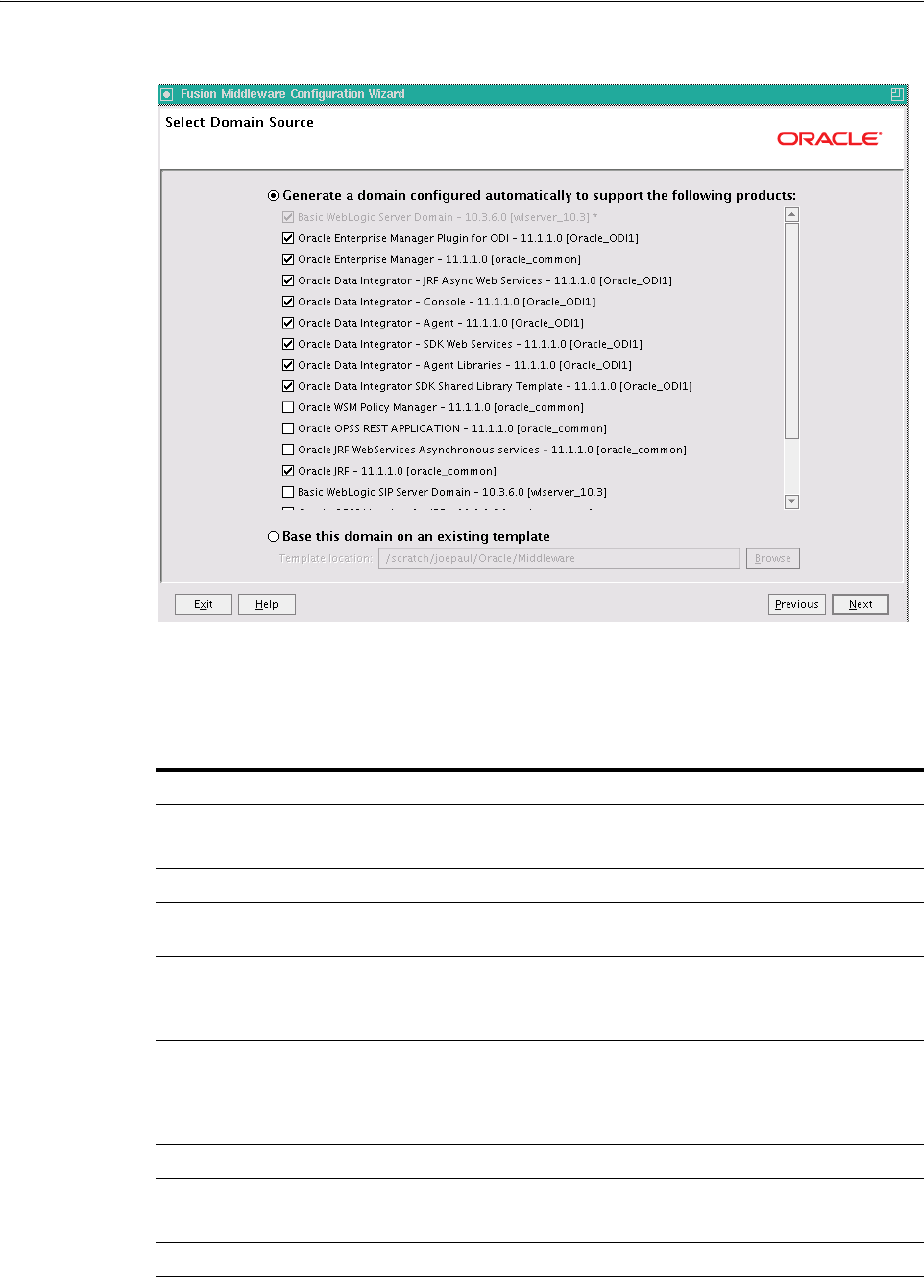
Configuring Java EE Components
3-8 Oracle Fusion Middleware Installation Guide for Oracle Data Integrator
Figure 3–1 Configuration Wizard Select Domain Source Screen with ODI Components
Some components depend on other components to also be present. The Configuration
Wizard automatically takes care of all dependencies; if you select a component then all
of its dependencies are also automatically selected (Table 3–4).
Table 3–4 ODI Components and Dependencies
Component Dependency
Oracle Enterprise Manager Plugin for ODI Oracle Enterprise Manager
Oracle JRF
Oracle Enterprise Manager Oracle JRF
Oracle Data Integrator - JRF Async Web
Services
ODI Agent
Oracle Data Integrator Console Oracle Data Integrator SDK Shared Library
Template
Oracle JRF
Oracle Data Integrator SDK Shared Library
Template
None
NOTE: The version for the template is 11.1.1.0.
The template version does not change for
patchset releases.
Oracle Data Integrator - SDK Web Services Oracle JRF
Oracle Data Integrator - Agent Oracle Data Integrator - Agent Libraries
Oracle JRF
Oracle Data Integrator - Agent Libraries Oracle JRF
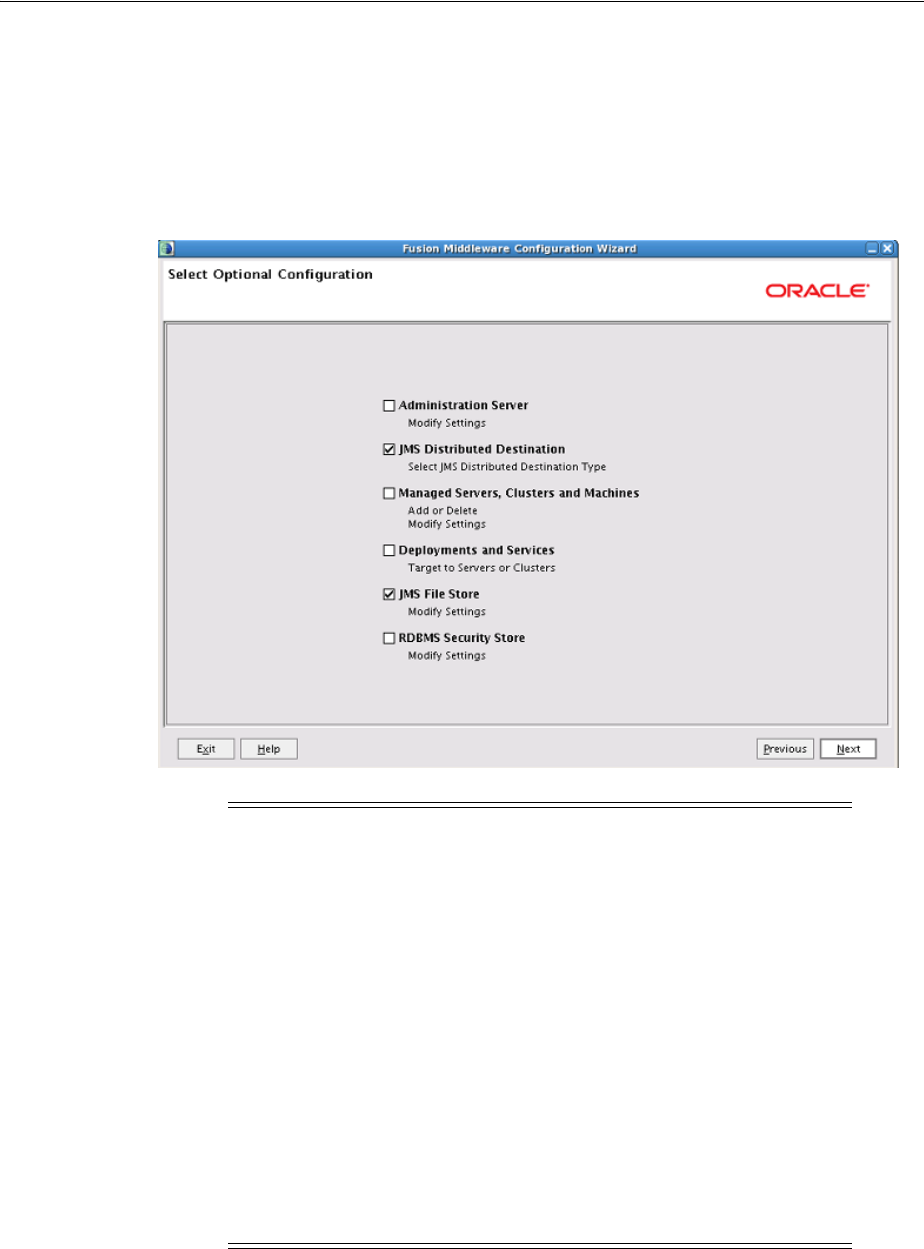
Configuring Java EE Components
Configuring Oracle Data Integrator 3-9
Selecting Optional Configuration Options
Some configuration options require you to select items on the Select Optional
Configuration screen. You should select the Administration Server, Managed
Servers, Clusters, and Machines, and Deployments and Services options, as shown
in Figure 3–2.
Figure 3–2 Select Optional Configuration Screen
Verifying the Listen Port of your ODI Managed Server
You must verify that the ODI Managed Server in your domain is configured correctly
to work with the Oracle Data Integrator Java EE components, as shown in Figure 3–3.
Note: If you select the Oracle Data Integrator - JRF Async Web
Services template in the Select Domain Source screen, and then select
JMS Distributed Destination and JMS File Store in the Select
Optional Configuration screen, the following two additional
configuration screens appear:
■ Select JMS Distribution Destination Type
■ Configure JMS File Stores
Accept the default values in these configuration screens.
For information about configuring JRF Asynchronous Web Services,
see "Using the OdiInvokeWebService Tool" in the Oracle Fusion
Middleware Developer's Guide for Oracle Data Integrator
For information about configuring OWSM for JRF-ODI Asynchronous
Web Services, Configuring OWSM Policies for JRF-ODI Asynchronous
Web Services with Callback" in the Oracle Fusion Middleware
Developer's Guide for Oracle Data Integrator.
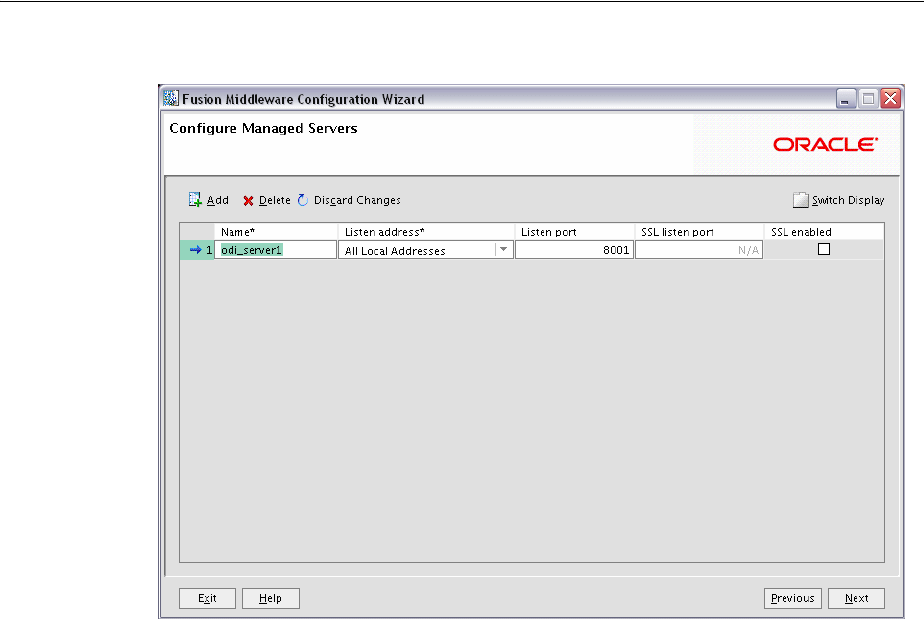
Configuring Java EE Components
3-10 Oracle Fusion Middleware Installation Guide for Oracle Data Integrator
Figure 3–3 ODI Managed Server Configuration
To get to this screen, you must first select Managed Server, Clusters, and Machines on
the Select Optional Configuration screen.
If you plan to use Oracle Enterprise Manager console to manage your ODI domain,
verify that the ODI Managed Server is using the default listening port of 8001.
Listening ports other than 8001 will not load correctly from the Enterprise Manager
Console.
Deploying the odiconsole and oraclediagent to the Administration Server
On the Target Deployments to Clusters or Servers screen, make sure Admin Server is
selected in the Target pane, then select odiconsole and oraclediagent in the
AdminServer pane on the right (Figure 3–4).
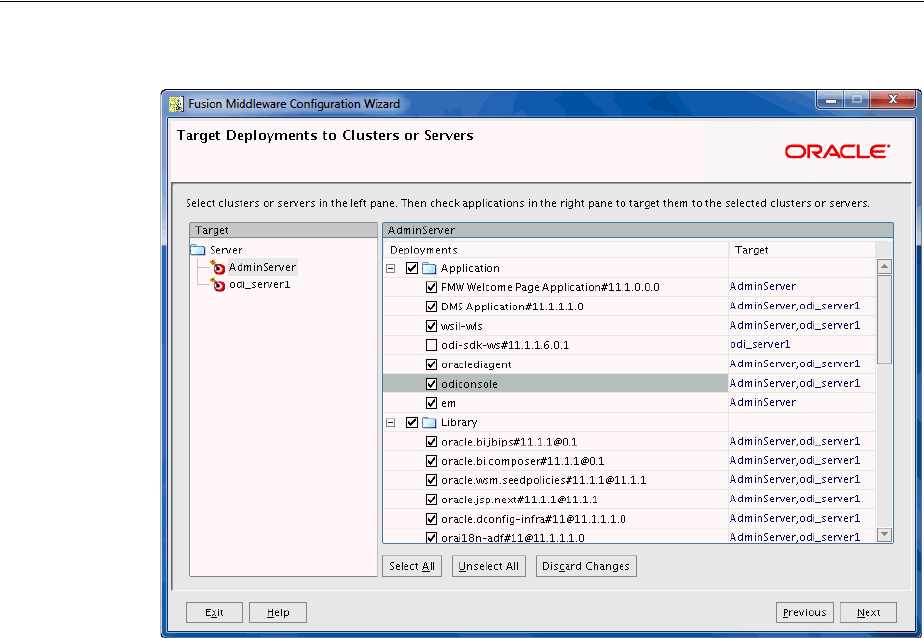
Configuring Java EE Components
Configuring Oracle Data Integrator 3-11
Figure 3–4 ODI Deployment Configuration
By default, product applications are automatically target to the Managed Server or the
cluster to which the Managed Server is assigned. This screen is used target
applications to additional servers or clusters.
Targeting JDBC Services on the Administration Server
On the Target Services to Clusters or Servers screen, make sure Admin Server is
selected in the Target pane, then select JDBC in the AdminServer pane on the right,
making sure that odiMasterRepository and odiWorkRepository are also both
selected. (Figure 3–5).
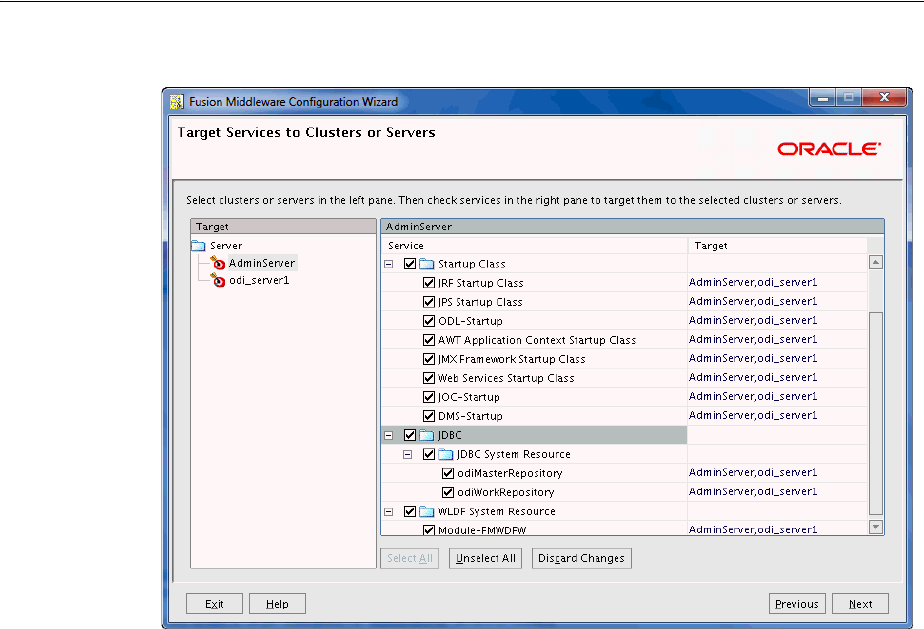
Configuring Java EE Components
3-12 Oracle Fusion Middleware Installation Guide for Oracle Data Integrator
Figure 3–5 ODI Services Configuration
By default, product services are automatically target to the Managed Server or the
cluster to which the Managed Server is assigned. This screen is used target services to
additional servers or clusters.
Creating the Domain
When you reach the Configuration Summary screen, verify that the domain
configuration details on this screen are correct, then click Create to create your
domain.
3.2.2 Starting the Servers
To start the servers in your IBM WebSphere cell, refer to "Start the IBM WebSphere
Servers" in Oracle Fusion Middleware Third-Party Application Server Guide for
instructions.
To start the servers in your WebLogic Server domain, follow the instructions in this
section:
■ Section 3.2.2.1, "Starting Node Manager"
■ Section 3.2.2.2, "Starting the Administration Server"
■ Section 3.2.2.3, "Starting the Managed Server"
3.2.2.1 Starting Node Manager
Node Manager is a WebLogic Server utility that enables you to start, shut down, and
restart Administration Server and Managed Server instances from a remote location.
Although Node Manager is optional, it is recommended if your WebLogic Server
environment hosts applications with high availability requirements.

Configuring Java EE Components
Configuring Oracle Data Integrator 3-13
A Node Manager process is not associated with a specific WebLogic domain but with a
machine. You can use the same Node Manager process to control server instances in
any WebLogic Server domain, as long as the server instances reside on the same
machine as the Node Manager process. Node Manager must run on each computer
that hosts WebLogic Server instances—whether Administration Server or Managed
Server—that you want to control with Node Manager.
Start Node Manager running the following script:
■ On UNIX operating systems:
WL_HOME/server/bin/startNodeManager.sh
■ On Windows operating systems:
WL_HOME\server\bin\startNodeManager.cmd
Replace
WL_HOME
with the full path to your WebLogic Server home directory. More
information about Node Manager can be found in Oracle Fusion Middleware Node
Manager Administrator's Guide for Oracle WebLogic Server.
3.2.2.2 Starting the Administration Server
To begin managing your domain, start the Administration Server. To start an
Administration Server that you have created, invoke the following:
■ On UNIX operating systems:
DOMAIN_HOME/bin/startWebLogic.sh
■ On Windows operating systems:
DOMAIN_HOME\bin\startWebLogic.cmd
Replace
DOMAIN_HOME
with the full path to the directory where you created the domain.
The default location is
MW_HOME\user_projects\domains\DOMAIN_NAME
.
On Windows operating systems, the Configuration Wizard creates a shortcut on the
Start menu to start the Administration Server that you created (for example, User
Projects >
DOMAIN_NAME
> Start Admin Server for WebLogic Domain).
If the server prompts you to enter a username and password, enter the name of a
WebLogic Server user who has permission to start servers. For more information, see
"Provide User Credentials to Start and Stop Servers" in Oracle Fusion Middleware
Managing Server Startup and Shutdown for Oracle WebLogic Server.
For more information on the various methods you can use to start the Administration
Server, see "Starting and Stopping Servers" in Oracle Fusion Middleware Managing Server
Startup and Shutdown for Oracle WebLogic Server.
To access the Administration Server Console, use the following URL:
http://administration_server_host:administration_server_port/console
Provide the Administration Server login credentials when you see the following
(Figure 3–6):
Note: In a development environment, it is usually sufficient to start
an Administration Server and deploy your applications directly on the
Administration Server. In a production environment, you typically
create Managed Servers to run applications.
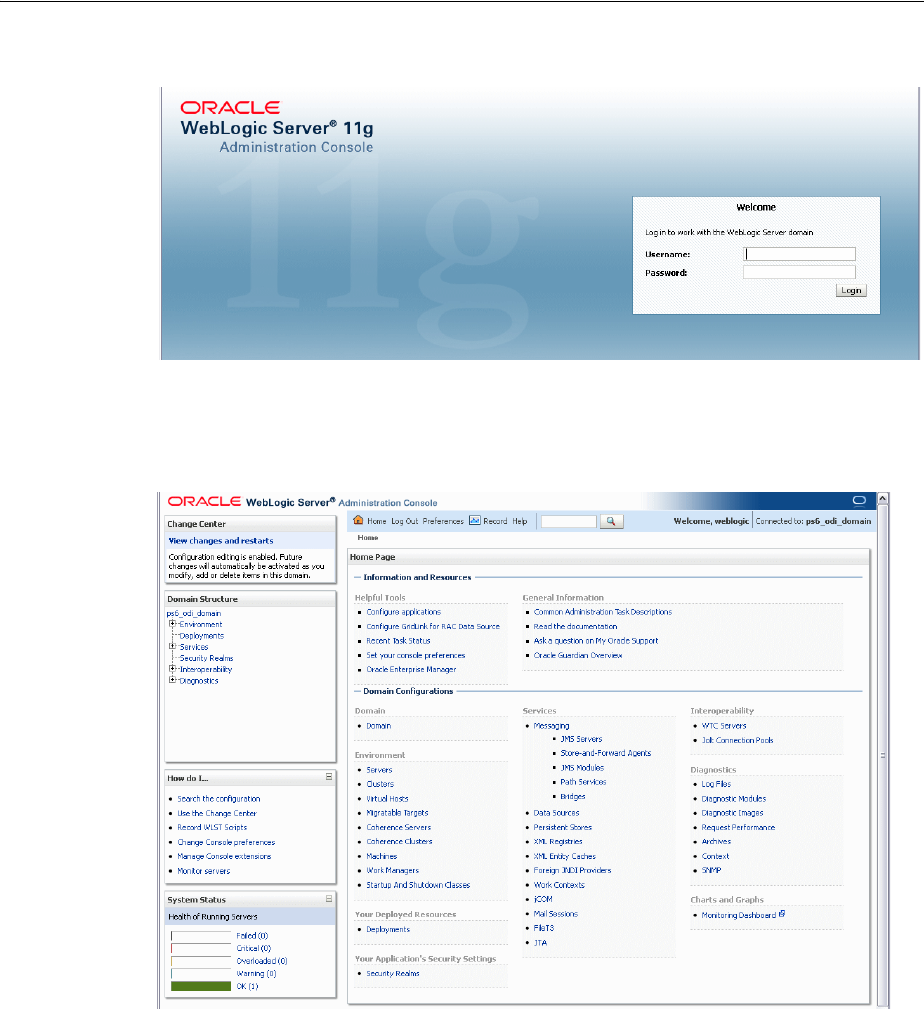
Configuring Java EE Components
3-14 Oracle Fusion Middleware Installation Guide for Oracle Data Integrator
Figure 3–6 Administration Console Login Screen
After you log in, you should see something similar to Figure 3–7:
Figure 3–7 Administration Server Console
If you configured your Administration Server to accept SSL connection, use the
following URL to access the Administration Server console in secure mode:
https://administration_server_host:secure_administration_server_port/console
3.2.2.3 Starting the Managed Server
To start the ODI Managed Server, run the following command:
■ On UNIX operating systems:
DOMAIN_HOME/bin/startManagedWebLogic.sh managed_server_name
■ On Windows operating systems:
DOMAIN_HOME\bin\startManagedWebLogic.cmd managed_server_name
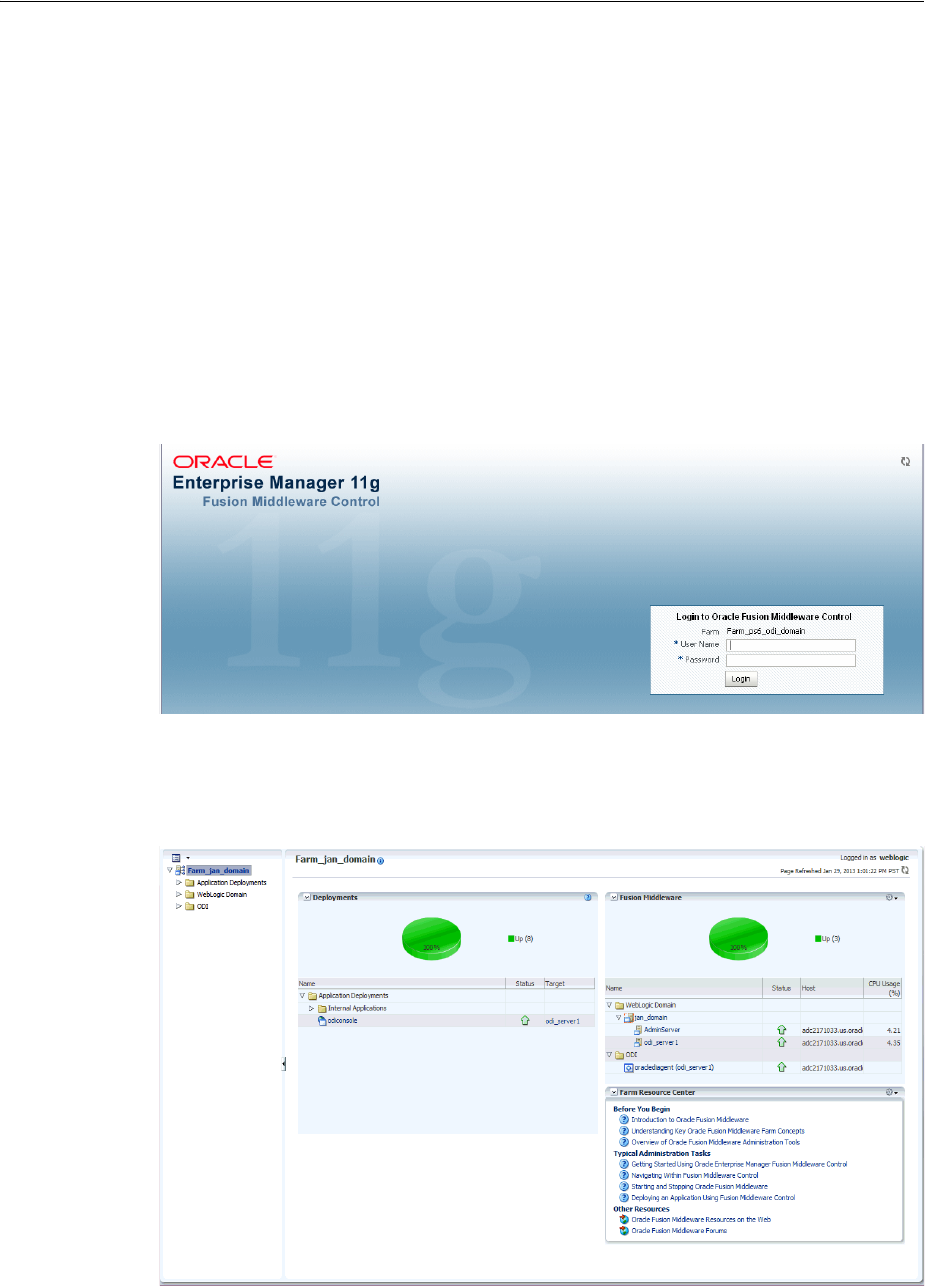
Configuring Java EE Components
Configuring Oracle Data Integrator 3-15
Note that this command requires that you specify the name of the Managed Server
you want to start. The default name of the ODI Managed Server is
odi_server1
.
Before the Managed Server is started, you will be prompted for the WebLogic Server
user name and password. These were provided on the Configure Administrator
Username and Password Screen in the Configuration Wizard. See Oracle Fusion
Middleware Creating Domains Using the Configuration Wizard for more information.
If you selected the Oracle Enterprise Manager - 11.1.1.0 [oracle_common] component
during domain creation, you can access Oracle Fusion Middleware Control to manage
odi_server1
using the following URL:
http://administration_server_host:administration_server_port/em
When prompted, provide the login credentials (Figure 3–8):
Figure 3–8 Fusion Middleware Control Login Screen
After you log in, you should see something similar to Figure 3–9:
Figure 3–9 Oracle Fusion Middleware Control

Configuring Java EE Components
3-16 Oracle Fusion Middleware Installation Guide for Oracle Data Integrator
3.2.3 Adding Credential Store Entries
The Oracle Data Integrator user names and passwords required by the Java EE
components to connect to the repositories are not stored in ODI Configuration files.
This information is stored in the Application Server credential store. When they need
to authenticate to the repository, the ODI Java EE components refer to credential store
entries, identified by a map named by default
oracle.odi.credmap
and a key.
This section provides instructions for creating credential store entries as follows:
■ Section 3.2.3.1, "Adding Credential Store Entries for the Java EE Agent"
■ Section 3.2.3.2, "Adding Credential Store Entries for the Oracle Enterprise
Manager"
■ Section 3.2.3.3, "Adding Credential Store Entries for IBM WebSphere Server"
3.2.3.1 Adding Credential Store Entries for the Java EE Agent
The Java EE agent requires a single key storing the login and password for a user that
will be used to connect to the repositories. The key is the Supervisor Key value
provided when creating the agent (this key is
SUPERVISOR
in the default agent
template) and the user and password values must be a valid user name and password
pair for a user with Supervisor privileges.
For example, if you use the default template and have created a repository with a
SUPERVISOR
user, you should create a key using the following WLST command:
1. Make sure the Administration Server is up and running.
2. Navigate to the
ODI_HOME/common/bin
directory.
Note that you must use WLST from this directory when using Oracle Data
Integrator. The default WLST script provided with the Oracle WebLogic Server
will not work. For more information on using WLST commands, see Oracle Fusion
Middleware WebLogic Scripting Tool Command Reference.
3. Launch
wlst
.
■ On UNIX operating systems:
./wlst.sh
■ On Windows operating systems:
wlst.cmd
4. Execute the following WLST command substituting your user names and
passwords:
CAUTION: Modifications to the credential store entries are only
required in the following situations:
■ When the ODI Console is deployed in one domain and the ODI
Agent is deployed in a different domain.
■ When the ODI Console is deployed on one Managed Server (for
example,
ms1
) and the ODI Agent is deployed on a different
Managed Server (for example,
ms2
), and both Managed Servers
are part of the same domain.
If neither case applies, then credential store entries are not required.

Configuring Java EE Components
Configuring Oracle Data Integrator 3-17
connect('weblogic','welcome1','t3://localhost:7001')
createCred(map="oracle.odi.credmap", key="SUPERVISOR", user="SUPERVISOR",
password="supervisor1", desc="Key for Supervisor")
disconnect()
5. Restart the Administration Server.
3.2.3.2 Adding Credential Store Entries for the Oracle Enterprise Manager
Oracle Enterprise Manager requires an ODI Supervisor key to connect the agents
deployed on a domain and manage them. This key is similar to the key created for the
Java EE Agent.
In addition to this key, Oracle Enterprise Manager requires a second key containing
the username and password of a WebLogic administrator for each domain into which
ODI Java EE Agents are deployed and must to be managed.
The second key is named after the domain, and contains a valid WebLogic
administrator username and password.
For example, if you use the default template and have it deployed within a domain
called based domain with the WebLogic administrator called WebLogic, you can create
the keys using the following WLST commands:
createCred(map="oracle.odi.credmap", key="SUPERVISOR", user="SUPERVISOR",
password="******", desc="Key for Supervisor")
createCred(map="oracle.odi.credmap", key="base_domain", user="weblogic",
password="*******", desc="Username and password for base_domain")
Example Scenario:
1. Three agents OdiAgent1, OdiAgent2 and OdiAgent3 are defined as physical
agents in the topology.
2. OdiAgent1 and OdiAgent2 are Java EE agents and OdiAgent3 is a Standalone
agent.
3. OdiAgent1 is deployed on a WLS domain with the name agent_1_domain and
OdiAgent2 is deployed on a WLS domain with the name agent_2_domain. Both
domains use a WebLogic user as their administrator.
4. A user called SUPERVISOR is declared in the Master Repository, and
SUPERVISOR
is specified as the Supervisor Key value when creating the Java EE agent
templates.
The following sequence of WLST commands creates the appropriate entries:
createCred(map="oracle.odi.credmap", key="SUPERVISOR", user="SUPERVISOR",
password="SUPERVISOR", desc="Key for Supervisor")
createCred(map="oracle.odi.credmap", key="agent_1_domain", user="weblogic",
password="*****", desc="Username and password for agent_1_domain")
createCred(map="oracle.odi.credmap", key="agent_2_domain", user="weblogic",
password="*****", desc="Username and password for agent_2_domain")
Once the credential maps are created, you can start the Java EE components. Agents
are fully functional, but Oracle Data Integrator Console and Oracle Enterprise
Manager may need extra configuration. See "Configuring ODI Console Connections"
and "Configuring Oracle Fusion Middleware Control with ODI Plugin" for more
information.

Configuring Java EE Components
3-18 Oracle Fusion Middleware Installation Guide for Oracle Data Integrator
For more information on Oracle Data Integrator JEE configuration options, see "High
Availability for Oracle Data Integrator" in the Oracle Fusion Middleware High Availability
Guide.
3.2.3.3 Adding Credential Store Entries for IBM WebSphere Server
If you are configuring Oracle Data Integrator using IBM WebSphere as the application
server, you can add credential store entries as described below.
1. Go to
ODI_HOME/common/bin
directory and start the
wsadmin
tool. Use the
following command, substituting your own user names and passwords:
./wsadmin.sh -profileName $NODE_PROFILE -connType SOAP -user wasadmin -password
welcome1
2. Create the credential store entry for the Java EE agent:
Opss.createCred(map="oracle.odi.credmap", key="SUPERVISOR", user="SUPERVISOR",
password="SUNOPSIS", desc="ODI SUPERVISOR Crendential")
3. Create the credential store entry for Oracle Enterprise Manager:
Opss.createCred(map="oracle.odi.credmap", key="xcell", user="wasadmin",
password="welcome1", desc="WAS credentials")
4. Type
exit
to exit from the
wsadmin
tool.
3.2.4 Declaring the Java EE Agent in Topology
All Java EE components are pre-configured in default templates. The default Java EE
agent has a template, but the agent is not declared in the repository. Therefore, the
agent must be configured in the repository.
1. Start the ODI Console.
2.
3. In Topology Navigator, connect to the Master Repository and declare the Java EE
agent and provide the following:
■ Name - Name of the physical agent.
Caution: If you use the default Java EE agent, then you must create an agent
called
OracleDIAgent
(case sensitive). In addition, if you use the default agent
created during the Java EE install, you do not have to create a new template.
See "Managing Agents" in the Oracle Fusion Middleware Developer's Guide for
Oracle Data Integrator for more information.
■ Host - Name of the host where the Java EE agent will be started.
■ Port: Port number of the WLS Server where the Java EE agent is deployed.
■ Protocol: Protocol to use for the agent connection. Possible values are
http
or
https
. Default is
http
.
■ Web Application Context: Default value is
oraclediagent
. The web
application context should match the name set when deploying the agent
template.
For detailed instructions on declaring the Java EE agent in Topology, see "Managing
Agents" in the Oracle Fusion Middleware Developer's Guide for Oracle Data Integrator.

Configuring Java EE Components
Configuring Oracle Data Integrator 3-19
3.2.5 Generating Java EE Agent Template
A Java EE agent template can be generated from the ODI Studio. This is required to
bundle the agent code with extra drivers with the source or target and Work or Master
datasources declared in the Topology. For more information on datasource declaration,
deployment and template generation in ODI Studio, see "Java EE Agent" in the Oracle
Fusion Middleware Developer's Guide for Oracle Data Integrator.
Java EE templates can also be generated through the following scripts, located in the
ODI_HOME/common/bin
directory:
For Oracle WebLogic Server:
generate_agent_wls_template.[sh|cmd]
For IBM WebSphere:
generate_agent_was_template.[sh|cmd]
3.2.6 Configuring ODI Console Connections
The Oracle Data Integrator Console template is created (by default) with two
connections aliases:
■ Work Repository connects a Work Repository after the two default datasources
jdbc/odiMasterRepository
and
jdbc/odiWorkRepository
.
■ Master Repository connects a Master Repository after the default datasource
jdbc/odiMasterRepository
.
If more repository connections are required, either to access these repositories from
ODI Console or to monitor them from Oracle Enterprise Manager, add the connections
from the ODI Console interface.
To add new connections to ODI Console:
1. Start the Oracle Data Integrator Console application:
http://odi_host:port/odiconsole
2. Provide the login credentials (for example,
SUPERVISOR
as the User ID along with
your password).
3. Open the Management tab.
If you have not yet configured a connection, a link to the Management tab appears
at the top right corner of the login screen.
4. Expand the Repository Connections node.
5. Click the Create icon in the Navigation tab toolbar. A Create Repository
Connection dialog for this object appears.
6. Provide the values for the repository connection:
Note: Default templates contain the following datasources for
connecting the repositories:
jdbc/odiMasterRepository
and
jdbc/odiWorkRepository
. These JNDI names are referred to in the
default Run-time Agent or Oracle Data Integrator Console templates.
If you use a generated agent template, the datasources included in this
template will be those declared in the topology for this agent. This
template will also optionally contain the driver files.

Configuring Java EE Components
3-20 Oracle Fusion Middleware Installation Guide for Oracle Data Integrator
■ Connection Alias: Name of the connection that will appear on the Login page.
■ Master JNDI URL: JNDI URL of the datasource to connect the master
repository database.
For example:
jdbc/odiMasterRepository
■ Supervisor User Name: Name of the Oracle Data Integrator user with
Supervisor privileges that Oracle Data Integrator Console will use to connect
to the repository. This user name is case-sensitive.
This user's password must be declared in the WebLogic Server Credential
Store.
■ Work JNDI URL: JNDI URL of the datasource to connect the work repository
database. If no value is given in this field, the repository connection will allow
connection to the master only, and the Navigation will be limited to Topology
information.
■ JNDI URL in JNDI Standard format?: Check this option if you want to use
the Environment Naming Context (ENC). When this option is checked, Oracle
Data Integrator Console automatically prefixes the data source name with the
string
java:comp/env/
to identify it in the application server's JNDI directory.
Note that the JNDI Standard is not supported by Oracle WebLogic Server or
for global data sources.
For example:
jdbc/odiWorkRepository
■ Default: Check this option if you want this Repository Connection to be
selected by default on the login page.
7. Click Save. The new Repository Connection appears in the Management
Navigation tab.
See "Performing Administrative Operations" in the Oracle Fusion Middleware
Developer's Guide for Oracle Data Integrator for more information about creating
repository connections.
3.2.7 Configuring Oracle Fusion Middleware Control with ODI Plugin
Oracle Fusion Middleware Control can be used in conjunction with ODI Console to
obtain information about your ODI agents, repositories and sessions. From Oracle
Fusion Middleware Control (see Figure 3–9), expand the ODI menu item and click on
your agent name in the Deployments pane.
Figure 3–10 shows detailed information about the ODI Console application.
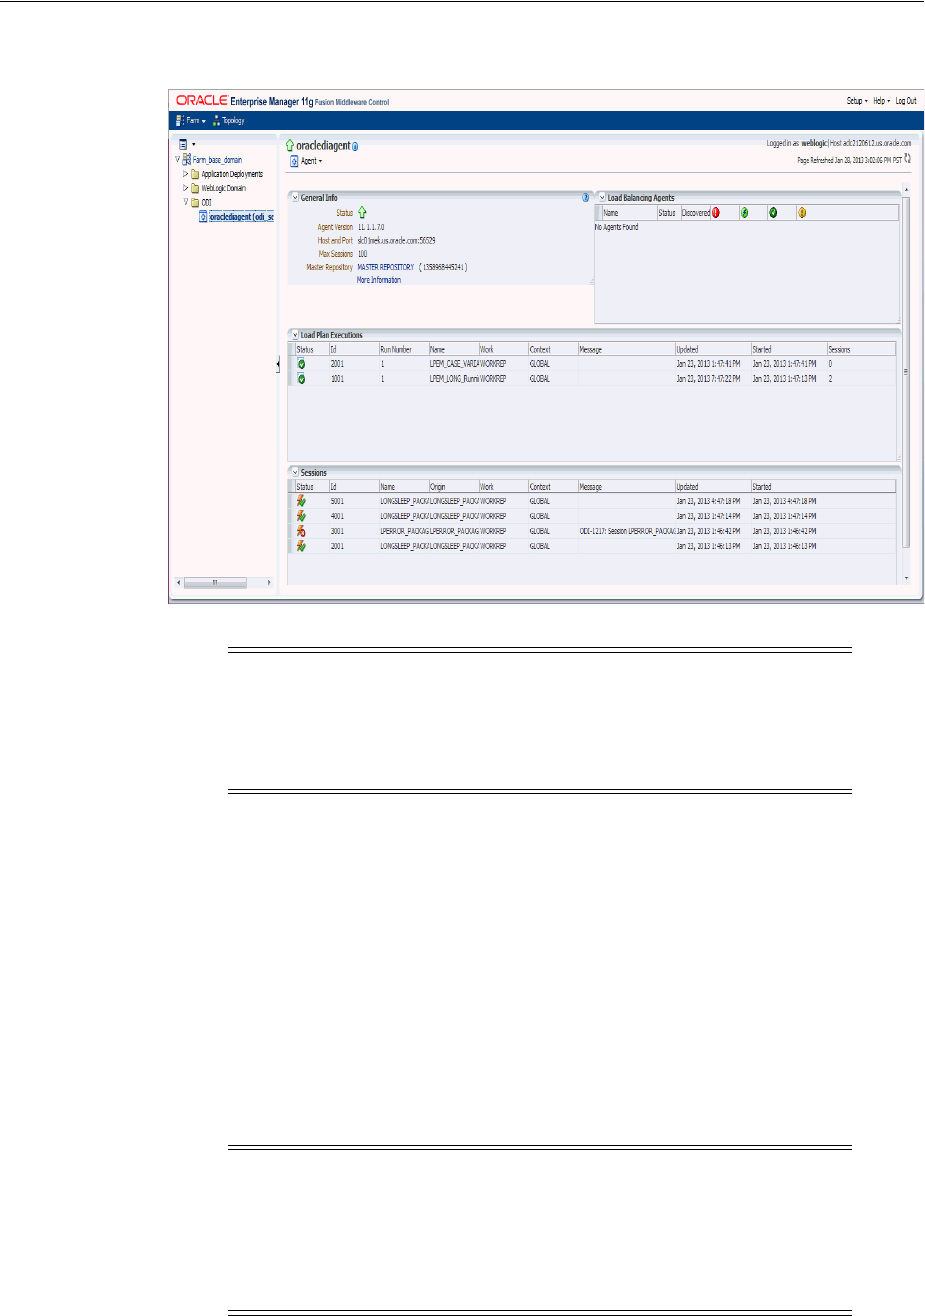
Configuring Java EE Components
Configuring Oracle Data Integrator 3-21
Figure 3–10 ODI Console Within Oracle Fusion Middleware Control
Domain discovery is performed with the following process:
1. Oracle Enterprise Manager finds the Oracle Data Integrator Console configuration
file storing the Repository Connection (
repositories.xml
) in the location
specified in the configuration file
DOMAIN_
HOME/config/oracledi/config.properties
.
2. Oracle Enterprise Manager parses the repository connections declared in Oracle
Data Integrator Console, tries to connect all the masters and retrieves their status
and list of agents. Even if an agent or repository is down, it will appear in the
Oracle Enterprise Manager.
3. Any agent on the domain will appear in the domain with its status and will start
posting notifications (if started).
Note: To use Oracle Enterprise Manager with Oracle Data Integrator
Console, and your agent resides in a separate domain, you must first
create the appropriate Credential Store Entries for Oracle Enterprise
Manager as described in Section 3.2.3, "Adding Credential Store
Entries".
Note: If you want Oracle Enterprise Manager to drill down into
Oracle Data Integrator Console using a different URL than the one
detected by Oracle Enterprise Manager, you will need to reconfigure
this in Oracle Enterprise Manager. Reconfiguration is not mandatory
but may be needed when using a firewall for HTTP load balancing to
Oracle Data Integrator Console.

Integrating ODI with Oracle Access Manager 11g
3-22 Oracle Fusion Middleware Installation Guide for Oracle Data Integrator
For more information on using Oracle Enterprise Manager, see the Oracle Fusion
Middleware Administrator's Guide.
3.3 Integrating ODI with Oracle Access Manager 11g
To secure your Oracle Data Integrator with Oracle Access Manager 11g, follow the
instructions in this section
1. Install and configure Oracle Access Manager (OAM), Oracle HTTP Server (OHS),
and WebGate as described in "Installing the Oracle Identity Management 11g
Software" in the Oracle Fusion Middleware Installation Guide for Oracle Identity
Management.
2. Use the Oracle Access Manager remote registration tool (
oamreg
) to register an
Oracle OAM Agent, specifying protected and public Oracle Data Integrator URIs.
The protected URIs that should be specified are
/odiconsole
,
/em
, and all of their
subdirectories.
For more information, see "Provisioning an OAM Agent with Oracle Access
Manager 11g" in Oracle Fusion Middleware Application Security Guide and "Setting
Up OAM Agents" in Oracle Fusion Middleware Installation Guide for Oracle Identity
Management.
3. Append Oracle Data Integrator entries to
mod_wl_ohs.conf
file, adding the proxy
URLs for ODI Console and Fusion Middleware Control. For example:
<Location /odiconsole>
SetHandler weblogic-handler
WebLogicHost hostname
WebLogicPort portnumber
</Location>
Replace
hostname
with the name of the machine hosting the Oracle Data Integrator
instance, and
portnumber
with the port of the Oracle WebLogic Server domain
hosting Oracle Data Integrator.
4. Configure your Oracle Data Integrator domain by ensuring that the following
tasks are performed. For more information, see See "Deploying the Oracle Access
Manager 11g SSO Solution" in the Oracle Fusion Middleware Application Security
Guide.
a. Configure the OAM Identity Asserter. The control flag for the OAM Identity
Asserter must be set to
REQUIRED
, and both
OAM_REMOTE_USER
and
ObSSOCookie
must be selected as Active Types.
For more information, see "Identity Asserter for Single Sign-on Function,"
"About Using the Identity Asserter for SSO with OAM 11g and 11g WebGates,"
and "Configuring Identity Assertion for SSO with Oracle Access Manager 11g"
in the Oracle Fusion Middleware Application Security Guide.
b. Configure an Authentication provider. This is necessary to specify the user
store, such as Oracle Internet Directory (OID) or another external LDAP
Note: This and other related links in this section may take you to the
latest version of Oracle Fusion Middleware Installation Guide for Oracle
Identity Management, which may or may not be the same version as
your Oracle Data Integrator.

Integrating ODI with Oracle Access Manager 11g
Configuring Oracle Data Integrator 3-23
server. For example, if OAM is using OID, then an OID Authentication
provider must be added to the Oracle Data Integrator domain.
For more information, see "Installing the Authentication Provider with Oracle
Access Manager 11g" and "Setting Up Providers for Oracle Access Manager
Identity Assertion" in Oracle Fusion Middleware Application Security Guide.
c. Configure the OAM OPSS Single Sign-On provider.
For more information, see "Introduction to Single Sign-On in Oracle Fusion
Middleware" in Oracle Fusion Middleware Application Security Guide.
5. Configure
oraclediagent
in Fusion Middleware Control to use Oracle HTTP
Server:
a. Login to Fusion Middleware Control.
b. In the navigation pane on the left, select ODI > oraclediagent (odi_server1).
c. In the oraclediagent window, select the Agent drop-down menu, then select
ODI Console Administration > Basic Configuration.
You should see something like the following:
d. In the Host field, specify the host name of your Oracle HTTP Server (this is the
same Oracle HTTP Server that was installed in Step 1 in this section).
e. In the Port field, specify the port number for your Oracle HTTP Server (this is
the same Oracle HTTP Server that was installed in Step 1 in this section).
After installing and configuring OAM 11g, check that you can access Oracle Data
Integrator Console via Fusion Middleware Control, and that the login is giving you
access to all of your configured applications without prompting you to sign in again.
Also test global logout where available and make sure you are logged out of all other
related applications.
For more information, see Oracle Fusion Middleware Administrator's Guide for Oracle
Access Manager and Oracle Fusion Middleware Application Security Guide.

Integrating ODI with Oracle Access Manager 11g
3-24 Oracle Fusion Middleware Installation Guide for Oracle Data Integrator

4
Deinstalling Oracle Data Integrator 4-1
4
Deinstalling Oracle Data Integrator
This appendix describes how to remove Oracle Data Integrator products from your
system.
You should always use the instructions provided in this chapter for removing the
software. If you try to remove the software manually, you may experience problems
when you try to reinstall the software again at a later time. Following the procedures
in this chapter will ensure that the software is properly removed. See Section 4.4,
"Reinstallation" for more information.
The following topics are covered:
■ Section 4.1, "Performing Pre-Deinstallation Tasks"
■ Section 4.2, "Deinstalling Oracle Data Integrator"
■ Section 4.3, "Uninstalling Your Application Server"
■ Section 4.4, "Reinstallation"
4.1 Performing Pre-Deinstallation Tasks
This section describes the tasks that should be performed prior to removing your
Oracle Data Integrator software.
The following topics are covered:
■ Section 4.1.1, "Stopping Oracle Fusion Middleware"
■ Section 4.1.2, "Stopping a Standalone Agent"
■ Section 4.1.3, "Removing the Oracle Data Integrator Schemas"
4.1.1 Stopping Oracle Fusion Middleware
Before deinstalling Oracle Fusion Middleware software components, you should stop
all servers and processes.
For more information about starting and stopping Oracle Fusion Middleware, refer to
"Starting and Stopping Oracle Fusion Middleware" in Oracle Fusion Middleware
Administrator's Guide.
4.1.2 Stopping a Standalone Agent
You can stop a Standalone Agent by stopping the Java process of this agent. You can
also stop a Standalone Agent remotely using the
agentstop
command.
To stop a Standalone Agent:

Performing Pre-Deinstallation Tasks
4-2 Oracle Fusion Middleware Installation Guide for Oracle Data Integrator
1.
Go to the
ODI_HOME/oracledi/agent/bin
(on UNIX operating systems) or
ODI_
HOME\oracledi\agent\bin
(on Windows operating systems) directory of the
Oracle Data Integrator Agent.
2. Enter the following command to stop the agent.
On UNIX operating systems:
./agentstop.sh
On Windows operating systems:
agentstop.bat
For more information on stopping the agent with OPMN, see Appendix G, "OPMN
Configuration for Standalone Agent".
AgentStop Command Parameters
Table 4–1 lists the different parameters for the command to stop the agent. The
parameters are preceded by the "-" character and the possible values are preceded by
the "=" character. When entering the command, consider the operating system specific
syntax of the delimiters.
4.1.3 Removing the Oracle Data Integrator Schemas
Run the Repository Creation Utility (RCU) to drop the Oracle Data Integrator Master
and Work Repositories from your database. For instructions, see "Dropping Schemas"
in Oracle Fusion Middleware Repository Creation Utility User's Guide.
If you manually installed the repositories, use the database tools to remove the
schemas storing the repositories. See your database administration documentation for
more information.
Note: For security reasons, it is only possible to stop an agent from a
command line launched on the same machine that the agent's process
was started. It is not possible to stop a remote agent.
Table 4–1 AgentStop Command Parameters
Parameter Description
-AGENT_URL=agent_url
URL of the standalone agent to stop:
http://host:port/oraclediagent
-NAME=agent_name
If this parameter is specified, the physical agent whose name is provided is
killed. This agent may be a local or remote agent, and must be declared in the
Master Repository.
-IMMEDIATE=true | false
If this parameter is set to
true
then the agent is killed without waiting for
completion of its running sessions. If it is set to
false
then the agent is killed
after all its running sessions reach completion or after the MAX_WAIT time-out
is reached. Default value is
true
.
-MAX_WAIT=stop_timeout_in_
milliseconds
This parameter can be used when IMMEDIATE is set to
false
. It defines a
timeout in milliseconds after which the agent is killed regardless of the running
sessions. Default is 0, meaning no timeout and the agent is killed after all its
running sessions reach completion.

Deinstalling Oracle Data Integrator
Deinstalling Oracle Data Integrator 4-3
4.2 Deinstalling Oracle Data Integrator
This section contains information and instructions for removing Oracle Data Integrator
components. When you run the Oracle Data Integrator deinstaller, it removes
everything under the Oracle home (referred to in this guide as
ODI_HOME
) from which
the deinstaller is started. Be sure that no system components are using the Oracle
home you want to remove.
The following topics are covered in this section:
■ Section 4.2.1, "Starting the Deinstaller"
■ Section 4.2.2, "Removing the ODI Home"
■ Section 4.2.3, "Removing the Oracle Common Home"
■ Section 4.2.4, "Manually Removing Your Oracle Home Directories"
■ Section 4.2.5, "Removing the Program Groups (Windows Only)"
4.2.1 Starting the Deinstaller
To start the Oracle Data Integrator deinstaller, go to the
ODI_HOME/oui/bin
(on UNIX
operating systems) or
ODI_HOME\oui\bin
(on Windows operating systems) directory
and start the deinstaller.
■ On UNIX operating systems:
./runInstaller.sh -deinstall
■ On Windows operating systems:
setup.exe -deinstall
On Windows operating systems, you can also start the Deinstaller from the Start
menu by selecting Programs > Oracle Home - ODI_HOME > Uninstall.
Follow the instructions in Table 4–2 to remove the
ODI_HOME
.
4.2.2 Removing the ODI Home
After starting the Deinstaller, follow the instructions in Table 4–2 to remove your
ODI_
HOME
.
Caution: You must reboot your Windows operating system after
running the Deinstaller. Failure to do so may result in an incomplete
deinstallation.
Table 4–2 Removing Your Oracle Data Integrator Home
Screen Description and Action Required
Welcome The installer displays this screen when you are about to deinstall
one or more Oracle Fusion Middleware software components.

Deinstalling Oracle Data Integrator
4-4 Oracle Fusion Middleware Installation Guide for Oracle Data Integrator
4.2.3 Removing the Oracle Common Home
This section describes how to remove the
oracle_common
directory in your
Middleware home. This directory contains its own deinstaller in
MW_HOME/oracle_
common/oui/bin
(on UNIX operating systems) or
MW_HOME\oracle_common\oui\bin
(on Windows operating systems), just like any other Oracle home directory.
The deinstaller requires the location of a Java Runtime Environment (JRE) on your
system. When you installed Oracle WebLogic Server, a JRE was installed on your
system. You can use this location (the location of the JRE directory) to start the
installer. The default location for the JRE is
MW_HOME/jdk160_version
(on UNIX
operating systems) or
MW_HOME\jdk160_version
(on Windows operating systems),
where
MW_HOME
is the Middleware home directory.
On 64-bit platforms, the JRE location is the
JAVA_HOME
you used to install Oracle
WebLogic Server.
On UNIX operating systems:
./runInstaller -deinstall -jreLoc [JRE_LOCATION]
On Windows operating systems:
setup.exe -deinstall -jreLoc [JRE_LOCATION]
You must specify the absolute path to your
JRE_LOCATION
; relative paths will not work.
After the deinstaller is started, follow the instructions in Table 4–2 to remove the
Oracle Common home.
4.2.4 Manually Removing Your Oracle Home Directories
If you selected No on the warning screen during deinstallation, you must manually
remove your Oracle home directories and all sub-directories. For example, if your ODI
Oracle home directory was
/home/Oracle/Middleware/Oracle_ODI1
on a UNIX
operating system:
> cd /home/Oracle/Middleware
> rm -rf Oracle_ODI1
Deinstall Oracle Home Verify the Oracle home you are about to deinstall.
Click Deinstall to continue.
On the Warning screen, select whether or not you want the
deinstaller to remove the Oracle home directory in addition to
removing the software.
Click Yes to have the deinstaller remove the software and Oracle
home, No to remove only the software, or Cancel to return to the
previous screen.
If you select No, go to Section 4.2.4, "Manually Removing Your
Oracle Home Directories" for instructions on how to manually
remove your Oracle home directory.
Deinstallation Progress This screen shows the progress and status of the deinstallation.
Deinstallation Complete This screen summarizes the deinstallation that was just
completed.
Click Finish to dismiss the screen.
Table 4–2 (Cont.) Removing Your Oracle Data Integrator Home
Screen Description and Action Required

Uninstalling Your Application Server
Deinstalling Oracle Data Integrator 4-5
On a Windows operating system, if your ODI Oracle home directory was
C:\Oracle\Middleware\Oracle_ODI1
, use a file manager window and navigate to the
C:\Oracle\Middleware
directory, then right-click on the
Oracle_ODI1
folder and select
Delete.
The same procedure can be used to manually remove the Oracle Common home
(
oracle_common
) directory.
4.2.5 Removing the Program Groups (Windows Only)
On Windows operating systems, you must also manually remove the program groups
from the
Start Menu\Programs
folder. As an example (the folder names and program
group names on your system may be different), you might remove the following from
C:\Documents and Settings\All Users\Start Menu\Programs
:
■ Oracle Fusion Middleware 11.1.1.n.n
■ Oracle Data Integrator 11g - Home1
■ Oracle WebLogic
4.3 Uninstalling Your Application Server
After you have removed your Oracle Data Integrator software, you can choose to
remove your application server from your system. Before doing so, make sure there
are no other products using the application server; those products will no longer
function once the application server is removed.
This section contains the following topics:
■ Section 4.3.1, "Removing Oracle WebLogic Server"
■ Section 4.3.2, "Removing IBM WebSphere"
4.3.1 Removing Oracle WebLogic Server
Refer to "Uninstalling the Software" in Oracle Fusion Middleware Installation Guide for
Oracle WebLogic Server for instructions on how to remove Oracle WebLogic Server.
After you have removed the Oracle WebLogic Server, you must manually remove the
Oracle Fusion Middleware home directory. For example, if your Oracle Fusion
Middleware home directory was
/home/Oracle/Middleware
on a UNIX operating
system:
> cd /home/Oracle
> rm -rf Middleware
On a Windows operating system, if your Middleware home directory was
C:\Oracle\Middleware
, use a file manager window and navigate to the
C:\Oracle
directory
, then right-click the Oracle Fusion Middleware folder and select Delete.
4.3.2 Removing IBM WebSphere
Refer to your IBM WebSphere documentation for instructions on how to remove IBM
WebSphere from your system.
Note: You should reboot your computer after you have finished
removing all of your programs to ensure proper cleanup.

Reinstallation
4-6 Oracle Fusion Middleware Installation Guide for Oracle Data Integrator
4.4 Reinstallation
The installer does not allow reinstallation of Oracle Data Integrator in a directory that
already contains an Oracle instance. To reinstall Oracle Data Integrator in the same
directory as before, you must:
1. Follow the instructions in Section 4.2, "Deinstalling Oracle Data Integrator" to
remove all Oracle Data Integrator components from the
ODI_HOME
directory.
2. Follow the instructions in Chapter 2, "Installing Oracle Data Integrator" to reinstall
the software.

A
Installation Screens for Oracle Data Integrator A-1
A
Installation Screens for Oracle Data Integrator
This appendix contains images and descriptions for all of the Oracle Data Integrator
installation and configuration screens.
The following topics are covered:
■ Section A.1, "Flowchart of the Oracle Data Integrator Installation Screens"
■ Section A.2, "Descriptions of the Oracle Data Integrator Installation Screens"
A.1 Flowchart of the Oracle Data Integrator Installation Screens
Figure A–1 shows the screens you will see during the Oracle Data Integrator
installation based on the options you choose during the installation process.
Each screen is described in detail in Section A.2, "Descriptions of the Oracle Data
Integrator Installation Screens".
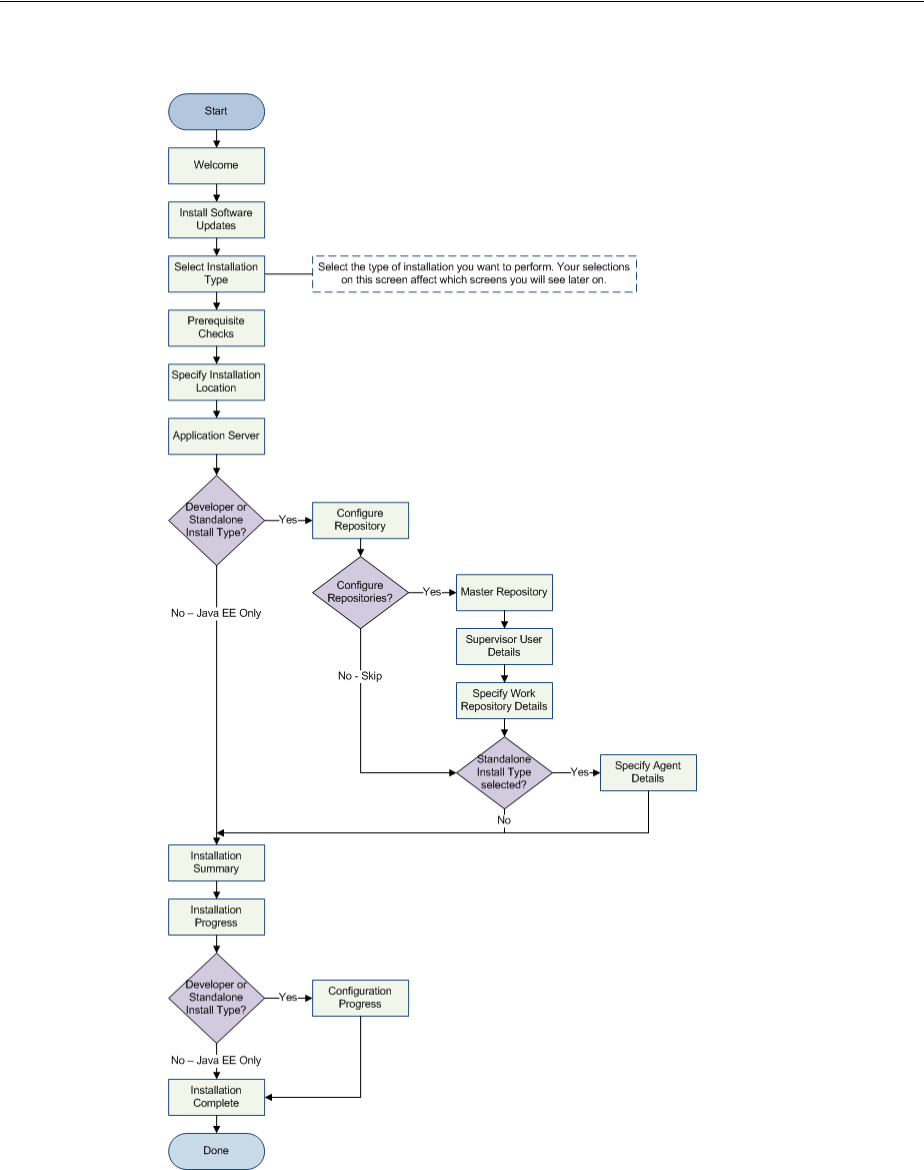
Descriptions of the Oracle Data Integrator Installation Screens
A-2 Oracle Fusion Middleware Installation Guide for Oracle Data Integrator
Figure A–1 Flowchart of the ODI Installation Screens
A.2 Descriptions of the Oracle Data Integrator Installation Screens
The following topics are covered:
■ Section A.2.1, "Welcome"
■ Section A.2.2, "Install Software Updates"

Descriptions of the Oracle Data Integrator Installation Screens
Installation Screens for Oracle Data Integrator A-3
■ Section A.2.3, "Select Installation Type"
■ Section A.2.4, "Prerequisite Checks"
■ Section A.2.5, "Specify Installation Location"
■ Section A.2.6, "Application Server"
■ Section A.2.7, "Repository Configuration"
■ Section A.2.8, "Master Repository"
■ Section A.2.9, "Supervisor User Details"
■ Section A.2.10, "Specify Work Repository Details"
■ Section A.2.11, "Specify Agent Details"
■ Section A.2.12, "Installation Summary"
■ Section A.2.13, "Installation Progress"
■ Section A.2.14, "Configuration Progress"
■ Section A.2.15, "Installation Completed"
A.2.1 Welcome
This page introduces you to the Oracle Fusion Middleware installer and provides two
important pieces of information:
■ A navigation pane on the left that summarizes the tasks the installer will help you
complete. Each item in the navigation pane represents a specific installer screen
that will prompt you for information required to install the software.
■ Information about any prerequisites you might need to perform before continuing
with the installation.
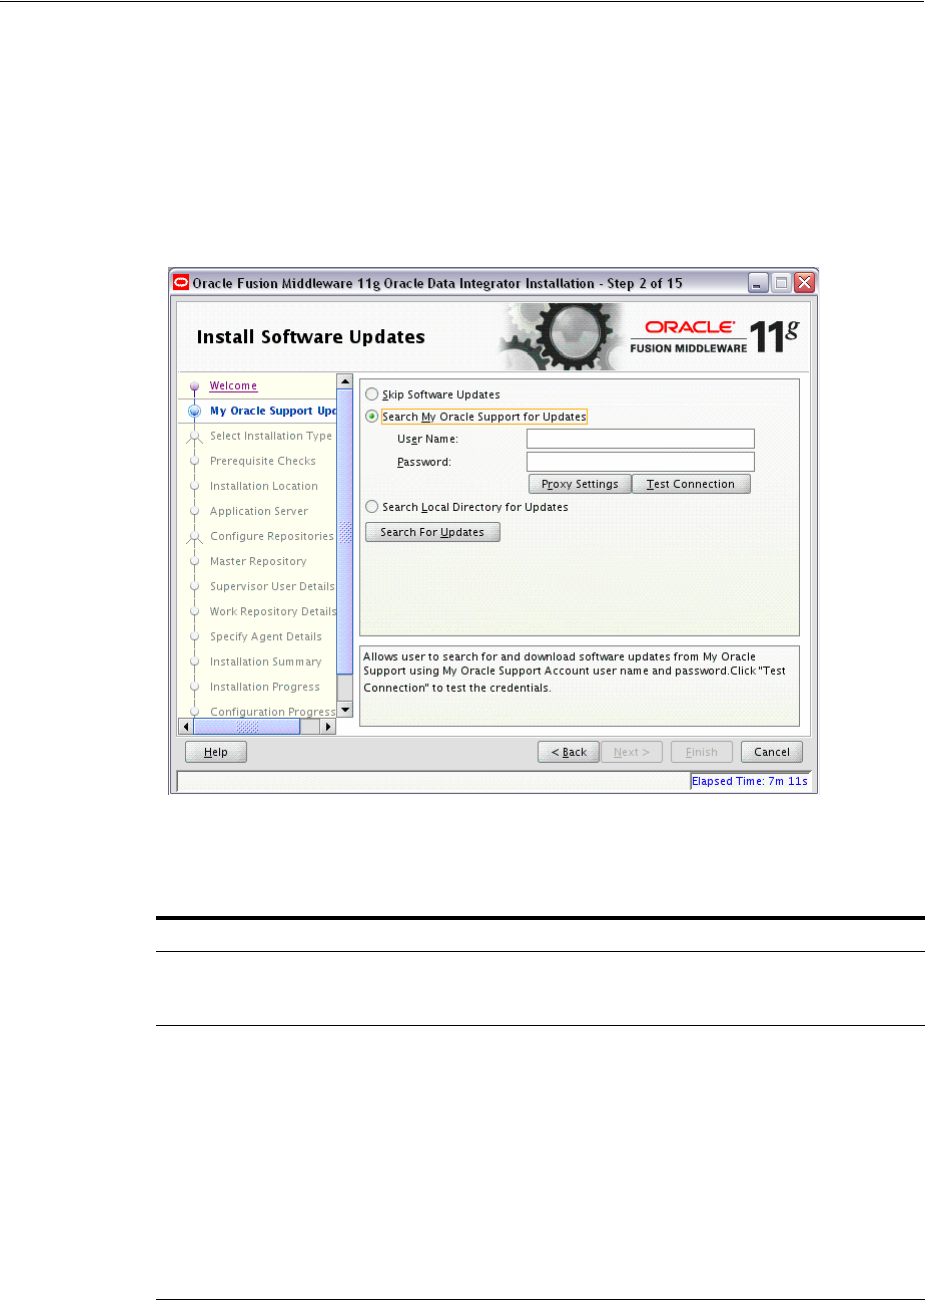
Descriptions of the Oracle Data Integrator Installation Screens
A-4 Oracle Fusion Middleware Installation Guide for Oracle Data Integrator
Review the information on this screen carefully to be sure you have performed all the
necessary prerequisites.
If you are not sure about any of the prerequisite tasks, refer to the Oracle Fusion
Middleware Installation Planning Guide or to Section 2.1, "Verifying Your System and
Network Environment".
A.2.2 Install Software Updates
Use this screen to select how you want to receive software updates.
The following table describes the options on this screen.
Field Description
Skip Software Updates Select this option to skip this screen. The installer will not
check for updates that might be applicable to the current
product installation.
Search My Oracle Support for
Updates
If you have a My Oracle Support account, then select this
option to have the installer automatically search My Oracle
Support for software updates that apply to the software
products are about to install.
Enter your My Oracle Support account name and
password, and then click Search For Updates. The installer
automatically downloads applicable software updates from
My Oracle Support.
Before you search for update, you can test your login
credentials and the connection to My Oracle Support by
clicking Test Connection. Click Proxy Settings to configure
a proxy server if one is required.
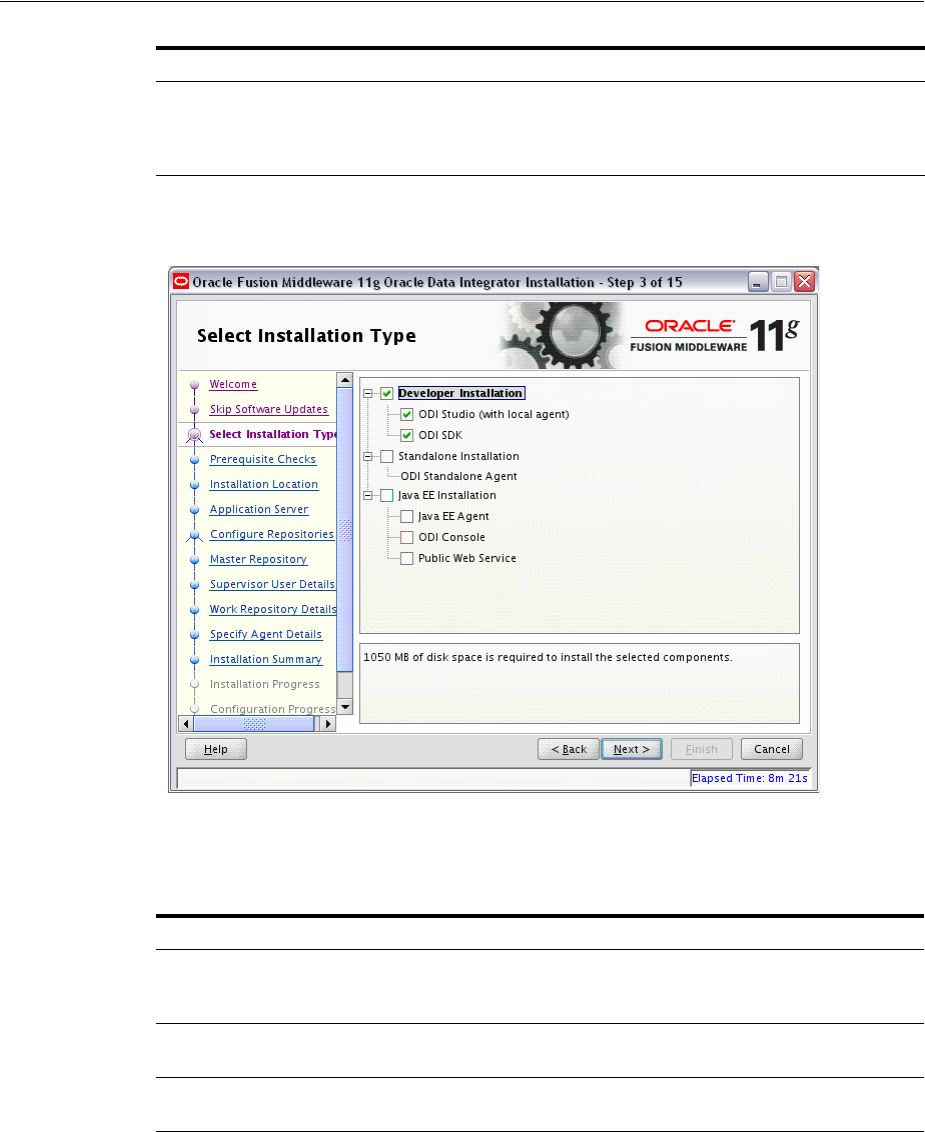
Descriptions of the Oracle Data Integrator Installation Screens
Installation Screens for Oracle Data Integrator A-5
A.2.3 Select Installation Type
Use this screen to select the type of installation you want to perform.
The following table describes the fields on this screen:
Search Local Directory for
Updates
Select this option if you already downloaded the latest
software updates and you want the installer to search a
local directory for updates applicable to the products you
are about to install.
Field Description
Developer Installation This installation type includes the ODI Studio (with a local
agent) and the Oracle Data Integrator Software Development Kit
(SDK).
Standalone Installation This installation type includes an Oracle Data Integrator
standalone agent.
Java EE Installation This installation type includes the Java EE agent, Oracle Data
Integrator Console, and Public Web Services.
Field Description
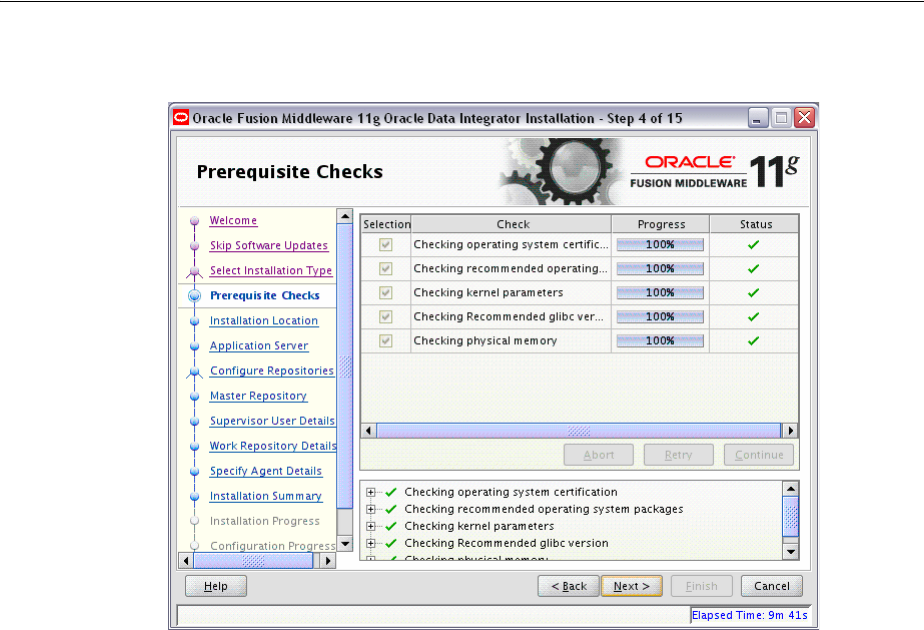
Descriptions of the Oracle Data Integrator Installation Screens
A-6 Oracle Fusion Middleware Installation Guide for Oracle Data Integrator
A.2.4 Prerequisite Checks
This screen analyzes the host computer to ensure that specific operating system
prerequisites have been met.
If any of the prerequisite checks fail, then a short error message appears in the bottom
portion of the screen. Fix the error and click Retry to try again. If you want to ignore
the error or warning messages and continue with the installation, click Continue.
Click Abort to stop prerequisite checking for all components.
More About System Requirements and Prerequisites
Note that before performing any installation you should read the system requirements
and certification documentation to ensure that your environment meets the minimum
installation requirements for the products you are installing. Both of these documents
are available on Oracle Technology Network (OTN).
The Oracle Fusion Middleware System Requirements and Specifications document covers
information such as hardware and software requirements, minimum disk space and
memory requirements, and required system libraries, packages, or patches.
The Oracle Fusion Middleware certification document for this release can be found on
the Oracle Fusion Middleware Supported System Configurations page. This document
covers supported installation types, platforms, operating systems, databases, JDKs,
and third-party products.
A.2.5 Specify Installation Location
Below is the Specify Installation Location screen if you selected Java EE Installation on
the Select Installation Type screen:
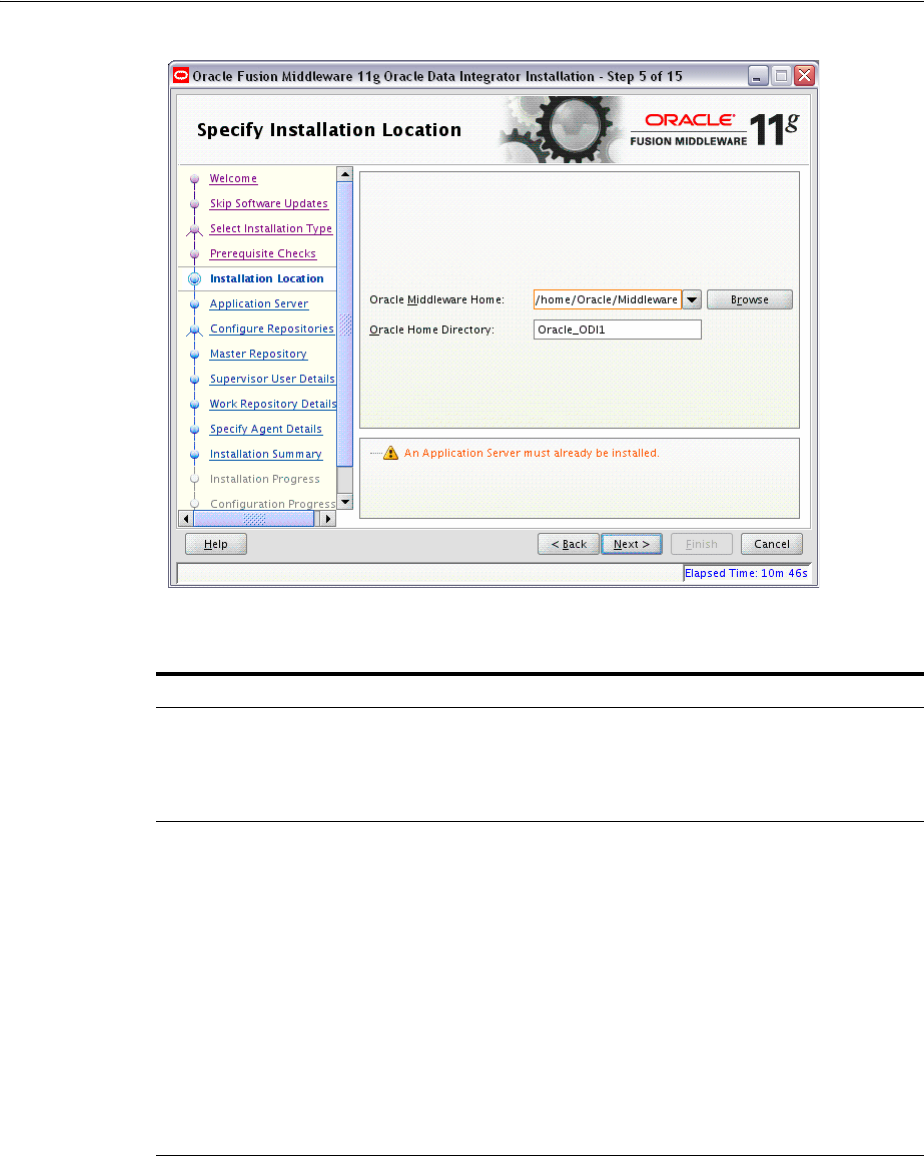
Descriptions of the Oracle Data Integrator Installation Screens
Installation Screens for Oracle Data Integrator A-7
The following table describes the fields on this screen:
Below is the Specify Installation Location screen if you did not select Java EE
Installation on the Select Installation Type screen:
Field Description
Oracle Middleware Home Specify the absolute path to your existing Oracle Middleware
Home directory; this is the directory that was created when you
installed Oracle WebLogic Server. If you do not know the full
path to your Middleware Home, you can click Browse to select
an existing directory in your system.
Oracle Home Directory Specify a directory inside the Oracle Middleware Home. This
Oracle Home Directory is the root directory where the ODI
products will be installed. This is also known as the ODI_HOME
directory.
If you specify a directory that already exists, it must be either:
■ An empty directory inside the Oracle Middleware Home
(for example, you have created an empty directory inside
the Middleware Home in advance of this installation and
should specify the directory here).
■ An existing Oracle home directory (for example, you are
reinstalling ODI to an existing Oracle home because of an
incomplete previous installation).
NOTE: If you specify a new directory, it will be created inside
the Oracle Middleware Home.
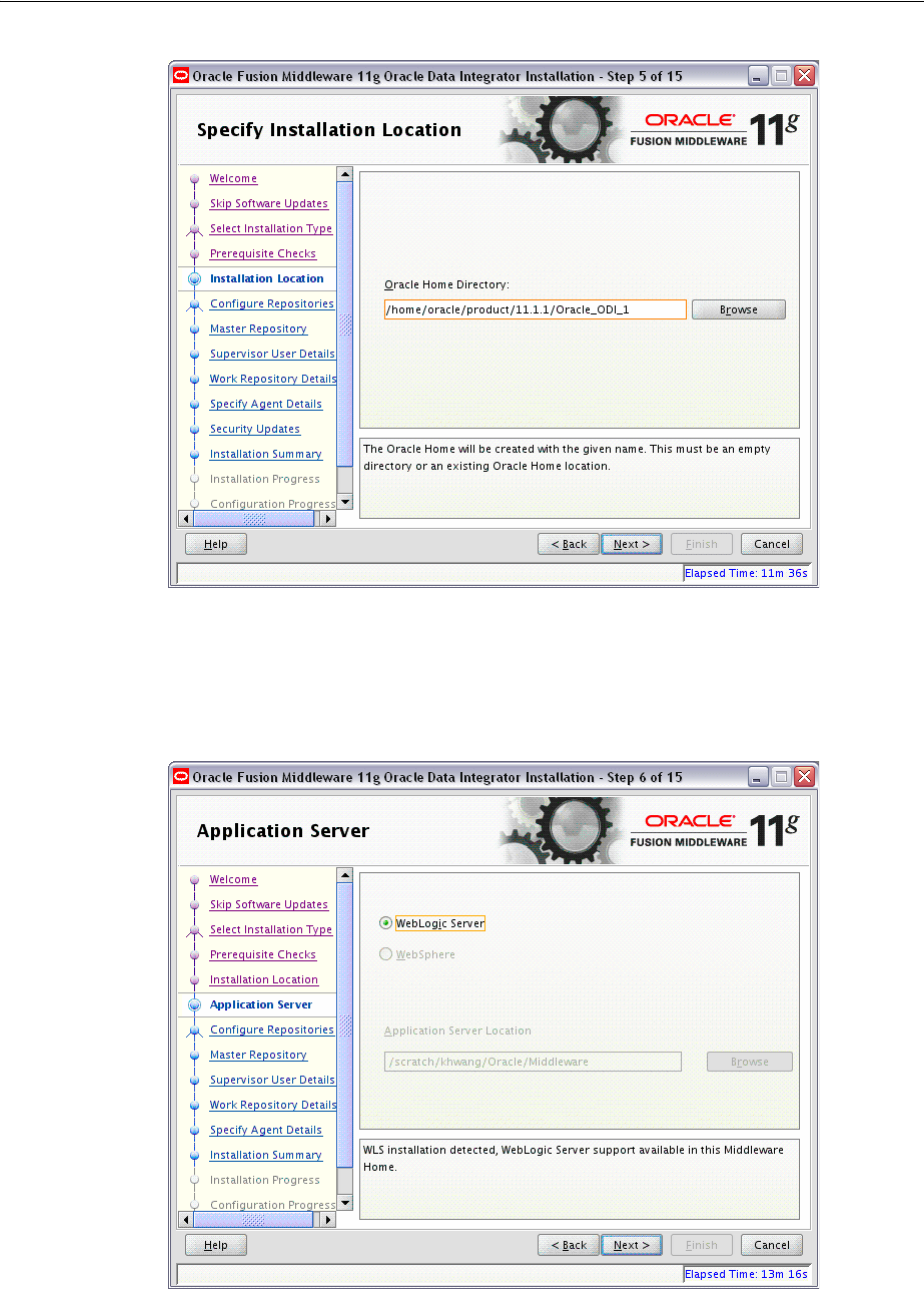
Descriptions of the Oracle Data Integrator Installation Screens
A-8 Oracle Fusion Middleware Installation Guide for Oracle Data Integrator
In the Oracle Home Directory field, specify the absolute path for the Oracle home
location.
A.2.6 Application Server
Use this screen to select the application server you want to use with your ODI
components.

Descriptions of the Oracle Data Integrator Installation Screens
Installation Screens for Oracle Data Integrator A-9
A.2.7 Repository Configuration
Field Description
WebLogic Server This option is selected by default if the installer detects a
Middleware home with Oracle WebLogic Server installed.
If no WebLogic Server is detected in the Middleware home,
you have the option to select either WebLogic Server or
WebSphere as your application server.
WebSphere Select this option if you installed an IBM WebSphere
application server.
This field is inactive when an Oracle WebLogic Server is
installed in the Middleware home.
Application Server Location Provide the location of your IBM WebSphere application
server, if applicable.
This field is inactive when an Oracle WebLogic Server is
installed in the Middleware home.
Field Description
Configure Repositories This option creates a connection to a work repository for the
Oracle Data Integrator Studio. It also configures the
odiparams file for the Standalone Agent to connect the
master repository. The agent definition is declared in the
topology and corresponding agent startup scripts and
shortcuts are created. With this configuration, the
standalone agent can be started with no additional
configuration.
Select this option if you have existing 11g Master and Work
Repositories.
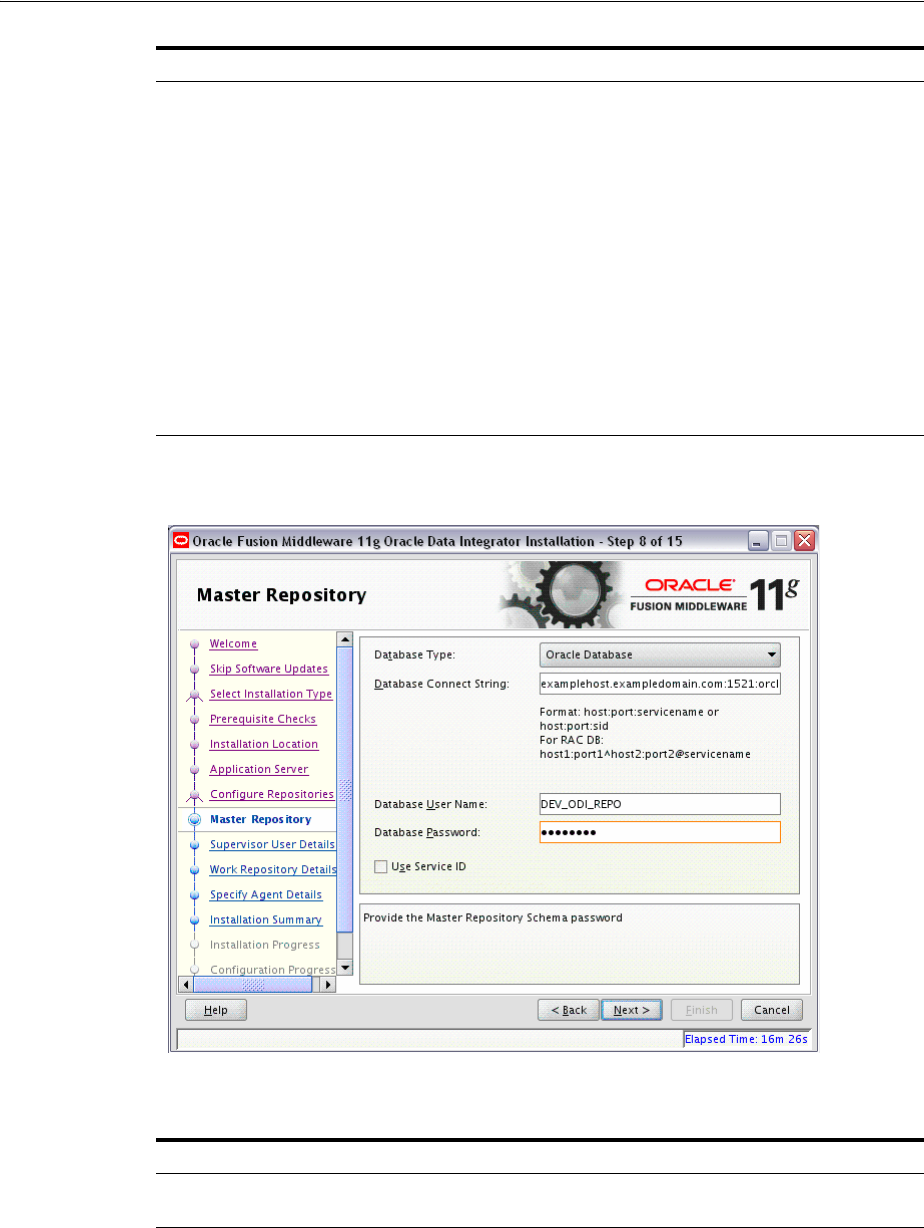
Descriptions of the Oracle Data Integrator Installation Screens
A-10 Oracle Fusion Middleware Installation Guide for Oracle Data Integrator
A.2.8 Master Repository
The following table describes the fields on this screen:
Skip Repository Configuration Select this option to continue with the Oracle Data
Integrator installation without configuring the repositories.
Once installed, you can use the Oracle Data Integrator
Studio JDev Gallery to create or configure the repositories.
NOTE: Select Skip Repository Configuration if:
■ Your database is not supported by Oracle’s Repository
Creation Utility (RCU). You will need to configure these
components manually after the installation. For more
information see Appendix E, "Creating Repositories
with Oracle Data Integrator Studio".
■ Your schemas have not yet been upgraded to the latest
release.
For a list of supported databases, see
http://www.oracle.com/technology/software/products/
ias/files/fusion_requirements.htm
.
Field Description
Database Type Select the database type that hosts the Oracle Data Integrator
Master Repository.
Field Description

Descriptions of the Oracle Data Integrator Installation Screens
Installation Screens for Oracle Data Integrator A-11
Database Connect String Enter the connect string for the database that contains the 11g ODI
schemas.
Oracle Database
Use the following connect string for a single host instance:
host:port:SID_or_servicename
For example:
odiHost:1521:odiDB
Use the following connect string for an Oracle RAC instance:
host1:port1^host2:port2@servicename
For example:
odiHost1:1521^odiHost2:1521@odiDB
Microsoft SQL Server Database
Use the following connect string:
serverName:portNumber:instanceName:databaseName
For example:
odiHost:1443:exampleInstance:exampleDatabase
IBM DB2 Database
hostname:port:servicename
For example:
odiHost:1443:exampleServiceName
MySQL Database
host:port;DatabaseName=name
For example:
odiHost:1443;DatabaseName=odiDB
NOTE: If your database is not supported by the Oracle Universal
Installer, see Appendix D.2, "Manual Installation and
Configuration Steps".
Database User Name Provide the Master Repository schema user name (
prefix_ODI_
REPO
).
Database Password Provide the Master Repository schema password.
Use Service ID Select Use Service ID only if the Master Repository schema
resides on an Oracle database and you want to use the Service ID
instead of the Service Name for your Oracle database.
Field Description
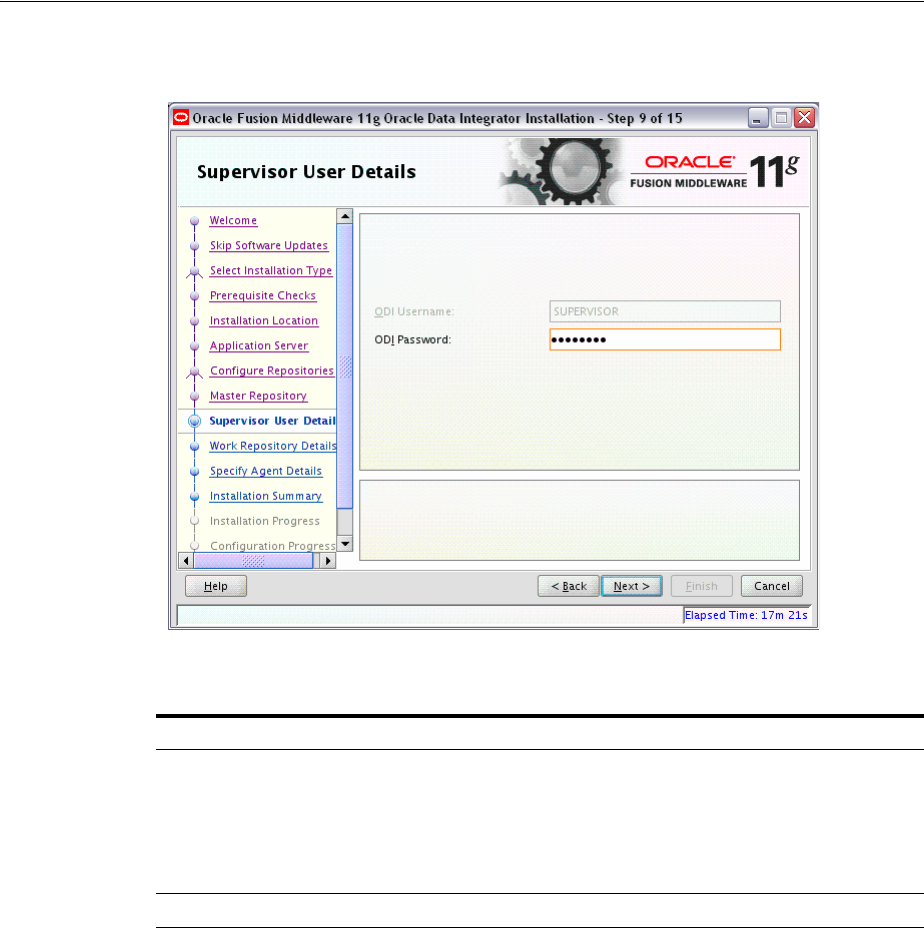
Descriptions of the Oracle Data Integrator Installation Screens
A-12 Oracle Fusion Middleware Installation Guide for Oracle Data Integrator
A.2.9 Supervisor User Details
The following table describes the fields on this screen:
Field Description
ODI Username Displays the ODI username with Supervisor privileges. This field
cannot be edited.
Note that the user name is
SUPERVISOR
(all CAPS) and ODI user names
are case-sensitive. When you are asked to provide the Supervisor name
later (for example, in ODI Studio), you must enter the name exactly at it
appears here (
SUPERVISOR
), in all CAPS.
ODI Password Provide the Supervisor user’s password.
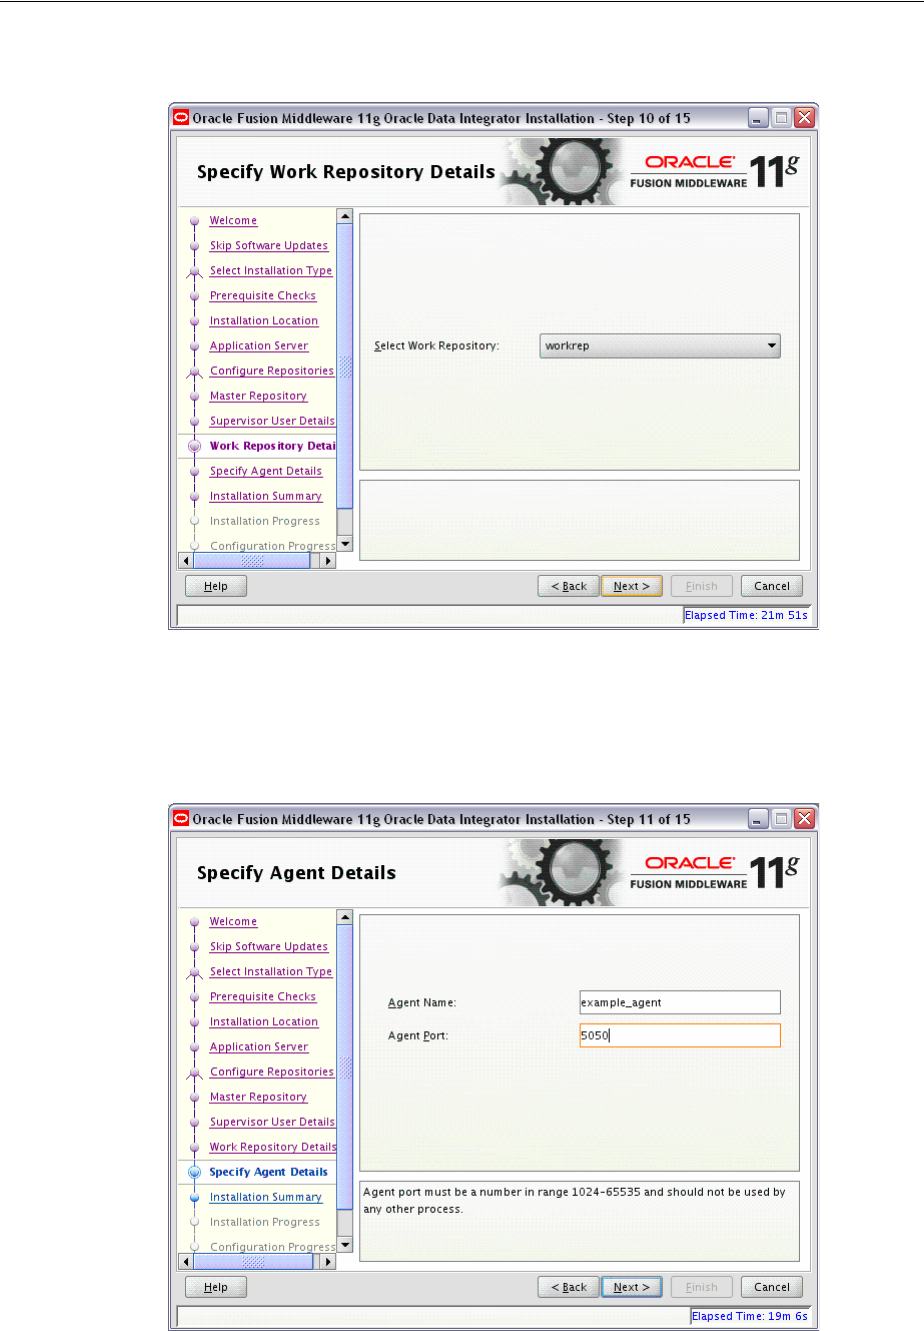
Descriptions of the Oracle Data Integrator Installation Screens
Installation Screens for Oracle Data Integrator A-13
A.2.10 Specify Work Repository Details
Use this screen to select the Oracle Data Integrator Work Repository from the
drop-down list.
A.2.11 Specify Agent Details
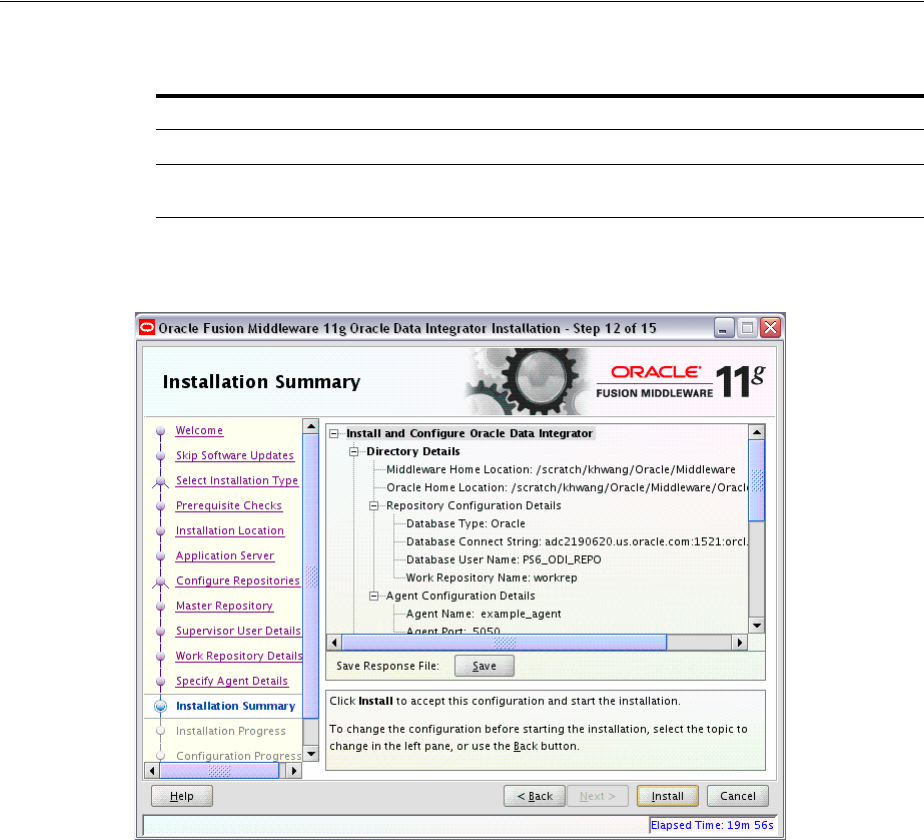
Descriptions of the Oracle Data Integrator Installation Screens
A-14 Oracle Fusion Middleware Installation Guide for Oracle Data Integrator
The following table describes the fields on this screen:
A.2.12 Installation Summary
Review the information on this screen, and click Install to begin the installation. The
operations summarized on this page will be performed when you click Install.
If you want to make any changes to the configuration before starting the installation,
use the navigation pane and select the topic you want to edit.
If you want to save this configuration to a text file, click Save. This file can be used
later if you choose to perform the same installation from the command line. See
Appendix C, "Silent Installation and Deinstallation" for more information.
Field Description
Agent Name Provide a name for the standalone or local agent.
Agent Port Provide a port number between 1024 and 65535 that is not currently
being used by any other Oracle home. This port defaults to 20910.
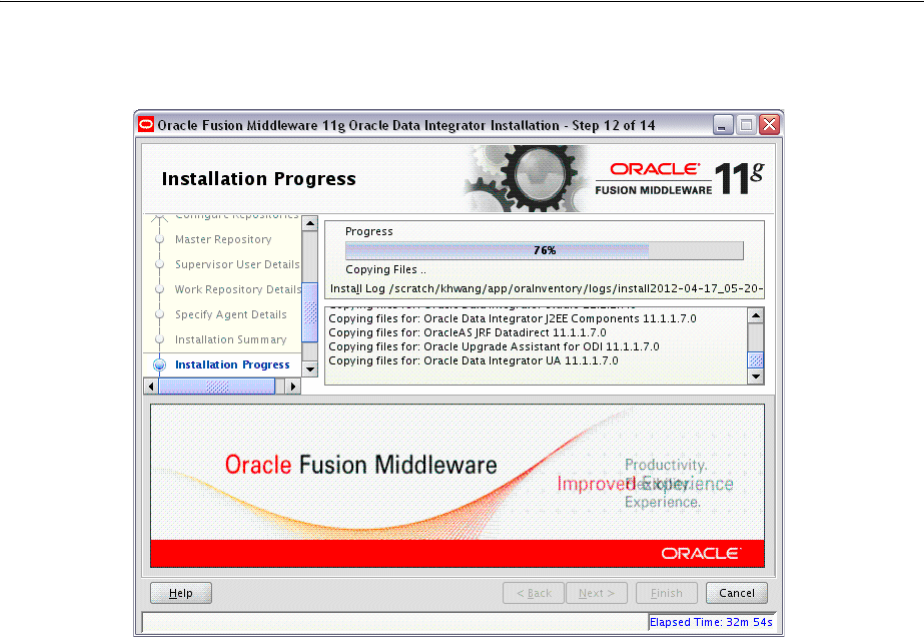
Descriptions of the Oracle Data Integrator Installation Screens
Installation Screens for Oracle Data Integrator A-15
A.2.13 Installation Progress
This screen shows you the progress of the installation.
If you want to quit before the installation is completed, click Cancel. Doing so will
result in a partial installation; the portion of the software that was installed on your
system before you click Cancel will remain on your system, and you will have to
remove it manually.
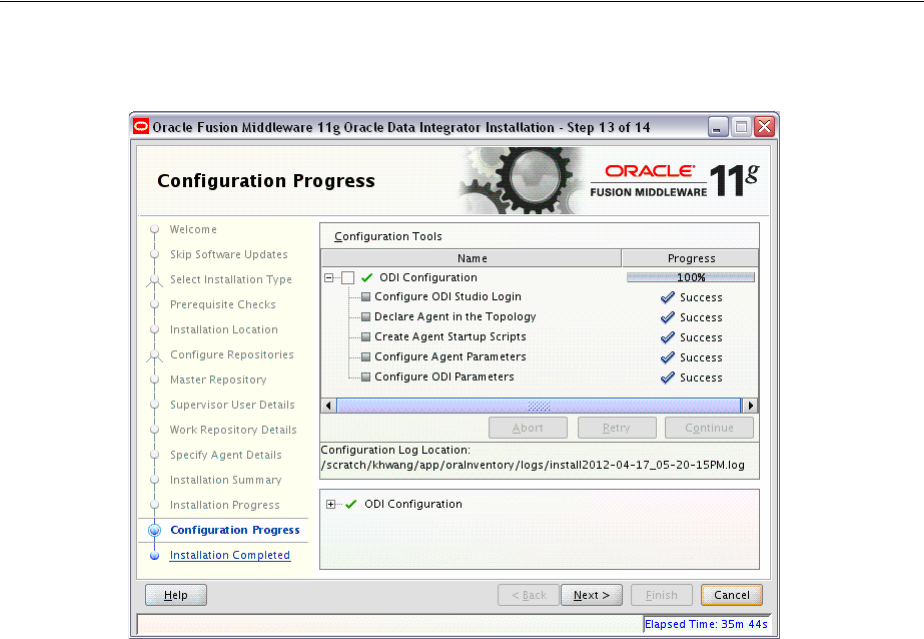
Descriptions of the Oracle Data Integrator Installation Screens
A-16 Oracle Fusion Middleware Installation Guide for Oracle Data Integrator
A.2.14 Configuration Progress
If you selected Configure Repositories on the Repository Configuration screen, this
screen shows you the progress of the component configuration. This screen will not
appear if you selected Skip Repository Configuration.
If there is a problem, a short error message appears in the bottom portion of the screen.
Fix the error and click Retry to try again.
If you want to ignore the error and warning messages and continue with the
installation, click Continue.
Click Abort to stop prerequisite checking for all components.
If you want to quit before the installation is completed, click Cancel.
Descriptions of the Oracle Data Integrator Installation Screens
Installation Screens for Oracle Data Integrator A-17
A.2.15 Installation Completed
This screen summarizes the installation that was just completed. The information that
you provided appears in the Directory Details section.
Click Save to save your configuration information to a file. This information includes
port numbers, installation directories, disk space usage, URLs, and component names
which you may need at a later time.
Click Finish to dismiss the screen.

Descriptions of the Oracle Data Integrator Installation Screens
A-18 Oracle Fusion Middleware Installation Guide for Oracle Data Integrator
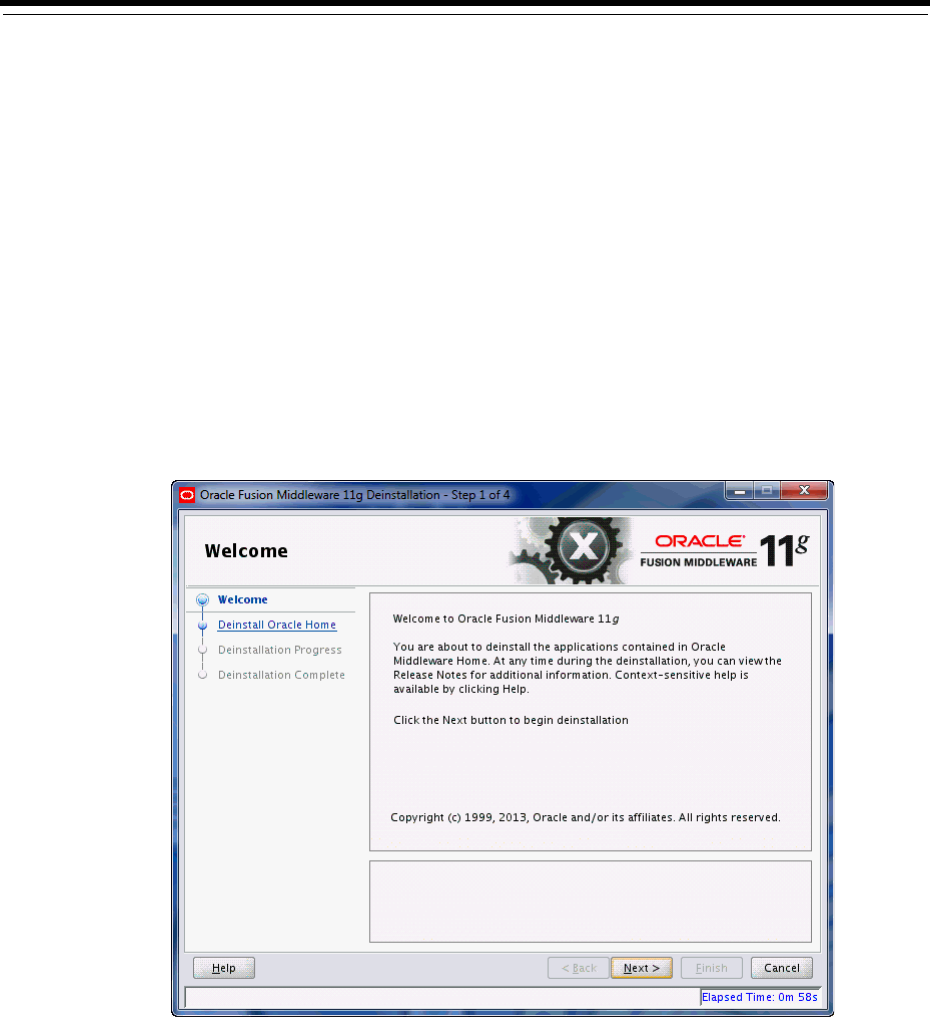
B
Deinstallation Screens for Oracle Data Integrator B-1
B
Deinstallation Screens for Oracle Data
Integrator
This appendix contains images and descriptions for all of the Oracle Data Integrator
deinstallation screens:
■ Section B.1, "Welcome"
■ Section B.2, "Deinstall Oracle Home"
■ Section B.3, "Deinstallation Progress"
■ Section B.4, "Deinstallation Complete"
B.1 Welcome
The installer displays this screen when you are about to deinstall one or more Oracle
Fusion Middleware software components.
When you use the installer to deinstall your Oracle Fusion Middleware software, the
installer removes the software files in the selected Oracle home from disk, updates the
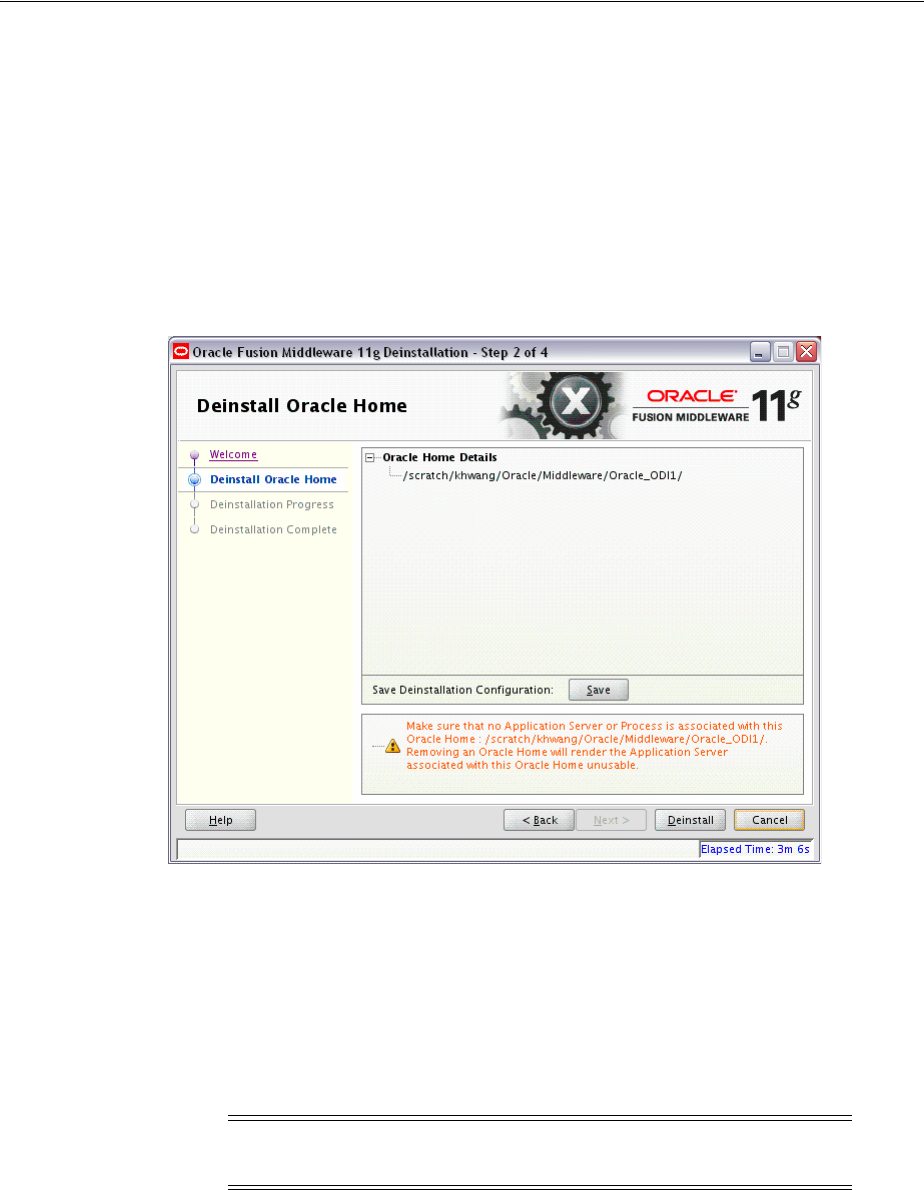
Deinstall Oracle Home
B-2 Oracle Fusion Middleware Installation Guide for Oracle Data Integrator
Oracle inventory, and performs other operating-specific tasks to remove the
components.
Like the Welcome screen that appears when you are about to install a product, the
deinstallation Welcome screen contains a navigation pane on the left that summarizes
the tasks the installer will help you complete.
Each item in the navigation pane represents a specific installer screen that will prompt
you for information required to install the software.
B.2 Deinstall Oracle Home
Use this screen to verify that you have selected the Oracle home that you want to
deinstall.
If you want to save this configuration to a text file, click Save. This file can be used
later if you choose to perform the same deinstallation from the command line. See
Appendix C, "Silent Installation and Deinstallation" for more information.
When you click Deinstall, then the installer will begin the process of deinstalling the
Oracle home shown on this screen.
If you want to save this configuration to a text file (called a response file), click Save.
The resulting response file can be used later if you choose to perform the same
deinstallation procedure from the command line.
Verify that this is the correct directory, then click Deinstall to continue.
The following warning screen will appear:
Note: Before you click Deinstall, ensure that all processes associated
with the selected Oracle home have been stopped.
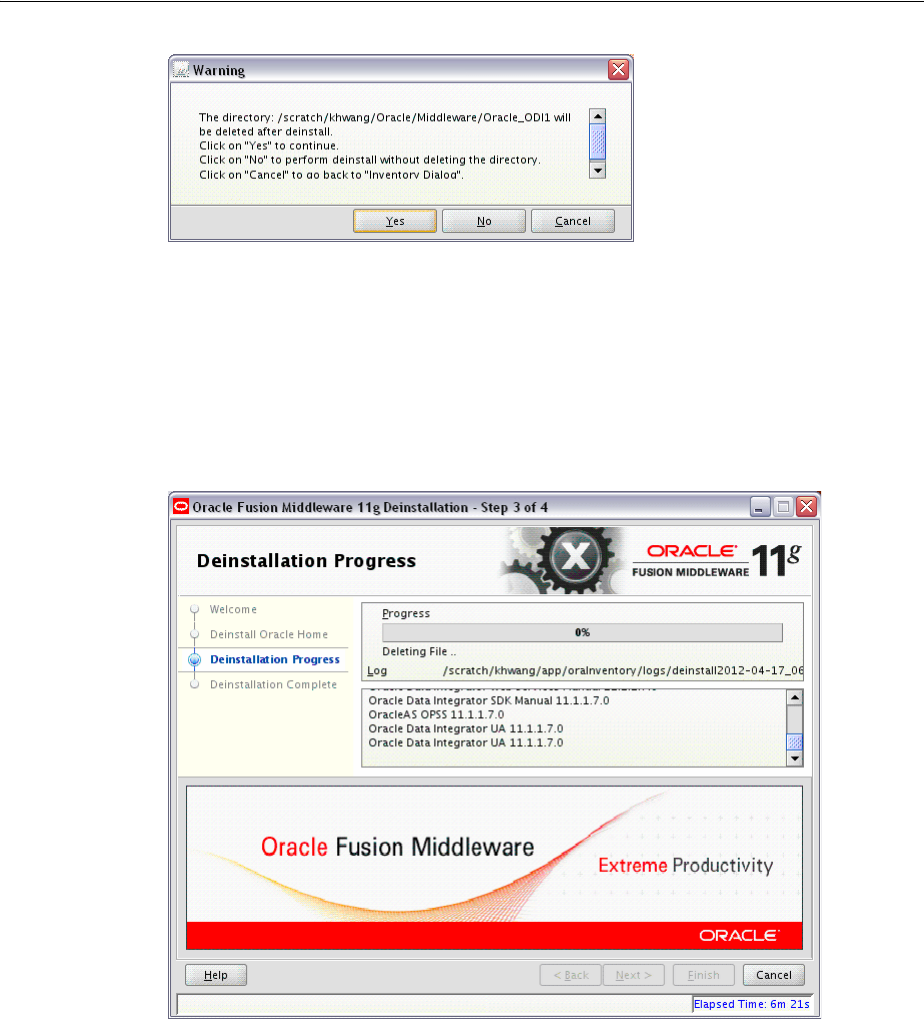
Deinstallation Progress
Deinstallation Screens for Oracle Data Integrator B-3
Click Yes to remove the software and the Oracle home directory from which the
deinstaller was started.
Click No to remove the software but do not remove the Oracle home directory.
Click Cancel to return to the previous screen.
B.3 Deinstallation Progress
Use this screen to monitor the progress of the deinstallation process.
Click Cancel to stop the deinstallation process.

Deinstallation Complete
B-4 Oracle Fusion Middleware Installation Guide for Oracle Data Integrator
B.4 Deinstallation Complete
This screen summarizes the deinstallation that was just completed. When this screen
appears, it indicates that the deinstallation is complete and the selected components
have been cleared from the Oracle Inventory.

C
Silent Installation and Deinstallation C-1
C
Silent Installation and Deinstallation
This appendix describes how to perform a silent installation or deinstallation of Oracle
Data Integrator.
■ Section C.1, "Understanding Silent Installation and Deinstallation"
■ Section C.2, "Using the Oracle Data Integrator Response Files"
■ Section C.3, "Oracle Data Integrator Installation Response File Parameters"
■ Section C.4, "Oracle Data Integrator Deinstallation Response File Parameters"
C.1 Understanding Silent Installation and Deinstallation
You can use the Oracle Universal Installer's silent installation mode to bypass the
graphical user interface and supply the necessary information in a response file. This
method is most useful when installing the same product multiple times on multiple
hosts. By using a response file, you can automate the installation of a product for
which you know the installation parameters.
For information about silent installation and deinstallation and response files, refer to
"Silent Installation and Deinstallation" in Oracle Fusion Middleware Installation Planning
Guide.
C.2 Using the Oracle Data Integrator Response Files
Before doing a silent installation or deinstallation, you must provide information
specific to your installation or deinstallation in a response file. The installer will fail if
you attempt an installation using a response file that is not configured correctly.
Response files are text files that you can create or edit in a text editor.
Oracle recommends creating your installation response file by first running the install
GUI, then clicking Save on the Installation Summary screen. Similarly, the
deinstallation response file should be created by first running the deinstallation GUI,
then clicking Save on the Deinstall Oracle Home screen. You will be prompted for a
name and location where you want to create this response file. After it is created, you
can use the response file exactly as-is to replicate the installation or deinstallation on
other systems, or modify the response file as needed.
The installation response files can be used to install the Oracle Data Integrator
software only. You will still need to run the Oracle Fusion Middleware Configuration
Wizard separately to create or extend your WebLogic domain and configure Oracle
Data Integrator products. For more information, see Section 3.2.1, "Configuring a
WebLogic Domain or WebSphere Cell".

Using the Oracle Data Integrator Response Files
C-2 Oracle Fusion Middleware Installation Guide for Oracle Data Integrator
The response file templates in Table C–1 are provided in the
Disk1/stage/Response
(on UNIX operating systems) or
Disk1\stage\Response
(on Windows operating
systems) directory in the location where you unpacked the archive file (Section 2.4.1,
"Obtaining the Installer").
For more information about the parameters you may see in the response files, see
Section C.3, "Oracle Data Integrator Installation Response File Parameters" and
Section C.4, "Oracle Data Integrator Deinstallation Response File Parameters".
Table C–1 ODI Response File Templates
Response File Template Description
developerPlatformConfigureExistingReposit
ory.rsp
This is the template response file that should be used if you are
installing ODI Studio (with a local agent) or the Oracle Data
Integrator Software Development Kit (SDK) and you want to
configure existing Master and Work Repositories.
This template provides the functional equivalent of using the
GUI and selecting the Developer Installation option on the
Specify Installation Location screen and the Configure with
existing Master and Work Repositories on the Repository
Configuration screen.
developerPlatformSkipRepository.rsp
This is the template response file that should be used if you are
installing ODI Studio (with a local agent) or the Oracle Data
Integrator Software Development Kit (SDK) and you do not
want to the configure the ODI Master and Work Repositories.
This template provides the functional equivalent of using the
GUI and selecting the Developer Installation option on the
Specify Installation Location screen and the Skip Repository
Configuration on the Repository Configuration screen.
j2eePlatformConfigureExistingRepository_
wls.rsp
This is the template response file that should be used if you are
installing the Java EE components (which includes the Java EE
agent, Oracle Data Integrator Console, and Public Web Services)
on an Oracle WebLogic Server and you want to configure
existing Master and Work Repositories.
This template provides the functional equivalent of using the
GUI and selecting the Java EE Installation option on the Specify
Installation Location screen and the Configure with existing
Master and Work Repositories on the Repository Configuration
screen.
j2eePlatformConfigureExistingRepository_
was.rsp
This is the template response file that should be used if you are
installing the Java EE components (which includes the Java EE
agent, Oracle Data Integrator Console, and Public Web Services)
on an IBM WebSphere Server and you want to configure existing
Master and Work Repositories.
This template provides the functional equivalent of using the
GUI and selecting the Java EE Installation option on the Specify
Installation Location screen and the Configure with existing
Master and Work Repositories on the Repository Configuration
screen.
j2eePlatformSkipRepository_wls.rsp
This is the template response file that should be used if you are
installing the Java EE components (which includes the Java EE
agent, Oracle Data Integrator Console, and Public Web Services)
on an Oracle WebLogic Server and you do not want to configure
repositories.
This template provides the functional equivalent of using the
GUI and selecting the Java EE Installation option on the Specify
Installation Location screen and the Skip Repository
Configuration on the Repository Configuration screen.

Oracle Data Integrator Installation Response File Parameters
Silent Installation and Deinstallation C-3
C.3 Oracle Data Integrator Installation Response File Parameters
Table C–2 lists the parameters that you may see in your response files. Not all
parameters will appear in all files; remember that the files can be customized for
specific installation needs.
j2eePlatformSkipRepository_was.rsp
This is the template response file that should be used if you are
installing the Java EE components (which includes the Java EE
agent, Oracle Data Integrator Console, and Public Web Services)
on an IBM WebSphere Server and you do not want to configure
repositories.
This template provides the functional equivalent of using the
GUI and selecting the Java EE Installation option on the Specify
Installation Location screen and the Skip Repository
Configuration on the Repository Configuration screen.
standalonePlatformConfigureExistingReposi
tory.rsp
This is the template response file that should be used if you are
installing the ODI Standalone agent and you want to configure
existing Master and Work Repositories.
This template provides the functional equivalent of using the
GUI and selecting the Standalone Installation and Configure
with existing Master and Work Repositories on the Repository
Configuration screen.
standalonePlatformSkipRepository.rsp
This is the template response file that should be used if you are
installing the ODI Standalone agent and you do not want to
configure existing Master and Work Repositories.
This template provides the functional equivalent of using the
GUI and selecting the Standalone Installation and Skip
Repository Configuration on the Repository Configuration
screen.
deinstall_oh.rsp
This is the template response file that should be used if you
want to deinstall an existing Oracle home.
Table C–2 Parameters for the Oracle Data Integrator Installation Response File Templates
Installation
Screen Response File Parameter Description
Install Software
Updates
SPECIFY_DOWNLOAD_LOCATION
SOFTWARE_UPDATES_DOWNLOAD_
LOCATION
Set the
SPECIFY_DOWNLOAD_LOCATION
parameter to
true
if
you want to specify the location where software updates
can be downloaded.
Then, specify the directory on your local system that
contains the updates using the
SOFTWARE_UPDATES_
DOWNLOAD_LOCATION
parameter.
SKIP_SOFTWARE_UPDATES
Set this parameter to
true
if you do not want the installer
to check for software updates.
Table C–1 (Cont.) ODI Response File Templates
Response File Template Description

Oracle Data Integrator Installation Response File Parameters
C-4 Oracle Fusion Middleware Installation Guide for Oracle Data Integrator
Select
Installation
Type
ODI_STUDIO
Specify
true
if you want to install ODI Studio; if not,
specify
false
.
ODI_SDK
Specify
true
if you want to install ODI SDK; if not, specify
false
.
STANDALONE_AGENT
Specify
true
if you want to install the ODI Standalone
Agent; if not, specify
false
.
ORACLE_DATA_INTEGRATOR_J2EE_
AGENT
Specify
true
if you want to install the Java EE Agent; if
not, specify
false
.
After installation this component must be configured
using the Configuration Wizard.
ORACLE_DATA_INTEGRATOR_CONSOLE
Specify
true
if you want to install the ODI Console; if not,
specify
false
.
After installation this component must be configured
using the Configuration Wizard.
ORACLE_DATA_INTEGRATOR_PUBLIC_
WEB_SERVICE
Specify
true
if you want to install the ODI Public Web
Service; if not, specify
false
.
After installation this component must be configured
using the Configuration Wizard.
Specify
Installation
Location
ORACLE_HOME
Specify the full path to the location of your Oracle home
directory.
MIDDLEWARE_HOME
Specify the full path to the location of your Middleware
home directory.
Application
Server
APPSERVER_TYPE
Specify the type of Application Server you are using. Use
WLS
for WebLogic Server, or
WAS
for IBM WebSphere.
Repository
Configuration
USE EXISTING REPOSITORY
SKIP REPOSITORY CREATION
Set
USE EXISTING REPOSITORY=true
and
SKIP REPOSITORY
CREATION=false
to configure an existing repository.
Set
USE EXISTING REPOSITORY=false
and
SKIP
REPOSITORY CREATION=true
to skip repository
configuration.
Master
Repository
MASTER DATABASE CONNECT STRING
Specify the connection credentials to the database
containing the ODI schemas.
For Oracle databases:
http://dbhost:dbport:SID-or-ServiceName
For Microsoft SQL Server or IBM DB2:
http://dbhost:dbport;DatabaseName=dbname
MASTER DATABASE USER NAME
Specify the Master Repository schema user name (
prefix_
ODI_REPO
).
MASTER DATABASE USER PASSWORD
Specify the Master Repository schema password.
MASTER DATABASE TYPE
Specify the database type. Valid values are:
■
Oracle
■
Microsoft
■
DB2
MASTER REPOSITORY IS SERVICE ID
USED
Set this to
true
only if the Master Repository schema
resides on an Oracle database and you want to use the
Service ID instead of the Service Name for your Oracle
database.
Table C–2 (Cont.) Parameters for the Oracle Data Integrator Installation Response File Templates
Installation
Screen Response File Parameter Description

Oracle Data Integrator Deinstallation Response File Parameters
Silent Installation and Deinstallation C-5
C.4 Oracle Data Integrator Deinstallation Response File Parameters
The
deinstall_oh.rsp
response file contains only a single parameter:
DEINSTALL_IN_
ASINSTANCE_MODE=false
. This causes the deinstaller to not look for any Oracle
instances to remove; instead, the deinstaller will remove the Oracle home from where
it is started.
Supervisor User
Details
ODI SUPERVISOR PASSWORD
Specify the ODI Supervisor’s password.
Specify Work
Repository
Details
WORK REPOSITORY NAME
Specify the name of the Oracle Data Integrator Work
Repository.
Specify Agent
Details
AGENT NAME
Specify a name for the standalone or local agent.
AGENT PORT
Specify a port number between 1024 and 65535 that is not
currently being used by any other Oracle home. This port
defaults to 20910.
Table C–2 (Cont.) Parameters for the Oracle Data Integrator Installation Response File Templates
Installation
Screen Response File Parameter Description

Oracle Data Integrator Deinstallation Response File Parameters
C-6 Oracle Fusion Middleware Installation Guide for Oracle Data Integrator

D
Oracle Data Integrator Companion CD D-1
D
Oracle Data Integrator Companion CD
This appendix describes the components that are provided on the Oracle Data
Integrator Companion disk and instructions for manual installation.
■ Section D.1, "Oracle Data Integrator Companion Disk Components"
■ Section D.2, "Manual Installation and Configuration Steps"
■ Section D.3, "Installing the Java Standalone Agent on iSeries"
D.1 Oracle Data Integrator Companion Disk Components
Table D–1 provides the location and description of the components that are provided
on the Oracle Data Integrator companion disk. These components must be manually
installed.
Table D–1 Directory Structure of the Oracle Data Integrator Companion Installation Disk
Directory Description
/agent_standalone
This folder contains the manual installation files for the ODI Standalone Agent in
oracledi-agent-standalone.zip
.
/demo
This folder contains demonstration files and samples in
oracledi-demo.zip
.
NOTE: Demonstration files and samples are NOT installed with the Oracle Data
Integrator GUI installer. To use the demonstration files, you must install them
manually.
/misc/cdc-iseries
This folder contains the manual installation files for the ODI CDC for iSeries.
/misc/biee-lineage
This folder that contains the Oracle Business Intelligence Enterprise Edition (OBIEE)
and Oracle Data Integrator (ODI) metadata to build report-to-source data lineage
wizard.
For more information on this component's installation, see "Oracle Business
Intelligence Enterprise Edition Data Lineage" in the Oracle Fusion Middleware
Connectivity and Knowledge Modules Guide for Oracle Data Integrator.

Manual Installation and Configuration Steps
D-2 Oracle Fusion Middleware Installation Guide for Oracle Data Integrator
D.2 Manual Installation and Configuration Steps
This section provides information on manually installing and configuring the
components provided on the Oracle Data Integrator Companion disk.
Before performing the manual installation of the ODI components, create a directory
on your disk that will be the
ODI_HOME
. For example, create a folder named
C:\oracle\odi11g\
on Windows operating systems.
D.2.1 Standalone Agent
To manually install the ODI Standalone Agent, do the following:
1. Unzip the
oracledi-agent-standalone.zip
file located in the target
ODI_HOME
directory.
2. Manually configure
odiparams.bat
(for Windows operating systems) or the
odiparams.sh
(for UNIX operating systems) as described in Table 3–1,
" Repository Connection Information".
3. Set the
JAVA_HOME
or
ODI_JAVA_HOME
environment to the path of the JVM directory
where the
/bin
directory resides.
For example:
setenv JAVA_HOME /usr/local/java
/misc/jde_world
This folder contains the following JD Edwards (JDE) World program files:
■
JDEWorldJDBC.jar
This JDE World JDBC driver file must be in the userlib or driver folder.
■
WorldBase.jar
This jar file must be in the userlib or driver folder.
■
config.xml
This configuration file must be in the ODI_HOME/odi/bin folder.
■
jdeworld_example.properties
This properties file is a template that you can make use of if you are using the
JDE_
SECURITY_FILE
option in the IKM JDE World Control Append.
/sdk
This folder contains the manual installation files for ODI SDK Component in
oracledi-sdk.zip
.
/studio
This folder contains the manual installation files for ODI Studio in
oracledi-studio.zip
.
/
xml-reference
This folder contains
oracledi-xml-reference.zip
which provides the technologies,
actions and knowledge modules that can be imported into ODI.
Note: Oracle Data Integrator Components requires a Java Virtual
Machine (JVM) to run. Make sure that a supported Java environment
is set up on your machine prior to installing Oracle Data Integrator.
For a list of supported platforms, see the Oracle Fusion Middleware
certification documents at
http://www.oracle.com/technology/software/products/ias/files
/fusion_certification.html
.
Table D–1 (Cont.) Directory Structure of the Oracle Data Integrator Companion Installation Disk
Directory Description

Manual Installation and Configuration Steps
Oracle Data Integrator Companion CD D-3
NOTE: The JVM that you point to must be a supported version. For a list of
certified JVM versions, see
http://www.oracle.com/technology/software/products/ias/files/fusion_
certification.html
.
4. Configure the Standalone Agent in the topology as described in Section 3.1.4.
5. Start the Standalone Agent as described in Section 3.1.4.2.
D.2.2 ODI Studio and XML Reference
To manually install the ODI Studio and XML Reference, do the following:
1. Unzip
oracledi-studio.zip
in the
ODI_HOME
directory.
2. Unzip
oracledi-xml-reference.zip
in the
ODI_HOME
directory.
3. Start ODI Studio.
■ On UNIX operating systems:
ODI_HOME/oracledi/client/odi.sh
■ On Windows operating systems:
ODI_HOME\oracledi\client\odi.exe
4. When ODI Studio starts for the first time, it prompts you for location of the Java
Virtual Machine. Provide the location of the JVM. Once you have provided the
JVM location, Oracle Data Integrator Studio starts.
D.2.3 Demonstration Environment
The demonstration (demo) environment should be installed with an existing
installation that includes the ODI Studio component.
To manually install the Demonstration environment, do the following:
1. Unzip
oracledi-demo.zip
in the
ODI_HOME
folder.
2. Set the
JAVA_HOME
or
ODI_JAVA_HOME
property to the path of the JVM directory
where the
/bin
directory resides. For a list of certified JVM versions, see
http://www.oracle.com/technology/software/products/ias/files/fusion_
certification.html
.
For example:
setenv JAVA_HOME /usr/local/java/bin
Tip: If you installed Oracle WebLogic Server, a JRE was installed on
your system. You can use this location (the location of the JRE
directory) to start the installer. The default location for the JRE is the
jdk160_version
directory inside your Middleware home.
On 64-bit platforms, the JRE location is the
JAVA_HOME
you used to
install Oracle WebLogic Server.
For more information, refer to Oracle Fusion Middleware Installation
Guide for Oracle WebLogic Server.

Installing the Java Standalone Agent on iSeries
D-4 Oracle Fusion Middleware Installation Guide for Oracle Data Integrator
3.
To start ODI Demonstration Environment:
■ On UNIX operating systems launch the following script:
ODI_HOME/oracledi/demo/bin/startdemo.sh
■ On Windows operating systems launch the following script:
ODI_HOME\oracledi\demo\bin\startdemo.bat
4. To stop ODI Demonstration Environment:
■ On UNIX operating systems launch the following script:
ODI_HOME/oracledi/demo/bin/stopdemo.sh
■ On Windows operating systems launch the following script:
ODI_HOME\oracledi\demo\bin\stopdemo.bat
The demonstration environment is described in the Oracle Data Integrator tutorials
available on Oracle Technology Network.
D.3 Installing the Java Standalone Agent on iSeries
The Standalone Agent can be deployed on iSeries systems. This deployment enables
you to start run-time agents and manage sessions using the iSeries server machine.
To manually install the ODI Standalone Agent on iSeries, do the following:
1. Create a temporary
TEMP_ODI_HOME
directory on a client machine.
2. Unzip the
oracledi-agent-standalone.zip
file in this
TEMP_ODI_HOME
directory.
Optionally, add additional drivers and open tools as described in Section 3.1.1.
3. Manually configure odiparams.sh as described in Table 3–1, " Repository
Connection Information".
4. Configure the agent in the topology as described in Section 3.1.4.
5. Using QShell (QSH), create a folder for the Standalone Agent in your iSeries
system. This folder will be your
ODI_HOME
.
6. Transfer the content of the
TEMP_ODI_HOME
folder to this
ODI_HOME
folder using FTP.
7. Use the UNIX operating system scripts located in the
ODI_
HOME/oracledi/agent/bin
directory for starting your agents or managing your
sessions. See Table 1–3, " Oracle Data Integrator Scripts and Tools" for a
description of these scripts.
Tip: If you installed Oracle WebLogic Server, a JRE was installed on
your system. You can use this location (the location of the JRE
directory) to start the installer. The default location for the JRE is the
jdk160_version
directory inside your Middleware home.
On 64-bit platforms, the JRE location is the
JAVA_HOME
you used to
install Oracle WebLogic Server.
For more information, refer to Oracle Fusion Middleware Installation
Guide for Oracle WebLogic Server.

E
Creating Repositories with Oracle Data Integrator Studio E-1
E
Creating Repositories with Oracle Data
Integrator Studio
This appendix describes how to create and administer Oracle Data Integrator
repositories. An overview of the repositories used in Oracle Data Integrator is
provided.
This appendix includes the following sections:
■ Section E.1, "Introduction to Oracle Data Integrator Repositories"
■ Section E.2, "Creating Repository Storage Spaces"
■ Section E.3, "Creating the Master Repository"
■ Section E.4, "Connecting to the Master Repository"
■ Section E.5, "Creating a Work Repository"
■ Section E.6, "Connecting to a Work Repository"
E.1 Introduction to Oracle Data Integrator Repositories
There are two types of repositories in Oracle Data Integrator:
■ Master Repository: This is a data structure containing information on the
topology of the company's IT resources, on security and on version management
of projects and data models. This repository is stored on a relational database
accessible in client/server mode from the different Oracle Data Integrator
modules. In general, you need only one Master Repository. However, it may be
necessary to create several Master Repositories in one of the following cases:
– Project construction over several sites not linked by a high-speed network
(off-site development, for example).
– Necessity to clearly separate the interfaces' operating environments
(development, test, production), including on the database containing the
Master Repository. This may be the case if these environments are on several
sites.
■ Work Repository: This is a data structure containing information on data models,
projects, and their use. This repository is stored on a relational database accessible
in client/server mode from the different Oracle Data Integrator modules. Several
Work Repositories can be created with several Master Repositories if necessary.
However, a Work Repository can be linked with only one Master Repository for
version management purposes.

Creating Repository Storage Spaces
E-2 Oracle Fusion Middleware Installation Guide for Oracle Data Integrator
The standard method for creating repositories is using Repository Creation Utility
(RCU). RCU automatically manages storage space as well as repository creation.
However, if you want to create the repositories manually, it is possible to manually
create and configure the repositories.
The steps needed to create and configure repositories are detailed in the following
sections:
■ Section E.2, "Creating Repository Storage Spaces"
■ Section E.3, "Creating the Master Repository"
■ Section E.4, "Connecting to the Master Repository"
■ Section E.5, "Creating a Work Repository"
■ Section E.6, "Connecting to a Work Repository"
Advanced actions for administering repositories are detailed in "Advanced Actions for
Administering Repositories" in the Oracle Fusion Middleware Developer's Guide for Oracle
Data Integrator.
E.2 Creating Repository Storage Spaces
Oracle Data Integrator repositories can be installed on database engines supported by
Oracle Fusion Middleware 11g. For the latest list of supported databases versions as
well as the requirements for each database, see:
http://www.oracle.com/technology/software/products/ias/files/fusion_
certification.html
For each database that will contain a repository, a storage space must be created.
Your Master Repository can be stored in the same schema as one of your Work
Repositories. A schema can only have one Master Repository and you cannot create
two different Work Repositories in the same schema.
The examples in the following table are supplied as a guide:
Note: Oracle recommends that you regularly perform the following
maintenance operations: purge the execution logs in order to reduce
the Work Repository size, and back up the Oracle Data Integrator
repositories on the database.
Caution: Oracle recommends that you store repositories in a
different space from where your application data is kept (for example
in a different schema for an Oracle database, or in a different database
for Sybase or Microsoft SQL Server).

Creating Repository Storage Spaces
Creating Repositories with Oracle Data Integrator Studio E-3
Technology Steps to follow
Oracle Create a schema to host the Master Repository and a schema to host the
Work Repository.
The schemas are created by executing the following SQL commands for
each of the
odim
and
odiw
schemas:
Master Repository:
SQL> create user MY_SCHEMA identified by MY_PASS
default tablespace MY_TBS
temporary tablespace MY_TEMP;
SQL> grant connect, resource to MY_SCHEMA;
Work Repository:
SQL> create user MY_SCHEMA identified by MY_PASS
default tablespace MY_TBS
temporary tablespace MY_TEMP;
SQL> grant connect, resource to MY_SCHEMA;
SQL> grant execute on dbms_lock to MY_SCHEMA;
Where:
MY_SCHEMA corresponds to the name of the schema you want to
create (for example,
odim
for the Master Repository and
odiw
for the
Work Repository).
MY_PASS corresponds to the password you have given to the default
tablespace
MY_TBS
. This is the Oracle tablespace where the data will be
stored.
MY_TEMP is the temporary default tablespace.
NOTE: The Work Repository database user requires the
grant execute
privilege on
dbms_lock
for the Work Repository schema.
If you are creating the repository on Oracle Database 12c, you must
assign a quota to allow the user to create objects. Choose the quota to
accommodate the expected size of your repository. If you are not sure
about the size of your repository, you can grant unlimited tablespace.
For example:
GRANT UNLIMITED TABLESPACE TO odi_DB_repos_user

Creating the Master Repository
E-4 Oracle Fusion Middleware Installation Guide for Oracle Data Integrator
E.3 Creating the Master Repository
Creating the Master Repository creates an empty repository structure and seeds
metadata (for example, technology definitions, or built-in security profiles) into this
repository structure.
To create the Master Repository:
1. Open the New Gallery by choosing File > New.
2. In the New Gallery, in the Categories tree, select ODI.
3. Select from the Items list the Master Repository Creation Wizard.
4. Click OK.
Microsoft SQL Server
or Sybase ASE
Create a database
db_odim
to host the Master Repository and a
database
db_odiw
to host the Work Repository. Create two logins,
odim
and
odiw
, that contain these databases by default.
Use Enterprise Manager to create the two databases db_odim and db_
odiw.
NOTE: It is recommended that you configure the Microsoft SQL Server
databases storing repository information with a case-sensitive collation.
This enables reverse-engineering and allows you to create multiples
objects with the same name but a different case (for example:
tablename and TableName).
Use Query Analyzer or I-SQL to launch the following commands:
CREATE LOGIN mylogin
WITH PASSWORD = 'mypass',
DEFAULT_DATABASE = defaultbase,
DEFAULT_LANGUAGE = us_english;
USE defaultbase;
CREATE USER dbo FOR LOGIN mylogin;
GO
Where:
mylogin corresponds to
odim
or
odiw
.
mypass corresponds to a password for these logins.
defaultbase corresponds to
db_odim
and
db_odiw
respectively.
DB2/400 Create a library odim to host the Master Repository and a library odiw to
host the Work Repository. Create two users odim and odiw who have
these libraries by default.
Master and work repository users should be granted access to
tablespaces with at least 16k pagesize. The database must have
temporary tablespace of at least 16k.
Use the following commands to se the pagesize:
CREATE LARGE TABLESPACE ODI16 PAGESIZE 16 K MANAGED BY
AUTOMATIC STORAGE ;
GRANT USE OF TABLESPACE ODI16 TO USER ODIREPOS;
Note: The libraries must be created in the form of SQL collections.
MySQL If you are using MySQL (release 5.5.14 or higher) to setup a repository,
and the database charset is set to utf8, you will need to add the
following parameters to the repository’s jdbc URL to operate
non-ASCII data correctly in Oracle Data Integrator Studio:
useUnicode=yes&characterEncoding=UTF-8
Technology Steps to follow

Creating the Master Repository
Creating Repositories with Oracle Data Integrator Studio E-5
The Master Repository Creation wizard opens.
5. Specify the Database Connection parameters as follows:
■ Technology: From the list, select the technology that will host your Master
Repository. Default is Oracle.
■ JDBC Driver: The driver used to access the technology, that will host the
repository.
■ JDBC URL: The URL used to establish the JDBC connection to the database.
Note that the parameters JDBC Driver and URL are synchronized and the
default values are technology dependant.
■ User: The user ID / login of the owner of the tables (for example,
odim
).
■ Password: This user's password.
■ DBA User: Enter the Database Administrator user ID.
■ DBA Password: Enter the DBA’s password.
6. Specify the Repository Configuration parameters as follows:
■ ID: Enter a specific ID for the new repository, other than the default 0.
7. Click Tes t to test the connection to your Master Repository.
The Information dialog opens and informs you whether the connection has been
established. If the connection fails, fix the connection to your Master Repository
before moving to next step.
8. Click Next.
9. Do one of the following:
■ Select Use ODI Authentication to manage users using ODI’s internal security
system and enter the following Supervisor login information:
■ Select Use External Authentication to use an external enterprise identity store,
such as Oracle Internet Directory, to manage user authentication and enter the
following supervisor login information:
Note: Oracle recommends that this ID is unique and not used for any
other Master Repository, as it affects imports and exports between
repositories. For more information, see "Exporting/Importing" in the
Oracle Fusion Middleware Developer's Guide for Oracle Data Integrator.
Properties Description
Supervisor User User name of the ODI supervisor.
This name should be
SUPERVISOR
(all CAPS - in Oracle Data
Integrator user names are case-sensitive).
Supervisor Password This user’s password
Confirm Password This user’s password

Connecting to the Master Repository
E-6 Oracle Fusion Middleware Installation Guide for Oracle Data Integrator
10.
Click Next.
11. Specify the password storage details:
■ Select Internal Password Storage if you want to store passwords in the Oracle
Data Integrator Master Repository
■ Select External Password Storage if you want to use JPS Credential Store
Framework (CSF) to store the data server and context passwords in a remote
credential store. Indicate the MBean Server Parameters to access the
credential store. Refer to "Managing the Security in Oracle Data Integrator" in
Oracle Fusion Middleware Developer's Guide for Oracle Data Integrator for more
information.
12. In the Master Repository Creation Wizard click Finish to validate your entries.
Oracle Data Integrator begins creating your Master Repository. You can follow the
procedure on your Messages – Log. To test your Master Repository, refer to
Section E.4, "Connecting to the Master Repository".
E.4 Connecting to the Master Repository
To connect to the Master repository:
1. Open the New Gallery by choosing File > New.
2. In the New Gallery, in the Categories tree, select ODI.
3. Select from the Items list Create a New ODI Repository Login.
4. Click OK.
The Repository Connection Information dialog appears.
5. Specify the Oracle Data Integrator connection details as follows:
■ Login name: A connection alias (for example:
Repository
)
The connection alias is used to connect to the Master Repositories and then to
create the Work Repository as described in Section E.5.
■ User: The ODI Supervisor user name you have defined when creating the
Master Repository or an ODI user name you have defined in the Security
Navigator after having created the Master Repository.
Note that the Supervisor user name is case-sensitive, and must be entered
exactly as previously defined (for example,
SUPERVISOR
in all CAPS).
Properties Description
Supervisor User User name of the ODI supervisor.
This name should be
SUPERVISOR
(all CAPS - in Oracle Data
Integrator user names are case-sensitive).
Supervisor Password This user’s password
Note: In order to use the external authentication option, ODI Studio
has to be configured for external authentication. See "Setting Up
External Authentication" in Oracle Fusion Middleware Developer's Guide
for Oracle Data Integrator for more information and restart ODI Studio.

Creating a Work Repository
Creating Repositories with Oracle Data Integrator Studio E-7
■ Password: The ODI supervisor password you have defined when creating the
Master Repository or an ODI user password you have defined in the Security
Navigator after having created the Master Repository.
6. Specify the Database Connection (Master Repository) details as follows:
■ User: Database user ID/login of the schema (database, library) that contains
the ODI Master Repository.
■ Password: This user's password.
■ Driver List: Select the driver required to connect to the DBMS supporting the
Master Repository you have just created from the drop-down list.
■ Driver Name: The complete driver name.
■ URL: The URL used to establish the JDBC connection to the database hosting
the repository.
7. Click Tes t to check that the connection is working.
8. Click OK to validate your entries.
E.5 Creating a Work Repository
Several Work Repositories can be designated with several Master Repositories if
necessary. However, a Work Repository can be linked with only one Master Repository
for version management purposes.
To launch a Work Repository creation:
1. In the Topology Navigator, go to the Repositories panel.
2. Right-click the Work Repositories node and select New Work Repository.
The Create Work Repository Wizard opens.
3. Specify the Oracle Data Integrator Work Repository connection details as follows:
■ Technology: Choose the technology of the server to host your Work
Repository. Default is Oracle.
■ JDBC Driver: The driver used to access the technology, that will host the
repository.
■ JDBC URL: The complete path of the data server to host the Work Repository.
Note that the parameters JDBC Driver and URL are synchronized and the
default values are technology dependant
■ User: User ID / login of the owner of the tables you are going to create and
host of the Work Repository.
■ Password: This user's password.
4. Click Tes t to verify that the connection is working.
5. Click Next.
Oracle Data Integrator verifies whether a Work Repository already exists on the
connection specified in Step 3:
■ If an existing Work Repository is detected on this connection, the next steps
will consist of attaching the Work Repository to the Master Repository. Refer
to "Attaching and Deleting a Work Repository" in Oracle Fusion Middleware
Developer's Guide for Oracle Data Integrator for further instructions.

Connecting to a Work Repository
E-8 Oracle Fusion Middleware Installation Guide for Oracle Data Integrator
■ If no Work Repository is detected on this connection, a new Work Repository
is created. Continue with the creation of a new Work Repository and provide
the Work Repository details in following step.
6. Specify the Oracle Data Integrator Work Repository properties:
■ ID: A specific ID for the new repository, rather than the default 0.
■ Name: Give a unique name to your Work Repository (for example:
DEVWORKREP1).
■ Password: Enter the password for the Work Repository.
■ Type: Select the type for the Work Repository:
– Development: This type of repository allows management of design-time
objects such as data models and projects (including interfaces, procedures,
etc). A development repository includes also the run-time objects
(scenarios and sessions). This type of repository is suitable for
development environments.
– Execution: This type of repository only includes run-time objects
(scenarios, schedules and sessions). It allows launching and monitoring of
data integration jobs in Operator Navigator. Such a repository cannot
contain any design-time artifacts. Designer Navigator cannot be used with
it. An execution repository is suitable for production environments.
7. Click Finish.
8. The Create Work Repository login dialog opens. If you want to create a login for
the Work Repository, click Yes and you will be asked to enter the Login Name in a
new dialog. If you do not want to create a Work Repository login, click No.
9. Click Save in the toolbar.
For more information, refer to Section E.6, "Connecting to a Work Repository".
E.6 Connecting to a Work Repository
To connect to an existing Work Repository and launch Designer Navigator:
1. Open the New Gallery by choosing File > New.
2. In the New Gallery, in the Categories tree, select ODI.
3. Select from the Items list Create a New ODI Repository Login.
4. Click OK.
The Repository Connection Information dialog opens.
5. Specify the Oracle Data Integrator connection details as follows:
■ Login name: A connection alias (for example: Repository)
The connection alias is used to connect to the Work Repositories and then to
create the Master Repository as described in Section E.4.
Note: Oracle recommends that this ID is unique and not used for any
other Master Repository, as it affects imports and exports between
repositories. For more information, see "Exporting/Importing" in
Oracle Fusion Middleware Developer's Guide for Oracle Data Integrator.

Connecting to a Work Repository
Creating Repositories with Oracle Data Integrator Studio E-9
■ User: The ODI supervisor user name you have defined when creating the
Master Repository or an ODI user name you have defined in the Security
Navigator after having created the Master Repository.
Note that the Supervisor user name is case-sensitive, and must be entered
exactly as previously defined (for example,
SUPERVISOR
in all CAPS).
■ Password: The ODI supervisor password you have defined when creating the
Master Repository or an ODI user password you have defined in the Security
Navigator after having created the Master Repository.
6. Specify the Database Connection (Master Repository) details as follows:
■ User: Database user ID/login of the schema (database, library) that contains
the ODI Master Repository.
■ Password: This user's password.
■ Driver List: Select the driver required to connect to the DBMS supporting the
Master Repository you have just created from the drop-down list.
■ Driver Name: The complete driver name.
■ URL: The URL used to establish the JDBC connection to the database hosting
the repository.
7. Click Tes t to verify that the connection is working.
8. Select Work Repository and specify the Work Repository details as follows:
■ Work repository name: The name you gave your Work Repository in the
previous step (WorkRep1 in the example). You can display the list of Work
Repositories available in your Master Repository by clicking on the button to
the right of this field.
9. Click OK to validate your entries.

Connecting to a Work Repository
E-10 Oracle Fusion Middleware Installation Guide for Oracle Data Integrator

F
Customizing the ODI Credential Map Name F-1
F
Customizing the ODI Credential Map Name
The Oracle Data Integrator Java EE Agent and Oracle Data Integrator Console use a
credential map to store usernames and passwords. The default credential map name is
oracle.odi.credmap
. In rare situations, ODI users may need to change the default to a
different credential map name for the ODI Java EE Agent and ODI Console.
F.1 What is Stored in Credential Store?
ODI runtime uses credential store for the ODI Java EE Agent and ODI Console.
■ ODI Java EE Agent boot AppId and Password
■ ODI Console boot AppId and Password
In most usage scenarios, ODI uses the credential map name
oracle.odi.credmap
. In
certain environments, however, the credential map name is decided at a global level
and all components are required to use that credential map name. For example, an
Oracle Fusion Middleware application may use the
oracle.apps.security
credential
map name instead of the standard
oracle.odi.credmap
. In this case, the credential
map name needs to be customized for the environment.
F.2 Modifying the Credential Map Name
You can modify the credential map name specified in the Oracle Data Integrator
templates by running the script
updateCredMapInEar.[sh|bat
] (for Oracle WebLogic
Server) or
was_updateCredMapInEar.[sh|bat]
(for IBM WebSphere). If you execute
the script with the
-EARFILE
parameter, you are able to modify a specific ear file and
update the default credential map. You must execute this script before creating and
deploying ODI Java EE Agent ear and before deploying ODI Console ear to a
WebLogic Domain. After executing this script, all generated ODI Java EE Agent ears
will carry the changed credential map name.
Usage for Oracle WebLogic Server:
updateCredMapInEar.sh -MAPNAME=credential_map_name -EARFILE=ear_file_to_update
Usage for IBM WebSphere:
was_updateCredMapInEar.sh -MAPNAME=credential_map_name -EARFILE=ear_file_to_update
Where:
■ MAPNAME: User supplied credential map name.
■ EARFILE: This is optional parameter. If specified, the credential map inside the
specified ear file will be modified.

Updating WLST Scripts for Credential Map Creation
F-2 Oracle Fusion Middleware Installation Guide for Oracle Data Integrator
If not specified, the credential map name in the default templates for ODI Java EE
Agent (
oraclediagent.ear
) and ODI Console (
odiconsole.ear
) will be modified.
Below is a sample command for Oracle WebLogic Server:
updateCredMapInEar.sh -MAPNAME=oracle.apps.security
updateCredMapInEar.sh -MAPNAME=oracle.apps.security -EARFILE=ODI_
HOME/setup/manual/oracledi-agent/oraclediagent.ear
F.3 Updating WLST Scripts for Credential Map Creation
If you have updated the credential map name in a template and then deployed this
template, make sure that the credential store entries created for this deployed
application use this new credential map name. See Section 3.2.3, "Adding Credential
Store Entries" for more information on creating credential store entries.
In the
createcred
command, the value provided for the
map
parameter should be the
customized credential map name, as shown in the example below:
createCred(map="acme.security.credmap", key="SUPERVISOR", user="SUPERVISOR",
password="supervisor1", desc="Key for Supervisor")

G
OPMN Configuration for Standalone Agent G-1
G
OPMN Configuration for Standalone Agent
Oracle Process Monitor and Notification server (OPMN) is used to stop, start and get
process status information of system components. OPMN can be obtained by installing
Oracle Web Tier; see Oracle Fusion Middleware Installation Guide for Oracle Web Tier
for more information. Note that you do not need to configure Oracle Web Tier to
obtain OPMN; you can select Install Only - Do Not Configure on the Select
Installation Type screen.
The Standalone Agent is a standalone Java process started from a command line
interface. This agent is typically deployed locally on the source or target machines for
optimal integration flow performances. If you want to use Fusion Middleware Control
to start, stop, and monitor the standalone agent, you need to add the Standalone
Agent to OPMN and register the OPMN instance with the Administration Server.
This chapter contains the procedure for accomplishing this on WebLogic Server. If you
are using IBM WebSphere as your application server, see the instructions in
"Configuring OPMN on IBM WebSphere" in Oracle Fusion Middleware Third-Party
Application Server Guide.
The following topics are covered:
■ Section G.1, "Adding a Standalone Agent to OPMN"
■ Section G.2, "Stopping the Agent"
■ Section G.3, "Starting the Agent and Agent Components"
■ Section G.4, "Determining the Status of Oracle HTTP Server"
■ Section G.5, "Deleting the Agent"
■ Section G.6, "Updating the Agent Setting Information"
G.1 Adding a Standalone Agent to OPMN
Follow the instructions in this section to add the standalone agent to OPMN and
register OPMN with the Administration Server:
1. Install Oracle Web Tier in order to get OPMN, and make sure:
a. Oracle Web Tier must be installed in the same Oracle home as Oracle Data
Integrator.
b. When installing Oracle Web Tier, choose the Install Software - Do Not
Configure option on the Select Installation Type screen.
c. The default instance name is
instance1
, which will be used in the examples
below. If you choose a different instance name, remember to replace
instance1
with your own instance name.

Adding a Standalone Agent to OPMN
G-2 Oracle Fusion Middleware Installation Guide for Oracle Data Integrator
2.
In order to configure OPMN to manage a Standalone Agent, with or without
registering the OPMN instance to an Administration Server, OPMN needs a
properties file containing the properties defined in Table G–1. Note that the values
shown may differ from your system configuration.
The list of properties required are given in the
ODI_
HOME/oracledi/agent/bin/agentcreate.properties
file. Create a copy of this file
and provide values for these properties as applicable to your Standalone Agent.
For example, if you wish to manage two Standalone Agent processes using
OPMN, create one copy of
agentcreate.properties
for each agent (perhaps
ODIAgent1.properties
and
ODIAgent2.properties
).
Note: The name of the file does not need to match the name of the
agent.
Table G–1 Parameters in agentcreate.properties
Parameter Description Example (Your Configurations May Differ)
PORTNO
HTTP(S) port number that the
Standalone Agent listens on.
PORTNO=9787
JMXPORTNO
JMX port of the ODI Standalone
Agent.
JMXPORTNO=9787
PROXY_PORT
OPMN proxy port number.
PROXY_PORT=98767
JAVA_HOME
Location of the JVM used by the ODI
Standalone Agent.
JAVA_HOME=/home/Oracle/Middleware/jdk6_35
ORACLE_OPMN_HOME
Oracle home directory for Oracle Web
Tier.
ORACLE_OPMN_
HOME=/home/Oracle/Middleware/Oracle_WT1
ORACLE_ODI_HOME
Oracle home directory for Oracle
Data Integrator.
ORACLE_ODI_
HOME=/home/Oracle/Middleware/Oracle_ODI1
INSTANCE_HOME
OPMN Instance home directory.
INSTANCE_
HOME=/home/Oracle/Middleware/Oracle_
WT1/instances/instance1
COMPONENT_TYPE
Set this property to
odiagent
.
COMPONENT_TYPE=odiagent
COMPONENT_NAME
Name of the agent you want to add.
This will be its identification in
OPMN.
COMPONENT_NAME=OracleDIAgent
ODI_MASTER_DRIVER
Name of the JDBC driver used to
connect the Master Repository.
ODI_MASTER_DRIVER=oracle.jdbc.OracleDriver
ODI_MASTER_URL
JDBC URL used to connect the Master
Repository. Use the format:
jdbc:oracle:thin:@db_
host:port:sid
ODI_MASTER_
URL=jdbc:oracle:[email protected]ampledo
main:1521:orcl
ODI_MASTER_USER
Database account used to connect the
Master Repository. This should be the
prefix and schema name of the ODI
schema created in the database using
RCU.
ODI_MASTER_USER=DEV_ODI_REPO
ODI_MASTER_ENCODED_
PASS
Database account password. The
password must be encoded with the
encode.[sh|bat] password
command.
ODI_MASTER_ENCODED_
PASS=hpfatLEoMR6zAK3T1PoP5LXDS

Adding a Standalone Agent to OPMN
OPMN Configuration for Standalone Agent G-3
3.
Define the environment variables shown in Table G–2:
4. If you want to register your OPMN instance with the Administration Server,
continue with the instructions in this section. If not, skip to Creating an OPMN
Instance Without Registering with the Administration Server later in this section.
5. Create an OPMN instance using the
opmnctl createinstance
command. Before
running this command ensure that the value of the
ODI_AGENT_HOME
environment
variable is set correctly to the path to the Standalone Agent directory. This
command must also be run in the same shell where the
ODI_AGENT_HOME
environment variable is defined.
Be sure to replace the variables with the actual values on your own system. The
instance_specified_in_properties_file
must be the instance you specified in
your properties file in Step 2.
cd WT_ORACLE_HOME/opmn/bin
./opmnctl createinstance
-oracleInstance instance_specified_in_properties_file
-oracleHome OPMN_HOME
-adminHost administration_server_host
-adminPort administration_server_port
When this command is executed, you will be prompted to enter the credentials to
log in to the Administration Server. Provide the Administration Server user name
and password to continue.
6. Create an OPMN component for the ODI Standalone Agent in the instance created
above using the
opmnctl createcomponent
command. Be sure to replace the
variables with your own values. The
path_to_properties_file
must be the
absolute path to the properties file you created in Step 2.
cd WT_ORACLE_HOME/instances/instance1/bin
./opmnctl createcomponent
ODI_SECU_WORK_REPO
Name of the Work Repository to
connect. This Work Repository must
be attached to the master repository.
ODI_SECU_WORK_REPO=WORKREP
ODI_SUPERVISOR_
ENCODED_PASS
OracleDI Supervisor user password.
The password must be encoded with
the
encode.[sh|bat] password
command.
ODI_SUPERVISOR_ENCODED_
PASS=hpfatLEoMR6zAK3T1PoP5LXDS
MASTER_REPO_EXTERNAL_
ID
External ID of the ODI Master
Repository. This can be obtained from
the Master Repository editor in ODI
Studio.
MASTER_REPO_EXTERNAL_ID=12345
Table G–2 Environment Variables to Define for OPMN Configuration
Variable Description
MW_HOME
Path to the Middleware home directory.
OPMN_HOME
Path to the Web Tier Oracle home directory (For example,
MW_
HOME/Oracle_WT1
).
ODI_AGENT_HOME
Path to the Standalone Agent directory (for example,
ODI_
HOME/oracledi/agent
).
Table G–1 (Cont.) Parameters in agentcreate.properties
Parameter Description Example (Your Configurations May Differ)

Stopping the Agent
G-4 Oracle Fusion Middleware Installation Guide for Oracle Data Integrator
-componentType odiagent
-componentName name_of_physical_agent
-propertiesFile path_to_properties_file
7. Start the ODI Standalone Agent:
./opmnctl startall
8. Login to Fusion Middleware Control and verify that the Standalone Agent has
been discovered.
Creating an OPMN Instance Without Registering with the Administration Server
Follow the instructions in this section to create an OPMN instance without registering
with the Administration Server.
1. Create an OPMN instance (if one does not already exist) in the Instance home
specified in the
INSTANCE_HOME
property in the properties file created in Step 2.
Run the following commands and replace the variables with the values on your
system. Replace
OPMN_instance_home_directory
with the same value you
specified for the
INSTANCE_HOME
properties in the properties file created in Step 2.
cd OPMN_HOME/opmn/bin
./opmnctl createinstance
-oracleInstance OPMN_instance_home_directory
-oracleHome OPMN_HOME
-adminRegistration OFF
2. Create an OPMN component for the ODI Standalone Agent in the instance created
above using the
opmnctl createcomponent
command. This command must be run
from the
OPMN_instance_home_directory
specified in the previous command.
cd OPMN_instance_home_directory
./opmnctl createcomponent
-componentType odiagent
-componentName name_of_physical_agent
-propertiesFile path_to_properties_file
Be sure to replace the variables with your own values. The
path_to_properties_
file
must be the absolute path to the properties file you created in Step 2.
G.2 Stopping the Agent
To stop all agent components in an Oracle instance using
opmnctl
:
opmnctl stopproc process-type=odiagent
To stop a specific agent component (for example,
odiagent1
) using
opmnctl
:
opmnctl stopproc ias-component=odiagent1
G.3 Starting the Agent and Agent Components
To start all agent components in an Oracle instance using
opmnctl
:
opmnctl startproc process-type=odiagent
To start a specific agent component (for example,
odiagent1
) using
opmnctl
:
opmnctl startproc ias-component=odiagent1

Updating the Agent Setting Information
OPMN Configuration for Standalone Agent G-5
G.4 Determining the Status of Oracle HTTP Server
You can determine the status of Oracle HTTP Server using
opmnctl
:
opmnctl status
G.5 Deleting the Agent
Run the following command to delete an Standalone Agent component from an
OPMN instance:
cd INSTANCE_HOME/bin
./opmnctl stopproc ias-component=physical_agent_name
./opmnctl deletecomponent -componentName physical_agent_name
G.6 Updating the Agent Setting Information
Use the commands in this section to change/update the standalone Agent’s settings
after changing the properties in the
agentcreate.properties
file.
For Standalone Agent components registered to the Administration Server:
cd INSTANCE_HOME/bin
./opmnctl updatecomponentregistration
-componentType odiagent
-componentName physical_agent_name
-propertiesFile path_to_properties_file
./opmnctl stopall
./opmnctl startall
For Standalone Agent components not registered to the Administration Server:
cd INSTANCE_HOME/bin
./opmnctl deletecomponent -componentName physical_agent_name
./opmnctl createcomponent
-componentType odiagent
-componentName physical_agent_name
-propertiesFile path_to_properties_file

Updating the Agent Setting Information
G-6 Oracle Fusion Middleware Installation Guide for Oracle Data Integrator

H
Troubleshooting H-1
H
Troubleshooting
This appendix describes solutions to common problems that you might encounter
when installing Oracle Data Integrator. It contains the following sections:
■ Section H.1, "General Troubleshooting Tips"
■ Section H.2, "Installation and Configuration Log Files"
■ Section H.3, "Keeping Track of Your JRE Location"
■ Section H.4, "ODI Client and Repository Compatibility"
■ Section H.5, "Need More Help?"
H.1 General Troubleshooting Tips
If you encounter an error during installation:
■ Read the Oracle Fusion Middleware Release Notes for the latest updates. The most
current version of the release notes is available on Oracle Technology Network:
http://www.oracle.com/technetwork/documentation/index.html#middleware
■ Verify your system and configuration is certified. Refer to the System Requirements
and Supported Platforms for Oracle Fusion Middleware 11gR1 document on the Oracle
Fusion Middleware Supported System Configurations page:
http://www.oracle.com/technetwork/middleware/ias/downloads/fusion-certification
-100350.html
■ Verify your system meets the minimum system requirements. Refer to the System
Requirements and Specifications document:
http://www.oracle.com/technetwork/middleware/ias/downloads/fusion-requirements-
100147.html
■ If you entered incorrect information on one of the installation screens, return to
that screen by clicking Back until you see the screen.
■ If an error occurred while the installer is copying or linking files:
1. Note the error and review the installation log files.
2. Remove the failed installation by following the steps in Chapter 4,
"Deinstalling Oracle Data Integrator".
3. Correct the issue that caused the error.
4. Restart the installation.

Installation and Configuration Log Files
H-2 Oracle Fusion Middleware Installation Guide for Oracle Data Integrator
H.2 Installation and Configuration Log Files
This section contains information about the log files that are created when running the
Oracle Data Integrator installer and the Oracle Fusion Middleware Configuration
Wizard. Log files contain information that can help you troubleshoot problems with
your installation or configuration.
H.2.1 Installation Log Files
The installer writes logs files to the
Oracle_Inventory_Location/log
(on UNIX
operating systems) or
Oracle_Inventory_Location\logs
(on Windows operating
systems) directory. On UNIX operating systems, if you do not know the location of
your Oracle Inventory directory, you can find it in the
oraInst.loc
file in the
following directories (default locations):
■ Linux:
/etc/oraInst.loc
■ HP-UX and Solaris:
/var/opt/oracle/oraInst.loc
On Windows operating systems, the location for the inventory directory is
C:\Program
Files\Oracle\Inventory\logs
. If you are using a 32-bit installer on a 64-bit Windows
machine, the inventory directory is
C:\Program Files
(x86)\Oracle\Inventory\logs
.
The following install log files are written to the log directory:
■
installdate-time-stamp.log
This is the main log file.
■
installdate-time-stamp.out
This log file contains the output and error streams during the installation.
■
installActionsdate-time-stamp.log
This file is used by the installer GUI to keep track of internal information.
■
installProfiledate-time-stamp.log
This log file contains the overall statistics like time taken to complete the
installation, as well as configuration, memory and CPU details.
■
oraInstalldate-time-stamp.log
This log file contains the output stream of the copy session.
If you start the installer with the
-printtime
parameter, the
timeTakendate-time-stamp.log
and
timedate-time-stamp.log
files are created in the
same directory:
■
timeTakendate-time-stamp.log
This file contains information for the amount of time taken to move between
screens (applicable for GUI installations only).
■
timedate-time-stamp.log
This file contains time information for the copy session.
If you start the installer with the
-printmemory
parameter, the
memorydate-time-stamp.log
file is created. This file contains memory usage
information for the copy session.

Keeping Track of Your JRE Location
Troubleshooting H-3
H.2.2 Configuration Log Files
To create a log file of your configuration session, start the Configuration Wizard with
the
-log
option, as shown below:
On UNIX operating systems:
./config.sh -log=log_filename -log_priority=log_level
On Windows operating systems:
config.cmd -log=log_filename -log_priority=log_level
See Table H–1 for more details about the
-log
and
-log_priority
options.
H.3 Keeping Track of Your JRE Location
The JRE location used by the installer is stored in the
ODI_ORACLE_
HOME/oui/oraparam.ini
(on UNIX operating systems) or
ODI_ORACLE_
HOME\oui\oraparam.ini
(on Windows operating systems) file. This file is used by
OPatch and Oracle Universal Installer (OUI) to determine the location of your
preferred JRE.
It is possible to change the location of your JRE (for example, the JRE directory is
moved out of the Middleware home). If this happens, you will get an error message
when trying to run OPatch or OUI since the JRE location can no longer be found. If
this happens, you can do one of the following:
Table H–1 Configuration Wizard Log File Options
Parameter Description
-log
Specify the location of your log file.
If you specify an absolute path with your
log_filename
then your log file
will be created there. If you only specify a file name with no path, then
the log files are created in the
MW_HOME/logs
(on UNIX operating systems)
or
MW_HOME\logs
(on Windows operating systems) directory.
Other values that can be specified with
-log
are:
■
stdout
This writes the error message to the standard output stream.
■
stderr
This writes the error messages to the standard error stream.
■
disable
This disables default logging so that no log files are generated in
MW_
HOME/logs
(on UNIX operating systems) or
MW_HOME\logs
(on
Windows operating systems).
-log_priority
Specify the level of detail you want included in your logs.
The acceptable values are listed below, from most detailed to least
detailed:
■
debug
■
info
■
warning
■
error
■
fatal

ODI Client and Repository Compatibility
H-4 Oracle Fusion Middleware Installation Guide for Oracle Data Integrator
■ Edit the
ODI_ORACLE_HOME/oui/oraparam.ini
(on UNIX operating systems) or
ODI_ORACLE_HOME\oui\oraparam.ini
(on Windows operating systems) file to
point to the new JRE location.
■ Use the
-jreLoc
command line option to point to the new JRE location. See
Section 2.4.2, "Starting the Installer" for more information.
H.4 ODI Client and Repository Compatibility
If you are using Oracle Data Integrator with other Oracle Fusion Middleware
products, make sure you have read the Oracle Fusion Middleware Interoperability and
Compatibility Guide.
Oracle strongly recommends that you use identical versions of different ODI
components such as ODI Studio, ODI Console, standalone and J2EE Agents, and
executable scripts for a specific site or platform. In addition, you should make sure
your Master and Work Repository versions are compatible with these components
(Table H–2).
H.5 Need More Help?
If this appendix does not solve the problem you encountered, try looking for a solution
on My Oracle Support (formerly OracleMetaLink):
https://support.oracle.com/
If you are unable to find a solution for your problem, open a service request.
Table H–2 ODI Component and Repository Compatibility
Product Component Version Repository Version
Oracle Data Integrator 11.1.1.6.0 and 11.1.1.0.7 04.03.04.02
11.1.1.5.0 04.03.03.08
11.1.1.3.0 04.03.02.04
10.1.3.6 4.2.03.01
10.1.3.5 4.2.02.01
10.1.3.4, 10.1.3.3, 10.1.3.2 4.2.01.01
Sunopsis 4.2 4.1.02.01
4.1 4.1.01.01
4.0 4.0.01.01
3.2.0.3 3.2.03.01
